Twin Trim GMT155 - Beard trimmer Conair - Free user manual and instructions
Find the device manual for free Twin Trim GMT155 Conair in PDF.

| Product Type | Beard Trimmer |
| Brand | Conair |
| Model | Twin Trim GMT155 |
| Dimensions (approx) | 6.5 x 1.5 x 1.5 inches |
| Weight | 0.3 lbs |
| Power Source | Rechargeable Battery |
| Battery Life | Up to 60 minutes |
| Charging Time | 8 hours |
| Blade Material | Stainless Steel |
| Cutting Lengths | Adjustable with guide combs (1-10 mm) |
| Washable | Yes, removable blade assembly for cleaning |
| Included Accessories | 4 guide combs, cleaning brush, blade oil |
| Safety Features | Blade guard, low battery indicator |
| Usage | Beard, mustache, and stubble trimming |
| Maintenance | Oil blades after each use; clean with brush |
| Spare Parts Available | Replacement blades and combs |
| Warranty | Limited 2-year warranty |
Frequently Asked Questions - Twin Trim GMT155 Conair
User questions about Twin Trim GMT155 Conair
0 question about this device. Answer the ones you know or ask your own.
Ask a new question about this device
Download the instructions for your Beard trimmer in PDF format for free! Find your manual Twin Trim GMT155 - Conair and take your electronic device back in hand. On this page are published all the documents necessary for the use of your device. Twin Trim GMT155 by Conair.
USER MANUAL Twin Trim GMT155 Conair
la que y que son cens, pasantos, que sas, suscens, que sas, suscens, que sas, suscens, que sas, suscens, que sas, suscens, que sas, suscens, que sas, suscens, que sas, suscens, que sas, suscens, que sas, suscens, que sas, suscens, que sas, suscens, que sas, suscens, que s as, suscens, que sas, suscens, que sas, suscens, que sas, suscens, que sas, suscens, que sas, suscens, que sas, suscens, que sas, suscens, que sas, suscens, que sas, suscens, que sas, suscens, que sas, suscens, que sas, suscans, que sas, suscans, que sas, suscans, que sas, suscans, que sas, suscans, que sas, suscans, que sas, suscans, que sas, suscans, que sas, suscans, que sas, suscans, que sas, suscans, que sas, suscans, que sas, suscans, que s as, suscans, que sas, suscans, que sas, suscans, que sas, suscans, que sas, suscans, que sas, suscans, que s as, suscans, que s as, suscans, que s as, suscans, que s as, suscans, que s as, suscans, que s as, suscans, que s as, suscans, que s as, suscans, que s as, suscans, que s as, suscans, que s as, suscans, que s as, suscans, que s as 25 and 30 and 35 and 40 and 45 and 50 and 55 and 60 and 65 and 70 and 75 and 80 and 85 and 90 and 95 and 100 and 105 and 110 and 115 and 120 and 125 and 130 and 135 and 140 and 145 and 150 and 155 and 160 and 165 and 170 and 175 and 180 and 185 and 190 and 195 and 200 and 205 and 210 and 215 and 220 and 225 and 230 and 235 and 240 and 245 and 250 and 255 and 260 and 265 and 270 and 275 and 280 and 285 and 290 and 295 and 300 and 305 and 310 and 315 and 320 and 325 and 330 and 335 and 340 and 345 and 350 and 355 and 360 and 365 and 370 and 375 and 380 and 385 and 390 and 395 and 400 and 405 and 410 and 415 and 420 and 425 and 430 and 435 and 440 and 445 and 450 and 455 and 460 and 465 and 470 and 475 and 480 and 485 and 490 and 495 and 500 and 505 and 510 and 515 and 520 and 525 and 530 and 535 and 540 and 545 and 550 and 555 and 560 and 565 and 570 and 575 and 580 and 585 and 590 and 595 and 600 and 605 and 610 and 615 and 620 and 625 and 630 and 635 and 640 and 645 and 650 and 655 and 660 and 665 and 670 and 675 and 680 and 685 and 690 and 695 and 700 and 705 and 710 and 715 and 720 and 725 and 730 and 735 and 740 and 745 and 750 and 755 and 760 and 765 and 770 and 775 and 780 and 785 and 790 and 795 and 800 and
TO TRIM YOUR MUSTACHE 1. For best results, start with a clean, slightly damp mustache. 2. Come through your mustache in the direction it grows. 3. Place the 5-position count over the facial hair
blade and snap it into position. It is a good idea to start with the lon- gest trim setting adjustment. (You can always go back and cut your mustache more closely with a shorter setting.) ALWAYS TRIM YOUR MUSTACHE FROM THE TOP DOWN
- After your muslache has been trimmed to the desired length, remove the 5-position comb and, using the blades only, define the outline of the section of your muslache.
- Use the single detailing blade for fine detail trimming and edging. HOW TO GET THE STUBBLE LOOK This trimmer includes 1 stubble comb. Comb #1 is close to the skin. The stubble comb fills on the blade just like the jawline combs (notic blending the jawline section for specifics on how combs/jawline combs go on).


BLENDING THE JAWLINE 1. The two jawline attachments will help you to achieve a neat, finished trim under your chin. To use one of the attachments, press it down over the trimmer blades until it clicks into position (jawline J1 provides 1mm and jawline J2 provides 2mm). 2. Hold the trimmer in an upright position and begin trimming under your jawline, using short, even strokes. 3. After your board is blended, turn off the trimmer and remove the attachment by gently pulling up on labs.
OUTLING YOUR BEARD 1. It is always best to begin with a clean, slightly doing beard. 2. After you have combed through your beard in the direction it grows naturally, you will want to outline the dosited shape, beginning under your javeline. 3. Begin defining your beard's shape under your chin and work toward on each side of your face toward your ears. Then define the upper outline of your beard across your cheeks, past your sideburns, and toward your hairline.
- The trimming includes a tire-position comb for use with the hair trimming blade (c=14mm). Each position increases the length by 2.5mm.
- To use the s-position comb slide the unit over the trimmer blade and snap it down into position. At first, until you become familiar with the adjustments, use the longest trim selling. You can always go back and make your beard a little shorter.
- Begin trimming your beard using smooth, even strokes. Start with your sideburns and work downward toward your chin. Never attempt to trim against the natural growth of your beard because the hair will be cut too short.
text_image
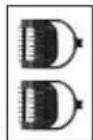
HOW TO USE THE SINGLE DETAILING TRIMMING BLADE UPPER BLADE REMOVAL AND ATTACHMENT The trimmer's upper blade can be removed to use the single detailing blade as shown in Fig. 1 and Fig. 2. Step 1 Push the upper blade forward. Step 2 Lift the blade off.
text_image
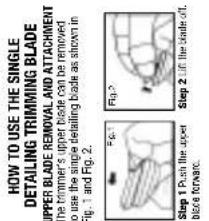
To reatlach upper blade, see Fig. 3 and Fig. 4. Step 3 line up near tab with opening in lower blade. Step 4 insert the rear tab, slide forward until the 2 front; tape drop in and the blade snap in piece.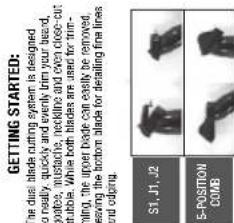
text_image
GETTING STARTED: The dual blade cutting system is designed to really, quickly and evenly trim your brand, potea, mustache, neckline and even close-cut tubble. While both blades are used for trim- ming, the upper blade can easily be removed. leaving the bottom blade for detailing fine lines and guiding. S1, J1, J2 5-POSITION COMB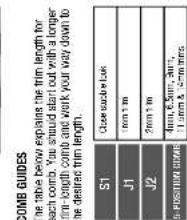
text_image
COMB GUIDES The table below explains the trim length for each comb. You should start out with a longer trim-length comb and work your way down to the desired trim length. S1 Close stub w look J1 1mm x 1m J2 2mm x 1m 0-POSITION COMAS 4mm, 6.5mm, 3mm, 11.5mm & 24mm mmsand a lower blade that provides a clone, even cut with the first pass and can also be used as a detailing blade. GROWING A BEARD AND MUSTACHE There are three key factors that will determine which beard or mustache style is best for you: 1. The shape and dimensions of your face. 2. The natural growth of your beard/mustache. 3. The thickness of your beard/mustache. If you are unsure about the type of beard or mus- tache that would most suit your face, speak with a professional hair stylist and ask for an opinion on what style would be best. Once your beard or mustache has been sedyed, it is essen- the that you maintain its appearance. To do the use your trimmer to trim your beard/mustache weekly. For the best trimming results, your beard should be slightly damp (NOT WET) when using your trimmer. This will prevent the trim- mer from removing more hair than desired.

pull ribbon upwards. 2. Align the AAA batteries with the positive and negative positions indicated inside the battery compartment. Being careful not to bend the clips, insert the negative end of each battery first so it will slip easily into position. 3. Return the battery cover to its original position by pushing it in and up until you hear a small click as it locks into place. 4. To use your trimmer, push ON/OFF switch up wards to ON position. 5. After your finish using your trimmer, push down on the ON/OFF switch to turn the trimmer off. 6. This trimmer comes with a detachable trimmer head. To remove, make sure the trimmer is in the OFF position, turn the head counter-clockwise until "I" mark aligns with "arrow" mark on the back of the body and then pull up. To attach trimmer head, align the "I" mark with the "arrow" mark and then turn clockwise until the "I" and "circle" marks align. "Requires 3 AAA batteries not included." We recommend using alkaline batteries in your trimmer because they last longer. TAKING CARE OF YOUR TRIMMER OILING THE BLADES About once a month you should oil the trimmer blades. It is best to do this over a piece of newspaper. Turn the trimmer on and hold it so that the blades are pointed downward. Spare one drop of oil across the blades, wait a few seconds for the oil to disperse then turn the trimmer off and wipe away the excess oil with a soft cloth. Be careful not to use too much oil and don't oil your trimmer more than necessary, as this could damage the motor. (Never attempt to oil the motor bearing, as it is permanently fabricated). Keep oil away from children. BLADE CARE Because the trimmer blades are precision-made for a very special use, they should always be handled with care. Each time you finish using the trimmer, take a cleaning brush and crush away any loose hair that has collected in the blades. Be especially careful
when changing or adjusting blades. When you have your trimmer serviced, be sure that both blades are sharpened or replaced at the same time. To promote the long life of the appliance, use your trimmer only for the purpose intended by the manufacturer - to trim your beard and mustache. DUAL BLADE TECHNOLOGY The new dual blade technology features a detachable upper blade for regular trimming
INSTRUCTIONS FOR USE 1. Always purchase the correct size and grade of battery most suitable for the intended use. 2. Replace all batteries of a set at the same time. 3. Clean the battery contacts and also those of the device prior to battery installation. 4. Ensure the batteries are installed correctly with regard to polarity (+ and -). 5. Remove batteries from equipment which is not to be used for an extended period of time. 6. Remove used batteries promptly. 7. Store unused batteries in their original packaging, away from metal objects that could short-circuit them. Never short-circuit batteries. 8. Remain dispose of batteries in fire, except under conditions of controlled incineration. Failure to observe this precaution may result in an explosion. Never attempt to recharge primary batteries as this may cause leakage, fire, or explosion. 9. Do not mix old and new batteries. 10. Do not mix alkaline, standard (carbon zinc), or rechargeable nickel cadmium or nickel metal hydraulic batteries.
INSTRUCTIONS FOR USE
- Always purchase the correct size and grade of battery most suitable for the intended use.
- Replace all batteries of a set at the same time.
- Clean the battery contacts and also those of the device prior to battery installation.
- Ensure the batteries are installed correctly with regard to quantity (+ and -).
- Remove batteries from equipment which is not to be used for an extended period of time.
- Remove used batteries promptly.
- Store unused batteries in their original packaging, away from metal objects that could short-circuit them. Never short-circuit batteries.
- Never dispose of batteries in fire, except under conditions of controlled incineration. Failure to observe this precaution may result in an explosion. Never attempt to recharge primary batteries as this may cause leakage, fire, or explosion.
- Do not mix old and new batteries.
- Do not mix alkaline, standard (carbon zinc), or rechargeable nickel cadmium or nickel metal hydraulic batteries.
SAVE THESE INSTRUCTIONS
FOR HOUSEHOLD USE ONLY OPERATING INSTRUCTIONS: 1. Remove the battery compartment cover pushing in and down toward the bottom of trimmer. To assist in removing the batterene
gm155_13pg021046_b_final.incd 1
10/22/13 12:50 PM