KE.1V.50x40.ST - Kitchen sink Foster - Free user manual and instructions
Find the device manual for free KE.1V.50x40.ST Foster in PDF.


| Type | Kitchen sink |
| Model | KE.1V.50x40.ST |
| Brand | Foster |
| Material | Austenitic stainless steel AISI 304 (18/10) |
| Standard | UNI EN 13310:2004 |
| Installation type | Standard (flat edge), flush-mount, undermount |
| Fixing system | Fixed and sliding brackets |
| Waste-fitting | Included with overflow pipe |
| Overflow | Present |
| Cut-out template | Included in packaging |
| Gasket | Included for sealing |
| Cleaning | Warm water, mild detergent, soft cloth |
| Recommended cleaner | Foster Steel Clean line |
| Avoid | Steel sponges, muriatic acid, bleach, iron objects |
| Maintenance | Rinse and dry after use |
| Warranty | Refer to manufacturer |
Frequently Asked Questions - KE.1V.50x40.ST Foster
User questions about KE.1V.50x40.ST Foster
0 question about this device. Answer the ones you know or ask your own.
Ask a new question about this device
Download the instructions for your Kitchen sink in PDF format for free! Find your manual KE.1V.50x40.ST - Foster and take your electronic device back in hand. On this page are published all the documents necessary for the use of your device. KE.1V.50x40.ST by Foster.
USER MANUAL KE.1V.50x40.ST Foster
Stainless steel sinks
Foster spa
via M.S. Ottone, 18/20
42041 Brescello (RE) - Italy
Instructions for the installation, use and maintenance of kitchen stainless steel sinks
Sinks' material: austenitic stainless steel AISI 304 - 18/10
UNI EN 13310:2004
(kitchen sinks for domestic use, functional features and tests' methods)
INSTALLATION
Standard and flat (3 mm bended) edge
Before making any cut-out on the worktop, we suggest to verify and lay the sink on the worktop itself and/or on the cabinets in order to verify that the external dimensions of the bowls are compatible with the cabinets themselves, in order to avoid making cut-outs for sinks that cannot be installed.
We also recommend to verify the possibility to install taps and other accessories, by checking the place they need and the place that remains. Also verify the possibility to accede to the water main tap under the sink, and that the positioning of the siphon is feasible. To install the sink, one must make a cut-out on the worktop according to the template included in the packing.
Once the cut-out is made, one must position the gasket around the perimeter of the hole. Before installing the sink, please position the waste-fitting and overflow pipe (when present); when available, also the command of the automatic waste-fitting must be
installed at this stage. Make sure that the external edge of the sink is positioned upon the gasket, so as to create a barrier preventing the infiltration of water and dirt between sink and worktop.

After having positioned the sink on the worktop, fix it by tightening the screws of the brackets which are provided (the screws must be tightened just enough to have
the brackets clamp down on the worktop). Afterwards, remove the excess gasket with a cutter. The taps can be installed before or after the positioning of the sink.
After having installed the sink, connect the waste-fitting with the siphon. Check the water-tightness by closing the basket of the waste-fitting, open the tap and wait until the water level reaches the overflow; shut the tap, and wait several minutes, verifying that the water does not drain away. Empty the sink.

Flush-mount edge
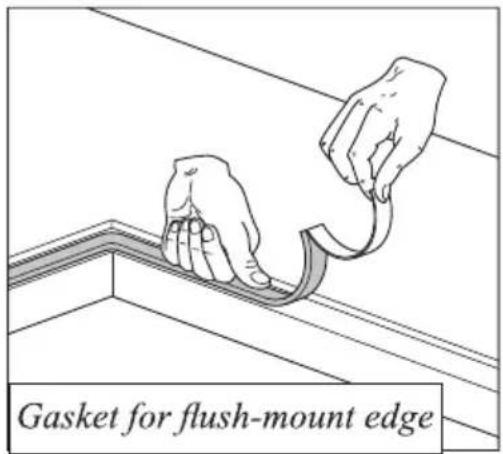
For a correct installation of the flush-mount sinks, please follow strictly the technical sheet (template) provided with the sink; only qualified personnel should make the cut-out, and a computer-operated machine is necessary. It is advisable to accurately clean the seat for the cut-out, and to insert the gasket which is provided, between the sink and the worktop, so as to avoid possible water infiltration into the worktop or the cabinets. The work must be carried out by experienced personnel.

Do not use electric screwdrivers to tighten the brackets. The tightening torque must not exceed 60 N/cm.
It is advisable to install the flush-mount sinks on hydro repellent materials, in order to avoid eventual deformations of the material itself.

Undermount installation
For the undermount sinks, proceed as for the normal built-in sinks.
Make a cut-out on the worktop following the template and/or instructions provided with the sink. Before installing the sink, seal with silicone. Tighten the brackets.

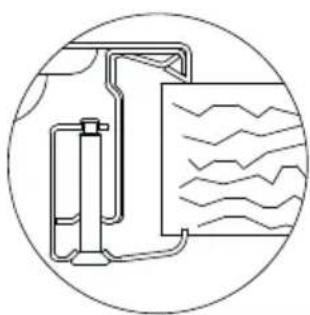
| Fixing system | |
| fixed bracketFR FI | fixed bracket |
 |  |
| sliding bracketS | fixed bracketFI |
 |  |
The Foster collections are the result of a huge experience, and a careful development to meet at best the necessities of the users', so as to obtain a high-quality product. It is important, however, to inform our customers that one must also use the product correctly and maintain it properly.
As all materials, also stainless steel can become dirty; by following very simple instructions, one can bring the sink back to its original shine.
For everyday's maintenance, wash the sink with water and soap, or a product to wash the dishes, rinse abundantly, and do not forget to dry. For more obstinate dirt, the STEEL CLEAN line of products, proposed by Foster and available at all our Assistance Centres throughout the Country, is very suitable to eliminate it without much fuss. Take care to avoid shocks, to drop heavy objects on the sink, and not to use utensils which can scratch the surface. Also avoid the contact with chemicals, cleaners for metal, products to take off paint, metal brushes. Do not leave for long stretches of time tomato residues on the sink, as well as milk, and coffee on the sink; also, avoid long contacts with metal drums with wet bottoms, and iron objects in general. Please note that the long contact of any of the above-mentioned substances with the sink can originate a corrosive attack of electrochemical nature, even though very mild.

TENTION
- Rinse accurately after use, and dry with a clean cloth
- To clean the sink, normal detergent can be used, as long as not containing hydrochloric Acid (commercial Muriatic acid) or its derivates
- In case of persistent staine, try to clean with some warm vinegar or with specific products for Stainless steel (the specific line of products “Foster Steel clean” is suggested)
- Do not use steel sponges to clean the sink, or any other item that could scratch the surface
- Avoid using muriatic acid or bleach
- Do not leave iron objects on the sink for long
- Please keep this instructions leaflet
Brand : Foster
Model : KE.1V.50x40.ST
Category : Kitchen sink