
HiPath SimplyPhone - Assistance program SIEMENS - Free user manual and instructions
Find the device manual for free HiPath SimplyPhone SIEMENS in PDF.


| Product Type | VoIP Desk Phone |
| Model | HiPath SimplyPhone |
| Brand | Siemens |
| Dimensions (approx) | 200 x 180 x 100 mm |
| Weight (approx) | 0.6 kg |
| Power Supply | Power over Ethernet (PoE) or AC adapter (12V, 0.5A) |
| Display | LCD screen with backlight |
| Keypad | Alphanumeric keypad with navigation keys |
| Call Functions | Call hold, transfer, conference, redial, speed dial |
| Voicemail | Integrated voicemail with message waiting indicator |
| Directory | Phonebook up to 100 entries |
| Speakerphone | Full-duplex speakerphone |
| Audio Codecs | G.711, G.722, G.729 |
| Network Interface | 1x 10/100 Base-T Ethernet |
| Protocols | SIP compatible |
| Headset Compatibility | RJ-9 headset jack |
| Mounting | Desk or wall mountable |
| Cleaning | Wipe with a soft, dry cloth. Do not use liquids or sprays. |
| Safety | Low voltage device; operates with limited power sources. |
| Spare Parts | Handset, handset cord, network cable, power adapter (sold separately) |
| Repairability | No user-serviceable parts inside. Contact Siemens support. |
| Compatibility | Works with Siemens HiPath communication systems |
Frequently Asked Questions - HiPath SimplyPhone SIEMENS
User questions about HiPath SimplyPhone SIEMENS
0 question about this device. Answer the ones you know or ask your own.
Ask a new question about this device
Download the instructions for your Assistance program in PDF format for free! Find your manual HiPath SimplyPhone - SIEMENS and take your electronic device back in hand. On this page are published all the documents necessary for the use of your device. HiPath SimplyPhone by SIEMENS.
USER MANUAL HiPath SimplyPhone SIEMENS
natural_image
Office scene with two professionals, one talking on a phone and the other using a computer (no visible text or symbols)HiPath
SimplyPhone for Outlook
Version 4.0
Administrator Manual
Contents
1 Preface.... 1-1
1.1 Functional overview.... 1-1
1.2 Program documentation 1-2
1.3 Fonts and symbols used 1-2
2 Installing SimplyPhone for Outlook 2-1
2.1 Requirements 2-2
2.1.1 Client PC hardware.... 2-2
2.1.2 Server PC hardware 2-2
2.1.3 Client PC software.... 2-2
2.1.4 Server PC software.... 2-3
2.1.5 Telephony infrastructure 2-4
2.2 Preparing for installation on a client PC 2-7
2.2.1 Preparations for default installation.... 2-7
2.2.1.1 Entering telephony data 2-7
2.2.1.2 Entering a server for partner identification 2-8
2.2.1.3 Entering a server for paging 2-8
2.2.1.4 Specifying data 2-9
2.2.1.5 Preparation complete 2-9
2.2.2 Preparations with multiple locations 2-10
2.2.2.1 Offering a location for selection 2-10
2.2.2.2 Duplicating location-specific data 2-10
2.2.2.3 Duplicating data source configuration files 2-10
2.2.3 Preparations for tie lines 2-10
2.2.4 Preparations for the terminal server 2-11
2.2.5 Assigning lines on the terminal server.... 2-11
2.2.5.1 Assigning lines for the dialer.... 2-11
2.2.5.2 Assigning lines for the teambar 2-13
2.2.6 Preparations for licensing 2-13
2.2.7 Configuring additional data sources 2-16
2.3 Installing the driver and software in a first-party environment 2-20
2.3.1 Installing the TAPI Service Provider driver 2-20
2.3.2 Installing SimplyPhone for Outlook V4.0.... 2-21
2.3.3 Configuring SimplyPhone for Outlook V4.0.... 2-22
2.3.4 Starting SimplyPhone for Outlook V4.0.... 2-23
2.4 Installing the driver and software in a third-party environment 2-26
2.4.1 Installing the CAP TAPI Service Provider driver 2-26
Contents
2.4.2 Installing TAPI 120 for HiPath 3000 with LIM module ..... 2-28
2.4.3 Installing SimplyPhone for Outlook V4.0 2-29
2.4.4 Starting SimplyPhone for Outlook V4.0 2-30
3 Partner identification service 3-1
3.1 Importance of installation 3-1
3.2 Configuring a user and mailbox 3-1
3.2.1 LAN domain controller: Windows 2000 Server/Windows Server 2003 and Exchange 5.5 3-1
3.2.2 LAN domain controller: Windows 2000 Server/Windows Server 2003 and Exchange 2000/Exchange 2003. 3-2
3.3 Assigning local rights 3-3
3.3.1 Partner identification service under Windows 2000 Server/Windows Server 2003 3-3
3.4 Installing on a server.... 3-5
3.4.1 Uninstalling the software 3-7
3.4.2 Warnings in Outlook 3-8
4 Troubleshooting/FAQ 4-1
4.1 Licensing errors.... 4-1
4.2 No response from SimplyPhone for Outlook component 4-1
4.3 Partner identification not working 4-2
4.4 Calling only possible from personal contacts 4-2
4.5 Outlook stops responding 4-2
4.6 Increasing performance by deactivating features 4-3
5 Appendix.... 5-1
5.1 Program architecture.... 5-1
5.1.1 Integration with Outlook/Exchange.... 5-1
5.1.2 Partner identification.... 5-3
5.1.3 Components and processes.... 5-4
5.2 Configuring telephony data.... 5-7
5.2.1 Overview of TAPI functionality 5-7
5.2.2 System requirements for functionality 5-8
5.2.3 Location data for telephony 5-9
5.2.4 Configuring the TAPI line 5-10
5.2.5 Configuring tie lines 5-10
5.3 Syntax of the ini files.... 5-11
5.3.1 SP_Inst.ini of the client component 5-11
5.3.2 Client component Locations.ini. 5-13
5.4 Syntax of the registry entries. 5-13
5.4.1 Entries under Common\Settings.... 5-15
5.4.2 Entries under Common\Settings\Telephony.... 5-19
5.4.3 Entries under Entry\Settings.... 5-21
5.4.4 Entries under Solutions\CallData 5-23
5.4.5 Entries under Solutions\CallerIdentification. 5-24
5.4.6 Entries under Solutions\CPhoneOutlook. 5-27
5.4.7 Entries under Solutions\HLMData.... 5-30
5.4.8 Entries under Solutions\Teambar 5-31
5.4.8.1 Entries under Solutions\Teambar\Member0.... 5-31
5.4.8.2 Entries under Solutions\Teambar\MemberN 5-31
5.4.9 Entries under TripleM 5-32
5.4.10 Entries under Common\LRU 5-32
5.4.11 Entries under Common\QuickDial 5-32
5.5 Configuration file syntax 5-32
5.5.1 File SPCr_svr.cfg 5-32
5.5.2 Data source parameters 5-33
5.5.3 Attribute mapping 5-34
5.6 Command line switch.... 5-34
5.6.1 Setup file switches 5-34
5.6.2 Switch for the Dialer 5-35
5.6.3 Switch for partner identification 5-35
5.6.4 Switch for the Inbox Manager 5-35
5.7 Product integration.... 5-36
5.7.1 Integration with HiPath ComAssistant. 5-36
5.7.2 Interaction with Teambase 5-36
5.8 List of abbreviations/Glossary 5-37
Index Z-1
Contents
Copyright and Trademarks
No part of this publication may be reproduced, stored in a retrieval system, or transmitted, in any form or by any means, mechanical, electronic, photocopying, recording, or otherwise, without prior written permission of Siemens. The software described in this publication is furnished under a license agreement and may be used only in accordance with the terms of that agreement.
All products named are trademarks or registered trademarks of their respective company.
Copyright © Siemens AG 2006.
All rights reserved. Subject to availability. Right of modification reserved.
Copyright and Trademarks
1 Preface
This chapter provides information on the following topics:
●Functional overview
●Program documentation
●Fonts and symbols used
1.1 Functional overview
SimplyPhone for Outlook is a software package which enhances the functionality of Microsoft Outlook to include telephony features.
Outlook
Manage and organize:
- contacts
- appointments
- tasks
- e-mails
SimplyPhone for Outlook
Telephony functions such as:
- calling, conferences, toggling, redirecting, calling back
- telephone control with variable key assignment
- minuting calls
- making calls by selecting contact items
- identifying callers
- scheduling call tasks and callback lists
- telephone notes with Outlook mail
- e-mail notification
an so on.
Preface
Program documentation
1.2 Program documentation
The documentation for SimplyPhone for Outlook is available in different formats on the product CD. Information on the mail client Microsoft Outlook can be found in the online help on Microsoft Outlook.
The following information sources are available for SimplyPhone for Outlook:
•Installation and Administrator Manual as PDF
This manual contains detailed information on the installation and administration of Simply-Phone for Outlook and is available as a softbook in electronic format (PDF). You can open and read it using the free Acrobat Reader software from the "Adobe" Acrobat product family.
- Operating Manual as PDF
This manual explains how to use SimplyPhone for Outlook and is available in electronic format as a softbook (PDF). You can open and read it using the free Acrobat Reader software from the "Adobe" Acrobat product family.
•Online help
The online help provides explanations covering all areas of the user interface.
1.3 Fonts and symbols used
... the OK button ...
Buttons and menus are marked using bold font.
Files or directories are indicated using courier font.

Notes or recommendations are indicated using this symbol.

Warnings that you must consider are indicated using this symbol.
2 Installing SimplyPhone for Outlook
This chapter provides information on the following topics:
- requirements in terms of hardware, the platforms, and the telephony infrastructure,
●pre-installation preparations,
●installation in a first-party or third-party environment.
To use SimplyPhone for Outlook features, a TAPI Service Provider for information exchange must be installed between the computer and telephone. This default interface makes the communication system connected accessible for TAPI-compliant applications (for example, dialer, SimplyPhone for Outlook) and facilitates PC-based telephony.
TAPI (Telephone Application Programming Interface) is a uniform interface for the international standard. The TAPI Service Provider is available in first-party and third-party versions.
First-party environment
In TAPI First Party, the telephone is directly connected to your PC (for example, over an adapter or USB) and is also operated directly from your PC without rerouting via a server. TAPI First Party therefore enables all applications compatible with Microsoft-TAPI to operate the connected telephone.
Third-party environment
In TAPI Third Party, the telephone is operated via a central server PC in the network. The server PC provides the required telephone functionality on every client PC over the LAN. Communication between server and clients is completely transparent and is conducted over the interfaces defined by Microsoft. Microsoft-TAPI-compatible applications and enhanced CTI solutions (Computer Telephony Integration) can therefore be implemented over the LAN.
Installing SimplyPhone for Outlook
Requirements
2.1 Requirements
2.1.1 Client PC hardware
The SimplyPhone for Outlook software is installed on the client PC.
"Standard user" requirements:
●800 MHz processor or higher (for Windows 2000)
- 1.5 GHz processor or higher (for Windows XP)
- 512 MB RAM or higher
"Power user" requirements:
●3.0 GHz processor or higher
- 1.0 GB RAM or higher
2.1.2 Server PC hardware
A server PC is required if you want to centrally administer SimplyPhone for Outlook in the network.
- 800 MHz processor or higher (1.5 GHz or higher recommended)
- 512 MB RAM or higher
- 500 MB free hard disk storage
2.1.3 Client PC software
SimplyPhone for Outlook has the following minimum client PC requirements:
The client is released for the following Microsoft operating systems:
●Windows XP Professional (Service Pack 1a or later)
●Windows XP Home (Service Pack 1 or later)
●Windows 2000 Professional (Service Pack 3 or later)
for operation with the following Microsoft mail clients:
- Outlook 2003
●Outlook XP (Service Pack 2 or later)
●Outlook 2000 (Service Pack 3 or later)
• Exchange 2003
• Exchange 2000 (Service Pack 3 or later)
• Exchange Version 5.5 (Service Pack 4 or later)

SimplyPhone for Outlook V4.0 does not support any of the following programs:
●an older version of SimplyPhone,
●HiPath Xpressions Outlook Extension (HXOE),
●HiPath Xpressions Extension (HXE),
●the partner identification service,
•cyPHONE
for the terminal server
- Citrix MetaFrame XP
●Microsoft 2003 Terminal Server
●Microsoft 2000 Terminal Server
2.1.4 Server PC software
SimplyPhone for Outlook has the following minimum server PC requirements:
●Windows 2000 Server (Service Pack 3 or later),
●Windows Server 2003
for the partner identification service
The partner identification service is released for:
- Outlook 2000 with CDO
- Outlook 2003 with CDO
- Outlook XP with CDO
- Exchange Admin
• Exchange 2003
• Exchange 2000 (Service Pack 3 or later)
●Exchange Version 5.5 (Service Pack 4 or later)
The server must be located in the same domain as the Exchange Server or in a domain known to the Exchange Server's domain.
Installing SimplyPhone for Outlook
Requirements
2.1.5 Telephony infrastructure
A TAPI Service Provider that supports TAPI V2.0 (or higher) is required to run SimplyPhone for Outlook. SimplyPhone for Outlook has been released for use with the following providers:
- 1st Party TAPI
- CallBridge Collection V2.0 (Callbridge TA/TU (CorNet TS) V2.0, CallBridge IP V2.0)
- Callbridge TA/TU (CorNet WP) V2.0
– Callbridge for Desktop V1.45 (CorNet WP Hicom 300 US R6.5, 6,6) - optiClient 130 V4.0
-3rd Party TAPI
- H i P a t h C A P V 3 . 0
- H i P a t h C A P V 2 . 0
- TAPI 170 V2.0
- TAPI 120 V2.0
First-party environment
SimplyPhone for Outlook can be operated with the telephones listed in the table. Your system administrator must have checked and ensured the telephone requirements are met and your telephone must be correctly configured for the relevant features. Ensure that the telephone is connected with the appropriate cable and is working.
The TAPI Service Provider driver required depends on the communication system and telephone used. The TAPI Service Provider driver should be installed as indicated in the appropriate installation manual (see also Section 2.3.1, "Installing the TAPI Service Provider driver").
| Communication system | optiPoint 500/410/420 (connection over USB cable or LAN)* | optiset E with data adapter (connection over serial V.24 ca-ble)** |
| HiPath 4000 CallBridge TU (CorNet WP) CallBridge TA (CorNet WP) | ||
| HiPath 3000/5000 CallBridge Collection CallBridge Collection | ||
| Hicom 300 E/H | CallBridge for Desktops | CallBridge for Desktops |
* A special USB cable (Siemens serial number: S30267-Z360-AS30) is needed for connecting the client PC and telephone. The telephone firmware must be MP01.03 or higher.
To check the telephone, press "<" until "Service Menu Key?" appears on the display - press "✓" - press "<" until "Phone Test?" appears - press "✓" - press "<" until "Software version?" appears - press "✓" and compare the firmware version (> MP0103).
** The version number of the data adapter must be B614-4 or higher.
Installing SimplyPhone for Outlook
Requirements
Third-party environment
In a third-party environment, the telephone is operated over a Third Party TAPI driver, such as, CAP V2.0/3.0 TAPI Service Provider, TAPI 170 V2.0 or TAPI 120 V2.0.
CAP V2.0/3.0 TAPI Service Provider
When installing CAP V2.0/3.0 TAPI Service Provider, make sure that the administrator is aware of the following points:
- Storage path for the SimplyPhone for Outlook installation software,
- IP address of the CAP server (you will need this information in Section 2.4.1, "Installing the CAP TAPI Service Provider driver"),
- SimplyPhone user ID (you will need this information in Section 2.4.4, "Starting SimplyPhone for Outlook V4.0"),
- Password (you will need this information in Section 2.4.4, "Starting SimplyPhone for Outlook V4.0").
• TAPI 120 V2.0
Section 2.4.2, "Installing TAPI 120 for HiPath 3000 with LIM module", for example, describes how to operate SimplyPhone with TAPI 120 V2.0 at a HiPath 3000 with LIM module.
2.2 Preparing for installation on a client PC
The following sections describe how to prepare for the client installation of SimplyPhone for Outlook so that a user can independently install a network server.
2.2.1 Preparations for default installation
First copy the folder
\Software\SimplyPhone for Outlook 4.0
from the CD-ROM to a network folder which can be accessed by the user for installing Simply-Phone for Outlook.
Make a copy of the file _Locations.ini and name it Locations.ini. The _Locations.ini file should remain unchanged and be kept as a template.
Disable the write protection on the files SP_Inst.ini and Locations.ini.
The data in the ini files is used to control the installation operation or is transferred to the client PC as registry entries (see "Syntax of the registry entries").
2.2.1.1 Entering telephony data
Open the Locations.ini file with a text editor to add location-specific data. This data is entered in the client PC's telephony settings as a new location with the name
Locations.ini - [Default] - UserCountry=
Enter the country code, for example, UserCountry=49 for Germany.
Locations.ini - [Default] - UserArea=
Enter the area code, for example, UserArea=89 for Munich.
Locations.ini - [Default] - UserNumber=
Enter the main station number, for example, UserNumber=12345.
Locations.ini - [Default] - UserExternal=
Enter the access code for national calls, for example, UserExternal=0.
Locations.ini - [Default] - UserForeign=
Enter the access code for international calls, for example, UserForeign=0.
Installing SimplyPhone for Outlook
Preparing for installation on a client PC
2.2.1.2 Entering a server for partner identification
The file CRIRemote.cfg is used to access data associated with a partner identification service.
Use a text editor to open the file CRIRemote.cfg in the folder \SPCr\dbserver to set the server for partner identification.
CRIRemote.cfg - DBEnv.ServerAddress=SPSERVER:4999
Enter the name or the IP address of the CRI server for \SPSERVER\. Do not change the port number (:4999).

For more information on partner identification, see Chapter 3, "Partner identification service" and Section 5.6.3, "Switch for partner identification".
Multiple SimplyPhone for Outlook partner identification services
If you want to use more than one partner identification service, the file names of the configuration files must start with CRIRemote.
Example:
CRIRemote_Service1.cfg and CRIRemote_Service2.cfg.
Contents of SPCr_svc.cfg:
CallerIdentServerList=
CRI, CRIRemote_Service1, CRIRemote_Service2
2.2.1.3 Entering a server for paging
In the folder \SPCr\dbserver, open the file
- Ex55.cfg for operation with Exchange 5.5 Server
• Ex2K.cfg for operation with Exchange 2000 Server
• Ex2003.cfg for operation with Exchange 2003 Server
use a text editor to define the server for paging:
[Ex55|Ex2K|Ex2003].cfg - DBEnv.ServerAddress=SPSERVER:[389|3268]
Enter the name or the IP address of the ActiveDirectory server for \SPSERVER\. Do not change the port number.
The Exchange Server name from the current profile is used in Outlook 2000, Outlook XP, and Outlook 2003 which means that no manual change is necessary here.
2.2.1.4 Specifying data
Specify the path to the Setup.exe installation program in the configured network folder for users.

A TAPI provider must be installed on the client PC so that telephony functions can be used there.
2.2.1.5 Preparation complete
The preparations for installing SimplyPhone for Outlook are now complete.
Please note that the above descriptions only relate to a standard scenario. Additional information is provided in subsequent chapters.
2.2.2 Preparations with multiple locations
2.2.2.1 Offering a location for selection
You must remove the standard Default entry in the SP_Inst.ini file to let the user choose from a selection of multiple locations during installation.
SP_Inst.ini - [GENERAL] - Location=

You will find a detailed description of the other parameters in Section 5.3.1, "SP_Inst.ini of the client component".
2.2.2.2 Duplicating location-specific data
Open the Locations.ini file with a text editor, duplicate the entire section (including [Default]) for each location and edit the entries in the duplicated section(s) as described in the section "Preparations for default installation".
Replace the [Default] name with different location names, which appear as selection options during installation, for example, [Plant, east], [Plant, west].
Enter the name of the data source configuration file for each location under CRconfigFile=.
Locations.ini - [<Location name>] - CRconfigFile=
The entry (for example, CRconfigFile=MyCompany.cfg) must be available as a file, see next section.
2.2.2.3 Duplicating data source configuration files
Make a copy of the file SPCr_svc.cfg in the folder \SPCr with the name that you entered under CRconfigFile=, for example, MyCompany.cfg. The file SPCr_svc.cfg should remain unchanged and be kept as a template.
2.2.3 Preparations for tie lines
If tie lines are used between different locations, the tie line number must be converted into a number in canonical format. Otherwise, partner identification is not possible for a call that uses the tie line.
You can do this by opening the Locations.ini file with a text editor and adding the following parameters.
Locations.ini - [Default] - ShortDial[n]=
Locations.ini - [Default] - ShortDialEx[n]=
The tie line number is entered in canonical format in front of the phone number and separated from it by a semicolon, for example, ShortDial1=96; +49 89 636. The name of the tie line is then added followed by the country code,
for example, ShortDialEx1=Neuperlach;49.
If there are multiple tie lines for a single location, the inputs are numbered consecutively on entry (ShortDial2= ... etc.).
2.2.4 Preparations for the terminal server
The trace file name must be specified in the registry if the trace is active.
The default trace is output to the installation directory with the default name. Multiple versions of the same output are not permitted as they would cause mutual blocking here. Therefore, we recommend creating the trace files on a share that is then unique for each user.
The trace files that must be output under
HKEY_Current_User\SOFTWARE\Siemens\SimplyPhone\Common\Settings
are as follows:
- TraceFilename
2.2.5 Assigning lines on the terminal server
CAP TSP lines (with or without fixed authentication) must be configured if Microsoft TAPI is implemented. All necessary lines are configured on the terminal server. However, the operating system does not allow you to assign specific lines to a particular user.
All of the following settings must be manually entered in the registry by the terminal server administrator (or via scripts). These settings have not yet been automated.
2.2.5.1 Assigning lines for the dialer
To prevent users from selecting unauthorized lines, the terminal server administrator can assign lines to users.
HKEY_Current_User\Software\Siemens\SimplyPhone\Entry\Settings
AssignedLine*: * = 0 - Number of assigned lines.
Installing SimplyPhone for Outlook
Preparing for installation on a client PC
Line assignment requirements
●Lines can only be assigned using TAPI.
- At least one key must be available with a value. If this is not the case, line assignment is deactivated and the user can select all available lines.
- The asterisk * represents numbering in ascending order.
- The process of reading the list is interrupted if a key's value is empty or if the key * does not exist.
Examples
Configured lines:
CAP Line 122
CAP Line 123
...
CAP Line 140
AssingnedLine0 = "CAP Line 122"
AssingnedLine1 = "CAP Line 123"
One of these two lines can be selected.
AssingnedLine0 = "" Line assignment deactivated.
AssingnedLine0 = ""
AssingnedLine1 = "CAP Line 123"
Line assignment deactivated.
AssingnedLine0 = "CAP Line 122"
AssingnedLine1 = "CAP Line 123"
AssingnedLine3 = "CAP Line 124"
Only one of the first two lines can be selected.
| AssingnedLine0 = "CAP Line 122"
| AssingnedLine1 = "CAP Line 123"
| AssingnedLine2 = ""
| AssingnedLine3 = "CAP Line 124"
Only one of the first two lines can be selected.
AssingnedLine0 = "CAP Line 155"
AssingnedLine1 = "CAP Line 156"
AssingnedLine2 = "CAP Line 124"
Only CAP line 124 can be selected.
2.2.5.2 Assigning lines for the teambar
To prevent users from selecting lines that are not assigned to their team, the terminal server administrator can assign team lines to users.
HKEY_Current_User\Software\Siemens\SimplyPhone\Solutions\Teambar\Member0
AssignedLine*: * = 0 - Number of assigned lines.
Lines are assigned as described in the previous section.
2.2.6 Preparations for licensing
In SimplyPhone for Outlook V4.0, licensing is performed with HiPath License Management. A distinction is made during installation as to whether First Party TAPI or Third Party TAPI is involved. The setups are different for these two variants.
When using SimplyPhone at a First Party TAPI (for example, CallBridge Collection V2.0), HiPath License Management is operated in "Remote" mode. When using SimplyPhone at a Third Party TAPI (for example, CAP V3.0), HiPath License Management is operated in "Floating Standard" mode. The "Floating Restricted" or "Floating Reserved" modes are not supported.
The following diagram illustrates SimplyPhone licensing in the HLM environment.
Installing SimplyPhone for Outlook
Preparing for installation on a client PC

flowchart
graph LR
    A["CLC configuration tile"] --> B["CLC API"]
    B --> C["License tile(s)"]
    C --> D["CLA"]
    D --> E["CLM"]
    F["user"] --> E
    G["LG"] --> H["CLS"]
    I["Siemens"] --> H
    style A fill:#d4edda,stroke:#333
    style B fill:#66b3ff,stroke:#333
    style C fill:#d4edda,stroke:#333
    style D fill:#d4edda,stroke:#333
    style E fill:#d4edda,stroke:#333
    style F fill:#d4edda,stroke:#333
    style G fill:#d4edda,stroke:#333
    style H fill:#d4edda,stroke:#333
    style I fill:#d4edda,stroke:#333
SimplyPhone incorporates the CLC (Customer License Client) component.
The CLA (Customer License Agent) and CLM (Customer License Management) components in HiPath License Management can be installed on the same client or a server.
CLA controls licensing based on the licenses configured with CLM.
In the case of First Party TAPI, CLA installation is performed as part of the SimplyPhone setup. This can be blocked, however, with the INI file SP_Inst.ini. This is controlled with the parameter
InstallCLA = True/False (CLA installation/no CLA installation)
In the case of Third Party TAPI, CLA installation is not performed as part of the SimplyPhone setup but can be carried out with the INI file SP_Inst.ini. This is controlled with the parameter
InstallCLA = True/False (CLA installation/no CLA installation)
When installing the CLA in the course of SimplyPhone setup, the CLA is installed in the folder Licensing\License Agent under the SimplyPhone installed. The user requires write authorization here to save the license file or the license key. After installation, CLA is automatically started as a service and appears as the process cla.exe in the Task Manager.
CLM is not installed as part of the SimplyPhone setup. However, CLA and CLM are supplied on the installation CD.
The CLA is automatically installed during first-party installation. The CLA is not installed during third-party installation and must, therefore, be provided on a server in the customer network. Initial startup of SimplyPhone is not possible without CLA.
The IP address of this server and the port number of the CLA (this must be set during CLA installation) must be made known to the SimplyPhone. These parameters can be set during installation with the file SP_Inst.ini. CLA can also be used to set the number of connection retries and the timeout for connection retries.
These settings can be found in the section [HLM].
| CLAIpAddress IP address of the CLA Default: 127.0.0.1 | |
| CLAIpPort Port number of the CLA Default: 61740 | |
| CLAConnectionRetries Connection retries with the CLA | Default: 3 |
| CLAConnectionTimeout Timeout for CLA connection retry in ms | Default: 5000 (5s) |
The values set are copied to the registry under
HKEY_LOCAL_MACHINE\SOFTWARE\Siemens\SimplyPhone\Solutions\HLMData
These values are copied to the user area the first time SimplyPhone is started up and can be modified there for each user:
HKEY_CURRENT_USER\Software\Siemens\SimplyPhone\Solutions\HLMData
The above-mentioned values can be modified during live operation in the Settings dialog on the Licensing tab (accessed via the SimplyPhone context menu).
Another setting in the installation file SP_Inst.ini controls the mode used and the CLA licensing files:
UsedTAPIServiceProvider=FirstPartyTAPI/ThirdPartyTAPI
The FirstPartyTAPI setting is intended for use with CallBridge Collection, CallBridge for Desktop, and optiClient. In this case, the HLM mode is "Remote". ThirdPartyTAPI is for TAPI120, TAPI 170, and CAP. In this case, the HLM mode is "Floating Standard". This setting should not be modified as it is used for license generation.
The SimplyPhone installation directory contains grace period configuration files. These let the user operate the system for a trial period of 30 days and must not be modified.
| Product | Grace Period configuration file |
| First Party TAPI | SPON1PTY_V4.0.gpcf |
| Third Party TAPI | SPON3PTY_V4.0.gpcf |
Installing SimplyPhone for Outlook
Preparing for installation on a client PC
2.2.7 Configuring additional data sources
Both the contact retrieval and the partner identification services are processed using the LDAP log. The following table explains the two terms.
| Procedure Contact | retrieval Partner identification | |
| What you have: for | example, name, department,etc. of the contact you want to re-trieve | Phone number |
| What you are looking for: | Phone number Name, department, | etc. of the contact you want to retrieve |
| Sample application: | The user wants to call someone but only knows the party's name and department. | The name and other caller-specific data should be displayed for an in-coming call. |
The default application is as follows:
– Data sources: private Outlook contacts, public Outlook contacts, the global Exchange address book, and customer-specific LDAP data sources.
– In private Outlook contacts, the local CRI server is used for contact retrieval and partner identification, whereas the remote partner identification service is used for public Outlook contacts.
– The global Exchange address book search is performed directly in the Exchange Server or, in the case of Windows 2000, in the ActiveDirectory server.
- The remote partner identification service is used for partner identification with the global Exchange address book.

Restrictions for public contact folders and public contacts.
"Public contact folders" and "Public contacts" refer to contact folders and contacts in the local InfoStore on the Exchange server. You can access these kinds of contact folders or contacts via Outlook's list of folders and create them (with administrative rights) under "Public Folders/All Public Folders".
This does not include contacts available with Exchange 2000 and later that must be entered directly in the Active Directory and that can be accessed by end users via the Outlook-Contacts. These are not supported.
The following is a list of the data source configuration files available for the installation share in the directory \SPCr\dbserver.
| The file ... contains configuration data ... | |
| CRI.cfg | for partner identification in private Outlook/Exchange contact folders on the client PC. |
| CRIREMOTE.cfg | for partner identification in the global Exchange address book and public Exchange contact folders. For information on using multiple partner identification services, see Section 2.2.1.2 on page 2-8. |
| Ex55.cfg | for contact retrieval in the global Exchange 5.5 address book. |
| Ex2K.cfg | for contact retrieval in the global Exchange 2000 address book. |
| Ex2003.cfg | for contact retrieval in the global Exchange 2003 address book. |
| Outlook.cfg | for contact retrieval in personal Outlook contact folders. |
| Contact.cfg | for contact retrieval in public Outlook contact folders. A partner identification server is required to use Contact.cfg. |
| .cfg(Example: SCD.cfg) | for contact retrieval and partner identification in a customer-specific LDAP database - in this example in the Siemens-specific SCD (Siemens Corporate Directory). |
The following overview provides an example of the interdependencies between the data source configuration files.
Installing SimplyPhone for Outlook
Preparing for installation on a client PC

flowchart
graph TD
    A["... CRConfigFile=SPCr_svc.cfg ..."] --> B["Locations.ini"]
    B --> C["... CallerIdentServerList= CRI, CRIREMOTE, ... QueryServerList= Outlook, SCD, ... ... SpCr_svc.cfg"]
    B --> D["... [LDAP config. and mapping"]]
    D --> E["CRI.cfg"]
    E --> F["Outlook.cfg"]
    F --> G["... [LDAP config. and mapping"]]
    G --> H["SCD.cfg"]
    H --> I["... LDAP config. and mapping"]
    I --> J["CRIREMOTE.cfg"]
    J --> K["Folder: \SPCr\dbserver"]
Random LDAP data sources can also be configured.
To do this
- you must make an appropriate entry in the main configuration file (default: SPCr_svc.cfg),
- you must create a CFG file in the folder \SPCr\dbserver; this file should contain suitable attribute mapping for the relevant LDAP server.

Do not make any changes to the mapping list (entries, such as, AttrMap.dn = dn, etc.) for the existing data source configuration files because these entries govern correct communication between SimplyPhone for Outlook and the server.

The server MUST be correctly entered under DBEnv.ServerAddress in the data source configuration file used, as described in the sections "Entering a server for paging" and "Entering a server for partner identification".
More information on the syntax of the configuration files and attribute mapping can be found in the Appendix.
Data source configuration files on client or server PCs
There are two ways to use the data source configuration files:
- On a client PC
During the runtime SimplyPhone for Outlook accesses a copy of the folder \SPCr that was copied to the client PC during setup.
Advantages: The search function is available even if the server share cannot be accessed. As the configuration files only have to be read locally, performance is generally a little higher.
This is the default scenario; copying is performed automatically during installation.
- On a server PC
SimplyPhone for Outlook uses the folder \SPCr on the server share.
Advantage: Changes to the data source configuration files take immediate effect without changes on the client PC.
In this case, the change must be entered in the file SP_Inst.ini. To do this, open the file SP_Inst.ini with a text editor and delete the parameter value USE_LOCAL for the following entry:
SP_Inst.ini - [DATA_SOURCES] - CRConfigPath=

- If you delete the USE_LOCAL value in the SP_Inst.ini file in the [DATA_SOURCES] section under CRConfigPath=, then the local configuration files are overwritten with the configuration files provided by setup, even in the case of updates.
- If you leave the USE_LOCAL value in the SP_Inst.ini file in the [DATA_SOURCES] section under CRConfigPath=, then the new value CR-ConfigNew= entered in the same section becomes effective.
The following applies:
CRConfigNew=False (default):
the local configuration files are maintained and the configuration files provided by the setup are only copied to the destination computer if it doesn't already have any configuration files, that is, in the case of first-time installation.
CRConfigNew=True:
the local configuration files are overwritten by the configuration files provided with the setup.
Installing SimplyPhone for Outlook
Installing the driver and software in a first-party environment
2.3 Installing the driver and software in a first-party environment
This section describes the correct sequence for the individual installation steps in a first-party environment.
2.3.1 Installing the TAPI Service Provider driver
Find out where the installation files for the TAPI Service Provider drivers are stored (installation CD or network drive). The following table indicates which TAPI Service Provider driver you must implement depending on the telephone used and the communication system connected. Follow the installation instructions in the relevant TAPI Service Provider instructions. This table shows which driver is required.
| Communication system | optiPoint 500/410/420 (connection over USB cable or LAN)* | optiset E with data adapter (connection over serial V.24 ca-ble)** |
| HiPath 4000 CallBridge TU (CorNet WP) CallBridge TA (CorNet WP) | ||
| HiPath 3000/5000 | CallBridge Collection | CallBridge Collection |
| Hicom 300 E/H | CallBridge for Desktops | CallBridge for Desktops |
* A special USB cable (Siemens serial number: S30267-Z360-AS30) is needed for connecting the client PC and telephone. The telephone firmware must be MP01.03 or higher.
To check the telephone, press "<" until "Service Menu Key?" appears on the display - press "✓" - press "<" until "Phone Test?" appears - press "✓" - press "<" until "Software version?" appears - press "✓" and compare the firmware version (> MP0103).
** The version number of the data adapter must be B614-4 or higher.
If you are operating a LAN-based optiPoint 500 at a HiPath 4000, you may need to find out certain information for the TAPI installation, such as, the IP address of your telephone as well as the password used to log your telephone on to the system.
2.3.2 Installing SimplyPhone for Outlook V4.0
Ensure that the necessary software is available on a CD or via a remote server.
In general, the administrator prepares the system for the installation of SimplyPhone for Outlook. He or she places the installation files in a released network path and preconfigures the installation so that SimplyPhone for Outlook is optimized and ready for operation immediately after installation.
If this is not the case and you have to install SimplyPhone for Outlook directly from the product CD, additional entries must be made in the configuration files in the folder SPCr in the SimplyPhone for Outlook installation directory (see Section 2.2.1, "Preparations for default installation" and Section 2.2.7, "Configuring additional data sources"). Otherwise, you must take the following functional restrictions into account:
– The search dialog does not produce search results.
– Partner identification is only performed on the basis of your personal contact folder.
Installation procedure
- Ensure that the user ID you used to log on and you want to use to install the program is assigned administrator rights. The program cannot be correctly installed without administrator rights.
- If you have already installed an earlier version of SimplyPhone for Outlook, you should uninstall it first (select Start | Settings | Control Panel | Add/Remove Programs).
- Ensure that one of the mail clients listed under the software requirements is installed (for example, Microsoft Outlook 2000). If the mail client is open, close it now.
- Start the Setup.exe file from the network drive or if necessary, from the software CD. If necessary, ask your administrator where the software is stored on the network.
- Follow the installation instructions for the setup program.
- Enter the following information during the installation routine:
– Country code - without leading zero (e.g. "49" for Germany)
- Area code - without leading zero (e.g. "89" for Munich)
– Phone number of the location (e.g. "722")
- Trunk seizure (e.g. "0" or "9")
- Trunk seizure - international (e.g. "0")
- Terminate the setup by pressing Next.
Installing SimplyPhone for Outlook
Installing the driver and software in a first-party environment
2.3.3 Configuring SimplyPhone for Outlook V4.0
You can modify the TAPI Service Provider settings that you entered during setup as required. You can also make other settings.
- Do this by starting the configuration with Start | Settings | Control Panel | Phone and Modem Options. Under Dialing Rules, select the entry that starts with your "My Location" telephone number and click Edit...

- If necessary, correct the settings, such as, the area code or the trunk access codes.
- You can also enter complex dial plans here that combine multiple area codes and location names. More information on this can be found under Dialingrules.doc on the software CD.
2.3.4 Starting SimplyPhone for Outlook V4.0

Before putting SimplyPhone into operation, a CLA (Customer License Agent) must be installed on the local client PC for correct licensing and so that SimplyPhone starts properly. The CLA is automatically installed at the same time as SimplyPhone.
If you can access the CLA, a 30-day trial license is available for SimplyPhone. A license key for permanent operation must be generated on the CLS (Central License Server) during this 30-day term (grace period time). This license key is then transferred to CLA with the help of SimplyPhone.
The license key is automatically copied to the Licensing\License Agent\import directory under the Siemens directory located in the Windows program directory (e.g.: C:\Programs).
- Start MS Outlook. SimplyPhone for Outlook then starts automatically.
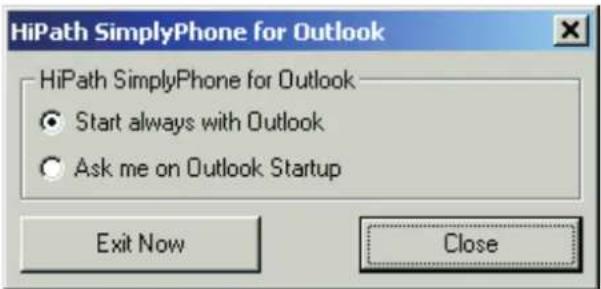
- The following dialog appears when the Outlook startup is complete. If you choose the option Start always with Outlook, SimplyPhone for Outlook automatically starts at the same time as Outlook and this prompt stops appearing. If you select the option Ask me on Outlook Startup, this prompt appears every time you start Outlook. Select one of the options and click Start Now.

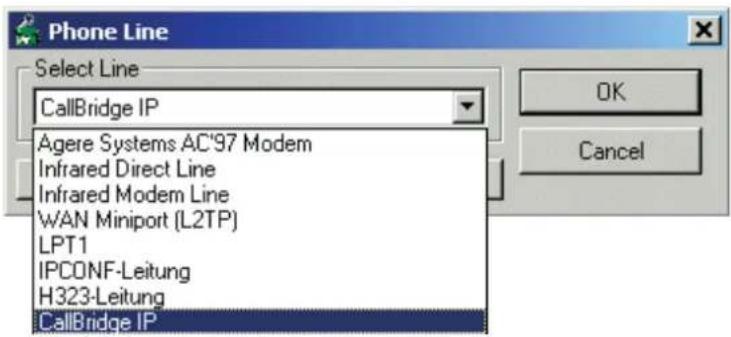
- The system searches for a valid license during SimplyPhone startup. If it does not find a valid license, the user can only operate SimplyPhone for 30 days, known as the "grace period time". The user must acquire a valid license key in the course of this grace period. The user is prompted to log on every time he or she starts the application during this period. You can purchase the license key via the CLS (Central License Server) by specifying the registration number (MAC address of the client PC). The registration number is indicated on the Software Registration dialog when you click Register.... The license is linked to this MAC address. You must purchase a new license each time the MAC address is changed, for example, if you replace the LAN card.
Installing SimplyPhone for Outlook
Installing the driver and software in a first-party environment
Using SimplyPhone during the grace period time
Click OK in the Software Registration dialog.

Registering SimplyPhone during the grace period time
Click Register... in the Software Registration dialog. Enter a valid license key in the Enter License Key field and click OK.

If you received the license key in the form of a license file, you can also store this file directly in the directory ... Siemens/SimplyPhone/Licensing/License Agent/import. After a few seconds, the file disappears from the directory and the license is activated.
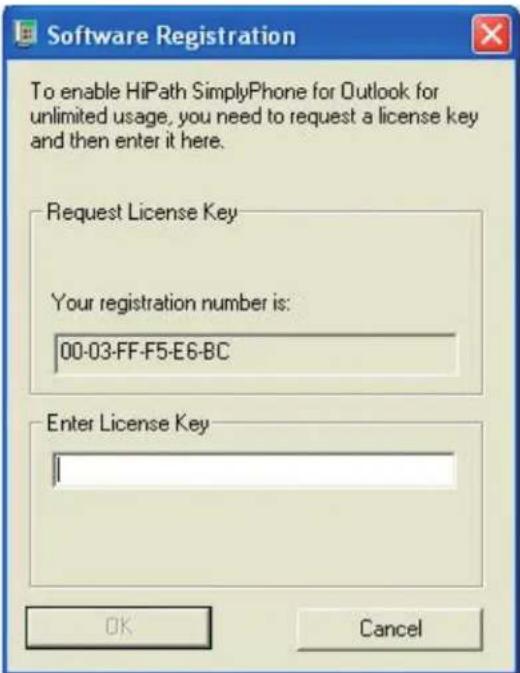
- The "Phone Line" dialog appears. Select the TAPI line that was installed at the same time as the TAPI Service Provider (see Section 2.3.1, "Installing the TAPI Service Provider driver") and click OK.
Installing SimplyPhone for Outlook
Installing the driver and software in a first-party environment
- SimplyPhone starts up and can be used. For information on using the program, refer to the operating manual or consult the online help.
Installing SimplyPhone for Outlook
Installing the driver and software in a third-party environment
2.4 Installing the driver and software in a third-party environment
This section describes the correct sequence for the individual installation steps in a third-party environment.
2.4.1 Installing the CAP TAPI Service Provider driver
If you need detailed information, refer to the service manual for HiPath CAP V3.0 TAPI Service Provider.
You can change the TAPI installation settings prior to installation by modifying the file setupTAPI.ini. This file can be found in the same folder as the file setupTAPI.exe on the installation CD.
Do not forget to delete the comment reference ";" at the start of each line that you want to automatically execute in every installation routine.
- Call up the file setupTAPI.exe in the installation directory
...\CTI_CD_SimplyPhone_Produkte_Edition_yyyy_mm_dd\Software
-
Select the required setup language and click OK.
-
Follow the installation program instructions.
-
Enter the IP address of the CAP server (ask your administrator). The default port number must not be changed.
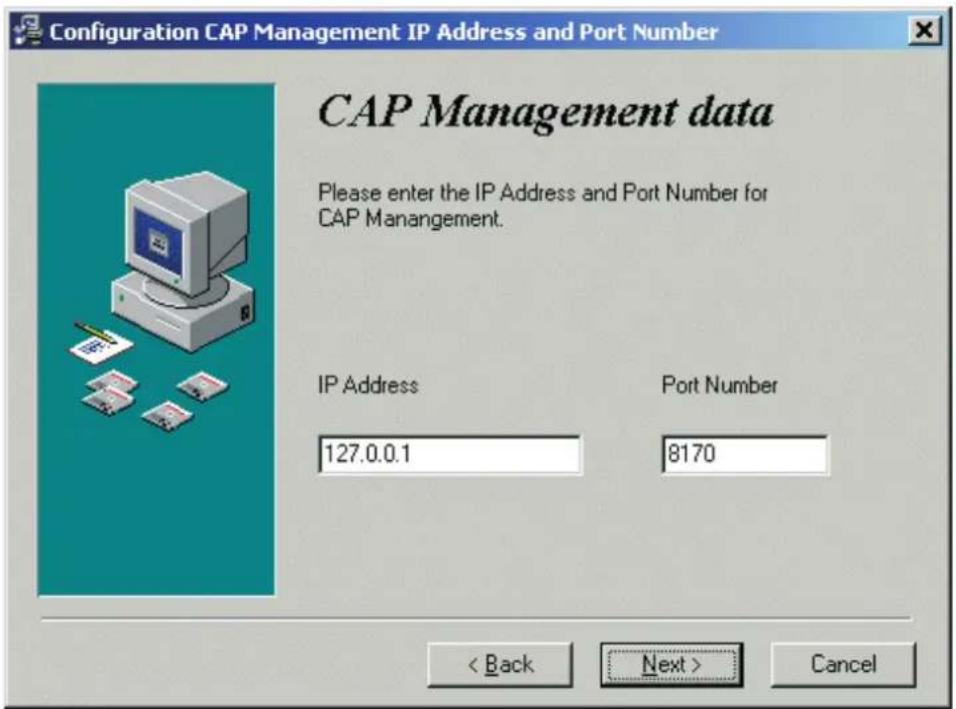
- Enter the 4- or 5-digit extension number (for example, 65225). Leave the other default values, but check if the country code, the area code, and the system number are correct.

- Start the installation with the button Start.
- Terminate the installation with the button Done.
- You must restart the PC to complete the installation. Do this by clicking OK.
Installing SimplyPhone for Outlook
Installing the driver and software in a third-party environment
2.4.2 Installing TAPI 120 for HiPath 3000 with LIM module
The following describes how to install the TAPI 120 V2.0 Service Provider together with a Hi-Path 3000 with LIM module. Up to five CTI clients can be operated on the LIM module.
If you need detailed information, refer to the installation and configuration manual for HiPath TAPI 120 V2.0.
If CTI TAPI is already installed on the PC, it must first be uninstalled. Administrator rights are required to install the HiPath TAPI 120 V2.0 driver.
- Install the installation CD and start the setup.exe file in the relevant "TAPI 120 V2.0" directory.
- Select TAPI 120 SP V2 as the setup type and follow the instructions for the setup routine.
- The TSP configuration dialog opens automatically once the TAPI has been successfully installed. Select LIM as the system and enter the necessary parameters here:
- own phone number (DID only)
– name of the TAPI line (freely selected) - IP address of the LIM module
-
port number of the LIM module
-
Finish configuration with OK. Installation is now complete. You must restart the PC.

You can also modify the configuration later in the configuration dialog by selecting Start | Settings | Control Panel | Phone and Modem Options | Advanced |
2.4.3 Installing SimplyPhone for Outlook V4.0
Ensure that the necessary software is available on a CD or via a remote server.
In general, the administrator prepares the system for the installation of SimplyPhone for Outlook. He or she places the installation files in a released network path and preconfigures the installation so that SimplyPhone for Outlook is optimized and ready for operation immediately after installation.
If this is not the case and you have to install SimplyPhone for Outlook directly from the product CD, additional entries must be made in the configuration files in the folder SPCr in the SimplyPhone for Outlook installation directory (see Section 2.2.1, "Preparations for default installation" and Section 2.2.7, "Configuring additional data sources"). Otherwise, you must take the following functional restrictions into account:
– The search dialog does not produce search results.
– Partner identification is only performed on the basis of your personal contact folder.
Installation procedure
- Ensure that the user ID you used to log on and you want to use to install the program is assigned administrator rights. The program cannot be correctly installed without administrator rights.
- If you have already installed an earlier version of SimplyPhone for Outlook, you should uninstall it first (select Start | Settings | Control Panel | Add/Remove Programs).
- Ensure that one of the mail clients listed under the software requirements is installed (for example, Microsoft Outlook 2000). If the mail client is open, close it now.
- Start the Setup.exe file from the network drive or if necessary, from the software CD. If necessary, ask your administrator where the software is stored on the network.
- Follow the installation instructions for the setup program.
- Enter the following information during the installation routine:
– Country code - without leading zero (e.g. "49" for Germany)
– Area code - without leading zero (e.g. "89" for Munich)
– Phone number of the location (e.g. "722")
- Trunk seizure (e.g. "0" or "9")
- Trunk seizure - international (e.g. "0")
- Terminate the setup by pressing Next.
Installing SimplyPhone for Outlook
Installing the driver and software in a third-party environment
2.4.4 Starting SimplyPhone for Outlook V4.0

Customer License Management (CLM) must be installed on the network before SimplyPhone is put into operation for correct licensing on the server PC. A CLA (Customer License Agent) must also be installed on the server PC or on the relevant client PC. The CLA and CLM can be found on the installation CD.
If you can access the CLA, a 30-day trial license is available for SimplyPhone. You must use Customer License Management (CLM) during this grace period to activate the licenses for permanent operation on the CLS (Central License Server) and transfer them to the CLA.
- Start MS Outlook. SimplyPhone for Outlook then starts automatically.
- The following dialog appears when the Outlook startup is complete. If you choose the option Start always with Outlook, SimplyPhone for Outlook automatically starts at the same time as Outlook and this prompt stops appearing. If you select the option Ask me on Outlook Startup, this prompt appears every time you start Outlook. Select one of the options and click Start Now.
- The system searches for a valid license during SimplyPhone startup. If it does not find a valid license, the user can only operate SimplyPhone within the “Grace Period Time” of 30 days. The user must acquire a valid license key in the course of this grace period. Until then, an advisory is displayed informing the user that SimplyPhone is not yet registered. You can use the CLM to purchase the license key: generate the license key by logging on to the CLS (Central License Server) and specifying the registration number (MAC address of the PC where CLA is installed). The license key must then be transferred to the CLA. The license is permanently linked to the MAC address. You must purchase a new license each time the MAC address is changed, for example, if you replace the LAN card.

You can also retrieve the license file from the CLS (Central License Server) and save it directly in the directory Licensing/License Agent/import in the License Agent (CLA). After a few seconds, the file disappears from the directory and the license is activated in the CLA.
Using SimplyPhone during the grace period time
Click OK in the Software Registration dialog.
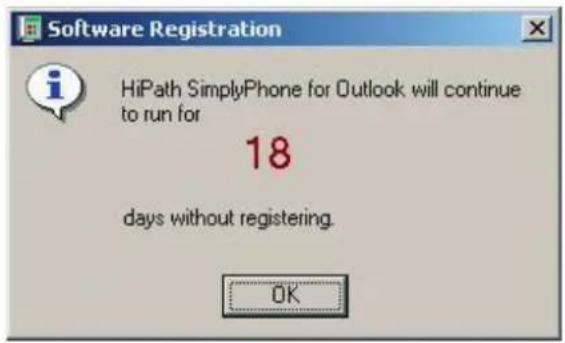
- The "Phone Line" dialog appears. Select the TAPI line for TAPI 120/170 and the Simply-Phone user ID for CAP V2.0/3.0 (consult your administrator) and click OK.

- If you are prompted to enter a password, click Change Password. Enter the default password (ask your administrator) and then enter your own password twice. Confirm with OK.
- SimplyPhone starts up and can be used. For information on using the program, refer to the operating manual or consult the online help.
- If a specific client requires CMC dialing, select the option Use Client Matter Codes in the context menu under Settings I Register CMC. You must restart the Outlook client to apply this change.
Installing SimplyPhone for Outlook
Installing the driver and software in a third-party environment
3 Partner identification service
This chapter provides information on the following topics:
- Importance of installation
- Configuring a user and mailbox
- Assigning local rights
- Installing on a server
3.1 Importance of installation
The partner identification service must be installed on the server to ensure high-speed access to global address books or public Exchange contact folders for partner identification. We recommend using a partner identification service to speed up partner identification in address books with over 1000 entries.
If the service is used by clients, the name of the server PC must be entered in the SPCr subfolder in the configuration files on the relevant client PC.
3.2 Configuring a user and mailbox
3.2.1 LAN domain controller: Windows 2000 Server/Windows Server 2003 and Exchange 5.5
Configuring the domain user account
Set up a user account with normal user rights on the LAN domain controller. This account is given the name
Partner identification service
Configuring a user and mailbox
Configuring the mailbox on the Exchange Server
- Configure a mailbox. We will refer to it below as
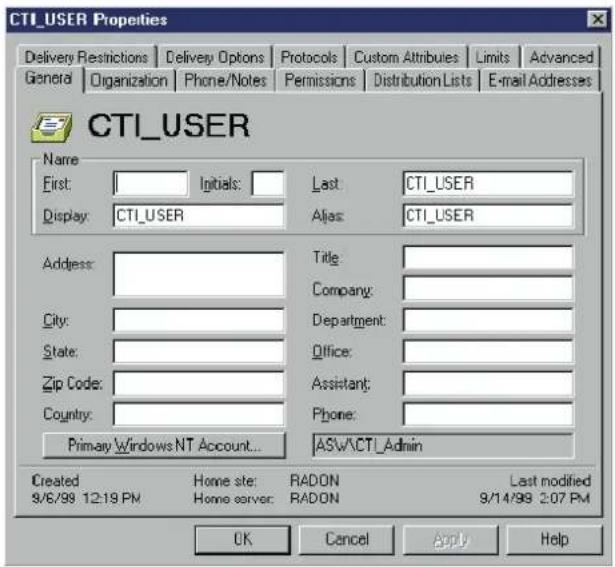

3.2.2 LAN domain controller: Windows 2000 Server/Windows Server 2003 and Exchange 2000/Exchange 2003
Configuring a domain user account and mailbox

User administration is identical in Windows 2000 Server and Exchange 2000 or Windows Server 2003 and Exchange 2003. Consequently, the configuration of a domain user and an Exchange mailbox is performed in a single step.
- Click the option Configure Exchange Mailbox to configure the domain user and set up the user
3.3 Assigning local rights
The assignment of local rights differs depending on the operating system (Windows 2000 Server or Windows Server 2003) used by the PC where you want to run the partner identification service.
3.3.1 Partner identification service under Windows 2000 Server/Windows Server 2003
Assigning NT rights
- Log on to the PC where you want to install the partner identification service.
- Select Control Panel | Users and Passwords to switch to user administration.
- Click Add to enter the user
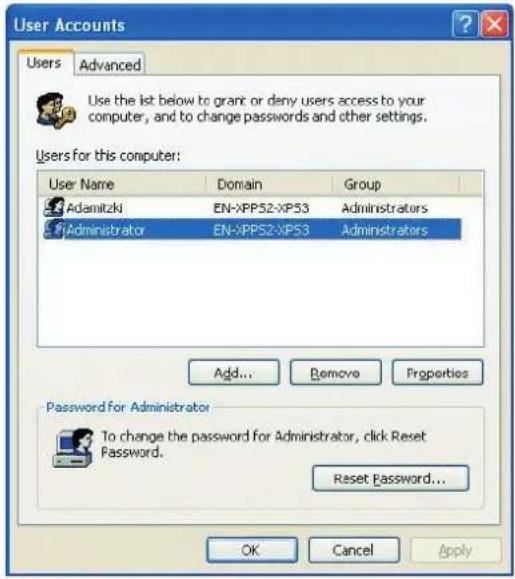
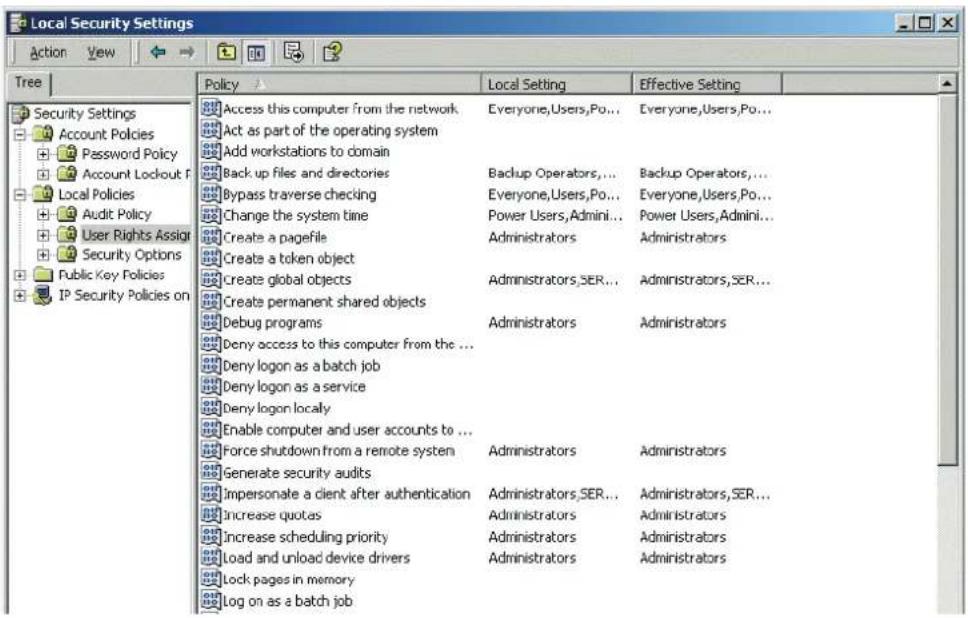
- In the Control Panel, click the Administrative Tools icon to assign the Log on as service right to
- Activate the icon Local Security Guideline.
- Open the Local Policies folder in the Local Security Settings window and mark the folder User Rights Assignment. Double-click the icon Logon as Service.
A dialer appears in the right window pane for user selection; use it to select the user
Partner identification service
Assigning local rights
Configuring an Exchange profile
- Log on as user

Check that the Microsoft Exchange Server information service has been installed. If not, install it. One way of doing this is to install Outlook.
- Configure an Exchange profile with the mailbox
To do this you must open the Mail icon in the Control Panel.
- Enter the profile as a default profile so that it can be used automatically by the Simply-Phone Partner Identification service.

Modify the SP\_Inst.ini file
The following changes are needed in the SP_Inst.ini file in section [General] for installation under Windows 2000 Server/Windows Server 2003:
ExchangeUseDynamicProfile=1
ExchangeMailboxServer=<ServerName>
Exchange Mailbox=<CTI_ADMIN> (in Exchange 2000, Exchange 2003)
Exchange Mailbox=<CTI_USER> (in Exchange 5.5)
The partner identification service can also be used for contact retrieval in an enhancement. In addition to data required for partner identification, additional information, such as, the company and an address, is stored for this function. This can be used, for example, to search for contacts in public folders (see Section 2.2.7, "Configuring additional data sources").
File SP_Inst.ini, section [PARTNER_IDENTIFICATION]
CRExtendedAttributes=1
3.4 Installing on a server

Installation is identical under Windows 2000 Server and Windows Server 2003.
Installing a service
You need an ID with administrator rights to perform installation.
- Start the Setup.exe program in the folder
Partner Identification Service 4.0. - Enter the data on your telephone system. This helps Partner Identification Service 4.0 perform correct number conversion.
- Now enter the account name
\CTI_Admin and the password.
Partner identification service
Installing on a server

The SimplyPhone Partner Identification service runs under this account. In other words, this account is used to import the server address books.
Starting a service
SimplyPhone Partner Identification appears in the service overview (Control Panel I Services).
- Start the SimplyPhone Partner Identification service.
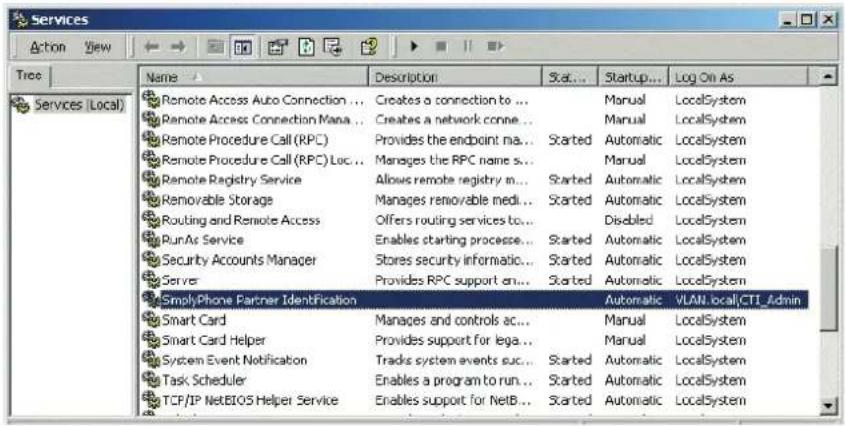
The database is immediately configured for partner identification the first time it is started; this can take a few hours if the data volume is very large. The components for partner identification are then started and the service can now be used by the clients.
- If the SimplyPhone Partner Identification service does not appear in the list of services, it can be registered manually. To do this, enter the
\CRIMmgr.exe /I in the Run... screen and click OK.

Then select the service SimplyPhone Partner Identification in the service overview and right-click Properties.
In the dialog that appears, set the start type to automatic and log on as local system account. Close the dialog with OK.
-
If the service cannot be started the first time, select Start I Programs I Siemens HiPath CTI and click the option Update Partner Identification. Updates can take a few hours if the data volume is very large.
-
Try starting the service again once the progress bar has finished.
3.4.1 Uninstalling the software
Uninstallation is performed under Control Panel I Add/Remove Programs.
Partner identification service
Installing on a server
3.4.2 Warnings in Outlook
Problem description
Microsoft has issued an update for Outlook 2000 with enhanced security features for greater protection against virus attacks and the like. This product is called Outlook 2000 Update SR1: Extended E-mail Security. When using this application or else Outlook XP or Outlook 20003 which incorporate these security features, Outlook displays warnings whenever an application tries to access address data (for example, in the contacts). But this is exactly what the partner identification service is designed to do!
Solution
To solve this type of problem, Microsoft created a way to modify the security settings for Outlook. This, however, is subject to the following restrictions:
- Outlook is operated with Exchange Server
- The user employs a profile with which incoming e-mails are routed either to the Exchange mailbox or an offline folder (.ost file).
The security settings cannot be modified, therefore, if the user employs another mail server or if he or she uses a profile with personal folders (.pst file). For more information on modifying the security update, go to:
http://www.microsoft.com/office/ork/2000/journ/OutSecUpdate.htm
To change the security settings, the administrator must create a specific public folder on the Exchange Server and output a specific Outlook form.
A preconfigured Outlook form can be found in the same folder as this document.
A set of step-by-step instructions follows.
Changes on the Exchange Server
To carry out these changes, you must have appropriate Exchange Server rights.
- Log on to Exchange Server with Outlook 2000, Outlook XP or Outlook 2003.
- Check if there is a folder named Outlook Security Settings in the root of all public folders. If not, generate it. Set the rights for this folder in such a way that all users have read authorization for it.
- If the folder Outlook Security Settings already exists, check if it contains an object with the subject Default Security Settings.
If so, proceed as follows:
-
Open the Default Security Settings object. Click the Programmatic Settings tab. Set the following lines to Automatically Approve:
-
When sending items via Outlook object model
-
When accessing the address book via CDO
– When accessing address information via CDO -
Close the form and confirm the memory prompt with Yes.
If not, proceed as follows:
- Then open the file Default Security Settings.oft in the Security folder in Windows Explorer. You are then prompted to select an Outlook folder. Select the folder Outlook Security Settings.
- In the open form, select the entry Publish Form under Forms in the Tools menu. Set the folder Outlook Security Settings in the drop-down list at the upper edge of the window. Enter the following in the field Display Name: Outlook Security Form. Click Publish.
- Close the form and acknowledge the memory prompt with Yes.
Checking
Check the following registry key on the client: HKEY_CURRENT_USER\Software\Policies\Microsoft\SecurityCheckAdminSettings. This key must be set to 1 so that the default security settings work as described above.
Partner identification service
Installing on a server
4 Troubleshooting/FAQ
This chapter provides information on the following topics:
- Licensing errors
●No response from SimplyPhone for Outlook component
●Partner identification not working - Calling only possible from personal contacts
- Outlook stops responding
4.1 Licensing errors
The license server is inaccessible
SimplyPhone cannot go into operation if a CLA is not found during initial startup. Check the IP address configured or the IP port of the CLA.
License detection error
An error was detected when performing licensing with HiPath License Management. Check the connection to the CLS or the MAC address (registration key).
4.2 No response from SimplyPhone for Outlook component
If one or more of the program components in SimplyPhone for Outlook stops responding, you can close all of the SimplyPhone for Outlook processes one by one.
To do this, start the program CInTasks.exe. All SimplyPhone for Outlook tasks are removed following program execution. To start SimplyPhone for Outlook, exit Outlook and start Outlook once again.
Troubleshooting/FAQ
Partner identification not working
4.3 Partner identification not working
This can have several causes. Proceed as follows:
– Ensure that the phone number in your contacts is saved in canonical format.
- Check the telephony applet to see if the current location contains the correct data. In particular, the name of the location must contain the main number of the telephone system.
4.4 Calling only possible from personal contacts
The restriction may be caused by the fact that you are operating Outlook in Internet Mail Only mode.
To change e-mail support
- in Outlook 2000, select the option Corporate or Workgroup under Tools | Options | Mail Delivery | Reconfigure Mail Support... and click Next.
- in Outlook 2003 and Outlook XP select the menu Tools | Options | Mail Setup | E-mail Accounts
Follow the on-screen instructions.
4.5 Outlook stops responding
If Outlook stops responding and the program cannot be closed in the usual manner, you can also close the Outlook task manually.
Press the keys simultaneously on your keyboard (in Windows 2000: select Task Manager), open the Close Application window, choose the entry Outlook from the list, and click End Task.
4.6 Increasing performance by deactivating features
Certain features can be deactivated as required to accelerate workflows under Outlook with SimplyPhone for Outlook.
Right-click the SimplyPhone for Outlook phone icon on the windows taskbar to display a context menu. Select Settings. In the General tab, you can change two default settings in the "Command Bar (Outlook restart mandatory)" field.
- Activate the "Show Command Bar in Explorer only" option.
If this option is activated, the SimplyPhone for Outlook toolbar is only displayed in the main Outlook window. This increases performance.
Outlook must be restarted for this change to take effect.
- Deactivate the option "Status Indication of Button 'Call Initiation'".
If this feature is active, partner identification is started in the background when a user selects a mail. The "Call Initiation" button 🔔 is activated if the system identifies the partner. Deactivating this function increases performance.
Outlook must be restarted for this change to take effect.
Troubleshooting/FAQ
Increasing performance by deactivating features
5 Appendix
This chapter provides information on the following topics:
- Program architecture
- Configuring telephony data
- Syntax of the ini files
●Syntax of the registry entries
-Configuration file syntax - Command line switch
●Product integration
●List of abbreviations/Glossary
5.1 Program architecture
This chapter tells you about the client/server architecture used by SimplyPhone for Outlook and how the individual components are linked.
5.1.1 Integration with Outlook/Exchange
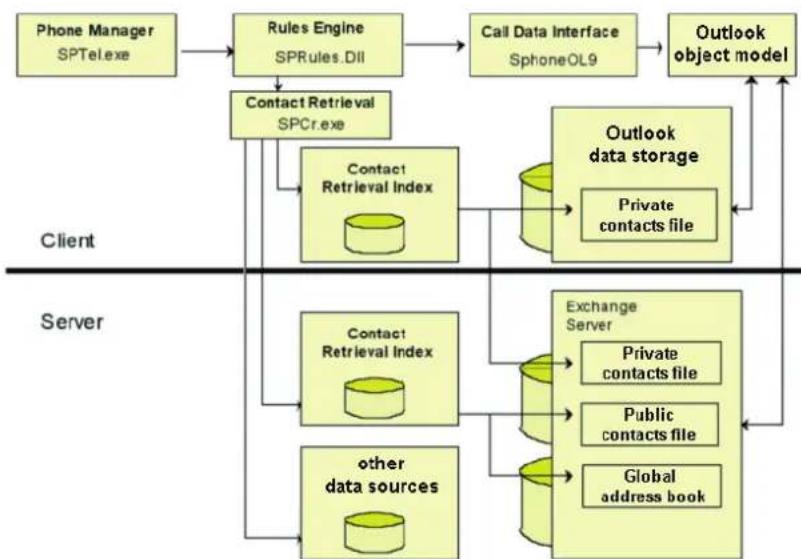
The key component is the Outlook add-in. This combines call management and paging in a standard Outlook icon bar.
flowchart
graph TD
    A["Phone Manager SPTelexe"] --> B["Rules Engine SPRules.DII"]
    B --> C["Call Data Interface SphoneOL9"]
    C --> D["Outlook object model"]
    D --> E["Contact Retrieval SPCr.exe"]
    E --> F["Contact Retrieval Index"]
    F --> G["Outlook data storage"]
    G --> H["Private contacts file"]
    H --> I["Exchange Server"]
    I --> J["Public contacts file"]
    J --> K["Global address book"]
    K --> L["other data sources"]
    L --> M["Contact Retrieval Index"]
    M --> N["Client"]
    style A fill:#d4edda,stroke:#333
    style D fill:#d4edda,stroke:#333
    style I fill:#d4edda,stroke:#333
    style M fill:#d4edda,stroke:#333
Appendix
Program architecture
The Phone Manager (SPTel.exe) recognizes the relevant telephony events and passes them on to the Rules Engine (SpRules.dll).
The Rules Engine consults the local Contact Retrieval Index server via the socket protocol LDAP and attempts to find data, such as the ID of its Outlook contact, relating to the caller on the basis of the telephone number.
If a remote CRI service which provides the relevant data from the public contact folders and the global address book as an index is available and has been configured, it is also used to identify the partner and other LDAP servers can be used.
The Rules Engine opens up the call dialog and/or uses the call data interface to consult the Outlook Object Library and requests Outlook to create and save objects or to send messages.

flowchart
graph TD
    A["Contact Retrieval Index"] --> B["CRI server CRISvr.exe"]
    A --> C["CRI manager CRIMngr.exe"]
    A --> D["Index generator"]
    C --> D
    D --> E["Outlook/Exchange data storage"]
5.1.2 Partner identification
CRI Server
CRISvr.exe is an LDAP server, which contains data which is extracted from the contact files of Outlook/Exchange or from the global Exchange address book. Its function is to make this data accessible via indexed telephone number entries so that a high-performance search via telephone numbers is possible.
CRI Manager
The CRISrv is first loaded and is checked against the data in Outlook/Exchange periodically by the Contact Retrieval Index Manager (CRIMngr.exe). The user can specify for the CRI Manager on the client whether the comparison should only be triggered manually or whether it should take place under certain conditions when SimplyPhone for Outlook starts up. (Partner Identification tab in the Settings dialog). The CRI Manager on the server side is installed as an NT service that is started automatically when the PC boots. It starts CRISrv.exe itself. Comparison of the data of the CRISrv with the Exchange data by the CRI Manager is time-controlled.
Appendix
Program architecture
When comparing the data, the CRI Manager scans the contact folder in Outlook/Exchange or the global address book via the ActiveX interface "CDO" and writes the relevant data to a file CRIData.txt. It then calls up the component CRISvrCt.exe, which uses this data to generate indices and prepares the data for CRISvr. It then stops CRISvr.exe, updates its database and then reboots CRISvr. During this phase the CRI server is unavailable for partner identification for a short time (a few seconds). The intermediate file CRIData.txt is then deleted.

You can prevent the temporary file CRIData.txt from being deleted during updating, for example, for troubleshooting. You must set the registry entry UpdateSave-CRIData=True for this; for more information, see Page 5-27.
5.1.3 Components and processes
All of the necessary processes are started and finished by the Outlook add-in. The individual processes that should be started or finished can be controlled via the registry (Registry entry startup, see Section 5.3.1, "SP_Inst.ini of the client component"). Typically, the dialer, the Contact Retrieval Manager and the Inbox Manager are started.
Outlook add-in
The file SphoneOL9.dll is registered during the installation process as an Outlook COM add-in and runs in the processing area of Outlook.
Call Control Manager
The Call Control Manager is implemented as the component SPTel.exe. It is used as a COM server by the Outlook add-in, the dialer, and the address book.
Dialer
The Dialer is implemented in the component Ctalkp.exe. The Rules Engine SPRules.dll also runs in its processing area.
Address book
The address book is implemented as the component SphoneAB.exe. It is called up via COM by the dialer and the Outlook add-in.
Contact Retrieval Manager
The interaction of the components CRIMngr.exe, CRISvr.exe and CRISvrCt.exe is described above under Architecture.
Contact Retrieval Client
The SPCr.exe process executes all LDAP accesses for paging and for partner identification both on the local and the remote CRISvr, as well as on the LDAP address books (Exchange global address book and Siemens Corporate Directory).
If a data source configuration file (.cfg) is used, SPCR checks if port 4999 is used. In a terminal server environment configuration (TerminalServer=TRUE), this port number is replaced by the assigned port number (CRILdapPort). If an assigned port number is not found, the default port number 4999 is assigned.
The Contact Retrieval Client is used by the address book, the dialer, the Rules Engine and the Inbox Manager.
Inbox Manager
The Inbox Manager SPOMEvnt.exe regularly checks the inbox for entries that have to be converted into journal or job entries on the basis of the user settings.
PopUp Manager
The PopUp Manager SPPopUp.exe controls caller pop-up display at the mouse pointer.
Reschedule
Reschedule is activated with SPReschedule.exe. The "Reschedule" icon then appears on the "SimplyPhone for Outlook" toolbar and in the dialer. The icon activates as soon as a task or journal item is selected.
Team Assistant (for third-party environment only)
The Team Assistant is activated with SPTeam.exe. The Team Assistant appears as a separate window that can also be displayed as a desktop bar. You can enable or disable automatic Team Assistant appearance on startup with an option under Settings I General.
A team can contain up to 20 members. You must set up a separate TAPI line with the relevant TAPI Service Provider (for example, TAPI170, CAP V2.0, CAP V3.0) for each team member. SimplyPhone detects the TAPI lines configured on startup and automatically generates a team member from each line.
To use the Team Assistant, you need a valid HiPath License Management license for third-party TAPI. When operating with CAP V2.0/V3.0, valid CAP licenses are needed for every monitored line.
Appendix
Program architecture
Example:
A team of three persons (A,B,C) is using the Team Assistant. Member A uses a line and has access to B and C over the Team Assistant. Member B uses a line and can access A and C over the Team Assistant, member C uses a line and can access A and B. In total, three valid CAP licenses are needed.
TAPI 170 does not differentiate between licenses for open and monitored lines. Every team member needs a TAPI 170 license in this case.
When operating with CAP V2.0/3.0, you need a password to access a TAPI line. You are requested to enter this password at the first access attempt.
5.2 Configuring telephony data
5.2.1 Overview of TAPI functionality
A TAPI Service Provider that supports TAPI V2.0 (or higher) is required to run SimplyPhone for Outlook. SimplyPhone for Outlook has been released for use with the following providers:
- 1st Party TAPI
- CallBridge Collection V2.0 (Callbridge TA/TU (CorNet TS) V2.0, CallBridge IP V2.0)
- Callbridge TA/TU (CorNet WP) V2.0
– Callbridge for Desktop V1.45 (CorNet WP Hicom 300 US R6.5, 6.6) - optiClient 130 V4.0
-3rd Party TAPI
- HiPath CAP V2.0
- HiPath CAP V3.0
- TAPI 120 V2.0
- TAPI 170 V2.0
Appendix
Configuring telephony data
5.2.2 System requirements for functionality
The telephony functions are available in various different circumstances. The functions that can actually be executed depend on which functions the telephony service provider indicates as being executable – depending on the current status of the telephone. The following table shows which functions are basically available from the various providers.
| Telephony function | HiPath CAP V2.0/V3.0HiPath 4000 | HiPath CAP V2.0/V3.0HiPath 3000/5000 | CallBridge Collection V2.0HiPath 3000/5000 | CallBridge Collection V2.0HiPath 4000 | CallBridge TATU (CorNet WP) V2.0 HiPath 40001 | CallBridge for Desktop V1.45Hicom 300 US | TAPI 170 V2.0 | TAPI 120 V2.0 | optiClient 130 V4.0 |
| Call selected or current item x x x x x x x x | x x | ||||||||
| Accept Call x x x x x x x x x | |||||||||
| End Call | x x | x x x x | x x x | ||||||
| Consultation | x x | x x x x | x x | ||||||
| Toggle | x | x | x | x | x | x | x | x | |
| Transfer Call | x x | x x x x | x x | ||||||
| Blind Transfer | x | x | x | x | x | x | x | ||
| Redirect Incoming Call | x x | x x | |||||||
| Conference | x x | x x x x | x x | ||||||
| Add To Conference | x x | x x x x | x x | ||||||
| Remove From Conference | x x | x | x | 2 | x | x | x | ||
| Hold Connection | x3 | x | x4 | x | x | x | |||
| Unhold | x x | x | 5 | x6 | x | x | x | ||
| Call Back | x | x x x x | |||||||
| Camp On | x7 | x | x | x | |||||
| Intrude | x x x | x | |||||||
| Pick up Call Within Group | x x x | x x x | |||||||
| Telephony function | HiPath CAP V2.0/V3.0HiPath 4000 | HiPath CAP V2.0/V3.0HiPath 3000/5000 | CallBridge Collection V2.0HiPath 3000/5000 | CallBridge Collection V2.0HiPath 4000 | CallBridge TA/TU (CorNet WP) V2.0 HiPath 40001 | CallBridge for Desktop V1.45Hicom 300 US | TAPI 170 V2.0 | TAPI 120 V2.0 | optiClient 130 V4.0 |
| Direct Pickup x x x x | |||||||||
| Park Connection x x x | |||||||||
| Unpark | x x x | ||||||||
| Direct Park | x x x | ||||||||
| Direct Unpark | x x x | ||||||||
| Forward Calls | x | x x | x x x | x x | |||||
| Client Matter Code | x | x |
1 Function information regarding Cornet WP: right of modification reserved.
2 Only the last user can be removed from a conference.
3 For analog telephones and for key system (multi-line) telephones only, provided the "Manual Hold" feature is configured for the telephone configured.
4 Internal: in consultation; external: on line key.
5 External: yes; internal: with lineDrop – back to waiting party.
6 Only in the case of call handles in ONHOLDPENDTREANSFER or ONHOLDPENDCONF state.
7 Automatically to Hicom 150.
5.2.3 Location data for telephony
SimplyPhone for Outlook uses the location data that is specified as the current location in the Control Panel's telephony applet.
In this regard, the CO number of the telephone system must be contained in the name of the location as a partial character string.
By adding (UTT) to a location name, it is possible to stipulate that the TAPI function Line-TranslateAdress be used for conversion from the canonical number format to the dialable number format for outgoing calls (instead of the SimplyPhone for Outlook-specific algorithm).
Appendix
Configuring telephony data
If you add (CMF) to a location name, a right-aligned comparison is performed between the phone number supplied by the telephone system and the phone numbers in the address data for partner identification in incoming calls.
If you add (POL=x) to a location number, 1 is the only country code that works (for example, USA, Canada). x can be either 1, 2 or 3. In the case of incoming, internal call, the last digits of the prefix are not considered for partner identification.
If you add (DMC) to a location number, 49 (Germany) is the only country code that works. This means that for partner identification, the system only searches for numbers in canonical format in the case of incoming calls; it does not also search for extensions (Disable Multivalue Compare).

These parameters can be set in the file locations.ini prior to installation (see Section 5.3.2, "Client component Locations.ini").
5.2.4 Configuring the TAPI line
The Select Line entry in the context menu of the telephone icon in the task bar opens up a dialog for selecting a TAPI line.
The dialog also contains a Line... button, which brings you to the service provider's configuration dialog, as well as a Location... button, which brings you to the configuration dialog for location data.
5.2.5 Configuring tie lines
The Enter Fixed Lines entry in the context menu of the telephone icon in the task bar opens up a dialog for editing fixed lines. These are required for partner identification so that callers who use fixed lines can also be identified.
Fixed lines are saved in the registry under HKEY_CURRENT_USER, in other words user-specifically. But they can also be edited globally for each installation. If data is copied from the registry branch HKEY_LOCAL_MACHINE to HKEY_CURRENT_USER after installing an upgrade, any user-specific fixed lines that already exist are retained.
5.3 Syntax of the ini files
The most important entries in SP_inst.ini and locations.ini are explained below. For more explanations, refer to the two ini files (in the SimplyPhone installation directory).
5.3.1 SP\_Inst.ini of the client component
| Section Entry Description | ||
| [GENERAL] | _KeysCopied=4100 | During installation all registry entries are written to the HKEY_LOCAL_MACHINE branch. SimplyPhone for Outlook copies user-specific entries from there to the HKEY_CURRENT_USER branch at startup if the _KeysCopied under HKEY_LOCAL_MACHINE is greater than the value under HKEY_CURRENT_USER. Thus by raising the value in SP_Inst.ini modified values can come into effect for all users following a new installation. Default: 4100 |
| [GENERAL] | Location | Name of a section in the file Locations.ini. Suppresses the dialog for selecting a location during installation. |
| [GENERAL] Install | Folder Default value for the | folder in which the application is installed. |
| [GENERAL] | Startup | List of processes that activate when Outlook starts up. Separated by a semicolon. Default: cTalkp.exe; CRIsvr.exe; SPOMEvnt.exe |
| [GENERAL] | Language={DE|EN} | This entry makes it possible to run the product using an interface language other than that of the operating system. If this value is left blank, the language of the operating system is applied. |
| [GENERAL] CRIServer | Version={2|3} | Version of the open LDAP server:2: Client version3: Partner identification service versionDefault: 2 |
| [GENERAL] ShowDialog | Welcome={0|1} | This switch controls whether or not the welcome dialog is displayed during installation. Default: 1 |
Appendix
| Section Entry Description | ||
| [GENERAL] ShowDialogLicense={0|1} | This switch controls whether or not the li-cense dialog is displayed during installation. Default: 1 | |
| [GENERAL] ShowDialogDestina-tion={0|1} | This switch controls whether or not the dia-log for entering the installation directory is displayed during installation. Default: 1 | |
| [GENERAL] ShowDialogExchange={0|1} | This switch controls whether or not the dia-log for selecting the Exchange Server is dis-played during installation. Default: 0 | |
| [GENERAL] ShowDialogGateway={0|1} | This switch controls whether or not the dia-log for entering the gateway numbers is dis-played during installation. Default: 0 | |
| [GENERAL] ShowDialogReady={0|1} | This switch controls whether or not a dialog requesting confirmation for execution of the installation is displayed at the end of the se-quence of dialogs. Default: 1 | |
| [GENERAL] ShowDialogFinished={0|1} | This switch controls whether or not a mes-sage is displayed indicating that the installa-tion has concluded successfully. Default: 1 | |
| [DATA_SOURCES] CRConfigPath=USE_LOCAL | Network path for the configuration files. USE_LOCAL means: SPCr in the Simply-Phone installation path.means: SPCr folder is in the same path as Setup.exe.See Section 2.2.7 on page 2-19. | |
| [XPRESSIONS_450] | ShowDialog={0|1} This switch controls whether or not the dia-log for inputting the two digit sequences for integrating Xpressions450 is displayed dur-ing installation. If not, the values, which are specified further down in the sections [XPRESSIONS_450] or in the file Loca-tions.ini, are applied as are. Default: 1 | |
5.3.2 Client component Locations.ini
| Entry Description | |
| UserCountry Country code | |
| UserArea Area code | |
| UserNumber Main station number | |
| UserExternal Access code for national calls | |
| UserForeign Access code for international calls.Caution: this setting had a different meaning prior to version 2.02.In many cases, for example, 00 had to be entered here, but now only 0 is required. | |
| CRconfigFile Name of the configuration file of the data source | |
| XPRCallerNo End digit for listening to the Xpressions450 voice mailbox (for example, 1) | |
| XPRAccessNo Access number for the Xpressions450 voice mailbox (for example, 6400) | |
| ShortDial[n] Tie lines | |
| ShortDialEx[n] Further information on fixed lines | |
5.4 Syntax of the registry entries
After installation, the values remain in the registry under one of the keys HKEY_LOCAL_MACHINE\Software\Siemens\SimplyPhone
\Common\Settings
\Common\Settings\Telephony
\Entry\Settings
\Solutions\
\Solutions CallData
\Solutions\CallerIdentification
\Solutions\CPhoneOutlook
\Solutions\HLMData
\Solutions\Teambar
\TripelM
When SimplyPhone for Outlook starts up the user-specific values are copied to the HKEY_CURRENT_USER section of the registry if the ...\Common\Settings_KeysCopied value under HKEY_LOCAL_MACHINE is greater than the relevant value under HKEY_CURRENT_USER.
If values that were changed under HKEY_LOCAL_MACHINE are to become effective for all us-
Appendix
Syntax of the registry entries
ers, the value of _KeysCopied under HKEY_LOCAL_MACHINE has to be increased by 1. If you want to change registry entries by means of a new installation, this value can also be increased in the SP_Inst.ini file.

In the case of switches that can have one of the values True or False, the effect of the True setting is always described in the description column. Default settings are underlined.
The U column specifies how to proceed for this entry when copying registry entries from HKEY_LOCAL_MACHINE to HKEY_CURRENT_USER:
L: (Leave) entry is not copied
C: (Copy) entry is copied, overwrites old value if necessary
M: (Merge) entry is copied if the value has not yet been set
Entries marked with L are read during the runtime of HKEY_LOCAL_MACHINE, all other entries are read during the runtime of HKEY_CURRENT_USER.
Columns C and S show whether or not the entry is relevant to the client or the server.
5.4.1 Entries under Common\Settings
The following settings are taken from the locations.ini file during installation:
| Entry in file Entry in the registry | Description UCS | ||||
| ShortDial | ShortDial | The fixed lines are saved under these values. | M | X | |
| ShortDialEx | ShortDial Ex | The fixed lines are saved under these values. | M | X | |
The following entries are taken from the SP_Inst.ini file during installation:
| Entry in file Entry in the registry | Description U C S | ||||
| [GENERAL] _KeysCopied= | _KeysCopied=4100 | If this value is higher than the value of the same name in the registry under HKEY_CURRENT_USER, all relevant registry entries are copied from HKEY_LOCAL_MACHINE to HKEY_CURRENT_USER when Simply-Phone starts up. | C | X | X |
| [GENERAL] TerminalServer= | TerminalServer={True|False} | Runs in a terminal server environment if True is set. | L | X | |
| [GENERAL] MailTypeToI-gnore= | MailTypeToI-gnore= | Mail types that require a password for their contents to be read can be excluded from automatic analysis. Although you will not be prompted to enter a password when you select the mail, you cannot set up a call to the sender either. Mail types "SMIME" and "SECURE" are excluded by default. These values can be overwritten or enhanced by adding types in the following format: "type1|type2|type3|...". Any number of types can be entered and separated by "|". Type names can be entered at any position in the mail type. Silent installation is supported. | L | X | |
| [GENERAL] Lan-guage={DE|EN|} | Lan-guage={DE|EN|} | Interface language if it is not the same as the operating system language. | C | X | X |
| [GENERAL] InstallFolder= | InstallPath= | Installation directory | L | X | |
Appendix
Syntax of the registry entries
| Entry in file | Entry in the registry | Description | U | C | S |
| Startup= | Startup= | File name of the executable files that are to be started when the application starts up; these are separated by a semicolon. Default: cTalkp.exe; CRISvr.exe; SPOMEvnt.exe | M | X | |
| [TELEPHONY] TelProvider= | TelProvider= Class | names of the telephony systems to be used, separated by a semicolon (;). The following values are used: SPTel.Tapi: for any TAPI provider SPAtoXpr.Telephony: for HiPath Xpressions Outlook Extensions Basic | L | X | |
| [TELEPHONY] CMCEn-abled={0|1} | CMCEnabled={True|False} | Display setting dialog for CMC. C X | |||
| [TELEPHONY] CMCUse={0|1} | CMCUse={True|False} | Use CMC. M X | |||
| [TELEPHONY] CMCTagCode= | CMCTagCode= Tag to | identify the CMC code entries. Default: CMC: | C | X | |
| [TELEPHONY] CMCMu-alLift={0|1} | CMCMu-al-Lift={True|False} | The handset has to be lifted manually at the terminal in order to be able to dial the CMC code. | M | X | |
| [TELEPHONY] CMCPromprDura-tion= | CMCPromptDura-tion= | Timeout in seconds for the request to pick up the handset after dialing a number with CMC code. | M | X | |
| [TELEPHONY] CMCPause= | CMCPause= Pause be | before dialing the CMC code. Only implemented for international calls. | M | X | |
| [TELEPHONY] CMCTapi=1 | CMCTapi={True} | This value must be set to True for the CMC functionality to work correctly. | L | X | |
| [TELEPHONY] TelAdressing-Postfix= | TelAdressing-Postfix= | In the case of outgoing calls this character can be appended to the dialed number. (Mostly #, signals the end of the charac-ter string to the telephone system) | L | X | |
| [PARTNER_IDENTI FICATION] ProvideMailIn-dex={1|0} | ProvideMailIn-dex={True|False} | Provide index for the mail address as well when generating the Contact Retrieval In-dex. | L | X | X |
| Entry in file Entry in the registry | Description | U | C | S | |
| [PARTNER_IDENTIFICATION]ProvideOrigPhoneIndex={0|1} | ProvideOrigPhoneIndex={True|False} | When generating the Contact Retrieval Index, read the original telephone number and create as an index (this is used for SimplyPhone). | L | X | X |
| [PARTNER_IDENTIFICATION]OrigPhoneIn-dexField= | OrigPhoneIn-dexField= | Name of the field from which the original telephone number is to be read. | L | X | X |

The CMC-specific TAPI provider implementation is currently only available for CAP.
Advantage of TAPI Provider implementation: Works not only for HiPath 4000, but also for HiPath 3000 and Hicom 150.
Advantage of the SimplyPhone for Outlook implementation: CMC can also be used for devices where the handset must be lifted to initiate a call.
| Entry in file Entry in the registry | Description UCS | ||||
| CPhoneProvider=SPRules | Name of the ActiveX server, which implements the CPhone interface. | C | X | ||
| CphoneUseObjects={True|False} | Use Outlook contact folder or task folder as private address book or as callback list. | C | X | ||
| ProductName= Specifies | ifies the product name. L X | ||||
| Version= Specifies | the version of the SimplyPhone software installed. | L | X |
The following switches are not set during installation:
| Entry in file Entry in the registry | Description | |||
| TraceFileLength=Maximum length of the trace file (bytes).Must be greater than or equal to 100000 to be effective.Default: 10000000 (10 MB). | L | X |
The following entries are transferred directly after HKEY_Current_User:
Appendix
Syntax of the registry entries
| Entry in file Entry in the registry | D es c ri p t i o n U C S | ||||
| TraceFile={True|False} | Generates one or more trace files for fault analysis in the installation directory (for example, cp_trace.txt). | C | X | X | |
| TraceFileName= File name or path of the trace filecp_trace.txt. | C | X | |||
| TraceTimeMark={True|False} | Display time stamp in trace. C X | ||||
| GarbageCollection= | Time (in format "hh:mm") when all processes are closed and restarted (lasts approximately 10 - 90 seconds).If a time is not entered, the process is started at 00:00 by default. If "off" is entered, the process is deactivated. Silent installation is supported. | C | X | ||
| TraceLevel= One of the following values:0: NoLogging10: Error. Error: CreateObject, New, logon, logoff20: MiscErrors: Miscellaneous error: FileOpen, ..30: ComponentInitTerm ' Component Initialisation, Termination40: FormClassInitTerm ' Form, Class Initialisation, Termination50: FuncCallsEventProc' Function Calls, Event Procedures60: FuncCallsEventProcParams' Function Calls, Event Procedures: ParamIn, ParamOut, Result70: MethodCalls80: MethodCallsParams90: PropertyGetLetSet100: All | L | X |
5.4.2 Entries under Common\Settings\Telephony
These entries control the choice of enhanced telephony functions available.
| Entry in file Entry in the registry | Description UCS | ||||
| [TELEPHONY]EnableCall-back={0|1} | EnableCallback={True|False} | Enable the Call Back function. M X | |||
| [TELEPHONY]Enable-SwapHold={0|1} | Enable-SwapHold={True|False} | Enable the Consultation function. M X | |||
| [TELEPHONY]EnableTransfer={0|1} | EnableTransfer={True|False} | Enable the Transfer Call function. M X | |||
| [TELEPHONY]EnableRedi-rect={0|1} | EnableRedirect={True|False} | Enable the Redirect Incoming Call func-tion. | M | X | |
| [TELEPHONY]EnableBlind-Transfer={0|1} | EnableBlind-Transfer={True|False} | Enable the Blind Transfer function. M X | |||
| [TELEPHONY]EnableConfer-ence={0|1} | EnableConfer-ence={True|False} | Enable the Conference function. M X | |||
| [TELEPHONY]EnableAddToCon-ference={0|1} | EnableAddToCon-ference={True|False} | Enable the Add To Conference function. | M | X | |
| [TELEPHONY]EnableRemove-FromConfer-ence={0|1} | EnableRemove-FromConference={True|False} | Enable the Remove From Conference function. | M | X | |
| [TELEPHONY]EnableHold={0|1} | EnableHold={True|False} | Enable the Hold Connection function. | M | X | |
| [TELEPHONY]Enable-CampOn={0|1} | Enable-CampOn={True|False} | Enable the Intrude function. | M | X | |
| [TELEPHONY]EnableIn-trude={0|1} | EnableIntrude={True|False} | Enable the Camp On function. | M | X | |
Appendix
Syntax of the registry entries
| Entry in file Entry in the registry | Description UCS | ||||
| [TELEPHONY]EnableGroup-Pickup={0|1} | EnableGroup-Pickup={True|False} | Enable the Pick up Call Within Group function. | M | X | |
| [TELEPHONY]Enable-Pickup={0|1} | Enable-Pickup={True|False} | Enable the Direct Pickup function. M X | |||
| [TELEPHONY]EnablePark={0|1} | EnablePark={True|False} | Enable the Park Connection function. M X | |||
| [TELEPHONY]EnableDirect-Park={0|1} | EnableDirect-Park={True|False} | Enable the Direct Park function. M X | |||
| [TELEPHONY]EnableForward={0|1} | EnableForward={True|False} | Enable the Forward Calls function. M X | |||
5.4.3 Entries under Entry\Settings
These entries affect the Dialer. The following entries are taken from the SP_Inst.ini file during installation:
| Entry in file Entry in the registry | Description UCS | ||||
| [DIALER]OnTop={1|0} | gvAlwaysOnTop={True|False} | The Dialer is always on top of all other windows and is therefore always visible. The value False is only effective if gvAppWindow=True. | M | X | |
| [DIALER]Caption={1|0} | gvAppWindow={True|False} | The Dialer has a title bar. M X | |||
| [DIALER]Callback={1|0} | gvCallback={True|False} | The Dialer displays the icon for the call-back list. | M | X | |
| [DIALER]Close={1|0} | gvCloseBtn={True|False} | Close button is displayed. If this switch is set to False, the Exit entry is added to the menu for the last numbers dialed. | M | X | |
| [DIALER]Recent-Menu={1|0} | gvLRUEnabled={True|False} | The menu for the last numbers dialed is displayed. | M | X | |
| [DIALER]Search={1|0} | gvSearch={True|False} | The input field is displayed. M X | |||
| [DIALER]AdrBook={1|0} | gvCPhoneAB={True|False} | The icon for the personal address book is displayed. | M | X | |
| [DIALER]QuickMenu={1|0} | gvQuickDial={True|False} | The Quick Dial Menu is displayed. M X | |||
| [DIALER]DisplayDial-er={1|0} | gvDisplayDial-er={True|False} | The Dialer is displayed. This entry is always written when exiting SimplyPhone for Outlook. | M | X | |
| [DIALER]InboundPop-up={1|0} | gvInboundPop-up={True|False} | The Dialer is opened automatically with an incoming call. | M | X | |
| [DIALER]DisplayName={1,0} | gvDisplayName={True|False} | Enables/disables partner identification. | M | X | |
| [DIALER]QuitOnOutOfService={1|0} | QuitOnOutOfService={True|False} | Exit Dialer if the telephony provider signals OutOfService. | L | X | |
| [DIALER]Telephony={1|0} | Telephony={True|False} | Display telephony functions. | M | X | |
Appendix
Syntax of the registry entries
| Entry in file Entry in the registry | Description UCS | ||||
| [DIALER] CallerPopupsS-how={1|0} | CallerPopupsS-how={True|False} | The caller pop-up is displayed at the mouse pointer. | M | X | |
| [DIALER] CallerPopu-pHideon-Click={1|0} | CallerPopupHide-onClick={True|False} | The caller pop-up at the mouse pointer disappears when you click it. | M | X | |
| [DIALER] CallerPopupTimeout= | CallerPopupTime-out=30 | The caller pop-up disappears after this time period (0=never). | M | X | |
The following entries are written during installation and cannot be configured:
| Entry in file Entry in the registry | Description UCS | ||||
| gvExternalJournal=True | External Call Manager is opened as OLE Automation Server. | M | X | ||
| ShowSystemTrayIcon=True | The telephone icon is displayed on the task bar. | M | X |
The following entries are not written during installation:
| Entry in file Entry in the registry | Description UCS | |||
| PhoneNumbers= Name of the TAPI line which is used by SimplyPhone for Outlook. If nothing has been entered and if more than one line has been configured, the line to be used is asked at startup. The name of the selected line is then written to the registry. | L | X |
5.4.4 Entries under Solutions\CallData
These entries affect the call dialog. The following entries are taken from the SP_Inst.ini file during installation:
| Entry in file Entry to registry Description U C S | |||||
| [COMMAND_BARS]CallDataDialog | CDCommandBars= | List of interface providers - separated by semicolons - that make up the function bar in the Call Data dialog, e.g.:SPTel.Telephony; SPhoneAB.ContactRetr | L | X | |
The following registry entries cannot be configured via the installation.
| Entry in file Entry in the registry | Description UCS | ||||
| CallDataProvider | Class name of the IcallData interface implementation to be used by the Rules Engine:SPhoneOL9.CallData | L | X |
Appendix
Syntax of the registry entries
5.4.5 Entries under Solutions\CallerIdentification
The following entries are taken from the SP_Inst.ini file during installation:
| Entry in file Entry in | the registry | Description UCS | |||
| [PARTNER_IDENTIFICATION]UpdateFrequen-cy=Never|OnStart|Every1Day|Every1Week | UpdateFrequen-cy=Never|OnStart|Every1Day|Every1Week | Times at which the Contact Retrieval In-dex is updated with the data from Outlook/Exchange. | M | X | |
| [PARTNER_IDENTIFICATION]ContactsLo-cal={1|0} | ContactsLocal={True|False} | Use local contact folder for partner identi-fication. Only available on the client side. | L | X | |
| [PARTNER_IDENTIFICATION]ContactsRemote-Mailbox={1|0} | ContactsRemote-Mailbox={True|False} | Use private contact folder in the user's Exchange Mailbox for partner identification.Only available on the client side. | L | X | |
| [PARTNER_IDENTIFICATION]ContactsGlobal-AB={1|0} | ContactsGlobal-AB={True|False} | This entry is only intended for the partner identification service.Use global Exchange Dialers (mailbox ac-counts) for partner identification. | L | X | |
| [PARTNER_IDENTIFICATION]ContactsPublic={1|0} | ContactsPublic={True|False} | This entry is only intended for the partner identification service.Use public contact folders for partner iden-tification. | L | X | |
| Entry in file Entry in the registry | D es c ri p t i o n U C S | ||||
| [ PARTNER IDENTIFICATION]Supervi-sorInterval={Number|Schedule} | Supervi-sorInterval={Number|Schedule} | Number: frequency of the comparison between the Contact Retrieval Index and the Exchange data in minutes.Schedule: frequency of the comparison between the Contact Retrieval Index and the Exchange data according to the settings:hourly|every|[]equals time in 24-hour format Example: hourly|every|1:15|start|8:00|end|22:00ordaily|at|equals time in 24-hour format Example: daily|at|14:11orweekly||[]equals time in 24-hour formatequals mon, tue, wed, thu, fri, sat or sunExample: weekly|mon|7:30|sat|23:00 | L | X | |
| [ COMMAND_BARS]AddressBook | CRCommandBars= | List of interface providers - separated by semicolons - that make up the function bar in the address book dialog, e.g.:SPTel.Telephony | L | X | |
| [ DATA_SOURCES]CrConfigPath=USE_LOCAL | CrConfigPath= | Network path for the configuration files. If the .ini file contains the entry USE_LOCAL, the field in the registry remains blank and the local data in the installation directory's SPCR folder is used. If the field in the .ini file remains blank, the path for set-up.exe is entered in the registry. | L | X | |
Appendix
Syntax of the registry entries
| Entry in file Entry in the registry | Description UCS | ||||
| [GENERAL]Exchange Server DynamicPro-file={1|0} | ExchangeUseDynamicProfile={True|False} | Use a dynamic profile.Should be set to True for all operating systems released (Windows 2000 Server and Windows Server 2003). | X | ||
| [GENERAL]ExchangeMailboxServer | ExchangeMail-boxServer={True|False} | Name of the Exchange Server.Should be set to True for all operating systems released (Windows 2000 Server and Windows Server 2003). | X | ||
| [GENERAL]ExchangeMailbox | ExchangeMail-box={True|False} | Mailbox name of the account.Should be set to True for all operating systems released (Windows 2000 Server and Windows Server 2003). | X | ||
| CriLdapPortRange | for terminal server only.Defines the port range used by the dynamic port assignment, default range: 4999-5499. Syntax: input of start port and end port separated by semicolons for example, 4999;5999 | L | X | ||
The following entries cannot be configured for the installation.
| Entry in file Entry in | the registry | D es c ri p t i o n U C S | |||
| PathCRI={PathName} | Path of the folder for the CRI data and the cache data. | C | X |
The following entries are not written during installation:
| Entry in file Entry in | the registry | D es c ri p t i o n U C S | |||
| UpdateValue={Date} | Date of the last CRI comparison (is used in connection with UpdateFrequency). | X |
The following entries are transferred directly after HKEY_Current_User:
| Entry in file Entry in the registry | Description UCS | ||||
| UpdateSaveCRI-Data={True | False} | When the CRI is being updated, the intermediate product is written to a file CRIData.txt, which is deleted afterwards by default. You can use this switch to prevent this file from being deleted in order to be able to view the contents of the Contact Retrieval Index immediately. | M | X | X | |
| UpdateProfile= | Name of the current Exchange profile. This is saved so that a change in profile can be established and an automatic CRI update can be initiated. | X | |||
| CRISvrProcID= | Process ID of the running instance of CRISvr.exe. This is written to the registry at startup in order to be able to automatically exit and restart the process automatically. | X | |||
| CRILdapPort | This entry is written by SP. It defines the port currently used by the local CRI. | L | X |
5.4.6 Entries under Solutions\CPhoneOutlook
These entries affect the behavior of the Outlook integration SPhoneOL9.dll. The following entries are taken from the SP_Inst.ini file during installation:
| Entry in file Entry in the registry | Description | ||||
| [CALL_DATA]OnInboundCall={1|0}|} | OnInboundCall={True|False}|} | Open journal entry with incoming callsPossible values for:NOTHINGJOURNAL writeJOURNAL|DISPLAY open | L | X | |
| [CALL_DATA]OnInboundCall-Failed={1|0}|} | OnInboundCall-Failed={True|False}|} | Write task entry with unanswered incoming callsPossible values for:NOTHINGTASK writeJOURNAL write | L | X | |
Appendix
Syntax of the registry entries
| Entry in file Entry in the registry | Description UCS | ||||
| [CALL_DATA]OnOutbound-Call= {1|0}|} | OnOutboundCall={True|False}|} | Open journal entry with outgoing calls.Possible values for:NOTHINGJOURNAL writeJOURNAL|DISPLAY open | L | X | |
| [CALL_DATA]OnOutboundCall-Failed={1|0}|} | OnOutboundCall-Failed={True|False}|} | Write task entry with unanswered outgoing callsPossible values for:NOTHINGTASK writeJOURNAL write | L | X | |
| [CALL_DATA]OnPickupCall={1|0}|} | OnPickupCall={True|False}|} | In the event of indirect incoming calls, open message to original addressees.Possible values for:NOTHINGJOURNAL writeJOURNAL|DISPLAY openDRAFT Save draftMAIL sendMAIL|DISPLAY open | L | X | |
| [CALL_DATA]OnPickupCall-Failed={1|0}|} | OnPickupCall-Failed={True|False}|} | Executefor indirect incoming calls that were not answered.Possible values for:NOTHINGJOURNAL writeDRAFT Save draftMAIL send | L | X | |
| [CALL_DATA]OnMessagePick-up= {1|0} | OnMessagePikk-up={True|False} | E-mail messages via calls to the user, which were accepted by other users, are converted into journal entries/tasks in accordance with settings fordirect calls. | L | X | |
| [CALL_DATA]UseJournalServer={1|0} | UseJournalServer={True|False} | HiPath ComAssistant (formerly Simply-Phone for Web) is used. This can be activated or deactivated in theGeneraltab. | L | X | |
| [CALL_DATA]PollingInterval= | PollingInterval=5 | Waiting time in minutes for the Inbox Manager until the mailbox is scanned for messages that have to be converted. | L | X | |
| [COMMAND_BARS] Outlook | OLCommandBars List of interface providers - separated by semicolons - that make up the function bar in Outlook, e.g.: SPTel.Telephony;SPhoneAB.ContactRetr. | L | |||
| [CALL_DATA] OLStartAlwaysEnabled={1|0} | OLStartAlwaysEnabled={True|False} | Enable dialog at startup of Outlook. L X | |||
The following entries are not written during installation:
| Entry in file Entry in the registry | Description UCS | |||
| [CALL_DATA] OLStartAlways={1|0} | OLStartAlways={True|False} | Start Outlook with SimplyPhone for Outlook without dialog prompting. | X | |
| LastScanDate Date of the last e-mail scanned by the Inbox Manager. | L | X |
Appendix
Syntax of the registry entries
5.4.7 Entries under Solutions\HLMData
These entries concern the Customer License Agent (CLA). The following entries are taken from the SP_Inst.ini file during installation:
| Entry in file Entry in the registry | Description UCS | ||||
| CLAIpAddress CLAIpAddress=127.0.0.1 | IP address of the CLA. C X | ||||
| CLAIpPort CLAIpPort=61740 Port number of the CLA. C X | |||||
| CLAConnection Retries | CLAConnection Retries=3 | Connection retries with the CLA. | C X | ||
| CLAConnection Timeout | CLAConnection Timeout=5000 (5s) | Timeout for CLA connection retry in ms. | C X | ||
5.4.8 Entries under Solutions\Teambar
These entries contain the team configuration and are generated by the Teambar.
5.4.8.1 Entries under Solutions\Teambar\Member0
Contains the general team configuration.
| Entry in file Entry in the registry | Description UCS | |||
| Members Number of configured members. X | ||||
| Docking Values:1 = docked window, above2 = docked window, below3 = docked window, left4 = docked window, right5 = desktop window | X | |||
| Hide Values:True= docked window is hiddenFalse= docked window is not hidden | X |
5.4.8.2 Entries under Solutions\Teambar\MemberN
Contains the configuration for the individual members; N is the member's consecutive number.
| Entry in file Entry in the registry | Description UCS | |||
| LineName | Name of the team member's TAPI line. | X | ||
| AliasName | Name displayed for the team member. | X |
Appendix
Configuration file syntax
5.4.9 Entries under TripleM
The following entries are taken from the SP_Inst.ini file during installation:
| Entry in file Entry in the registry | Description UCS | |||
| XPrAccessNo XPrAccessNo - X | ||||
| XPRCallerNo XPRCallerNo - X |
5.4.10 Entries under Common\LRU
The numbers for redial are stored here.
5.4.11 Entries under Common\QuickDial
The quick dial numbers are stored here. To edit the quick dial numbers, select Enter Quick Dial Numbers from the program group in the Start menu.
5.5 Configuration file syntax
5.5.1 File SPCr\_svr.cfg
| Entry Description | |
| ServiceName= | Name of the program component for contact retrieval.Normally you do not need to make any changes to the default valueHiPath SimplyPhone Contact Retrieval. |
| CallerIdentServerList=[,] | List containing file names that must be available in the folder(default: DBServer).Enter the file name here of the server to be used for partner identification. |
| QueryServerList=[,] | List containing file names that must be available in the folder(default: DBServer).Enter the file name here of the server to be used for contact retrieval. |
| ServerListDir= | Subdirectory containing the data source configuration files. |
5.5.2 Data source parameters
| Entry Description | |
| DBEnv.Version= | Version of the configuration file. |
| DBEnv.DatabaseName Name of the data source.This is shown in the dialog Contact Retrieval. | |
| DBEnv.ServerAddress Server name and port number of the data source.You can manually enter the server (DNS name or IP address) that should be used for this folder.The local host IP 127.0.0.1 is specified for the Outlook-specific search; the name of the Siemens server is permanently set for SCD.In all other cases, the keyword is SPServers. | |
| DBEnv.SearchBase Node from where the search begins(not relevant for type NOTESR5). | |
| DBEnv.DatabaseType SimplyPhone supports the types:LDAP and NOTESR5. | |
| DBEnv.TimeLimit | Time in seconds after which a search is automatically cancelled, 0 = unlimited. |
| DBEnv.MaxRows Max. number of required data records.This value is overwritten by a corresponding value from the relevant data source server. | |
| DBEnv.Scope | Specification of the search range.The value should always be 2 (whole subtree)(not relevant for type NOTESR5). |
| DBEnv.AuthUser | User name. |
| DBEnv.AuthPW | User password. |
Appendix
Command line switch
5.5.3 Attribute mapping
The definitions for attribute mapping have the form:
For partner identification, the LDAP server field AttrMap.Filter PI in the cfg file must contain a rational entry. The default value for SCD searches is PhoneNumbers. This is a specially defined field in SCD that can be used to perform an advanced search based on numbers. The numbers are therefore stored in international format. If this field is left blank, there is a risk that a search that does not produce any results will end in a timeout.
5.6 Command line switch
5.6.1 Setup file switches
File name: Setup.exe
| Switch Description | |
| /S Performs the | complete client installation without any interaction. To deactivate individual installation dialogs, you can enable the appropriate switches in the file SP_Inst.ini, see "SP_Inst.ini of the client component" on Page 5-11.For non-interactive installation and when using third-party TAPI providers (for example, CAP), you must enter the value 000000 in the Locations.ini file under UserNumber= so that a dialog for entering the extension number appears the first time you start the system. |
| /v Permits the | attachment of various path information (examples):/v"INIFILE=\"D:\Folder 1\SP_Inst.ini\"" indicates the path and name of another ini file which should contain the Locations.ini file in the directory./v"INSTALLDIR=\"C:\Folder 2\"" indicates the path of an installation directory. |
5.6.2 Switch for the Dialer
File name: CTALKP.EXE
| Switch Description | |
| The specified file should contain a telephone number which is dialed. (This function can also be executed while the process cTalkp.exe is running.) | |
5.6.3 Switch for partner identification
File name: CRIMNGR.EXE (Contact Retrieval Manager)
| Switch Description | |
| /StartCRI The contact retrieval server is started. | |
| /StopCRI The contact retrieval server is closed. | |
| /UpdateCRI [/Show-Progress] [/Logfile] | A new contact retrieval database is created. The contact retrieval server is then started./ShowProgress: the individual steps for generating the contact retrieval database are displayed in a window./LogFile: the steps required for generating the contact retrieval database are contained in a log file. |
| /I[,] | The application CRIMngr is installed as NT Service SimplyPhone Partner Identification. The account under which the service is to run can also be specified (with a password). |
| /u | The SimplyPhone Partner Identification service is uninstalled. |
In a terminal server environment configuration, only the startup parameter for CRISVR.EXE is changed (in accordance with CRILdapPort). The folder names that feature the port number (4999) remain unchanged.
5.6.4 Switch for the Inbox Manager
File name: SPOMEvnt.exe (Inbox Manager)
| Switch Description | |
| /Start Starts the | Inbox_Manager. |
| /Stop The Inbox | Manager closes a second instance of itself that may be open and then closes down. |
Appendix
Product integration
5.7 Product integration
5.7.1 Integration with HiPath ComAssistant
Outlook entries can be generated as required for unanswered incoming calls using ComAssistant (SimplyPhone for Web). In this case, SimplyPhone for Outlook does not generate any Outlook entries itself for those types of call. Instead, it checks the ComAssistant inbox at regular intervals for this type of call and then converts these into the Outlook entries that have been specified in the settings.
5.7.2 Interaction with Teambase
The configuration file Comfo.ini is only required for Teambase integration; it is still supported for reasons of compatibility.
If Comfo family products have not been installed on the PC (ComfoDesk, Mail.D, ComfoPhone, etc.) and if the file comfo.ini is to be used, the system variable PATH has to be extended as follows:
PATH=%PATH%;<ComfoDir>;<ComfoDir>\CDLL
where ComfoDir is the directory containing the file comfo.ini.
The following entries can be made in the section [CTalkP]:
- teambase=
•overwrite=[0|1]
- AdrPathCPhoneAB=
This entry has priority over the relevant registry entry and it can also contain (recursively) the path name of another configuration file.
5.8 List of abbreviations/Glossary
| Term Definition | |
| CLA Customer License | Agent |
| CLC Customer License | Client |
| CLM Customer License | Management |
| CLS Central License Server | |
| CRI Contact Retrieval Index | |
| HLM HiPath License Management | |
| LDAP Lightweight Directory Access ProtocolStandardized directory service based on TCP/IP. | |
| SCD Siemens Corporate Directory | |
| TCP/IP Transmission Control Protocol over Internet ProtocolDefault Internet/intranet protocol for packet-based data transmission and for checking transmission. | |
Appendix
List of abbreviations/Glossary
Index
C
CAP TAPI Service Provider 2-26
Contacts
public 2-16
public folders 2-16
Customer License Agent (CLA) 2-14
Customer License Client (CLC) 2-14
Customer License Management (CLM) 2-14
D
Documentation 1-2
F
FAQ 4-1
First-party environment 2-1
Functional overview 1-1
H
Hardware
client PC 2-2
server PC 2-2
|
Installation 2-1
driver and software (first-party environment) 2-20
driver and software (third-party environment) 2-26
preparations 2-7
requirements 2-2
L
Licensing 2-13
M
Minimum requirements 2-2, 2-3
Multiple locations 2-10
P
Partner identification 3-1, 5-3
Preface 1-1
Preparations 2-7
Program architecture 5-1
Public contact folders 2-16
Public contacts 2-16
R
Requirements 2-2
S
Software
client PC 2-2
server PC 2-3
SP_Inst.ini 5-11
Symbols 1-2
Syntax of the ini files 5-11
T
TAPI 120 Service Provider 2-28
TAPI First Party 2-1
TAPI Service Provider 2-20
TAPI Third Party 2-1
Telephony infrastructure 2-4
Terminal server 2-11
Third-party environment 2-1
Tie lines 2-10
Troubleshooting 4-1
Index
www.siemens.com/hipath
Subject to availability. Right of modification reserved.
- HiPath
- SimplyPhone for Outlook
- Contents
- Preface.... 1-1
- Installing SimplyPhone for Outlook 2-1
- Partner identification service 3-1
- Troubleshooting/FAQ 4-1
- Appendix.... 5-1
- Copyright and Trademarks
- Preface
- Functional overview
- Outlook
- Preface
- Program documentation
- •Installation and Administrator Manual as PDF
- - Operating Manual as PDF
- •Online help
- Fonts and symbols used
- Installing SimplyPhone for Outlook
- First-party environment
- Third-party environment
- Installing SimplyPhone for Outlook
- Requirements
- Client PC hardware
- Server PC hardware
- Client PC software
- for the terminal server
- Server PC software
- for the partner identification service
- Telephony infrastructure
- - 1st Party TAPI
- -3rd Party TAPI
- CAP V2.0/3.0 TAPI Service Provider
- • TAPI 120 V2.0
- Preparing for installation on a client PC
- Preparations for default installation
- Entering telephony data
- Entering a server for partner identification
- Multiple SimplyPhone for Outlook partner identification services
- Entering a server for paging
- Specifying data
- Preparation complete
- Preparations with multiple locations
- Offering a location for selection
- Duplicating location-specific data
- Duplicating data source configuration files
- Preparations for tie lines
- Preparations for the terminal server
- Assigning lines on the terminal server
- Assigning lines for the dialer
- Line assignment requirements
- Examples
- Assigning lines for the teambar
- Preparations for licensing
- Configuring additional data sources
- Restrictions for public contact folders and public contacts.
- To do this
- Data source configuration files on client or server PCs
- - On a client PC
- - On a server PC
- Installing the driver and software in a first-party environment
- Installing the TAPI Service Provider driver
- Installing SimplyPhone for Outlook V4.0
- Installation procedure
- Configuring SimplyPhone for Outlook V4.0
- Starting SimplyPhone for Outlook V4.0
- Using SimplyPhone during the grace period time
- Registering SimplyPhone during the grace period time
- Installing the driver and software in a third-party environment
- Installing the CAP TAPI Service Provider driver
- Installing TAPI 120 for HiPath 3000 with LIM module
- Installing SimplyPhone for Outlook V4.0
- Starting SimplyPhone for Outlook V4.0
- Partner identification service
- Importance of installation
- Configuring a user and mailbox
- LAN domain controller: Windows 2000 Server/Windows Server 2003 and Exchange 5.5
- Configuring the domain user account
- Partner identification service
- Configuring the mailbox on the Exchange Server
- LAN domain controller: Windows 2000 Server/Windows Server 2003 and Exchange 2000/Exchange 2003
- Assigning local rights
- Partner identification service under Windows 2000 Server/Windows Server 2003
- Assigning NT rights
- Assigning local rights
- Configuring an Exchange profile
- Modify the SP\_Inst.ini file
- Installing on a server
- Installing a service
- Starting a service
- Uninstalling the software
- Warnings in Outlook
- Problem description
- Solution
- Changes on the Exchange Server
- Checking
- Troubleshooting/FAQ
- Licensing errors
- The license server is inaccessible
- License detection error
- No response from SimplyPhone for Outlook component
- Troubleshooting/FAQ
- Partner identification not working
- Calling only possible from personal contacts
- Outlook stops responding
- Increasing performance by deactivating features
- Appendix
- Program architecture
- Integration with Outlook/Exchange
- Appendix
- Partner identification
- CRI Server
- CRI Manager
- Components and processes
- Outlook add-in
- Call Control Manager
- Dialer
- Address book
- Contact Retrieval Manager
- Contact Retrieval Client
- Inbox Manager
- PopUp Manager
- Reschedule
- Team Assistant (for third-party environment only)
- Configuring telephony data
- Overview of TAPI functionality
- System requirements for functionality
- Location data for telephony
- Configuring the TAPI line
- Configuring tie lines
- Syntax of the ini files
- SP\_Inst.ini of the client component
- Client component Locations.ini
- Syntax of the registry entries
- Entries under Common\Settings
- Syntax of the registry entries
- Entries under Common\Settings\Telephony
- Entries under Entry\Settings
- Entries under Solutions\CallData
- Entries under Solutions\CallerIdentification
- Entries under Solutions\CPhoneOutlook
- Entries under Solutions\HLMData
- Entries under Solutions\Teambar
- Entries under Solutions\Teambar\Member0
- Entries under Solutions\Teambar\MemberN
- Entries under TripleM
- Entries under Common\LRU
- Entries under Common\QuickDial
- Configuration file syntax
- File SPCr\_svr.cfg
- Attribute mapping
- Command line switch
- Setup file switches
- Switch for the Dialer
- Switch for partner identification
- Switch for the Inbox Manager
- Product integration
- Integration with HiPath ComAssistant
- Interaction with Teambase
- Index
- C
- D
- F
- H
- |
- L
- M
- P
- R
- S
- T
Brand : SIEMENS
Model : HiPath SimplyPhone
Category : Assistance program