
SE6591B - Answering machine PHILIPS - Free user manual and instructions
Find the device manual for free SE6591B PHILIPS in PDF.


| Product Type | Digital Answering Machine |
| Brand | Philips |
| Model | SE6591B |
| Color | Black |
| Dimensions (W x H x D) | 12 x 8 x 4 inches (approx.) |
| Weight | 0.8 kg (approx.) |
| Power Supply | AC adapter, 220-240V, 50Hz |
| Recording Time | Up to 60 minutes |
| Number of Mailboxes | 4 |
| Remote Access | Yes, via touch-tone phone |
| Call Screening | Yes |
| Message Playback | Speakerphone or handset |
| Display | LCD with Caller ID |
| Memory Type | Digital chip (no tape) |
| Maintenance | Clean with dry cloth; avoid liquids |
| Safety | Keep away from water; use only specified adapter |
| Spare Parts | Available from Philips service centers |
| Repairability | Repairable by authorized technicians |
| General Information | Compatible with analog phone lines |
Frequently Asked Questions - SE6591B PHILIPS
User questions about SE6591B PHILIPS
0 question about this device. Answer the ones you know or ask your own.
Ask a new question about this device
Download the instructions for your Answering machine in PDF format for free! Find your manual SE6591B - PHILIPS and take your electronic device back in hand. On this page are published all the documents necessary for the use of your device. SE6591B by PHILIPS.
USER MANUAL SE6591B PHILIPS
Register your product and get support at www.philips.com/welcome
SE659

natural_image
Black Philips 6.0 phone with a digital display and keypad, no visible text or symbols on the device body.US-EN Telephone Answering Machine

Warning
Use only rechargeable batteries. Charge the handset for 24 hours before use.
Table of contents
1 Important Safety Instructions 4
2 Environment and safety 6
2.1 Safety information 6
2.2 Power requirements 6
2.3 Battery requirements 6
2.4 Telephone connection 6
2.5 Environmental care 7
2.6 Precautions 7
2.7 Equipment Approval Information 8
2.7.1 Notification to the Local Telephone Company 8
2.7.2 Rights of the Phone Company 8
2.8 Interference Information 9
2.9 Hearing Aid Compatibility (HAC) 10
2.10 FCC RF Radiation Exposure Statement 10
3 Important 10
3.1 Power requirements 11
3.2 Electric, Magnetic and Electromagnetic Fields (“EMF”) 12
3.3 Recycle your batteries 12
4 The RBRC ^® seal 12
4.1 Service Centers 13
5 Your phone 14
5.1 What's in the box 14
5.2 Overview of your handset 15
5.3 Display icons and Messages 18
5.4 Overview of the base station 20
5.5 Base station display 22
6 Conventions Used in this Manual 22
7 Getting started 23
7.1 Connect the base station 23
7.2 Wall mounting the base 24
7.3 Install your phone 25
7.3.1 Install battery 25
7.3.2 Charge battery 25
7.4 Remove/Attach belt clip 26
7.5 Install optional headset 26
7.6 Power up 26
7.7 Using multipacks 27
7.8 Handset menu structure 28
8 Using your phone 33
8.1 Make a call 33
8.1.1 Predialling 33
8.1.2 Direct dialling 33
8.1.3 Call from redial list 33
8.1.4 Call from the call log 34
8.1.5 Call from the phonebook 34
8.1.6 Call from the phonebook while already on the phone 34
8.1.7 Call using Direct Access Memory 35
8.1.8 Enter a Dialing Pause 35
8.2 Answer a call 35
8.2.1 Handsfree answering with handset 35
8.3 Answer a call on the other line 36
8.4 End a call 36
8.5 Using the Redial list 36
8.5.1 Access Redial list 36
8.5.2 View redial number details 36
8.5.3 Save a redial number into the phonebook 36
8.5.4 Delete a redial number 37
8.5.5 Delete all redial numbers 37
9 U s e phone 38
9.1 Switch the handset off/on 38
9.2 Handset keypad lock/ unlock 38
9.3 Text or number entry 38
9.4 Call waiting 38
9.5 Call in progress 38
9.5.1 Adjust earpiece or speaker volume 39
9.5.2 Mute/Unmute microphone 39
9.5.3 Activate/Deactivate handset loudspeaker mode 39
9.6 Chain dialing 39
9.7 Using the Intercom 39
9.7.1 Intercom another unit 39
9.7.2 Transfer an external call to another unit 40
9.7.3 Answer an external call during intercom 40
9.7.4 Switch between an internal and external call 40
9.7.5 Establish a three-party conference call 40
9.8 Locate Handset 41
9.9 Clock and Alarm settings 42
9.9.1 Set Date and Time 42
9.9.2 Set Time and Date Format 42
9.9.3 Set Alarm (Handset only) 42
9.9.4 Set Alarm Tone
(Handset only) 43
10 Using your Phonebook 43
10.1 Store a contact in the phonebook 43
10.2 Access phonebook 44
10.3 Modify a phonebook entry 44
10.4 Select phonebook melody (Handset only) 44
10.5 Delete a phonebook entry 45
10.6 Delete all phonebook entries 45
10.7 Direct Access Memory 45
10.7.1 Add/Edit Direct Access Memory 45
10.7.2 Delete Direct Access Memory 46
11 Using the Call log 46
11.1 Access the Call log 46
11.1.1 To choose the format for call log display 47
11.2 Save call list entry into the phonebook 47
11.3 Delete a call list entry 47
11.4 Delete all call list entries 48
12 Personal settings 48
12.1 Change the Handset Name (Handset only) 48
12.2 Ring Settings 48
12.2.1 Set the Ring Volume 48
12.2.2 Set the Ring Tones 49
12.2.3 Activate/Deactivate Key Beep 49
12.3 Change the Display Language 49
12.4 Select the Display Wallpaper (Handset only) 50
12.5 Select the Color Theme (Handset only) 50
12.6 Set the Display Contrast 50
12.7 Set the Backlight Time (Handset only) 51
12.8 Deactivate/Activate Auto Hang-Up (Handset only) 51
12.9 Changing the Line Setting (Base Station only) 51
13 Advanced settings 52
13.1 Easy Call 52
13.1.1 Set Easy Call to On or Off 52
13.1.2 Set Easy Call number 52
13.2 Auto Conference 53
13.3 Call Barring 53
13.3.1 Set Call Barring Mode 53
13.3.2 Set a Call Barring number 53
13.4 XHD Sound 54
13.5 Change PIN 54
13.6 Registration 54
13.6.1 Easy registration 55
13.6.2 Manual registration 55
13.7 Unregister 55
13.8 Reset Unit 56
13.9 Set Area Code 56
13.10 Set Auto Prefix 56
13.11 Change Flash time 57
13.12 Change the Dial Mode 57
13.13 Set First Ring Detection 57
13.14 Changing the Line Setting (Handset only) 58
13.15 Default Settings 59
14 Network Service 59
14.1 Voice Mail 59
14.1.1 Access Voice Mail 60
14.1.2 Set Voice Mail Number 60
15 Telephone answering machine (TAM) 60
15.1 Playing Messages 61
15.1.1 Playback of messages via handset 61
15.1.2 Functions available during playback 61
15.2 Delete all messages from the handset 61
15.3 Turn the Answering Machine On/Off from the Handset 62
15.4 Play, Record, or Delete an Outgoing Message 62
15.5 Set the Answer mode 62
15.6 Answering Machine Settings 63
15.6.1 Ring Delay 63
15.6.2 Remote Access 63
15.6.3 Handset Screening 64
15.6.4 Setting the Outgoing Message Language 65
16 Technical data 65
17 Frequently asked questions 66
17.1 Connection 66
17.2 Set-up 66
17.3 Sound 66
17.4 Product behaviour 67
18 INDEX 69
1 l m p o r
Instructions
Some of the following information may not apply to your particular product; however, when using telephone equipment, basic safety precautions should always be followed to reduce the risk of fire, electric shock and injury to persons, including the following:
1 Read and understand all instructions.
2 Follow all warnings and instructions marked on the product.
3 Unplug this product from the wall outlet before cleaning. Do not use liquid cleaners or aerosol cleaners. Use a damp cloth for cleaning.
4 Telephones should not be used while you are in a bathtub, shower or pool. Immersion of the telephone or handset in water could cause an electrical shock.
5 Slots and openings in the cabinet back or bottom are provided for ventilation, to protect it from overheating. These openings must not be blocked or covered. The openings should never be blocked by placing the product on the bed, sofa, rug, or other similar surface. This product should not be placed in a built-in installation unless proper ventilation is provided.
6 This product should be operated only from the type of power source
t indicated on the marking label. If you are not sure of the type of a power supply to your home, consult your dealer or local power company.
7 Do not allow anything to rest on the power cord. Do not locate this product where the cord will be abused by persons walking on it.
8 Do not overload wall outlets and extension cords as this can result in the risk of fire or electric shock.
9 Never push objects of any kind into this product through cabinet slots as they may touch dangerous voltage points or short out parts that could result in a risk of fire or electric shock.
Never spill liquid of any kind on the product.
10 To reduce the risk of electric shock, do not disassemble this product, but take it to a qualified service personnel when service or repair work is required. Opening or removing covers may expose you to dangerous voltages or other risks. Incorrect reassembly can cause electric shock when the appliance is subsequently used.
11 Do not expose the product to extreme temperatures such as areas near a hot radiator or stove or in a hot car.
12 Do not place lighted candles, cigarettes, cigars, etc., on the telephone.
13 Never touch uninsulated telephone wires or terminals unless the
telephone line has been disconnected at the network interface.
14 Never install or modify telephone wiring during a lightning storm.
15 Never install telephone jacks in wet locations unless the jack is specifically designed for wet locations.
16 Use caution when installing or modifying telephone lines to prevent electrical shock and/or fire.
17 Unplug this product from the wall outlet and refer servicing to qualified service personnel under the following conditions:
A When the power supply cord or plug is damaged or frayed.
B If the product has been exposed to rain or water.
C If the product does not operate normally by following the operating instructions.
D If the product's cabinet has been damaged.
E If the product exhibits a distinct change in performance.
18 Avoid using a telephone (other than a cordless type) during an electrical storm. There may be a remote risk of electric shock from lightning.
19 Do not use the telephone to report a gas leak in the vicinity of the leak.
20 Do not place this product on an unstable cart, stand or table. The product may fall, causing serious damage to the product.
IF YOUR PRODUCT UTILIZES BATTERIES, THE FOLLOWING
ADDITIONAL PRECAUTIONS SHOULD BE OBSERVED:
1 Use only the type and size of battery(ies) specified in the user manual.
2 Do not dispose of the battery(ies) in fire. They may explode. Check with local codes for possible special disposal instructions.
3 Do not open or mutilate the battery(ies). Released electrolyte is corrosive and may cause damage to the eyes or skin. It may be toxic if swallowed.
4 Exercise care in handling battery(ies) in order not to short out the battery(ies) with conducting materials such as rings, bracelets, and keys. The battery(ies) or conductor may overheat and cause burns.
5 Do not attempt to recharge the battery(ies) provided with or identified for use with this product that are not intended to be charged. The battery(ies) may leak corrosive electrolyte or explode.
6 Do not attempt to rejuvenate the battery(ies) provided with or identified for use with this product by heating them. Sudden release of the battery(ies) electrolyte may occur causing burns or irritation to eyes or skin.
7 When replacing battery(ies), all batteries should be replaced at the same time. Mixing fresh and discharged batteries could increase internal cell pressure and rupture
the discharged battery(ies). (Applies to products employing more than one separately replaceable primary battery.)
8 When inserting battery(ies) into this product, the proper polarity or direction must be observed. Reverse insertion of battery(ies) can cause charging, and that may result in leakage or explosion.
9 Remove battery(ies) from this product if storing over 30 days because the battery(ies) could leak and damage the product.
10 Discard “dead” battery(ies) as soon as possible since “dead” batteries are more likely to leak in a product.
11 Do not store this product, or the battery(ies) provided with or identified for use with this product, in high temperature areas. Batteries that are stored in a freezer or refrigerator for the purpose of extending shelf life should be protected from condensation during storage and defrosting. Batteries should be stabilized at room temperature prior to use after cold storage.
12 If your product uses rechargeable battery(ies), charge the battery(ies) only in accordance with the instructions and limitation specified in the User Manual.
SAVE THESE INSTRUCTIONS
2 Environment and safety
2.1 Safety information
This telephone is not designed for making emergency telephone calls when the power fails. An alternative should be made available for access to emergency calling.
2.2 Power requirements
This product requires an electrical supply of 120 volts, single phase alternating current, excluding IT installations defined in standard UL 60950.
2.3 Battery requirements
The handset requires power source of two rechargeable NiMH batteries, size AAA 1.2V 600mAh (Hr11/45). IF THE INCORRECT TYPE OF BATTERIES ARE USED, A WARNING MESSAGE WILL BE DISPLAYED.
Use only Philips Multi-Life 600mAh rechargeable NimH batteries.
For servicing or replacement, you can purchase a suitable headset through service centre or retail shop.
2.4 Telephone connection
The voltage on the network is classified as TNV-3 (Telecommunication Network Voltages, as defined in the standard UL
60950). Following a power cut, the call in progress is lost.

Caution
Users should ensure for their own protection that the electrical ground connections of the power utility, telephone lines and internal metallic water pipe system, if present, are connected together. This precaution may be particularly important in rural areas.
2.5 Environmental care
Please remember to observe the local regulations regarding the disposal of your packaging materials, exhausted batteries and old phone and where possible promote their recycling.
2.6 Precautions
- Do not allow the handset to come into contact with liquids or moisture.
- Do not open the handset, base station or charger. This could expose you to high voltages.
- Do not allow the charging contacts of the charger or the battery to come into contact with extraneous conductive materials.
- There is a slight chance that the telephone could be damaged by an electrical storm. It is recommended that users unplug the phone from the USB socket and the phone line from the phone wall socket during a storm.
- Because the phone works by sending radio signals between the base unit and the handset, wearers of hearing
aids may experience interference in the form of a humming noise.
• We advise that this phone should not be used near intensive care medical equipment, nor by persons with pacemakers.
- Your phone can interfere with electrical equipment such as answering machines, TV and radio sets, clock radios and computers if placed too close. It is recommended that you position the base unit at least one meter from such appliances.

Caution
Use only the mains adapter supplied with this telephone. Incorrect adapter polarity or voltage can seriously damage the unit. Base adapter:
Input: 100 V - 240 VAC 50/60 Hz
Output: 6 VDC 500 mA
Charger adapter:
Input: 100 V - 240 VAC 50/60 Hz
Output: 6 VDC 210 mA

Caution
RISK OF EXPLOSION IF BATTERY IS REPLACED BY AN INCORRECT TYPE.
Never use non-rechargeable batteries; use recommended type supplied with this telephone. NiMH batteries must be disposed of in accordance with the applicable waste disposal regulations.
FCC CERTIFICATION NUMBER IS LOCATED ON THE CABINET BOTTOM
The term “IC:” before the certification number signifies that Industry Canada technical specifications were met. This certification means that the equipment
meets certain radio communications and operational requirements.
2.7 Equipment Approval Information
Your telephone equipment is approved for connection to the public switched telephone network and is in compliance with parts 15 and 68, FCC Rules and Regulations and the Technical Requirements for Telephone Terminal Equipment published by ACTA.
2.7.1 Notification to the Local Telephone Company
On the bottom of this equipment is a label indicating, among other information, the US number and Ringer Equivalence Number (REN) for the equipment. You must, upon request, provide this information to your telephone company. The REN is useful in determining the number of devices you may connect to your telephone line and still have all of these devices ring when your telephone number is called. In most (but not all) areas, the sum of the RENs of all devices connected to one line should not exceed 5. To be certain of the number of devices you may connect to your line as determined by the REN, you should contact your local telephone company. A plug and jack used to connect this equipment to the premises wiring and telephone network must comply with the applicable FCC Part 68 rules and requirements adopted by the ACTA. A compliant telephone cord and modular plug is provided with this product. It is designed to be connected to a compatible modular jack that is also compliant. See installation instructions for details.
Notes
- This equipment may not be used on coin service provided by the telephone company.
- Party lines are subject to state tariffs, and therefore, you may not be able to use your own telephone equipment if you are on a party line. Check with your local telephone company.
- Notice must be given to the telephone company upon permanent disconnection of your telephone from your line.
- If your home has specially wired alarm equipment connected to the telephone line, ensure the installation of this product does not disable your alarm equipment. If you have questions about what will disable alarm equipment, consult your telephone company or a qualified installer.
2.7.2 Rights of the Phone Company
Should your equipment cause trouble on your line which may harm the telephone network, the telephone company shall, where practicable, notify you that
temporary discontinuance of service may be required. Where prior notice is not practicable and the circumstances warrant such action, the telephone company may temporarily discontinue service immediately. In case of such temporary discontinuance, the telephone company must:
(1) promptly notify you of such temporary discontinuance; (2) afford you the opportunity to correct the situation; and (3) inform you of your right to bring a complaint to the Commission pursuant to procedures set forth in Subpart E of Part 68, FCC Rules and Regulations.
The telephone company may make changes in its communications facilities, equipment, operations or procedures where such action is required in the operation of its business and not inconsistent with FCC rules and Regulations. If these changes are expected to affect the use or performance of your telephone equipment, the telephone company must give you adequate notice, in writing, to allow you to maintain uninterrupted service.
2.8 Interference Information
This device complies with Part 15 of the FCC Rules. Operation is subject to the following two conditions:
(1) this device may not cause harmful interference; and (2) this device must accept any interference received, including interference that may cause undesired operation.
This equipment has been tested and found to comply with the limits for a Class B digital device, pursuant to Part 15 of the FCC Rules.
These limits are designed to provide reasonable protection against harmful interference in a residential installation. This equipment generates, uses, and can radiate radio frequency energy and, if not installed and used in accordance with the instructions, may cause harmful interference to radio communications. However, there is no guarantee that interference will not occur in a particular installation.
If this equipment does cause harmful interference to radio or television reception, which can be determined by turning the equipment off and on, the user is encouraged to try to correct the interference by one or more of the following measures:
- Reorient or relocate the receiving antenna (that is, the antenna for radio or television that is “receiving” the interference).
- Reorient or relocate and increase the separation between the telecommunications equipment and receiving antenna.
- Connect the telecommunications equipment into an outlet on a circuit different from that to which the receiving antenna is connected.
If these measures do not eliminate the interference, please consult your dealer or an experienced radio / television technician for additional suggestions.
Also, the Federal Communications
Commission has prepared a helpful booklet, “How To Identify and Resolve Radio/TV Interference Problems”. This booklet is available from the U.S.
Government Printing Office, Washington, D.C. 20402.
Please specify stock number 004-000-00345-4 when ordering copies.
Notice: The changes or modifications not expressly approved by the party responsible for compliance could void the user's authority to operate the equipment.
2.9 Hearing Aid Compatibility (HAC)
This telephone system meets FCC and Industry Canada standards for Hearing Aid Compatibility.
2.10 FCC RF Radiation Exposure Statement
This equipment complies with FCC RF radiation exposure limits set forth for an uncontrolled environment. This equipment should be installed and operated with a minimum distance of 20 centimeters between the radiator and your body. This transmitter must not be co-located or operating in conjunction with any other antenna or transmitter. For hand held operation, this phone has been tested and meets the FCC RF exposure guidelines. Use of other accessories may not ensure compliance with FCC RF exposure guidelines.
3 Import port
Take time to read this user manual before you use your phone. It contains important information and notes regarding your phone.
NOTICE: This product meets the applicable Industry Canada technical specifications.
The equipment must be installed using an acceptable method of connection. The customer should be aware that compliance with the above conditions may not prevent degradation of service in some situations.
Repairs to certified equipment should be made by an authorized Canadian maintenance facility designated by the supplier. Any repairs or alterations made by the user to this equipment, or equipment malfunctions, may give the telecommunications company cause to request the user to disconnect the equipment.
Users should ensure for their own protection that the electrical ground connections of the power utility, telephone lines and internal metallic water pipe systems, if present, are connected together. This precaution may be particularly important in rural areas.
CAUTION: Users should not attempt to make such connections themselves, but should contact the appropriate electric inspection authority, or electrician, as appropriate.
NOTES: This equipment may not be used on coin service provided by the telephone company.
3.1 Power requirements
- This product requires an electrical supply of 100-240 volts AC. In case of power failure, the communication can be lost.
- The Electrical network is classified as hazardous. The only way to power down the charger is to unplug the power supply from the electrical outlet. Ensure that the electrical outlet is always easily accessible.
- The voltage on the network is classified as TNV-3 (Telecommunication Network Voltages), as defined in the standard UL 60950.

Warning
To avoid damage or malfunction:
- Do not allow the charging contacts or the battery to come into contact with metal objects.
- Do not open it as you could be exposed to high voltages.
- Do not allow the charger to come into contact with liquids.
- Never use any other battery than the one delivered with the product or recommended by Philips: risk of explosion.
• Always use the cables provided with the product. - Handsfree activation could suddenly increase the volume in the earpiece to
a very high level: make sure the handset is not too close to your ear.
- This equipment is not designed to make emergency calls when the power fails. An alternative has to be made available to allow emergency calls.
- Do not expose the phone to excessive heat caused by heating equipment or direct sunlight.
- Do not drop your phone or allow objects to fall on your phone.
- Do not use any cleaning agents containing alcohol, ammonia, benzene, or abrasives as these may harm the set.
- Do not use the product in places where there are explosive hazards.
- Do not let small metal objects come into contact with the product. This can deteriorate audio quality and damage the product.
• Active mobile phones in the vicinity may cause interference.
About operating and storage temperatures: - Operate in a place where temperature is always between 0 and 35^ C (32 to 95^ F ).
- Store in a place where temperature is always between -20 and 70^ C (-4 to 158^ F ).
- Battery life may be shortened in low temperature conditions.
3.2 Electric, Magnetic and Electromagnetic Fields (“EMF”)
-
Philips Royal Electronics manufactures and sells many consumer oriented products which usually, as with any electronic apparatus, have the ability to emit and receive electro magnetic signals.
-
One of Philips' leading Business Principles is to take all necessary health and safety precautions for our products, to comply with all applicable legal requirements and to stay well within the EMF standards applicable at the time of producing the products.
-
Philips is committed to develop, produce and market products that cause no adverse health effects.
-
Philips confirms that if its products are handled properly for their intended use, they are safe to use according to scientific evidence available today.
-
Philips plays an active role in the development of international EMF and safety standards, enabling Philips to anticipate further developments in standardisation for early integration in its products.
3.3 Recycle your batteries
Do not dispose your rechargeable batteries. Call the toll fee number 1-800-822-8837 to get instructions on how to recycle your batteries.
4 The RBRC ^® seal

The RBRC ^® Seal on the nickel metal hydride battery indicates that Philips Royal Electronics is voluntarily
participating in an industry program to collect and recycle these batteries at the end of their useful lives, when taken out of service within the United States and Canada.
The RBRC ^® program provides a convenient alternative to placing used nickel metal hydride batteries into the trash or municipal waste, which may be illegal in your area.
Philips's participation in RBRC ^ makes it easy for you to drop off the spent battery at local retailers participating in the RBRC ^ program or at authorized Philips product service centers.
Please call 1-800-8-BATTERY for information on Ni-MH battery recycling and disposal bans/restrictions in your area. Philips's involvement in this program is part of its commitment to protecting our environment and conserving natural resources.
RBRC ^® is a registered trademark of Rechargeable Battery Recycling Corporation.
4.1 Service Centers
US service center
Philips Accessories & Computer
Peripherals North America1881 Route
46 WestLedgewood, NJ 07852
Phone: (800) 233-8413
E-mail support:
http://www.support.philips.com/support
5 Your phone
Congratulations on your purchase and welcome to Philips!
To fully benefit from the support that Philips offers, register your product at www.philips.com/welcome.
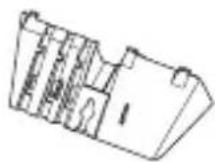
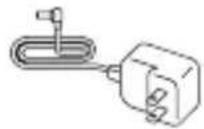
5.1 What's in the box


Handset with belt clip Base Station Battery door


natural_image
Two identical U-shaped metal components with connectors, shown side by side (no text or symbols)Bracket for wall mounting
2 AAA rechargeable batteries
Power supply Line cords\*

User manual Guarantee Do not return


leaflet

Quick Start Guide

Note
* The black line cord is a 4-pin telephone line cord, and the gray line cord is a 2-pin telephone line cord. Use these as explained in 7.1 Connect the base station. In multihandset packs, you will find one or more additional handsets, chargers with power supply units and additional rechargeable batteries.
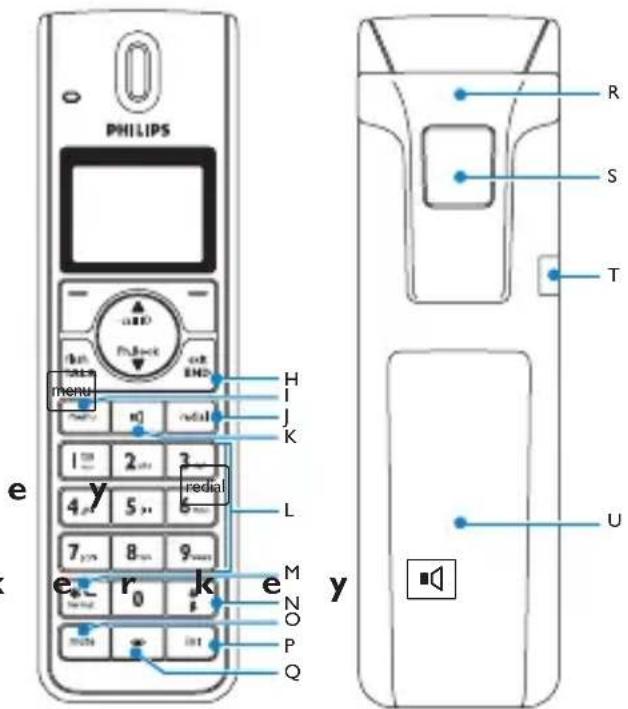
5.2 Overview of your handset

A E v e n t L E D
The event LED on your handset blinks when there is a new message recorded on your telephone answering machine. If you have subscribed to Caller Line Identification, the event LED also blinks when there is a new call, or a new voice mail message.
B E a r p i e c e
C D i s p l a y
See section 5.3 for an overview of the display icons.
D Select key

Press to receive an incoming call on Line 1, or to select Line 1 for making an outgoing call.
In a menu, selects the function displayed on the screen or go to the next lower level. Also used to confirm entries (for example, when setting date and time).
E B a c k / C l e a r
Press to receive an incoming call on Line 2, or to select Line 2 for making an outgoing call.
When making an entry, press to clear (delete) a character or number, or long press to clear all.
When navigating menus, press to move to the previous higher menu level (Back is displayed).
F Navigation keys

In idle mode: Scroll up call ID to access the Call log and scroll down Ph.Book to access the Phonebook.
During a call: Scroll ⬆ to increase or decrease earpiece and speaker volume. Editing and entry: Move to the previous character ▲ or next character Ph.Book. In other modes: Scroll up ▲ and down Ph.Book a menu list or go to the previous or next record in the Phonebook, Redial list, or Call log.
G Talk key

In idle mode: Make or answer an external call on the default line, or answer an incoming internal call.
During a call: Activate the flash function. In other modes: Dial the selected number in the Phonebook, Redial list, or Call log on the default line.
H Hang-up/Exit key exit END
In idle mode: Long press (5 seconds) to switch off the handset.
When the handset is switched off: Long press (1 second) to switch it on.
During a call: Hang up a call.
In other modes: Press to return to idle mode.
I M e n u k e y
In idle mode: Go to the main menu.
J R e d i a l k
Access the Redial list in idle mode.
K L o u d s p e a k
In idle mode: Turn on the loudspeaker and dial the number. Answer an incoming call on the default line using handsfree mode.
During a call: Toggle the loudspeaker on/off.
L Number keys
Use to dial numbers and write characters.
With key 1, a long press invites you to select a line, then dials your voice mail subscriber access number via the selected line. With keys 3 def to 9 wxyz , a long press invites you to select a line, then dials one of your direct memory access numbers via the selected line.
M */Keypad lock & Format key format
In idle mode: Long press to lock/ unlock keypad.
Predialling or editing: Press to enter a “*”.
Off hook: Long press to temporarily switch to tone (DTMF) dialling if using pulse.
During call log display: Toggles area code and long distance display on/off.
N#/Ringer on/off & Pause key
In idle mode: Long press to turn the ringer on/off.
Dialling or editing: Long press to insert a pause (during predialling) and short press to insert a “#”.
Editing: Short press to switch upper/lower case.
O M u t e k e y mute
When off hook: Deactivate/activate the microphone.
P Call transfer key & Intercom key int
In idle mode: Initiate an internal call.
During a call: Short press to hold the line and page another handset. Long press to set up a conference between an external call and two handsets.
Q Microphone
R B e l t c l i p
S Loudspeaker (underneath the belt clip)
Warning
Handsfree activation can suddenly increase the volume of the earpiece to a
very high level. Make sure the handset is not too close to your ear.
T Headset jack
U Battery y door
5.3 Display icons and Messages
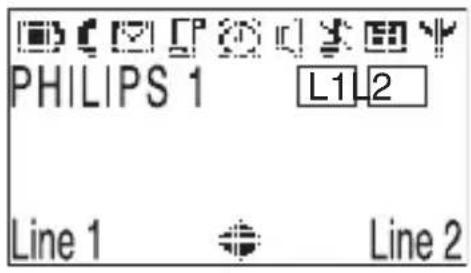

Indicates that the battery is fully charged. This icon blinks during charge and when the battery is low.

When the Icon is empty the battery is practically discharged.

Note
If Warning Batt flashes together with a blinking battery icon, batteries of the wrong type are installed in the handset. Replace with batteries of the correct type.

Blinks when there is an incoming call. Steady On during a call.

If you subscribe to voice mail service, blinks when there is new voice mail.

Blinks when there are new and missed calls in the call log records.

Appears when the alarm clock is activated. Blinks when the alarm time comes.

Appears when the loudspeaker is activated.

Appears when the ringer is off.

Steady on when the answering machine is on. Blinks when messages have been received by the answering machine; blinks rapidly when answering machine memory is full.

Indicates that the handset is registered and within range of the base station. Icon blinks when the handset is out of range or is searching for a base.

Appears when using Line 1.

Appears when using Line 2.
L1 IN USE
Steady ON when another unit is using Line 1 (appears only in talk mode).
L1 HOLD
Steady on when Line 1 is on hold (appears only in talk mode).
L1 CALL
Steady on when there is a incoming call on Line 1 (appears only in talk mode).
L2 IN USE
Steady ON when another unit is using Line 2 (appears only in talk mode).
L2 HOLD
Steady on when Line 2 is on hold (appears only in talk mode).
L2 CALL
Steady on when there is a incoming call on Line 2 (appears only in talk mode).
Line 1/Select/OK
Line 1 selects Line 1.
Select appears when in menu mode. Press the key directly below to move to the next menu level or to confirm a selection.
OK appears to request confirmation of an operation. Press the key directly below to confirm.

Indicates that more options are available in a scroll list, or that you can adjust the volume.
Line 2/Back/Clear
Line 2 selects Line 2.
Back appears when in menu mode. Press the key directly below to return to the previous menu level.
Clear appears when making an entry. Press the key directly below to clear (delete) a character or number when making an entry. Long press to clear all.
5.4 Overview of the base station

A Handset locator key
Locate handset.
Long press more than 3 seconds to start the registration procedure.
B D i s p l a y
See 5.5 for an overview of the display.
C S p e a k e r
D Play/Stop key (play/stop)
Play phone messages (the first message recorded will be played first). After pressing this key, select Line 1 or Line 2 using the soft keys. Voice prompts are played between messages and when all messages have been played.
Stop message playback.
E P r e v i o u s
During message playback: Go to the previous message.
In menu mode: Select the function displayed on the screen or go to the next lower level in a menu.
F Call log/Up key call ID
In idle mode: Enter the call log.
In menu mode: Scroll up in the list.
G Back / Clear K
During message playback: Go to the next message.
In menu mode: Go to the previous level in a menu.
H Er a s e K e y erase
During message playback: Short press to delete the current message.
In idle mode: Long press to delete all old messages. After long pressing this key, select Line 1 or Line 2 using the soft keys.
I Menu key menu
Enter/exit the main menu.
J Phonebook/Down key Ph.Book
/ In Sdle mode: Enter the phone kook.e y In menu mode: Scroll down in the list.
K On/Off Key
Short press to switch the answering machine on/off. After pressing this key, select Line 1 or Line 2 using the soft keys.
L E v e n t L E D
The event LED on the base blinks during handset locating. It is steady on when a handset has taken the line.
M Volume Key
In idle mode: Increase or decrease the ring volume. Ring volume can be set separately for each of Line 1 and Line 2.
During a conversation or during message playback: Increase or decrease the speaker volume.
N S p e a k e r k e
In idle mode: Pick up the first open line with the speaker on.
During a call: End the call. The speaker key LED blinks when receiving an incoming call. It is steady on when the base is in talk mode.
O Hold/Intercom key hold intercom
In idle mode: Initiate an internal call.
During a call: End the call. The speaker key LED blinks when receiving an incoming call. It is steady on when the base is in talk mode.
P M u t e k e y
When off hook: Mute/Unmute the microphone.
Q R e d i a l k e y
Access the Redial list.
R Flash/Call waiting flash call wait
Send a flash on the line. If there is an incoming call waiting, answer the call.
S Line 1 key
In idle mode: Pick up Line 1 with the speaker on.
During a call: Release Line 1. If there is a current call on Line 2, pick up Line 1 and put the call on hold on Line 2.
T Line 2 key
In idle mode: Pick up Line 2 with the speaker on.
During a call: Release Line 2. If there is a current call on Line 1, pick up Line 2 and put the call on hold on Line 1.
U Hash key #
Short press to enter a '#'.
Long press to enter a pause.
V Star/format key \*format
Enter a ‘*’.
When viewing the call log, press to change the number format. (See section11.1.1 - "To choose the format for call log display.")
W Number keys
Short press to dial numbers.
Long press keys 3_def to 9_wxyz to dial a direct access memory number.
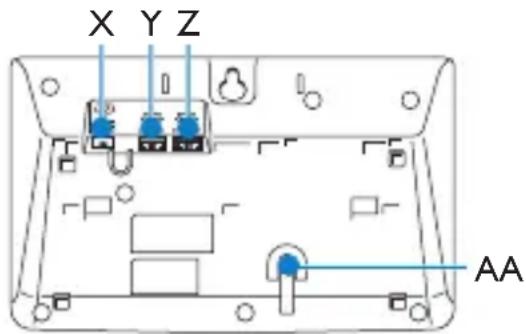
redX DC IN 6V jack
Y TEL LINE 2 phone jack
Z TEL LINE 1/2 phone jack
AA Microphone (at the bottom front of the base station)
5.5 Base station display

flowchart
graph TD
    A["A"] --> B["B"]
    B --> C["C"]
    C --> D["D"]
    D --> E["E"]
    E --> F["F"]
    F --> G["G"]
    G --> H["H"]
    H --> I["L1 Inuse"]
    I --> J["L2 Inuse"]
    J --> K["Softkey 1"]
    J --> L["Softkey 2"]
    style A fill:#f9f,stroke:#333
    style B fill:#f9f,stroke:#333
    style C fill:#f9f,stroke:#333
    style D fill:#f9f,stroke:#333
    style E fill:#f9f,stroke:#333
    style F fill:#f9f,stroke:#333
    style G fill:#f9f,stroke:#333
    style H fill:#f9f,stroke:#333
    style I fill:#ccf,stroke:#333
    style J fill:#ccf,stroke:#333
    style K fill:#ccf,stroke:#333
    style L fill:#ccf,stroke:#333
A Sub-screen display area
Shows answering machine status. See below.
B Main display area
In idle mode: Displays the time and date or new events.
In menu mode: Displays the options in the menu.
C R i n g e r O f f
Turns on when the ringer volume is set to zero. The small numerals “1” and “2” show which line(s) have ringer volume set to zero.
D L1 and L2 in Main Display Area
L1 is for Line 1 and L2 is for Line 2.
These icons blink when the line is receiving a call.
They are steady on when:
- The line is off-hook.
- The line is in external talk mode.
- Viewing call log of the line.
- The line is in hold mode or in use by handset.
• The line is set to Call barring on.
E S o f t k e y s
Soft key 1 is activated by the Select/OK key. Soft key 2 is activated by the Back/Clear key.
F Answering Machine Counters
Displays ⚙ ready on when the answering machine of the line is set to off.
Displays “AA” steady on when the answering machine of the line is in handset remote control mode or auto answering mode.
G Message Counter
Shows the number of the messages in answering machine for the line. Blinks when there are new messages.
The icon comes on when message memory of the line is full, but only when there are no new messages.
H L1 and L2 in the Sub-screen Display Area
L1 is for Line 1 and L2 is for Line 2.
These icons appear at all times.
6 Conventions Used in this Manual
This manual uses the following conventions.
- Bold text
Bold text is used for messages and instructions that are shown on the handset or base display screen.
- Handset and Base Station Keys
Except where indicated otherwise, basic operation is the same for both the handset and base station of this product. However, for some functions the keys
used on the handset and base station have different shapes or different lettering.
The procedures in this manual use the handset key icons. This table shows the corresponding keys for the base station. Refer to it when needed.
| Key on Handset | Key on Base Station |
| call ID | call ID |
| Ph.Book | Ph.Book |
| Left — key | |
| Right — key | |
| int hold intercom | |
| format format | |
These keys are used to access the main menu and utilize functions such as redial and caller ID.
For details, see 5.2 and 5.4.
- Terminology When a procedure applies equally to the handset and the base station, the word "unit" is used to indicate both.
- Scrolling
“Scroll ⬆” means to use the call ID and Ph.Book keys on the handset or the call ID and Ph.Book keys on the base station to scroll through a menu or list on the display screen.
Note: See Section 5 for detailed descriptions of the functions and use of the keys of the handset and base station.
7 Getting started
7.1 Connect the base station
1 Place the base station in a central location near the telephone line socket and electricity socket.
2 Connect the line cord(s) and the power cable to their corresponding connectors at the back of the base station.

Note
For 2 line subscriptions, connect the 4-pin telephone line cord (the black cord) to the black TEL LINE 1/2 phone jack and to the telephone wall jack for line 1.
Connect the second telephone line cord (the gray cord) to the gray TEL LINE 2 phone jack and to the telephone wall jack for line 2.
If the two phone lines are on one modular wall jack, connect only the 4-pin telephone line cord (the black cord) to the black TEL LINE 1/2 phone jack and to the telephone wall jack. (Do not connect anything to the gray TEL LINE 2 phone jack.)
3 Connect the other end of each of the line cords to its socket.
4 Connect the power cable to the power outlet.


Note
Line adaptors may not be attached to the line cords. In this case, you have to connect line adaptors to the line cords first before plugging the line cords into the line sockets.

Warning
Avoid placing the base station too close to large metal objects such as filing cabinets, radiators or electrical appliances. This can impair the range and sound quality. Buildings with thick internal and external walls may impair transmission of signals to and from the base.

Warning
Power is applied when the power adaptor is plugged into the unit and connected to the electricity socket. The only way to power down the unit is to unplug the power adaptor from the electricity socket. Therefore, ensure that the electricity socket is easily accessible.
The power adaptor and telephone line cord(s) have to be connected correctly, as incorrect connection could damage the unit. Always use the telephone line cord(s) supplied with the unit.
Otherwise, you may not get a dial tone.
7.2 Wall mounting the base
The base is designed to support wall mounting. To wall mount the base, follow the instructions below.
1 Attach the bracket to the base station as shown below.
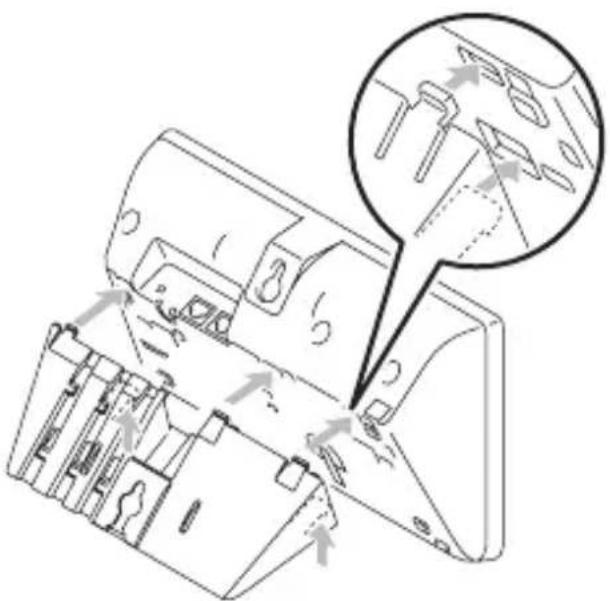
natural_image
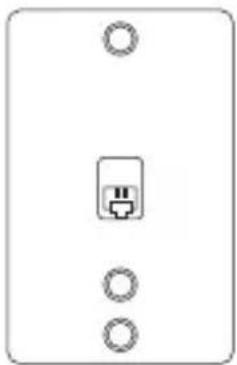
Diagram of a device's internal structure showing internal components and directional arrows, with no readable text or symbols.2 Use the pedestal wall mounting to plug your base station.
natural_image
Simple line drawing of a device panel with three circular ports and a central socket (no text or symbols)
7.3 Install your phone
Before using the handset, the batteries have to be installed and fully charged.

Warning
When the batteries are inserted for the first time, the unit will not be able to start normally due to the low battery. You must charge the batteries on the base station before you can use the handset.
7.3.1 Install battery

Warning
Always use AAA rechargeable batteries supplied with your unit. If alkaline batteries are used instead of rechargeable batteries, "Warning
Batt" will show on the display and the battery icon will blink quickly.
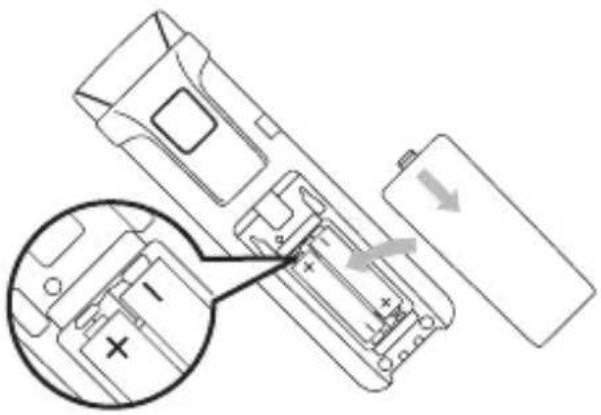
1 Slide out the battery cover.

natural_image
Technical line drawing of a mechanical component with an arrow indicating direction (no text or symbols)2 Place the batteries in the correct polarity as indicated and replace the cover.
7.3.2 Charge battery

Warning
The handset must be charged for at least 24 hours before using it for the first time. When the battery level becomes low, the low battery sensor warns you by blinking the battery icon. If this occurs during a conversation, an alert tone sounds to inform you that the battery is low. If the battery level becomes exceedingly low, the phone automatically switches off shortly after the icon starts blinking and any function in progress will not be saved.
1 Place the handset on the charging cradle of the base station. A beep is emitted if the handset is placed correctly.
2 The battery icon on the display blinks during charge.
3 The battery icon becomes steady when the handset is fully charged.

Note
Optimal battery life is reached after 3 cycles of complete charging (over 15
hours) and discharging, allowing approximately 12 hours of talk-time and 150 hours of stand-by time.
The indoor and outdoor range of the phone is up to 50 metres and 300 metres respectively. When the handset moves beyond the operation range, the antenna icon will blink.

Tip
When you reach the range limit the conversation may become crackly. Move closer to the base.
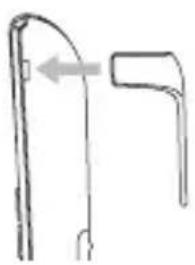
7.4 Remove/Attach belt clip
A belt clip allows you to carry your handset on your belt.
1 To remove the belt clip, simply pull the clip away from the handset.
2 To attach the belt clip to your handset, fit the tabs on the belt clip into the slots at the back of the handset and push into place.
natural_image
Simple line drawing of a bent tool or bracket with an arrow indicating direction (no text or symbols)7.5 Install optional headset
Your phone may be used with an optional headset (not included in the box). To use this feature, insert the headset plug into the headset jack. Your phone is ready for hands-free conversations.

Diameter: 2.5 mm
7.6 Power up
On the base, the screen below is shown during power up.

flowchart
graph TD
    A["Welcome Please Wait..."] --> B["TUE 00:01 AM"]
    B --> C["L1 3"]
    B --> D["L2 0"]
    C --> E["01/01/2008"]
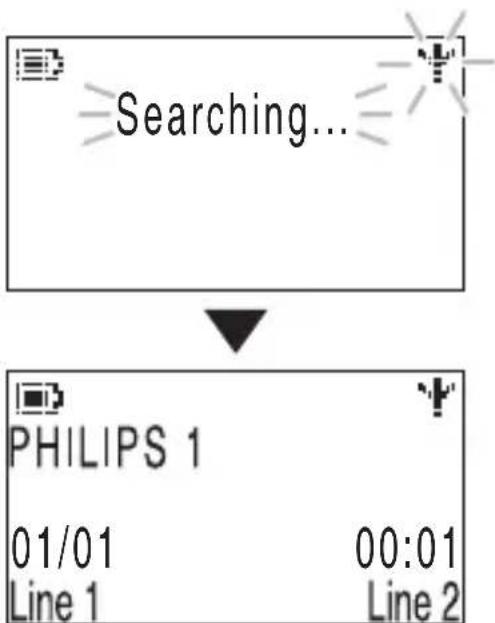
The handset will start searching and the backlight will turn on.
Handset screen
flowchart
graph TD
    A["Searching..."] --> B["PHILIPS 1"]
    B --> C["01/01"]
    B --> D["00:01"]
    B --> E["Line 1"]
    B --> F["Line 2"]
Getting started
The display will show the word “Searching” and Antenna icon flashing until it locks onto its subscribed base. Then the display shows the standby display.
7.7 Using multipacks
If you have purchased a multipack you will have additional handsets, chargers, power adaptors and AAA rechargeable batteries.
1 Plug the chargers into a power socket.
2 Install the batteries supplied into the handsets.
3 Place the handsets on the chargers to charge the batteries.
7.8 Handset menu structure
The SE659 has six menus as shown in the following table.
| Menu Name Icon | ||
| 1 Phonebook |  | |
| 2 Personal Settings |  | |
| 3 Clock and Alarm |  | |
| 4 Advanced Settings |  | |
| 5 Network Services |  | |
| 6 Answer Machine |  | |
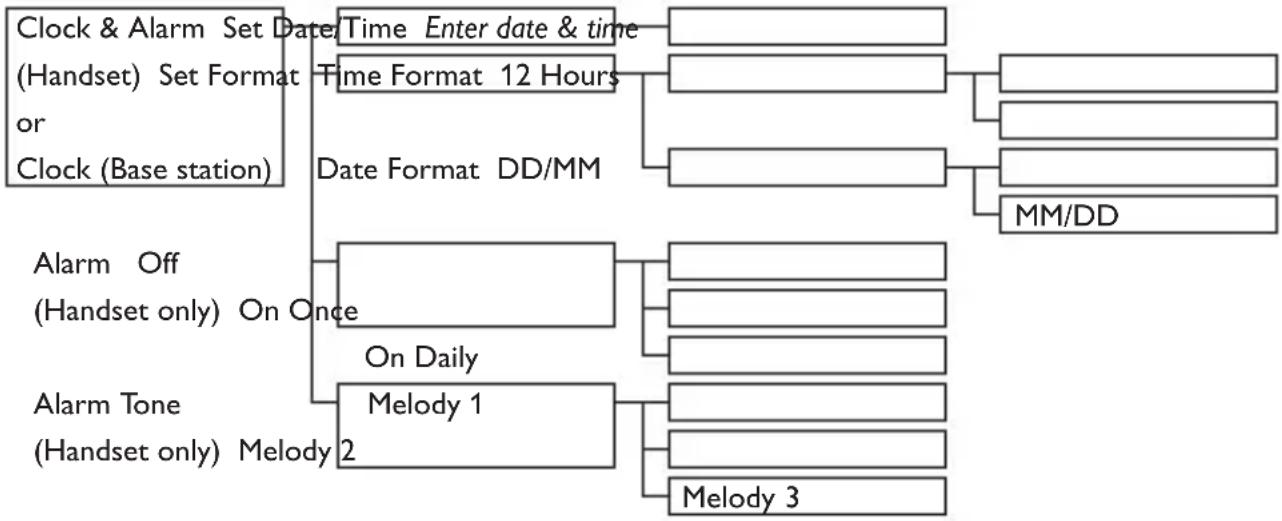
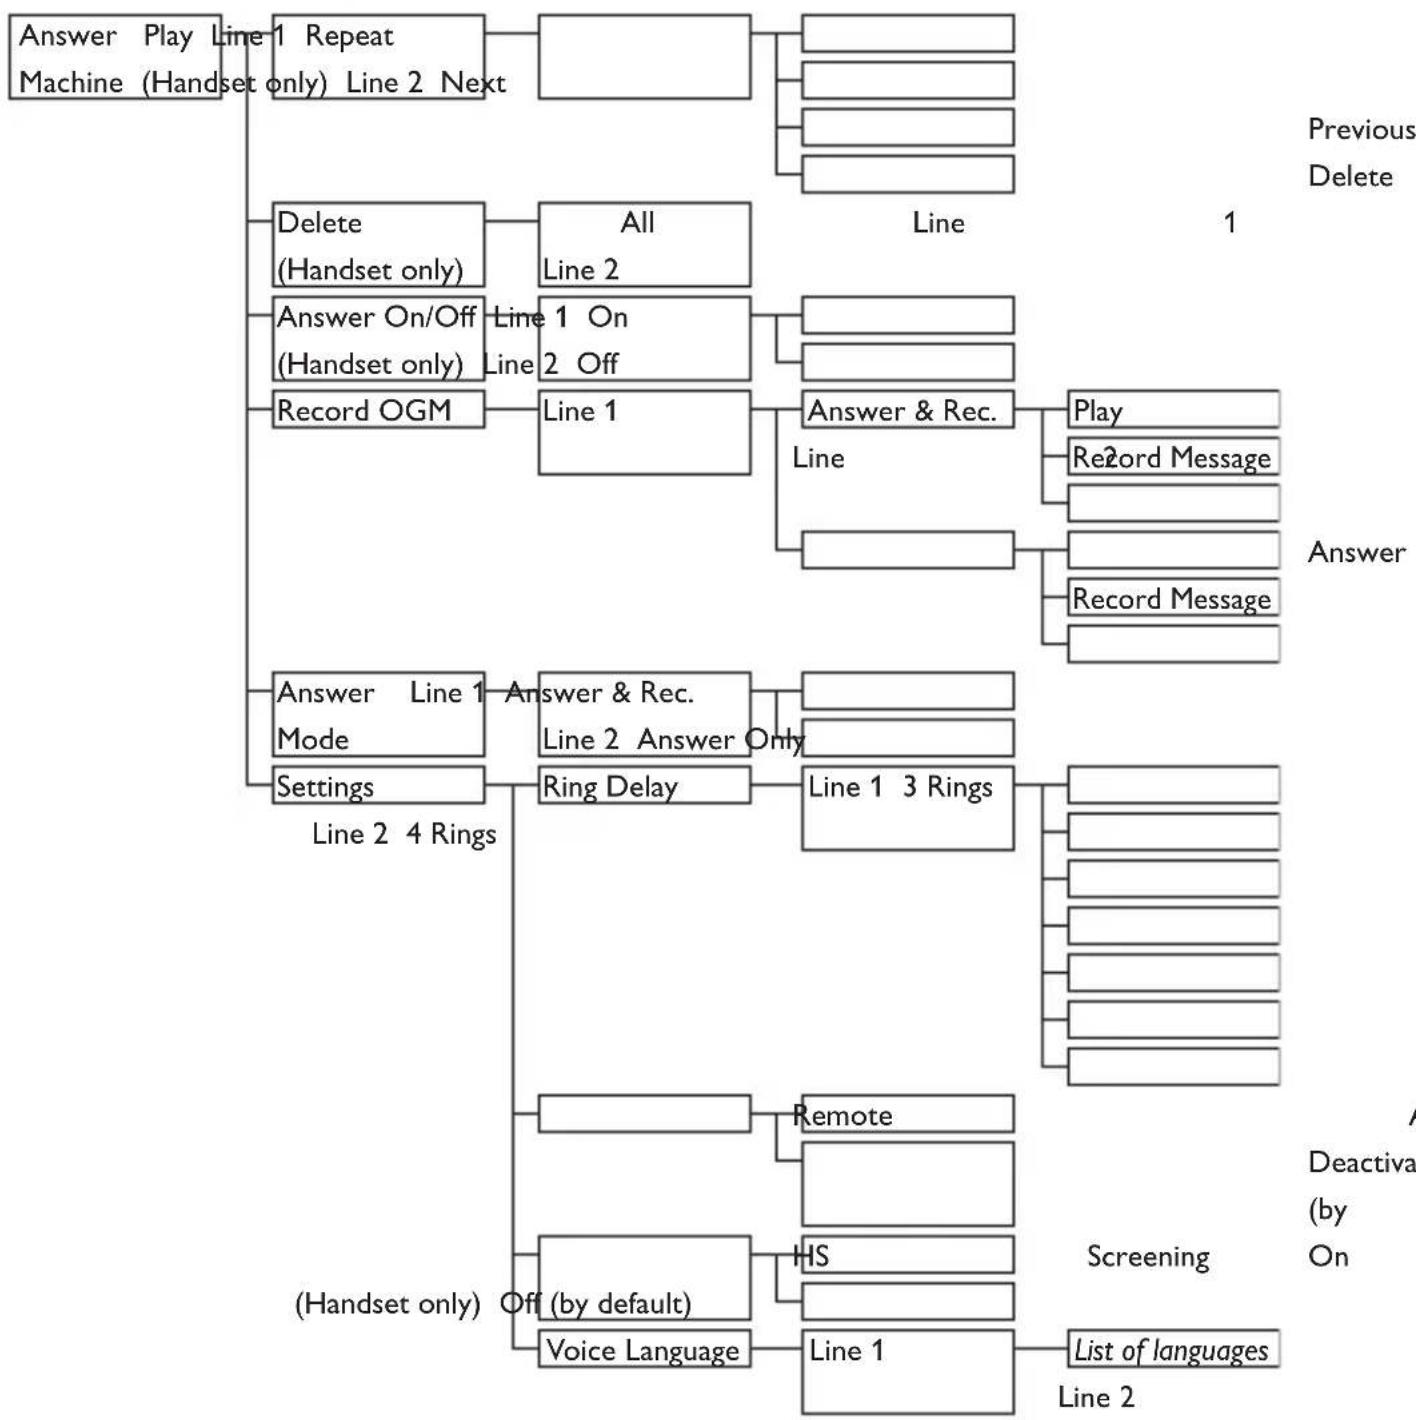
Press the menu key [menu] to enter menu mode. Use navigation keys (P) to navigate within the menus and all submenus.
Press ☐ Select to enter the next lower menu level. Press ☐ Back to go to the previous menu level.
The charts below show the menu trees of your phone.
Phonebook

flowchart
graph TD
    A["Phonebook New"] --> B["Entry Enter Name: Enter Number:"]
    B --> C["List"]
    B --> D["Edit"]
    B --> E["Select (Handset)"]
    B --> F["Delete"]
    B --> G["All?"]
    B --> H["Direct Memory"]
    C --> I["Entry list displayed"]
    D --> J["Entry list displayed only"]
    E --> K["Entry list displayed"]
    F --> L["Entry list displayed"]
    G --> M["Key list and status"]
    H --> N["Key list and status"]
    I --> O["Melody details List of melodies for selected entry"]
    J --> P["Delete?"]
    K --> Q["Edit"]
    L --> R["Delete"]
Personal Settings


flowchart
graph TD
    A["Personal Set Handset"] --> B["Name Enter name (Handset)"]
    B --> C["only"]
    D["Handset Tones Ring Volume Line 1 No bar (off) or Base Tones (Handset only) One bar"] --> E["Ring"]
    E --> F["Tones"]
    F --> G["Line"]
    G --> H["2 Name of tones 15 (Base)"]
    G --> I["..."]
    J["Line 2 No bar (off)"] --> K["Line"]
    K --> L["2 Name of tones 15 (Base)"]
    M["Name of tones 1"] --> N["Ring"]
    O["Name of tones 1"] --> P["Tones"]
    Q["Name of tones 5"] --> R["Line"]
    S["Name of tones 1"] --> T["Key"]
    U["Name of tones 5"] --> V["Beep"]
    W["Color Theme"] --> X["Language"]
    X --> Y["List of languages"]
    X --> Z["Wallpaper 1 (Handset)"]
    X --> AA["Wallpaper 2"]
    X --> AB["only"]
    X --> AC["Wallpaper 3"]
    X --> AD["Wallpaper off"]
    AE["Color 4 Contrast"] --> AF["Level 1"]
    AF --> AG["..."]
    AH["Level 5 Backlight Time (Handset only) 40 Seconds"] --> AI["20 Seconds"]
    AI --> AJ["..."]
    AK["Auto Hang-up"] --> AL["On (Handset)"]
    AL --> AM["only"]
    AN["Line Setting Auto"] --> AO["(Base station only)"]
    AO --> AP["Line 1"]
    AO --> AQ["Line"]
    AR["Off"] --> AS["2"]
Clock and Alarm

flowchart
graph TD
    A["Clock & Alarm Set Date/Time Enter date & time (Handset) Set Format or Clock (Base station)"] --> B["Time Format 12 Hours"]
    B --> C["Date Format DD/MM"]
    C --> D["MM/DD"]
    E["Alarm Off (Handset only) On Once"] --> F["On Daily"]
    G["Alarm Tone (Handset only) Melody 2"] --> H["Melody 1"]
    H --> I["Melody 3"]
Advanced Settings (Handset only)


flowchart
graph TD
    A["Advanced Set (Handset only)"] --> B["Easy Call"]
    B --> C["Mode"]
    C --> D["On"]
    D --> E["Enter Number:"]
    C --> F["Number"]
    F --> G["Enter number"]
    H["Off"] --> I["Conference"]
    I --> J["On (by default)"]
    J --> K["Barring Line2"]
    K --> L["Line1"]
    L --> M["Enter PIN"]
    M --> N["Mode"]
    M --> O["Off (by default)"]
    M --> P["Number"]
    P --> Q["Number"]
    Q --> R["...Number"]
    S["Off Change PIN"] --> T["XHD"]
    T --> U["On (by default)"]
    U --> V["Reset?"]
    V --> W["Area"]
    W --> X["Code Line2"]
    X --> Y["Line1"]
    Y --> Z["Enter number"]
    AA["Register"] --> AB["Reset"]
    AB --> AC["Reset?"]
    AC --> AD["Auto Prefix"]
    AD --> AE["Line1 Line2"]
    AE --> AF["Detect Digit: Prefix"]
    AF --> AG["Line1"]
    AG --> AH["Short Long"]
    AG --> AI["Line2"]
    AJ["Unregister"] --> AK["Reset"]
    AK --> AL["Reset?"]
    AL --> AM["Auto Prefix"]
    AM --> AN["Line1 Line2"]
    AN --> AO["Line1"]
    AO --> AP["Line1"]
    AP --> AQ["Line1"]
    AQ --> AR["Line1"]
    AS["Dial Mode"] --> AT["Line 1"]
    AT --> AU["Tone Line"]
    AU --> AV["Line1"]
    AV --> AW["Line1"]
    AW --> AX["Line1"]
    AX --> AY["Line1"]
    AY --> AZ["Line1"]
    AZ --> BA["Line1"]
    BA --> BB["Line1"]
    BB --> BC["Line1"]
    BC --> BD["Line1"]
    BE["First Ring"] --> BF["On"]
    BF --> BG["Off"]
    BG --> BH["Setting"]
    BH --> BI["Auto"]
    BH --> BJ["Line1"]
    BJ --> BK["Line1"]
    BK --> BL["Line1"]
    BL --> BM["Line1"]
Network Services (Handset only)


flowchart
graph LR
    A["Netw. Services\n(Handset only)"] --> B["Line 1 Voicemail\nLine 2"]
    B --> C["Call"]
    C --> D["Settings"]
    D --> E["Enter Number"]
Answer Machine
flowchart
graph TD
    A["Answer Play Line 1 Repeat Machine (Handset only) Line 2 Next"] --> B["All"]
    B --> C["Line 2"]
    C --> D["Answer On/Off Handset only"]
    D --> E["Line 1 On"]
    E --> F["Line 2 Off"]
    F --> G["Line 1"]
    G --> H["Answer & Rec."]
    H --> I["Play"]
    H --> J["Record Message"]
    H --> K["Record Message"]
    L["Delete Handset only"] --> M["All"]
    M --> N["Line 2"]
    N --> O["Answer On/Off Handset only"]
    O --> P["Line 1 On"]
    P --> Q["Line 2 Off"]
    Q --> R["Line 1"]
    R --> S["Answer & Rec."]
    S --> T["Play"]
    S --> U["Record Message"]
    V["Record OGM"] --> W["Line 1"]
    W --> X["Answer & Rec."]
    X --> Y["Line 2 Answer Only"]
    Y --> Z["Line 1 3 Rings"]
    AA["Answer Mode"] --> AB["Answer & Rec."]
    AB --> AC["Line 2 Answer Only"]
    AC --> AD["Line 1 4 Rings"]
    AE["Settings"] --> AF["Ring Delay"]
    AF --> AG["Line 1 3 Rings"]
    AH["(Handset only)"] --> AI["Remote"]
    AI --> AJ["Home"]
    AK["Off (by default)"] --> AL["HS"]
    AL --> AM["Line 1"]
    AM --> AN["List of languages"]
    AN --> AO["Line 2"]
    AP["Deactiva (by On)"] --> AQ["Screening"]
8 Using your phone
8.1 Make a call
8.1.1 Predialling
1 Enter the number. (A maximum of 24 digits including * and # are allowed. Press 📄 Clear to delete the last digit. Or long press to delete all.)
2 From the handset: Press 📄TALK. The line selection menu appears and the default line is highlighted. If you want to switch to the other line, scroll 📄TALK. To start the call, press 📄TALK or 📄Select (or press 📄to start in speaker mode).
• The call is initiated on the highlighted line.
From the base: Press speaker to call from the default line. When Auto is selected as the line setting, the base will automatically select a free line. To call from a particular line, press line 1 or line 2.
- The call is initiated.

Note
For the line setting on the base station, see section 12.9.
8.1.2 Direct dialling
1 From the handset: Pick up the handset. To call from the default line, press 📄 (or press 📋 to start a call in speaker mode). To call from a
particular line, press ☐ Line 1 or ☐ Line 2.
From the base: Press speaker to call from the default line. To call from a particular line, press line 1 or line 2.
2 Dial the number.
- The call is initiated.

Note
If Auto is selected as the line setting, the phone will automatically select a free line when you press TALK or on the handset or speaker on the base. For the line setting, see section 13.14 for the handset and section 12.9 for the base station.
8.1.3 Call from redial list
1 Press redial in idle mode.
2 Scroll ⓐ to an entry in the redial list.
3 From the handset: Press flush TALK. The line selection menu appears and the default line is highlighted. If you want to switch to the other line, scroll 📂. To start the call, press flush TALK or Select (or press 📋 to start in speaker mode).
• The call is initiated on the highlighted line.
From the base: Press speaker to call from the default line. When Auto is selected as the line setting, the base will automatically select a free line. To call from a particular line, press line 1 or line 2.
- The call is initiated.

Note
The handset(s) and base station each have their own redial list.
8.1.4 Call from the call log

Note
- The call log is shared between handset(s) and the base station.
- You need to subscribe to Caller Line Identification service to be able to see the caller's number or name in the call log. See section 11.1 - "Access the Call log".
1 Press call ID in idle mode.

Note
If the list is already empty, then “List Empty” is displayed.
2 Scroll ⬆ to an entry in the call list.
3 From the handset: Press 📄Bash TALK. The line selection menu appears and the default line is highlighted. If you want to switch to the other line, scroll 📄AID P-Book. To start the call, press 📄Bash TALK or 📄Select (or press 📄to start in speaker mode).
• The call is initiated on the highlighted line.
From the base: Press speaker to call from the default line. When Auto is selected as the line setting, the base will automatically select a free line. To call from a particular line, press line 1 or line 2.
- The call is initiated.

Note
For the line setting on the base station, see section 12.9.
8.1.5 Call from the phonebook
1 Press Ph.Book in idle mode.
2 Scroll ⬆ to a phonebook entry.
3 From the handset: Press flush TALK. The line selection menu appears and the default line is highlighted. If you want to switch to the other line, scroll call to press or Select (or press to start in speaker mode).
• The call is initiated on the highlighted line.
From the base: Press speaker to call from the default line. When Auto is selected as the line setting, the base will automatically select a free line. To call from a particular line, press line 1 or line 2.
- The call is initiated.

Note
For the line setting on the base station, see section 12.9.
8.1.6 Call from the phonebook while already on the phone
1 While on the phone, press Option soft key and then Select to enter the phonebook name list.
2 Scroll 📄 to a phonebook entry.
3 From the handset: To call from the default line, press 📄 (or press 📋 to start a call in speaker mode). To call from a particular line, press 📋 Line 1 or 🏠 Line 2.
From the base: Press speaker to call from the default line. To call from a particular line, press line 1 or line 2.

Note
If Auto is selected as the line setting, the phone will automatically select a free line when you press 🔊 or 📷 on the handset
or speaker on the base. For the line setting, see section 13.14 for the handset and section 12.9 for the base station.
8.1.7 Call using Direct Access Memory
Press a number key 3_def to 9_wxyz for more than 2 seconds. This invites you to select a line, then dials a stored direct access memory number on the desired line.

Note
- The handset(s) and base station each have their own direct access memories.
• See section 10.7 for instructions on how to store, edit, and delete direct access memory numbers.
8.1.8 Enter a Dialing Pause
Long press key # to enter a pause in the dialling sequence. The pause is indicated by a P.
8.2 Answer a call

Danger
When the handset rings during an incoming call, please do not hold the handset too close to your ear as the volume of the ringing tone may damage your hearing.
When the phone rings, the L1 (or L2) indicator and L1 CALL (or L2 CALL) icon appear to indicate the incoming call line. To answer, press the appropriate soft key on the handset (Line 1 or
Line 2), or line 1/line 2 on the base station.)
• The call is established.

Note
- When Auto is selected as the line setting, you can accept incoming calls on either line by pressing 🔊 or 🔒 on the handset, or speaker on the base station. When Line 1 or Line 2 is selected as the line setting, you can use these keys to accept calls on the selected line, but you must use the Line 1 or Line 2 soft keys on the handset or line 1/line 2 on the base station to accept calls on the other line.
- Incoming call has priority over other events. Whenever there is an incoming call, other status in progress such as phone setting, menu navigation, etc will be aborted.
8.2.1 Handsfree answering with handset

Danger
Handsfree activation can suddenly increase the volume in the earpiece to a very high level. Make sure the handset is not too close to your ear.
When the phone rings, and current default line is the incoming call line, press on the handset.
- The loudspeaker is activated on the handset.
8.3 Answer a call on the other line
You can put the current call on hold and accept an incoming call on the other line.
1 When there is a incoming call from the other line, the earpiece will emit a beep tone to inform you; press the other line key on the handset. • The call is established on the second line.
2 To switch back to the first caller, either hang up the second line, or place it on hold and press the first line key to resume talking with the first caller.
8.4 End a call
To end a conversation, press 📄 on the handset or speaker key on the base.
- The call ends.

Tip
When auto hang-up is on, you can simply place the handset back to its base station or charger to end the call. This feature is activated by default.

Note
The call duration (MM:SS) will be displayed on the handset screen for about 5 seconds.
8.5 Using the Redial list
The redial list stores the last 10 numbers dialed. A maximum of 32 digits can be displayed for each entry.
8.5.1 Access Redial list
1 Press redial to go to the redial list and scroll to browse the redial list.
- The last number dialed will appear first in the redial list. If the redial number matches a phonebook entry, the name will be displayed instead.
2 To open the redial list options, press ☐ Menu.

Note
Press 📄 Back to return to the previous menu.
8.5.2 View redial number details
1 Press redial in idle mode, scroll to select an entry and press → Menu.
2 View is highlighted on the screen; press Select to display information about the number dialed.
3 Press Next to display further information. Afterward, you can press Prev. to return to the former screen. After viewing, press Back to return to previous menu levels.
8.5.3 Save a redial number into the phonebook
1 Press redial in idle mode, scroll to select an entry and press → Menu.
2 View is highlighted on the screen. Scroll 📄 to Save Number and press ☐ Select.
3 Enter Name is displayed. Enter the name of the contact (maximum 14 characters) and press OK.
4 Enter Number is displayed and the selected number from the redial list appears in the number field. At this time you can edit the number if you wish to.
5 Press OK. The screen returns to the redial list.

Note
Press 📄 Clear to delete the last digit or character entered. Long press 📄 Clear to clear the entire entry.
8.5.4 Delete a redial number
1 Press redial in idle mode, scroll to select an entry and press — Menu.
2 Scroll ⬆ to Delete and press Select.
3 Delete? is displayed on the screen.
4 Press OK to confirm deletion.
• A validation tone is emitted.

Note
Press 📄 Back to discard the deletion. The screen returns to the redial list.
8.5.5 Delete all redial numbers
1 Press redial in idle mode, and press — Menu
2 Scroll ⬆ to Delete All and press Select.
3 Delete All? is displayed on the screen.
4 Press OK to confirm deletion.
• A validation tone is emitted.
9 Use more of your phone
9.1 Switch the handset off/on
To switch the handset off, press and hold in idle mode for at least 5 seconds.
To switch it on, press and hold 📄 for at least one second.
9.2 Handset keypad lock/unlock
Press and hold /*» format for 3 seconds to lock/unlock the keypad in idle mode.
9.3 Text or number entry
When you select a field in which you can enter text, you can enter the letters that are printed on the keys by pressing the relevant key once or several times. For example, to enter the name "PAUL":
1 Press 7pqrs once: P
2 Press 2 _abc once: PA
3 Press 8 _tuv twice: PAU
4 Press 5 jkl three times: PAUL
The table below gives you the character assignment during text or number entry:
| Keys Assigned characters | |
| 0 | . 0 , / : ; “‘! i ? i * + - % \ ^ ~ | |
| 1 | SPACE 1 @ _ # = < > ( ) & € £ $ ¥ [ ] { } ∩ § ... |
| 2abc | a b c 2 à â æ á ã ä ä å ç |
| 3def | d e f 3 è é ê ë Δ Φ |
| 4ghi | g h i 4 ğ í í í í Γ |
| 5jkl | j k l 5 Λ |
| Keys Assigned characters | |
| 6mno | m n o 6 ñ ó ô õ õ ò ò |
| 7pqrs | p q r s 7 β § Π Θ Σ |
| 8tuv | t u v 8 ù ú ù μ |
| 9wxyz | w x y z 9 ø Ω Ξ Ψ |

Tip
- Press Clear to delete the last digit or character entered or long press to delete all.
- Short press # to shift between lowercase and uppercase.
- Long press # to insert a pa
9.4 Call waiting
If you have subscribed to Call Waiting services, the earpiece will emit a beep tone to inform you that there is a second incoming call on the line you are currently using. The number or name of the second caller will also be displayed if you have subscribed to Caller Line Identification service (CLI). Please contact your network provider for more information on this service.
To hold the call in progress and answer the new call:
- From the handset, press ☐ Accept or 🔍 TALK.
• From the base station, press
- Accept or flash call wait.
9.5 Call in progress
Some options are available to you during a call. The available options are :
9.5.1 Adjust earpiece or speaker volume
9.5.1.1 Earpiece or Speaker volume in handset
During a call, press call ID and to select the volume level.
- The earpiece/speaker volume will be displayed as volume bar (level 1 to 5). The selected volume is saved for the next call.
9.5.1.2 Speaker volume in base
During a call, press + and - to select the volume level.
- The speaker volume will be displayed as volume bar (level 1 to 5). The selected volume is saved for the next call.
9.5.2 Mute/Unmute microphone
When the microphone is muted, your correspondent cannot hear you.
1 During a call, press mute to turn off the microphone.
2 Press mute again to turn on the microphone.
9.5.3 Activate/Deactivate handset loudspeaker mode
Danger
Handsfree activation can suddenly increase the volume in the earpiece to a very high level. Make sure the handset is not too close to your ear.
1 During a call, press 📄 on the handset to activate the loudspeaker mode.
2 Press 📄 again to return to deactivate the loudspeaker mode.
9.6 Chain dialing
This feature allows you to dial an extension to a number already saved in the phonebook during a call.
1 Press 📊 or 📋 on the handset, or press 📊 speaker on the base to take the default line. Then press Option soft key and 📌 Select to enter the phonebook list.
2 Scroll 📄 to a phonebook entry.
3 Press ☐ Select. • The first part is dialed.
4 Enter the extension.
9.7 Using the Intercom
The intercom feature allows you to make free internal calls, transfer external calls from one unit to another and use the conference option.
9.7.1 Intercom another unit
Note
If the handset does not belong to this model's series, this function may not be available.
1 Press int in idle mode.
- Intercom between the base and the handset is established immediately if there is only one handset registered to the base.
2 If there is more than 1 registered handset, scroll Ⓜ to select the unit to call and press ☐ Select.
- Once the intercom call is initiated the icon is displayed on the handset.
3 Press talk to answer an intercom call on the called handset, or speaker to answer on the base.
• The intercom is established.

Note
Pressing 📄 exit on any handset or speaker on the base will exit intercom mode and return other units to idle mode. If an external call arrives during intercom mode and you want to accept this call, you must first exit intercom mode.
• The external call is transferred.

Note
If there is no answer from the called unit, press int to resume the external call.
9.7.3 Answer an external call during intercom
1 During intercom, a new call tone is emitted when there is an incoming external call.
2 Press exit END (speaker on the base) to exit intercom mode.
3 To pick up the external call, press Line 1 / Line 2 on the handset or line 1 / line 2 on the base station.
9.7.2 Transfer an external call to another unit
1 During the call, press int to put the external call on hold (the caller can no longer hear you).
- The display shows the numbers of the handsets registered to the base and the base as well if you are looking at the display on a handset.
2 Scroll (A) to the unit you wish to transfer your external call to and press Select.
3 Press on the called unit to answer the internal call, where both internal callers can talk.
• Intercom is established.
4 Press ON the first unit to transfer the external call to the called handset.
9.7.4 Switch between an internal and external call
During the call, press int to switch between an internal or external call.
9.7.5 Establish a three-party conference call
The conference call feature allows an external call to be shared with two handsets, one handset and another external call, or one handset and the base. The three parties can share the conversation and no network subscription is required.
9.7.5.1 Conferencing between two internal units and an external line
1 During the call, press int to put the external call on hold (the caller can no longer hear you).
- The display shows the numbers of available units (base or handsets).
2 Scroll 🔊 to the number of the unit you wish to establish the conference call with and press Select.
3 Press Bank TALK on the called handset or speaker on the base to answer the internal call, where both internal callers can talk.
• Intercom is established.
4 Press Conf. soft key or long press int on the first unit to start the three party conference.
• Conference will be displayed on the screen once the conference call is established.
9.7.5.2 Conferencing between one internal unit and two external lines
1 During a call, press the line key (Line 1 or Line 2 soft key on the handset, or line 1 or line 2 on the base station) for a free line to make or answer a second external call and put the first external call on hold (the caller can no longer hear you).
2 When the second call is connected, press Option soft key, scroll 📄 to
Conference, and press Select to initiate the conference call.
- Conference will be displayed on the screen once the conference call is established.
3 To disconnect a single caller, press the corresponding line key (Line 1 or Line 2 soft key on the handset, or line 1 or line 2 on the base station) to place the caller you wish to keep speaking to on hold, and then press key on the handset or speaker on the base to hang up the other caller. Then press the other line soft key to take the remaining call off hold and continue the conversation.
To hang up both lines, press key on the handset or speaker on the base station.
9.8 Locate Handset
This feature enables you to locate a missing handset if the handset is in range and contains charged batteries.
1 Press ⬙ on the base station.
- All the registered handsets start to ring.
- Once a handset is found, press Silent on a handset to stop its ringing.
2 Press 🙏 again to end the paging. Note
If there are no key presses within 30 seconds, the handset and base station will automatically return to idle mode.
9.9 Clock and Alarm settings
This feature allows you to set the date, time and alarm settings for your phone.

Note
The alarm feature is available only on the handset.
The procedures in this section refer you to the Clock & Alarm menu. However if you access this menu from the base station, the menu name is "Clock".
9.9.1 Set Date and Time
1 Press menu in idle mode, scroll to Clock & Alarm (Clock on the base), and press Select.
2 Set Date/Time is highlighted. Press ☐ Select.
3 The last stored date and time are displayed. Enter the current time and current date (HH:MM DD/MM/YY). Press call ID to move the cursor left, or press Ph.Book to move it right. If using the 12 hour format, just after setting the minutes, use format to switch between AM and PM.
4 Press OK.
- A validation tone is emitted and the screen returns to the idle mode.

Note
You can change the format as shown in the next section.
9.9.2 Set Time and Date Format
9.9.2.1 Set Time Format
1 Press menu in idle mode, scroll to Clock & Alarm (Clock on the base), and press Select.
2 Scroll to Set Format and press Select.
3 Time Format is highlighted in the display. Press ☐ Select, then scroll to select 12Hours or 24Hours.
4 Press ☐ Select to select the option.
- A validation tone is emitted and the screen returns to the Set Format menu.
9.9.2.2 Set Date Format
1 Press menu in idle mode, scroll to Clock & Alarm (Clock on the base), and press Select.
2 Scroll to Set Format and press Select.
3 Scroll ⬆ to Date Format and press — Select.
4 Scroll 📂 to select DD/MM or MM/DD and press ☐ Select to select the option.
- A validation tone is emitted and the screen returns to the Set Format menu.
9.9.3 Set Alarm (Handset only)
1 Press menu in idle mode, scroll to Clock & Alarm, and press Select.
2 Scroll to Alarm and press Select.
3 Scroll 📐 to Off, On Once, or On Daily and press 📞 Select.
4 If you select On Once or On Daily, enter the time (HH-MM) for the alarm. (If using the 12 hour format, you can switch between AM and PM by pressing *format key.) Press OK to confirm.
- A validation tone is emitted and the screen returns to the Alarm menu. And the alarm icon is displayed.
- If you select Off, a validation tone is emitted and the screen returns to the Clock & Alarm menu.
Note
The alarm tone and alarm icon will sound/blink for 1 minute when the alarm time is reached. To mute the alarm tone, simply press any key on the handset.
9.9.4 Set Alarm Tone (Handset only)
1 Press menu in idle mode, scroll to Clock & Alarm, and press Select.
2 Scroll (P=10) to Alarm Tone and press Select.
3 Scroll 📄 to select the tone. (Three tones are available. The tones sound as you scroll.) Press ⏱ Select to confirm your selection.
- A validation tone is emitted and the screen returns to the Clock & Alarm menu.
10 Using your Phonebook
Your phone can store up to 200 phonebook entries. Each phonebook entry can have a maximum of 24 digits for the phone number and 14 characters for the name.
All names and numbers in the phonebook must be unique.
Note
Only one unit (handset or base station) can access the phonebook at a time.
10.1 Store a contact in the phonebook
1 Press menu in idle mode. Phonebook is highlighted. Press Select.
2 New Entry is highlighted. Press Select.
3 Enter Name is displayed. Enter the name of the contact (maximum 14 characters) and press OK.
4 Enter Number is displayed. Enter the number (maximum 24 digits) and press OK.
• A validation tone is emitted.
Note
- Press Clear to delete the last digit or character entered or long press to delete all.
- To return to the previous menu, press 📄 Back.

Tip
You cannot store a new phonebook entry when the memory is full. In this case, you have to delete existing entries to make space for new entries.
10.2 Access phonebook
1 Press Ph.Book in idle mode and scroll to browse the phonebook. (You can also access the phonebook through the menu mode. → Phonebook → List)
• The phonebook entries will be listed in alphabetical order.
2 To view the details, press View.
\* Tip
Instead of scrolling 📄 to browse the phonebook entries, you can press the numeric key corresponding to the first letter of the entry you wish to locate. For example, pressing 2 abc will show the entries starting with A. Pressing 2 abc again will show the entries starting with B, etc.
3 Press TALK (or speaker) on the base station) to dial the number. To return to idle mode press exit END (or speaker) on the base station).
10.3 Modify a phonebook entry
1 Press menu in idle mode. Phonebook is highlighted. Press Select.
2 Scroll 🔊 to Edit Entry and press Select.
3 Scroll ⬆D to select an entry to edit.
4 Press ☐ Select to display the name.
5 Press Clear to erase the letters one by one.
6 Edit the name and press OK to confirm.
7 Edit the number and press OK to confirm.
• A validation tone is emitted.
Note
While editing, press 📄 Clear to delete the last digit or character entered or long press to delete all.
10.4 Select phonebook melody (Handset only)
With this function you can personalize the melody played when someone in the phonebook calls you.
Note
You need to subscribe to Caller Line Identification service to be able to benefit from this feature.
1 Press menu in idle mode. Phonebook is highlighted. Press Select.
2 Scroll 📂 to Select Melody and press — Select.
3 Scroll 🔒 to the entry you want to select a melody for, then press View.
4 The screen shows the melody currently selected for that entry. Press ▼ Change to change the melody.
5 Scroll 📄 the list of melodies. (There are 15 melodies plus No Melody to choose from. The melodies play as you scroll through them.)
6 Press Select to select the melody you prefer.
- A validation tone is emitted and the screen returns to the Phonebook menu.

Note
When first ring detection is set On, a normal tone sounds first, then it changes to the personalized phonebook melody. When it is set Off, the personalized phonebook melody plays from the start. See Section 13.13 for how to set first ring detection On or Off.
10.5 Delete a phonebook entry
1 Press menu in idle mode. Phonebook is highlighted. Press Select.
2 Scroll ⬆D to Delete and press Select.
3 Scroll 📄 to select an entry to delete and press 📋 Select.
4 Delete? is displayed on the screen. Press ☐ OK to confirm deletion.
• A validation tone is emitted.

Note
Press 📄 Back to discard the deletion. The screen returns to the phonebook list.
10.6 Delete all phonebook entries
1 Press menu in idle mode. Phonebook is highlighted. Press Select.
2 Scroll ⬆ to Delete All and press Select.
3 Delete All? is displayed on the screen. Press OK to confirm deletion.
• A validation tone is emitted.
10.7 Direct Access Memory
There are 7 direct access memories (corresponding to keys 3 def to 9 wxyz) included in the phonebook. A long press on any of these keys in idle mode invites you to select a line, then dials the phone number stored in the corresponding direct access memory.

Note
Key ☐ is reserved for use with Voicemail in the network services menu. If you subscribe to this service, this allows you to dial your voice mail access number using key ☐.
10.7.1 Add/Edit Direct Access Memory
1 Press menu in idle mode. Phonebook is highlighted. Press Select.
2 Scroll 📂 to Direct Memory and press — Select.
3 Handset: Scroll 📂 to the key you wish to edit (Key 3 to Key 9) and press ☐ Select.
Base: Scroll call ID or PhBook to the key you wish to edit (Key 3 to Key 9) and press Select soft key.
- The current number stored in the direct access memory location will be displayed. If no number is stored, No number will be displayed.
4 Press ☐ Menu. Edit is highlighted; press ☐ Select.
5 The Phonebook list will be displayed. Scroll 🐎 to the Phonebook entry you wish to store in the selected direct access
memory number and press Select.
6 Press OK to confirm.
- A validation tone is emitted and the screen returns to the previous menu.
10.7.2 Delete Direct Access Memory
1 Press menu in idle mode. Phonebook is highlighted. Press Select.
2 Scroll to Direct Memory and press Select.
3 Handset: Scroll 📄 to the key you wish to delete the memory from. Base: Scroll 📄 or 🅐 to the key you wish to delete the memory from and press 📋 Select.
4 Press ☐ Menu, and then scroll to Delete and press ☐ Select.
- A validation tone is emitted and the screen returns to the previous menu.
11 Using the Call log
The call log stores the last 50 external calls and any new voice mail received. In idle mode, New Call(s) appears on the handset or base display for new and unanswered calls. If you have subscribed to Caller Line Identification (CLI), and provided the identity of the caller is not withheld, the name (or number) of the caller will be displayed.
During CLI display, you can press format to toggle area code and long distance code display on/off.
Note
If the identity of the caller is withheld, then the information will not be displayed in the call log. If you have not subscribed to Caller Line Identification service, there will not be any caller information displayed in the call log.
11.1 Access the Call log
1 Press call ID in idle mode, and scroll to browse the call log.
- The calls (missed and received) are displayed in chronological order with the most recent call at the top of the list. L1 or L2 indicates the line on which the call was received. If the call is unviewed and unanswered, New appears on the display. After you view the message, New disappears.
- Press TALK to dial out the number of the selected call log entry.
2 To view the call details, press ☐ Menu and then press ☐ Select. The display shows the caller information.
- Press 📄 Back at any time to return to the previous menu.
11.1.1 To choose the format for call log display
You must choose the correct format to dial the area code and number of the call log record chosen. The original incoming number from the call log will appear as a 7, 10 or 11-digit number.
When viewing the call log, press *format to change the format of the call log display as it should be dialed from your location. For example, if the call log entry appears as “234-567-8900”:
- Press 567-8900"

- Press 8900"

- Press 567-8900"

- Press 567-8900" aga

2 To dial the current displayed number, press TALK (or speaker on the base station).
- The call is initiated.

Note
You need to subscribe to Caller Line Identification service to be able to see the caller's number or name in the call log (see section 11.1 - "Access the Call log").
When you store an incoming number in the phonebook, the digits of the number will be saved exactly as they appear on the screen.
If the first 3 digits of the incoming number corresponds to the local area code set in your phone, they will be filtered automatically when you press the
or on the handset (or speaker on the base station) to dial. To change the local area code, see section 13.9 - "Set Area Code."
11.2 Save call list entry into the phonebook
1 Press call ID in idle mode, then scroll to select an entry and press — Menu.
2 Scroll to Save Number and press Select.
3 Enter-Name is displayed on the screen. Enter the name of the
ay "560ntact (maximum 14 characters) and press OK.
4 Enter Number is displayed and the selected number from the call
play "134appears in the number field. At this time you can edit the number if you wish to.
5 Press OK.
- A confirmation tone sounds and the screen returns to call log.

Note
Press 📄 Clear to delete the last digit or character entered or long press to delete all.
11.3 Delete a call list entry
1 Press call ID in idle mode, then scroll to select an entry and press — Menu.
2 Scroll ⬆ to Delete and press Select.
3 Delete? is displayed on the screen.
Press ☐ OK to confirm deletion.
- A validation tone is emitted, the call list entry is deleted, and the display goes to the next entry in the call list.

Note
Press 📄 Back to discard the deletion. The screen returns to the Call List menu.
11.4 Delete all call list entries
1 Press call ID in idle mode, then press Menu.
2 Scroll 🔊 to Delete All and press Select.
3 Delete All? is displayed on the screen. Press OK to confirm deletion.
- A validation tone is emitted. The display shows List Empty for 2 seconds and returns to the idle mode.
12 Personal settings
12.1 Change the Handset Name (Handset only)
You can name the handset and display the handset name in idle mode. The default handset name of your handset is Philips.
1 Press menu in idle mode, scroll to Personal Set and press Select.
2 Handset Name is highlighted. Press ☐ Select.
3 The last stored name is displayed. Press 🔍 Clear to delete the characters one by one or a long press to delete all.
4 Enter the new name and press OK to confirm.
- A validation tone is emitted and the screen returns to the Personal Set menu.
12.2 Ring Settings
12.2.1 Set the Ring Volume

Danger
When the handset rings during an incoming call, please do not hold the handset too close to your ear as the volume of the ringing tone may damage your hearing.
You can set the ring volume independently for each registered handset, as well as the base station.
Handsets have 5 ringer volume levels, plus progressive and off. The base station has 5 ringer volume levels plus off. The default setting for both handsets and the base station is level 3.
To adjust ring volume on the handset:
1 Press menu in idle mode, scroll to Personal Set, and press Select.
2 Scroll to Handset Tones and press Select. Ring Volume is highlighted. Press Select.
3 Scroll 📄 to select Line 1 or Line 2 and press — Select.
4 Scroll to your desired volume level. The ring tone sounds at each level.
5 Press OK to confirm.
- A validation tone is emitted and the screen returns to the Handset Tones menu.
To adjust ring volume on the base station:
1 Press + or - in idle mode; Select line appears.
2 Press ☐ Line 1 or ☐ Line 2 to select the line whose ring volume is being adjusted.
3 Press + or - to adjust the ring volume on the selected line.
Note
If ring volume is set to off, the icon will be displayed on the screen. If ring volume is set to progressive (handset only), the ringer will start at level 1 and go up one level volume every ring.
12.2.2 Set the Ring Tones
There are 15 ring tones available on your handset, and 5 ring tones available for the base.
1 Press menu in idle mode, scroll to Personal Set, and press Select.
2 Scroll 📄 to Handset Tones on the handset or Base Tones on the base and press 📋 Select. Then
scroll to Ring Tones and press Select.
3 Scroll ⏻ to select Line 1 or Line 2 and press — Select.
4 Scroll 📄 to your desired melody. The melodies will play as you scroll them.
5 Press ☐ Select to set the ring tone.
- A validation tone is emitted and the screen returns to the previous menu.
12.2.3 Activate/Deactivate Key Beep
A single beep tone is emitted when a key is pressed. You can enable or disable the key beep.
1 Press menu in idle mode, scroll to Personal Set, and press Select.
2 Scroll 🔊 to Handset Tones on the handset or to Base Tones on the base and press 📄 Select. Then scroll 🔊 to Key Beep and press 📄 Select.
3 Scroll 📂 to select On or Off and press ⏚ Select to confirm.
- A validation tone is emitted and the screen returns to the previous menu.
12.3 Change the Display Language
Your handset and base can support different display languages.
1 Press menu in idle mode, scroll to Personal Set, and press Select.
2 Scroll to Language and press Select.
3 Scroll to your desired language and press Select to confirm.
- A validation tone is emitted and the screen returns to the Personal Set menu.
Note
Once the display language is set, the option menus on the unit will immediately switch to display in the selected language.
12.4 Select the Display Wallpaper (Handset only)
There are 3 wallpaper images available on your handset as well as an option to set it off.
1 Press menu in idle mode, scroll to Personal Set, and press Select.
2 Scroll ⬆ to Wallpaper and press Select.
3 Scroll 🔊 to your desired wallpaper. The image on the display will change as you scroll.
4 Press Select to confirm.
- A validation tone is emitted and the screen returns to the Personal Set menu.
12.5 Select the Color Theme (Handset only)
There are 4 color themes available on your handset.
1 Press menu in idle mode, scroll to Personal Set, and press Select.
2 Scroll to Color Theme and press Select.
3 Scroll 🔊 to your desired color theme. The color theme used on the display will change as you scroll.
4 Press ☐ Select to confirm.
• A validation tone is emitted and the screen returns to the Personal Set menu.
12.6 Set the Display Contrast
You can change the contrast of the text on the display. There are 5 contrast levels available. The default is level 3.
1 Press menu in idle mode, scroll to Personal Set, and press Select.
2 Scroll to Contrast and press Select.
3 Scroll 🔒 to the desired display contrast, and press — Select to confirm.
- A validation tone is emitted and the screen returns to the Personal Set menu.
12.7 Set the Backlight Time (Handset only)
You can change the backlight timing for the display. There are 3 options available - 20, 40, or 60 seconds.
1 Press menu in idle mode, scroll to Personal Set, and press Select.
2 Scroll to Backlight Time and press Select.
3 Scroll ⏻ to the desired backlight time, and press ☐ Select to confirm.
- A validation tone is emitted and the screen returns to the Personal Set menu.
12.8 Deactivate/Activate Auto Hang-Up (Handset only)
If auto hang-up is set to On, it will automatically release the line when the phone is put back on the cradle.
If auto Hang-up is set to Off, putting the handset back on the cradle while in talk mode will switch the handset to hands free talk mode. This allows you to charge the handset during calls.
The default setting for auto hang up is On.
1 Press menu in idle mode, scroll to Personal Set, and press Select.
2 Scroll to Auto Hang-up and press Select.
3 Scroll to On or Off and press Select to confirm.
- A validation tone is emitted and the screen returns to the Personal Set menu.
12.9 Changing the Line Setting (Base Station only)
Note
See section 13.14 for how to change the line setting from the handset.
If you have two telephone lines connected to the base unit, the line setting determines how the lines are selected when making or receiving calls. When “auto” is selected as the line setting, pressing speaker automatically connects the line that is currently free when making outgoing calls, or the line that is ringing when receiving an incoming call. (If both lines are in the same state, line 1 takes priority.) If Auto Conference is activated, pressing speaker lets the base station join a conversation between the external call on line 1 and another unit.
If Line 1 or Line 2 is selected as default and the corresponding line is free, pressing speaker automatically connects to that line when making outgoing calls, or when receiving an incoming call on that line. If Auto Conference is activated, pressing speaker lets the base station join a conversation on the selected line between an external caller and another unit.
1 Press menu inidlemode, scroll call ID/Ph.Book to Personal Set and press Select soft key.
2 Scroll _call ID / ^Ph.Book to LineSetting and press Select soft key.
3 Scroll ^▲ call ID/ ^Ph.Book to select Auto, Line 1, or Line 2 and press Select soft key.
- A validation tone is emitted and the screen returns to the Personal Set menu.
13 Advanced settings
These settings can be made from any registered SE659 handset. They cannot be made from the base station.
13.1 Easy Call
When activated, this feature allows you to dial a preset number by pressing any key on the handset (except Cancel). This feature is useful for fast access to emergency services.
13.1.1 Set Easy Call to On or Off
Follow this procedure to switch Easy Call on. To switch Easy Call off, see the Note at the end of this section.
1 Press menu in idle mode, scroll to Advanced Set and press Select.
2 Easy Call is highlighted. Press Select to enter the Easy Call menu.
3 Mode is highlighted in the display. Press ☐ Select again to select Mode, then scroll ☑ to On.
4 Press ☐ Select to confirm the selection.
- If an Easy Call number has not been set, you will be prompted to input the Easy Call number.
- If an Easy call number has already been set, the screen returns to idle mode. If you want to edit the number, press Cancel and scroll to Number and press Select, edit the new number and press OK.

Note
When you switch Easy Call on, Easy Call On will be displayed on your screen in standby mode. You can still answer any incoming call as normal.
To switch Easy Call off from idle mode, press Cancel. Mode is highlighted in the display. Press Select again to select Mode, and then scroll to Off. Press Select to confirm.
13.1.2 Set Easy Call number
1 Press menu in idle mode, scroll to Advanced Set and press Select.
2 Easy Call is highlighted in the display. Press ☐ Select to enter the Easy Call menu.
3 Mode is highlighted in the display. Scroll ⬆ to Number and press Select.
4 Input the Easy Call number.
5 Press OK to confirm.
- A validation tone is emitted and the screen returns to the Easy Call menu.
13.2 Auto Conference
If activated, this feature allows another handset to join a conversation with an external call by simply pressing TALK. The default setting is On.
1 Press menu in idle mode, scroll to Advanced Set and press Select.
2 Scroll to Conference and press Select.
3 Scroll 📄 to select On or Off and press — Select to confirm.
- A validation tone is emitted and the screen returns to the Advanced Set menu.
13.3 Call Barring
If activated, this function prevents dialing out to numbers beginning with designated barring numbers. This is useful for preventing outgoing long distance calls or calls to specific prefixes. You can store up to four numbers, each with up to 4 digits.

Note
If you switch call barring on, Call Barr On is displayed on the screen in idle mode. By default call barring is off.
13.3.1 Set Call Barring Mode
By default, Call Barring is OFF.
1 Press menu in idle mode, scroll to Advanced Set and press Select.
2 Scroll 🔊 to Call Barring and press Select.
3 Scroll ⬆ to select Line 1 or Line 2 and press — Select.
4 Enter the PIN number.
- If you enter and incorrect PIN number, an error tone will sound and “Wrong PIN!” will be displayed. Then, the display will return to idle screen.
5 Mode is highlighted in the display.
Press ☐ Select.
6 Scroll to select On or Off and press Select to confirm.
• If a Call Barring number has not been set, you will be prompted to input a Call Barring number.

Note
To switch Call Barring mode off again from idle mode, press Cancel and enter the PIN number. Mode is highlighted in the display. Press
Select to select Mode, then scroll to Off and press Select.
13.3.2 Set a Call Barring number
1 Press menu in idle mode, scroll to Advanced Set and press Select.
2 Scroll to Call Barring and press Select.
3 Scroll to select Line 1 or Line 2 and press Select.
4 Enter the PIN number.
5 Mode is highlighted in the display.
Scroll Ph.Book to Number and press
Select.
6 Scroll ⬆ to select a call barring number location, and press Select to confirm.
7 Input the call barring number (up to 4 digits) and press OK.
- A validation tone is emitted and the screen returns to the Call Barring menu.
13.4 XHD Sound
XHD (extra high definition) Sound can increase voice quality when On. The default setting is On.
To turn it off:
1 Press menu in idle mode, scroll to Advanced Set and press Select.
2 Scroll 🔊 to XHD Sound and press Select.
3 Scroll to select On or Off and press Select to confirm.
- A validation tone is emitted and the screen returns to the Advanced Set menu.
13.5 Change PIN
The PIN is used for setting call barring numbers and registration/unregistration of handsets. The default PIN number is 0000. This PIN is also used to protect the settings of your handset. Your handset will prompt you whenever the PIN is required.
Note
The default PIN code is preset to 0000. If you change this PIN code, keep the PIN details in a safe place where you have easy access to them. Do not lose the PIN code.
1 Press menu in idle mode, scroll to Advanced Set and press Select.
2 Scroll to Change PIN and press Select.
3 Old PIN: will be displayed. Enter the current PIN and press OK.
- The PIN entered will be shown as asterisks (*) on the screen.
- If you enter an incorrect PIN number, an error tone will sound and “Wrong PIN!” will be displayed. Then, you will be prompted to enter the current PIN again.
4 New PIN: will be displayed. Enter the new PIN and press OK.
5 Confirm PIN: will be displayed. Enter the new PIN again and press OK to confirm PIN change.
- A validation tone is emitted, Saved! is displayed and the screen returns to the Advanced Set menu.
\* Tip
If you forget your PIN, you will need to reset your phone to its default settings. For more details, see section 13.8 - "Reset Unit."
13.6 Registration
If you wish to register an additional handset or if you have inadvertently unregistered your phone's handset and want to re-register it, follow the procedure described below. This is the procedure for registering SE65 handsets. Procedures may vary for other types of
handsets. In this case, please refer to the manufacturer of the handset. Additional handsets must be registered to the base station before you can use them. Up to 8 handsets can be registered to one base station. The PIN is required before you can register or unregister handsets.

Note
By default, the PIN is 0000.
13.6.1 Easy registration
1 Insert the unregistered handset in the base station to automatically begin registration.
2 Registering... is displayed on the screen.
- Upon successful registration, a validation tone is emitted and the handset number (1 to 8) will be assigned by the base automatically.

Note
Easy registration is possible only when the PIN has not been changed and is still the default PIN, 0000.
13.6.2 Manual registration
1 On the base station, press and hold (●) for 3 seconds. A beep sounds to indicate that the base is ready to accept registration.

Note
If no action is taken on the handset within 90 seconds, the registration procedure will be aborted. If this happens, repeat from Step 1.
2 On the handset, press menu, scroll to Advanced Set and press Select.
3 Scroll 🔊 to Register and press Select.
4 Enter the PIN when prompted and press ☐ OK to confirm.
Registering... is displayed on the screen.
- Upon successful registration, a validation tone is emitted and the handset number (1 to 8) will be assigned by the base automatically.
13.7 Unregister
1 Press menu in idle mode, scroll to Advanced Set and press Select.
2 Scroll to Unregister and press Select.
3 Enter the PIN when prompted and press ⏚ OK to confirm.
4 Scroll 📂 to select the handset number to unregister and press 📋 Select. Press ⚫ OK to confirm.
- A validation tone is emitted to indicate successful unregistration.

Note
You can only use a SE659 handset to unregister a handset that does not belong to the SE659 range.
13.8 Reset Unit
You can reset your phone to its default settings with this feature. (see 13.15 "Default Settings")
Caution
Upon reset, all your personal settings, call log and redial list entries will be deleted and the phone will return to its default settings. However, your phonebook will remain unchanged after reset.
Note
You may have to configure your phone once again.
1 Press menu in idle mode, scroll to Advanced Set and press Select.
2 Scroll to Reset and press Select.
3 Reset? is displayed on the screen.
Press ☐ OK to confirm.
• A validation tone is emitted.
- The unit is reset to its default settings. (See section 13.15 below.)
13.9 Set Area Code
This feature is useful when you have subscribed to Caller Line Identification service. It allows you to set an area code in your phone. Once the local area code is set, the phone automatically filters the area code for all incoming calls, by removing the area code for local calls and retaining the area code for calls from other areas.
If it is a local call, then only the phone number of the caller is displayed during
an incoming call or when you call the number from the call log. If it is a long distance call, then both the area code and phone number will be displayed in a proper format to be dialed out directly from the call log, or saved into the phonebook.
Note
You can enter 3 digits for the area code. You need to subscribe to Caller Line Identification service to be able to see the caller's number or name in the call log. See 8.1.4 "Call from the call log" for details.
1 Press menu in idle mode, scroll to Advanced Set and press Select.
2 Scroll to Area Code and press Select.
3 Scroll to select Line 1 or Line 2 and press Select.
4 Area Code will appear in the display. Input your area code and press ☐ OK to confirm.
- A validation tone is emitted and the screen returns to the Advanced Set menu.
13.10 Set Auto Prefix
This feature allows you to define a prefix number to be added to the beginning of a number during predialling (see "Predialling" - section 8.1.1). You may also use this feature to add a detect string to match and replace the first few digits of the number during predialing.
You can enter up to a maximum of 5 digits for the detect string and 10 digits for the auto prefix number.
1 Press menu in idle mode, scroll to Advanced Set and press Select.
2 Scroll 📂 to Auto Prefix and press Select.
3 Scroll (P1-2) to select Line 1 or Line 2 and press Select.
4 Detect Digit: is displayed on the screen. Enter a detect string number (maximum 5 digits) and press OK to confirm.
5 Prefix: is displayed on the screen. Enter the prefix number (maximum 10 digits) and press OK to confirm.
- A validation tone is emitted and the screen returns to the Advanced Set menu.

Note
If no detect string (blank) is entered, the prefix number will be automatically added to the predial number after fish TALK is pressed.
For numbers starting with *, # or P, the prefix number will not be added to the predial number after 🔊 is pressed.
13.11 Change Flash time
Flash time is the time delay by which the line will be disconnected after you press the 🔊 key. It can be set to short or long. The default value is Long.
1 Press menu in idle mode, scroll to Advanced Set, and press Select.
2 Scroll 📊 to Flash Time and press Select.
3 Scroll to Short or Long and press Select to confirm.
- A validation tone is emitted and the screen returns to the Advanced Set menu.

Note
The use of your SE659 cannot be guaranteed on all PABX.
13.12 Change the Dial Mode
The default value for dial mode that is preset in your handset should be the best suited for your subscribed network and therefore you should not need to change it.
1 Press menu in idle mode, scroll to Advanced Set, and press Select.
2 Scroll 📁 to Dial Mode and press Select.
3 Scroll to select Line 1 or Line 2 and press Select.
4 Scroll to Tone or Pulse and press Select to confirm.
- A validation tone is emitted and the screen returns to the Advanced Set menu.
13.13 Set First Ring Detection
First ring detection allows the phone to ring upon reception of the first ring signal. It is recommended that you set first ring detection Off if you subscribe to caller line identification service.
(When using personalized phonebook
melodies, this will prevent a normal ring tone from sounding before a melody starts playing.) If you do not subscribe to caller line identification service, it is recommended that you set first ring detection On. (See Section 10.4.)
1 Press menu in idle mode, scroll to Advanced Set, and press Select.
2 Scroll to First Ring and press Select.
3 Scroll 🔊 to select Line 1 or Line 2 and press — Select.
4 Scroll to On or Off and press Select to confirm.
- A validation tone is emitted and the screen returns to the Advanced Set menu.

Note
The default setting for first ring detection is On. The setting automatically switches to Off when you receive a call containing caller line identification. However, this occurs only if you do not first manually change the setting. (It does not change automatically
if you manually change the first ring setting even once.)
13.14 Changing the Line Setting (Handset only)

Note
See section 12.9 for how to change the line setting from the base station.
If you have two telephone lines connected to the base unit, the line
setting determines how the lines are selected when making or receiving calls. When “auto” is selected as the line setting, pressing TALK or automatically connects the line that is currently free when making outgoing calls, or the line that is ringing when receiving an incoming call. (If both lines are in the same state, line 1 takes priority.) If Auto Conference is activated, pressing TALK lets the handset join a conversation between the external call on line 1 and another handset.
If Line 1 or Line 2 is selected as default and the corresponding line is free, pressing 📂 or 📋 automatically connects to that line when making outgoing calls, or when receiving an incoming call on that line. If Auto Conference is activated, pressing 📂 or 📋 lets the handset join a conversation on the selected line between an external caller and another unit.
1 Press menu in idle mode, scroll to Advanced Set and press Select.
2 Scroll 📐 to Line Setting and press Select.
3 Scroll 📄 to select Auto, Line 1, or Line 2 and press 📋 Select.
- A validation tone is emitted and the screen returns to the Advanced Set menu.
13.15 Default Settings
| Parameter Default Value | |
| Ring Volume Level 3 | |
| Ring Tone Ring 1 | |
| Earpiece Volume | Level 3 |
| Speaker Volume | Level 3 |
| Key Beep On | |
| Display Language | English |
| Wallpaper Wallpaper 1 | |
| Color Theme | Color 1 |
| Display Contrast | Level 3 |
| Backlight Time | 20 Seconds |
| Auto Hang-Up | On |
| Handset Name | Philips |
| Time/Date Format | MM/DD 12Hours |
| Time/Date 00:00 01/01/2008 | |
| Set Alarm Off | |
| Alarm Tone Bell 2 | |
| Dial Mode Tone | |
| Flash Time Long | |
| PIN Code 0000 | |
| Call Barring Off | |
| Call Barring Number | Cleared |
| XHD Sound | On |
| Easy Call | Off |
| Easy Call Number | Cleared |
| Auto Prefix | Cleared |
| Set First Ring | On |
| Parameter | Default Value |
| Line Setting | Auto |
| Phonebook Memory | After a reset, phonebook is maintained as it was just before the reset |
| Redial Memory | Cleared |
| CLI Memory | Cleared |
| Network Service | Empty (no preset numbers) |
| Auto Conference | On |
14 Network Service
The network service function provides a convenient way for you to access some network provider services. A subscription is required in order to benefit from this service. Contact your network provider for details. Depending on your subscribed network, this service and menus described in this chapter may not be available in your SE659.
This setting can be made from any registered SE659 handset. It cannot be made from the base station.
14.1 Voice Mail
Use this function to access your voice mail account.
14.1.1 Access Voice Mail
1 Press menu in idle mode, scroll to Netw. Services, and press Select.
2 Scroll to select Line 1 or Line 2 and press Select.
3 Scroll to Voicemail and press Select.
4 You are now at the Voicemail menu and Call is highlighted. Press Select to connect to the voice mail account number.
Note
You can also access your voice mail number by long-pressing 📋.
14.1.2 Set Voice Mail Number
1 Press menu in idle mode, scroll to Netw. Services, and press Select.
2 Scroll to select Line 1 or Line 2 and press Select.
3 Scroll to Voicemail and press Select.
4 Scroll 🔊 to Settings and press Select.
5 Enter the voice mail account number (maximum 14 digits) and press OK.
- A confirmation tone will sound and the display will return to the Voic email screen.
15 Telephone
answering machine (TAM)
Both telephone lines of your phone feature an answering machine that records unanswered calls when it is activated. The answering machine can store up to 59 messages for each line. The maximum recording time is 3 minutes per message, or 30 minutes for all messages on both lines. The maximum length of an outgoing message is 1 minute. You can use the control keys on the base station to perform the basic functions of the answering machine such as message playback, deleting messages and adjustment of volume on the base station. For a description of each function of the control keys on the base station, please see “Overview of the base station” (section 5.4) for more details. You can also use the answering machine menu to access the answering machine functions. (Functions available differ depending on whether you are using the menu on the handset or the base station.) Those procedures are covered below. There is also a menu to set the answering machine options.
The telephone answering machine is ON by default. To switch the answering machine between on and off, press on your base station. Alternatively, you may
switch the answering machine on and off via your handset (see section 15.6.2).
15.1 Playing Messages
15.1.1 Playback of messages via handset
The answering machine message counter blinks when there are new messages and display the number of new messages. The first recorded message is played first via the loudspeaker. When all new messages have been played, the answering machine will stop and the message counter will stop blinking.
1 Press the menu key in idle mode, scroll to Answer Machine, and press Select.
2 Press Select.
3 Scroll to Line 1 or Line 2 and press ☐ Select to start playing new messages.
- The handset displays New and the number of new messages in the format 01/04, where 01 is the number of the message being played and 04 is the number of new messages.
- If there are no new messages, the handset displays the number of old messages in the same format (however ‘New’ is not displayed.) and plays the old messages.
15.1.2 Functions available during playback
During playback, you can enable the following functions by pressing
Menu. Use 📂 to scroll between the functions and press ☐ Select to confirm.
| Repeat Replay | the current message |
| Next Listen to | the next message. |
| Previous Listen | to the previous message. |
| Delete Delete | the message currently playing. |
15.2 Delete all messages from the handset
Warning
Deleted messages cannot be recovered.
Note
Unplayed messages will not be deleted.
1 Press the menu key in idle mode, scroll to Answer Machine, and press Select.
2 Scroll ⬆ to Delete All and press Select.
3 Scroll to select Line 1 or Line 2 and press Select.
4 Delete All? is displayed on the screen. Press OK to confirm deletion of all your messages.
- Waiting... is displayed while the messages are deleted; then, Deleted is displayed for 2 seconds, and the display returns to the Answer Machine menu.
15.3 Turn the Answering Machine On/Off from the Handset
You can turn the answering machine on or off from the handset as follows.
1 Press the menu key in idle mode, scroll to Answer Machine, and press Select.
2 Scroll to Answer On/Off and press Select.
3 Scroll to select Line 1 or Line 2 and press Select.
4 Scroll to select On or Off and press Select.
- A validation tone is emitted and the screen returns to Answer Machine menu.
15.4 Play, Record, or Delete an Outgoing Message
You can record a personalized message to be played when the answering machine picks up an incoming call.

Note
The maximum length of an outgoing message is 1 minute.
1 Press the menu key in idle mode, scroll to Answer Machine, and press Select.
2 Scroll to Record OGM and press Select.
3 Scroll ⏻ to select Line 1 or Line 2 and press — Select.
4 Scroll ⬆ to select Answer & Rec. or Answer Only and press Select.
5 Scroll ⬆ to select Play, Record Message, or Delete and press Select.
- If Play is selected, the current outgoing message is played.
- If Record Message is selected, a beep sounds and message recording starts automatically.
- If Delete is selected and a personal outgoing message was previously recorded, Deleted is displayed. The predefined OGM is reinstated automatically.
15.5 Set the Answer mode
There are 2 answer modes available: Answer Only and Answer & Record. By default, the answer mode is Answer & Record, which lets your caller leave a message on the answering machine. This can be changed to Answer Only mode, which does not allow your caller to leave any messages on the answering machine.
1 Press the menu key in idle mode, scroll to Answer Machine, and press Select.
2 Scroll 📁 to Answer Mode and press — Select.
3 Scroll 🔊 to select Line 1 or Line 2 and press ➤ Select.
4 Scroll 📐 to select Answer & Rec. or Answer Only and press Select.
- A validation tone is emitted and the screen returns to Answer Machine menu.

Note
Depending on the answer mode you have selected, the appropriate default outgoing
message is played once the answering machine picks up an incoming call.

Tip
You can set the answering machine to play a personalized outgoing message. See 15.4 above.
15.6 Answering Machine Settings
15.6.1 Ring Delay
This is the number of rings before the answering machine answers and starts playing your greeting message. You can set the answering machine to start playing your greeting message after 3 to 8 rings or the “Economy” option. The default ring delay is Economy.
1 Press the menu key in idle mode, scroll to Answer Machine, and press Select.
2 Scroll 📄 to Settings and press Select.
3 Ring Delay is highlighted. Press Select.
4 Scroll 📄 to select Line 1 or Line 2 and press — Select.
5 Scroll Ⓗ key to select from 3 to 8 or Economy, and press 📋 Select to confirm.
- A validation tone is emitted and the display returns to the Settings menu.

Note
If Economy is selected, the ring delay depends on the answering machine's condition.
- If there are new messages in the answering machine, it will pick up the line after 2 rings.
- If there are no new messages in the answering machine, it will pick up the line after 4 rings.
- Hence, if you want to check if you have any messages without incurring call charges, you can hang up the call after the 3rd ring.
15.6.2 Remote Access
You can check the messages on your answering machine by calling in from an outside line and entering the remote access code*. The keypad on the phone you use to dial in acts like the functions on your answering machine.

Note
This feature is deactivated by default. * The remote access code (which is the same as your PIN code) prevents any unauthorised remote access of your answering machine.
15.6.2.1 Activate/Deactivate Remote Access
1 Press the menu key in idle mode, scroll to Answer Machine, and press Select.
2 Scroll 🔊 to Settings and press — Select. Then, scroll 🔊 to Remote Access and press — Select.
3 Scroll 📄 to select Activate or Deactivate and press ☑ Select.
- A validation tone is emitted and the screen returns to Settings menu.
15.6.2.2 Controlling the Answering Machine from an external call
1 From your external phone, dial home.
• The answering machine answers and starts playing your greeting message.
2 Press # key and a voice prompt invites you to enter your PIN code. Enter the remote access code (same as your PIN code).
- If the access code is incorrect, a voice prompt "Security code error, please enter again" will sound.
- If the remote access code is correct, a short validation tone will be heard.
Note
Operation is cancelled if the PIN code is not entered within 8 seconds.
If the answering machine is off, the phone will enter into the remote access mode after 10 rings. A voice prompt invites you to enter the PIN code. Enter the PIN (default is 0000) to activate the remote access feature. You can then turn ON the answering machine and play the recorded messages.
The following table indicates how to access the functions of the answering machine using the telephone keypad.
| Key | Action |
| 1 Go to previous message. | |
| 2 Play the message. | |
| 3 Skip to the next message. | |
| 6 Delete the playing message. | |
| 7 Turn on the answering machine. | |
| 8 Stop message playback. | |
| 9 Turn off the answering machine. | |
15.6.3 Handset Screening
When Handset call screening is set to On, you can press 📋 Screen to start call screening for incoming messages. If you decide to pick up the call, press 📋. Once you pick up, the recording will stop automatically.
Note
If you have multiple handsets, only one handset can enable handset call screening for each call.
1 Press the menu key in idle mode, scroll to Answer Machine, and press Select.
2 Scroll ⬆ to Settings and press — Select. Then, scroll ⬆ to HS Screening and press — Select.
3 Scroll 🔊 to select On or Off and press — Select.
• A validation tone is emitted and the screen returns to Settings menu.
15.6.4 Setting the Outgoing Message Language
The language of the default outgoing messages and the voice prompts is originally set to English. However you can change the language of the default outgoing messages as follows.
1 Press the menu key in idle mode, scroll to Answer Machine, and press Select.
2 Scroll 📂 to Settings and press — Select. Then, scroll 📂 to Voice Language and press — Select.
3 Scroll ☐ to select Line 1 or Line 2 and press ☐ Select.
4 Scroll 📄 to select the language and press 📋 Select.
- A validation tone is emitted and the screen returns to Settings menu.
16 Technical data
Display
• Color LCD with backlight
- Selectable wallpaper
- Selectable color theme
General telephone features
- Caller name & number identification
- 5 standard + 10 polyphonic ringer melodies on the handset, and 5 standard ringer melodies on the base station
- Wideband synthesis for receiver and loudspeaker
Phonebook list, Redial list and Call log
• Phonebook list with 200 entries
• Redial list with 10 entries
- Call log with 50 entries
Battery
- 2 × AAA, 600mAh batteries
Radio specifications
• Frequency Band: 1920 - 1930Mhz
• Maximum output power: 120mW
Weight and dimensions
Base:
• 403 grams
- 64.5mm × 123.5mm × 199.5mm (H × D × W)
Handset:
• 128.5 grams
- 160mm × 28mm × 46mm
(H × D × W)
Temperature range
• Operation: Between 0 and 35°C (32 to 95°F).
- Storage: Between -20 and 70°C (-4 to 158°F).
Relative humidity
• Operation: Up to 95% at 40°C
• Storage: Up to 95% at 40°C
17 Frequently asked
questions
www.philips.com/support
In this chapter, you will find the most frequently asked questions and answers about your phone.
17.1 Connection
The handset does not switch on!
- Charge the batteries: Put the handset on the base station to charge. After a few moments, the phone will switch on.
- You may have accidentally switched off the handset. In this case, press and hold for at least 1 second to switch it on again (see section 9.1 - "Switch the handset off/on").
The handset does not charge!
- Check charger connections.

icon is not blinking during ge!
- Battery is full: There is no need to charge the battery.
- Bad battery contact: Adjust the handset slightly.
- Dirty contact: Clean the batteries contact with a cloth moistened with alcohol.
Communication is lost during a call!
- Charge the battery
- Move closer to the base station.
The phone is "Out of range"!
- Move closer to the base station.
17.2 Set-up
Searching... is displayed on handset and icon is blinking!
- Move closer to the base station.
- Make sure that your base station is on.
- Reset your unit and restart handset registration.
17.3 Sound
Handset does not ring!
Check that the Ring Volume is not set to no bars (Ringer Off), and make sure the icon is not displayed on the screen (see section 12.2.1 - "Set the Ring Volume").
Caller does not hear me!
Microphone may be muted: During a call, press mute.
There's no dialling tone!
- No power: Check the connections.
- Batteries are empty: Charge the batteries.
- Move closer to the base station.
- Wrong line cord(s) used: Use the line cord(s) provided.
- Line adaptor is required: Connect the line adaptor to the line cord(s).
Caller does not hear me clearly!
- Move closer to the base station.
- Move the base station at least one metre away from any electronic appliances.
Frequent noise interference on my radio or television!
- Move the base station as far away as possible from the electrical appliances.
17.4 Product behaviour
Keypad does not work!
- Unlock your keypad: Long press format in idle mode.
The handset warms up when making a long call and when it is on the base station!
- This is a normal behavior. The handset consumes energy while calling and charging.
The handset cannot be registered to the base station!
• Maximum number of handsets (8) has been reached. To register a new handset, unregister an existing handset.
- Remove and replace the handset batteries.
- Try again by disconnecting and connecting the base station power supply and follow the procedure to register a handset (see section 13.6).
Caller number is not displayed!
- Service is not activated: Check your subscription with your network operator.
I cannot change the settings of my voice mail!
- Operator voice mail is managed by your operator and not the phone itself. Please contact your operator should you want to change the settings.
My handset keeps going into idle mode!
- If there are no key presses for 30 seconds, the handset will automatically return to idle mode. It will also return to idle mode automatically when you place the handset back on the base station (if auto hang-up feature is on).
Phonebook entry cannot be stored and Memory Full is displayed!
- Delete an entry to free memory before saving your contact again.
The PIN code is wrong!
- The default PIN is 0000.
- Reset the handset to revert to the default PIN code if it has been changed before (see “Reset Unit” - Section 13.8).
The answering machine does not record calls.
• Make sure the answering machine is connected to the power adaptor, and
the power adaptor is plugged into mains supply which is switched on.
- Check if the answer machine is off, or Answer only mode is selected.
- Check to see if the answering machine is memory full. If so, delete some or all messages.
- Try switching off the power at the mains socket, and then turn it on again after 1 minute.
Unable to perform remote operation
- Make sure the remote access is on (see Section 15.6.2).
- Make sure you entered the correct remote access code.
- Use a touch-tone phone.

Note
If the above solutions do not help, remove the power from both the handset and the base. Wait for 1 minute and try again.
18 INDEX
A
Access phonebook 44
Access Redial list 36
Access the Call log 46
Activate/Deactivate handset loudspeaker mode 39
Activate/Deactivate Remote Access 63
Adjust earpiece or speaker volume 39
Advanced settings 52
Advanced Settings menu tree 31
Answer a call 35
Answer an external call during intercom 40
Answer Machine menu tree 32
Answering Machine Settings 63
Auto Conference 53
Auto hang-up 51
Auto Prefix 57
B
Backlight timing 51
Base station 20
Batteries 25
C
Call Barring 53
Call from redial list 33
Call from the call log 34
Call from the phonebook 34
Call using Direct Access Memory 35
Change PIN 54
Change the Dial Mode 57
Change the Display Language 49
Change the Handset Name 48
Charge battery 25
Clock and Alarm menu tree 30
Clock and Alarm settings 42
Color themes 50
Connect the base station 23
Contrast 50
D
Deactivate/Activate Auto Hang-Up 51
Default PIN code 54
Default settings 59
Delete a call list entry 47
Delete a phonebook entry 45
Delete a redial number 37
Delete all call list entries 48
Delete all messages 61
Delete all phonebook entries 45
Delete all redial numbers 37
Delete Direct Access Memory 46
Dial mode 57
Direct Access Memory 45
Direct dialling 33
Display icons and Messages 18
Display languages 49
E
Easy Call 52
End a call 36
Establish a three-party conference call 40
F
Frequently asked questions 66
Functions available during playback 61
G
Getting started 23
H
Handset menu structure 28
Handset name 48
Handset Screening 64
Handsfree answering with handset 35
I
Install battery 25
Install your phone 25
Intercom 39
K
Key Beep 49
Keypad lock/unlock 38
L
Locate Handset 41
M
Make a call 33
Modify a phonebook entry 44
Mute/Unmute microphone 39
N
Network Service 59
Network Services menu tree 32
O
Overview of the base station 20
Overview of your handset 15
P
Personal settings 48
Personal Settings menu tree 29
Personalized message 62
Phonebook menu tree 28
PIN 54
Play, Record, or Delete an Outgoing Message 62
Playback of messages via handset 61
Playing Messages 61
Power requirements 6
Predialling 33
R
Registration 54
Remote Access 63
Reset Unit 56
Ring Delay 63
Ring Settings 48
Ring tones 49
Ring Volume 48
S
Save a redial number 36
Save call list entry 47
Select phonebook melody 44
Select the Color Theme 50
Select the Display Wallpaper 50
Set a Call Barring number 53
Set Alarm 42
Set Alarm Tone 43
Set Auto Prefix 56
Set Call Barring Mode 53
Set Date and Time 42
Set Date Format 42
Set Easy Call number 52
Set Easy Call to On or Off 52
Set First Ring Detection 57
Set the Answer mode 62
Set the Backlight Time 51
Set the Display Contrast 50
Set the Ring Tones 49
Set the Ring Volume 48
Set Time Format 42
Set Voice Mail Number 60
Setting the Outgoing Message Language 65
Store a contact in the phonebook 43
Switch between an internal and external call 40
Switch the handset off/on 38
T
Technical data 65
Telephone answering machine 60
Text or number entry 38
The call log 46
Transfer an external call 40
Turn the Answering Machine On/Off from the Handset 62
U
Unregister 55
Using the Call log 46
Using the Intercom 39
Using the Redial list 36
Using your phone 33
Using your Phonebook 43
V
Voice Mail 59
W
Wallpaper images 50
What's in the box 14
×
XHD Sound 54
Y
Your phone 14

Reproduction in whole or in part is prohibited without the
written consent of the copyright owner
Document order number: 3111 285 47141 (US-EN)

Please Recycle Printed in China
- Register your product and get support at www.philips.com/welcome
- Warning
- Table of contents
- Important Safety Instructions 4
- Environment and safety 6
- Important 10
- The RBRC ® seal 12
- Your phone 14
- Conventions Used in this Manual 22
- Getting started 23
- Using your phone 33
- Answer a call on the other line 36
- U s e phone 38
- Using your Phonebook 43
- Using the Call log 46
- Personal settings 48
- Advanced settings 52
- Network Service 59
- Telephone answering machine (TAM) 60
- Technical data 65
- Frequently asked questions 66
- INDEX 69
- l m p o r
- Instructions
- IF YOUR PRODUCT UTILIZES BATTERIES, THE FOLLOWING
- ADDITIONAL PRECAUTIONS SHOULD BE OBSERVED:
- SAVE THESE INSTRUCTIONS
- Environment and safety
- Safety information
- Power requirements
- Battery requirements
- Telephone connection
- Caution
- Environmental care
- Precautions
- FCC CERTIFICATION NUMBER IS LOCATED ON THE CABINET BOTTOM
- Equipment Approval Information
- Notification to the Local Telephone Company
- Notes
- Rights of the Phone Company
- Interference Information
- Hearing Aid Compatibility (HAC)
- FCC RF Radiation Exposure Statement
- Import port
- Power requirements
- Electric, Magnetic and Electromagnetic Fields (“EMF”)
- Recycle your batteries
- The RBRC ® seal
- Service Centers
- Your phone
- What's in the box
- Handset with belt clip Base Station Battery door
- Bracket for wall mounting
- AAA rechargeable batteries
- Power supply Line cords\*
- User manual Guarantee Do not return
- Note
- Overview of your handset
- A E v e n t L E D
- B E a r p i e c e
- C D i s p l a y
- D Select key
- E B a c k / C l e a r
- F Navigation keys
- G Talk key
- H Hang-up/Exit key exit END
- L Number keys
- T Headset jack
- Display icons and Messages
- L1 IN USE
- L1 HOLD
- L1 CALL
- L2 IN USE
- L2 HOLD
- L2 CALL
- Line 1/Select/OK
- Line 2/Back/Clear
- Overview of the base station
- A Handset locator key
- E P r e v i o u s
- F Call log/Up key call ID
- G Back / Clear K
- H Er a s e K e y erase
- J Phonebook/Down key Ph.Book
- K On/Off Key onoff
- L E v e n t L E D
- M Volume Key
- N S p e a k e r k e
- O Hold/Intercom key hold intercom
- P M u t e k e y
- Q R e d i a l k e y
- R Flash/Call waiting flash call wait
- S Line 1 key
- T Line 2 key
- U Hash key #
- V Star/format key \*format
- W Number keys
- redX DC IN 6V jack
- Base station display
- A Sub-screen display area
- B Main display area
- C R i n g e r O f f
- D L1 and L2 in Main Display Area
- E S o f t k e y s
- F Answering Machine Counters
- G Message Counter
- H L1 and L2 in the Sub-screen Display Area
- Conventions Used in this Manual
- - Bold text
- - Handset and Base Station Keys
- Getting started
- Connect the base station
- Wall mounting the base
- Install your phone
- Install battery
- Charge battery
- Tip
- Remove/Attach belt clip
- Install optional headset
- Power up
- Using multipacks
- Handset menu structure
- Phonebook
- Using your phone
- Make a call
- Predialling
- Direct dialling
- Call from redial list
- Call from the call log
- Call from the phonebook
- Call from the phonebook while already on the phone
- Call using Direct Access Memory
- Enter a Dialing Pause
- Answer a call
- Danger
- Handsfree answering with handset
- Answer a call on the other line
- End a call
- Using the Redial list
- Access Redial list
- View redial number details
- Save a redial number into the phonebook
- Delete a redial number
- Delete all redial numbers
- Use more of your phone
- Switch the handset off/on
- Handset keypad lock/unlock
- Text or number entry
- Call waiting
- Call in progress
- Adjust earpiece or speaker volume
- Earpiece or Speaker volume in handset
- Speaker volume in base
- Mute/Unmute microphone
- Activate/Deactivate handset loudspeaker mode
- Chain dialing
- Using the Intercom
- Intercom another unit
- Answer an external call during intercom
- Transfer an external call to another unit
- Switch between an internal and external call
- Establish a three-party conference call
- Conferencing between two internal units and an external line
- Conferencing between one internal unit and two external lines
- Locate Handset
- Clock and Alarm settings
- Set Date and Time
- Set Time and Date Format
- Set Time Format
- Set Date Format
- Set Alarm (Handset only)
- Set Alarm Tone (Handset only)
- Using your Phonebook
- Store a contact in the phonebook
- Access phonebook
- \* Tip
- Modify a phonebook entry
- Select phonebook melody (Handset only)
- Delete a phonebook entry
- Delete all phonebook entries
- Direct Access Memory
- Add/Edit Direct Access Memory
- Delete Direct Access Memory
- Using the Call log
- Access the Call log
- To choose the format for call log display
- Save call list entry into the phonebook
- Delete a call list entry
- Delete all call list entries
- Personal settings
- Change the Handset Name (Handset only)
- Ring Settings
- Set the Ring Volume
- To adjust ring volume on the handset:
- To adjust ring volume on the base station:
- Set the Ring Tones
- Activate/Deactivate Key Beep
- Change the Display Language
- Select the Display Wallpaper (Handset only)
- Select the Color Theme (Handset only)
- Set the Display Contrast
- Set the Backlight Time (Handset only)
- Deactivate/Activate Auto Hang-Up (Handset only)
- Changing the Line Setting (Base Station only)
- Advanced settings
- Easy Call
- Set Easy Call to On or Off
- Set Easy Call number
- Auto Conference
- Call Barring
- Set Call Barring Mode
- Set a Call Barring number
- XHD Sound
- Change PIN
- Registration
- Easy registration
- Manual registration
- Unregister
- Reset Unit
- Set Area Code
- Set Auto Prefix
- Change Flash time
- Change the Dial Mode
- Set First Ring Detection
- Changing the Line Setting (Handset only)
- Network Service
- Voice Mail
- Access Voice Mail
- Set Voice Mail Number
- Telephone
- answering machine (TAM)
- Playing Messages
- Playback of messages via handset
- Functions available during playback
- Delete all messages from the handset
- Turn the Answering Machine On/Off from the Handset
- Play, Record, or Delete an Outgoing Message
- Set the Answer mode
- Answering Machine Settings
- Ring Delay
- Remote Access
- Activate/Deactivate Remote Access
- Controlling the Answering Machine from an external call
- Handset Screening
- Setting the Outgoing Message Language
- Technical data
- Display
- General telephone features
- Phonebook list, Redial list and Call log
- Battery
- Radio specifications
- Weight and dimensions
- Temperature range
- Relative humidity
- Frequently asked
- questions
- Connection
- The handset does not switch on!
- The handset does not charge!
- icon is not blinking during ge!
- Communication is lost during a call!
- The phone is "Out of range"!
- Set-up
- Searching... is displayed on handset and icon is blinking!
- Sound
- Handset does not ring!
- Caller does not hear me!
- There's no dialling tone!
- Caller does not hear me clearly!
- Frequent noise interference on my radio or television!
- Product behaviour
- Keypad does not work!
- The handset warms up when making a long call and when it is on the base station!
- The handset cannot be registered to the base station!
- Caller number is not displayed!
- I cannot change the settings of my voice mail!
- My handset keeps going into idle mode!
- Phonebook entry cannot be stored and Memory Full is displayed!
- The PIN code is wrong!
- The answering machine does not record calls.
- Unable to perform remote operation
- INDEX
- A
- B
- C
- D
- E
- F
- G
- H
- I
- K
- L
- M
- N
- O
- P
- R
- S
- T
- U
- V
- W
- ×
- Y
Brand : PHILIPS
Model : SE6591B
Category : Answering machine