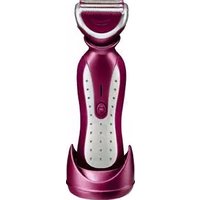
LWD500CS - Razor Conair - Free user manual and instructions
Find the device manual for free LWD500CS Conair in PDF.


| Product Type | Electric Shaver |
| Brand | Conair |
| Model | LWD500CS |
| Dimensions (approx.) | 5.2 x 2.1 x 1.8 in (13.2 x 5.3 x 4.6 cm) |
| Weight (approx.) | 0.5 lb (227 g) |
| Power Source | Rechargeable battery |
| Charging Time | 8 hours |
| Usage Time per Charge | Up to 30 minutes |
| Voltage | 100-240 V, 50/60 Hz |
| Motor Type | Rotary |
| Blades/Head | Dual foil system |
| Trimmer | Pop-up trimmer for sideburns |
| Wet/Dry Use | Dry use only (not waterproof) |
| Cleaning | Rinse under running water after removing head; brush included |
| Blade Replacement | Replace foil and cutter every 12-18 months |
| LED Indicator | Charging light |
| Travel Lock | No |
| Warranty | 2 years limited |
| Included Accessories | Shaver, charging stand, brush, cleaning cloth, user manual |
Frequently Asked Questions - LWD500CS Conair
User questions about LWD500CS Conair
0 question about this device. Answer the ones you know or ask your own.
Ask a new question about this device
Download the instructions for your Razor in PDF format for free! Find your manual LWD500CS - Conair and take your electronic device back in hand. On this page are published all the documents necessary for the use of your device. LWD500CS by Conair.
USER MANUAL LWD500CS Conair
The quick brown fox jumps over the lazy dog.
The quick brown fox jumps over the lazy dog.
The quick brown fox jumps over the lazy dog.
presented as complete summary of our data. Puesto que es complete summary of Parna
Congratulations on the purchase of your new Woman's Infiniti® by Conair® Razor. For maximum satisfaction when using this quality product, please take a minute to read the following operating and care instructions. Thank you for choosing Conair, the #1 brand in personal care appliances.
IMPORTANT SAFETY INSTRUCTIONS
When using an electrical appliance, basic precautions should always be taken, including the following:
READ ALL INSTRUCTIONS BEFORE USING
DANGER— To reduce the risk of death or serious injury from electrical shock:
-
Do not place or store shaver where the stand can fall or be pulled into a tub or sink. Do not place or drop charging stand into water or other liquid.
-
Except when charging, always unplug this appliance from the electrical outlet immediately after using.
-
Always turn this shaver off before cleaning.
- Do not reach for an appliance that has fallen into water.
WARNING— To reduce the risk of burns, fire, electrical shock, or injury to persons:
-
This appliance should not be used by, on, or near children or individuals with certain disabilities.
-
Use this appliance only for its intended use as described in this manual. Do not use attach -ments not recommended by the manufacturer. 3. Never operate this appliance if it has a damaged cord or plug, if it is not working properly, if it has been dropped or damaged, or if the stand has been dropped into water. Return the appliance to a service center for examination and repair.
-
Keep the cord away from heated surfaces.
-
Never drop or insert any object into any opening.
-
Do not use outdoors or operate where aerosol (spray) products are being used or where oxy-gen is being administered.
-
Do not use this appliance with damaged or broken foils, as injury may occur.
- Always attach plug to appliance first, then to outlet. To disconnect turn all controls to off position before removing plug from outlet.
Shaver voltage: This appliance comes with an adapter which can be used on alternating current (120v AC 60HZ) only.
SAVE THESE
INSTRUCTIONS
WARNING
-
Women whose skin is sensitive to cosmetics or easily irritated by shaving, or who suffer from a skin allergy, should test one section of the leg or arm before using the shaver.
-
The foils are thin and precisely finished pieces. Do not press hard against the foils, or drop foils. A warped or distorted foil will produce poor shaving results. Also a damaged foil may cause skin injury. A damaged foil should be replaced immediately.
-
When cleaning, use cold or warm water. Do not use hot water, sea water, or cleaners, as they can cause damage to the waterproof seals.
-
Do not leave the entire unit submerged in water for a long period of time.
-
To prevent possible damage to the foils and the cutter, women who use underarm deodorant must thoroughly clean and air-dry the foil and cutter after each use. Failure to do this may result in corrosion of the inner blades.
OPERATING
INSTRUCTIONS
IMPORTANT
This shaver has been engineered to give you a clean, close, and smooth shave. If you are not currently using a rechargeable shaver, it may take some time to adapt to this new method. Give yourself some time to determine the best
motion for the best shave
Use your shaver exclusively for three to four weeks so that your legs and underarms adjust to the shaver. At first, your shave might not be as close as you expect. However, this is normal. It takes time for your skin and hair to adjust to the new procedure. Please be patient; use your shaver 10 to 12 times before you judge its performance.
CHARGING: THE LWD500CS
Before your first shave, or after six months of non-use, charge the shaver for 15 hours to use for up to 25 minutes. After initial charge, recharge the shaver as needed.
To charge the LWD500CS, plug the power cord in an AC outlet (120V) and make sure the charging stand is placed on a firm, level surface at all times. The foils are extremely thin and precisely crafted. Do not push on the foils when inserting the shaver into the charging stand. For extra protection, keep the blade guard on while handling the unit in the charging stand as well as when not in use.
- Turn the shaver switch off. If the switch is not in the off position, the shaver will not charge.
-
While holding the charging stand with one hand, plug the shaver firmly into the charging stand with the other hand. Make sure the shaver is completely inserted.
-
Keep the shaver switch in the off position while charging.
-
The charging indicator light will stay on while the shaver is in the charging stand and is charging.
-
A fully charged shaver will give approximately 25 minutes of shaving time.
Rechargeable Model LWD500CS
Congratulations! Silky, smooth legs are just a shave away with your new Conair wet/dry rechargeable women's shaver. This shaver can be used with shaving cream, which provides a smoother, closer shave, or it can be used dry as a regular shaver. Because the shaver is fully submersible, you can conveniently shave in the shower or in the tub. And the shaver is easy to clean; simply rinse the cutting heads under a faucet, using warm or cold water (DO NOT USE HOT WATER. IT CAN DESTROY THE SHAVER'S
SEALS.)
Do not immerse any part of the charging stand or cord in water.
Do not try to plug the charging stand into an AC outlet while your hands are wet.
The outer foils and inner blades are delicate and must be handled very carefully.
BEFORE SHAVING
-
Before wet shaving, you may wish to prepare your legs and underarms with shaving cream or soap. If a soapy lather is applied to the skin, the shaver will glide smoothly over the skin and clear away oil residue while at the same time removing hair. Caution: DO NOT use shaving gels, as these products can clog your shaver foils.
-
When dry shaving, be certain that your skin is clean. If you have sensitive skin, you may want to apply talcum powder before and after you shave.
- Clean your shaver after each use. This will
insure the best performance. (Please refer to How to Clean Your Shaver section for further instructions.)
- Although the shaver is washable, do not immerse in water for extended periods of time.
Exclusive 360° Swivel
Your new Infiniti™ by Conair® women's razor features a Conair exclusive 360° swiveling head. It will automatically adjust to your different body contours for the ultimate silky smooth shave. A locking switch on the back of the trimmer allows you to position the head in a stable, non-swiveling mode. You should select the desired mode before following the Instructions for Use section.
INSTRUCTIONS FOR USE
- Remove the plastic blade guard.
- Slide the main switch up to the on position.
-
After each shave, switch the unit off, clean, and replace the blade guard.
-
Put the unit back on the charging stand for storage and/or recharging.
SHAVING YOUR LEGS/BIKINI AREA NOTE: Pushing the shaver against the skin to hard will prevent the hairs from entering the foils to be cut. Experience will show just the right pressing to use to maximize performance.
- Prepare your legs for wet or dry shaving.
-
Turn shaver on.
-
Shave with smooth, steady strokes up and down your leg.
-
Keep the full shaving head in contact with your skin
-
For best results, shave against the direction of hair growth

- Your shaver has an integral cutter feature which is ideal for shaving longer hairs. The shaver also has a bikini pop-up trimmer for your complete shaving needs. To use pop-up trimmer push button upward with thumb.
For best results, use the bikini pop-up trimmer for really long hairs.
- When you finish shaving, turn the shaver off. Important: After several uses, you will be able to determine the optimum shaving method for your legs and bikini area.
SHAVING YOUR UNDERARMS
- Prepare your underarms for wet or dry shaving. (Be sure that your skin is clean).
- Turn the shaver on

-
Lift your arm until the skin under the arm stretches slightly.
-
Use the trimmer first to cut any long hair, stroking trimmer against the direction of hair growth.
-
Hold the shaver so that it is in full contact with your skin, and shave with gentle strokes.
-
It is important to press lightly. Pressing too hard may lead to skin irritation.
-
When finished shaving, turn the shaver off. Important: After several uses, you will be able to determine the optimum shaving method for your underarms.
HOW TO CLEAN YOUR SHAVER
DETACH SHAVER HEAD AND FOIL FRAME 1. Make sure the unit is in the off position before detaching the shaver head.
- Hold the shaver body and press the release buttons on both sides of the shaver head, then remove the shaver head by pulling it straight up from the body (see Fig. 1).


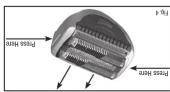
- Press the release buttons on both sides
FOR 30% MINIMUM ASSEMBLIT
NOTE WE DO NOT RECOMMEND REACLING
THE TIMMER ASSEMBLIT YOUNSEL.
THIS REQUESTS A SPECIAL TOOL FOR
AND gently remove the toll frame (see Flyg. 4).
head by pluing it straight up from the body
for the shear head, then remove the shear
NOTE WE DO NOT RECOMMEND REACLING
• US\$M is an odd
5 Boelesce - Firmly press the inner blades until they snap
Caution: MAKE SOHE YOU DO NOT CLOSE THE SMALL SPRING UNDER THE CUTTER.
guide it into the inner blade mount. - Firmly hold the new inner blade and gently
straight up (see Fig. 5). - Press the release buttons on both sides of the shaver head, then remove the shaver head by pulling it straight up from the body and gently remove the toll frame (see Fig. 4).
CALUATION: NEVER REPLACE THE CUTTER'S WITHOUT REPACKING THE FOILS AS WELL.
shaver and how quickly your hair grows. - When replacing the tolls, press the toll frame release buttons on the both sides of the shaver head, remove and then gently insert the new roll frame into position, being careful not to push on the tolls.
REPLACE THE CUTTER (INPUT BLADES)
- It is time to replace the rolls when you find your have to push harder than the server to get a close shave, or if you have to go your one year experience skin irritation. Replacement for you experience skin irritation. Replacement time will depend on how often use your
REPLACING THE FOILS FRAME
Note: if the body of the seawer becomes dirty, wipe off with a damp cloth and mild detergent or soap. Never use thinner, other solvents, or any harsh cleaners.
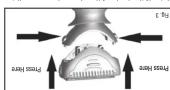
Once the shaving head is dry, hold and press back to the shaver body (see Fig. 3).
REPLACE SHAYER HEAD
NOTE Never pull on the charging stand cord. Never twist or wrap the cord around the charging - ring stand. Lay if flat in the storage pouch pro - wind with the card cord, the wide port to use -
- When shaking off excess water, hold the main unit firmly to prevent refusing the head assembly. Bly or dropping the unit.
- Do not use a drier or heater to dry the shaver. This may result in malfunction or damage to the shaver.
CAUTION
- Rinse the silver cutter and toll frame under warm or cold running water only; d out of dry before replacing toll frame.
- Allow the silver head and toll frame and cutters to air-dry before replacing toll frame.
RINSE THE SHAVER HEAD
The cutter will now be in view, be careful not to push on the tolls as they are delicate and can be
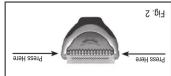
- gently press the toll frame release buttons on both sides of the shaver head and fill the toll frame straight up from shaver head (see Flyg. 2).
GARANTÍA LIMITADA POR CINCO
ANOS
Sollan Corporation Service Department 7475 N. Clan Harbas Blvd
7473 N. dien Harbor Glendale, AZ 85307
(1) 本次股东大会的决议


- IMPORTANT SAFETY INSTRUCTIONS
- READ ALL INSTRUCTIONS BEFORE USING
- SAVE THESE
- INSTRUCTIONS
- WARNING
- OPERATING
- IMPORTANT
- CHARGING: THE LWD500CS
- Rechargeable Model LWD500CS
- SEALS.)
- BEFORE SHAVING
- Exclusive 360° Swivel
- INSTRUCTIONS FOR USE
- SHAVING YOUR UNDERARMS
- HOW TO CLEAN YOUR SHAVER
- REPLACE THE CUTTER (INPUT BLADES)
- REPLACE SHAYER HEAD
- GARANTÍA LIMITADA POR CINCO
- ANOS
Brand : Conair
Model : LWD500CS
Category : Razor