
CWE4800ACS - Oven MAYTAG - Free user manual and instructions
Find the device manual for free CWE4800ACS MAYTAG in PDF.


| Product Type | Electric Single Wall Oven |
| Model | CWE4800ACS |
| Brand | Maytag |
| Color | Stainless Steel |
| Overall Width | 30 inches |
| Overall Height | 27 inches |
| Overall Depth | 24 inches |
| Oven Capacity | 4.8 cu. ft. |
| Power Source | Electric, 240 V / 60 Hz |
| Wattage | 3400 W |
| Cooking Modes | Bake, Broil, Roast, Convection Bake, Convection Roast, Warm |
| Cleaning Type | Self-Cleaning |
| Control Type | Electronic Touch Controls |
| Display | Digital Clock and Temperature Display |
| Temperature Range | 170°F - 550°F (77°C - 288°C) |
| Timer | Yes, with delayed start option |
| Interior Light | Yes |
| Oven Racks | 2 heavy-duty racks |
| Door Style | Drop-down, with window |
| Safety Features | Control lockout, auto shut-off |
| Installation Type | Built-in / Wall-mount |
| Warranty | 1 year limited parts and labor |
Frequently Asked Questions - CWE4800ACS MAYTAG
User questions about CWE4800ACS MAYTAG
0 question about this device. Answer the ones you know or ask your own.
Ask a new question about this device
Download the instructions for your Oven in PDF format for free! Find your manual CWE4800ACS - MAYTAG and take your electronic device back in hand. On this page are published all the documents necessary for the use of your device. CWE4800ACS by MAYTAG.
USER MANUAL CWE4800ACS MAYTAG
KEEP THESE INSTRUCTIONS FOR FUTURE REFERENCE
MAYTAG

natural_image
Abstract black and white geometric logo design with three curved white stripes (no text or symbols)
TABLE OF CONTENTS
Page
For Future Reference.... 1
- Model Identification .... 1
Safety Instructions 2-4
Electronic Clock 4-5
- Function Pads 5–6
Automatic Oven Cooking Feature.... 6-7
Self-Clean Oven.... 7-8
Using Your Oven.... 9-13
- Oven Characteristics....9
- Oven Controls 9
- Indicator Light 9
- Oven Racks....9
- Rack Positions 9
- Preheating 9–10
• How to Bake....10–11
• How to Roast.... 12
• How to Broil.... 13
Maintenance.... 14
• Light Replacement 14
- Removable Oven Door 14
Care and Cleaning 15
- Cleaning Chart 15
Service 16
- Troubleshooting Chart.... 16
- Adjusting Oven Temperature 17
Wall Oven Warranty....Back page
FOR FUTURE REFERENCE
Congratulations on your choice of a Maytag oven! As you use your new oven we know you will appreciate the many features that provide excellent performance, ease of cleaning, convenience and dependability.
New features have dramatically changed today's cooking appliances and the way we cook. It is therefore very important to understand how your new oven operates before you use it. On the following pages you will find a wealth of information regarding all aspects of your oven. By following the instructions carefully, you will be able to fully enjoy and properly maintain your Maytag oven and achieve excellent results with the food you prepare.
Should you have any questions about using your Maytag oven, call or write us. Be sure to provide the model and serial number of your oven.
If you have questions, write us (include your model number and phone number) or call:
Maytag Appliances Sales Company
Attn: CAIR ^SM Center
P.O. Box 2370
Cleveland, TN 37320-2370
1-800-688-9900 (USA)
1-800-688-2002 (CANADA)
1-800-688-2080 (U.S. TTY for deaf, hearing
impaired or speech impaired)
(Mon.-Fri., 8 am-8 pm Eastern Time)
Internet: http://www.maytag.com
Model Identification
If you have a question, or need service, have this information ready:
- Complete model and serial numbers from the data plate which is located:
A. Single Oven: Left side or lower right side of oven trim.
B. Double Oven: Lower right side of lower oven trim.
- Purchase or installation date from your sales slip.
Copy this information in these spaces. Keep this book, your warranty and the sales slip together in a handy place.
Model Number
Serial Number
Purchase Installation Date
Service Company & Phone Number
HOMEOWNER: Keep this booklet and the installation instructions which are included in the literature package.
INSTALLER: Leave this booklet with the appliance for future reference.
SAFETY INSTRUCTIONS
The following instructions are based on safety considerations and must be strictly followed to eliminate the potential risks of fire, electric shock or personal injury.
Installation
Adjustment and service of this unit must be done by a qualified installer to insure proper operation, avoid possible damage of the unit or injury to an unqualified installer. Be sure appliance is properly grounded to avoid shock hazard.
Installation of unit must be in accordance with local and national fire codes and with clearances from combustible surface or materials as listed in the Installation Instructions.
Be certain all packing materials are removed from the oven before operating, to prevent fire or smoke damage should the packing material ignite.
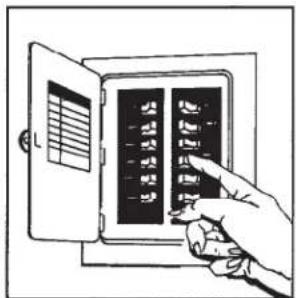
Circuit Breaker or Fuse
Locate and mark circuit breaker or fuse. Never replace a blown fuse or reset a circuit breaker
until you know what has caused the fuse to blow or circuit to be broken. Always replace a blown fuse with one of the correct amperage, do not use a substitute.
natural_image
Illustration of a hand inserting a component into an open electrical box with buttons (no text or symbols visible)General
Never use oven to heat or warm a room.
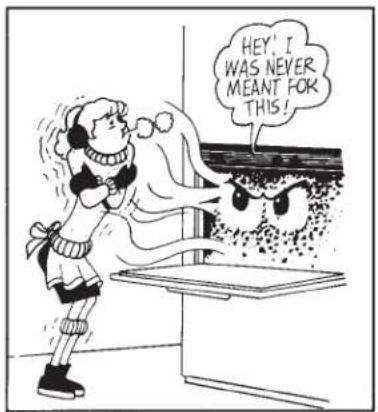
This
instruction is based on safety considerations, to prevent potential hazards and to prevent damage to the unit.
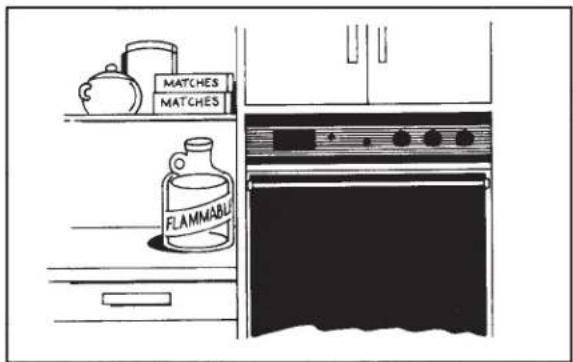
Do not store or use gasoline or other flammable materials, vapors and liquids in the vicinity of this or any other appliance.
Servicing
Do not repair or replace any part of this unit unless such service is specifically recommended in this booklet. All servicing not specifically recommended in this booklet must be referred to a qualified service technician.
Always disconnect unit or cut-off power to unit by removing fuse or by tripping circuit breaker manually to the "off" position, before any servicing.
IN CASE OF FIRE:
- Turn oven controls and ventilating hood, if equipped, off immediately.
- Smother fire or flame, use dry chemical, or a foam-type extinguisher.
- If the fire is in the oven, smother it by closing the oven door.
- Baking soda is also effective, if available.
- Do not use water on grease fires.
Oven Safety
Use care when opening oven door. Let hot air or steam escape before removing or replacing food.
Slide oven rack out to add or remove food, using dry, sturdy pot holders. Always avoid reaching into oven to place or remove food.
Always place oven racks in the desired positions while oven is cool. If a rack must be removed while hot, be careful to avoid contact of pot holders with hot oven elements.
Child Safety
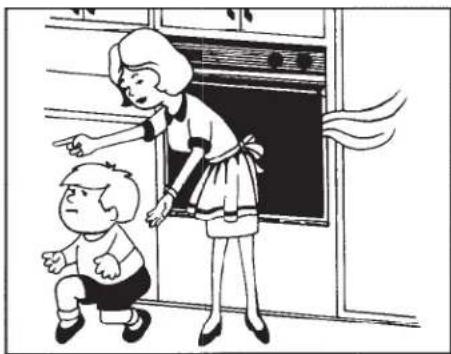
- Do not leave children alone or unsupervised near the appliance when it is in use or is still hot.
natural_image
Illustration of a girl and child interacting in a kitchen, one pointing at the window (no text or symbols)-
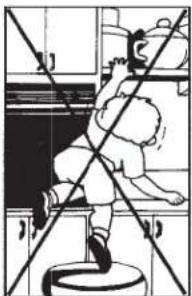
Children should never be allowed to sit or stand on any part of the appliance.
-
Children MUST be taught that the appliance and utensils in or on it can be hot.
-
Children should be taught that an appliance is not a toy. They should not be allowed to play with controls or other parts of the unit.
-
Let hot utensils cool in a safe place, out of reach of small children.
-
Caution: Do not store items of interest to children in cabinets above an appliance. Children climbing on the appliance to reach items could be seriously injured. An appliance should not be used cabinets above.
natural_image
Illustration of a child climbing stairs with diagonal lines, no text or symbols presentCooking Safety
Do not use oven as a storage area for food or cooking utensils.
Self-Cleaning Oven
Do not clean door gasket. The door gasket is essential for a good seal. Care should be taken not to rub, damage, or move the gasket. Do not use oven cleaners or oven liner protective coating of any kind in or around any part of the self-clean oven. Clean only parts listed in this booklet. Before self-cleaning the oven, remove broiler pan, oven racks, and other utensils.
Venting
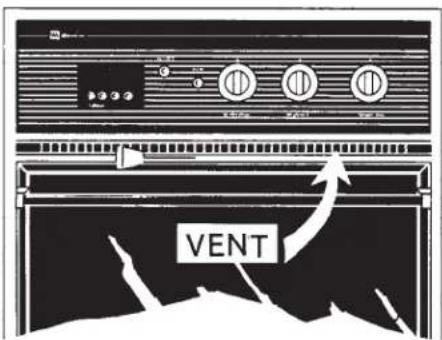
Never block oven vent. Blockage of vent prevents proper oven air circulation and will affect oven performance. Avoid touching oven vent area while oven is on and for several minutes after oven is turned off. Some parts of the vent and surrounding area become hot enough to cause burns.
Important Safety Notice and Warning
The California Safe Drinking Water and Toxic Enforcement Act of 1986 (Proposition 65) requires the Governor of California to publish a list of substances known to the State of California to cause cancer or reproductive harm, and requires businesses to warn customers of potential exposures to such substances. Users of this appliance are hereby warned that when the oven is engaged in the self-clean cycle, there may be some low level exposure to some of the listed substances, including Carbon Monoxide. Exposure to these substances can be minimized by properly venting the oven to the outdoors during the self-clean cycle.
Cleaning
Be sure all appliance parts are cool before touching or cleaning them. Clean oven with caution. If a wet sponge or cloth is used to wipe spills on a hot cooking area, be careful to avoid steam burns. Some cleaners can produce noxious fumes if applied to a hot surface.
Storage Above Oven
If storage is provided, it should be limited to items which are used infrequently and which are safely stored in an area subjected to heat from an appliance. Temperatures in storage areas above the unit may be unsafe for some items, such as volatile liquids, cleaners or aerosol sprays.
Plastics
Many plastics are vulnerable to heat. Keep plastics away from parts of the appliance that may become warm or hot.
Aerosol Sprays
Many aerosol-type spray cans are EXPLOSIVE when exposed to heat and may be highly flammable. Avoid their use or storage near a hot appliance.
This appliance has been tested for safe performance using conventional cookware. Do not use any devices or accessories that are not specifically recommended in this manual. Do not use eyelid covers for the surface units, stove top grills, or add-on oven convection systems. The use of devices or accessories that are not expressly recommended in this manual can create serious safety hazards, result in performance problems, and reduce the life of the components of the appliance.
Grease
Use extreme caution when moving the grease kettle or disposing of hot grease.
Hot grease is flammable. Avoid letting grease deposits collect around appliance, range hood or vent fan. Do not leave container of grease around a cooking appliance. In the event of a grease fire, do not attempt to move pan. Cover pan with lid to extinguish flame and turn surface element off.
Do not douse flame with water. Use a dry chemical or foam-type fire extinguisher, if available, or sprinkle heavily with baking soda.
Spills or boilovers which contain grease should be cleaned up as soon as possible. If they are allowed to accumulate they could create a fire hazard.
CLOCK AND OVEN CONTROL
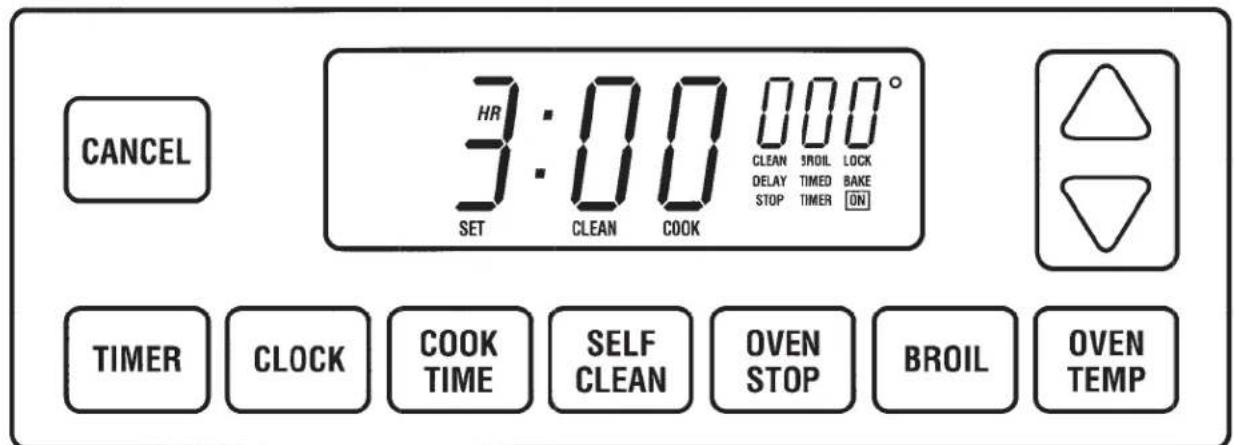
(Note: All indicator words are displayed to show their location.)
The electronic clock and oven control on your Maytag oven is used for the time-of-day clock, timer, bake, broil, delay start and self-clean functions. A beep will sound each time a function pad is pressed. At the end of an operation, consecutive beeps will sound.
The display on the control will flash when power is first supplied to the oven or if there is a power failure. Once the time-of-day clock has been set (see Setting the Clock, page 5), the display will stop blinking.
The oven will automatically turn off if it is left on for 12 hours.
NOTE: The electronic control is equipped with a self-diagnostic feature for service use ONLY. If a fault code (F plus a number, ex. F1) appears in the display along with a continuous beeping sound, press the CANCEI pad. See Before Calling a Service Technician (page 16) if the fault code reappears in the display.
The following pads are found on your Maytag electronic clock and oven control:
Cancel Pad
Press this pad to cancel all operations except the time-of-day clock and timer. If you are ever unsure if you've programmed the control correctly, press the CANCEL pad and start over.
▲ and ▼ Pads
Press or press and hold these pads to enter the time or temperature desired. These pads are also used to select Hi or Lo broil.
Timer Pad
The timer can be set from 1 minute to 9 hours, 50 minutes. It will count down by seconds (when set for 1 minute) or minutes (when set for 2 minutes or more time). See below for instructions on setting the timer.
Clock Pad
Use this pad to set the time-of-day clock. For instructions to do this, see top of next column.
Setting the Clock and Timer
Timer
- Press TIMER.
- Press ▲ or ▼ pad to desired time.
TIMER can be set from 1 minute (0HR:01) up to 9 hours and 50 minutes (9 HR:50).
The timing operation will start automatically. Colons will flash in the display to indicate a timing operation. One long continuous beep signals the end of the timing operation and "End" briefly appears in the display. The time of day will automatically reappear in the display. The TIMER does not control the oven.
To cancel: Press TIMER and hold for 3 seconds. Time of day will reappear after a slight delay.
Clock
- Press CLOCK.
- Press ▲ or ▼ pad until display shows correct time of day.
When power is first supplied to oven or if there has been a power failure, the display will flash. Follow above instructions to set clock. Clock time cannot be changed when oven is set for a cook or self-clean operation. Cancel operation to set clock.
Press CLOCK to recall time of day when another function is displayed.
Cook Time/Stop Time
To begin cooking immediately:
- Press COOK TIME. Enter desired cooking time by pressing the ▲ or ▼ pad.
- Press OVEN TEMP. Enter oven temperature with ▲ or ▼ pad.
To delay the start of cooking:
- Press COOK TIME. Enter cooking time with ▲ or ▼ pad.
- Press OVEN STOP. Enter the time you wish the oven to turn off with ▲ or ▼ pad.
- Press OVEN TEMP. Enter oven temperature with ▲ or ▼ pad.
The oven will automatically turn on and off at the preset times. 3 beeps will signal the end of cooking. "End" will appear in the display and continuous beeps will prompt you to remove the food from the oven.
Press CANCEL to stop end-of-cooking beeps. See pages 6 and 7 for additional information.
Clean
- Press SELF CLEAN.
- Close and lock oven door.
- Oven will automatically clean for 3 hours.
Select 2 or 4 hours by pressing ▲ or ▼ pad.
“door” will appear in display until the door is properly locked. See pages 7 and 8 for additional information.
Broil
- Press BROIL.
- Press ▲ pad to select HI broil or ▼ pad to select Lo broil.
See page 13 for additional information.
Oven Temp
- Press OVEN TEMP.
- Press ▲ or ▼ pad until desired oven temperature appears in the display.
See pages 9–12 for additional information on baking and roasting.
▲ and ▼ Pads
Press the ▲ or ▼ pad to enter time or temperature. These pads are also used to select HI or Lo broil.
ADDITIONAL INFORMATION:
A beep sounds each time a pad is pressed.
If a fault code (example: F 2) is displayed and beeps sound, press CANCEL. If fault code continues, see page 16.
AUTOMATIC OVEN COOKING FEATURE
The Automatic Oven Cooking feature is used to turn the oven on and off at a preset time of day.
The Automatic Oven Cooking feature will not operate unless the clock is functioning and is set at the correct time of day.
Highly perishable foods such as dairy products, pork, poultry, stuffing, seafoods, or baked goods are not recommended for delay start cooking. If cooking more than one food, select foods that cook for the same length of time and at the same oven temperature.
Basic Instructions
Example: Food is to cook for 2 hours and 30 minutes (2:30) at an oven temperature of 350^ . You wish the food to be cooked by 6 o'clock (6:00).
- Press COOK TIME pad.
- Press ▲ pad until 2:30 (2 hours and 30 minutes) is displayed.
- Press OVEN STOP pad.
- Press ▲ pad until 6:00 (6 o'clock) is displayed.
- Press OVEN TEMP pad.
-
Press ▲ or ▼ pad until 350° is displayed.
-
Press CLOCK pad and time of day reappears in the display.
The oven will turn on at 3:30; will cook the food for 2 12 hours at 350^ F . and will automatically turn off at 6:00.
NOTE: If you wish cooking to begin immediately, omit steps 3 and 4.
To set oven for immediate start:
- Press COOK TIME pad.
TIMER
CLOCK
COOK TIME
SELF CLEAN
OVEN STOP
BROIL
OVEN TEMP
- 0 HR:00 will appear in the display and SET COOK TIME will flash in the display.
-
Push the ▲ or ▼ pad to enter the cooking time.
-
The display will show cooking time in HOURS:MINUTES. Cooking time can be set from 10 minutes (0:10) up to 11 hours and 55 minutes (11:55).
- If you delay in entering the cooking time, the program will automatically cancel and the time of day will reappear in the display.
-
If you set the cooking time but delay in entering the oven temperature, beeps will sound and the display will flash 000.
-
Press OVEN TEMP pad.
- Enter oven temperature with the ▲ or ▼ pad.
- If you press the OVEN TEMP pad but delay in entering the temperature, the program will cancel and the display will return to the time of day.
- Press CLOCK pad and the time of day will reappear in the display. TIMED BAKE ON indicator words will remain in the display to show that the oven has been set for Automatic Oven Cooking.
- After a few seconds, the oven will turn on and the display will begin to count down.
- At the end of the preset cooking time, the oven will automatically turn off. "End" will appear in the display and 3 beeps will signal the end of cooking. Continuous beeps will prompt you to remove food from the oven.
- Press CANCEL to cancel the beeps and remove food from the oven.
To set oven for delayed start:
-
Press COOK TIME pad.
-
0 HR:00 will appear in the display and SET COOK TIME will flash in the display.
- Press the ▲ or ▼ pad to enter the cooking time.
- The display will show cooking time in HOURS:MINUTES. Cooking time can be set from 10 minutes (0:10) up to 11 hours and 55 minutes (11:55).
TIMER
CLOCK
COOK TIME
SELF CLEAN
OVEN STOP
BROIL
OVEN TEMP
- Press OVEN STOP pad.
- SET STOP TIME will flash in the display.
- Press the ▲ or ▼ pad to enter the stop time.
- If you delay in entering the stop time, beeps will sound and the display will flash SET BAKE and 000°.
- Press OVEN TEMP pad.
- Enter oven temperature with the ▲ or ▼ pad.
- Press CLOCK pad to return the current time of day to the display. DELAY BAKE and the preset oven temperature will appear in the display to show that the oven has been set for a delay start cooking operation.
- The oven will automatically turn on at the preset time and TIMED BAKE ON will appear to indicate that the food is cooking.
- The oven will automatically turn off at the preset stop time. "End" will appear in the display and continuous beeps will signal the end of cooking.
- Press CANCEL to cancel the beeps and remove food from the oven.
Additional Information
If you delay more than 30 seconds between touching a pad and pressing the ▲ or ▼ pad, the display will either return to the previous setting or the time of the day will reappear and the program will cancel.
To recall the preset stop time or cook time, just press the corresponding pad.
To reset or cancel the program, press the CANCEL pad.
At the end of the cooking operation, continuous beeps will sound until the CANCEL pad is pressed.
SELF-CLEAN OVEN (IF EQUIPPED)
The self-clean oven uses temperatures above normal cooking temperatures to automatically clean the oven interior.
Avoid contact with the oven door and window as these areas become warm during the self-clean cycle.
It is better to clean the oven regularly rather than to wait until there is a heavy build-up of soil in the oven.
Basic Instructions
- Close oven door.
- Move the door lock lever to the right or locked position.
- Press SELF CLEAN pad.
- Press ▲ or ▼ pad to select cleaning time.
• Light soil – 2 hours
• Average soil – 3 hours
- Heavy soil – 4 hours
Before Self-Cleaning
Remove all pans and the oven racks from the oven. The racks will discolor and may not slide easily after a clean cycle.
Turn off oven light before clean cycle. The life of the bulb may be shortened if left on during the clean cycle.
Clean oven frame, door frame and around the oven vent with a non-abrasive cleaning agent such as Bon Ami or soap and water. These areas are not exposed to cleaning temperatures and should be cleaned to prevent soil from baking on during the clean cycle.
Wipe up excess grease or spillovers from the oven bottom to prevent excessive smoking during the clean cycle.
Wipe up acid spillovers such as lemon juice, tomato sauce or milk-based sauces and sugary spillovers. Porcelain enamel is acid resistant, not acid proof. The porcelain finish may discolor if acid spills are not wiped up immediately.
Do not use oven cleaners or oven liner protective coatings of any kind on the self-clean oven finish or around any part of the oven. To prevent damage, do not clean or rub the gasket around the oven door. The gasket is designed to seal in heat during the clean cycle.
During Self-Cleaning
When the SELF CLEAN pad is pressed and the door is locked, the oven will automatically begin to heat to cleaning temperatures.
As the oven reaches cleaning temperatures, the LOCK indicator will turn on to show that an internal lock mechanism has engaged. At this point, the oven door can not be unlocked and opened.
To prevent damage to the door and lock lever, do not force the door open when the LOCK indicator is displayed.
The first few times the oven is cleaned, some smoke and odor may be detected. This is normal and will reduce or disappear with use. If the oven is heavily soiled, or if the broiler pan is left in the oven, smoke and odor may occur.
As the oven heats and cools, you may hear sounds of metal parts expanding and contracting. This is normal and will not damage your appliance.
After Self-Cleaning
About one hour after the end of the clean cycle, the internal lock will disengage and the LOCK indicator will turn off. At this point, the door can be unlocked and opened. Move the door lock lever to the left or unlocked position and open the door.
Some soil may leave a light gray, powdery ash which can be removed with a damp cloth. If soil remains, it indicates that the clean cycle was not long enough. The soil will be removed during the next clean cycle.
If the oven racks do not slide smoothly after a clean cycle, wipe racks and embossed rack supports with a small amount of vegetable oil to restore ease of movement.
Fine, hair-like lines may appear in the oven interior or oven door. This is a normal condition resulting from heating and cooling of the porcelain finish. These lines do not affect the performance of the oven.
To set oven for a self-clean cycle:
-
Remove oven racks and close the oven door.
-
Move the door lock lever to the right or locked position.
-
Press the SELF CLEAN pad.
- 3 HR:00 will appear in the display and SET CLEAN TIME will flash in the display. After a few seconds delay, the oven will automatically turn on. CLEAN and ON will appear in the display.
- If you wish to change the cleaning time, press the SELF CLEAN pad and press the ▲ or ▼ pad to select 2 hours for light soil or 4 hours for heavy soil.
- "door" will appear in the display and continuous beeps will sound if the oven door is not locked.
- If the door is not locked or the clean time is not entered within 30 seconds of pressing the SELF CLEAN pad, the program will automatically be cancelled.
- Press CLOCK pad and the current time of day will reappear in the display. CLEAN and ON will remain in the display to show that the oven is in a clean cycle.
About one hour after the clean cycle ends, the LOCK indicator will turn off and the oven door can be opened.
The oven door and door lock lever will be damaged if the oven door is forced to open when the LOCK indicator is still displayed.
To cancel clean cycle:
-
Push CANCEL pad.
-
If the LOCK indicator is displayed, allow oven to cool up to one hour. Once LOCK indicator turns off, the door can be unlocked and opened.
If the LOCK indicator is not displayed the oven door can be unlocked and opened.
USING YOUR OVEN
Oven Characteristics
Every oven has its own characteristics. You may find that the cooking times and temperatures you were accustomed to with your previous oven may need to be altered slightly with your new oven. Please expect some differences with the new appliance.
Oven Control for Lower Oven or Double Oven Models
radar
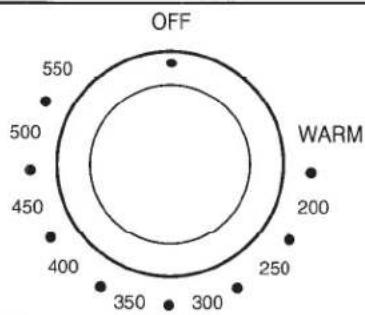
| Angle | Value | |---|---| | OFF | 550 | | WARM | 200 | | Other | 250 | | Other | 300 | | Other | 350 | | Other | 400 | | Other | 450 | | Other | 500 | | Other | 550 |The lower oven of the double wall oven has a mechanical control to operate the oven. The knob is labeled LOWER OVEN TEMP. This knob is used to select the oven temperature. Always turn knob just to the desired temperature, never to a higher temperature and then back. This allows for more precise oven temperatures and is especially important if oven is being set for a critical baking operation.
IMPORTANT (Self-Clean Oven Only): DO NOT MOVE DOOR LOCK LEVER TO THE RIGHT DURING BROILING OR BAKING. The oven door may lock and will not unlock until the oven cools.
Fan
A fan automatically turns on whenever the oven is set for a cooking or self-clean operation. The fan will automatically turn off when the oven has cooled
To operate the lower oven: Turn lower OVEN TEMP knob to desired temperature. After cooking, turn the lower OVEN TEMP knob to OFF and remove the food from the oven.
Indicator Light
The OVEN indicator light turns on whenever the lower oven is turned on for a cooking operation. The light turns on and off as the oven elements cycle on and off.
Oven Racks
Wall ovens are equipped with two lock-stop oven racks. One rack is a "straight" rack while the other is an "off-set" rack. The lower oven has only one oven rack.
When using two racks for baking, place the off-set rack in the bottom rack position. It is recommended that the straight rack be used for broiling.
To remove: Be sure rack is cool. Pull rack out to the "lock-stop" position. Tilt up and continue pulling until rack releases.
To replace: Place rack on rack supports, tilt up and push toward rear of oven. Pull rack out to "lock-stop" position to be sure rack is correctly replaced.
Rack Positions
Never place pans directly on the oven bottom. Do not cover entire rack with aluminum foil or place foil directly under utensil. To catch spillovers, cut a piece of foil a little larger than the pan and place it on the second rack located below the utensil.
Rack 4 — (top of oven) used for broiling thin foods and for two rack baking.
Rack 3 — used for baking and for broiling thicker cuts of meat.
Rack 2 — used for one- or two-rack baking and for roasting some meats.
Rack 1 — (bottom of oven) for cooking larger foods and for baking angel food cake or pie shells.
Place food in oven on center of rack. Allow 1 or 2 inches between edge of utensil and oven sides or adjacent utensils. If cooking on two racks, stagger foods on racks. Use rack positions 2 and 4 when cooking on two racks.
Preheating
Preheating is necessary for proper baking results. It is not necessary for broiling or roasting. Allow the oven to heat until the desired oven temperature is reached (approximately 10-15 minutes).
Selecting a temperature higher than desired will not preheat the oven any faster. Preheating at a higher temperature may have a negative effect on baking results.
How to Bake in Upper Oven
Basic Instructions
- Position oven racks.
- Press OVEN TEMP pad.
- Press ▲ or ▼ pad to desired temperature.
To set oven for baking or roasting:
- Press OVEN TEMP pad.
- 000^ and BAKE indicator words will appear in the display.
TIMER
CLOCK
COOK TIME
SELF CLEAN
OVEN STOP
BROIL
OVEN TEMP
- The display will return to the current time of day if the oven temperature is not entered within 30 seconds.
-
To enter the oven temperature, press the ▲ or ▼ pad until the desired temperature is displayed.
-
350 will appear in the display when the SET pad is pressed. The temperature can be set from 170 to 550^ .
- The oven will turn on within a few seconds. The ON indicator word and 75° or the actual oven temperature, whichever is higher, will appear in the display.
-
The temperature in the display will increase in 5° increments until the oven reaches the preset temperature. A single beep will signal that the oven is preheated. Allow 10 to 15 minutes for the oven to preheat.
-
Place food in the oven. Check food at the minimum cooking time. Cook longer if needed.
- At the end of cooking, remove food and press the CANCEL pad to cancel the operation. The current time of day will reappear in the display.
To recall the preset temperature during preheat, press the OVEN TEMP pad.
To change the preset temperature, press the ▲ or ▼ pad until the desired temperature is displayed.
The oven will automatically turn off if it is left on for 12 hours.
How to Bake in Lower Oven
- When cool, position racks in oven according to what you are baking.
- Push and turn lower OVEN TEMP knob to desired temperature. Allow oven to preheat (approximately 10-15 minutes).
- Place food in center of oven, allowing a minimum of 2 inches between utensil and oven walls.
- Check food for doneness at minimum time in recipe. Cook longer if necessary. Turn lower OVEN TEMP knob to OFF. Remove food from the oven.
Common Baking Problems and Why They Happen
If you have carefully followed the basic instructions and still experience poor results, these suggestions may be helpful:
| Cakes are uneven.Pans touching each other or oven walls.Batter uneven in pans.Oven temperature too low or baking time too short.Oven not level.Undermixing.Too much liquid. | Excessive shrinkage.Too little leavening.Overmixing.Pan too large.Oven temperature too high.Baking time too long.Pans too close to each other or oven wall. |
| Cakes high in middle.Temperature too high.Baking time too long.Overmixing.Too much flour.Pans touching each other or oven walls. | Crumbly or dry texture.Improper measurement of sugar, baking powder,liquid or fat.Old baking powder.Oven temperature too high.Baking time too long. |
| Cakes fall.Too much shortening or sugar.Too much or too little liquid.Temperature too low.Old or too little baking powder.Pan too small.Oven door opened frequently. | Uneven Texture.Too much liquid.Undermixing.Oven temperature too low.Baking time too short. |
| Cakes crack on top.Batter overmixed.Oven temperature too high.Too much leavening. | Cakes have tunnels.Not enough shortening.Too much baking powder.Overmixing.Oven temperature too high. |
| Cakes don't brown on top.Oven temperature too low.Overmixing.Too much liquid.Incorrect pan size or too little batter in pan.Oven door opened too often. | Cakes don't brown evenly on bottom.Oven not preheated.Pans darkened, dented or warped. |
| Cakes, cookies, biscuits too brown on bottom.Oven not preheated.Pans touching each other or oven walls.Using glass, darkened, warped or dull finish metal pans.Incorrect rack position.Incorrect use of aluminum foil. | Cakes not done in middle.Temperature too high.Pan too small. |
| Pie crust edges too brown.Oven temperature too high.Pans touching each other or oven walls.Edges of crust too thin. | |
| Pies don't brown on bottom.Using shiny metal pans. | |
| Pies have soaked crust.Temperature too low at start of baking.Filling too juicy.Using shiny metal pans. |
Temperature Conversions
| °Fahrenheit | 200 | 250 | 275 | 300 | 325 | 350 | 375 | 400 | 425 | 450 |
| °Celsius | 100 | 120 | 140 | 150 | 160 | 180 | 190 | 200 | 220 | 230 |
How to Roast
Roasting is the cooking of tender cuts of meat with dry heat. No water is added nor is the cooking utensil covered. Searing is unnecessary. If desired, season meat with salt and pepper.
Check weight of meat and place meat fat-side-up on a rack in a shallow roasting pan.
Place oven rack in one of the two bottom rack positions before oven is turned on. Preheating is unnecessary for roasting meats.
Meats are roasted at 325^ F generally (except tenderloin, 425^ F and smaller poultry at 375^ F to 400^ F).
Cooking time is determined by the weight of the meat and the desired doneness. Use the chart given below as a guide in determining cooking times. For the most accurate results, use a meat thermometer. Insert the thermometer so the tip is in the center of the thickest part of the meat and is not touching bone or fat.
After cooking, remove meat from the oven and let stand 15 to 20 minutes for easier carving. Rare or medium rare meats should be removed from the oven when the internal temperature is 5 to 10^ less than the final desired temperature since meat will continue to cook slightly while standing.
Frozen meat may be cooked in the same way as fresh meat if the meat is thawed first. It is also possible, however, to cook meat from the frozen state. Follow the same roasting instructions but increase cooking time approximately 10 to 25 minutes per pound. When using frozen packaged meat, follow package directions. Frozen poultry should always be thawed before cooking except when package directions recommend cooking from the frozen state such as for frozen turkey rolls. Do not refreeze meats that have not been cooked first.
Roasting Chart
| Cut of Meat | Approximate Weight | Internal Temp. | Cooking | |
| Temp. | Time | |||
| BeefStanding Rib | 6-8 lbs. | 140°F (rare)160°F (medium)170°F (well done) | 300-325°F | 23-25 min./lb.27-30 min./lb.32-35 min./lb. |
| 4-6 lbs. | 140°F (rare)160°F (medium)170°F (well done) | 300-325°F | 26-32 min./lb.34-38 min./lb.40-42 min./lb. | |
| Rolled Rib | 5-7 lbs. | 140°F (rare)160°F (medium)170°F (well done) | 300-325°F | 32 min./lb.38 min./lb.48 min./lb. |
| Rib Eye | 4-6 lbs. | 140°F (rare)160°F (medium)170°F (well done) | 350°F | 18-20 min./lb.20-22 min./lb.22-24 min./lb. |
| Tenderloin,Whole | 4-6 lbs. | 140°F (rare) | 425°F | 40-60 mins.(total time) |
| 2-3 lbs. | 140°F (rare) | 425°F | 45-50 min.(total time) | |
| Sirloin Tip(high quality) | 3-4 lbs.6-8 lbs. | 140-170°F140-170°F | 325-350°F | 35-40 min./lb.30-35 min./lb. |
| Rolled Rump(high quality) | 4-6 lbs. | 150-170°F | 325-350°F | 25-30 min./lb. |
| Pork LoinCenterHalf | 3-5 lbs.5-7 lbs. | 160°F Throughout160°F Throughout | 325°F | 30-35 min./lb.35-40 min./lb. |
| Lamb, Leg | 5-9 lbs. | 160°F (medium)170-180°F (well) | 325°F | 25-30 min./lb.30-35 min./lb. |
How to Broil
Broiling is a method of cooking tender meats by direct heat. The cooking time is determined by the distance between the meat and the broil element, the desired degree of doneness and the thickness of the meat.
Broiling Tips:
Broiling requires the use of the broiler pan and insert. The broiler insert must be in place to allow fat and liquid to drain to the pan below to prevent spatters, smoke and flare-ups. Improper use may cause grease fires.
Do not cover the broiler insert with aluminum foil as this prevents fat from draining into pan below. For easier clean up, the broiler pan can be lined with foil and spray the insert with a non-stick vegetable spray.
Remove excess fat and slash remaining fat to help keep meat from curling. This also reduces smoking and spattering.
Place oven rack in the correct rack position when oven is cool. For darker browning, place meat closer to the broil element. Place meat further down if you wish meat to be well done or if excessive smoking and flaring occurs.
See Care and Cleaning Chart on page 15 for instructions on cleaning the broiler pan and insert.
To set oven to broil:
- Press BROIL pad. 000° and BROIL indicator words will appear in the display.
- Press ▲ pad to select HI for normal broiling or ▼ pad to select Lo for low temperature broiling.
- For optimum results, remove broiler pan and preheat broil element 3 to 5 minutes.
- Broil with the oven door opened to the broil stop position (opened about 6 inches). Turn meat once about halfway through cooking. Check for doneness by cutting a slit in the meat near the center for desired color.
- At the end of cooking, press CANCEL to cancel the broil operation. The current time of day will reappear in the display.
Use HI BROIL for most broil operations. Select Lo BROIL when broiling longer cooking foods such as poultry. The lower temperature allows food to cook to the well done stage without excessive browning. Cooking time may increase if Lo BROIL is selected.
Broil times may need to be increased if range is installed on a 208-volt circuit.
Broiling Chart
| Type of Meat | Rack Position* | Doneness | Total Time (Minutes)** |
| Bacon | #4 | Well Done | 6 to 10 |
| Beef Steak1-inch thick 1^1/2 -inch thick | #4#4#4#4#4#3 | RareMediumWell DoneRareMediumWell Done | 10 to 1415 to 1819 to 2218 to 2022 to 2425 to 30 |
| ChickenWhole, splitPieces | #3#3 | Well DoneWell Done | Lo Broil45 to 6030 to 45 |
| Fish Steak or Fillet 1/2 -inch thick | #4 | Flaky | 10 to 12 |
| Ground Beef Patties ^3/4 to 1-inch thick | #4 | RareMediumWell Done | 10 to 1312 to 1515 to 18 |
| Ham Slice, precooked1-inch thick 1^1/2 -inch thick | #4#4 | 12 to 1621 to 26 | |
| Lamb Chops1-inch thick1-1/2-inch thick | #4#3 | MediumWell DoneMediumWell Done | 12 to 1516 to 2015 to 1925 to 30 |
| Pork Chops ^3/4 -inch thick1-inch thick | #4#4 | Well DoneWell Done | 15 to 2020 to 25 |
*Bottom rack position is #1. **Times are approximate and may vary depending on the meat.
MAINTENANCE
Light Replacement
Before replacing light bulb, disconnect power to oven. Be sure bulb is cool. Do not touch a hot bulb with a damp cloth as the bulb may break.
Use a dry pot holder to prevent possible harm to hands. If bulb should break, use a pot holder to protect hands and very carefully remove bulb. If bulb breaks at base, have a service technician remove bulb.
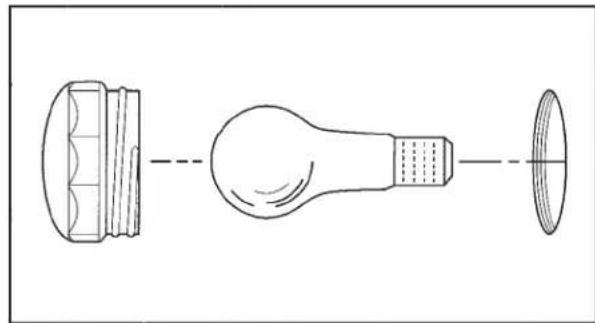
Oven light bulb is located on back oven wall. Replace with a 40 watt appliance bulb. Restore power to oven. Reset clock.
Note for Self-Clean Ovens:
Remove 4 screws and plates as illustrated below.
Use care when removing gasket, it may tear.
Replace only with a 40 watt appliance bulb.
Reconnect power to oven and reset clock.
natural_image
Diagram of a light bulb and its internal components, showing cross-sections without any text or symbolsRemovable Oven Door
To remove door:
-
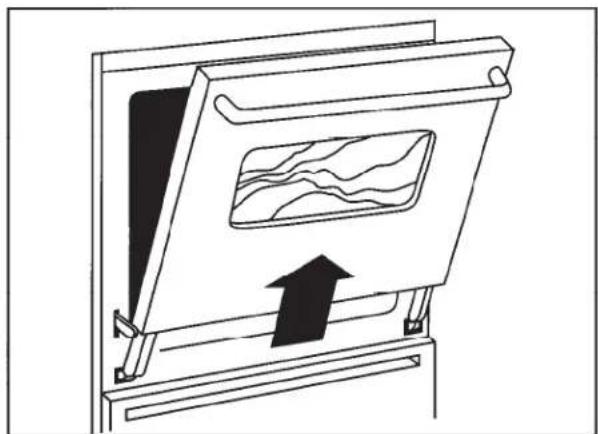
Open door to the broil stop position (open about 4–6 inches).
-
Grasp the sides of the door at the middle of the door. Slowly lift door straight up.
CAUTION:
Hinge arms are spring mounted and will slam shut against the oven if accidentally hit. Never place hand or fingers between the hinges and the front oven frame. You could be injured if hinge snaps back.
Do not attempt to open or close door until door is completely seated on hinge arms. Never turn on oven unless door is properly in place. When baking, be sure door is completely closed.
Baking results will be affected if door is not securely closed.
- As you lift the door up, very slightly open door by pulling door toward you. Check to be sure latches swing down into the notches on the hinge arms.
natural_image
Diagram of a mechanical or architectural component with internal flow pattern and an upward arrow (no text or symbols)To replace door:
-
Grasp sides of door and align slots in door with hinge arms.
-
Very slightly pull door to a more open position as you slide the door down onto the hinge arms. The sliding action of the door will disengage the latches on the hinge arms.
-
Gently push the door downward until the door rests evenly on the hinges. Close door.
CARE AND CLEANING
Be sure all parts of the oven are cool before cleaning. After cleaning be sure all parts are replaced correctly.
Cleaning Chart
| Parts & Cleaning Agents | Directions |
| Broiler Insert and PanSoap and water.Plastic scouring pad.Soap-filled scouring pad. | Remove from the appliance after use. Allow to cool then pour off grease. Place soapy cloth over insert and pan; let soak to loosen soil. Wash in warm soapy water. Use soap-filled scouring pad to remove stubborn soil. Clean in dishwasher if desired. |
| Control KnobsMild detergent and water. | To remove knobs for cleaning, gently pull forward. Wash in mild detergent and water. Do not use abrasive cleaning agent. They will scratch finish and remove markings. Rinse, dry, and replace. |
| Control Panel | Use a clean, soft cloth. Clean with glass cleaner or soap and water. |
| Glass (Oven Window)Soap and water.Glass cleaner. | Wash with glass cleaner or with cloth wrung out in soapy water. Do not oversaturate cloth to avoid inside staining of oven door glass. Do not use abrasive materials such as scouring pads, steel wool, or powdered cleaning agents. They will damage glass. Rinse with clear water and dry. To prevent staining of oven door window glass, never use excessive amounts of water which may seep under or behind glass. |
| Metal Finishes (Trim Parts, Aluminum, Chrome & Stainless Steel)Soap & Water | Wash with soap and water. Do not use abrasive or caustic agents. They will damage the finish. |
| Oven RacksSoap and water.Cleansing powder and plastic pads.Soap-filled scouring pads. | Clean with soapy water. Remove stubborn soil with cleansing powder or soap-filled scouring pad. Rinse and dry. Self-Clean Oven: Racks will permanently discolor if left in the oven during a clean cycle. |
| Porcelain Enamel — Oven (see page 7 for self-clean oven instructions).Mild soap and water.Cleansing powder and plastic pads.Commercial oven cleaner. | Clean with soap and water when parts are cool. All spillovers, especially acid spillovers, should be wiped up immediately with a dry cloth. When surface is cool, clean with warm soapy water. Never wipe off a warm or hot enamel surface with a damp cloth. This may cause cracking and chipping. Never use abrasive or caustic cleaning agents on exterior finish of range. Porcelain enamel may crack or chip with misuse. |
| Oven Elements | Elements are self-cleaning. Soil will burn off as elements are used. |
| Plastic Finishes (Door Handle)Soap and water.Mild liquid sprays. | Never use abrasive or caustic cleaning agents on plastic finishes. |
SERVICE INFORMATION
Before Calling a Service Technician, Check the Following
| Elements Fail to Turn on or Heat Food Properly | Check circuit breakers or fuse box for tripped circuit breakers of blown fuses. • Is element defective? Have service technician replace. |
| Food Not Baking Satisfactorily | Are your racks properly in place and in correct position for what you are baking? • Is your oven level? • Are you using the proper pan? • Is it bright, not soiled or dark colored? • Have you used foil incorrectly? • Are you using standard measuring utensils? • Did you preheat if recommended? |
| Oven Does Not Operate | Was the automatic cooking feature correctly set?• See page 6. • Is the oven disconnected from the electrical power? • Was the oven control properly set. |
| Oven Light Does Not Work | Is your bulb loose or burned out? • Is oven connected to power? |
| Need Service, Accessories or Parts? | When your oven requires service or replacement parts, contact your Dealer or Authorized Service Agency. • Consult the Yellow Pages in your telephone directory under ranges for the service center nearest you. • Be sure to include your name, address, and phone number, along with the model and serial number of the appliance. (See inside front cover for location of your model and serial numbers). |
Explanation of Fault Codes
Your appliance is equipped with an electronic control featuring built-in, self-diagnostic software. This software continuously monitors the control to insure safe and proper operation. If the software should detect a questionable situation, a FAULT CODE (F plus a number) will appear in the display and continuous beeps may sound.
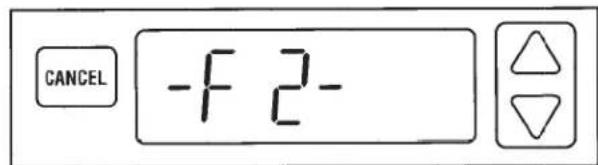
A fault code indicates that there may be a functional error. As a safety precaution, the control will automatically cancel the program.
During Normal Oven Cooking
If a fault code appears in the display and continuous bccps sound, press the CANCEL pad. Then, reprogram the cooking operation.
If the fault code reappears in the display, call an authorized servicer. Do not use the oven until the control has been serviced. The cooktop can be used.
During a Self-Clean Cycle
If the oven is heavily soiled, excessive smoke and flaring may result in a fault code. If this occurs, press the CANCEL pad and allow the oven to cool for an hour. Then, reprogram the oven for the clean cycle.
If the fault code reappears in the display, call an authorized servicer. Do not use the oven until the control has been serviced. The cooktop can be used.
Adjusting Oven Temperature
Your new appliance has been factory tested for oven temperature accuracy. Even though your range has been tested, you may find that the cooking results with your new oven are different from your previous oven.
If you have carefully followed the recipe, reviewed the baking tips on page 11 and still feel cooking results do not meet your expectations, you can adjust the oven temperature. DO NOT ADJUST THE TEMPERATURE if only one or two items are not baking properly.
If you think the oven should be hotter or cooler, you can adjust it yourself. To decide how much to change the thermostat, set the oven temperature 25^ F higher or lower than the temperature in your recipe, then bake. The results of the “test” should give you an idea of how much to adjust the thermostat.
To adjust the thermostat:
- Press OVEN TEMP pad.
- Press ▲ or ▼ pad until 550° is displayed.
- Press and hold the OVEN TEMP pad for several seconds until 00° appears in the display.
- If 00^ does not appear in the display, press the CANCEL pad and begin again.
- If the oven temperature was previously adjusted, the change will be displayed. For example, if the temperature was reduced by 15^ , -15^ will be displayed.
-
Press the ▲ or ▼ pad to select the temperature change desired.
-
The oven temperature can be increased up to 35^ or reduced by as much as 35^(-35^) in 5^ increments.
-
NOTE: If you delay in selecting a temperature, the program will automatically cancel and 00^ will disappear. Begin again if the program cancels.
-
Press the CANCEL pad and the time of day will reappear in the display. The oven will now bake at the adjusted temperature.
It is not necessary to readjust the oven temperature if there is a power interruption. This adjustment will not affect broil or clean temperatures.
MAYTAG® MAJOR APPLIANCE WARRANTY
LIMITED WARRANTY
For one year from the date of purchase, when this major appliance is operated and maintained according to instructions attached to or furnished with the product, Maytag brand of Whirlpool Corporation or Whirlpool Canada LP (hereafter “Maytag”) will pay for factory specified parts and repair labor to correct defects in materials or workmanship. Service must be provided by a Maytag designated service company. This limited warranty is valid only in the United States or Canada and applies only when the major appliance is used in the country in which it was purchased. Outside the 50 United States and Canada, this limited warranty does not apply. Proof of original purchase date is required to obtain service under this limited warranty.
ITEMS EXCLUDED FROM WARRANTY
This limited warranty does not cover:
- Service calls to correct the installation of your major appliance, to instruct you on how to use your major appliance, to replace or repair house fuses, or to correct house wiring or plumbing.
- Service calls to repair or replace appliance light bulbs, air filters or water filters. Consumable parts are excluded from warranty coverage.
- Repairs when your major appliance is used for other than normal, single-family household use or when it is used in a manner that is contrary to published user or operator instructions and/or installation instructions.
- Damage resulting from accident, alteration, misuse, abuse, fire, flood, acts of God, improper installation, installation not in accordance with electrical or plumbing codes, or use of consumables or cleaning products not approved by Maytag.
- Cosmetic damage, including scratches, dents, chips or other damage to the finish of your major appliance, unless such damage results from defects in materials or workmanship and is reported to Maytag within 30 days from the date of purchase.
- Any food loss due to refrigerator or freezer product failures.
- Costs associated with the removal from your home of your major appliance for repairs. This major appliance is designed to be repaired in the home and only in-home service is covered by this warranty.
- Repairs to parts or systems resulting from unauthorized modifications made to the appliance.
- Expenses for travel and transportation for product service if your major appliance is located in a remote area where service by an authorized Maytag servicer is not available.
- The removal and reinstallation of your major appliance if it is installed in an inaccessible location or is not installed in accordance with published installation instructions.
- Major appliances with original model/serial numbers that have been removed, altered or cannot be easily determined. This warranty is void if the factory applied serial number has been altered or removed from your major appliance.
The cost of repair or replacement under these excluded circumstances shall be borne by the customer.
DISCLAIMER OF IMPLIED WARRANTIES; LIMITATION OF REMEDIES
CUSTOMER'S SOLE AND EXCLUSIVE REMEDY UNDER THIS LIMITED WARRANTY SHALL BE PRODUCT REPAIR AS PROVIDED HEREIN. IMPLIED WARRANTIES, INCLUDING WARRANTIES OF MERCHANTABILITY OR FITNESS FOR A PARTICULAR PURPOSE, ARE LIMITED TO ONE YEAR OR THE SHORTEST PERIOD ALLOWED BY LAW. MAYTAG SHALL NOT BE LIABLE FOR INCIDENTAL OR CONSEQUENTIAL DAMAGES. SOME STATES AND PROVINCES DO NOT ALLOW THE EXCLUSION OR LIMITATION OF INCIDENTAL OR CONSEQUENTIAL DAMAGES, OR LIMITATIONS ON THE DURATION OF IMPLIED WARRANTIES OF MERCHANTABILITY OR FITNESS, SO THESE EXCLUSIONS OR LIMITATIONS MAY NOT APPLY TO YOU. THIS WARRANTY GIVES YOU SPECIFIC LEGAL RIGHTS, AND YOU MAY ALSO HAVE OTHER RIGHTS WHICH VARY FROM STATE TO STATE OR PROVINCE TO PROVINCE.
If outside the 50 United States and Canada, contact your authorized Maytag dealer to determine if another warranty applies.
If you need service, first see the “Troubleshooting” section of the Use & Care Guide. After checking “Troubleshooting,” you may find additional help by checking the “Assistance or Service” section or by calling Maytag. In the U.S.A., call 1-800-688-9900. In Canada, call 1-800-807-6777.
9/07
- TABLE OF CONTENTS
- FOR FUTURE REFERENCE
- Model Identification
- SAFETY INSTRUCTIONS
- Installation
- Circuit Breaker or Fuse
- General
- Servicing
- IN CASE OF FIRE:
- Oven Safety
- Child Safety
- Cooking Safety
- Self-Cleaning Oven
- Venting
- Important Safety Notice and Warning
- Cleaning
- Storage Above Oven
- Plastics
- Aerosol Sprays
- Grease
- CLOCK AND OVEN CONTROL
- Cancel Pad
- ▲ and ▼ Pads
- Timer Pad
- Clock Pad
- Setting the Clock and Timer
- Timer
- Clock
- Cook Time/Stop Time
- To begin cooking immediately:
- To delay the start of cooking:
- Clean
- Broil
- Oven Temp
- ADDITIONAL INFORMATION:
- AUTOMATIC OVEN COOKING FEATURE
- Basic Instructions
- To set oven for immediate start:
- To set oven for delayed start:
- Additional Information
- SELF-CLEAN OVEN (IF EQUIPPED)
- Before Self-Cleaning
- During Self-Cleaning
- After Self-Cleaning
- To set oven for a self-clean cycle:
- To cancel clean cycle:
- USING YOUR OVEN
- Oven Characteristics
- Oven Control for Lower Oven or Double Oven Models
- Fan
- Indicator Light
- Oven Racks
- Rack Positions
- Preheating
- How to Bake in Upper Oven
- To set oven for baking or roasting:
- How to Bake in Lower Oven
- Common Baking Problems and Why They Happen
- How to Roast
- How to Broil
- Broiling Tips:
- To set oven to broil:
- MAINTENANCE
- Light Replacement
- Note for Self-Clean Ovens:
- Removable Oven Door
- To remove door:
- CAUTION:
- To replace door:
- CARE AND CLEANING
- SERVICE INFORMATION
- Before Calling a Service Technician, Check the Following
- Explanation of Fault Codes
- During Normal Oven Cooking
- During a Self-Clean Cycle
- Adjusting Oven Temperature
- To adjust the thermostat:
- MAYTAG® MAJOR APPLIANCE WARRANTY
- LIMITED WARRANTY
- ITEMS EXCLUDED FROM WARRANTY
- This limited warranty does not cover:
- DISCLAIMER OF IMPLIED WARRANTIES; LIMITATION OF REMEDIES
Brand : MAYTAG
Model : CWE4800ACS
Category : Oven