
WMS281WF - Microwaves WESTINGHOUSE - Free user manual and instructions
Find the device manual for free WMS281WF WESTINGHOUSE in PDF.


| Product Type | Countertop Microwave Oven |
| Brand | Westinghouse |
| Model | WMS281WF |
| Capacity | 28 Liters |
| Dimensions (W x D x H) | Approx. 513 x 400 x 310 mm |
| Weight | Approx. 12.5 kg |
| Power Supply | 230 V ~ 50 Hz, 1200 W |
| Microwave Power Output | 900 W |
| Grill Power | 1000 W |
| Display Type | LED Digital |
| Control Type | Touch + Rotary Knob |
| Cooking Modes | Microwave, Grill, Combi, Auto Cook, Defrost |
| Auto Programs | 8 preset menus |
| Defrost Function | By weight or time |
| Child Lock | Yes |
| Interior Light | Yes |
| Turntable Diameter | 315 mm |
| Timer | Up to 90 minutes |
| Cleaning Instructions | Wipe with damp cloth, mild detergent; avoid abrasive cleaners |
| Safety Features | Door interlock, overheat protection |
| Spare Parts Availability | Turntable, roller ring, fuse available from authorized service centers |
| Repairability Index | 7.0 / 10 |
| Warranty | 1 year limited |
| Manual Languages | English, French, Spanish |
Frequently Asked Questions - WMS281WF WESTINGHOUSE
User questions about WMS281WF WESTINGHOUSE
0 question about this device. Answer the ones you know or ask your own.
Ask a new question about this device
Download the instructions for your Microwaves in PDF format for free! Find your manual WMS281WF - WESTINGHOUSE and take your electronic device back in hand. On this page are published all the documents necessary for the use of your device. WMS281WF by WESTINGHOUSE.
USER MANUAL WMS281WF WESTINGHOUSE
FREESTANDING MICROWAVE OVEN
CONGRATULATIONS
Congratulations and thank you for choosing our microwave oven. We are sure you will find your new appliance a pleasure to use and a great asset to your cooking. Before you use the appliance, we recommend that you read through the whole user manual which provides a description of the product and its functions.
To avoid the risks that are always present when you use an electrical appliance, it is important that the appliance is installed correctly and that you read the safety instructions carefully to avoid misuse and hazards. For future reference, please store this manual in a safe place.
Record model and serial number here:
Model:
Serial number: ....
Please read the user manual carefully and store in a handy place for later reference. The symbols you will see in this manual have these meanings:

WARNING
This symbol indicates information concerning your personal safety

CAUTION
This symbol indicates information on how to avoid damaging the appliance

TIPS & INFORMATION
This symbol indicates tips and information about use of the appliance

ENVIRONMENTAL TIPS
This symbol indicates tips and information about economical and ecological use of the appliance
Meanings of symbols used in this manual are shown below:

This symbol indicates never to do this

This symbol indicates always do this
CONTENTS
Important safety instructions 3
Description of your microwave oven 6
Setting up your microwave oven 7
Using your microwave oven 8
Troubleshooting....13
Installing your microwave oven . . . . . . . . . . . . . . . . . . . . . . . . . . . . . . . . . . . . . . . . 14
Warranty. 15

TIPS & INFORMATION
IMPORTANT – CHECK FOR ANY DAMAGE OR MARKS.
If you find the appliance is damaged or marked, you must report it within 7 days if you wish to claim for damage/ marks under the manufacturer's warranty. This does not affect your statutory rights.

ENVIRONMENTAL TIPS
Information on disposal for users
- Most of the packing materials are recyclable. Please dispose of those materials through your local recycling depot or by placing them in appropriate collection containers.
- If you wish to discard this product, please contact your local authorities and ask for the correct method of disposal.
IMPORTANT SAFETY INSTRUCTIONS

WARNING
Improper installation, adjustment, alteration or maintenance can cause injury or property damage. Please contact your nearest Electrolux Service Department for additional information or assistance for an approved installer.
NOTE TO THE INSTALLER
This manual must remain with the owner for future reference

WARNING
- This appliance is not intended for use by persons (including children) with reduced physical, sensory or mental capabilities, or lack of experience and knowledge, unless they have been given supervision or instruction concerning use of the appliance by a person responsible for their safety.
- Children should be supervised to ensure that they don't play with the appliance
- Accessible parts may become hot during use. To avoid burns, young children should be kept away.
- The contents of feeding bottles and baby food jars should be shaken or stirred and the temperature checked before consumption in order to avoid burns.

WARNING
PRECAUTIONS TO AVOID POSSIBLE EXPOSURE TO EXCESSIVE MICROWAVE ENERGY
(a) Do not attempt to operate this microwave oven with the door open since this can result in harmful exposure to microwave energy. It is important not to break or tamper with the safety interlocks.
(b) Do not place any object between the microwave oven front face and the door or allow soil or cleaner residue to accumulate on sealing surfaces.
(c) If the door or door seals are damaged, the microwave oven must not be operated until it has been repaired by a qualified tradesperson.

WARNING
IMPORTANT SAFETY INSTRUCTIONS READ CAREFULLY AND KEEP FOR FUTURE REFERENCE
Do not allow anyone other than a qualified service person to carry out any service or repair operation which involve the removal of a cover which gives protection against exposure to microwave energy.
Do not heat liquids and other foods in sealed containers since they are liable to explode.
Do not allow children to use the microwave oven without supervision unless adequate instructions have been given so that the child is able to use the microwave oven in a safe way and understands the hazards of improper use.
Do not overcook food.
Do not use the microwave oven cavity for storage purposes.
Do not heat eggs in the shell and whole hard-boiled eggs in the microwave oven as they may explode – even after microwave heating has ended.
Do not use corrosive chemicals or vapors in this appliance.
Do not store or use this microwave oven outdoors.
Do not use this microwave oven near water, in a wet basement or near a swimming pool.
Do not cover any vents on the microwave oven.
Do not let cord hang over edge of table or counter.
Do not use harsh abrasive cleaners or sharp metal scrapers to clean the microwave oven door glass as they can scratch the surface, which may result in shattering.
Do not use a steam cleaner on this microwave oven.

CAUTION
If the microwave oven is not maintained in a good state of cleanliness, its surface could become degraded, affecting the lifespan of the microwave oven and its operational safety.
IMPORTANT SAFETY INSTRUCTIONS

WARNING
When the appliance is operated in the grill and combination modes, extreme care should be taken as the microwave oven will become hot in these modes.

CAUTION
- Only use utensils suitable for use in microwave ovens.
- This microwave oven should be cleaned regularly and any food deposits should be removed.
- Read and follow the specific: 'PRECAUTIONS TO AVOID POSSIBLE EXPOSURE TO EXCESSIVE MICROWAVE ENERGY' (pg 3).
- When heating food in plastic or paper containers, keep an eye on the microwave oven due to the possibility of ignition.
- If smoke is observed, switch off or unplug the appliance and keep the door closed in order to stifle any flames.
- Remove wire twist-ties and metal handles from paper or plastic containers/bags before placing them in the microwave oven.
- Install or locate the microwave oven only in accordance with the installation instructions provided.

WARNING
To reduce the risk of fire, electric shock, injury to persons or exposure to excessive microwave oven energy when using your appliance, follow basic precautions, including the following:
- Use this appliance only for its intended uses as described in the manual.
- If the supply cord is damaged, it must be replaced by the manufacturer, its service agent or similarly qualified persons in order to avoid a hazard.
- The temperature of accessible surfaces may be high when the appliance is operating. Keep cord away from heated surface.
- Microwave heating of beverages can result in delayed eruptive boiling, therefore care should be taken when removing the beverage from the microwave oven.
- During use, the appliance becomes hot. Care should be taken to avoid touching heating elements inside the microwave oven.

WARNING
A short power-supply cord is provided to reduce the risks resulting from becoming entangled in or tripping over a longer cord.
Materials which may be used in your microwave oven
| Aluminum foil Shielding only. Small smooth pieces can be used to cover thin parts of meat or poultry to prevent overcooking. Arcing can occur if foil is too close to microwave oven walls. The foil should be at least 1 inch (2.5cm) away from microwave oven walls. | |
| Browning dish Follow manufacturer's instructions. The bottom of browning dish must be at least 3/16 inch (5mm) above the turntable. Incorrect usage may cause the turntable to break. | |
| Dinnerware Microwave-safe only. Follow manufacturer's instructions. Do not use cracked or chipped dishes. | |
| Glass jars Always remove lid. Use only to heat food until just warm. Most glass jars are not heat resistant and may break. | |
| Glassware Heat-resistant microwave oven glassware only.Make sure there is no metallic trim. Do not use cracked or chipped glassware. | |
| Oven cooking bags Follow manufacturer's instructions. Do not close with metal tie. Make slits to allow steam to escape. | |
| Paper plates and cups Use for short-term cooking/warming only. Do not leave microwave oven unattended while cooking. | |
| Paper towels Use to cover food for reheating and absorbing fat.Use with supervision for short-term cooking only. | |
| Parchment paper Use as a cover to prevent splattering or a wrap for steaming. | |
| Plastic Microwave-safe only. Follow the manufacturer's instructions. Should be labeled 'Microwave Safe'. Some plastic containers soften, as the food inside gets hot. 'Boiling bags' and tightly closed plastic bags should be slit, pierced or vented as directed by package. | |
| Plastic wrap Microwave-safe only. Use to cover food during cooking to retain moisture. Do not allow plastic wrap to touch food. | |
| Thermometers Microwave-safe only (meat and candy thermometers). | |
| Wax paper Use as a cover to prevent splattering and retain moisture. |
Materials to be avoided in your microwave oven
| Aluminum trays | May cause arcing. Transfer food into microwave-safe dish. |
| Food dishes with metal handles or trim | May cause arcing. Transfer food into microwave-safe dish. |
| Metal or metal trimmed utensils | Metal shields the food from microwave energy. Metal trim may cause arcing. |
| Metal twist ties | May cause arcing and could cause a fire in the microwave oven. |
| Paper bags | May cause a fire in the microwave oven. |
| Plastic foam Plastic | foam may melt or contaminate the liquid inside when exposed to high temperature. |
| Wood | Wood will dry out when used in the microwave oven and may split or crack. |
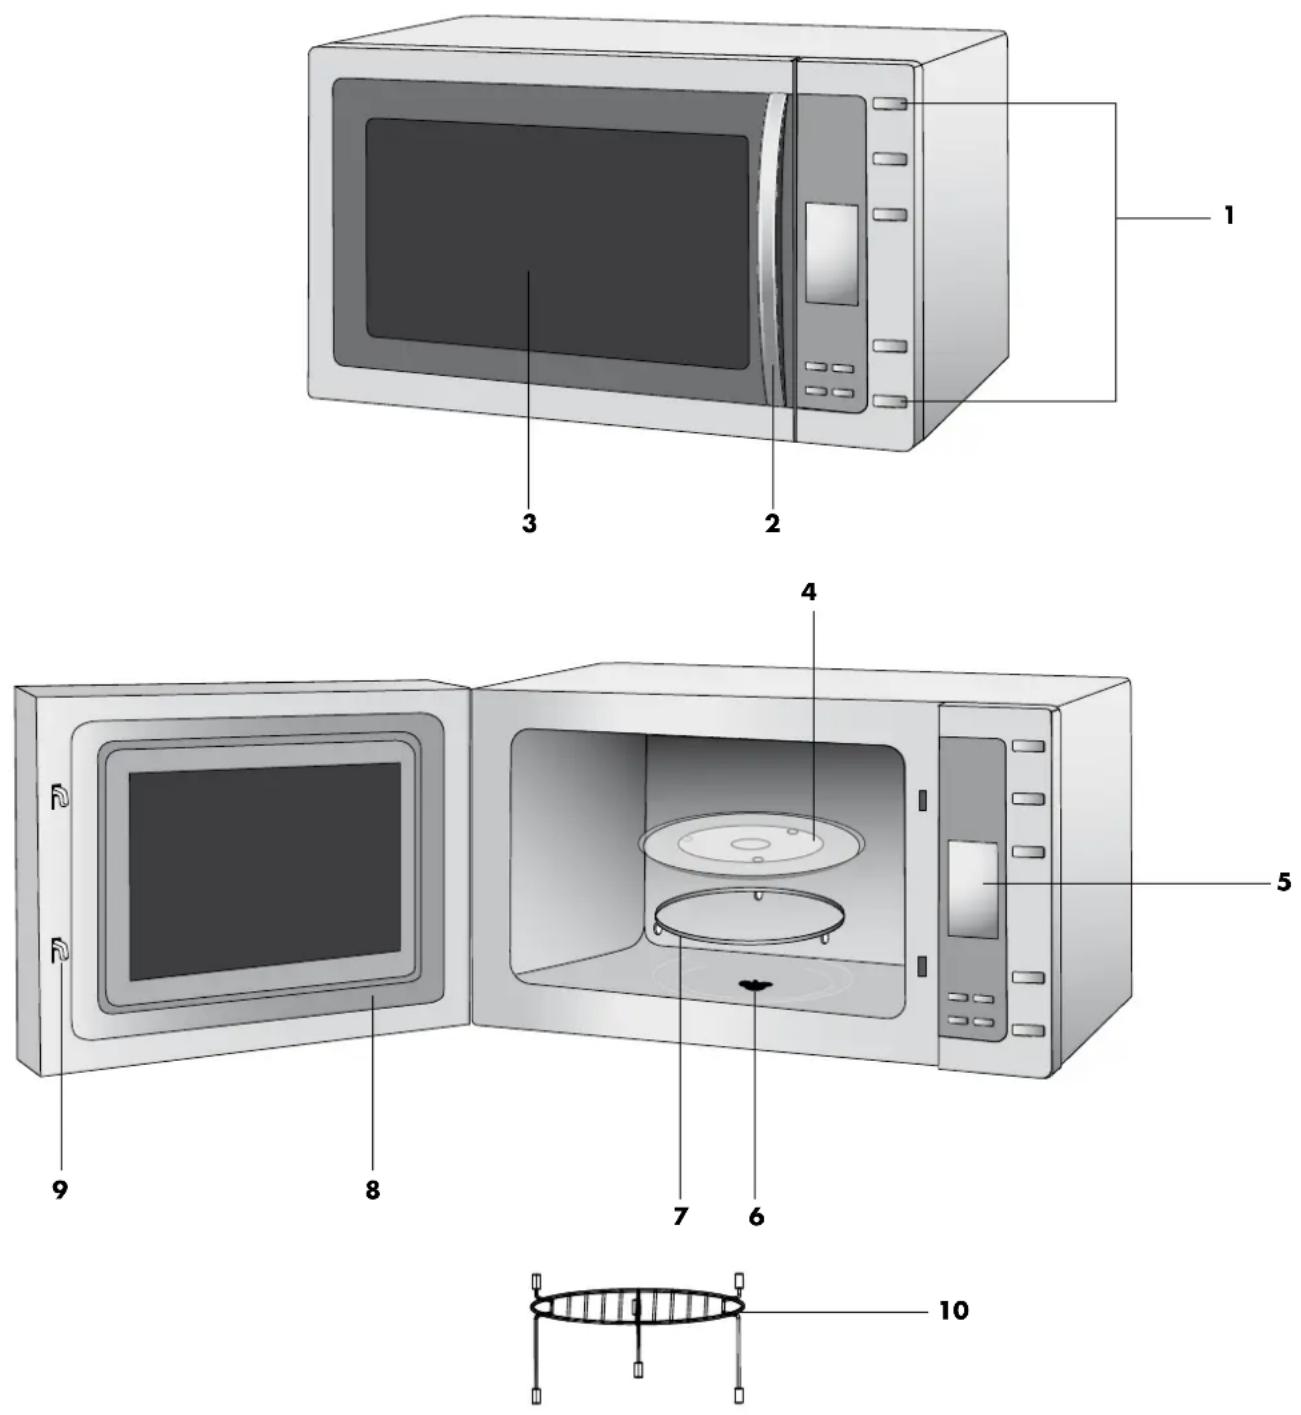
1 Control buttons
2 Integrated Westinghouse handle
3 Observation window
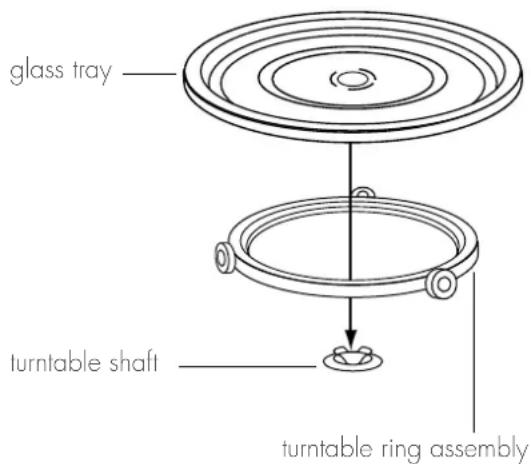
4 Glass tray
5 Display panel
6 Turntable shaft
7 Turntable ring assembly
8 Door assembly
9 Safety interlock system
10 Grill rack (only on WMG281SF)
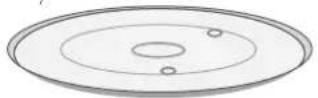
Remove the microwave oven and all materials from the carton and take out the material from the microwave oven cavity. Your microwave oven comes with the following accessories: (a) Glass tray
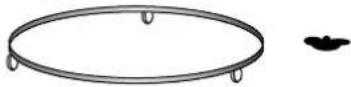
(b) Turntable ring assembly and turntable shaft
(c) Grill Rack (only on WMG281SF)
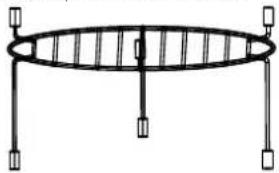
natural_image
Simple line drawing of a horizontal oval structure with vertical supports and a central vertical bar (no text or symbols)- The glass tray should never be restricted or placed upside down.
- Both glass tray and turntable ring assembly must always be used during cooking.
- All food and containers of food must be placed on the glass tray for cooking.
- If the glass tray or turntable ring assembly cracks or breaks, contact your nearest authorized service center.
Installation and Connection
- This appliance is only intended for domestic use.
- This microwave oven is intended for counter-top use at or above 850mm only. It is not intended for built-in use or for use inside a cupboard.
- Please refer to the installation instructions on page 14 and adhere to clearances specified to allow adequate ventilation around your microwave oven.
- The appliance is fitted with a plug and must only be connected to a properly installed earthed socket.
- The mains voltage must correspond to the voltage specified on the rating plate.
- The socket must be installed and connecting cable must only be replaced by a qualified electrician. If the plug is no longer accessible following installation, an all-pole disconnecting device must be present on the installation side with a contact gap of at least 3mm.
- Adapters, multi-way strips and extension leads must not be used. Overloading can result in a risk of fire.
SPECIFICATIONS
| Model WMS281SF/WMS281WF | WMG281SF | |
| Rated Voltage | 230-240V | 230-240V |
| Rated Input Power (Microwave) | 1450W | 1450W |
| Rated Input Power (Max) | 1500W | 1500W |
| Rated Output Power (Microwave) | 900W | 900W |
| Rated Input Power (Grill) | N/A | 1100W |
| Turntable Diameter | 315mm | 315mm |
| External Dimensions wxdxh(including handle) | 513mm x 418.8mm x 305mm | 513mm x 418.8mm x 305mm |
| Net Weight | Approximately 16.3 kg | Approximately 16.9 kg |
Turntable installation
- Place the turntable ring assembly on the cavity bottom.
- Place the glass tray on top of the turntable support.
Control panel
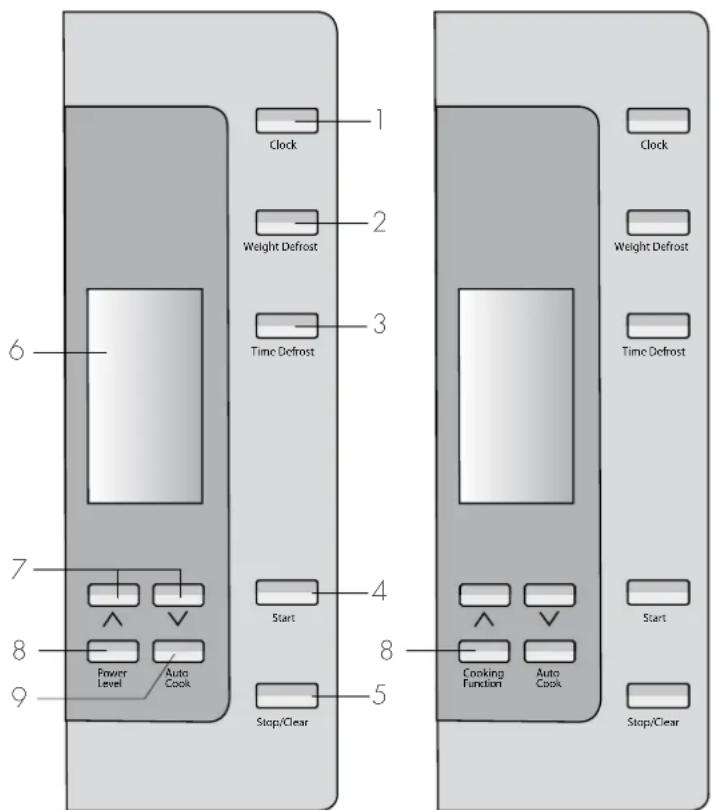
WMS218SF/WMS218WF WMG218SF
- clock - set the time of day and delayed start
- weight defrost – select defrost by weight
- time defrost – select defrost by time
- start - start your microwave oven
- stop/clear – stop or pause your microwave oven program, or exit the cooking program setting
- display panel – view cooking time, power level, cooking mode, and time of day
- control buttons – select cooking mode and time
- power level on model WMS218SB and cooking function on model WMG218SB – select microwave power level (and grill/combination function on WMG281SB only)
- auto cook – select desired cook mode
The display panel will show cooking function and auto cook mode.
When the power cord is connected, the display will show '0:00' and the buzzer will sound. To set the clock, follow these steps.
- Press the 'clock' button.
- Press the ∧buttons to adjust the hour figures.
- Press the 'clock' button to confirm hours. The minutes indicator will flash.
- Press the ^buttons to adjust the minute figures.
- Press the 'clock' button to confirm minutes and complete the clock setting.
Microwave cooking
- Open the door, place the food on the turntable. Close the door.
- Press the 'cooking function' button several times to select the microwave power level you want.
- Press the ▲ buttons to adjust the cooking time. The maximum cooking time that can be set is 95 minutes.
- Press the 'start' button to start cooking.
Microwave power setting guide
| Press 'power level/cooking function' button | Microwave | Watt power | Suggested use |
| 1 time 100% 900 | Boiling or reheating liquids. Cooking vegetables. Preheating a browning dish | ||
| 2 times 80% 720 | Reheating of casseroles, stews and precooked foods. Roasting of joints of meat and poultry | ||
| 3 times 50% 450 | Faster defrosting for casseroles. Baking of cakes and sponge puddings | ||
| 4 times 30% 270 | Simmering. Healing custards and cheesecakes | ||
| 5 times 10% 90 | Keeping foods warm |
Grill cooking (WMG281SB only)
- Open the door, place the grill rack on the turntable and the food on the grill rack. Put a non-metal plate underneath the grill rack to catch any food spillage or juices to minimize cleaning. Close the door.
- Press the 'cooking function' button until the display shows the grill symbol 🎯.
- Press the 'start' button to confirm. is displayed.
- Press the ^buttons to adjust the cooking time.
- Press the 'start' button to start cooking.
i TIPS & INFORMATION
In order to get a better result from the grill function, turn the food over half-way through the grilling time. The appliance will sound a buzzer twice to indicate that it is half way into the grilling time. Open the door and turn the food over. Close the door and press the 'start' button. If you do not open the door to turn the food over, the microwave oven will continue grilling the food.
Combination cooking (WMG218SB grill model only)
With this microwave oven you can combine microwave power with the grill function.
- Open the door, place the food on the turntable. Close the door.
- Press the 'cooking function' button to select combination function.
- Press the buttons to adjust the cooking time. The maximum cooking time is 95 minutes.
- Press the 'start' button to start cooking.
| Function Display Microwave | Power | Grill Power | |
| Combi. 1 C-1 | 55% 45% | ||
| Combi. 2 C-2 | 36% 64% | ||
Multi-stage cooking
Up to three stages of cooking can be set on this appliance. If one of the stages is defrosting, this stage should be set as the first stage. The buzzer will sound after each stage and the next stage will begin automatically.
Example: if you want to cook with 100% microwave power for 10 minutes and then 80% microwave power for 5 minutes, follow these steps.
- Open the door, place the food on the turntable. Close the door.
- Press the 'cooking function' button once to select 100% microwave power.
- Press the 🔊 buttons to adjust the cooking time to 10 minutes.
- Press the 'cooking function' button twice to select 80% microwave power.
- Press the ↗ buttons to adjust the cooking time to 5 minutes.
- Press the 'start' button to start cooking.
Delayed start cooking
Up to three cooking stages can be programmed for a delayed start.
Example: to cook food with 80% microwave power for 15 minutes with delayed start, follow these steps.
-
Open the door, place the food on the turntable. Close the door.
-
Press the 'cooking function' button twice to select 80% microwave power. 'P80' is displayed.
-
Press the ↗ buttons to adjust the cooking time to 15 minutes.
-
Press the 'clock' button. The hour figure will flash.
-
Press the ∧buttons to adjust the hours.
-
Press the 'clock' button. The minute figures will flash.
-
Press the ∧ buttons to adjust the minutes.
-
Press the 'start' button to finish the setting. The display will show':'. When the set time arrives, the buzzer will sound twice and the cooking will start automatically.
Weight defrost
- Open the door, place the food on the turntable. Close the door.
- Press the 'defrost by weight' button once. 'dEF1' is displayed.
- Press the ∧√buttons to adjust the weight in grams.
- Press the 'start' button to start defrosting.
Time defrost
- Open the door, place the food on the turntable. Close the door.
- Press the 'defrost by time' button. 'dEF2' is displayed.
- Press the ^buttons to adjust the defrost time.
- Press the 'start' button to start defrosting.

TIPS & INFORMATION
- It is better to underestimate defrosting time if you are unsure. Food will continue to defrost during the standing time.
- Separate food as soon as possible.
- Turn large items, e.g. joints, halfway through the defrosting time.
- Remove any thawed food as soon as possible.
- Remove or open any packaging before defrosting.
- Place food in a larger container than what it was frozen in, this will allow for easy stirring.
- Begin thawing poultry, breast side down and turn over halfway through defrosting time. Delicate areas such as wing tips can be shielded with small pieces of smooth foil.
- Standing time is very important, particularly for large, dense foods which cannot be stirred to ensure that the centre is completely defrosted before cooking.
Auto cook
This microwave oven has a number of pre-set auto cook recipes that will help you to select the right preparation mode for the food you would like to prepare.
-
Open the door, place the food on the turntable. Close the door.
-
Press the 'auto cook' button to select the auto cook recipe.
-
Press the 'start' button to confirm the auto cook recipe.
-
Press the ^buttons to adjust the weight of the food.
-
Press the 'start' button to confirm the weight.
In the table below you will find all pre-set auto cook recipes.
| menu weight (g) display | ||
| A-1Auto Reheat | 150 150 | |
| 250 250 | ||
| 350 350 | ||
| 400 400 | ||
| A-2Vegetable | 150 150 | |
| 350 350 | ||
| 500 500 | ||
| A-3Pasta | 50 (with water 450g) 50 | |
| 100 (with water 800g) 100 | ||
| 150 (with water 1200g) 150 | ||
| A-4Meat | 150 150 | |
| 300 300 | ||
| 450 450 | ||
| 600 600 | ||
| A-5Pizza | 1 slice (about 80g) 1 | |
| 2 slices (about 160g) 2 | ||
| 3 slices (about 250g) 3 | ||
| A-6Potato | 1 portion (about 220g) 1 | |
| 2 portions (about 440g) 2 | ||
| 3 portions (about 660g) 3 | ||
| A-7Fish | 150 150 | |
| 250 250 | ||
| 350 350 | ||
| 400 400 | ||
| 450 450 | ||
| A-8Soup | 500 500 | |
| 750 750 | ||
| 1000 1000 | ||
Auto reheat
This function helps you to easily heat up food with microwave power. The time and power level are pre-set. The table below shows the different auto reheat modes.
- Open the door, place the food on the turntable.
Close the door. - Press the 'auto cook' button once and A-1 (the auto reheat button) will be displayed.
- Press the ∧ ∨ buttons to select weight.
- Press the 'start' button to start reheating.
| menu | weight (g) | display |
| Auto Reheatauto reheat | 150 | 150 |
| 250 | 250 | |
| 350 | 350 | |
| 400 | 400 |
To stop the microwave oven
There are two way to stop the oven whilst it is in use.
- Press the 'stop/clear' button. You can restart the oven by pressing the 'start' button. Pressing the 'stop/clear' button again will reset the current program.
- Open the door
You may restart the oven by closing the door and pressing the 'start' button. Pressing the 'stop/clear' button will cancel the current program.
Quick start
Press the 'start' button to cook with 100% microwave power level for 30 seconds. Each time you press the 'start' button the time will increase 30 seconds.
Inquiring function
During cooking, press the 'cooking function' button to display the current power level. When pressing the 'clock' button, the current time will be displayed.
When delayed start has been entered, press the 'clock' button to display the time when the cooking will start.
Child lock
Press the 'stop/clear' button for 3 seconds. A long 'beep' will sound and the 'lock' indicator will light up indicating that the microwave oven controls has been locked.
To unlock, press the 'stop/clear' button for 3 seconds.
A long 'beep' will sound and the 'lock' indicator light will go off indicating that the microwave oven controls have been unlocked.
- Preferably use round or oval casseroles with a lid when cooking in your microwave oven.
- Cover the food when cooking. Use a glass lid, a plate or grease proof paper.
- Pastry, bread and the like can be defrosted directly in a bread basket or on a paper towel.
- If frozen food is heated in its packaging, the packaging should be opened. Packaging containing metal or metal decoration must not be used unless specifically recommended for use in the microwave oven. Remove metal clips and wire ties.
- Put large, thick pieces close to the edge of the casserole and try to cut the food into even sized pieces. Always place the food in the centre of the microwave oven.
- The food will be evenly cooked if you stir or turn it a few times during cooking.
- Always set a shorter cooking time than indicated in your recipe to avoid over cooking.
- Use little or no water for vegetables.
- Use less salt and spices than for 'normal' cooking.
- Allow a few minutes standing time after the oven has switched off to ensure complete and even cooking results.
- Use pot holders or gloves when taking dishes and food out from the oven as they will be hot.
Softening honey – If you have a jar of honey which has crystallized, remove lid and place the jar in the microwave oven, microwave on medium power for 2 minutes.
Melting chocolate – Break 100g of chocolate into squares, place in a bowl and heat on high power for 1-2 minutes and stir well.
Softening or melting butter – Melting takes a few seconds on high power. Softening is best done on low power.
Freshen or warm bread – Use medium power for a few seconds.
Peeling garlic easily – Heat 3 or 4 cloves of garlic on high power for 15 seconds. Squeeze at one end until the clove pops out.
Fruit juice – Citrus fruits will yield more juice if they are heated on high power for 15 seconds before squeezing.
CARE AND CLEANING OF YOUR MICROWAVE OVEN
The appliance must always be kept clean. Deposits that are allowed to remain on the oven could affect the performance and safety of the appliance.
Cleaning the accessories
Clean accessories with mild detergent after removing them from the cavity. The turntable support should be carefully handled.
Cleaning the interior
Always keep the inside of the oven clean. Wipe up spillovers and food spatters immediately. Use mild, liquid detergent, warm water and a soft, clean cloth to remove deposits.
Cleaning the grill element
The element may be stained with spattered fat or oil while the oven is in use. Wait until the cavity cools down and wipe off the spattered oil before next using the appliance. Stains on the grill may cause unpleasant odors and smoke.
Cleaning the exterior
Open the microwave oven door when cleaning the control panel. This will prevent the appliance from being turned on accidentally. You should clean the outside surfaces of the microwave oven with mild liquid detergent and warm water, followed by a wiping with clean water to remove any excess detergent. Dry with a soft cloth. Spray-on window cleaners or all purpose spray-on kitchen cleaners can also be used. To prevent damage to the working parts, do not allow water to seep into ventilation openings.
CAUTION
Never use abrasive cleaners, scouring pads or harsh chemicals on the outside surfaces of your appliance.
CAUTION
Do not change or make any adjustments or repairs to any part of the microwave oven. Repairs should only be done by a qualified service technician. This includes the replacement of the interior light bulb as it requires the removal of a cover which protects against exposure to dangerous microwave energy.
CARE AND CLEANING OF YOUR MICROWAVE OVEN

CAUTION
DO NOT use harsh abrasive cleaners or sharp metal scrapers to clean the microwave oven door glass since they can scratch the surface, which may result in shattering of the glass.

CAUTION
Never use abrasive cleaners, commercial oven cleaners or steel wool pads on any part of the oven.

TIPS & INFORMATION
To loosen difficult deposits, boil a cup of water in the oven for 2 or 3 minutes.

CAUTION
Never use a knife or any utensil to remove deposits from the oven surfaces.

TIPS & INFORMATION
To remove odors from the microwave oven interior, boil a cup of water plus 2 tablespoons of lemon juice for 5 minutes.

CAUTION
The turntable motor is sealed. Nevertheless, be careful to avoid water penetrating under the turntable spindle when the bottom of the oven is being cleaned.

CAUTION
Be sure the oven is disconnected from the electricity supply before cleaning.

CAUTION
Do not use a steam cleaner to clean this appliance.
TROUBLESHOOTING
| problem possible cause remedy | ||
| Microwave oven interfering with TV reception | Your microwave oven may cause interference with radio and television signals. This is normal and applies to all small electrical appliance around the home | Position the microwave oven as far from the television as is practical. |
| Dim microwave oven light | In low power microwave cooking, microwave oven light may dim. | This is a normal part of the low power function. |
| Steam accumulating on microwave oven door or leaking from vents | Cooking foods with a high moisture content will always produce steam | This is a normal part of the cooking process. |
| Microwave oven cannot be started | Power cord not plugged in or loose | Ensure that power cord is inserted securely into the socket and try again. |
| Blown fuse or circuit breaker | Reset circuit breaker or have fuse replaced by a qualified tradesperson | |
| Faulty power outlet | Test the outlet with other electrical appliances | |
| Microwave oven does not heat | Door not closed | Ensure that door is properly closed |
| Glass turntable makes a noise when microwave oven is in operation | Dirty or incorrectly installed turntable ring assembly | Refer to installation guide or cleaning advice. |
Before calling a Service Technician please check carefully the operating instructions, service booklet and the warranty terms and conditions
INSTALLATION INSTRUCTIONS
Select a level surface that provides enough open space for the intake and/or outlet vents.
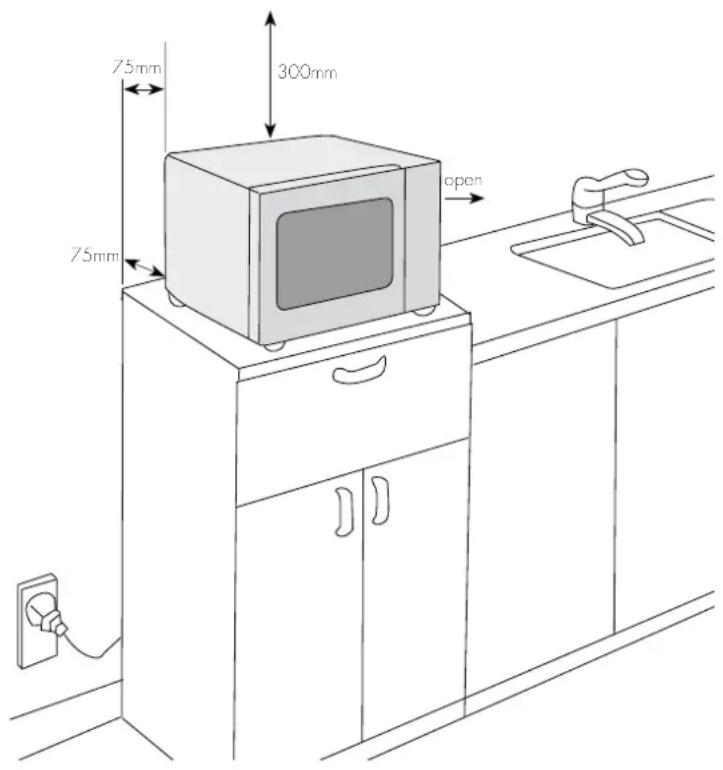
A minimum clearance of 7.5cm is required between the oven and any adjacent walls. One side must be open.
- Always leave a minimum clearance of 300mm above the microwave oven.
- Do not remove the legs from the bottom of the microwave oven.
- Blocking the intake and/or outlet openings can damage the microwave oven.
- Place the microwave oven as far away from radios and TVs as possible. Operation of the microwave oven may cause interference to your radio or TV reception
- Plug your microwave oven into a standard household outlet. Make sure that the voltage and the frequency is the same as the voltage and frequency on the rating label.
- This microwave oven is not suitable for building in, and is designed for bench top mounting above 850mm high only.

WARNING
Do not install microwave oven over a cooktop or other heat-producing appliance. If installed near or over a heat producing appliance, the microwave oven may be damaged and your warranty voided.
Electrolux Warranty
FOR SALES IN AUSTRALIA AND NEW ZEALAND
APPLIANCE: WESTINGHOUSE FREESTANDING MICROWAVE OVEN
This document sets out the terms and conditions of product warranties for Electrolux branded appliances. It is an important document. Please keep it with your proof of purchase documents in a safe place for future reference should you require service for your Electrolux appliance.
General Terms and Conditions
- In this warranty
(a) 'Electrolux' means Electrolux Home Products Pty Ltd ABN 51 004 762 341 in respect of Appliances purchased in Australia and Electrolux (NZ) Limited in respect of Appliances purchased in New Zealand;
(b) 'Appliance' means any Electrolux product purchased by you accompanied by this document;
(c) 'Warranty Period' means
(i) where you use the Appliance for personal, domestic or household purposes in Australia the period of '24' months and in New Zealand the period of '24' months;
(ii) where you use the Appliance for commercial purposes, in Australia the period of '3' months and in New Zealand the period of '3' months, (if the period stated is 0 months you are not covered by this product warranty) following the date of original purchase of the Appliance;
(d) 'you' means the purchaser of the Appliance not having purchased the appliance for re-sale, and 'your' has a corresponding meaning.
-
This warranty only applies to Appliances purchased and used in Australia or New Zealand and is in addition to (and does not exclude, restrict, or modify in any way) any non-excludable statutory warranties in Australia or New Zealand.
-
Electrolux warrants that, when dispatched from an Electrolux warehouse, the Appliance is free from defects in materials and workmanship for the Warranty Period.
-
During the Warranty Period Electrolux or its Authorised Service Centre will, at no extra charge if your appliance is readily accessible without special equipment, and subject to these terms and conditions, repair or replace any parts which it considers to be defective. Electrolux or its ASC may use reconditioned parts to repair your appliance. You agree that any replaced Appliances or parts become the property of Electrolux. This warranty does not apply to light globes, batteries, filters or similar perishable parts.
-
Parts and Appliances not supplied by Electrolux are not covered by this warranty.
-
Where you are within an Electrolux service area, this warranty covers the cost of transport of the Appliance to and from Authorised Service Centres of Electrolux and travelling costs for representatives of the Authorised Service Centre to and from your home or business. If you are outside an Electrolux service area, you will bear these costs. For information about whether you are within an Electrolux service area, please phone 13 13 49 in Australia, or 0800 10 66 10 in New Zealand.
-
Proof of purchase is required before you can make a claim under this warranty.
-
You may not make a claim under this warranty unless the defect claimed is due to faulty or defective parts or workmanship. Electrolux is not liable in the following situations (which are not exhaustive):
(a) The Appliance is damaged by:
(i) accident
(ii) misuse or abuse, including failure to properly maintain or service
(iii) normal wear and tear
(iv) power surges, electrical storm damage or incorrect power supply
(v) incomplete or improper installation
(vi) incorrect, improper or inappropriate operation
(vii) insect or vermin infestation.
(b) The Appliance is modified without authority from Electrolux in writing.
(c) The Appliance's serial number or warranty seal has been removed or defaced.
(d) The Appliance was serviced or repaired by anyone other than Electrolux or its Authorised Service Centres.
- This warranty, the contract to which it relates and the relationship between you and Electrolux are governed by the law applicable in the Australian State where the Appliance was purchased or the law applicable in New Zealand if the Appliance was purchased in New Zealand. Where the Appliance was purchased in New Zealand for business purposes the Consumer Guarantee Act does not apply.
Limitation of Liability
- To the extent permitted by law:
(a) Electrolux excludes all warranties other than as contained in this document;
(b) Electrolux shall not be liable for any loss or damage whether direct or indirect or consequential arising from your purchase, use or non-use of the Appliance.
- Provisions of the Trade Practices Act and State consumer legislation in Australia, and the Consumer Guarantees Act, the Sale of Goods Act and the Fair Trading Act in New Zealand, imply warranties or conditions, or impose obligations, upon Electrolux which cannot be excluded, restricted or modified. To the extent permitted by law, the liability of Electrolux (if any) arising out of or in relation to the Appliance or any services supplied by Electrolux shall be limited (where it is fair and reasonable to do so):
(a) in the case of Appliances, at its option, to the replacement or repair of the Appliances or the supply of equivalent products or the payment of the cost of replacing the Appliances or having the Appliances repaired or of acquiring equivalent Appliances. Upon being replaced, parts and Appliances become the property of Electrolux; or
(b) in the case of services, at its option, to the supply of the services again or the payment of the cost of having the services re-supplied; and in the case of Appliances or services supplied in New Zealand, loss or damage whether direct or indirect or consequential that is reasonably foreseeable.
Privacy
You acknowledge that in the event that you make a warranty claim it will be necessary for Electrolux and its Authorised Service Centres to exchange information in relation to you to enable Electrolux to meet its obligations under this warranty.
Important Notice
Before calling a Service Technician please check carefully the operating instructions, service booklet and the warranty terms and conditions.
| FOR SERVICEor to find the address of your nearest stateservice centre in AustraliaPLEASE CALL 13 13 49for the cost of a local call (Australia only) | SERVICE AUSTRALIAElectroluxELECTROLUX HOME PRODUCTSwww.electrolux.com.au | FOR SPARE PARTSor to find the address of your nearest statespare parts centre in AustraliaPLEASE CALL 13 13 50for the cost of a local call (Australia only) |
| FOR SERVICEor to find the address of your nearestauthorised service centre in New ZealandFREE CALL 0800 10 66 10(Now Zealand only) | SERVICE NEW ZEALANDElectroluxELECTROLUX HOME PRODUCTSwww.electrolux.co.nz | FOR SPARE PARTSor to find the address of your nearest statespare parts centre in New ZealandFREE CALL 0800 10 66 20(Now Zealand only) |
For more information on all Westinghouse appliances, or for dimension and installation information, call into your retailer, phone or email our customer care team or visit our website:
AUSTRALIA
phone: 1300 363 640
fax: 1800 350 067
email: customercare@electrolux.com.au
web: www.westinghouse.com.au
NEW ZEALAND
phone: 09 573 2384
fax: 0800 363 600
email: customercare@electrolux.co.nz
web: www.westinghouse.co.nz
Electrolux
TOP SERVICE
TOP SERVICE
Top Service encompasses the after sales service provided by The Electrolux Group to consumers including delivery, home service and spare parts.
Westinghouse. We are part of the Electrolux family.
Share more of our thinking at www.electrolux.com
© 2009 Electrolux Home Products Pty Ltd ABN 51 004 762 341
Print code: WBIM_Jul09
Part number: 261800302727
- CONGRATULATIONS
- Record model and serial number here:
- WARNING
- CAUTION
- TIPS & INFORMATION
- ENVIRONMENTAL TIPS
- CONTENTS
- IMPORTANT – CHECK FOR ANY DAMAGE OR MARKS.
- Information on disposal for users
- IMPORTANT SAFETY INSTRUCTIONS
- NOTE TO THE INSTALLER
- PRECAUTIONS TO AVOID POSSIBLE EXPOSURE TO EXCESSIVE MICROWAVE ENERGY
- IMPORTANT SAFETY INSTRUCTIONS READ CAREFULLY AND KEEP FOR FUTURE REFERENCE
- Installation and Connection
- Turntable installation
- Microwave cooking
- Grill cooking (WMG281SB only)
- i TIPS & INFORMATION
- Combination cooking (WMG218SB grill model only)
- Multi-stage cooking
- Delayed start cooking
- Weight defrost
- Time defrost
- Auto cook
- Auto reheat
- To stop the microwave oven
- Quick start
- Inquiring function
- Child lock
- CARE AND CLEANING OF YOUR MICROWAVE OVEN
- Cleaning the accessories
- Cleaning the interior
- Cleaning the grill element
- Cleaning the exterior
- INSTALLATION INSTRUCTIONS
- Electrolux Warranty
- General Terms and Conditions
- Limitation of Liability
- Privacy
- AUSTRALIA
- NEW ZEALAND
- TOP SERVICE
Brand : WESTINGHOUSE
Model : WMS281WF
Category : Microwaves