
1143 - Sphygmomanometer Lumiscope - Free user manual and instructions
Find the device manual for free 1143 Lumiscope in PDF.


| Product Type | Automatic Upper Arm Blood Pressure Monitor |
| Brand | Lumiscope |
| Model | 1143 |
| Dimensions (Monitor) | 4.1 x 3.1 x 2.0 inches |
| Weight (Monitor) | 0.5 lbs (230 g) |
| Power Source | 4 AA batteries (not included) or AC adapter (optional) |
| Measurement Method | Oscillometric |
| Measurement Range (Blood Pressure) | Systolic: 60-260 mmHg; Diastolic: 30-200 mmHg |
| Measurement Range (Pulse) | 40-199 beats per minute |
| Accuracy (Blood Pressure) | ±3 mmHg |
| Accuracy (Pulse) | ±5% |
| Memory Capacity | 90 readings per user (2 users) |
| Cuff Size | Adult: 8.7-16.5 inches (22-42 cm) arm circumference |
| Display | Large LCD with date/time |
| Features | Irregular heartbeat detection, WHO classification indicator, auto power-off |
| Warranty | 2 years limited |
| Included Accessories | Carrying case, instruction manual, battery (none) |
| Color | White/Blue |
| Certifications | CE, FDA (if applicable) |
| Language | English |
| Cleaning | Wipe with a soft dry cloth; cuff may be hand washed in mild detergent |
Frequently Asked Questions - 1143 Lumiscope
User questions about 1143 Lumiscope
0 question about this device. Answer the ones you know or ask your own.
Ask a new question about this device
Download the instructions for your Sphygmomanometer in PDF format for free! Find your manual 1143 - Lumiscope and take your electronic device back in hand. On this page are published all the documents necessary for the use of your device. 1143 by Lumiscope.
USER MANUAL 1143 Lumiscope
Quick Read Technology
Automatic Wrist
Blood Pressure Monitor
Model 1143

GF Health Products, Inc.
Atlanta, Georgia 30360
Made and Printed In China
User Manual
1143-INS-LAB-RevAA08
-
一
| _
1
Table of Contents Two Year Limited War
GF Health Products, Inc. guarantees this product free from defects in material and workmanship for a period of two years from the date of purchase, except as noted below.
This product warranty does not cover damage caused by misuse or abuse, the attachment of any unauthorized accessory, alteration to the product, or any other conditions whatsoever that are beyond the control of GF Health Products, Inc. GF Health Products, Inc. shall not be responsible for any type of incidental, consequential, or special damage. All implied warranties, including but not limited to those implied warranties of fitness and merchantability, are limited to the total duration of two years from the original date of purchase.
To obtain warranty service on your Blood Pressure Monitor, please contact the Repair Department at 1-800-672-8293. There is a \$15 fee for return shipping and handling. Please make checks payable to GF Health Products, Inc. Upon receipt, we will repair or replace, as appropriate, this blood pressure monitor and return it to you. Warranty is solely through the Repair Department. Service of this product by anyone other than the Repair Department voids warranty.
Introduction 3
About Blood Pressure 4,5
Parts Identification 6
Display Symbols & Explanations ....7
Installing the Batteries 8
Correct Measuring Posture 9
Applying the Cuffs 10, 11
Helpful Tips 12
Measurement Procedures 13, 14
Memory Recall 15
Deleting the Memory 16
Clock Settings 17
Care & Maintenance 18
Troubleshooting 19
Specifications 20
Warranty 21
Introduction
Specifications
Congratulations on your purchase of the new Lumiscope Model 1143. This automatic wrist blood pressure monitor is both easy-to-use and ideally suited for daily measurements. The large display includes systolic blood pressure reading, diastolic blood pressure reading and the pulse rate, all clearly shown at the completion of each reading.
You can store up to 85 measurements, ideal for users who want to monitor and track their blood pressure on a regular basis. The 1143 is compact and portable, making it perfect for home use and travel.
Blood pressure measurements determined with your 1143 are equivalent to those obtained by a trained observer using cuff/stethoscope auscultation method, within the limits prescribed by the American National Standard, Electronic or Automated Sphygmomanometers.
Please read this manual carefully before use. For specific information on your own blood pressure, contact your physician. Please be sure to keep this manual.
Model : 1143
Display System : Liquid Crystal Display
Power source : 2 "AAA" Alkaline batteries
Measurement Method : Oscillometric
Measurement Range : Pressure: 20\~300 mmHg Pulse: 40\~200 beats/minute
Accuracy : Pressure: ±3 mmHg Pulse: within ±5% of reading
Inflation : Electrical Rolling Pump
Pressure Exhaust : Solenoid Valve
Memory : 85 sets
Low Battery Indicator : Yes
Auto shut-off : 2.5 minutes after last key operation
Battery Life : Around 250 operations
Operating : 10°C\~40°C (50°F\~104°F) Environment < 85% RH.
Storage Environment : -20°C\~50°C (-4°F\~122°F) < 85% RH
Weight : Approximately 150g (w / batteries)
Dimensions : 2.8" (L) x 2.9" (W) x 1.5"(H)
*Specifications are subject to change without notice.
Troubleshooting
About Blood Pressure
| Message Correction | |
| LL Err | The pressure measured was lower than 20 mmHg.Solution: Please measure again. |
| UU Err | The pressure measured was higher than 300 mmHg.Solution: Please measure again. |
| PErr | Pumping error.Solution: Please check cuff and try again. |
| rrErr | The pressure can not be measured due to signal noise.Solution: Please measure again. |
| HI | The pumping pressure is higher than 300 mmHg.Solution: Please measure again. |
| Low battery.Solution: Check and replace the batteries if necessary. | |
What is Blood Pressure?
Blood pressure is the pressure exerted on the artery tube while blood flows through the arteries. The pressure measured when the heart contracts and sends blood out of the heart is systolic (highest) blood pressure. The pressure measured when the heart dilates with blood flowing back into the heart is called diastolic (lowest) blood pressure.
Why Measure Your Blood Pressure?
Among the various health problems afflicting people today, problems associated with high blood pressure are by far the most common. High blood pressure's dangerously strong correlation with cardiovascular disease has made measuring blood pressure a necessity for identifying those at risk.
About Blood Pressure
Care & Maintenance
Blood Pressure Standard
The World Health Organization (WHO) and National High Blood Pressure Education Program Coordinating Committee have developed a blood pressure standard, according to which areas of low- and high-risk blood pressure are identified. This standard, however, is a general guideline and blood pressures vary between different people, age groups, etc.
It is important that you consult with your physician regularly. Your physician will tell you your normal blood pressure range as well as the point at which you will be considered at risk.

other
| Category | Diastolic Pressure (mmHg) | |---|---| | Optimal | 808590100110 | | Normal | 808590100110 | | High-Normal | 808590100110 | | Grade 1 Hypertension (Mild) | 808590100110 | | Grade 2 Hypertension (Moderate) | 808590100110 | | Grade 3 Hypertension (Severe) | 808590100110 || Do not drop the unit. It's not shock proof. |  |
| Do not modify or disassemble the unit or the arm cuff. |  |
| Use a cloth moistened with water or neutral detergent to clean the body of the unit. Then wipe it dry. |  |
| Avoid thinner, benzene and other harsh cleaners. |  |
| Keep the unit in a suitable place. Avoid high temperature, direct sunlight, high moisture and dust. |  |
| Remove the batteries if the unit will not be used for a long time. |  |
Clock Settings
Parts Identification
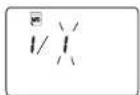
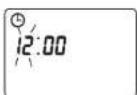
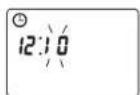
Setting the Clock, Date & Time
A. Press and hold the "MEMORY" button for over 3 seconds. The display will show a blinking year. Press the "START/STOP" button to adjust the year when it's blinking.

B. Press the "MEMORY" button again. The "MONTH" will appear and blink to be adjusted, the "DATE", "HOUR" and "MINUTE" will follow as you press and release the "MEMORY" button.

C. Press the "START/STOP" button to adjust the values of the "MONTH", "DATE", "HOUR" and "MINUTE" when they are blinking.

| 1. START/STOP |
| 2. Memory Select |
| 3. Battery Compartment |
| 4. Wrist Cuff |
Display Symbols & Explanations
Deleting the Memory
Display Symbols

Pulse Rate
Systolic Pressure
Diastolic Pressure
Display Explanations
| Low Battery Indicator: Appears when the batteries are low or need replacement. | |
| Pulse Symbol: Shows the pulse rate per minute. | |
| MEMORY | Memory: Holds the memory for up to 85 readings. |
| DATE (M/D) TIME | Date and Time: Shows the exact date (month and day) and time of each reading. |
| Quick Read Technology: Detects your blood pressure with the touch of a button. |
To delete the memory
1. To delete one memory:
A. Press the "MEMORY" button to display the record that you wish to delete.
B. Press and hold the "START/STOP" button until the display shows "DEL".



C. Once the "DEL" has been displayed, press and hold the "START/STOP" button again. After 3 beeps, the selected record has been deleted.
2. To delete all memories:
Follow steps A and B above
C. Press the "MEMORY" button until the display shows "DEL ALL".

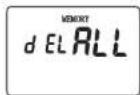
D. Once the "DEL ALL" has been displayed, press and hold the "START/STOP" button again. After 3 beeps, all records have been deleted.

Memory Recall
Installing the Batteries
To see the previously measured values
A. Press the "MEMORY" button to recall the last reading. The LCD display will show the memory number, actual date and time simultaneously of the measurement.

Memory

Memory Number

Date

Time

B. To view additional readings, push the "MEMORY" button successively to go through the various readings. (1\~85).

To insert the batteries
A. Lift the cover towards you to open the battery compartment.

natural_image
Line drawing of a handheld device with a mesh cover and handle, no text or symbols presentB. Insert 2 "AAA" batteries as indicated. Make sure to match polarities (+, -) on the batteries.
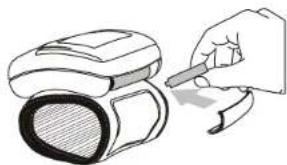
natural_image
Illustration of a hand using a pen to interact with a device (no text or symbols visible)C. Replace the battery cover by inserting the two hooks at the bottom into the slot, then push on the top area.
Note: Please remove batteries when not in use for an extended period of time. Do not dispose batteries with household garbage.
Correct Measuring Posture
Measurement Procedures
A. Place your elbow on a table so that the cuff is at the same level as your heart. (Fig. A.)
Note: The level of your heart is slightly below your armpit.

Fig. A
Relax your entire body, especially the area between your elbow and fingers.
B. If the cuff is not at the same level as your heart or if you can not keep your arm completely still throughout the reading, use a soft object such as a folded towel to support your arm. (Fig. B) Do not allow hard objects to come in contact with the wrist cuff.

Fig. B
C. Turn your palm upwards.
D. Sit upright in a chair, and take 5-6 deep breaths.
Note: Avoid leaning back or crossing your legs while the measurement is being taken. (Fig. C)
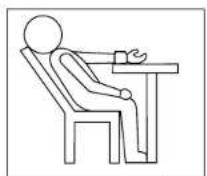
Fig. C
C. Quick Read Technology detects your blood pressure with the touch of a button, which reduces measurement time significantly and decreases patient discomfort.

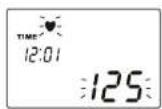
Note: It is important to remain still and quiet during measurement. Any significant movement may affect measurement results.

Results
D. Once the measurements have been displayed, press the "START/STOP" button to turn off the unit or it will automatically shut off after 150 seconds.
Start / Stop
Measurement Procedures
Applying the Cuff
To start the measurement
Note: In order to get your correct measurement result and, to avoid erroneous measurements, you should be seated quietly. Your arm, hand, and fingers should be still during the measurement procedure.
A. Press the "START/STOP" button. The display will initially show a flashing "0".

Start / Stop

Initial Display
B. After the "0" stops blinking, the unit will automatically inflate to the appropriate inflation level based on the user's pulse oscillations. Measurement will then begin.
To apply the cuff
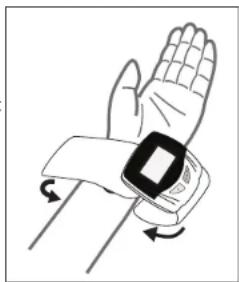
A. Remove all watches, jewelry, etc. prior to attaching the wrist monitor. Clothing sleeves should be rolled up and the cuff should be wrapped on bare skin for correct measurements.
B. Apply cuff to left wrist with palm facing up as Fig. A.
C. Make sure the edge of the cuff is about 1 cm (1/2 an inch) from the palm as Fig. B.
D. In order to insure accurate measurements, fasten the velcro strap securely around your wrist so there is no extra space between the cuff and the wrist.
natural_image
Illustration of a human hand wearing a wristwatch with a square button, showing rotational motion (no text or symbols)Fig. A

Fig. B
Note: If the cuff is not wrapped tight enough, the measurement values will be inaccurate.
Applying the Cuff
Helpful Tips
E. If it is not possible to measure on the left wrist, attach the cuff on the right wrist as shown in Fig. C

natural_image
Line drawing of a human hand wearing a smartwatch (no text or symbols)Fig. C
Here are a few helpful tips to help you obtain a more accurate reading.
A. Do not measure your blood pressure immediately after consuming a large meal. To obtain more accurate readings, please wait one hour before measuring.
B. Do not smoke or drink alcohol before measuring your blood pressure.
C. You should not be physically tired or exhausted while taking a measurement.
D. It is important that you relax during measurement. Take a 15-minute rest before a reading.
E. Do not take measurements if you are under stress or feeling tense.
F. Take your blood pressure at normal body temperature. If you are feeling cold or hot, wait a while before taking a measurement.
G. If the monitor is stored at very low temperature (near freezing), place it in a warm location for at least one hour before using it.
H. Wait about 5 minutes before taking the next pressure measurement.


- Quick Read Technology
- Automatic Wrist
- Blood Pressure Monitor
- Table of Contents Two Year Limited War
- Introduction
- Specifications
- Troubleshooting
- About Blood Pressure
- What is Blood Pressure?
- Why Measure Your Blood Pressure?
- Care & Maintenance
- Blood Pressure Standard
- Clock Settings
- Parts Identification
- Setting the Clock, Date & Time
- Display Symbols & Explanations
- Deleting the Memory
- To delete the memory
- To delete one memory:
- To delete all memories:
- Memory Recall
- Installing the Batteries
- To see the previously measured values
- To insert the batteries
- Correct Measuring Posture
- Measurement Procedures
- Applying the Cuff
- To start the measurement
- To apply the cuff
- Helpful Tips
Brand : Lumiscope
Model : 1143
Category : Sphygmomanometer