
TRJ601E - Hedge Trimmer Snow Joe - Free user manual and instructions
Find the device manual for free TRJ601E Snow Joe in PDF.


| Product Type | Hedge Trimmer |
| Brand | Snow Joe |
| Model | TRJ601E |
| Power Source | Electric Corded |
| Motor | 4.5 Amp |
| Blade Length | 22 inches |
| Cutting Capacity | Up to 3/4 inch |
| Weight | 5.5 lbs |
| Dimensions (L x W x H) | 36 x 7 x 6 inches |
| Blade Type | Dual-action, hardened steel |
| Safety Features | Two-hand operation, blade guard, lock-off switch |
| Handle Design | Ergonomic with soft grip |
| Cord Retention | Built-in cord lock |
| Maintenance | Clean after use, lubricate blades with light oil |
| Storage | Hang with blade cover included |
| Warranty | 2-year limited warranty |
Frequently Asked Questions - TRJ601E Snow Joe
User questions about TRJ601E Snow Joe
0 question about this device. Answer the ones you know or ask your own.
Ask a new question about this device
Download the instructions for your Hedge Trimmer in PDF format for free! Find your manual TRJ601E - Snow Joe and take your electronic device back in hand. On this page are published all the documents necessary for the use of your device. TRJ601E by Snow Joe.
USER MANUAL TRJ601E Snow Joe
All Operators Must Read These Instructions Before Use
CAUTION!
Before using this electric tool, carefully read and observe the safety rules and instructions listed below. Before starting work, make sure that you know how to stop the machine in case of an emergency. The incorrect use of this machine could cause serious injury. Keep these instructions in a safe place and on hand so that they can be consulted when required.
CAUTION!
The electric grass trimmer should only be used for cutting lawns and for trimming along the borders of flower beds. Other uses of the trimmer that are not indicated in these instructions could damage the trimmer or seriously injure the operator.
GENERAL Safety Rules
⚠ WARNING: When using the electric grass trimmer, basic safety precautions should always be followed to reduce the risk of fire, electric shock, and personal injury, including the following:
a) FOR ALL DOUBLE-INSULATED APPLIANCES
- Replacement parts – When servicing, use only identical replacement parts.
- Polarized appliance connections - To reduce the risk of electric shock, this appliance has a polarized plug (i.e. one blade is wider than the other) and will require the use of a polarized extension cord. The appliance plug will fit into a polarized extension cord only one way. If the plug does not fit fully into the extension cord, reverse the plug. If the plug still does not fit, obtain a correct polarized extension cord. This plug will fit into the polarized wall outlet only one way. If the plug still does not fit fully into the wall outlet, reverse the plug. If the plug still does not fit, contact a qualified electrician to install a proper wall outlet. Do not change the appliance plug, extension cord receptacle, or extension cord plug in any way.
b) FOR ALL APPLIANCES
- Avoid dangerous environments – Do not use appliances in damp or wet locations. Do not use in rain.
- Keep children and bystanders away – Children and other spectators, including pets, should be kept at least 50 feet (15 meters) away from the work area. When the grass is cut, stones and debris contained in the grass can be picked up by the trimmer and dispersed into the air. These flying projectiles can cause blindness or other bodily injury.
-
Dress properly – Always wear suitable clothing when using the trimmer to prevent head, hand, or feet injuries. Do not wear loose clothing or jewelry. They can get caught in moving parts.
-
Use safety glasses – Also use safety footwear, snug-fitting clothing, protective gloves, hearing and head protection.
-
Use the right tools – Do not use tools for any job except that for which they are intended.
-
△WARNING! To reduce the risk of electric shock, use only with an extension cord intended for outdoor use, such as an extension cord of cord type SW-A, SOW-A, STW-A, STOW-A, SJW-A, SJOW-A, SJTW-A, or SJTOW-A.
-
Avoid unintentional starting - Do not carry plugged-in tool with finger on the trigger. Make sure the switch is off before plugging in the tool.
-
Do not abuse the cord – Never carry the tool by the cord or yank the cord to disconnect it from the receptacle. Keep cord away from heat, oil, and sharp edges.
-
Do not force the tool – It will do the job better and with less likelihood of injury if it is used at the rate for which it was designed.
-
Do not overreach – Keep proper footing and balance at all times.
-
Stay alert – Watch what you are doing. Use common sense. Do not operate the trimmer when you are tired, or under the influence of alcohol or drugs.
-
Disconnect the tool – Turn the trimmer off and disconnect the plug when: the trimmer is not in use; it is left unattended; it is being examined because it is not working correctly; the power supply cable is damaged; the blade is being removed or changed or when the trimmer is being moved from one place to another.
-
Store idle tools indoors – When not in use, tools should be stored indoors in a dry and high or locked-up place out of the reach of children.
-
Maintain tools with care – Keep cutting edges sharp and clean for best performance and to reduce the risk of injury. Follow instructions for lubricating and changing accessories. Inspect the trimmer periodically and replace if damaged. Repair the trimmer only at an authorized service facility. Keep handles dry, clean, and free from oil and grease.
-
Checked for damaged parts – Before continuing to use the trimmer, a guard or other part that is damaged should be carefully checked to determine that it will operate properly and perform its intended function. Check for the alignment of moving parts, binding of moving parts, breakage of parts, mounting, and any other condition that may affect the trimmer's operation. A guard or other part that is damaged should be properly repaired or replaced by an authorized service center unless indicated elsewhere in this manual.
c) ADDITIONAL SAFETY INSTRUCTIONS FOR GRASS TRIMMER/EDGER
- Keep guards in place and in working order.
- Keep hands and feet away from the cutting area.
CAUTION!
The safety guard is critical to the safety of the operator and the safety of people standing within a safe distance of the trimmer. The safety guard keeps the trimmer in good working order and must always be in place during operation.
- Do not try to stop the cutting device (nylon line) with your hands. Always let it come to a stop by itself.
⚠ WARNING! After switching off the tool, the cutting device continues to rotate for a few seconds. - Only use the original type of nylon line. Do not under any circumstances use metal line instead of nylon line.
- Do not use the tool to cut grass which is not on the ground. For example, do not cut grass growing on walls or rocks.
- Do not switch on the tool in an enclosed or poorly ventilated space or in the presence of flammable and/or explosive substances such as liquids, gases and powders.
- Only cut during broad daylight or with adequate artificial light.
- Check that all grass cuttings and dirt have been removed from the ventilation vents.
- Do not cross roads or gravel paths while the tool is still running.
- When the tool is not in use, store it in a dry place and out of reach of children.
- After use, disconnect the tool from the power supply and check for damage. If you have the slightest doubt about the condition of the tool, contact an authorized service center.
-
Only use the tool according to the instructions given in this manual.
-
Check regularly that the screws are tight.
- Do not try to repair the tool or access internal parts. Contact an authorized service center.
Extension Cords
- Make sure your extension cord is in good condition. When using an extension cord, be sure to use one heavy enough to carry the current your product will draw. An undersized cord will cause a drop in line voltage resulting in loss of power and overheating. Table 1 shows the correct size to use depending on cord length and nameplate Ampere rating. If in doubt, use the next heavier gauge. The smaller the gauge number, the heavier the cord.
- Ground Fault Circuit Interrupter (GFCI) protection should be provided on the circuits or outlets to be used for this electric trimmer. Receptacles are available with built-in GFCI protection and may be used for this measure of safety.
- Use only UL listed extension cords. Inspect the extension cord before use and never use damaged or altered extension cords. Follow the extension cord manufacturer's safety instructions.
- To prevent the appliance cord from disconnecting from the extension cord during operation, use the plug-receptacle retaining straps provided or make a knot with the two cords as shown in Table 2.
Table 1. Minimum Recommended Extension Cord Gauge (AWG) Chart
| Volts | Total length of cord in feet | |||
| 120V | 25 | 50 | 100 | 150 |
| Ampere Rating | AWG(Extension Cord Gauge) | |||
| 0 – 6 | 18 | 16 | 16 | 14 |
| 6 – 10 | 18 | 16 | 14 | 12 |
| 10 – 12 | 16 | 16 | 14 | 12 |
| 12 – 16 | 14 | 12 | Not Recommended | |
Table 2. Method of securing Extension Cord

(A) Tie cord as shown

natural_image
Simple line drawing of a resistor connected in series with two leads (no text or symbols)(B) Connect plug and receptacle
Safety Symbols
The following table depicts and describes safety symbols that may appear on this product. Read, understand, and follow all instructions on the machine before attempting to assemble and operate.
| Symbol Description | |
 | SAFETY ALERT – Indicates a precaution, a warning or a danger. |
 | READ THE OPERATOR'S MANUAL(S) Read, understand and follow all instructions in the manual(s) before attempting to assemble and operate. |
 | WARNING! Keep out of rain and away from wet areas. |
 | For protection against injury, wear safety goggles and ear protection. |
 | Wear protective gloves and non-slip footwear when using the machine and handling debris. |
 | DANGER! Beware of thrown objects to bystanders. Keep bystanders at least 15 m (50 ft) away from the machine. |
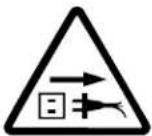 | WARNING! Remove the plug from the mains if cable is damaged or cut and replace damaged cord immediately. |
 | DOUBLE INSULATION – When servicing, use only identical replacement parts. |
Know Your Electric Grass Trimmer/Edger
- Handle
- ON/OFF trigger
- Safety button
- Cable restraint
- Handle knob
- Auxiliary handle
- Locking lever
- Power cord
- Telescopic shaft adjustment knob
- Shroud
- Safety guard
- Cooling fan
- Spool
- Flower guard

Technical Data
Rated Voltage 120 V - 60 Hz
Rated Power 4 amp
Maximum Cutting Diameter 12 in. (30 cm)
No Load Speed 8,800/min
Line Diameter 0.063 in. (1.6 mm)
Spool Length 20 ft (6 m)
Spool Advance Bump Feed
Unpacking
Carton Contents:
- Grass trimmer/edger
- Safety guard
- Auxiliary handle
- Handle bolt and screws
-
Safety and operating instruction manual
-
Carefully remove the contents from the shipping carton. Make sure that all items listed in the carton contents are included.
-
Inspect the product carefully to make sure no breakage or damage occurred during shipping. If you find damaged or missing parts, DO NOT return to the store. Please call 1-866-766-9563.
NOTE: Do not discard the shipping carton and packaging material until you are ready to use your new Electric Grass Trimmer/Edger.
Assembly
Before using the Electric Grass Trimmer/Edger, follow these instructions to assemble:
NOTE: Observe correct mains voltage – The voltage of the power source must match the voltage specified on the nameplate of the unit.
Fitting Auxiliary Handle
- Remove the trimmer and parts from the box.
- Place the handle on the tool as shown (Fig. 1).
Fig. 1

-
Adjust the handle to the most comfortable position.
-
Assemble the auxiliary handle on the machine by inserting the handle knob into the auxiliary handle and tightening the handle with the bolt provided (Fig. 2).
Fig. 2

- Make sure that the handle assembly is tightly fixed to the machine body.
Fitting the safety guard
WARNING! The guard must be properly installed. The guard provides partial protection from the risk of thrown objects to the operator and other bystanders.
- Unplug the tool and remove the screws from the motor housing.
- Place the safety guard in the direction of the arrow shown to align it with the screw holes on the motor housing (Fig. 3).
Fig. 3
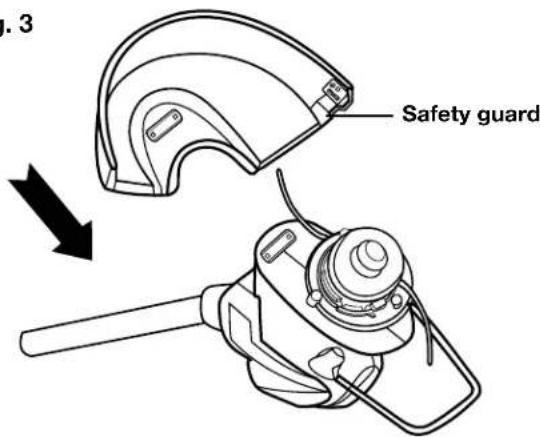
- Firmly press the safety guard into place and secure it to the trimmer head with the screws provided (Fig. 4).
NOTE: Never use the tool unless the safety guard is properly fitted.

Adjusting the telescopic shaft
- Loosen the telescopic shaft adjustment knob.
- Pull and adjust the shaft to a comfortable height (Fig. 5).
- Tighten the knob once the desired length is achieved (Fig. 5).

Adjusting the angle of cutting head
⚠ WARNING! Always unplug the trimmer before making any adjustments to the trimmer.
- Slide the locking lever down and hold (Fig. 6).
- Twist the operation handle to the desired position.
- Release the locking lever.

WARNING! Never use steel, wire, rope, string, or other materials as cutting line. Other materials can break off during cutting and become a dangerous missile that can cause serious injury.
Application
Replacing the spool
- Disconnect the main plug.
- Press together both locking device tabs on the spool cover and remove the cover (Figs. 7-8).
- Remove the spool from the spool cover (Fig. 9).
- Remove the spring and clean out any dirt or grass residue.


natural_image
Technical line drawing of a mechanical assembly with a hand operating a tool (no text or symbols)
Winding the line
NOTE: A dual-line factory wound spool (Model TRJ601ERS) is available for easy spool replacement on the TRJ601E electric grass trimmer. Visit www.snowjoe.com to purchase. Should you wish to wind the line yourself, the instructions are provided below. Self-winding, however, is NOT recommended because if the line is not wound properly it can cause the trimmer's bump feed system to malfunction. For this reason, users are strongly urged to purchase the pre-wound spool.
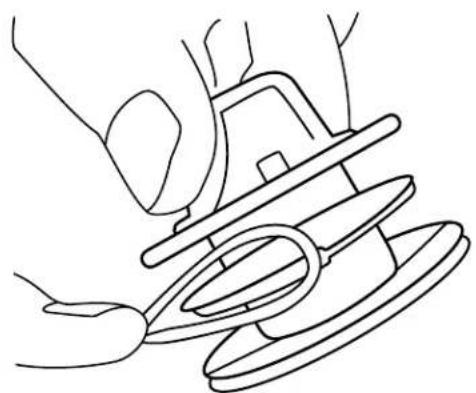
- The spool can hold 20 ft (6 m) of line. Remove the white cover. Holding the loose ends of the line together with one hand, find the center of the line with the other hand and hook this center loop into the groove on the spool as shown in Fig. 10.
Fig. 10
natural_image
Line drawing of hands using a tool to adjust or install a mechanical component (no text or symbols present)- Wind the line following the directional arrows on the spool housing and hook the two ends into the side grooves (Fig. 11).
Fig. 11

natural_image
Hand holding a coiled wire component, no text or symbols visible- Firmly place the white cover on the spool and pull the two ends approximately 3.5 inch (9 cm) out of the spool (Fig. 12).
Fig. 12

natural_image
Line drawing of a hand holding a coiled cable or wire, with no text or symbols present.- Along the groove, slide the line into the hole in the spool cover (Fig. 13).

natural_image
Line drawing of a hand holding a device with a curved handle, labeled 'Fig. 13' (no text or symbols on the diagram itself)- Prepare to assemble the spool into the trimmer.
Assembling the spool
NOTE: A dual-line factory wound spool (Model TRJ601ERS) is available for easy spool replacement on the TRJ601E electric grass trimmer. Visit www.snowjoe.com to purchase. When using the factory wound spool, keep the protective white cover encasing the line in place, then follow the directions below to feed the line into the grass trimmer.
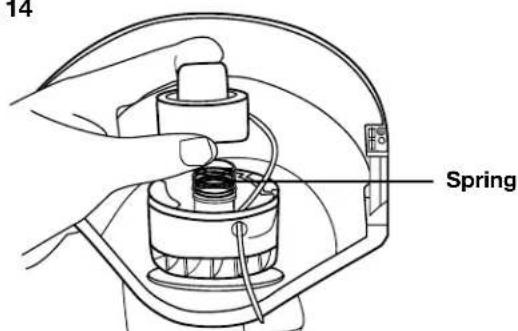
- Insert the spring into the shroud and thread the line into the hole as shown in Fig. 14.
Fig. 14
- Place the spool cover on the spool and press it firmly down until the locking devices of the spool cover securely click into place (Fig. 15).

Check length of nylon cutting line
- Pull the line to the inner edge of the outer safety guard. If the line is too short (i.e. less than 50 mm from the inside edge of the safety guard), push down on the center of the trimmer head and simultaneously pull the line a few centimeters past the edge of the safety guard (Fig. 16).

To increase line length
NOTE: The grass trimmer comes with a full line spool. The line wears down during work. To feed in new line:
- Switch the machine on and press the head of the spool firmly against the ground.
- The line will automatically be released by centrifugal force. The trimmer line will be cut to the right length by the blade on the spool cover.
Operation
The Electric Grass Trimmer/Edger is designed to cut grass and weeds under bushes, and on slopes and edges that cannot be reached with the lawn mower. The trimmer must be used outdoors only, at an ambient temperature between 0°C and 45°C.
WARNING! Remove stones, loose pieces of wood and other objects from the cutting area. The blade continues to rotate for a few seconds after the trimmer is switched off. Let the motor come to a complete stop before switching the trimmer back on. Do not rapidly switch the trimmer off and on.
ON/OFF switch
- To switch the grass trimmer ON, press and hold the safety button, then squeeze the ON/OFF trigger and release the safety button.
- To switch OFF, release the ON/OFF trigger.
Cutting grass
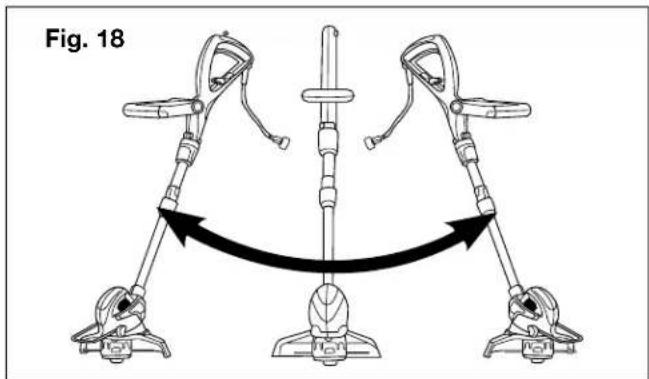
- Move the grass trimmer left and right, keeping it a safe distance away from the body. The trimmer can efficiently cut grass up to a height of 6 in. (15 cm). Cut higher grass in stages.
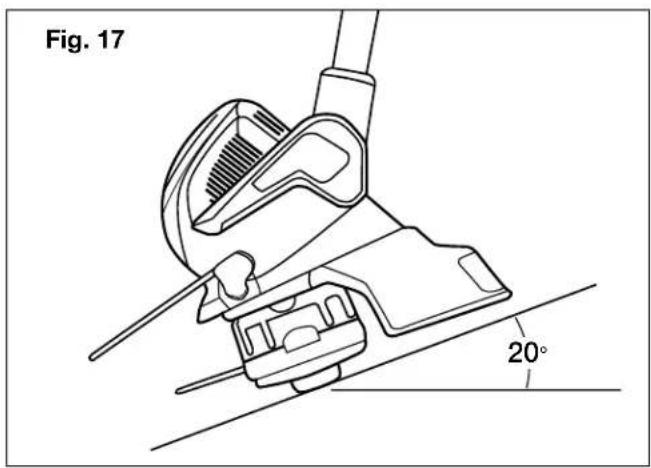
- When using the trimmer, hold it at an angle of about 20^ to the ground (Fig. 17) and swing the trimmer from side to side (Fig. 18).
WARNING! Do not overload the trimmer – Cut in small sections to maximize the trimmer's efficiency and keep the trimmer running at high speed (Fig. 19).

Trimming edges
- Guide the grass trimmer along the edge of the lawn. Avoid contact with paved surfaces, stone or garden walls, as this will wear the line rapidly.
- Use the edge of the guard as a guide when cutting near fences and walls (Fig. 20).
- Move the trimmer in a backwards direction when trimming around edges to avoid damage.

natural_image
Technical line drawing of a mechanical tool or clamp device (no text or symbols)Maintenance
⚠ WARNING! Before performing any maintenance task, cut off the electric power supply by disconnecting the plug from the extension cord.
WARNING! Always wear protective gloves during maintenance tasks. Do not carry out maintenance when the engine is running or hot.
WARNING! Use only original manufacturer's replacement parts, accessories and attachments. Failure to do so can cause potential injury and poor performance.
- Before conducting any maintenance task, make sure the trimmer is unplugged.
- Only the maintenance operations described in this manual may be carried out by the user. For repairs that have not been explained in these instructions, contact an authorized service center.
- Check all screws regularly to ensure that they are tightly secured.
- Only use original replacement parts. These spare parts are designed specifically for this device and are the only ones suitable for replacement. Other replacement parts will not only lead to an invalidation of the warranty, but also may endanger you and your environment.
- Do not spray or wet the appliance with water.
- Do not use detergents or solvents as these could ruin the trimmer. The plastic parts can be easily damaged by chemical agents.
- If the cutting blade no longer cuts or breaks, replace it by contacting an authorized service center.
IMPORTANT:
To ensure product safety and reliability, repairs, maintenance and adjustments should be performed by authorized service centers or other qualified service organizations that utilize identical replacement parts for their repairs.
Storage
Follow these recommendations for storing the grass trimmer.
- Clean the grass trimmer thoroughly before storing.
- Store the trimmer in a stable and safe position out of the reach of children. Keep the trimmer in a dry place where the temperature is not too hot or too cold.
- Do not store the grass trimmer resting against the floor. Hang it by the upper handgrip so that the guard does not touch anything. If the guard rests against a surface, its shape and dimensions could be permanently altered, and could render the machine unsafe to use.
Troubleshooting
| Problems Possible Cause Possible Solution | ||
| The motor does not run or the tool runs slowly. | Power failure/unit not plugged into a working receptacle.Spool housing cannot rotate freely.Cutting line does not protrude. | Check to make sure the unit is plugged into a working outlet. Make sure the extension cord is not damaged.Remove the spool and clean the slots; carefully remove any grass and weeds or other debris.Cut the spool line off so that it just reaches the line trimming blade.Take the trimmer to an authorized service center if the trimmer does not start after completing these checks. |
| Bump line feed does not work. | Trimming blade bound with accumulated grass.Bump feed out of line.Spool bound up.Bump feed is dirty.Spool line twisted when refilled.Not enough line is exposed. | Stop the machine and clean the trimming blade.Install a new spool of cutting line.Clean the bump feed.Remove the spool cover and pull the cutting line until it reaches the trimming blade. |
Service and Support
If your Electric Grass Trimmer/Edger requires service or maintenance, please call 1-866-766-9563 for assistance.
Model and Serial Numbers
When contacting the company or reordering parts, you will need to provide the model and serial numbers of your product. These are found on the decal affixed to the housing or guard of your Electric Grass Trimmer/Edger. Copy these numbers into the space provided below.
Record the following numbers from the housing or handle of your new product:

Serial #:

NOTES
General Conditions:
Snow Joe ^® , LLC warrants this product to the original purchaser for two years against defects in material or workmanship when used for normal residential purposes. Snow Joe ^® , LLC will repair any defect in material or workmanship, and repair or replace any defective part, subject to the conditions, limitations, and exclusions set forth herein. Such repair or parts replacement will be free from charge to the original purchaser except noted below.
The duration of the warranty applies only if the product is put to personal use around the household or residence. If the product is put to any business use, commercial or industrial, then the duration of this warranty is 90 days from the date of original purchase. If any product is rented or leased, the duration of the warranty is 90 days from the date of original purchase.
It is the owner's responsibility to perform correctly all maintenance, and minor adjustments explained in the owner's manual.
Electric Products:
To obtain a replacement electric powered unit or repair the existing electric powered unit, you must return the complete unit and postage prepaid to: Snow Joe Return Center, 86 Executive Avenue, Edison, NJ 08817.
Gasoline / Battery Products:
Limitations
- Batteries are warranted only for the period of 12 months after the date of purchase on a prorated basis. Rechargeable batteries will be replaced free from charge during the first 90 days. After the initial 90 days, batteries will be replaced at a prorated cost to the customer.
- Idlers, cables, and electrical components are warranted to the original purchaser for use at household or residence for a period of two years.
Exclusions
- Snow Joe® brand engines are covered under this warranty. All other engines and engine accessories are covered only by the engine manufacturer's warranty and are not covered by this warranty.
- Parts used that are not genuine Snow Joe® parts are not covered by this warranty.
- Damages resulting from misuse, alteration, improper assembly, improper adjustment, neglect, or accident which requires repair is not covered under this warranty.
- Belts, augers, and tines are not covered under warranty – belts, augers, and tines wear out and can be purchased at www.snowjoe.com or by calling 1-866-766-9563.
Snow Joe ^® , LLC may from time to time change the design of its products. Nothing contained in this warranty shall be construed as obligating Snow Joe ^® , LLC to incorporate such design changes into previously manufactured products, nor shall such changes be construed as an admission that previous designs were defective.
This warranty is intended to cover product defects only. Snow Joe ^® , LLC is not liable for indirect, incidental, or consequential damages in connection with the use of the Snow Joe ^® Products covered by this warranty. This warranty does not cover any cost or expense incurred by the purchaser in providing substitute equipment or service during reasonable periods of malfunction or non-use of this product, while waiting for completion of repairs under this warranty. Some states do not allow exclusions of incidental or consequential damages, so the above exclusions may not apply in all states. This warranty may give you specific legal rights in your state.
If you wish to contact Snow Joe ^® , please direct inquiries to the:
Customer Service Department
Snow Joe Center
86 Executive Avenue
Edison, NJ 08817
Customers who have purchased Snow Joe ^® products exported from the United States and Canada should contact their Snow Joe ^® Distributor (Dealer) to obtain information applicable for your country, province, or state. If for any reason, you are not satisfied with the distributor's service, or if you have difficulty obtaining warranty information, contact your Snow Joe ^® seller. If in the event your efforts are unsatisfactory, please write to the Snow Joe ^® Center at the above address.
If you have any questions about your product warranty, please call 1-866-SNOW-JOE or visit us online at www.snowjoe.com.
- All Operators Must Read These Instructions Before Use
- CAUTION!
- GENERAL Safety Rules
- a) FOR ALL DOUBLE-INSULATED APPLIANCES
- b) FOR ALL APPLIANCES
- c) ADDITIONAL SAFETY INSTRUCTIONS FOR GRASS TRIMMER/EDGER
- Extension Cords
- Safety Symbols
- Know Your Electric Grass Trimmer/Edger
- Technical Data
- Unpacking
- Carton Contents:
- Assembly
- Fitting Auxiliary Handle
- Fitting the safety guard
- Adjusting the telescopic shaft
- Adjusting the angle of cutting head
- Application
- Replacing the spool
- Winding the line
- Assembling the spool
- Check length of nylon cutting line
- To increase line length
- Operation
- ON/OFF switch
- Cutting grass
- Trimming edges
- Maintenance
- IMPORTANT:
- Storage
- Service and Support
- Model and Serial Numbers
- NOTES
- General Conditions:
- Electric Products:
- Gasoline / Battery Products:
- Limitations
- Exclusions
Brand : Snow Joe
Model : TRJ601E
Category : Hedge Trimmer