
PDCD204 - CD Player Pyle - Free user manual and instructions
Find the device manual for free PDCD204 Pyle in PDF.


| Product Type | Dual CD Player (Semi-Professional) |
| Model | PDCD204 |
| Brand | Pyle |
| Drive Type | Dual disc drive with separate control unit |
| Playable Media | Standard audio CDs (8 cm and 12 cm) |
| Audio Output | Analogue stereo cinch (RCA), unbalanced, 2 V RMS ±0.5dB |
| D/A Converter | 1-bit, 8× oversampling |
| Pitch Control Range | ±4%, ±8%, ±16% |
| Pitch Bend | ±16% temporary |
| Frequency Response | 20–20,000 Hz ±0.4dB |
| Signal-to-Noise Ratio | 92 dB |
| Channel Separation | 89 dB |
| Distortion | 0.01% |
| Special Functions | Auto Cue, Loop (playback loop), Relay (auto switch between drives), Frame-precise search, Stutter mode |
| Controls | Jog wheel, Shuttle wheel, Pitch slide, Pitch Bend buttons, Track skip, Search, +10, SGL/CTN, TIME, CUE, LOOP IN/OUT, RELOOP |
| Display | LCD with track, time, frame, bar graph, status indicators |
| Remote Control | Included (infrared) |
| Power Supply | 115 V~/60 Hz – 230 V~/50 Hz, 16.5 W |
| Dimensions (Drive Unit) | 482 × 88.8 × 267 mm (19" rack mountable) |
| Dimensions (Control Unit) | 482 × 88.8 × 50 mm (19" rack mountable) |
| Weight (Drive Unit) | Approx. 5.2 kg |
| Weight (Control Unit) | Approx. 1.2 kg |
| Operating Temperature | +5°C to +35°C |
| Humidity | 25% – 85% (non-condensing) |
| Accessories Included | Control unit, drive unit, 2× stereo cinch cables, system connection cable, power cable, remote control, operating instructions |
Frequently Asked Questions - PDCD204 Pyle
User questions about PDCD204 Pyle
0 question about this device. Answer the ones you know or ask your own.
Ask a new question about this device
Download the instructions for your CD Player in PDF format for free! Find your manual PDCD204 - Pyle and take your electronic device back in hand. On this page are published all the documents necessary for the use of your device. PDCD204 by Pyle.
USER MANUAL PDCD204 Pyle
The Pyle Pro PDCD204"is a semi-professional CD player. It used to play standard audio CDs. This appliance is intended for operation at home and in semi-professional environments.
The low-level audio output signal must be transmitted to an external amplifier (which might be used together with a mixer or pre-amplifier) for amplification. The appliance should not be connected directly to loud-speakers.
The CD player consists of a control unit and a dual disc drive. Both units may only be operated together.
Any other use than that described above can result in damage to the product, involving such hazards as short-circuits, fire and electrocution. No part of the product may be modified or retrofitted and the housing may not be opened!

The safety instructions must be observed at all times.
2. Equipment features
- Dual-CD-disc drive
- Remote control unit
- 8×over-sampling,1 bit D/A converter
- Jog shuttle wheel
- Separate track skip and search buttons
• AUTOCUE function
• Installation possible in a 19" rack system - Pitch speed control of +/-4% , +/-8% , +/-16%
- LOOP function( playback loop)
- RELAY function(automatic switchover between the two CD drives)
- Frame-precise search(frame=smallest possible scanning unit of the CD player)
• Analogue audio output
3. Scope of delivery
- Control unit
- Drive unit
• 2×stereo cinch cables
• 1×system connection cable - Power cable
- Operating instructions
4. Table of contents
-
Introduction....1
-
Intended use....2
-
Equipment features....2
-
Scope of delivery....2
-
Table of contents....3
-
Explanation of signs....3
-
Safety instructions and danger warnings....4
-
Connection elements and controls....6
-
Setting up/Rack installation of the device....10
-
Connection 11
a) Connecting the control unit and drive unit....12
b) Connection of the audio cinch outputs....12
c) Connection to the power supply....12
- Putting the appliance into service 12
a) Switching on the appliance....12
b) Inserting CDs....12
c) Playback....13
d) Track selection....13
e) Selecting a section within a track....13
f) SEARCH....14
g) CUEING....14
h) Synchronization of the CD speed ....15
i) Playback loop (LOOP function)....15
j) RELAY operation....15
k) Switching off the appliance....16
-
Maintenance and care....16
-
Troubleshooting....17
-
Useful notes on handing CDs....18
-
Disposal....18
-
Technical specifications....18
5. Explanation of signs

The triangle containing a lightning symbol is used to indicate whenever your health is at risk (due to electrocution, for example).

An exclamation mark in a triangle indicates particular risks in handling or operating the appliance.

The hand symbol refers to useful tips and additional information on using the appliance.
6. Safety instructions and danger warnings

Any guarantee claims are rendered invalid if damage occurs due to non-observance of these operating instructions. We assume no liability for any consequent damage.
We assume no liability for personal injury or damage to property caused by incorrect handling or nonobservance of the safety instructions. Any guarantee claims expire in such cases.

Unauthorised conversions and/or modifications of the appliance are not permitted for safety and licensing reasons (CE).

The appliance is approved for operation in dry, closed rooms only. Do not operate the device nearby water, such as in bathrooms or nearby swimming pools.

The appliance may not be exposed to extreme temperatures ( < +5^ / > +35^ ) in operation.

The appliance may not be subjected to strong vibrations or heavy mechanical strain.

The appliance may not be exposed to excessive moisture (due to dripping or sprayed water, for example).

Do not place any vessels filled with liquid, such as glasses or vases, on top of or directly next to the appliance. They could fall over, causing water to enter the appliance. Never pour out liquids above the appliance. Do not place any small objects, such as coins or paper clips, on the appliance since they could fall inside the appliance. You run a high risk of causing a fire or life-threatening

electrocution! If any liquid or objects enter the appliance nevertheless, pull the mains plug out of the socket immediately and contact a specialist.

The appliance has been constructed according to protection class II.

110 V\~/60Hz- 230 V\~/50 Hz mains socket may be used as source of power for the appliance. Never try to operate the appliance with any other voltage.

Only pull the mains plug out of the socket by the intended gripping surface. Do not pull it by the cable.

Never plug the mains plug in or out with damp or wet hands.
• Always pull the mains plug out of the mains socket:
- Before cleaning the appliance
- If there is a thunderstorm
- If you will not be using the appliance for a long period of time (>1 week)

Electrical appliances must be kept out of the reach of children. Be particularly careful if children are present. Children are not aware of the hazards involved in handing electrical appliances improperly. Children could attempt to poke objects into the appliance. There is a life-threatening danger of electrocution.

Do not leave the appliance unattended while operating it.
- Never place the appliance on an unstable or movable surface. Persons could be injured or the appliance damaged by it falling down.
- When using a rack, make sure it is in a stable position and is transported securely. Installation on uneven, slanted surfaces or stopping the rack abruptly during transport can result in the rack overturning or appliances falling from or out of the rack and injuring people.

Live components can be exposed by opening covers or removing components (unless this can be done without tools). Contact points can also be live. If the appliance has to be opened in order to calibrate, service, repair or replace components or assemblies, all of its poles must be disconnected from all sources of voltage first. If the appliance has to be kept open and under voltage during maintenance or repairs, this work may only be carried out by a specialist who is familiar with the risks involved and the relevant regulations.
- This product is equipped with a laser of class1. Never open the appliance. Only trained specialists who are familiar with the respective hazards are permitted to make adjustments or carry out maintenance work. Adjustments made by unqualified persons could result in dangerous laser radiation.


A laser warning sign is on the back of the appliance and in the CD compartment. Do not remove the warning signs from the appliance. Do not open up the appliance or try to gain access to the inside of the appliance. Never stare into the laser beam. Laser radiation can damage your eyes.
- Never connect the appliance directly after transferring it from a cold to a warm room. The condensation water that forms could destroy the appliance or result in an electric shock. Allow the device to reach room temperature before connecting it. Wait until the condensation water has evaporated. This can take some hours.
- Do not place any naked flames such as those of burning candles on or next to the appliance.
- Do not place the appliance on soft surfaces such as carpets or beds. Do not cover the air vents of the appliance. Do not obstruct the air circulation with objects such as magazines, table cloths or curtains. This prevents the dissipation of heat from the appliance and can result in overheating.
• Only use the appliance in a moderate climate, not in tropical environments.
- All persons involved in operating, installing and servicing the appliance and putting it into service must be trained and qualified accordingly and observe these operating instructions.

Defective mains cables may only be replaced by specialists. Danger of electrocution!
- Do not leave the packaging material lying around carelessly since it can become a source of danger for children playing with it.
- The CD player may be a source of interference to radios or television sets. Keep it therefore a sufficient distance away from such appliances.
- The accident prevention regulations and the regulations of the employers' liability insurance association should be observed at commercial institutions.

If you are not sure about the correct connection or if questions arise which are not answered by the operating instructions, please do not hesitate to contact support or a specialist of your choice. Consult a specialist if you are in doubt the operating principle or the safety of the product.
7. Connection elements and controls
The buttons and operational controls of CD player 1 (DISC 1) and CD player 2 (DISC 2) are operated in exactly the same way. To keep these instructions clear and concise, each of the buttons and operational controls, which are available twice, are described only once in the following.
Control unit of CD player 1 (DISC 1)
The left-hand side of the control unit is used to control CD player 1 (on the left).
Control unit of CD player 2 (DISC 2)
The right-hand side of the control unit is used to control CD player 2 (on the right).
Control unit
(1) SHUTTLE wheel
Function during playback:
The shuttle wheel can be used to quickly move forwards or backwards. Fast forward is performed by turning the wheel clockwise (FWD+). Fast backward is performed by turning it anti-clockwise (REV-). The speed of the search function depends on how far the shuttle wheel is turned clockwise or anti-clockwise.
Function in pause mode:
The appliance switches to 'stutter mode' (continuous repetition of a small section of the CD) if the shuttle wheel is used in pause mode. This makes it easier to find specific playback points.
(1a) JOG wheel
Function during playback:
The JOG wheel can be used to increase (clockwise rotation) or reduce (anti-clockwise rotation) the playback speeds temporarily by +/-16%. The CD is played at its original speed as soon as the wheel is no longer moved.
Function in pause mode:
The appliance switches to "stutter mode" (continuous repetition of a small section of the CD) if the JOG wheel is used in pause mode. You can move backwards and forwards step-by-step within a CD track with the JOG wheel. This makes it easier to find specific certain playback points (e.g. the CUE mark).
The search speed depends on how far the wheel is turned clockwise or anti-clockwise.
(2) LC display
The most important settings and the CD play data are shown on the LC display (liquid crystal display).
(3) PITCH-side control
The playback speed can be changed with the side control. Push the control downwards (position +) to increase the playback speed. The speed is reduced by pushing the control upwards (position -). In the central position, you can slightly feel the slide control clicking into place. The original playback speed and tone pitch are reproduced in this position.
This setting can be made with or without a CD. The pitch setting is retained after changing the CD.

The slide control only takes effect if the function has been witched on with the PITCH key.
The maximum possible change to the playback speed in percent is specified by the setting made with the
PITCH % key.
(4) LOOP-In button
The starting point of the playback loop is set by pressing this button. A detailed description of the "LOOP"
function can be found under "Playback loop (LOOP function)".
(5) OPEN/CLOSE button
You can open and close the respective CD compartment with this button.
The CD compartment cannot be opened while the CD player is in playback mode.
(6) +10 - button
You can skip 10 tracks on the CD by pressing this button.
Example: If the appliance is at track 4, the playback point skips to track 14 by pressing the +10 - key.
It skips to track 24 by pressing the +10 button again. The appliance returns to track 4 if there are not enough remaining tracks on the CD.
(7) SGL/CTN button
You can switch the CD player between single track playback (SINGLE) and continuous track playback (CONTINUOUS) with this button. "SINGLE" is displayed on the LC display in single track playback mode.
CONTINUOUS playback: All tracks of the CD are played one after another.
SINGLE playback: The appliance plays a track and then automatically switches to pause mode at the start of the following track.
The appliance is automatically set to CONTINUOUS playback mode after switching it on.
(8) PITCH - % key
The maximum PITCH speed change is switched between 4%, 8% and 16% with this key. The corresponding LED 4, 8 or 16 goes on.
(9) TIME button
A short press of this button switches between the various CD time counters on the LC display.
The following displays are available for selection:
- Remaining track time (REMAIN is displayed)
- Played track time
• Total remaining time of the CD (TOTAL REMAIN is displayed)
(10) Track skips buttons \* \* \*
You can select any track on the CD with the track skip buttons. You can skip through the tracks of the CD at accelerated speed by holding down the button.
H = backward track skip
H = forward track skip
(11) LOOP - OUT button
The end point of the playback loop is set and the playback loop started simultaneously by pressing this button. The playback loop is ended by pressing the button again.
A detailed description of the "LOOP" function can be found under "Playback loop (LOOP function)".
(12) RELAY button
This button is used to activate or deactivate the RELAY function. The LED above the button goes on if the
RELAY function is activated.
A detailed description of the RELAY function can be found under "Relay operation".
(13) PITCH button
This button is used to activate the "PITCH slide control" (3) function. The LED above the button goes on whenever the PITCH function is switched on.
(14) PITCH - BEND buttons
The playback speed of the CD player can be increased or reduced temporarily by 16% with these buttons.
Pitch bend (-) button = reduces the speed
Pitch bend (+) button = increases the speed
A desired point within a CD track can be selected with these buttons. You can move small steps by pressing the button briefly. The search is accelerated if the button is held down.
« = backward search
= forward search
(16) RELOOP button
This button allows you to retrieve a saved playback loop. The LOOP-OUT button must be pressed to end the playback loop.
A detailed description of the "LOOP" function can be found under "Playback loop (LOOP function)".
(17) PLAY/PAUSE button
The CD is played or switched to pause mode with this button. The green LED next to the button goes on in playback mode and flashes in pause mode.
(18) CUE button
CUE function during playback:
The CD player returns to the beginning of the piece of music or to the previously selected CUE mark and switches to pause mode if the CUE button is pressed during playback.
CUE function in pause mode:
You can pre-hear tracks by holding down the CUE button with the CD player in pause mode. The CD player returns to the beginning or song or to the CUE mark as soon as the CUE button is let go of.
A detailed description of the "CUE function" can be found under "CUEING".
(19) System connection socket of the CD control unit
The data is transmitted between the drive unit and the control unit via this socket.
Drive unit
(20) CD compartment 2
This is the compartment (disc 2 drive) in which the CD is placed.
(21) OPEN/CLOSE button for CD compartment 2
You can open and close the CD compartment of the DISC 2 drive with this button.
The CD compartment cannot be opened with the CD player in playback mode.
(22) CD compartment 1
This is the compartment (DISC 1 drive) in which the CD is placed.
(23) OPEN/CLOSE button for CD compartment 1
You can open and close the CD compartment for the DISC 1 driver with this button.
The CD compartment cannot be opened with the CD player in playback mode.
(24) ON/OFF "POWER" switch
The dual CD player is switched on and off with this mains switch. The appliance is switched on after pressing the switch. The power indicator above the switch goes on.
(25) System connection socket
Connect this socket to terminal (19) on the control unit with the supplied system control cable.
(26) "AC INPUT" mains connection
The supplied mains cable for the power supply of the appliance is plugged in here.
(27) AUDIO - OUT R&L sockets
The right and left audio signals of CD player 2 are output in analogue form at these cinch sockets. Connect the audio input of your mixer or amplifier here.
Red cinch socket = right output
White cinch socket = left output
(28)FUSE Socket
LC display
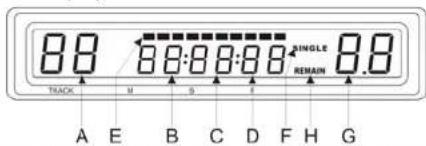
(A) - (D) Track, minutes, seconds, frame display and display of additional information
The current CD data, such as position and time, is displayed here.
In addition the following messages can be displayed:
"OPEN" = CD compartment is opened
"CLOSE" = CD compartment is closed
"no disc" = no CD inserted or inserted CD cannot be read
"Read" = CD is currently being read
(E) Bar graph display
The temporal status is displayed in "bar form" here in addition to the digital time display. The display depends on which display mode has been set (remaining track time, total remaining time or elapsed track time). The bar display starts to flash 15 seconds before the end of the track.
(F) SINGLE
This symbol appears after selecting single track playback mode.
(G) PITCH display
The current BPM (beats per minute) change is displayed here. The BPM change depends on the PITCH side control setting.
(H) REMAIN
The remaining time of the current track is displayed if this symbol is lit up.
8. Setting up / Rack installation of the device
The dual CD player is suitable for table top use or for the installation in a 19" (483mm) rack.

Make sure the appliance is well ventilated when installing it together with other equipment. Do not place the appliance on soft surfaces, such as carpets or beds. Furthermore the air circulation may not be obstructed by objects such as magazines, table cloths or curtains. This prevents heat from being dissipated from the appliance and can result in overheating (risk of fire!). If the appliance is installed in a rack, an additional fan may be necessary to dissipate the heat generated in the rack.
Do not drill any holes or screw any screws into the housing in order to attach the appliance, since this can damage it and impair its safety.
Make sure the appliance is in a stable position on a stable surface. The appliance can injure persons by falling down or overturning.
Only operate the drive unit of the CD player in a horizontal position, since it will not work properly otherwise. Non-observance of these instructions can result in the inserted CD or the drive unit becoming damaged.
Make sure the connection cable is not being squeezed or damaged by sharp edges. Always lay the cables in such a way that no-one can stumble over them or become entangled in them. There is risk of injury!
Make sure you avoid direct, intensive sunlight, vibrations, dust, heat, cold and moisture when selecting the location of the appliance.
No appliances with strong electric or magnetic fields, such as transformers, motors, wireless telephones, radios of computers, may be within the direct vicinity of the dual CD player, since they can influence the CD player. Furthermore the CD player may be source of interference to radios or television sets. Keep it therefore a sufficient distance away from such appliance.

Due to the large variety of paints and polishes used for furniture, it cannot be ruled out that the feet of the appliance may leave visible marks on the furniture. The appliance should therefore not be placed on the surfaces of valuable furniture without any appropriate protection.
Table top use:
Place the drive unit and the control unit on a flat and level surface. The control unit has appropriate feet on the rear. The feet of the appliance are on the bottom of the drive unit.
Use within a rack:
The control unit and drive unit can be built into a *19* rack. A rack with openings on both sides is recommended to allow the appliance to be installed and connected without any problems. Four attachment holes are in the front plate of both the control unit and the drive unit. Attach both the control unit and the drive unit in the rack with four M6 screws.
Attachment to the front plate alone is insufficient for a safe attachment. Additional, even attachment must be provided by side and floor rails. The respective rack manufacturers provide several options for this purpose.
9. Connection

Before connecting the dual CD player, disconnect it and any other appliances which are to be connected to it from the mains supply (pull mains plug from the socket). Use the supplied cables to connect the appliance. Interference and safety problems can be caused by using the wrong cables.
a) Connecting the control unit and drive unit
Connect the system connection socket (19) of the control unit to the system connection socket (25) on the drive unit with the supplied system control cable.

Only use the supplied system connection cable as connection cable as connection cable. Do not try to plug in the cable with force. There is only one position in which the plugs can be inserted. Operation is not possible without the control unit and drive unit connected.
b) Connection of the audio cinch outputs
Connect a free cinch input of your amplifier or mixer to the AUDIO-OUT (27) cinch output.
The white AUDIO-OUT socket (L) of the drive is connected to the left input of the respective amplifier or mixer.
The red AUDIO-OUT socket (R) of the drive is connected to the right input of the respective amplifier or mixer.

Only appliances with analogue audio cinch inputs (LINE level) may be connected to the outputs to avoid any distortion or mismatching which could damage the appliance.
c) Connection to the power supply

The dual CD player and all appliances connected to it must be switched off. Make sure all of the electrical connections and connection cables between the appliance and any extension cables conform to the regulations and comply with the operating instructions.
Make sure the voltage specifications on the nameplate (back of the appliance) correspond to the available power supply voltage before establishing the connection. Serious damage can be caused by incorrect supply voltages.
Connect the appliance connection plug of the supplied mains cable to the 'AC INPUT' (26) mains connection of the dual CD player. Insert the mains plug into a 110V\~/60Hz-230V\~/50Hz mains socket.
10. Putting the appliance into service

Only put the appliance into service once you have become familiar with its features and these operating instructions. Check whether all connections have been established properly. Do not put the appliance into service if it is damaged.
Do not listen to music at excessive volume since it can damage your hearing.
The amplifier of the system should always be switched on last and switched off first. In this way you can prevent any undesired noises (which can be made when switching off the CD player, for example) from damaging the amplifier or loudspeakers.
Make sure the connected appliances are not overloaded. Playback may not be distorted under any circumstances. If any distorted music signals can be heard even though the volume which is set on the amplifier is not too high, switch off the dual CD player immediately and check the connection. Please contact a specialist if there is no error to the connection.
CD player 1 and CD player 2 are equipped with exactly the same features and can be operated separately.
a) Switching on the appliance
Turn the volume of the connected amplifier to minimum. Switch off the dual CD player by the on/off switch. Then, if a mixer is connected, switch it on and finally switch on the amplifier of the system.
b) Inserting CDs
Open the CD compartment by pressing the OPEN/CLOSE button either on the control unit or the drive unit. "OPEN" appears on the display.

The open drive tray is closed automatically after about 60 seconds if no other button is pressed.
Insert an audio CD in the CD tray with the written side facing upwards. Hold the CD by the outer edge and avoid touching its inner surface.


The dual CD player is only designed for playing audio CDs. Do not insert any other CDs. Make sure the CD is placed properly in the recess in the tray intended for this purpose.
Only insert CDs, and only one CD at a time in each CD tray. Never interfere with the motor driven movements of the CD drive tray. Do not push the CD compartment closed since this would damage the mechanics and result in malfunctions.
Close the drive tray by pressing the OPEN/CLOSE button again. The appliance reads in the CD ("READ" is displayed). The total amount of tracks and the total CD playing time is briefly displayed on the LC display. The appliance the automatically sets the CUE mark at the beginning of the music of the first track on the CD. The CD player switches to pause mode after reading in the CD.
The CD compartment can not be opened in playback mode. This prevents any accidental interruptions to playback. Stop the CD before pressing the OPEN/CLOSE button.
c) Playback
Press the PLAY/PAUSE button. Playback begins. The time display starts to runs and the green LED next to the button goes on. The point at which playback is started is automatically saved as CUE mark.
There are two ways of stopping playback.
-
Press the PLAY/PAUSE button. The appliance switches to pause mode at the current playback point and the green LED next to the button flashes.
-
Press the CUE button and the appliance will return to the CUE mark and switch to pause mode.
d) Track selection
You can select the CD track with the respective track skip button*or* The CD player goes to the beginning of the selected track.
If you hold down the track skip button, the CD player will skip through the track numbers until you let go of the button.
Track skip button
The next CD track is selected by pressing the button. The CD player goes to the first track of the CD in playback mode if the button in pressed during the last track of the CD.
Track skip button«
The beginning of the previous track is selected by pressing the button ✦ once. The CD player goes to the beginning of the track currently being played if this button is pressed during playback.
+10 - button
You can skip 10 tracks on the CD by pressing this button.
Tracks selected with the track skip button are selected in the mode in which the CD player was before the button was pressed.
Examples:
- If the track skip button is pressed in pause mode, the CD player switches to the beginning of the selected track and remains in pause mode.
- If the track skip button is pressed in playback mode, the CD player switches to the beginning of the selected track and starts to play it.
- The CD player always switches to pause mode directly after selecting a track if the CD player is set to single-track playback mode (SINGLE).
The appliance automatically resets the CUE mark to the beginning of the track each time a track is selected. The red LED next to the CUE button flashes briefly.
e) Selecting a section within a track
The shuttle wheel (1) is used to quickly find a specific point within a track. The search speed depends on how far the wheel is turned clockwise or anti-clockwise. The wheel automatically returns to the central position after letting go of it. To search forwards, turn the shuttle wheel clockwise. To search backwards, turn the shuttle wheel anticlockwise.
The JOG wheel (1a) is used to quickly find a specific point within a track. In pause mode, it is very easy to set the start of the beat precisely with the rotary wheel, since the track is scanned in very small steps (frames) and the search steps can be heard. To search forwards, turn the JOG wheel clockwise. To search backwards, turn the JOG wheel anticlockwise.
The playing speed is altered with the JOG wheel (1a) in playback mode. The extent to which the playing speed is changed depends on the speed at which the wheel is turned.
You can operate the SHUTTLE or JOG wheel in pause or playback mode. In pause mode, the CD player switches to "stutter mode" as soon as one of the wheels is operated.
1) SEARCH
This type of search is ideal for quickly finding points within tracks. Hold down the Search button « or » . The appliance begins to search backwards or forwards.
The CD can be heard during the search.
The appliance automatically increases the search speed if one of search buttons is pressed for a longer period of time.
This function allows you to work through the tracks. The button can be pressed in playback or pause mode. The appliance switches to "stutter mode" after pressing one of the search buttons in pause mode.
g) CUEING
You can select the playback starting point with the CUE function. The advantage of this function is that, for example, pause at the start of tracks are not played and there are therefore no delays after starting to play a track. The red LED next to the CUE button flashes whenever a new CUE mark is set. The CUE LED lights up permanently as soon as the appliance is in CUE mode.
Auto - CUE:
The appliance automatically sets the CUE mark to the point where the music starts after it is switched on or one of the track skip buttons«or»is pressed.
Back-CUE function:
Press the CUE button in playback mode and the CD player will go to the beginning of the song or return to the saved CUE mark and switch to pause mode.
Saving CUE marks manually:
First way:
The CD player is in playback mode.
-
Press the PLAY/PAUSE button once you have arrived at the desired music point and the CD player will switch to pause mode.
-
Start playback again by pressing the PLAY/PAUSE button. The red LED next to the CUE button flashes briefly. The CUE mark was set where the playback was restarted.
-
If you now press the CUE button, the CD player jumps back to the CUE mark and switches to pause mode. The red LED next to the CUE button goes on.
Second way:
The CD player is in pause mode:
1. Search for the desired starting point with the search buttons « or » the JOG wheel.
2. Start playback by pressing the PLAY/PAUSE button. The red LED next to the CUE button flashes
briefly. The CUE mark was set where the playback was started.
- If you now press the CUE button, the CD player return to the CUE mark and switches to pause mode.
The red LED next to the CUE button goes on.
Checking the CUE mark:
Press the CUE button and hold it down in CUE mode (red LED next to the CUE button goes on). The CD is played as long as you hold down the CUE button. The CD player returns to the CUE mark and switches to pause mode after letting go of the button.
Deleting the CUE mark:
The CUE mark is automatically deleted as soon as a new CUE mark is set.
h) Synchronization of the CD speed
To mix or cross-fade two signal sources "cleanly", it is often necessary to synchronise the beat of the two pieces of music first.
There are two ways of doing this:
-
The playing speed can be changed statically (permanently) with the PITCH slide control. The function is used if the beat tempo of two tracks is completely different.
-
The playing speed can be changed temporarily with the PITCH bend buttons. This function is used if two tracks have the same beat but need to be synchronized.
PITCH slide control
-
Switch on the function by pressing in the PITCH button.
-
Select the desired maximum change of pitch of 4%, 8% or 16% with the PITCH % button.
-
Change the playing speed by moving the PITCH slide control upwards or downwards. The respective variation in speed set is displayed on the LC display. The original playback speed is maintained if the slide control is set to the central position.
PITCH BEND buttons:
- Hold down the respective PITCH BEND button during playback to change the speed up to 16%.
Pitch Bend (-) button = reduction of the speed
Pitch Bend (+) button = increase of the speed
-
The extent to which the playing speed varies depends on how long the PITCH button is pressed.
-
The playing speed specified by the PITCH control slide is returned to after letting go of the button.
i) Playback loop (LOOP function)
This function can be used to define a playback loop. The starting point and end point of the loop can be selected in playback and pause mode.
-
Press the LOOP-IN button after arriving at the desired starting point. The starting point of the playback loop is set.
-
Press the LOOP-OUT button after arriving at the desired end point. The yellow LEDs next to the LOOP-OUT button flash. The set loop is now played. Playback continues until the LOOP function is stopped by pressing the LOOP-OUT button. The yellow LEDs next to the LOOP-OUT button go on.
-
If the playback loop was stopped, it can be restarted by pressing the RELOOP button. The LOOP-OUT button must be pressed to end the playback loop.
The existing playback loop is deleted as soon as a new playback loop is programmed.
j) RELAY operation
Tracks of the two CD drives are played alternately with this function. This means the CD in one of the drives is played as soon as a track on a CD in the other drive has finished.
- Insert a CD in both CD compartments.
- Press the RELAY button. The red LED above the button goes on. Single-track playback mode (SINGLE) is automatically activated on both CD player sides by pressing the RELAY button.
- Start playing CD player 1. Once CD player 1 has arrived at the end of the track, it switches to pause mode and CD player 2 automatically starts to play. Once the end of the track (on CD player 2) is reached, CD-player 1 automatically starts playing the next track, and so on.
- You must press the RELAY button again to end the RELAY function.
k) Switching off the appliance
Take the CDs out of the CD compartments before switching off the appliance. Close both CD compartments. Switch off the amplifier and, if a mixer is connected, switch it off as well. Switch off the dual CD player with the on/off switch only afterwards. If one of the CD compartments is not closed properly, switch the dual CD player back on again and close the CD compartment with the OPEN/CLOSE button.

Do not try to close an open CD compartment manually with the appliance switched off since this would damage the CD player.
11. Maintenance and care
Make sure you observe the following safety instructions before cleaning the appliance or subjecting it to maintenance:

Pull the mains plug out of the mains socket. The appliance may only be repaired or opened by a specialist who is familiar with the risks involved and the relevant regulations.
All connected appliances must be disconnected from the mains supply (by pulling the mains plug) prior to maintenance or repairs. Never open the appliance since it is maintenance free. The guarantee is rendered invalid by opening the appliance.
The outside of the appliance should only be cleaned with a soft, dry cloth or brush. Do not use any aggressive cleaning agents or chemical solutions under any circumstances, since they could damage the housing or impair operation.
Check the technical safety of the appliance regularly, for damage to the housing or the mains cable for example.
If you have reason to assume that safe operation is no longer possible, remove the appliance from service and secure it against inadvertent operation.
It can be assumed that safe operation is no longer possible if:
• The appliance has visible signs or damage.
• The appliance is no longer working or working properly.
• The appliance has been stored under unfavorable conditions for a long period of time.
• The appliance has been subjected to excessive strain during transport.
• The appliance has come in contact with liquids, such as rain.
12. Troubleshooting
By purchasing the "Pyle Pro PDCD204 dual CD player", you have acquired a safe, state-of-the-art product. Problems and malfunctions can occur nevertheless. We would therefore like to show you how to eliminate certain malfunctions yourself.

Observe the safety instructions by all means!
| Problem | Cause | Solution |
| No display after Switching on the on/off switch. | The mains cable is not inserted properly in the mains socket or the socket of the appliance | Plug in the mains cable properly. |
| The CD is not played back. | CD has not been inserted properly. | Insert the CD with the written side facing upwards. |
| CD is dirty. Clean the CD with a soft cloth. | ||
| The inserted CD is not an audio CD. Insert an audio CD. | ||
| There are drop outs when playing the CD. | The CD is dirty. | Clean the CD |
| The CD is scratched. | ||
| The CD is badly pressed. Renew the CD. | ||
| The appliance is subjected to vibrations. | Place the dual CD player on an appropriate stable surface. | |
| LC displays are not working. | The system connection cable has not been inserted or has not been inserted properly. | Establish a correct system Connection. |
| The PITCH slide control is not working. | The PITCH button has not been pressed. | Switch on the PITCH function. |
| No sound can be heard. | A playback appliance is not switched on. | Switch on the appliance |
| The wrong input has been selected on the amplifier/mixer. | Select the right input. | |
| The volume controls of the amplifier/ mixer or the output stage are set to the "MINIMUM" position. | Increase the volume. | |
| A channel is not working | A cinch cable has become disconnected from the audio output of the CD player or from the amplifier/ mixer input. | Connect the clinch cable properly. |
| The wrong balance has been selected on the amplifier/mixer. | Set the balance properly. | |
| The cinch connection cables is defective. | Renew the cinch cable. |

Repairs other than those just described should only be performed by authorized electricians.
13. Useful notes on handing CDs
- Hold CDs only by the edges. In this way you can prevent fingerprints and dirt on the surface.
- Only touch your CDs with clean hands.
- If a CDs is dirty nevertheless, wipe it clean from the centre to the rim with a soft, lint-free cloth. Avoid circular motion when cleaning CDs. Do not use any solvents.
- Please use a commercially available CD cleaning agent (do not use a cleaning agent for vinyl records) to remove dirt which is difficult to remove, while observing the instructions of the manufacturer.
- Do not write on your CDs since this can result in reading errors. Do not apply any stickers or similar.
Stickers can become stuck in the CD player, for example, and damage it.
• Store your CDs in the supplied CD cases after playing them. - Avoid exposing CDs to direct sunlight, heat and moisture when storing them.

14. Disposal

Dispose of the product at the end of its service life in accordance with the current statutory regulations.
15. Technical specifications
Operating voltage:
Power consumption:
Playback media:
Output voltage
Channel separation:
Pitch speed control:
Pitch bending speed control:
Frequency response:
S/N ratio:
Distortion factor:
Analogue audio output:
Digital audio output:
Drive unit weight
Weight of the control unit:
Drive unit dimensions (W × H × D):
Control unit dimensions (W × H × D);
Ambient conditions:
Storage temperature range:
Operating temperature range:
Humidity range:
115V\~/60Hz to 230 V\~/50Hz
16.5W
Standard audio CDs, 8 cm and 12 cm and
2 V RMS +/- 0.5dB
89dB
+/- 4%, +/- 8%, +/- 16%
+/- 16%
20-20000 Hz. +/- 0.4dB
92dB
0.01%
Unsymmetrical stereo cinch sockets
Unsymmetrical cinch sockets
Approx. 5.2kg
Approx. 1.2kg
482×88.8×267mm
482×88.8×50mm
-20」to 60
+5°C to +35°C
25% to 85% relative humidity (non-cond
- Equipment features
- Scope of delivery
- Table of contents
- Explanation of signs
- Safety instructions and danger warnings
- Connection elements and controls
- Control unit of CD player 1 (DISC 1)
- Control unit of CD player 2 (DISC 2)
- Control unit
- SHUTTLE wheel
- Function in pause mode:
- (1a) JOG wheel
- LC display
- PITCH-side control
- LOOP-In button
- OPEN/CLOSE button
- The CD compartment cannot be opened while the CD player is in playback mode.
- +10 - button
- SGL/CTN button
- The appliance is automatically set to CONTINUOUS playback mode after switching it on.
- PITCH - % key
- TIME button
- Track skips buttons \* \* \*
- LOOP - OUT button
- A detailed description of the "LOOP" function can be found under "Playback loop (LOOP function)".
- RELAY button
- A detailed description of the RELAY function can be found under "Relay operation".
- PITCH button
- PITCH - BEND buttons
- RELOOP button
- PLAY/PAUSE button
- CUE button
- A detailed description of the "CUE function" can be found under "CUEING".
- System connection socket of the CD control unit
- Drive unit
- LC display
- Setting up / Rack installation of the device
- Table top use:
- Use within a rack:
- Connection
- a) Connecting the control unit and drive unit
- b) Connection of the audio cinch outputs
- c) Connection to the power supply
- Putting the appliance into service
- a) Switching on the appliance
- b) Inserting CDs
- c) Playback
- d) Track selection
- Track skip button
- Track skip button«
- +10 - button
- Examples:
- 1) SEARCH
- g) CUEING
- Auto - CUE:
- Back-CUE function:
- Saving CUE marks manually:
- Checking the CUE mark:
- Deleting the CUE mark:
- h) Synchronization of the CD speed
- There are two ways of doing this:
- PITCH slide control
- PITCH BEND buttons:
- i) Playback loop (LOOP function)
- j) RELAY operation
- k) Switching off the appliance
- Maintenance and care
- Troubleshooting
- Useful notes on handing CDs
- Disposal
- Technical specifications
Brand : Pyle
Model : PDCD204
Category : CD Player