
NVM-4370 - Gps SANYO - Free user manual and instructions
Find the device manual for free NVM-4370 SANYO in PDF.


| Product Type | GPS Navigation |
| Brand | Sanyo |
| Model | NVM-4370 |
| Display Size | 4.3 inches |
| Dimensions (W x H x D) | 120 x 80 x 20 mm |
| Weight | 200 g |
| Power Supply | Car charger (12V) and internal rechargeable battery |
| Battery Life | Up to 3 hours |
| Navigation Features | Voice-guided turn-by-turn, route planning, points of interest |
| Maps | Preloaded North America (or region-specific) |
| Mounting | Suction cup windshield mount included |
| Connectivity | USB port for map updates and charging |
| Languages | Multi-language support |
| Maintenance | Clean with a soft, dry cloth; avoid liquids |
| Safety Warnings | Mount securely; do not place where it obstructs driver view |
| Spare Parts | Power cable, mount, cradle available separately |
| Repairability | No user-serviceable parts; contact service center |
Frequently Asked Questions - NVM-4370 SANYO
User questions about NVM-4370 SANYO
0 question about this device. Answer the ones you know or ask your own.
Ask a new question about this device
Download the instructions for your Gps in PDF format for free! Find your manual NVM-4370 - SANYO and take your electronic device back in hand. On this page are published all the documents necessary for the use of your device. NVM-4370 by SANYO.
USER MANUAL NVM-4370 SANYO
Portable Navigation System
natural_image
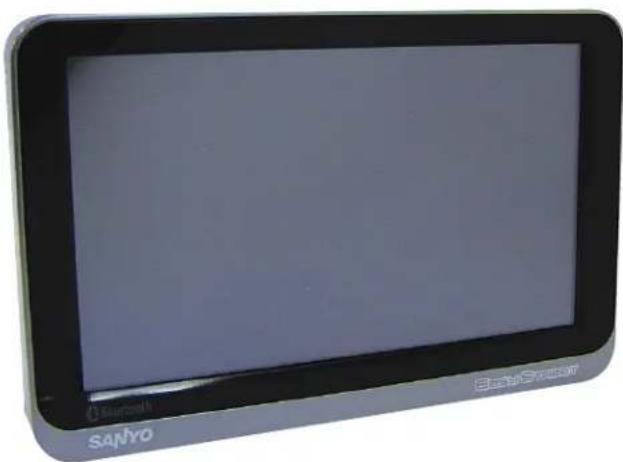
Front view of a black SANYO tablet device with no visible text or symbols on the screen or body.If you need assistance with product operation, authorized service center referral, service assistance, problem resolution, or parts and accessories availability; you may contact us by:
A. Visiting www.sanyoservice.com on a 24hr/7 days a week basis or B. calling the customer support center at 1-800-421-6382
Weekdays 7:30 AM - 5:00 PM Pacific Time
FCC COMPLIANCE
* This device complies with Part 15 of the FCC Rules.
Operation is subject to the following two conditions:
(1) this device may not cause harmful interference, and
(2) this device must accept any interference received, including interference that may cause undesired operation.
FCC WARNING
Changes or modifications not expressly approved by the party responsible for compliance could void the user's authority to operate the equipment.
NOTICE
This equipment has been tested and found to comply with the limits for a Class B digital device, pursuant to part 15 of the FCC Rules. These limits are designed to provide reasonable protection against harmful interference in a residential installation.
This equipment generates uses and can radiate radio frequency energy and, if not installed and used in accordance with the instructions, may cause harmful interference to radio communications. However, there is no guarantee that interference will not occur in a particular installation. If this equipment does cause harmful interference to radio or television reception, which can be determined by turning the equipment off and on, the user is encouraged to try to correct the interference by one or more of the following measures:
- Reorient or relocate the receiving antenna
- Increase the separation between the equipment and receiver.
- Connect the equipment into an outlet on a circuit different from that to which the receiver is connected.
- Consult the dealer or an experienced radio/TV technician for help.
This transmitter must not be co-located or operated in conjunction with any other antenna or transmitter.
Industry Canada Compliance
Category I radio communication devices comply with Industry Canada Standard RSS-210. Category II radio communication devices comply with Industry Canada Standard RSS-310.
Precautions
Copyright
SANYO Portable Navigation System Instruction Manual
Original issue: Apr 2008
SANYO and the SANYO logo are registered trademarks of SANYO. Other products or system names appearing in this document are trademarks or registered trademarks of their respective owners. Further, the © or TM symbols are not used in the text.
No part of this publication may be reproduced, stored in a retrieval system, or transmitted, in any form or by any means, electronic, mechanical, photocopy, recording, or otherwise, without the prior written permission of SANYO.
You have acquired a device (“DEVICE”) that includes software licensed by SANYO from an affiliate of Microsoft Corporation (“MS”). Those installed software products of MS origin, as well as associated media, printed materials, and “online” or electronic documentation (“SOFTWARE”) are protected by international intellectual property laws and treaties. Manufacturer, MS and its suppliers (including Microsoft Corporation) own the title, copyright, and other intellectual property rights in the SOFTWARE. The SOFTWARE is licensed, not sold. All rights reserved.
Microsoft, Windows is registered trademarks or trademarks of the Microsoft Corporation in the United States and/or other countries. Adobe and Reader are registered trademarks or trademarks of Adobe Systems Incorporated in the United States and/or other countries.
The Bluetooth word mark and logos are owned by the Bluetooth SIG, Inc. and any use of such marks by Sanyo is under license. All other brand or product names mentioned in this manual are trademarks or registered trademarks of their respective companies.
Maintenance
- Keep your device away from excessive moisture and extreme temperatures.
- Avoid exposing your device to direct sunlight or strong ultraviolet light for extended periods of time.
- Do not drop your device or subject it to severe shock.
- Do not subject your device to sudden and severe temperature changes. This could cause moisture condensation inside the unit, which could damage your device. In the event of moisture condensation, allow the device to dry out completely before use.
- Do not leave your device in plain sight when you leave your vehicle. Take your device with you or remove it from view to avoid theft.
- The screen surface can be easily scratched. Sharp objects may scratch the screen. You may use non-adhesive generic screen protectors designed specifically for use on portable devices with LCD panels to help protect the screen from minor scratches.
- Never clean your device with it powered on.
- Never use organic solvents such as benzene or paint thinner to clean your device. Use of these solvents can cause deformation or discoloration.
- Use a soft, clean, lint-free cloth to clean the display screen. Moistened LCD screen wipes could also be used as required.
- Never attempt to disassemble, repair or make any modifications to your device. Disassembly, modification or any attempt at repair could cause damage to your device and even bodily injury or property damage and will void any warranty.
Storage precautions
- Do not store your device anywhere it may be exposed to water or in conditions of high humidity.
- When the device is not in use for an extended period of time, bring it indoors and store it in cool dry area.
Accessories and repair precautions
- Only authorized accessories should be use with the device. The use of incompatible accessories could result in bodily injury and/or damage to the device.
- The use of unauthorized accessories will also void your warranty.
- Never attempt to disassemble, repair or make any modification to your device.
DISCLAIMER AND LIMITATION OF LIABILITY
SANYO and its subsidiaries makes no representations or warranties, either expressed or implied, with respect to the contents hereof and specifically disclaims the implied warranties of merchantability or fitness for a particular purpose. SANYO and its subsidiaries assume no responsibility for any damage or loss resulting from the use of this SANYO Portable Navigation System.
NOTE: Record the device ID, serial number, purchase date, and place of purchase information in the space provided below. The serial number is indicated on the label affixed to your unit. All correspondence concerning your unit should include the serial number, device ID, and purchase information. Information in this manual is subject to change without notice.
WARNINGS AND NOTICES
For your safety, do not operate the controls of the product while driving.
GPS satellite signals cannot typically pass through solid materials (except glass). GPS location information is not typically available inside buildings, tunnels, or underground parking lots.
A minimum of 4 GPS satellite signals is needed to calculate your GPS position. Signal reception can be affected by weather events or overhead obstacles (e.g. dense foliage and tall buildings).
Other wireless devices in the vehicle may interfere with the reception of satellite signals and cause the reception to be unstable.
Adaptor

Do not attempt to service the unit. There are no serviceable parts inside. Replace the unit if it is damaged or exposed to excess moisture.
Do not use the adaptor if the cord becomes damaged.
Connect the adaptor to the proper power source. The voltage requirements are found on the product case and/or packaging.
Battery

This unit contains a non-replaceable internal Lithium Ion battery. The battery can burst or explode, releasing hazardous chemicals. To reduce the risk of fire or burns, do not disassemble, crush, puncture, or dispose of in fire or water.
To charge the battery, connect the Car adaptor to the main unit. Under high temperatures, however, the protection circuit may be activated and charging may not be possible.
Do not connect any accessory (Car adaptor, etc.) other than those supplied or optional.
FOR AMERICAN USERS
The following advisory is included in accordance with the laws of the State of California (USA):
WARNING: This product contains chemicals, including lead, known to the State of California to cause cancer, and birth defects or other reproductive harm. Wash hands after handling.
CHECK YOUR STATE AND LOCAL TRAFFIC LAWS BEFORE MOUNTING.
Currently, some states (including, e.g., California and Minnesota) and municipalities restrict or prohibit drivers from mounting objects or other materials (a) on their windshields while operating motor vehicles or (b) that obstruct the driver's view or interfere with the operation of the vehicle. In such cases, other Sanyo mounting options should be used. SANYO does not take any responsibility for any fines, penalties, or damages that may be incurred as a result of disregarding this notice.
You are responsible for complying with applicable federal, state or local laws, regulation or ordinances regarding the disposal of your Sanyo Navigation product.
READ CAREFULLY BEFORE USE!!!
User license agreement
IMPORTANT! — BY INSTALLING, COPYING, ACCESSING, DOWNLOADING, AND/OR USING THIS THE SOFTWARE, YOU ARE CONSENTING TO BE BOUND BY AND ARE BECOMING A PARTY TO THIS AGREEMENT AS A LICENSEE. IF YOU DO NOT AGREE TO ALL OF THE TERMS OF THIS AGREEMENT, TERMINATE THIS INSTALLATION PROCESS OR, IF THE SOFTWARE IS ALREADY INSTALLED, IMMEDIATELY UNINSTALL IT.
THIS USER LICENSE AGREEMENT (“this Agreement”) shall serve as a legally binding instrument between you (as “Licensee”, whether an individual or a corporation, regardless) and SANYO Electric Co., Ltd. (“Licensor”) concerning the Licensee's use of a single SANYO SOFTWARE PRODUCT (“the Software”) under the terms and conditions set forth herein. The Software shall include, but without limitation, computer software and related media materials, printed materials (documents such as user manuals), and electronic documents whether or not retrieved by licensee “on-line”, and shall include any updates and upgrades thereof supplied by Licensor having additional features and functions.
Where a separate User License Agreement is attached to any the Software supplied by Licensor, the terms and conditions of that User License Agreement shall also apply in addition to the terms and conditions set forth in this Agreement.
If you are unable to agree to any of the terms and conditions set forth herein, Licensor is unable to grant you the license to install, use or copy the Software.
The Software covered under this Agreement is protected under the international conventions and treaties on copyright and the related laws and regulations. This license shall constitute a grant of a license to Licensee for a single use of the Software and may not be deemed under any circumstances to constitute a sale of the Software itself.
1. Grant of License
Licensor shall grant Licensee a non-exclusive, non-sublicensable, non-transferable license for the use of the Software under the terms and conditions set forth herein:
- System Software
Licensee may use the Software only in a single computer or on a computer network (“the Computer”, including without limitation, workstation, terminal, and/or other digital or electronic device) in binary executable form.
2. Other rights and limitations
- Reverse engineering, etc.
Except as expressly provided herein, Licensee shall not copy, modify reproduce, display, decompile, reverse engineer, reverse assemble, store, translate, sell, lease or otherwise transfer, distribute the Software, in whole or in part, nor may Licensee use the Software with the intent to clone any proprietary product to Licensor.
- Separation or division of the Software prohibited
This license hereby is granted for a single use only. In no circumstances shall Licensee separate, divide or compartmentalize any constituent portion(s) of the Software into multiple parts, sections, or compartments for use in multiple computers.
• Rental, lease or loan prohibited
Licensee shall not lend, lease or loan the Software to any party(ies).
- User support service by Licensor
Licensor may choose to provide user support service in accordance with the Licensor's policy set out in User Manual, On-line documents, or other printed matters made available by Licensor from time to time (the "Support Service"). All additional software code made available to Licensee as a part of the Support Service shall be deemed to constitute a part of the Software hereof to which all the terms and conditions of this Agreement shall apply. Licensor shall be entitled to use for commercial purposes or otherwise any and all technical information (the "Technical Information") provided by Licensee to Licensor, provided, however, that Licensor shall ensure that the identity of the Licensee shall remain undisclosed in the Licensor's use of all such Technical Information.
3. Other Intellectual Proprietary Rights
Licensor or its supplier is the owner of all right, title and interest in and to the Software and its documents such as user manual and any and all copies thereof. The proprietary ownership of all data operated using this Software shall remain with the respective owner(s) and shall be protected by the international conventions and treaties and other intellectual proprietary rights. Licensee shall not be deemed, by anything contained in or done pursuant to this Agreement to acquire any right, title, or interest in any trademark, copyright, patent or other intellectual property of Licensor, and shall do nothing to prejudice the value or validity of the respective owner's rights therein or ownership thereof. Licensor shall preserve the proprietary ownership of any and all rights and titles in the Software not specifically provided herein.
4. Backup copy
After having installed a copy of the Software pursuant to this Agreement, Licensee may make a single copy of the Software for backup and archival purposes only, provided that any copy must contain all proprietary notices included in the original. If another original medium becomes necessary to use the Software on a computer under this Agreement, Licensee may make a single copy of the Software. Except as specifically provided herein, Licensee shall refrain from making copy of the Software or its incidental documents such as user manual in any manner whatsoever.
5. DISCLAIMER OF WARRANTY:
THE SOFTWARE IS DEEMED ACCEPTED BY LICENSEE UPON IT'S USE BY LICENSEE. THE SOFTWARE IS PROVIDED TO LICENSEE AS IS, WITHOUT WARRANTY OF ANY KIND. TO THE MAXIMUM EXTENT PERMITTED BY APPLICABLE LAW. LICENSOR FURTHER DISCLAIMS ALL WARRANTIES, INCLUDING WITHOUT LIMITATION, ANY IMPLIED WARRANTIES OF MERCHANTABILITY, FITNESS FOR A PARTICULAR PURPOSE, AND NON INFRINGEMENT. THE ENTIRE RISK ARISING OUT OF THE USE OR PERFORMANCE OF THE PRODUCT AND DOCUMENTATION REMAINS WITH LICENSEE. IN NO EVENT SHALL LICENSOR OR ITS SUPPLIERS BE LIABLE FOR ANY CONSEQUENTIAL, INCIDENTAL, DIRECT, INDIRECT, SPECIAL, PUNITIVE OR OTHER DAMAGES WHATSOEVER (INCLUDING WITHOUT LIMITATION, DAMAGES FOR LOSS OF BUSINESS PROFITS, BUSINESS INTERRUPTION, LOSS OF BUSINESS INFORMATION, OR OTHER PECUNIARYLOSS) ARISING OUT OF THIS AGREEMENT OR THE USE OF OR INABILITY TO USE THE PRODUCT, EVEN IF LICENSOR HAS BEEN ADVISED OF THE POSSIBILITY OF SUCH DAMAGES. LICENSOR DOES NOT WARRANT THAT THE SOFTWARE DOES NOT INCLUDE ANY VIRUS OR DEFECTS, THE SOFTWARE ROUTINE OR OTHER SOFTWARE DESIGNED TO RESTRICT UNAUTHORIZED ACCESS; OR TO DISABLE, ERASE OR OTHERWISE HARM THE SOFTWARE, HARDWARE, OR DATA; OR TO PERFORM ANY OTHER SUCH ACTIONS AND LICENSOR HEREBY EXPRESSLY DISCLAIMS ANY AND ALL LIABILITIES TO RESTORE ANY SUCH DEFECTS.
6. Indemnification:
Licensor will not have any liability to Licensee for, and Licensee will defend and hold Licensor harmless against, any claim, expense, judgment, liability, or loss (including attorneys' fees and expert witnesses' expenses) based on Licensee's use of any content of the Software, arising from any intellectual property claim (including patent, trademark, copyright, or trade secret infringement), any right of publicity or privacy claim, or any defamation or unfair competition claim.
7. Termination.
Without prejudice to any other rights, Licensor may terminate this Agreement if Licensee fails to comply with the terms and conditions herein. Licensee may also terminate this Agreement at any time by destroying the Software and Documentation and all copies thereof. The provisions of sections 2, 3, 4, 5, 6 and 7 shall survive any termination of this Agreement.
Contents
1 Features and Specifications ....9
1.1 Features 9
1.2 Specifications 9
2 Getting Started ....11
2.1 Hardware overview 11
2.1.1 Packing list 11
2.1.2 External features ...... 11
2.2 Mounting your unit in your vehicle 13
2.3 Set up TMC antenna unit in your vehicle (Option) 17
3 System 19
3.1 Initial settings 19
3.2 System settings 20
3.2.1 Locale 21
3.2.2 Brightness 21
3.2.3 Camera / Camera settings 21
3.2.4 FM transmitter 23
3.2.5 System information 23
4 Communications ....25
4.1 Connection 25
4.1.1 Mobile phone connection (New) 25
4.1.2 Mobile phone connection (Reconnect) 26
4.2 Call-out (Hands-free Calling) 27
4.2.1 Making a call 27
4.2.2 Receiving a call 28
4.3 Contacts 28
4.3.1 Create new entry 29
4.3.2 Call-out 30
4.3.3 View 30
4.3.4 Delete 30
4.4 Data transfer 31
4.4.1 File transfer 31
4.4.2 Import phonebook 31
4.4.3 Export contacts to SD 32
4.4.4 Import contacts from SD 32
4.5 SMS (Short Message Service) 32
4.5.1 Inbox 33
4.5.2 Outbox 34
4.5.3 Write SMS 34
4.5.4 Draft 35
5 Multimedia Players ....36
5.1 Photo viewer 36
5.1.1 Features ...... 36
5.1.2 Using the photo viewer 36
5.1.3 Full screen display / slide-show 37
5.2 Music player 37
5.2.1 Features 37
5.2.2 Using the music player .... 37
5.2.3 Background music mode 38
5.3 Video player 39
5.3.1 Features 39
5.3.2 Using the video player 39
5.3.3 Full screen display 39
5.3.4 Fast forward / backward play mode 40
5.4 USB mass storage 40
6 Troubleshooting 41
6.1 Your device does not turn on. 41
6.2 The internal battery cannot be charged or charging time is long. 41
6.3 System stops responding; is "frozen" or "locked up." 41
6.4 Users can also perform a "system reset." 41
6.5 Screen is not displayed normally. 41
6.6 The touch screen does not respond well. 41
6.7 Connection problems with PC. 41
6.8 No GPS connection 41
6.9 No sound coming from the device. 41
6.10 Getting a GPS fix takes longer time than normal. 42
6.11 Factory reset does not mean a GPS reset. 42
6.12 Bluetooth functions do not work. 42
6.13 Unavailable functions 42
6.14 The rear view camera image is not displayed 42
1 Features and Specifications
1.1 Features
The SANYO NVM-4370 Portable Navigation System is a powerful multifunction GPS navigation and entertainment device.
- Compact size and lightweight
- Integrated GPS receiver for GPS navigation
- Embedded SD/MMC card slot ensuring ample data storage
- Incorporates high-performance GPS antenna
• High-resolution color LCD - 4.3" wide touch screen with 16:9 scale
- Bluetooth v1.2 supported with various profiles
- Multimedia functionality with high performance processor
- USA/Canada/Alaska/Hawaii/Puerto Rico map preloaded into Internal 4GB Flash
1.2 Specifications
| General Specification | |
| Overall dimension (w/o antenna) 4.5" x 2.9" x 0.72" (115mm x 74.5mm x 18.3mm) | |
| Weight (incl. battery) 6.7 oz (190 g) | |
| Certificates FCC | |
| Operating Temperature | 32 °F to 122 °F (0 °C to 50 °C) |
| Storage Temperature | short period: -4 °F to 140 °F (-20 °C to 60 °C)long period: -4 °F to 95 °F (-20 °C to 35 °C) |
| Charging battery Temperature | 32 °F to 104 °F (0 °C to 40°C) |
| Hardware Main unit | |
| Display 4.3" Touch screen, 480 x 272 pixel, TFT, 16.7M colors | |
| Memory NAND Flash 4GB | |
| Indicators Green/Red/orange for power, Blue for Bluetooth | |
| Speaker 1.5 W, 8 ohm | |
| Connectors MiniUSB (B type), SD/MM | MC memory slot, Camera in, Headphones |
| (Headphones jack) 3.5mm, stereo, More than 32 ohm | |
| (Camera in jack) 2.5mm | |
| Bluetooth Bluetooth v1.2 compatible class 2 | |
| Bluetooth Profile | HFP, OPP, FTP |
| FM transmitter | 87.7 - 108.0 MHz (0.1MHz step adjustable) |
| Microphone | Built-in for Bluetooth Hands-Free |
| USB Interface | USB ver. 2.0 |
| Main Battery | |
| Type | Rechargeable Li-ion |
| Voltage/Capacity | 3.7V, 1200 mAh |
| Runtime | Up to 4 hours(Display Main Menu with LCD power save mode) |
| Charge time | Approximately 4 hours(Charge the battery from an empty status with Car adaptor) |
| GPS | |
| Type | internal Chipset SiRF GSC3 |
| Car Adaptor | |
| Input rating 10.8-30V | |
| Output rating 5.0V, 1A | |
| Certificates FCC, CE, e-mark | |
| Output plug USB mini-B type | |
| USB Cable | |
| Length 4' (120 cm) | |
| Mini-jack to RCA conversion cable | |
| Length 1' (30cm) | |
| SD Card | |
| Support Capacity Maximum 8GB (SDHC Support) | |
| MMC (Multi Media Card) | |
| Support Capacity Maximum 2GB | |
2 Getting Started
This chapter describes the hardware interface of your unit and its peripherals. Instructions for setting up the device and some basic system operations are also discussed.
NOTE: Although your unit's rechargeable Li-ion battery comes approximately 40-80% charged, before using, it is best to connect the Car adaptor and plug to power socket and fully charge the battery. The POWER/MENU button will glow orange when charging.
2.1 Hardware overview
This section introduces your unit's external features and hardware components.
2.1.1 Packing list
The box contains all of the items listed below:
- Portable Navigation System unit
- Dashboard Mounting Disc
• Windshield & Dashboard Car Mounting kit - Car Adaptor
- USB cable
- Quick Start Guide
- CD Instruction Manual
- Warranty
• DVD Map Software - Mini-jack to RCA conversion cable
2.1.2 External features
Figure 1: Front Panel View

natural_image
Front view of a black SANYO Bluetooth device with a blue cable pointing to it, labeled with the brand logo (no additional text or symbols visible)Table 1: Front panel controls
| No. Function Description | |
| 1 Bluetooth LED Glows blue when Bluetooth connected | |
Figure 2: Top and Bottom view
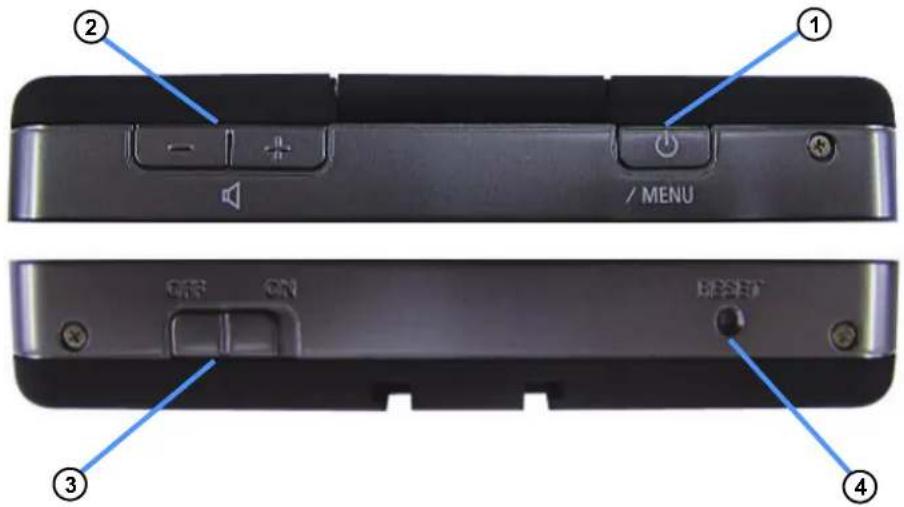
Table 2: Top and Bottom controls
| No. Function Description | |
| 1 Power / Menu button Normal ON/OFF power button and change menu | |
| 2 Volume Control Adjust the sound volume. | |
| 3 Battery switch The main power/battery cut off switch. | |
| 4 Reset Restarts your device | |
NOTE: Power / Menu button : Press and hold the button for 2 seconds to turn power off. While unit power is on, press and immediately release the button to display Main Menu.
Figure 3: Left and Right side view

Table 3: Left and Right panel controls
| No. Function Description | |
| 1 Microphone nondirectional Microphone | |
| 2 SD/MMC slot | Accepts a SD (Secure Digital) or MMC (MultiMediaCard) for data storage. |
| 3 Headphones Standard stereo headphones jack. | |
| 4 CAMERA-IN Rear view camera input (mini-jack) | |
| 5 USB Car adaptor, PC (with USB cable) or TMC unit connector |
NOTE: Your unit can charge by USB Interface.
• Make sure that the battery switch is ON.
• Make sure that your device is OFF state. (If your device is ON state, press Power / Menu button for long interval.)
- Connect your device to your PC with USB cable, then USB charging starts.
Figure 4: Rear view
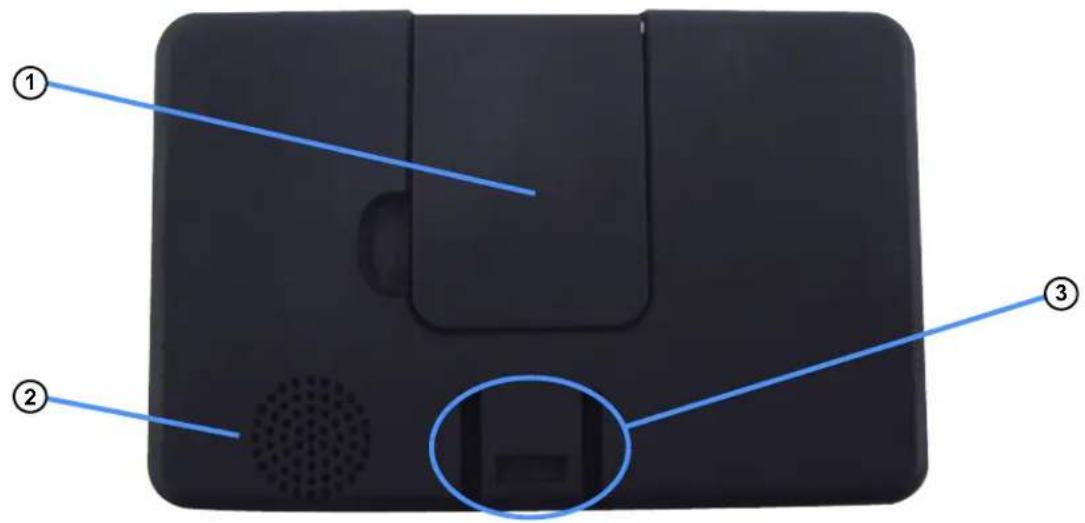
Table 4: Rear controls
| No. Function Description | |
| 1 GPS antenna GPS antenna | |
| 2 Speaker Speaker | |
| 3 Car mounting kit slots Slots for Windshield & Dashboard Car Mounting kit | |
2.2 Mounting your unit in your vehicle
WARNING: Do not use the car mount kit under low temperatures. The cradle may come off because of insufficient suction power.
WARNING: Make sure that the car mount kit does not obstruct the driver's view, or interfere with the operation of vehicle airbags and safety devices.
Your unit comes with a car Mounting kit and a car adaptor to help install your device in your vehicle. The car Mounting kit uses a suction cup on the windshield/dashboard to offer flexible mounting options for your unit.
NOTE: Do attach the Car Adaptor to your device when you use it in vehicle. Rechargeable batteries may sometimes not be chargeable in the vehicle.
This section shows how to install the car mount kit in your vehicle's windshield/dashboard using the suction cup.
Figure 5: Windshield & Dashboard Car Mounting kit

Table 5: The components of Windshield & Dashboard Car Mounting kit
| No. | Function Description | |
| 1 | Adjustable 2 prong ratching plate | Connects the device to the ratching plate which can be adjustable horizontally and vertically. |
| 2 | Tower unit Allows the device to be adjusted in 360^ | |
| 3 | Suction cup locking lever Secures the vacuum seal of the car mount. | |
| 4 | Suction cup Fixes the car mount to the selected mounting area. | |
| 5 | Suction cup release tab Pull to release the vacuum seal of the suction cup. | |
| 6 | Dashboard Mounting Disc For Dashboard mounting usage | |
Using the car Mounting kit
-
Clean and dry the mounting surface with a clean cotton cloth.
-
If the ambient temperature is below +60°F (15°C), you can warm the mounting area and the suction cup (e.g. with a hair dryer) to ensure a strong suction bond.
-
Install the car mount on the selected area.
On the Windshield
a. Fix the suction cup to the selected area with the locking lever facing up for easier access.
b. Flip the locking lever away from you to create a vacuum between the suction cup and the window surface.
On the Dashboard
Warning: The permanent mounting adhesive is extremely difficult to remove after it is installed.
a. Remove the backing from the permanent mounting adhesive on the bottom of the disc and place the mounting disc on the dashboard.
b.Fix the suction cup to top of the mounting disc with the locking lever facing up for easier access.
c. Flip the locking lever away from you to create a vacuum between the suction cup and the mounting disc.
Make sure that the suction is strong and stable before proceeding to the next step.
-
After you are sure the mounting bracket is safe and secure, attach and slide your unit into its ratching plate. It snaps in easily with the quick release connectors.
-
Adjust the car mount for the best viewing angle.
- Connect the car adaptor into the cigarette lighter receptacle.
- The car adaptor LED indicator will glow when powered.
- Plug the car adaptor into the side of your unit and position the cord to an appropriate location.
- Flip the GPS antenna and set it to a level position.
NOTE: Your car may be required to switch the vehicle ignition into the accessories position to power the cigarette lighter. Your unit will not charge with the ignition off.
Figure 6: Mounting on the windshield
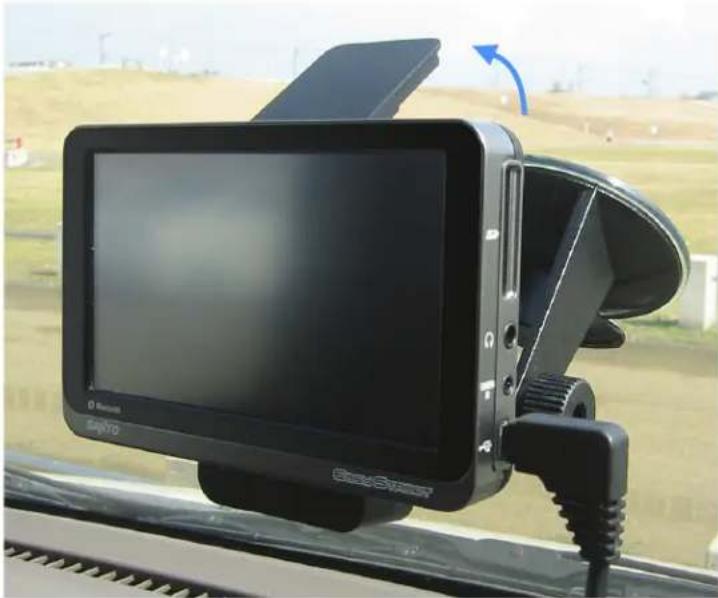
natural_image
Front view of a black GPS navigation monitor mounted on a car, showing rearview and side-mounted sensors (no visible text or symbols)Figure 7: Mounting on the dashboard

natural_image
Front view of a black GPS navigation device mounted on a tripod, with a blue arrow indicating clockwise motion (no visible text or symbols)- Detach your unit from the Car mounting kit (ratching plate)
Figure 8: Mounting on the dashboard

2.3 Set up TMC antenna unit in your vehicle (Option)
Figure 9: TMC unit and TMC antenna
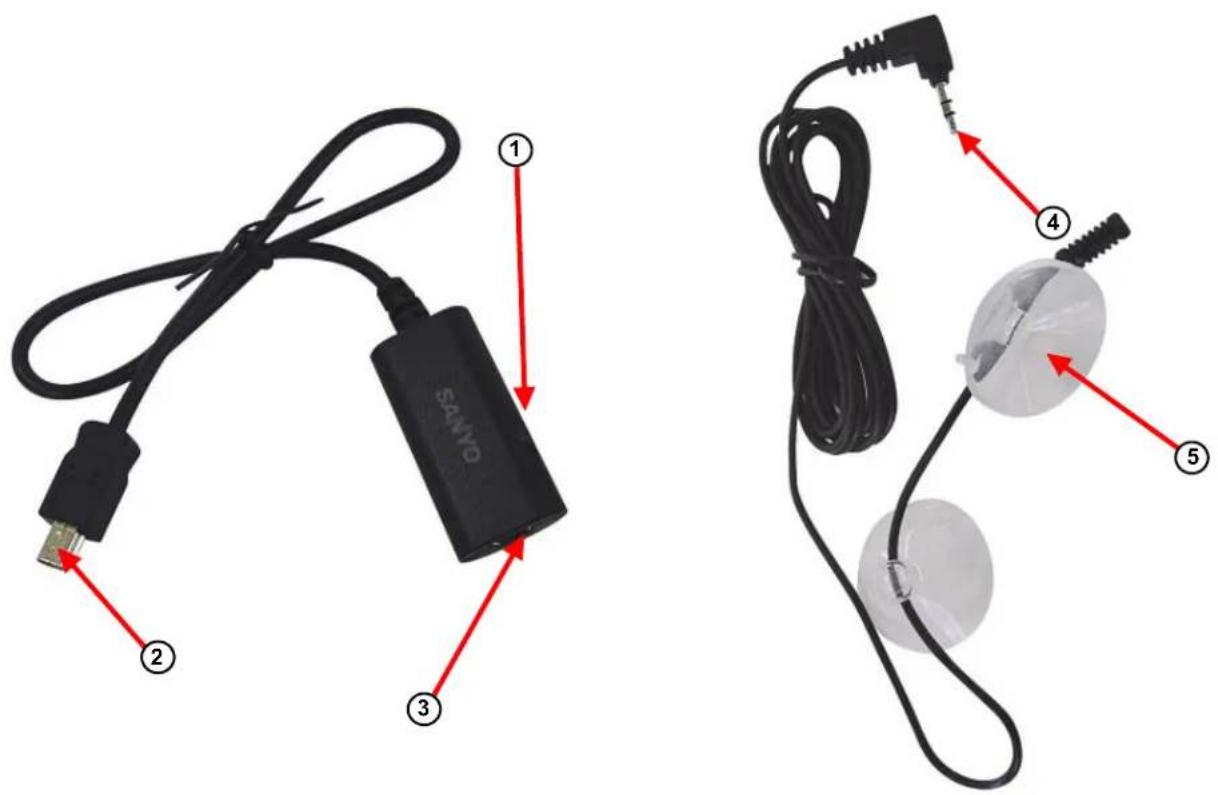
| No. | Component Description | |
| 1 | TMC antenna jack Connects to the TMC antenna | |
| 2 | USB terminal Connects to the USB slot of the device | |
| 3 | USB slot Connects to the USB terminal of the car adaptor | |
| 4 | TMC antenna terminal Connects to the antenna jack of the TMC unit | |
| 5 | Suction cup Fixes the windshield |
Figure 10: TMC antenna recommended connection method
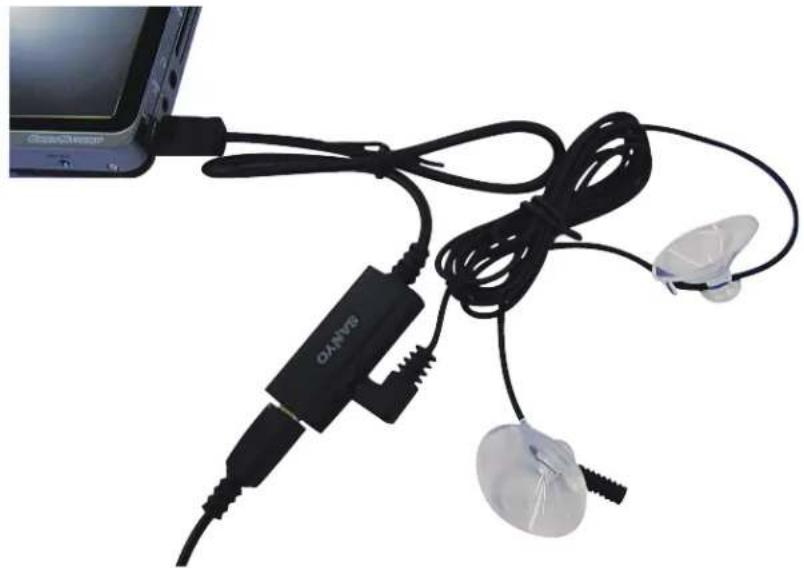
natural_image
Close-up of a wearable device with black cable, earphones, and earplugs connected to a smartphone (no visible text or symbols)Using the TMC antenna unit
- Clean and dry the suction cup surface with a clean cotton cloth.
- Fix TMC antenna unit on Windshield as recommended connection method
- Connect the TMC antenna to the TMC unit.
- Connect the TMC unit to the device.
- Connect the car adaptor to the USB slot of the TMC unit.
WARNING: Make sure that the TMC antenna does not obstruct the driver's view, or interfere with the operation of vehicle airbags and safety devices.
NOTE: SANYO is not responsible for the availability or quality of traffic information provided by TMC.
3 System
3.1 Initial settings
- Turn on the Battery ON / OFF switch.

- Select the desired language English/Espanol/Français.

- Set the time zone.

NOTE: The time displayed by the navigation software is set automatically when the GPS receives a signal. If you would also like the time zone to be set automatically, set "Automatic Time Zone" to "ON".
- Set the rear view camera input. To use the rear view camera select "ON", if you don't use the rear view camera select "OFF". When set to "ON", the screen will switch automatically when camera images are input.
NOTE: If you don't use the rear view camera input you should select "OFF" for power saving.

- The Main Menu screen is displayed after the Warning screen.

| No. Description | |
| 1 Battery Status | |
| 2 | Bluetooth Status(2424) : Bluetooth is “ON”.Mobile phone is not connected.(ADDRESS) : Mobile phone is connected. |
| 3 The name of the connected mobile phone | |
3.2 System settings
System setting can be used to view and adjust your device current preferences. Navigate from the "Settings" menu.

3.2.1 Locale
- Tap the "Locale" icon in the "Settings" menu.
- Tap the forward or backward arrow until the language and the Time Zone you want appears.
- If you set "Automatic daylight savings time" to "ON", your unit adjusts clock for daylight saving automatically. And if you set "Automatic Time Zone" to "ON", the navigation software automatically sets the system Time Zone after receiving GPS.
- Tap to set the language and the Time Zone and return to the “Settings” menu.

3.2.2 Brightness
- Tap the "Brightness" icon in the "Settings" menu.
- Tap "+" or "-" to set the Backlight brightness.
- Tap the left or right arrow to set the LCD power-save of battery and external power drive modes.
- Tap to return to the "Settings" menu.

3.2.3 Camera / Camera settings
This device can be used as a monitor for rear view cameras such as those manufactured by Sanyo CCA-BC200. If you use the rear view camera connect the “mini-Jack to RCA conversion cable” provided to the video output terminal of the rear view camera and insert it into the CAMERA-IN of the device.
NOTE: See Rear View Camera Instruction Manual for details about how to fix the rear view camera to the car.
NOTE: The unit is not equipped with an image reverse function, to obtain a mirror image similar to that of the back mirror use a camera equipped with an image reverse function.
The procedure to display the rear view camera image is the following:
- Tap the "Camera Settings" icon in the "Settings" menu.
- Tap the "Camera Input ON/OFF" button in "Camera Settings" and set the button to "ON".
NOTE: If you don't use the rear view camera input you should select "OFF" for power saving.
- When "Camera Automatic Display" is set to "ON", the screen will switch automatically when a camera image is input.
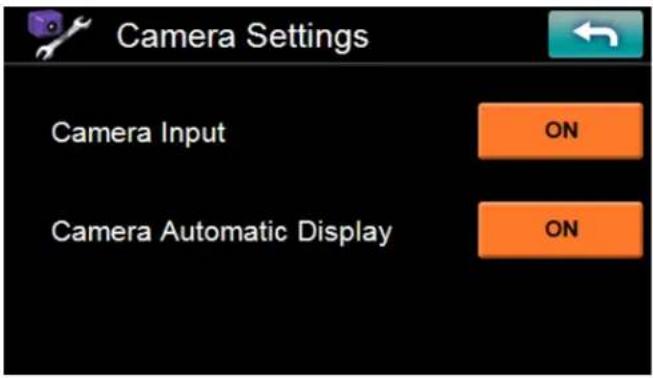
If you would like to switch the camera image manually, set "Camera Automatic Display" to "OFF". At such times, tap the "Camera" icon in the "Settings" menu, the camera image is displayed.

- When the input of the camera image stops, the screen will automatically return to the original screen.
- If you keep pressing the "MENU" button on the top of the device for a few seconds, the camera image disappears and the "Main Menu" is displayed. To redisplay the camera image at this time, tap the "Camera" icon in the "Settings" menu.
NOTE: If the "Navigation", "Music Player" or "Video Player" were in operation, they are temporarily suspended when the camera image is displayed.
WARNING: When a camera image is displayed the hands free Bluetooth signal is not available.
3.2.4 FM transmitter
- Tap the "FM Transmitter" icon in the "Settings" menu.
- When pressing the "FM Transmitter ON / OFF" button and setting it to "ON", the FM Transmitter is set to "ON" and the speaker output is turned OFF.

- Tap the "XX.X MHz" button.
- Input frequency using "FM Transmitter Frequency" screen and then tap the "Set" button.

- When pressing the "FM Transmitter ON / OFF" button and setting it to "OFF", the FM Transmitter is set to "OFF".
3.2.5 System information
- Tap the "Sys Info." icon in the "Settings" Menu.
- You can view the OS version, GPS firmware version and other system information.

- Tap the "Calibration" button to open the Calibration screen of the touch panel.
Tap the center of the target as it moves around the screen.

- Tap the "Factory Reset" button to open a dialog box to select whether to reset the settings. Tap the "YES" button to reset the settings and the "NO" button not to reset the settings.

- Tap the "GPS Reset" button to open a dialog box to select whether to reset the GPS satellite receiver. Tap the "YES" button to reset the receiver and the "NO" button not to reset the receiver.

- Tap to return to the "Settings" menu.
4 Communications
"Communications" provides the various functions with the Bluetooth mobile phone.
"Communications" main menu is as follows:
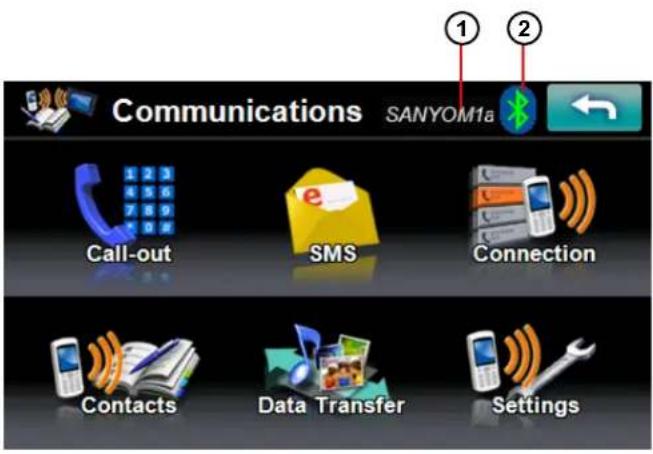
| No. Description | |
| 1 The name of the connected mobile phone | |
| 2 | Bluetooth Status[THX2] : Bluetooth is “ON”.Mobile phone is not connected.[4247] : Mobile phone is connected. |
4.1 Connection
NOTE: Make sure the Bluetooth settings of your mobile phone.
- The Bluetooth switch is set to "ON" or "enable".
- The visibility is set to "Discoverable", "Show my phone". (For more detailed information, see your phone's manual.)
4.1.1 Mobile phone connection (New)
- Set Bluetooth to "ON" in the "Settings", and tap the "Connection" button of the "Communications" screen.

- Tap the "Search" button. Your unit starts to search available mobile phones.
- The available phones are displayed on the phone list. Select one of the mobile phones and tap the "Connect" button.

- The mobile phone will often require you to enter a password to connect the device. Enter "0000" on the mobile phone in this case.
- When the connection completes, the name of the connected phone is displayed on the title bar of the "Communications" screen. And the Bluetooth icon changes to green.
NOTE: If the connected mobile phone has the Bluetooth auto-accept function, set this function to "ON". (For more detailed information, see your phone's manual.)
4.1.2 Mobile phone connection (Reconnect)
- Set Bluetooth to "ON" on the "Settings", and tap the "Connection" button of the "Communications" screen. The mobile phones that have connected in the past are displayed on the "Paired List".

- Select one of the mobile phones and tap the "Connect" button.
- The mobile phone will often require you to enter a password to connect the device. Enter "0000" on the mobile phone in this case.
- When the connection completes, the name of the connected phone is displayed on the title bar of the "Communications" screen. And the Bluetooth icon changes to green.
4.2 Call-out (Hands-free Calling)
"Call-out" screen is as follows:
Call-out

| No. | Name Description | |
| 1 | Start to make a call. | |
| 2 | History Call-out from the history of the incoming / outgoing call | |
| 3 | Contacts Call-out from the contacts. In detail, refer to 4.3. |
Call-out (in a phone call)
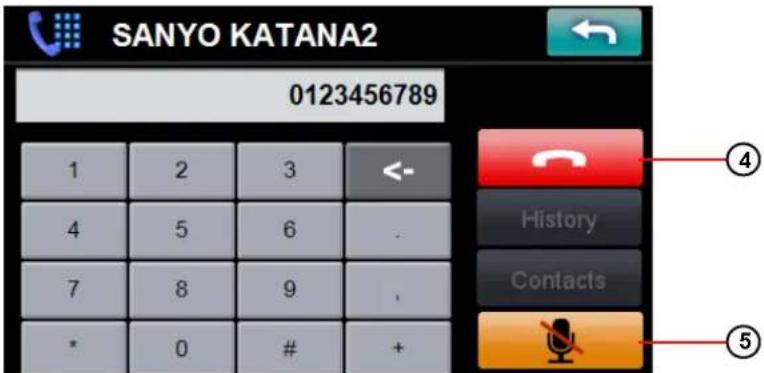
| No. Name Description | ||
| 4 Close a phone call. | ||
| 5 | M u t e | Set the microphone muting.:Set the microphone mute to ON.:Set the microphone mute to OFF. |
4.2.1 Making a call
-
Tap the "Call-out" button of the "Communications", the "Call-out" screen opens.
-
Input a phone number and tap

Your unit starts to make a call.
- Tap, the phone call quits.
4.2.2 Receiving a call
- When the connected mobile phone receives a call, the caller's phone number and two buttons are displayed on the screen.

- To receive a call, tap . To quit a call, tap .
- On a phone call, and are displayed at the top-right of the screen.

- On the "Settings", you can do the setting of the automatic answer to phone call.
4.3 Contacts
"Contacts" screen is as follows:
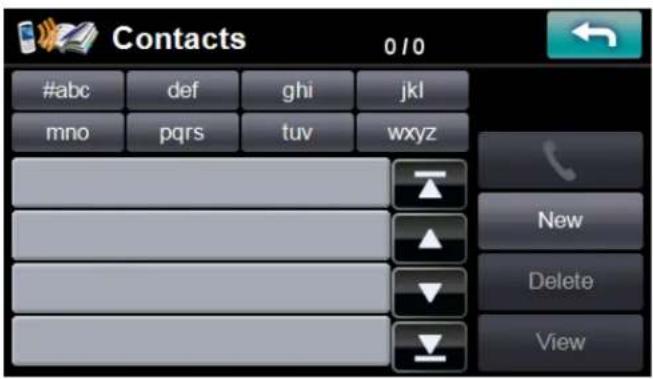
4.3.1 Create new entry
- Tap "New" button. The "Input Entry" screen opens.

| No. Description |
| 1 Save: Save the entry |
| 2 Category Up / Down |
| 3 Item Up / Down |
| 4 Keyboard (Alphabet, Numbers, and Symbols) |
- Input each item. All categories and items are as follows:
| Category Record | |||
| Name | First | ||
| Last | |||
| Phone | Home | ||
| Work | |||
| Mobile | |||
| Other | |||
| Home Address | Street City State | ||
| Zip Country — | |||
| Work Address | Street City State | ||
| Zip Country — | |||
| Others | Company | ||
- Tap the "Save" button, the entry is added to the list of Contacts.
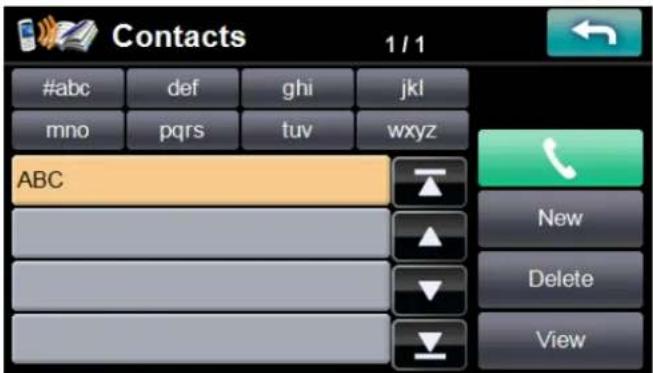
NOTE: The maximum number of the saved entry is 400.
4.3.2 Call-out
- Select the entry and tap .
- Select one of the enabled buttons, your unit starts to make a call to the selected number.


4.3.3 View
- Select one of the entries and tap the "View" button, the "View Contacts" screen opens. You can see the detailed information of the selected entry.
![[Name] First : John Last : Smith [Phone] Home : 111-111-1111 Work : 222-222-2222 Mobile: 333-333-3333 Other : [Home Address]](/content/2026/05/1065857/images/6acb1ebb26f45821d3e17a42cfb90051e95f7abba25f63169e783fae2d1b1b5f.jpg)
- Tap the "Edit" button, the "Input Entry" screen opens and you can edit the entry.
- About , sec 4.3.2.
4.3.4 Delete
- Select the entry and tap the "Delete" button.
- Tap the "YES" button to delete.

4.4 Data transfer
Tap the "Data Transfer" button in "Communications" screen.
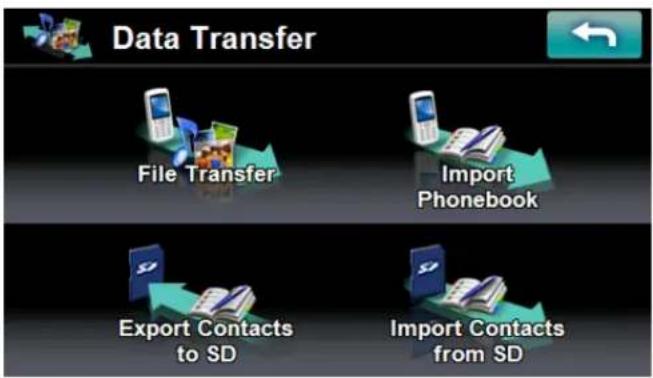
4.4.1 File transfer
NOTE: Not all mobile phones support "File Transfer".
- Tap the "File Transfer" button.
- Files and folders on mobile phone appears.
![Music [root] [upper] Playlist track10.mp3 track02.mp3 Music Files Photo Files Import](/content/2026/05/1065857/images/6955d9a9c12380ea63f11db56fe8aed85772476aef7d6d80f280eab44f4f398c.jpg)
- Tap the "Music Files" or "Photo Files" button to select file type you want to transfer to your unit from mobile phone.
- Select the file you want to transfer (allowed to select multiple files).
- Tap the "Import" button and transfer starts.
NOTE: Music files are transferred to "Music" folder of Internal Memory of your unit. Photo files are transferred to "Photo" folder of Internal Memory.
4.4.2 Import phonebook
NOTE: Not all mobile phones support "Import Phonebook".
- Tap the "Import Phonebook" button.
- Phone book on mobile phone is imported to your unit.
- You can see imported Contacts in "Contacts" screen.
NOTE: Phonebook may be imported separating into multiple entries depending on mobile phones.
4.4.3 Export contacts to SD
- Insert SD card to your unit.
- Tap the "Export Contacts to SD" button.
- Tap the entry you want to Export (allowed to select multiple entries).
(You can select all entries using the "Select All" button)

- Tap the "Export" button and the entry you have selected starts to be exported to SD card.
NOTE: The selected entry is output to the "Contacts" folder of SD card in vCard format. vCard file can be read by Microsoft Outlook etc. with PC.
4.4.4 Import contacts from SD
- Insert SD card including vCard file to your unit.
- Tap the "Import Contacts from SD" button.
- vCard files existing in the "Contacts" folder of SD card appear.

- Tap vCard file you want to Import (allowed to select multiple files).
- Tap the "Import" button and the vCard file you have selected starts to be Imported.
- You can see imported Contacts in "Contacts" screen.
4.5 SMS (Short Message Service)
NOTE: Not all mobile phones support "SMS". Depending on mobile phones, only sending or receiving function is supported.
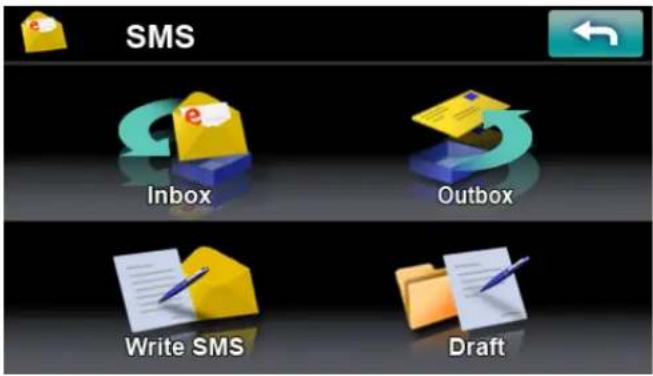
4.5.1 Inbox
You can receive and read the message of the connected phone via Bluetooth.
The maximum number of the saved message in Inbox is 100.
Unread messages are displayed with '*' and the unread number is displayed on the title bar.
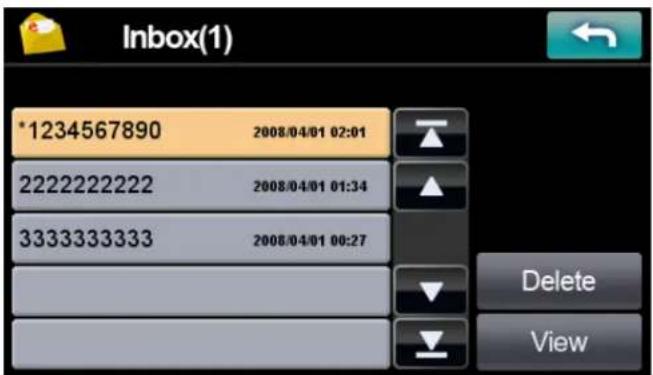
Select one of messages and tap the "Delete" button, the message is deleted.
And select one of messages and tap the "View" button, you can read the whole of the message on the "View SMS" screen. Then tap the message field, you can input the reply.

| Name Description | |
| Start to make a call to the sender | |
| Save Save the reply | |
| Send Send the reply to the sender | |
NOTE: On the "Settings", you can do the setting of "SMS Automatic Receive" and "SMS Automatic Display".
4.5.2 Outbox
The sent message is saved to the Outbox.
The maximum number of the saved message in Outbox is 100.
Select one of messages and tap the "View" button, you can read the whole of the message on the "View SMS" screen.

4.5.3 Write SMS

- Input the destination number with A or B.
A. Input the number directly (Tap the destination number field)
B. Select the number from Contacts entries (Tap the "Search" button)
- Tap the message field, you can input the message. After finishing, tap the "Save" button.

- After making a message finishes, tap the "Save" button.
- Tap the "Send" button when connecting with the mobile phone, the message is sent.
- Tap the "Save" button, the message is saved to "Draft".
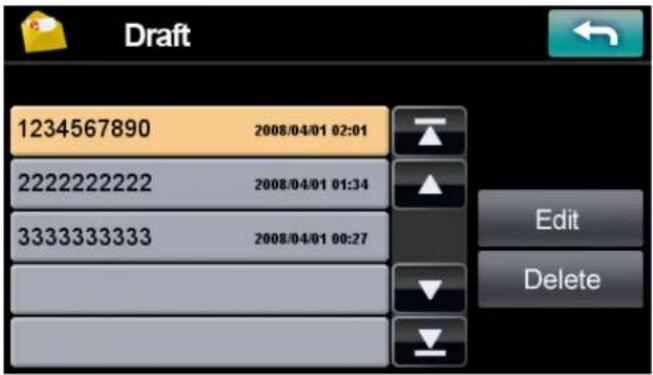
4.5.4 Draft
The draft messages are saved to "Draft".
The maximum number of the saved message in Draft is 100.
Select one of messages and tap the "Edit" button, the "Write SMS" screen opens.
You can edit and send the selected message.
5 Multimedia Players
Sanyo portable navigation system provides you with a full multi media entertainment system.
Enjoy your favorite music, photo and movie on the road.
5.1 Photo viewer
5.1.1 Features
• Support for JPEG file.
- Photo files on both of your unit's internal memory and SD card can be displayed. (You can copy photo files from PC to your unit using USB cable.)
- Slide-show mode and Rotation function
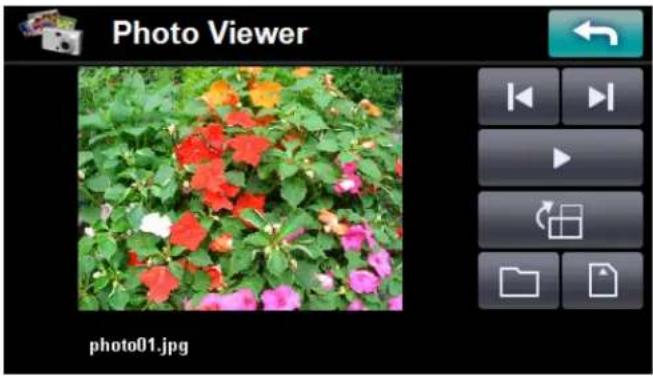
5.1.2 Using the photo viewer
- Tap the "Photos" button on "Main Menu".
- Tap (Internal Memory) / (SD Card) to select the media in which exist image file you want to display.
- Tap, then "File Explorer" screen appears.
- Tap the photo file icon (Thumbnail) you want to display, then selected file is displayed.
Normal screen mode
natural_image
Photo viewer interface displaying a garden photo with colorful flowers and green foliage, alongside a file browser panel (no readable text on the flower image itself)File Explorer screen

displays an image rotating 90 degrees clockwise.
Tap 📄 then previous / next image in current folder is displayed.
5.1.3 Full screen display / slide-show
- Tap the screen or ▶, then the screen changes to full screen and slide-show mode (displays automatically next file in a folder in a specific time) starts.
- The button which had been appear once is automatically disappear after 5 seconds. By tapping screen at full screen mode, buttons appear / disappear.
- By tapping, slide-show mode is canceled.
- By tapping again, slide-show mode is restarted.
- By tapping, the screen returns to normal screen mode.
Full screen mode without buttons

natural_image
Garden scene with vibrant red, orange, and pink flowers among green foliage (no text or symbols visible)Full screen mode with buttons

natural_image
Garden scene with vibrant red and orange flowers in green, surrounded by pink and white flowers (no text or symbols visible)5.2 Music player
5.2.1 Features
• Support for MP3, WMA, and WAV files
- Music files on both of your unit's internal memory and SD card can be played back. (You can copy music files from PC to your unit using USB cable.)
- You can use navigation system while listening to music. (Background music mode)
- Folder repeat / Song repeat / Random play modes.
5.2.2 Using the music player
- Tap the "Music" button on Main Menu.
- The Music Player screen below controls playback.

| No. Function Description | |
| 1 Skip backwards/forwards Advances one song backward and forward | |
| 2 Play / Pause Plays or Pauses the music | |
| 3 Random Play Sets play-mode to random order | |
| 4 Repeat Sets repeat mode (Song Repeat / Folder Repeat) | |
| 5 File Changes to File Explorer screen to select file | |
| 6 Memory/SD card Selects Data Storage (Internal Memory / SD card) | |
| 7 Slide-bar Changes playing location | |
| 8 Return Stops the music and returns to Main Menu | |
3. File Explorer screen
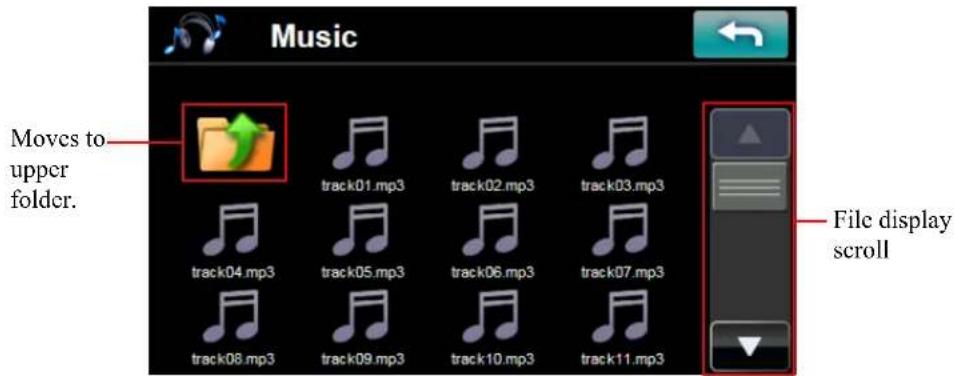
Tap the music file icon you want to play, then selected file is started to playback.
5.2.3 Background music mode
Starting Background Playback
- Start to play music in Music Player
- Push shortly the "MENU" button.
- "Main Menu" appears (music keeps playing).
- You can enter to each screen of "Navigation", "Communications", "Photo" and "Settings", but not "Video".
Stopping Background Playback
- Enter to Music Player again.
- Tap and exit to "Main Menu".
- Music stops.
5.3 Video player
5.3.1 Features
• Support for MPEG4/H.264 file
- Movie files on both of your unit's internal memory and SD card can be played back. (You can copy movie files from PC to your unit using USB cable.)
- Fast Forward / Backward Play mode. (2x, 4x, 8x, 16x, 32x)
NOTE: This unit cannot play all MPEG4/H.264 movie files.
5.3.2 Using the video player
- Tap the "Videos" button on "Main Menu".
- Tap (Internal Memory) / (SD Card) button to select the media in which exist movie file you want to display.
- Tap, then "File Explorer" screen appears.
- Tap the movie file icon (Thumbnail) you want to playback, then selected file is started to playback.
Normal screen mode

File Explorer screen
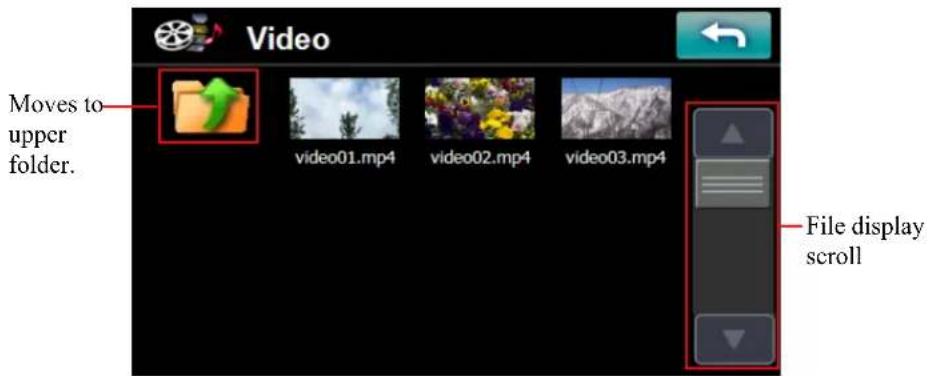
5.3.3 Full screen display
- Tap the screen, then the screen changes to full screen mode.
- By tapping screen at full screen mode, buttons appear / disappear.
- By tapping, the screen returns to normal screen mode.
Full screen mode without buttons

natural_image
Sky with scattered clouds and tree silhouettes against a cloudy sky (no text or symbols)Full screen mode with buttons
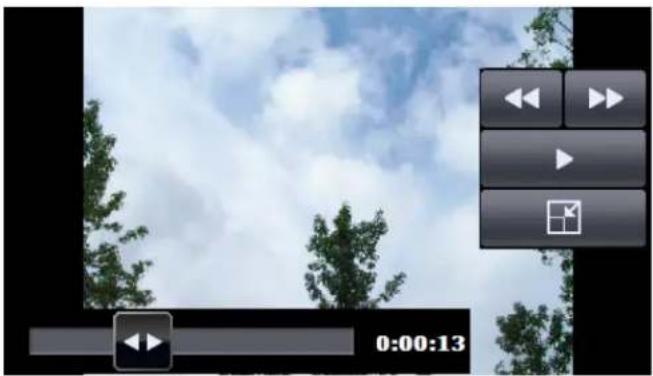
natural_image
Video player interface with playback controls and frame rate (0:00:13), no readable text or symbols on the scene itself.5.3.4 Fast forward / backward play mode
Tap then Fast Forward Play (2x -> 4x -> 8x -> 16x -> 32x) is started.
Tap, then Fast Backward Play (2x -> 4x -> 8x -> 16x -> 32x) is started.
5.4 USB mass storage
You can use your unit as the external mass storage disk of your PC.
- Connect your unit to PC using USB cable.
- Your unit becomes the external mass storage disk of your PC.
- You can see files on your unit.
You can copy multimedia files (mp3, wma, jpeg and mp4) from PC to your unit.
NOTE: Operating system of your PC should be Windows XP or later.
6 Troubleshooting
6.1 Your device does not turn on.
- Check that the battery switch is ON.
- Check that the Car adaptor is connected to your device.
- Check that the battery power of your device is enough.
6.2 The internal battery cannot be charged or charging time is long.
- Check that the battery switch is ON.
- Check that the Car adaptor or PC by USB cable is connected to your device.
- In case of USB charging, make sure that your device is OFF state and the USB interface of your PC supports 500 mA at 5 Volts (Bus Powered).
- In comparison with Car adaptor, USB charging takes long time.
6.3 System stops responding; is "frozen" or "locked up."
• To reset your device, take a sharp object like a pen and depress the reset button on the bottom of the device.
- If your device still does not respond after performing “reset”, disconnect all cables, including the Car adaptor, from your device. Slide the battery ON/OFF switch on the bottom of the device to the OFF (left) position. Then slide it to the ON position again.
6.4 Users can also perform a "system reset."
- To do a “system reset” in the Main Menu, tap the Settings, then tap the Sys Info. This will allow you to do a factory reset (restore to default settings), reset the GPS and recalibrate the touchscreen interface.
6.5 Screen is not displayed normally.
- Make sure that brightness setting is appropriate.
- There is the case that LCD does not work normally at a high temperature and low temperature. Make sure that the temperature is in the normal operating range.
6.6 The touch screen does not respond well.
- Calibrate the screen of your device.
6.7 Connection problems with PC.
• Make sure that the cable is securely plugged into the USB port on your computer and on the device.
- Connect the USB cable directly to your computer - do not run the cable through a USB hub.
- Reset your device before connecting the cable. Always disconnect your device before you restart your computer.
6.8 No GPS connection
- Make sure that your device has a clear view of the sky.
- Note that the GPS reception can be affected by:
- Bad weather
- Dense overhead obstacles (e.g. trees and tall buildings)
- Other wireless devices in the car
- GPS signal may not be received if a window is coated with film.
6.9 No sound coming from the device.
- Make sure that volume setting is not too low.
- The built-in speaker turns off when the headphones jack is being used.
- The built-in speaker also turns off when the FM transmitter is ON.
6.10 Getting a GPS fix takes longer time than normal.
- If the previous GPS fix position was more than 500 km or 12 hours apart from your current position and time, it will take significantly longer than the standard TTFF time to get a GPS fix. This is due to the nature of the GPS algorithm and rotational velocity between the satellites and planet Earth, and deemed normal.
- Perform a GPS reset in the Main/Settings/Sys Info. menu to get a faster GPS fix.
6.11 Factory reset does not mean a GPS reset.
- The Factory Reset function only resets the OS settings to their default factory values; it will not reset the GPS settings.
6.12 Bluetooth functions do not work.
- Make sure that Bluetooth setting of your phone is ON and Visible.
- If the connected mobile phone has the Bluetooth auto-accept function, set this function to "ON". (For more detailed information, see your phone's manual.)
- Make sure that your phone is located within 30 feet (10 meters) from your device.
- The following Bluetooth functions are usable or unusable depending on a model of mobile phone. "File Transfer"
"Import Phonebook"
- The SMS sending and receiving functions are usable or unusable depending on a model of mobile phone.
- For the “Import Phonebook”, depending on a model of mobile phone, one contact on your phone is divided into multiple entries on your device.
6.13 Unavailable functions
- When “Navigation” is running as the background process (When the ""MENU" button is pushed briefly and exit from “Navigation”), it is impossible to enter to “Photo”, “Video” and “Locale” menus.
- When “Music” is running as the background process (When the “MENU” button is pushed briefly and exit from “Music”), it is impossible to enter to “Video” menu.
6.14 The rear view camera image is not displayed
- Make sure that the rear view camera is connected to the device.
- Make sure that the contents of the “Camera Settings” have been properly configured. (See “3.2.3 Camera / Camera settings”)
- Portable Navigation System
- FCC COMPLIANCE
- FCC WARNING
- NOTICE
- Industry Canada Compliance
- Precautions
- Copyright
- Maintenance
- Storage precautions
- Accessories and repair precautions
- DISCLAIMER AND LIMITATION OF LIABILITY
- WARNINGS AND NOTICES
- Adaptor
- Battery
- FOR AMERICAN USERS
- CHECK YOUR STATE AND LOCAL TRAFFIC LAWS BEFORE MOUNTING.
- READ CAREFULLY BEFORE USE!!!
- User license agreement
- Grant of License
- Other rights and limitations
- Other Intellectual Proprietary Rights
- Backup copy
- DISCLAIMER OF WARRANTY:
- Indemnification:
- Termination.
- Contents
- Features and Specifications ....9
- Getting Started ....11
- System 19
- Communications ....25
- Multimedia Players ....36
- Troubleshooting 41
- Features and Specifications
- Features
- Specifications
- Getting Started
- Hardware overview
- Packing list
- External features
- Mounting your unit in your vehicle
- Using the car Mounting kit
- On the Windshield
- On the Dashboard
- Set up TMC antenna unit in your vehicle (Option)
- Using the TMC antenna unit
- System
- Initial settings
- System settings
- Locale
- Brightness
- Camera / Camera settings
- FM transmitter
- System information
- Communications
- Connection
- Mobile phone connection (New)
- Mobile phone connection (Reconnect)
- Call-out (Hands-free Calling)
- Making a call
- Receiving a call
- Contacts
- Create new entry
- Call-out
- View
- Delete
- Data transfer
- File transfer
- Import phonebook
- Export contacts to SD
- Import contacts from SD
- SMS (Short Message Service)
- Inbox
- Outbox
- Write SMS
- Draft
- Multimedia Players
- Photo viewer
- Features
- Using the photo viewer
- Normal screen mode
- File Explorer screen
- Full screen display / slide-show
- Full screen mode without buttons
- Full screen mode with buttons
- Music player
- Features
- Using the music player
- File Explorer screen
- Background music mode
- Starting Background Playback
- Stopping Background Playback
- Video player
- Features
- Using the video player
- Full screen display
- Fast forward / backward play mode
- USB mass storage
- Troubleshooting
- Your device does not turn on.
- The internal battery cannot be charged or charging time is long.
- System stops responding; is "frozen" or "locked up."
- Users can also perform a "system reset."
- Screen is not displayed normally.
- The touch screen does not respond well.
- Connection problems with PC.
- No GPS connection
- No sound coming from the device.
- Getting a GPS fix takes longer time than normal.
- Factory reset does not mean a GPS reset.
- Bluetooth functions do not work.
- Unavailable functions
- The rear view camera image is not displayed
Brand : SANYO
Model : NVM-4370
Category : Gps