
IK-WP41A - Security Camera TOSHIBA - Free user manual and instructions
Find the device manual for free IK-WP41A TOSHIBA in PDF.


| Product Type | Network Security Camera |
| Brand | Toshiba |
| Model | IK-WP41A |
| Image Sensor | 1/2.8 Type CMOS |
| Effective Pixels | 1920 x 1080 (Full HD) |
| Lens | f=4.7mm (wide) to 94.0mm (tele), F1.6 to 3.5 |
| Optical Zoom | 20X |
| Digital Zoom | 12X (240X with optical zoom) |
| Minimum Illumination | 0.3 lux / F1.6 (Night mode) |
| Pan Range | 360° continuous rotation |
| Tilt Range | Indoor 85°, Outdoor 92° |
| Preset Positions | 128 presets |
| Alarm I/O | 6 alarm inputs, 1 alarm output |
| Video Compression | H.264, MJPEG (except 1080P) |
| Max Resolution | 1920 x 1080 (1080P) |
| Max Frame Rate | 30 fps |
| Local Storage | Micro SD/SDHC up to 32GB |
| Power Supply | AC24V ±10% 50-60Hz, PoE+ (IEEE802.3at) |
| Power Consumption | 2.25A |
| Dimensions (DxH) | 216.14 mm x 360.19 mm (8.5 in x 14.2 in) |
| Weight | 3800 g (8.14 lb) |
| IP Rating | IP66 |
| Operating Temperature | -30 to 50°C (AC24), -10 to 50°C (PoE+) |
| Included Accessories | Allen wrench, Torx wrench, screw, RJ45 coupler, silica-gel, CD-ROM, quick start guide, warranty |
| Cleaning and Maintenance | Disconnect power before cleaning; use dry cloth; avoid harsh chemicals; do not submerge in water |
| Safety Certifications | FCC Class A, IC Class A, UL 60950-1, CSA C22.2 No. 60950-1 |
Frequently Asked Questions - IK-WP41A TOSHIBA
User questions about IK-WP41A TOSHIBA
0 question about this device. Answer the ones you know or ask your own.
Ask a new question about this device
Download the instructions for your Security Camera in PDF format for free! Find your manual IK-WP41A - TOSHIBA and take your electronic device back in hand. On this page are published all the documents necessary for the use of your device. IK-WP41A by TOSHIBA.
USER MANUAL IK-WP41A TOSHIBA
Leading Innovation >>>
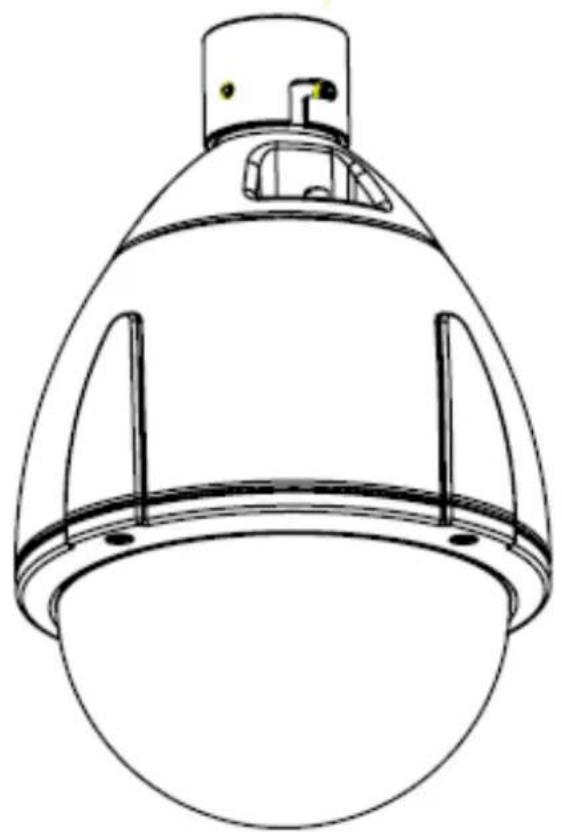
NETWORK CAMERA
Model: IK-WP41A
User's Manual
natural_image
Line drawing of a security camera dome with dual speakers and a top-mounted antenna (no text or symbols)For information on our latest products and peripheral devices, refer to the following Website:
■ http://www.toshibasecurity.com
If the URL changes, refer to the Toshiba website (http://www.toshiba.com).
Table of Contents
Introduction....2
FCC (USA)-INFORMATION 2
Important Safeguards 4
Important Safeguards (Cont.) 6
Notes on Use and Installation 7
Precautions for Use 8
Package Contents....9
Physical Description....9
Installation 11
Accessing the Network Camera....12
Using Web Browsers 12
Using RTSP Players 14
Live Video....15
MENU....15
PTZ Control....16
Snapshot....18
Resize OFF/ON 18
Close 19
Configuration....19
Camera Settings....20
Basic Settings 20
Auto Patrol 26
Privacy Zone Mask....26
Video Codec....28
Alarm 30
SD Recording....33
FTP Recording....35
E-mail 38
Audio 40
Network Settings 41
Basic....41
DDNS 42
FTP Server 43
Administrator 44
Password 44
Date/Time 45
FW Update 46
Maintenance....46
Event Log....47
Specification....49
Technology License Notice....51
Introduction
FCC (USA)-INFORMATION
NOTE: This equipment has been tested and found to comply with the limits for a Class A digital device, pursuant to Part 15 of the FCC Rules.
These limits are designed to provide reasonable protection against harmful interference when the equipment is operated in a commercial environment. This equipment generates, uses, and can radiate radio frequency energy and, if not installed and used in accordance with the instruction manual, may cause harmful interference to radio communications. Operation of this equipment in a residential area is likely to cause harmful interference in which case the user will be required to correct the interference at his own expense.
USER-INSTALLER CAUTION: Your authority to operate this FCC verified equipment could be voided if you make changes or modifications not expressly approved by the party.
This device complies with Part 15 of the FCC Rules. Operation is subject to the following two conditions:
(1) This device may not cause harmful interference, and
(2) this device must accept any interference received, including interference that may cause undesired operation.
Thank you for purchasing the IK-WP41A Network Camera. Before using the camera, read this User's Manual carefully to ensure correct usage. After reading this User's Manual, save it for future reference.
The design, specifications, software, and manual contents are subject to change without prior notice.
Terms and Trademarks
- The term "OS" is used in this manual to indicate operating systems compatible with this product.
-- Windows XP: Microsoft Windows XP operating system
-- Windows Vista: Microsoft Windows Vista Business operating system
-- Windows 7: Microsoft Windows 7 Professional operating system
● The formal name of Windows is Microsoft Windows Operating System. - Microsoft, Windows and Windows Vista are trademarks or registered trademarks of Microsoft Corporation in the United States and other countries.
- Intel and Intel Core are trademarks or registered trademarks of Intel Corporation or its subsidiaries in the United States and other countries.
- Adobe is a registered trademark and Adobe Reader is a trademark of Adobe Systems Incorporated.
- Other product names appearing in this manual may be trademarks or registered trademarks of their respective holders.
NOTE
- The performance of the network camera may vary depending on the network environment.
- When using multiple network cameras, the appropriate network switch and PC are required.
● This camera does not support MAC-PC.
Important Safeguards
1. Read Instructions
Read all the safety and operating instructions before operating the product.
2. Retain Instructions
Retain the safety instructions and user's manual for future reference.
3. Warnings
Comply with all warnings on the product and in the user's manual.
4. Follow Instructions
Follow all operating and use instructions.
5. Cleaning
Disconnect this camera from the power supply before cleaning.
6. Attachments
Do not use attachments not recommended by the camera manufacturer as they may pose safety risks.
7. Accessories
Do not place this camera on an unstable cart, stand, tripod, bracket or table. The camera may fall, causing serious injury to a person, or serious damage to the product. Use only with stand, tripod, bracket, or table recommended by the manufacturer, or sold with the camera. Any mounting of the product should follow the manufacturer's instructions, and should use a mounting accessory recommended by the manufacturer.
8. Ventilation
This camera should never be placed near or over a radiator or heat register. If this product is placed in a built-in installation, verify that there is proper ventilation so that the camera temperature operates within the recommended temperature range.
9. Power Sources
This camera should be operated only from the type of power source indicated on the information label. If you are not sure of the type of power supply at your location, consult your product dealer.
10. Power-Cord Protection
Power cords should be routed so that they are not likely to be walked on or pinched by items placed upon or against them. Pay particular attention to cords at plugs, screws and the point where they exit the product.
11. Installation
Install this camera on a secure part of the ceiling or wall. If installed on an unsecured location, the camera could fall causing injury and damage.
12. Lightning
For additional protection on this camera during a lightning storm, or when it is left unattended and unused for long periods of time, unplug it from the wall outlet and disconnect the power supply and cable system. This will prevent damage to the camera due to lightning and power-line surges. If lightning occurs, do not touch the unit or any connected cables in order to avoid electric shock.
13. Overloading
Do not overload the power supply or extension cords as this can result in a risk of fire or electric shock.
14. Object and Liquid Entry
Never push objects of any kind into this camera through openings as they may touch dangerous electrical points or short-out parts that could result in a fire or electrical shock. Never intentionally spill liquid of any kind on the camera.
15. Servicing
Do not attempt to service this camera yourself as opening or removing covers may expose you to dangerous electrical or other hazards. Refer all servicing to qualified service personnel.
16. Damage Requiring Service
Disconnect this camera from the power supply and refer servicing to qualified service personnel under the following conditions.
a. When the power-supply cord or plug is damaged.
b. If liquid has been spilled, or objects have fallen into the camera.
c. If the camera has been submerged in water.
e. If the camera has been dropped or the cabinet has been damaged.
d. If the camera does not operate normally by following the operating instructions in the user's manual. Adjust only those controls that are covered by the user's manual as an improper adjustment of other controls may result in damage and will often require extensive work by a qualified technician to restore the camera to its normal operation.
f. When the camera exhibiting a distinct change in performance which indicates a need for service.
g. Other trouble.
17. Replacement Parts
When replacing parts, be sure the service technician uses parts specified by the manufacturer or have the same characteristics as the original part. Unauthorized substitutions may result in fire, electric shock or other hazards.
18. Safety Check
Upon completion of any service or repairs to this camera, ask the service technician to perform safety checks to determine that the camera is in proper operating condition.
Important Safeguards (Cont.)
CAUTION TO REDUCE THE RISK OF ELECTRIC SHOCK.
DO NOT REMOVE COVER. NO USER SERVICEABLE PARTS INSIDE. REFER SERVICING TO QUALIFIED SERVICE PERSONNEL.

The lightning flash with arrowhead symbol, within an equilateral triangle, is intended to alert the user to the presence of uninsulated "dangerous voltage" within the product's enclosure that may be of sufficient magnitude to constitute a risk of electric shock to persons.

The exclamation point within an equilateral triangle is intended to alert the user to the presence of important operating and maintenance(servicing) instructions in the literature accompanying the appliance.
WARNING:
TO REDUCE THE RISK OF FIRE OR ELECTRIC SHOCK, DO NOT SUBMARGE THIS CAMERA IN WATER.
FIELD INSTALLATION MARKING:
WORDED: "THIS INSTALLATION SHOULD BE MADE BY A QUALIFIED SERVICE PERSON AND SHOULD CONFORM TO ALL LOCAL CODES."
NOTICE
- The product is intended to be supplied by a Listed Power Unit marked "Class 2" or "L.P.S." (or "Limited Power Source") and rated output 24Vac, 50-60Hz, 2.25A minimum or 48Vdc, 0.6A minimum.
- The product shall be installed by a qualified service person and the installation shall conform to all local codes.
- The product is to be connected to only PoE+ networks without routing to the outside plant.
Notes on Use and Installation
- Do not aim the camera at the sun
Never aim the camera at the sun even with the camera power off.
- Do not shoot intense light
Intense light such as a spotlight may cause a bloom or smear. A vertical stripe may appear on the screen. However, this is not a malfunction.
● Treat the camera with care
Dropping or subjecting the camera to intense vibration may cause it to malfunction.
● Never touch internal parts
Do not touch the internal parts of the camera other than the parts specified.
- Do not submerge in water
The camera has some protection to water (see IP rating), and can be used indoors or outdoors. If the camera was submerged in water, turn off the power and contact your dealer.
- Keep the camera installation away from video noise
If cables are wired near electric lighting wires or a TV set, noise may appear in images. In this event relocate cables or reinstall equipment.
- Check the ambient temperature and humidity
Avoid using the camera where the temperature is hotter or colder than the specified operating range. Doing so could affect the internal parts or cause the image quality to deteriorate. Special care is required to use the camera at high temperature and humidity.
● Should you notice any trouble
If any trouble occurs while you are using the camera, turn off the power and contact your dealer. If you continue to use the camera when there is something wrong with it, the trouble may get worse and an unpredictable problem may occur.
Precautions for Use
Disclaimer
We disclaim any responsibility and shall be held harmless for any damages or losses incurred by the user in any of the following cases:
- Fire, earthquake or any other act of God; acts by third parties; misuse by the user, whether intentional or accidental; use under extreme operating conditions.
- Malfunction or non-function resulting in indirect, additional or consequential damages, including but not limited to loss of expected income and suspension of business activities.
- Incorrect use not in compliance with instructions in this user's manual.
- Malfunctions resulting from misconnection to other equipment.
- Repairs or modifications made by the user or caused to be made by the user and carried out by an unauthorized third party.
Notwithstanding the foregoing, Toshiba's liabilities shall not, in any circumstances, exceed the purchase price of the product.
Copyright and Right of Portrait
There may be a conflict with the Copyright Law and other laws when a customer uses, displays, distributes, or exhibits an image picked up by the camera without permission from the copyright holder. Please also note that transfer of an image or file covered by copyright is restricted to use within the scope permitted by the Copyright Law.
Protection of Personal Information
Images taken by the camera that reveal the likeness of an individual person may be considered personal information. To disclose, exhibit or transmit those images over the internet or otherwise, consent of the person may be required.
Usage Limitation
The product is not designed for any "critical applications." "Critical applications" means life support systems, exhaust or smoke extraction applications, medical applications, commercial aviation, mass transit applications, military applications, homeland security applications, nuclear facilities or systems or any other applications where product failure could lead to injury to persons or loss of life or catastrophic property damage.
Accordingly, Toshiba disclaims any and all liability arising out of the use of the product in any critical applications.
Package Contents
IK-WP41A ---- 1
Allen wrench ---- 1
Torx wrench ---- 1
Screw (1/4-20UNC, 12mm) ---- 1
RJ45 Coupler ---- 1
Silica-gel ---- 1
CD-ROM ---- 1
Quick Start guide and Important Safeguards ---- 1
Warranty ---- 1
Physical Description

Hardware Reset
Occasionally resetting the system can return the camera to normal operation. If the system problems remain after resetting, restore the factory settings and install again.
The IK-WP41A has a reset terminal and default terminal. (See QSG on page 17)
Reset: Using a pointed object, short both terminals of "Reset". Wait for the Network Camera to reboot.
Restore: Using a pointed object, short both terminals of "Default" for about 5 seconds to restart the camera. Note that all settings will be restored to factory default.
NOTE
Restoring the factory defaults will erase any previous settings such as IP address, ID and Password.
Micro SD/SDHC Card and Capacity
This network camera is compliant with Micro SD/SDHC 32GB and other preceding standard
Micro SD cards for local storage.
- There is a limit to the number of rewrites that is possible with the SD memory card. Replacing
the SD memory card when performing periodic maintenance of the camera is recommended.
- Do not use 512MB and below SD memory cards.
- The Camera system reserves approximately 100MB in SD memory cards. Any images are not recordable on this space.
- Carefully read the User's guide, precautions on use, and any other information supplied with a purchased memory card.
- An SD memory card can be used for repeated storage. The lifespan (number of rewrites possible) of an SD memory card is greatly affected by the capacity of the SD memory card.
- Do not use a memory card containing the data recorded by another device with the camera as this may result in the camera not functioning correctly.
- Do not modify, overwrite the data, or change the folder name of an SD memory card. It may result in the camera not to function correctly.
- If you unmount or remove the SD memory card from camera, you have to turn OFF the power of camera.
Installation
Hardware Installation
Please verify that your product package contains all the accessories listed in the Package Contents listed on page 7. Depending on the user's application, an Ethernet cable may be needed. The Ethernet cable should meet the specs of UTP Category 5e or higher.
Hardware Installation is shown in the Quick Start Guide(QSG). Please refer to page 10 of the QSG.
Network Deployment
In this user's manual, "User" refers to whoever has access to the Network Camera, and "Administrator" refers to the person who can configure the Network Camera and grant user access to the camera.
Network Deployment is shown in the Quick Start Guide(QSG). Please refer to page 19 of the QSG.
Micro SD/SDHC Card Installation
NOTE:
Card slot is in the inside of a camera. You should turn off all power before installation.
When installing the SD/SDHC card, be careful not to generate static electricity at the time.
When installing the SD/SDHC card, don't touch the internal wiring.
◇ Check if the silica-gel also needs to be exchanged.
Refer to 10 pages of QSG for details.
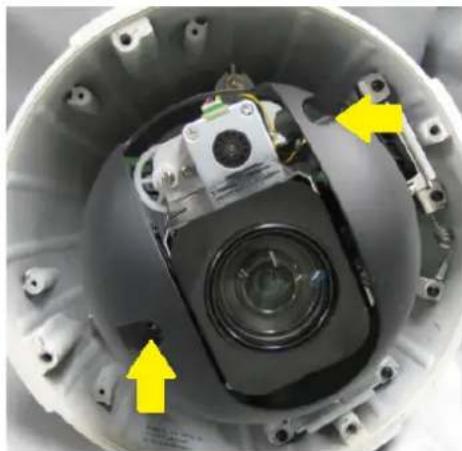
- The dome cover and the internal black cover are removed.(Refer to 10 pages of QSG.)
When you remove the internal black cover, remove the two screws indicated by the arrows.
natural_image
Interior view of a mechanical device showing a camera lens and surrounding components (no text or symbols visible)- The micro SD/SDHC card is inserted in direction of the following picture.(The contacts face downward.)

natural_image
Close-up of a hand inserting a small electronic component into a green circuit board (no visible text or symbols)Accessing the Network Camera
This chapter explains how to access the Network Camera through web browsers or RTSP players.
Using Web Browsers
Use IP Camera Finder to access the Network Cameras on the LAN. See QSG on 19. If your network environment is not a LAN, follow these steps to access the Network Camera:
- Launch your web browser (Microsoft® Internet Explorer).
- Enter the IP address of the Network Camera in the address field. Press Enter.
-
The live video will be displayed in your web browser.
-
If it is the first time installing the network camera, an information bar will pop up as shown below. Follow the instructions to install the required plug-in on your computer.
NOTE:
The administrator log-in ID and password are set to "admin" and to "1234" respectively by default.
To prevent unauthorized access, it is highly recommended to set a new password for the Network Camera.
▶ If you see a dialog box indicating that your security settings prohibit running ActiveX® Controls, please enable the ActiveX® Controls for your browser.
- Choose Tools > Internet Options > Security > Custom Level.

- Look for Download signed ActiveX® controls; select Enable or Prompt. Click OK.

- Refresh your web browser, then install the Active X® control. Follow the instructions to complete installation.
Using RTSP Players
To view the H.264 streaming media using RTSP player, you can use VLC media player. And set the RTSP port to 554.
- Launch the RTSP player (VLC media player).
- Choose File > Open network URL. A URL dialog box will pop up.

- The address format is rtsp://
: / . For example, rtsp://192.168.0.194:554/livestream

natural_image
Interior view of a room with a white shelf and wall-mounted cabinet (no visible text or symbols)Live Video

A click of the Menu button on the left of a screen displays MENU.
MENU

PTZ Control, Snapshot, Resize ON/OFF, JPEG, and Close are displayed.
PTZ Control
![Pan / Tilt Mouse PTZ: ON Mouse PTZ : OFF Upper Left Up Upper Right Left Right Lower Left Down Lower Right Pan Speed: 5 (1-63) Stop Tilt Speed: 5 (1-63) Zoom / Focus / Iris Zoom In Focus Near Iris Open Zoom Out Focus Far Iris Close Preset [ ] 0 C 1 2 3 Set 4 5 6 7 8 9 Go to Scan Auto Frame Random Auto Patrol Patrol1 Patrol2 Patrol3 Patrol4 One Push WB One Push Trigger Other Flip P/T CAL. Close](/content/2026/05/1065703/images/32b47169db5bb981f5d2ce8a99647cd8b57c71ccfd78063a53f6d21291d88d25.jpg)
Pan/Tilt
Mouse PTZ:
Use Mouse PTZ to control the camera PTZ by clicking the screen and sliding the mouse in that direction
Zoom IN/OUT is controlled by the mouse scroll wheel.
Up/Down / Left/Right / Upper Left / Upper Right / Lower Left / Lower Right:
Click these buttons to move the camera in the intended direction. Click and hold to continuously move the camera.
Pan Speed / Tilt Speed:
Adjust the pan and tilt speed. The higher value indicates faster speed.
STOP:
This is the button to stop 'Scan' and 'Auto Patrol'.
Zoom / Focus / Iris
Zoom In / Zoom Out:
Zoom In expands the view and Zoom Out reduce the view. Click and hold to continuously zoom the camera.
Focus Near / Focus Far:
When clicked, focus will be set to manual mode and the lens focus will be adjusted. If the Pan/Tilt/Zoom button is clicked, it will return to Auto Focus.
NOTE: In a wide angle, the manual focus increments increase.
Iris Open / Iris Close:
When clicked, iris will be set to manual mode and the iris will be adjusted. If the Pan/Tilt/Zoom button is clicked, it will return to Auto Iris.
Preset
Setup method:
- Move the camera to the desired position.
- Input the preset position number.
- Click the 'Set' button.
Move method:
- Input the preset position number.
- Click 'Go to' button.
NOTE:
Manual focus cannot be set as preset position.
Scan
To set the scan speed, refer to Camera Settings → Basic → Pan / Tilt → Scan Speed.
Auto :
The camera will pan continuously until a manual pan, tilt, zoom, or Stop operation is performed.
(Zoom) At power-up, the zoom is fully zoomed out. When an auto scan is started directly, the zoom will maintain the last magnification.
(Tilt) At power-up, the tilt is set up by the Configuration. To set the tilt angle, refer to Camera Settings → Basic → Tilt Angle.
Frame:
Operation of zoom and tilt is the same as in Auto Scan. The camera will move in 45-degree increments (called stops) horizontally until a manual pan, tilt, zoom, or Stop operation is performed.
Random:
Operation of zoom and tilt is the same as in Auto Scan. The dome camera will move between random stops until a manual pan, tilt, Zoom, or Stop operation is performed.
Auto Patrol
The Auto Patrol feature will repeat a pattern of up to 128 presets. To set the moving speed, refer to Camera Settings → Basic → Pan / Tilt → Max Speed.
One Push WB
This is a trigger button of 'One Push WB'. To set the 'One Push WB', refer to Camera Settings → Basic → Image → White Balance control.
Other
Flip
The Flip feature allows the pan to rotate 180 degrees when you click this button.
P/T CAL.
This is a calibration of Pan / Tilt mechanism. If the displacement of preset position occurred for any reason, please click this.
Snapshot
The “Snapshot” function is for snapshot capture. Press the “Snapshot” button to take a picture, and it will be saved into specific folder which is created automatically.
This folder location is shown above the snapshot image.
Resize OFF/ON
ON: When the window size of live video is changed, screen size is resized automatically.
OFF: Screen size is not resized even if window size of live video is changed.
Close
A Menu is closed.
Configuration
This window and Live Video screen open first. If you click Configuration, this live video screen will close.

| TOSHIBA | TOSHIBA IK-WP41A |
| Config / Live Video ► Camera Settings ► Network Settings ► Administrator Event Log Information | FW Version : TSB.0.0.14 Mac Address : 00:0B:67:01:2B:05 MCU Version : 30 |
After clicking Configuration, this Information window will open.
FW Version and Mac Address are shown. (MCU Version is information required for after sales service.)
NOTE: Click the "Save" button to save settings. Or click the "Reset" button to reset the data before changes. And you can click the "Default" button to bring back factory defaults.
Camera Settings
After clicking Camera Settings, Basic, Auto Patrol, Privacy Zone Mask, Video Codec, Alarm, FTP Recording, E-mail, Audio configurations will be displayed.

Basic Settings
Basic items such as color and quality of delivered images of the camera can set.
- Click Camera Settings on the Configuration Menu.
• A sub menu for Camera Settings will appear.
- Click Basic in the sub menu.
- The screen of "Camera - Basic Settings" will appear.
- Configure each setting items.
- Click the Save button to save settings.
- The settings will not be reflected unless the Save button is clicked.
Image

Power Up
Power Up
Default

Tilt-Angle
Scan tilt angle

Tilt-Angle mode
Outdoor 92
Pan / Tilt
Auto Flip
ON
OFF
Proportional P/T
ON
OFF
Recover Time
OFF ▼
Scan Speed
Max Speed
Freeze Activity
ON
OFF
Image:
● Automatic Exposure
Automatic Exposure controls the light intensity of picture. Two types of specific application conditions can be selected. You can select "Full Automatic" or "Shutter Priority" by the camera depending on your application environment. When using Full Automatic, the Shutter speed is disabled. When using Shutter priority, EV adjustment and Backlight
Compensation are disabled.
- EV adjustment
EV adjustment is called exposure compensation that tells the camera for a particular scene you want it either brighter (zero to +7) or darker (zero to -7).
Set the value of EV adjustment from -7 to 7, which is available under Full Automatic mode.
- Shutter Speed
Set desired Shutter speed from 1s to 1/10000s, which is available under Shutter Priority mode.
- Slow Shutter
Set Slow Shutter function. Choose 'Auto' or 'Off' (Default).
When set to "Auto," ensures that the slow shutter is set automatically when the brightness drops.
● Backlight Compensation
The Backlight Compensation function is to provide optimal exposure of subjects under back light circumstances.
Set Backlight Compensation function. Choose 'On' or 'Off' (Default).
Backlight Compensation is a function that achieves the brightness of a selected area to an optimum image level. This function is necessary when an auto iris lens tends to close due to an intense light coming from back of object in the area wished to view so that areas desired to see become dark and difficult to see. In this case, set the area so that the portion wished to see enters the selected area.
NOTE:
When the ‘Backlight Compensation’ is ON, WDR cannot set to enable.
- Sharpness
Increasing the sharpness value enhances the edges and small features. In your camera images, you can set a sharpness value of image from 0 to 15.
● White Balance Control
Set the white balance values to meet the environment condition for best color rendition. There are 5 modes.
ATW: It ranges from 2000°K to 10000°K. (default)
➢ Auto: It ranges from 3000°K to 7500°K.
Indoor: 3200°K as the basis.
Outdoor: 5800°K as the basis.
One Push WB: Use Trigger button on the PTZ Control interface to
perform this function.
- Focus Mode
There are three modes to choose, the default is 'Auto'.
Manual: Press NEAR and FAR to control focus on the PTZ Control interface.
Auto: The Auto mode automatically adjusts the focus position to the best of the picture in a center. Also, change near/far to Focus Near and Focus Far on the PTZ Control interface. After this change, camera became ‘Manual’ mode once, and getting back ‘Auto’ mode if you click PTZ operation.
Zoom Trigger: Under this mode, camera will remain as 'Manual' mode unless it receives zoom in or zoom out signal, and after the designated action it will back to 'Manual' mode.
- Focus Sensitivity
You can set is as Normal (default) or Low.
When the lighting level is low, the Auto Focus function does not take effect. At that time, you can set to 'Low'.
- Focus Correction
Set 'Standard' normally. If you light the IR illuminator and the camera was unfocussed, set to 'IR Light'.
- Day-Night
Set DAY/NIGHT function. Move the cursor to select the AUTO (default), Day, or Night mode.
AUTO: The IR Cut filter can be disengaged automatically to increasing sensitivity in low light environments.
NOTE: Although hunting may occur under the conditions of specific brightness, it is not a malfunction.
Day: You can force the camera to stay in DAY (COLOR) mode.
Night: You can force the camera to stay in BW (NIGHT) mode.
- Zoom Limit
You can choose x20(default, optical), x40(x20 optical + x2 digital), x80(x20 optical + x4 digital), x160(x20 optical + x8 digital), x240(x20 optical + x12 digital).
• DNR
You can configure the noise reduction related setting from 0 to 5 and reduce noise on the screen. '0' means OFF and '5' is the maximum. (Default is 3.)
● WDR(Wide Dynamic Range)
When there are both very bright portion and very dark portion simultaneously in the field of view, you can enable WDR function. It optimizes an image to ensure that dark areas are more visible while retaining details in bright areas.
Images with WDR are produced by combining long-exposure signals with the signals of the high-intensity portions obtained with a short exposure.
NOTE:
'Backlight Compensation' will be turned OFF when WDR is enabled.
ON: WDR is ON. A camera is automatically controlled by the optimal image. 'EV adjustment' cannot be operated in this mode.
Exposure: WDR is ON. This mode fixes the shutter speed of a long exposure. Configure the shutter speed of a short exposure by setting the ratio with regards to a long exposure with the exposure ratio parameter.
➢ Histogram: This mode uses a histogram to correct blocked-up shadows and blown-out highlights.
OFF (default): WDR is OFF.
Auto: This mode switches WDR ON/OFF automatically in accordance with the intensity difference of the subject.
NOTE:
When the wide dynamic range mode is ON, overexposure may be observed in the images of some subjects. This phenomenon is unique to WDR mode, and it is not a malfunction of camera.
The frame rate during WDR mode will be half of standard mode.
Power Up:
- Power up
During Power-Up, the camera can be set to start in various modes.
Default: The dome camera moves to the mechanical reset point.
➢ PARK: The camera moves to Preset 1 position.
Auto scan: The camera performs an auto scan operation.
➢ Auto patrol 1\~4: The camera performs an auto patrol 1\~4 operation.
Tilt-Angle:
- Scan tilt angle
The tilt angle of the camera for auto scan, random scan and frame scan can be set from 0 to 85 degrees or 92 degrees (0 degree is straight
down). Set the elevation of camera from 0irc 92 .
- Tilt-Angle mode
Set up the limit value of camera's tilt angle: Indoor 85° or Outdoor 92°.
Pan / Tilt:
- Auto Flip
Set as 'ON' or 'OFF'. The Auto Flip feature allows the tilt to rotate 180 degrees and reposition itself for continuous viewing of a moving object directly beneath the camera.
● Proportional P/T
Set as 'ON' or 'OFF'. Proportional P/T controls the pan and tilt speeds according to the amount of zoom.
At telephoto settings, the pan and tilt speeds will be slower to keep the image from moving too fast on the screen.
● Recover Time and Actions
Set as 'ON' or 'OFF'. After a programmed number of minutes of inactivity, the camera will move to Park / Random Scan / Frame Scan / Auto Scan / Patrol 1\~4 (selectable). Recover Time can be set from 1 to 120 minutes.
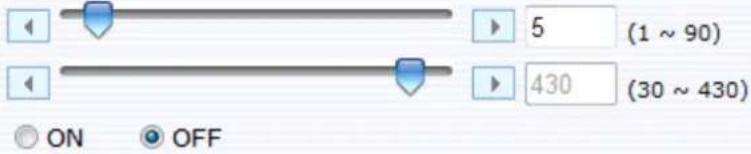
- Scan Speed
Speed of Auto Scan/ Frame Scan/Random Scan can be set from 1irc 90irc/s .
However, this speed is limited by Max Speed setting.
- Max Speed
The maximum speed of Pan/Tilt functions can be set from 30 degrees/sec to 430°/s. The max speed controls global Pan/Tilt speeds. To reduce rotation noise, use a lower speed.
- Freeze Activity
Set as ‘ON’ or ‘OFF’. During frame scan, random scan or auto patrol, camera images will not be shown while the camera moves from the current position to the next position.
Auto Patrol

bar
Camera - Auto Patrol Settings | Patrol | 001 | 002 | 003 | 004 | 005 | 006 | 007 | 008 | | :--- | :--- | :--- | :--- | :--- | :--- | :--- | :--- | :--- | | :--- | :--- | :--- | :--- | :--- | :--- | :--- | :--- | :--- | | 001 | □001 | □002 | □003 | □004 | □005 | □006 | □007 | □008 | | 009 | □009 | □010 | □011 | □012 | □013 | □014 | □015 | □016 | | 017 | □017 | □018 | □019 | □020 | □021 | □022 | □023 | □024 | | 025 | □025 | □026 | □027 | □028 | □029 | □030 | □031 | □032 | | 033 | □033 | □034 | □035 | □036 | □037 | □038 | □039 | □040 | | 041 | □041 | □042 | □043 | □044 | □045 | □046 | □047 | □048 | | 049 | □049 | □050 | □051 | □052 | □053 | □054 | □055 | □056 | | 057 | □057 | □058 | □059 | □060 | □061 | □062 | □063 | □064 | | 065 | □065 | □066 | □067 | □068 | □069 | □070 | □071 | □072 | | 073 | □073 | □074 | □075 | □076 | □077 | □078 | □079 | □080 | | 081 | □081 | □082 | □083 | □084 | □085 | □086 | □087 | □088 | | 089 | □089 | □090 | □091 | □092 | □093 | □094 | □095 | □096 | | 097 | □097 | □098 | □099 | □100 | □101 | □102 | □103 | □104 | | 105 | □105 | □106 | □107 | □108 | □109 | □110 | □111 | □112 | | 113 | □113 | □114 | □115 | □116 | □117 | □118 | □119 | □120 | | 121 | □121 | □122 | □123 | □124 | □125 | □126 | □127 | □128 | Stop Time: 5 sec- Patrol
You can set four groups of preset positions.

Set stop time for auto/ frame /random scan as 3 / 5 / 7 / 15 / 30 / 60s.

- Preset setting
The auto patrol function will continuously scan up to 128 preset positions.
Privacy Zone Mask
This function masks a user defined area that cannot be viewed by the operator. The
mask adjusts with the pan, tilt and zoom of the camera.

NOTE:
✨ UP to 8 masks can be set on the screen.
✨ Masking areas are only rectangles.
When using the PTZ function the privacy zone, although the image under a mask can sometimes be seen, it is not malfunction.
Although the privacy zone works in digital zoom, a mask setup of very small area cannot be performed.
It is recommended to set privacy zone bigger than actual masking area.

- Check the checkbox "ON", then press the "Set Masking Zone" button.
- Then a "Camera-Privacy Zone Masking Settings" pops out.
- Use mouse to drag a mask rectangle on the screen, click "Save" to save settings.
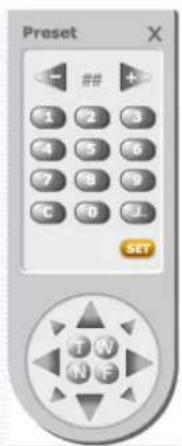
- You can enable the PTZ function shown below by pressing the "PTZ" button in order to adjust an appropriate position. And in this mode, mouse PTZ is ON.
After adjusted, click 'X' on the PTZ function screen and close this window.
Finally, use the mouse to drag a mask zone on the pop-out window, and click "SET" to save the setting.
"T": Zoom in
"W": Zoom out
"N": Focus near
“F”: Focus far
- Go back to the "Privacy Zone Masking" section.
Video Codec
-
Select Video Codec.
-
Configure the options as described in the table below.
-
Click save.
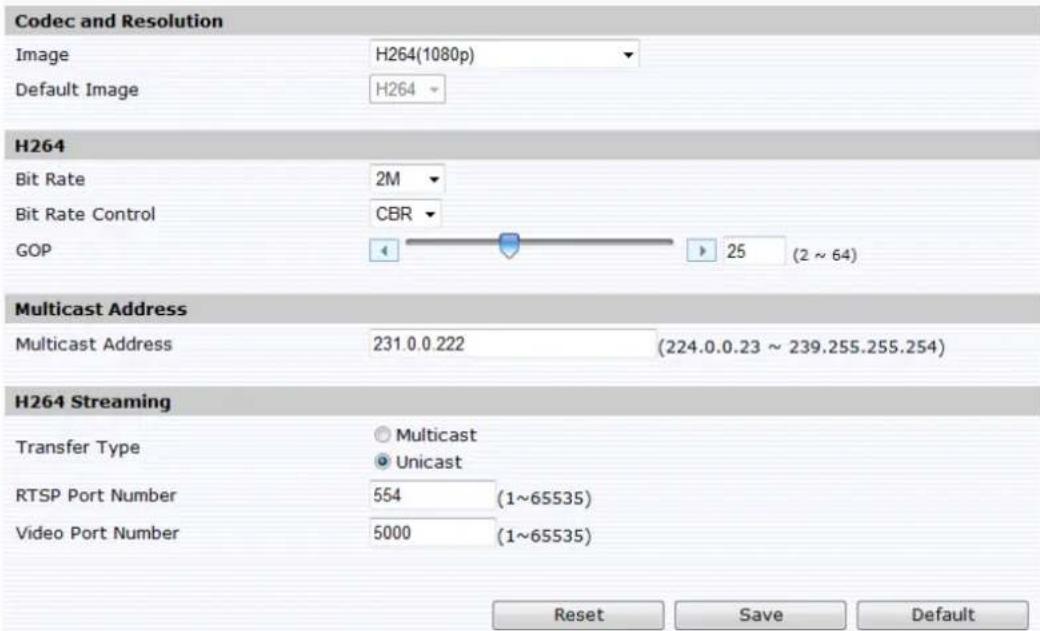
| Video Codec H.264 MJEPG | ||
| Image | Higher resolution results in larger image sizes. You can set H264(1080P)H264(720P)+MJPEG(720P)H264(480P)+MJPEG(480P)H264(VGA)+MJPEG(VGA)H264(VGA)+MJPEG(QVGA)H264(QVGA)+MJPEG(QVGA)H264(720P)+MJPEG(CIF)H264(720P)+MJPEG(QVGA) | |
| Default image | Selection of the video codec of the image after the camera powers ON. Reboot after setup. | |
| H264 Bit rate | Select the desired bit rate including 256k, 512k, 1M, 2M, 4M, 6M and 8M bps. | - |
| H264 Bit rate control | Select the desired bit rate control including CBR and VBR. | - |
| H264 GOP | Select the desired GOP length, including 2~64 | - |
| Image Quality - | Select the desired image quality including Low, Middle and High. | |
| Multicast Address | Specify the multicast address (e.g. of the switch or router) | |
| H264 Transfer Type | Select “Unicast” or “Multicast”. In “Multicast” mode camera supports IGMP. | |
| H264 RTSP Port Number | Specify the port number you would like to use for RTSP protocol, from 1 to 65530, default is 554. | Specify the port number you would like to use for RTSP protocol, from 1 to 65530, default is 556. |
| H264 Video Port Number | Specify the port number you would like to use for video streaming, from 1 to 65530, default is 5000 | Specify the port number you would like to use for video streaming, from 1 to 65530, default is 5010 |
NOTE:
- Since this camera uses a HD sensor, an Image not over 480P is displayed vertically.
● Max. Connections of real time:
✿ Up to 3 simultaneous Unicast users at 1080P.
✨ Up to 10 simultaneous Unicast users.
Alarm
There are 6 alarm input terminals and 1 output terminal on the base of the camera and each alarm contain 32 preset actions, when alarm 1-6 is triggered, the camera will immediately move to the preset position.
- Alarm In1 to Alarm In6

- Input Type: Set the alarm contact type as Normal Open or Normal Close. For alarm input type, the active state is shown on the page 19 in the QSG.
● Actions: Specify the action to be taken when alarm is triggered. No action will be taken (but an alarm is logged).
- The status of the alarm blinks above the live video screen. Double click the status to clear the alarm
NOTE:
The "Input Type" and "Actions" settings are enabled when alarm is not set to "OFF".
Motion Detection
1) Function
ON: Camera detects motion.
OFF: Camera does not detect motion.
2) Sensitivity
Set "Sensitivity."
HIGH: Motion is activated with slight changes in brightness or motion
MIDDLE: Intermediate between HIGH and LOW.
LOW: Motion is activated with larger changes in brightness or motion
3) Set Motion Area: Single click the "Set Motion Area" button then drag the mouse to select "Detection Area". Finally click "Save" to save your set.


NOTE:
The status of the alarm blinks above the live video screen. Double click the status to clear the alarm
♦ Motion detection doesn't work during PTZ.
Even if a scene is changed by PTZ, detection area is not changed automatically. setup the detection area again.
- Alarm Output
When the Alarm input is triggered, the camera will send out a signal through the Alarm output. (See the page 19 in the QSG. After alarm is triggered, this switch will short between COM and OPEN.)
You can set Alarm Mode as OFF or Event. If you choose OFF, this function will be closed, And you can set alarm dwell time as 1s, 5s, 10s, 15s, 30s, 60s by the menu of 'Output Delay Time'.
Alarm Output
Alarm Mode
Output Delay Time
OFF
Event
5 seconds
SD Recording
You can save image files in micro SD card. This menu will not show unless you insert the micro SD card.
NOTE: Supported for Class4 of micro SDHC (SD High Capacity) under 32GB.
Recording Condition
Schedule Recording
Event Recording
Alarm In
Conditions
(Enabled only when 'Alarm In' is chosen at the Event setting page.)
□ Motion Detection
(Enabled only when 'Motion Detection' is set to ON at the Event setting page.)
OFF
Cycle Recording
Cycle Recording

ON

OFF
Schedule Recording Table
The following settings are valid when 'Scheduled Recording' is set to 'ON':
| Day | Recording Schedule | |||
| OFF | All Day | Schedule 1 | Schedule 2 | |
| Monday | ||||
| Tuesday | ||||
| Wednesday | ||||
| Thursday | ||||
| Friday | ||||
| Saturday | ||||
| Sunday | ||||
| Schedule 1 | Start:8 ▼ | am ▼- Stop:5 ▼pm ▼ | ||
| Schedule 2 | Start:8 ▼ | am ▼- Stop:5 ▼pm ▼ | ||
| Recording Interval | 60 seconds | |||
Event Recording Setting
| Pre-Recording | 3 | frames |
| Post-Recording | 10 | frames |
| Recording Interval | 10 | seconds |
- Recording Condition: You can save image files based on your scheduled recording, or Event Recording settings.
- Scheduled Recording Table: Determine the recording condition: OFF, All Day, Schedule 1 or Schedule 2 from the recording schedule table for all days from Monday to Sunday.
Recording Interval: Set a time interval for recording images.
● Event Recording Setting: Images are recorded when Alarm In is detected.
Pre-Recording: Set the number of images to be recorded immediately before motion occurs. Images at the moment when motion occurs are not included.
Post-Recording: Set the number of images to be recorded immediately after motion occurs. Images at the moment when motion occurs are not included.
Recording Interval: Set a time interval for motion recording.
-
Cycle Recording: You can set it as 'OFF' or 'ON'. If set to 'ON', the SD card will automatically overwrite when full.
-
Recorded Files: Click "Delete all" to delete all files. Click "Delete from Event Recording list" to delete the files you have kept on Event Recording. Click "Delete from Scheduled Recording list" to delete the files you have kept on Scheduled Recording.
Recorded Files
| Delete all |
| Delete from Event Recording list... |
| Delete from Scheduled Recording list... |
NOTE:
When events occur frequently, Pre-Recording, Post-Recording, and Recording Interval may be unable to be recorded as setup.
FTP Recording
You can save image files via FTP. Setting your FTP recording condition first, and then identify your FTP sever 1 and 2.

1. FTP Recording Conditions
You can store your image files based on your scheduled recording, or recording by alarm, or recording by motion.
- Schedule Recording
| Schedule Recording Table | |||||
| The following settings are valid when 'Scheduled Recording' is set to 'ON': | |||||
| Day | Recording Schedule | ||||
| OFF | All Day | Schedule 1 | Schedule 2 | ||
| Monday | |||||
| Tuesday | |||||
| Wednesday | |||||
| Thursday | |||||
| Friday | |||||
| Saturday | |||||
| Sunday | |||||
| Schedule 1 | Start: 8 am - Stop: 5 pm | ||||
| Schedule 2 | Start: 0 am - Stop: 0 am | ||||
| Recording Interval | 1 seconds | ||||
| Recording File Name | LV yyyyymmddHHMMSS***N.JPG | ||||
| Server Path | Server 1: Server 2: | ||||
- Determine the recording condition: OFF, All Day, Schedule 1 or Schedule 2 from the recording schedule table for all days from Monday to Sunday.
- Recording Interval: Set a time interval for recording images.
- Recording File Name: Set the file name where the name is to be stored on the server.
- Server Path: Enter the data path where the data is to be stored on the server.
● Event Recording Setting
a) Recording by Alarm In
Perform "Alarm input setting" first,
Then record in the following sequence:
- Pre-recording: Set the number of images to be recorded before an alarm occurs. Images of the moment when an alarm occurs are not included. You can set Pre-Recording as 0, 3, 5, 10 frames.
- Post-Recording: Set the number of images to be recorded immediately after a motion occurs. Images at the moment when a motion occurs are not included. You can also set Pre-Recording as 0, 3, 5, 10, 20, 60, 120 frames.
- Recording Interval: Set a time interval for motion recording.
- Recording File Name: Set the file name where the name is to be stored on the server.
- Server Path: Enter the data path where the data is to be stored on the server.
b) Recording by Motion
Perform "Motion Detection Setting" first,
All the other settings are same as recording by alarm as above.
| Event Recording Setting | ||
| Pre-Recording | 10 frames | |
| Post-Recording | 10 frames | |
| Recording Interval | 1 seconds | |
| Recording File Name | Alarm In : EX | yyyymmddHHMMSS***N--A.JPG |
| Motion Detection : MD | yyyymmddHHMMSS***N--A.JPG | |
| Server Path | Server 1: | |
| Server 2: | ||
NOTE:
When events occur frequently, Pre-Recording, Post-Recording, and Recording Interval may be unable to be recorded as setup.
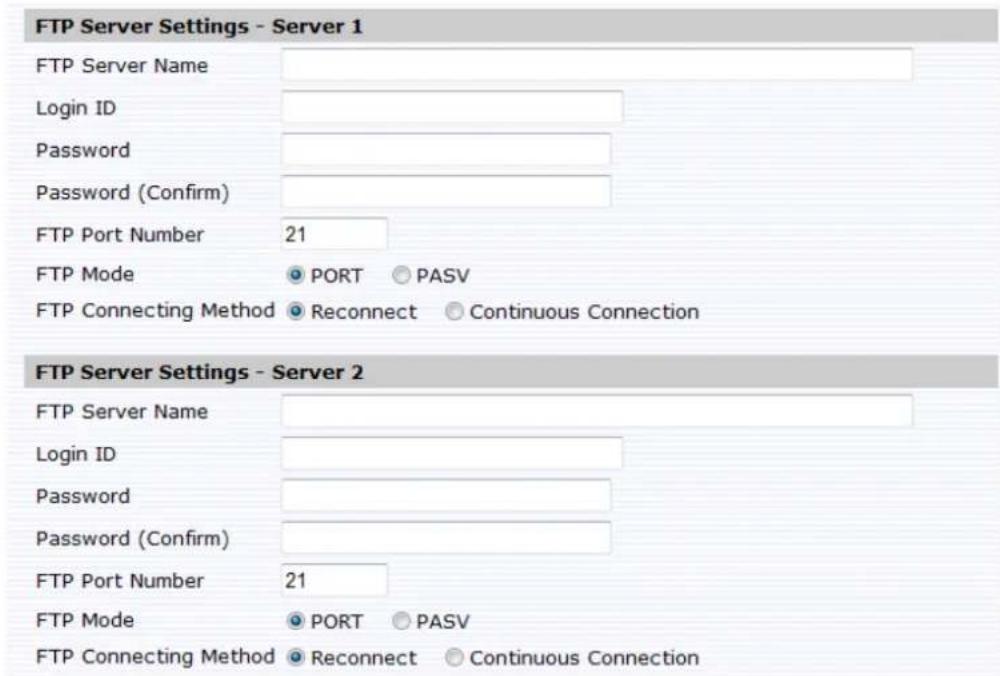
2. FTP Server Settings - Server 1 and 2
Please follow your FTP setting to setup FTP server name, Login ID, Password, FTP port number, FTP mode, and FTP connecting method.
- FTP server name: Input a server name or address.
- Login ID: Limited only to users who have authority to access the server.
- Password: Input the registered password associated with Login ID.
-
Password (Confirm): Re-enter the password.
-
FTP Port Number: set "21" as default.
- FTP Mode:
PORT mode- This mode is for most FTP applications.
PASV mode-This mode is for the camera's network environment is behind a firewall.
- FTP Connecting Method:
Reconnect- The network camera logs in/out for each file transfer.
Continuous Connection- The network camera is always in connection.
3. FTP Server Usage
You can choose to save your image files to either FTP server 1, 2, or automatically switching servers.
| FTP Server Usage | |
| Primary Server | ○ FTP Server 1 (Default) ○ FTP Server 2 |
| Automatic Server Switch | ○ ON (Automatically switches servers in the event of a communication failure) ○ OFF (Default) |
• Primary Server: Define FTP server 1 or 2 as the primary server for saving image files
- Automatic Server Switch: Select "ON" if the FTP server is to be automatically switched to the secondary server in case the primary server is not available.
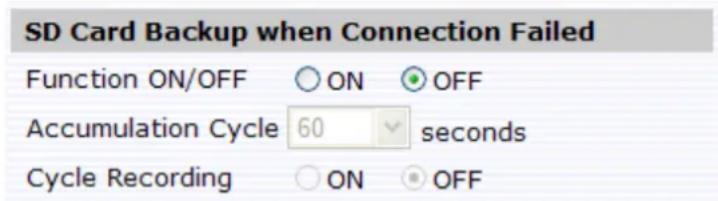
SD Card Back Up when connection failed
The network camera automatically stores images in the SD card when images cannot be recorded in the server due to a network failure, or other trouble. The stored images can be transferred to the FTP server when the network status or other troubles are resolved.
Function ON/OFF: Select ON to active SD card FTP back up function.
Accumulation Cycle: Set a time interval in seconds for recording images to be stored. (Time interval: 1, 2, 3, 5, 10, 30, 60, 120 or 180 seconds)
Cycle Recording: Overwrite when SD card reaches the maximum capacity and start with oldest stored images.
You can receive images by setting your e-mail account.
Authentication Settings:
- Authentication
- No Authentication: no restrict rule
- POP before SMTP: A protocol that defines an email server and a way to retrieve mail from it. Incoming messages are stored at a POP server until the user logs in and downloads the messages to their computer.
- SMTP Auth: Plain, and Login. Simple Mail Transfer Protocol (SMTP) is an Internet standard for e-mail transmission across Internet Protocol (IP) networks.
PLAIN: PLAIN is the name of a registered SASL authentication mechanism, which is supplied as a parameter to the AUTH command. The PLAIN authentication mechanism is described in RFC 2595. PLAIN is the least secure of all the SASL authentication mechanisms, since the password is sent unencrypted across the network.
- LOGIN: The LOGIN mechanism is supported by Microsoft's Outlook Express, as well as by some other clients.
- E-mail Server (SMTP): Enter your outgoing mail server (SMTP).
● E-mail Server (POP): Enter your incoming mail server (POP).
● E-mail User ID: Input your e-mail account ID number. -
Password: Input your e-mail account password.
-
Password (Confirm): Confirm your e-mail password.
- Administrator E-mail Address: Input your e-mail address.
Press "save & test e-mail" button to save your setting and to test your e-mail.

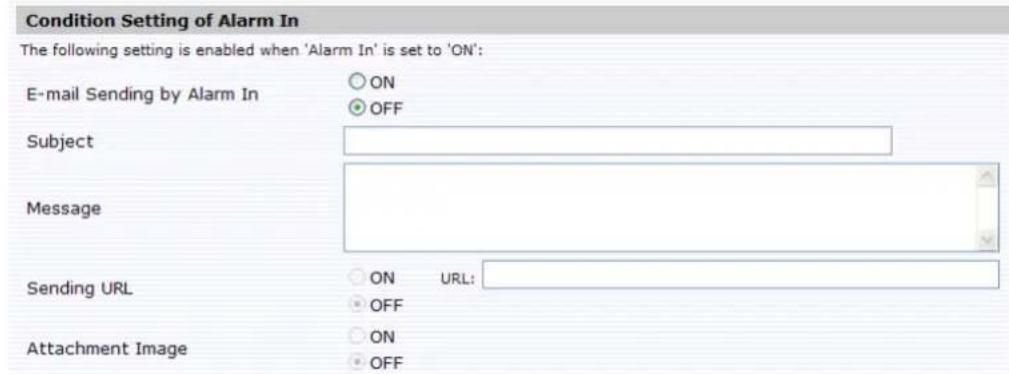
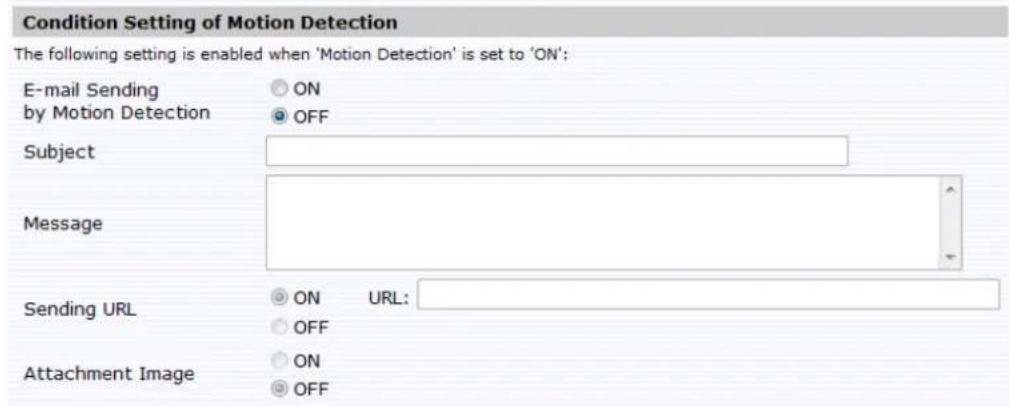
Condition Settings of Alarm In / Condition Settings of Motion Detection:
- Setup E-mail condition and style when 'Alarm In' or 'Motion detection' activated.
E-mail Address list:
The destination of e-mail is set up.
When you always send to an administrator, turn ON.
Add other mail addresses and set up transmitting conditions.
| No. | Mail-to Address | Send Condition | ||
| Alarm In | Notice Detection | |||
| 1 | ☐ | ☐ | ||
| 2 | ☐ | ☐ | ||
| 3 | ☐ | ☐ | ||
| 4 | ☐ | ☐ | ||
| 5 | ☐ | ☐ | ||
| 6 | ☐ | ☐ | ||
| 7 | ☐ | ☐ | ||
| 8 | ☐ | ☐ | ||
| 9 | ☐ | ☐ | ||
| 10 | ☐ | ☐ | ||
Audio
You can setup audio setting. Refer cable connection shown page 17 in QSG.

- Format: Support three audio Video Codec formats of PCM, G711-Alaw and G711-Ulaw.
- Audio Input: Set to "ON" when receiving audio from a microphone connected to the camera.
● Audio Input Level: Low / Middle / High selectable.
Network Settings

Basic

- Camera Name: Enter your camera name. This name is displayed as the camera name of Configuration window and on the frame of Internet explorer of a Live Video window.
- DHCP (Default is 'ON').
The IP address is automatically obtained when you select "ON"; otherwise, select "OFF" to setup the static IP address. - IP Address:
Input your static IP address here when you select DHCP off. - Subnet Mask:
If the subnet mask is not properly configured, the camera may not be able to communicate with other devices on the network. - Default Gateway:
Leave blank as default setting. It is not necessary to enter Default Gateway if it is not used. Ask your Network Administrator for Default Gateway information.
● Primary DNS: (same as above)
● Secondary DNS: (same as above) - HTTP Port Number: We recommend using the default port number. If you need to change the default port, contact your Network Administrator. Options: 1025 to 65535 (80 is the default).
- Enter a host name. Ask your Network Administrator.
- Enter a domain name. Ask your Network Administrator
- UPnP: When set to "ON", the camera can be detected automatically if you use UPnP protocol from the PC.
DDNS
This section explains how to configure the dynamic domain name service (DDNS) for the Network
Camera.
The provider list contains two hosts that provide DDNS service. Please connect to the service provider's web site to review the service charges and sign-up for the service if you want to use DDNS.
ChangelP.com
http://www.changeip.com/toshiba/
No-IP.com
http://www.no-ip.com/ext/toshiba.php
- Click "ON" to activate the DDNS function or "OFF" to disable the DDNS function.
- Select a DDNS server: NO IP, CHANGE IP, from the drop-down list of the DDNS
Server.
- Enter a user's id in the "User ID" field.
- Enter a password in the Password field.
- Re-enter a password to confirm it. Finally, click Save to save the settings.

FTP Server
This section explains how to configure the FTP server for the network camera.
- Click "ON" to activate the FTP function. follow the following procedures to set up related settings. Or "OFF" to disable the FTP function and skip the following procedures.
- Enter a login ID if you activate the FTP function.
- Enter a password associated with a login ID.
● Re-enter the password to confirm it. - Determine the number of maximum connections by selecting a number from the drop-down list in the Max Simultaneous Connections field.

Administrator

Password
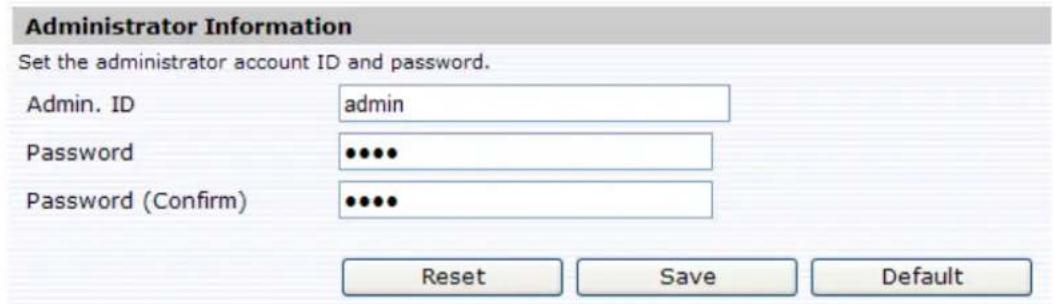
Administrator Information:
You can setup User ID and password.
The default setting for administrator ID and password are:
- Admin: ID: admin
- Password: 1234
You can adjust your unique Administrator ID and password at this field.
NOTE:
To prevent unauthorized access, it is highly recommended to set a password for the Network Camera.
User List:
Besides administrator, five Users can access the camera under authorization from administrator by ID and password control. However, Users 1\~5 are allowed to review the live video only. Without authorization, any operation will be forbidden.
- The default User 1 login name and password are "guest" and "guest".
- Enter an ID in the User ID field.
- Enter a password in the Password field.
● Re-enter the password again to confirm.

Finally, click "Save" to save the settings.
Date/Time
- Date and Time setting
Enter the date and time to set up system time manually.

- Time zone
Select the time zone where your camera is located.

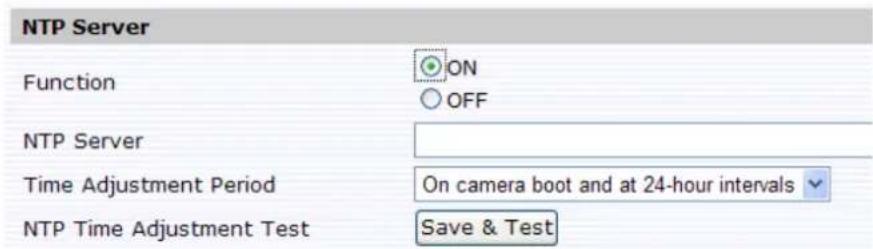
- NTP Server
Select ON to active the NTP Server function. If "NTP" is selected "ON", the date and time will be synchronized by the NTP server. And you can choose the Time Adjustment Period. The button "Save & Test" can test the NTP Server operation.
- Daylight saving
Select ON to activate the daylight-saving function if you are in a daylight-saving time (effective for NTP mode only).
| Daylight saving | |
| Daylight saving | ONOFF |
FW Update
- You can update system firmware once the update file is available.
- It is the customer's responsibility to update firmware.
● All camera motions will shut down during firmware update. - Close any other screens on the PC before starting a firmware update.
● Never disconnect power and LAN cable during the firmware update process.
● Rebooting the camera after firmware update may take approx. 3 minutes. - After finish FW update, please reboot Internet explorer® on your PC.

Maintenance
- Import Configuration Settings
This function is designed to upload configuration setting from the client PC to network cameras.
Import Configuration Settings
Imports saved configuration settings from the client computer to the network camera.
Configuration Information File:
浏览...
Import
Configuration information import takes several minutes.
- Export Configuration Settings
This function is designed to export configuration settings to the client PC.
Export Configuration Settings
Exports configuration settings from the network camera to the client computer.
Export
This function is designed to reset all configuration settings into factory default except for IP address, ID/Password and Camera Name.
The camera will reboot to make the changes effective.
- Reboot Camera
This function is designed to reboot the camera. Clicking the Reboot button and a display window appears the confirmation message.
Reboot Camera
Reboot
Event Log
Click Event Log on the setting menu.
Click the buttons to display the desired logbooks or to delete all logs.
● Display all: You can display all logs from the camera.
● Condition Settings (Log filter):
a) Display "Most recent" or "Old" logs (input 1 to 8190).
b) Display logs with keyword.
c) Display logs by Date and Time.
NOTE:
If you click 'Delete Logs', all logs will disappear.
Event Log - Browse and delete
Log Browse
== Total log messages - 6 ==
- Show all log messages.
[1] Jan 25 2011 10:08:05am 2000221 rgst> Success to save. Camera info.
[2] Jan 04 2012 11:29:14am 2000713 webm> Success to default. Network info.
[3] Jan 04 2012 00:48:23pm 2000229 rgst> Success to save. Network info.
[4] Jan 04 2012 03:06:17pm 2000223 rgst> Success to save. Alarm info.
[5] Jan 04 2012 03:07:04pm 2000226 rgst> Success to save. Recording info.
[6] Jan 04 2012 03:07:05pm 2000227 rgst> Success to save. FTPc info.
== Appeared log messages - 6/6(100%) ==
Filter Settings


Save Conditions
Delete Logs
Default
Specification
| Camera | Image device 1/2.8 Type CMOS | |
| Optical zoom 20X | ||
| Focal length f=4.7mm(wide) to 94.0 mm (tele) | ||
| F-number F1.6 to 3.5 | ||
| Angle of view H: 55.4°(wide), 2.9°(tele) at Full HD mode | ||
| Effective number of pixels 1920 x 1080 | ||
| Digital zoom 12X (240x with optical zoom) | ||
| Focus mode Manual, Auto, Zoom Trigger | ||
| Minimum illumination (*1) 0.3 lux / F1.6 : Night mode, Exposure(Full Automatic) | ||
| White balance Auto, ATW, Indoor, Outdoor, One Push WB | ||
| Electric shutter | 1 ~ 1/10,000 | |
| Slow Shutter | Auto, Off | |
| Exposure control | Full Automatic, Shutter priority | |
| Backlight Compensation | On/Off | |
| Day/Night function | Removable IR-Cut filter in Night mode | |
| Wide dynamic range | ON / Exposure mode / Histogram mode / Auto mode / OFF | |
| Video and Audio | Video Compression | H.264, MJPEG(except 1080P) |
| Resolutions 1080P,720P,480P, VGA,QVGA,CIF | ||
| Maxmum Frame Rate | 30fps | |
| Video Streaming | Dual streaming (720P and below : H.264 and MJPEG) Single streaming (1080P : H264) | |
| SD card | Micro SDHC supported (32GB) | |
| Audio (*2) | Simplex (mic input ) | |
| Alarm | Motion detection | Yes |
| Alarm I/O | 6 alarm inputs, 1 alarm output | |
| P/T Operation | Pan angle | 360 degrees continuous rotation |
| Tilt angle | Indoor 85 / Outdoor 92 | |
| Pan speed | 0.1-430 degrees/s(auto), 0.1-120 degree/s(manual), | |
| Tilt speed | 0.1-200 degrees/s(auto), 0.1-90 degree/s(manual), | |
| Programmable presets | 128 presets | |
| Auto patrol | 4 groups | |
| Auto flip | On/Off | |
| Scan | Auto, Frame, Random | |
| Privacy masking | 8 zones | |
| Freeze activity | On/Off | |
| Network | Ethernet | 10base-T/100base-Tx Ethernet connection |
| Internet protocol | TCP/IP, UDP, HTTP, SMTP, DNS, DHCP, NTP, DDNS,FTPc,FTPs,ICMP,IGMPv3,RTSP,RTCP, RTP,ARP | |
| DDNS | NoIP, Change IP | |
| Time and Date | Manual, NTP, and Daylight saving | |
| FTP recording | Linked "Schedule" and "Events" | |
| Linked "Events" | ||
| OS | Windows® XP, Windows Vista® Business, Windows® 7 professional | |
| Brouser | Internet Explorer® Ver. 8 and Ver. 9 | |
| General | Power supply | AC24V ± 10 % 50-60 Hz, PoE+(IEEE802.3at) |
| Consumption current | 2.25A | |
| Operating temperature (*3) | -30 to 50°C (AC24) pre-heat 3H | |
| -10 to 50°C (PoE+) pre-heat 1H | ||
| Storage temperature | -30 to 60°C | |
| Operating humidity | ~90%RH | |
| Dimensions | (DxH) 216.14mm(8.5") X 360.19mm(14.2") | |
| Weight | 3800g (8.14lb) | |
| Regulation | Radiation Standard FCC Class A, IC Class A | |
| Safety Standard UL 60950-1, CSA C22.2 No. 60950-1 | ||
| IP Code IP66 | ||
- Designs and specifications may change without prior notice for better improvement.
- Screens, photos, illustrations and other diagrams contained in this user's manual may slightly change from actual ones.
*1: Varies in accordance with the object, image quality, network environment and performance of the personal computer used.
*2: The sound may not be clear depending on the conditions of the lines.
*3: When the camera is installed and operated in low temperatures below -10ircC {14°F}, normal images may not be obtained immediately after startup. In such a case, wait until the camera warms up and start adjustment after turning on the power again.
Technology License Notice
About the software
This product contains a piece of software licensed to TOSHIBA CORPORATION (hereafter TOSHIBA) by a third party. The copyright and other intellectual property rights of the software are held by this third party or the licensor. The software is protected by the Copyright Law, Universal Copyright Convention, and other intellectual property laws and agreements. The permission of Toshiba and the third party must therefore be obtained before the software can be reproduced. Contact Toshiba if you need it for more information at http://www.toshibasecurity.com/support/firmware.jsp.
End-user License Agreement on Free Software Components Used in the TOSHIBA Network Camera
GNU GENERAL PUBLIC LICENSE
Version 2, June 1991
Copyright (C) 1989, 1991 Free Software Foundation, Inc.
51 Franklin Street, Fifth Floor, Boston, MA 02110-1301 USA
Everyone is permitted to copy and distribute verbatim copies of this license document, but changing it is not allowed.
Preamble
The licenses for most software are designed to take away your freedom to share and change it. By contrast, the GNU General Public License is intended to guarantee your freedom to share and change free software--to make sure the software is free for all its users. This General Public License applies to most of the Free Software Foundation's software and to any other program whose authors commit to using it. (Some other Free Software Foundation software is covered by the GNU Lesser General Public License instead.) You can apply it to your programs, too. When we speak of free software, we are referring to freedom, not price. Our General Public Licenses are designed to make sure that you have the freedom to distribute copies of free software (and charge for this service if you wish), that you receive source code or can get it if you want it, that you can change the software or use pieces of it in new free programs; and that you know you can do these things.
To protect your rights, we need to make restrictions that forbid anyone to deny you these rights or to ask you to surrender the rights. These restrictions translate to certain responsibilities for you if you distribute copies of the software, or if you modify it.
For example, if you distribute copies of such a program, whether gratis or for a fee, you must give the recipients all the rights that you have. You must make sure that they, too, receive or can
get the source code. And you must show them these terms so they know their rights.
We protect your rights with two steps: (1) copyright the software, and (2) offer you this license which gives you legal permission to copy, distribute and/or modify the software.
Also, for each author's protection and ours, we want to make certain that everyone understands that there is no warranty for this free software. If the software is modified by someone else and passed on, we want its recipients to know that what they have is not the original, so that any problems introduced by others will not reflect on the original authors' reputations.
Finally, any free program is threatened constantly by software patents. We wish to avoid the danger that redistributors of a free program will individually obtain patent licenses, in effect making the program proprietary. To prevent this, we have made it clear that any patent must be licensed for everyone's free use or not licensed at all.
The precise terms and conditions for copying, distribution and modification follow.
GNU GENERAL PUBLIC LICENSE
TERMS AND CONDITIONS FOR COPYING, DISTRIBUTION AND MODIFICATION
- This License applies to any program or other work which contains a notice placed by the copyright holder saying it may be distributed under the terms of this General Public License.
The "Program", below, refers to any such program or work, and a "work based on the Program" means either the Program or any derivative work under copyright law: that is to say, a work containing the Program or a portion of it, either verbatim or with modifications and/or translated into another language. (Hereinafter, translation is included without limitation in the term "modification".) Each licensee is addressed as "you".
Activities other than copying, distribution and modification are not covered by this License; they are outside its scope. The act of running the Program is not restricted, and the output from the Program is covered only if its contents constitute a work based on the Program (independent of having been made by running the Program). Whether that is true depends on what the Program does.
- You may copy and distribute verbatim copies of the Program's source code as you receive it, in any medium, provided that you conspicuously and appropriately publish on each copy an appropriate copyright notice and disclaimer of warranty; keep intact all the notices that refer to this License and to the absence of any warranty; and give any other recipients of the Program a copy of this License along with the Program.
You may charge a fee for the physical act of transferring a copy, and you may at your option offer warranty protection in exchange for a fee.
- You may modify your copy or copies of the Program or any portion of it, thus forming a work based on the Program, and copy and distribute such modifications or work under the terms of Section 1 above, provided that you also meet all of these conditions:
a) You must cause the modified files to carry prominent notices stating that you changed the
files and the date of any change.
b) You must cause any work that you distribute or publish, that in whole or in part contains or is derived from the Program or any part thereof, to be licensed as a whole at no charge to all third parties under the terms of this License.
c) If the modified program normally reads commands interactively when run, you must cause it, when started running for such interactive use in the most ordinary way, to print or display an announcement including an appropriate copyright notice and a notice that there is no warranty (or else, saying that you provide a warranty) and that users may redistribute the program under these conditions, and telling the user how to view a copy of this License. (Exception: if the Program itself is interactive but does not normally print such an announcement, your work based on the Program is not required to print an announcement.)
These requirements apply to the modified work as a whole. If identifiable sections of that work are not derived from the Program, and can be reasonably considered independent and separate works in themselves, then this License, and its terms, do not apply to those sections when you distribute them as separate works. But when you distribute the same sections as part of a whole which is a work based on the Program, the distribution of the whole must be on the terms of this License, whose permissions for other licensees extend to the entire whole, and thus to each and every part regardless of who wrote it.
Thus, it is not the intent of this section to claim rights or contest your rights to work written entirely by you; rather, the intent is to exercise the right to control the distribution of derivative or collective works based on the Program.
In addition, mere aggregation of another work not based on the Program with the Program (or with a work based on the Program) on a volume of a storage or distribution medium does not bring the other work under the scope of this License.
- You may copy an d distribute the Program (or a work based on it, under Section 2) in object code or executable form under the terms of Sections 1 and 2 above provided that you also do one of the following:
a) Accompany it with the complete corresponding machine-readable source code, which must be distributed under the terms of Sections 1 and 2 above on a medium customarily used for software interchange; or,
b) Accompany it with a written offer, valid for at least three years, to give any third party, for a charge no more than your cost of physically performing source distribution, a complete machine-readable copy of the corresponding source code, to be distributed under the terms of Sections 1 and 2 above on a medium customarily used for software interchange; or, c) Accompany it with the information you received as to the offer to distribute corresponding source code. (This alternative is allowed only for noncommercial distribution and only if you received the program in object code or executable form with such an offer, in accord with
Subsection b above.)
The source code for a work means the preferred form of the work for making modifications to it. For an executable work, complete source code means all the source code for all modules it contains, plus any associated interface definition files, plus the scripts used to control compilation and installation of the executable. However, as a special exception, the source code distributed need not include anything that is normally distributed (in either source or binary form) with the major components (compiler, kernel, and so on) of the operating system on which the executable runs, unless that component itself accompanies the executable.
If distribution of executable or object code is made by offering access to copy from a designated place, then offering equivalent access to copy the source code from the same place counts as distribution of the source code, even though third parties are not compelled to copy the source along with the object code.
-
You may not copy, modify, sublicense, or distribute the Program except as expressly provided under this License. Any attempt otherwise to copy, modify, sublicense or distribute the Program is void, and will automatically terminate your rights under this License. However, parties who have received copies, or rights, from you under this License will not have their licenses terminated so long as such parties remain in full compliance.
-
You are not required to accept this License, since you have not signed it. However, nothing else grants you permission to modify or distribute the Program or its derivative works. These actions are prohibited by law if you do not accept this License. Therefore, by modifying or distributing the Program (or any work based on the Program), you indicate your acceptance of this License to do so, and all its terms and conditions for copying, distributing or modifying the Program or works based on it.
-
Each time you redistribute the Program (or any work based on the Program), the recipient automatically receives a license from the original licensor to copy, distribute or modify the Program subject to these terms and conditions. You may not impose any further restrictions on the recipients' exercise of the rights granted herein. You are not responsible for enforcing compliance by third parties to this License.
-
If, as a consequence of a court judgment or allegation of patent infringement or for any other reason (not limited to patent issues), conditions are imposed on you (whether by court order, agreement or otherwise) that contradict the conditions of this License, they do not excuse you from the conditions of this License. If you cannot distribute so as to satisfy simultaneously your obligations under this License and any other pertinent obligations, then as a consequence you may not distribute the Program at all. For example, if a patent license would not permit royalty-free redistribution of the Program by all those who receive copies directly or indirectly through you, then the only way you could satisfy both it and this License would be to refrain entirely from distribution of the Program.
If any portion of this section is held invalid or unenforceable under any particular circumstance,
the balance of the section is intended to apply and the section as a whole is intended to apply in other circumstances.
It is not the purpose of this section to induce you to infringe any patents or other property right claims or to contest validity of any such claims; this section has the sole purpose of protecting the integrity of the free software distribution system, which is implemented by public license practices. Many people have made generous contributions to the wide range of software distributed through that system in reliance on consistent application of that system; it is up to the author/donor to decide if he or she is willing to distribute software through any other system and a licensee cannot impose that choice.
This section is intended to make thoroughly clear what is believed to be a consequence of the rest of this License.
-
If the distribution and/or use of the Program is restricted in certain countries either by patents or by copyrighted interfaces, the original copyright holder who places the Program under this License may add an explicit geographical distribution limitation excluding those countries, so that distribution is permitted only in or among countries not thus excluded. In such case, this License incorporates the limitation as if written in the body of this License.
-
The Free Software Foundation may publish revised and/or new versions of the General Public License from time to time. Such new versions will be similar in spirit to the present version, but may differ in detail to address new problems or concerns.
Each version is given a distinguishing version number. If the Program specifies a version number of this License which applies to it and "any later version", you have the option of following the terms and conditions either of that version or of any later version published by the Free Software Foundation. If the Program does not specify a version number of this License, you may choose any version ever published by the Free Software Foundation.
- If you wish to incorporate parts of the Program into other free programs whose distribution conditions are different, write to the author to ask for permission. For software which is copyrighted by the Free Software Foundation, write to the Free Software Foundation; we sometimes make exceptions for this. Our decision will be guided by the two goals of preserving the free status of all derivatives of our free software and of promoting the sharing and reuse of software generally.
NO WARRANTY
- BECAUSE THE PROGRAM IS LICENSED FREE OF CHARGE, THERE IS NO WARRANTY FOR THE PROGRAM, TO THE EXTENT PERMITTED BY APPLICABLE LAW. EXCEPT WHEN OTHERWISE STATED IN WRITING THE COPYRIGHT HOLDERS AND/OR OTHER PARTIES PROVIDE THE PROGRAM "AS IS" WITHOUT WARRANTY OF ANY KIND, EITHER EXPRESSED OR IMPLIED, INCLUDING, BUT NOT LIMITED TO, THE IMPLIED WARRANTIES OF MERCHANTABILITY AND FITNESS FOR A PARTICULAR PURPOSE. THE ENTIRE RISK AS TO THE QUALITY AND PERFORMANCE OF THE PROGRAM IS WITH
YOU. SHOULD THE PROGRAM PROVE DEFECTIVE, YOU ASSUME THE COST OF ALL NECESSARY SERVICING, REPAIR OR CORRECTION.
- IN NO EVENT UNLESS REQUIRED BY APPLICABLE LAW OR AGREED TO IN WRITING WILL ANY COPYRIGHT HOLDER, OR ANY OTHER PARTY WHO MAY MODIFY AND/OR REDISTRIBUTE THE PROGRAM AS PERMITTED ABOVE, BE LIABLE TO YOU FOR DAMAGES, INCLUDING ANY GENERAL, SPECIAL, INCIDENTAL OR CONSEQUENTIAL DAMAGES ARISING OUT OF THE USE OR INABILITY TO USE THE PROGRAM (INCLUDING BUT NOT LIMITED TO LOSS OF DATA OR DATA BEING RENDERED INACCURATE OR LOSSES SUSTAINED BY YOU OR THIRD PARTIES OR A FAILURE OF THE PROGRAM TO OPERATE WITH ANY OTHER PROGRAMS), EVEN IF SUCH HOLDER OR OTHER PARTY HAS BEEN ADVISED OF THE POSSIBILITY OF SUCH DAMAGES.
END OF TERMS AND CONDITIONS
How to Apply These Terms to Your New Programs
If you develop a new program, and you want it to be of the greatest possible use to the public, the best way to achieve this is to make it free software which everyone can redistribute and change under these terms.
To do so, attach the following notices to the program. It is safest to attach them to the start of each source file to most effectively convey the exclusion of warranty; and each file should have at least the "copyright" line and a pointer to where the full notice is found.
Copyright (C)
This program is free software; you can redistribute it and/or modify it under the terms of the GNU General Public License as published by the Free Software Foundation; either version 2 of the License, or (at your option) any later version.
This program is distributed in the hope that it will be useful, but WITHOUT ANY WARRANTY; without even the implied warranty of MERCHANTABILITY or FITNESS FOR A PARTICULAR PURPOSE. See the GNU General Public License for more details.
You should have received a copy of the GNU General Public License along with this program; if not, write to the Free Software Foundation, Inc., 51 Franklin Street, Fifth Floor, Boston, MA 02110-1301 USA
Also add information on how to contact you by electronic and paper mail.
If the program is interactive, make it output a short notice like this when it starts in an interactive mode:
Gnomovision version 69, Copyright (C) year name of author
Gnomovision comes with ABSOLUTELY NO WARRANTY; for details type `show w'.
This is free software, and you are welcome to redistribute it under certain conditions; type `show c' for details.
The hypothetical commands `show w' and `show c' should show the appropriate parts of the
General Public License. Of course, the commands you use may be called something other than `show w' and `show c'; they could even be mouse-clicks or menu items--whatever suits your program.
You should also get your employer (if you work as a programmer) or your school, if any, to sign a "copyright disclaimer" for the program, if necessary. Here is a sample; alter the names:
Yoyodyne, Inc., hereby disclaims all copyright interest in the program `Gnomovision' (which makes passes at compilers) written by James Hacker.
Ty Coon, President of Vice
This General Public License does not permit incorporating your program into proprietary programs. If your program is a subroutine library, you may consider it more useful to permit linking proprietary applications with the library. If this is what you want to do, use the GNU Lesser General Public License instead of this License.

- Model: IK-WP41A
- Table of Contents
- Introduction
- FCC (USA)-INFORMATION
- Terms and Trademarks
- NOTE
- Important Safeguards
- Read Instructions
- Retain Instructions
- Warnings
- Follow Instructions
- Cleaning
- Attachments
- Accessories
- Ventilation
- Power Sources
- Power-Cord Protection
- Installation
- Lightning
- Overloading
- Object and Liquid Entry
- Servicing
- Damage Requiring Service
- Replacement Parts
- Safety Check
- Important Safeguards (Cont.)
- WARNING:
- FIELD INSTALLATION MARKING:
- NOTICE
- Notes on Use and Installation
- Precautions for Use
- Disclaimer
- Copyright and Right of Portrait
- Protection of Personal Information
- Usage Limitation
- Package Contents
- Physical Description
- Hardware Reset
- Micro SD/SDHC Card and Capacity
- Installation
- Hardware Installation
- Network Deployment
- Micro SD/SDHC Card Installation
- NOTE:
- Accessing the Network Camera
- Using Web Browsers
- Using RTSP Players
- Live Video
- MENU
- PTZ Control
- Pan/Tilt
- Zoom / Focus / Iris
- Preset
- Scan
- Auto :
- Frame:
- Random:
- Auto Patrol
- One Push WB
- Other
- Snapshot
- Resize OFF/ON
- Close
- Configuration
- Camera Settings
- Basic Settings
- Image
- Power Up
- Tilt-Angle
- Pan / Tilt
- Image:
- ● Automatic Exposure
- Power Up:
- Tilt-Angle:
- Pan / Tilt:
- Privacy Zone Mask
- Video Codec
- Alarm
- - Alarm In1 to Alarm In6
- Motion Detection
- - Alarm Output
- Alarm Output
- SD Recording
- Recording Condition
- Cycle Recording
- Schedule Recording Table
- FTP Recording
- FTP Recording Conditions
- - Schedule Recording
- ● Event Recording Setting
- a) Recording by Alarm In
- b) Recording by Motion
- FTP Server Settings - Server 1 and 2
- FTP Server Usage
- SD Card Back Up when connection failed
- Authentication Settings:
- - Authentication
- Condition Settings of Alarm In / Condition Settings of Motion Detection:
- E-mail Address list:
- Audio
- Network Settings
- Basic
- DDNS
- ChangelP.com
- No-IP.com
- Server.
- FTP Server
- Administrator
- Password
- Administrator Information:
- User List:
- Date/Time
- - Daylight saving
- FW Update
- Maintenance
- - Import Configuration Settings
- Import Configuration Settings
- Export Configuration Settings
- Reboot Camera
- Event Log
- Event Log - Browse and delete
- Log Browse
- Filter Settings
- Technology License Notice
- About the software
- End-user License Agreement on Free Software Components Used in the TOSHIBA Network Camera
- Preamble
- GNU GENERAL PUBLIC LICENSE
- TERMS AND CONDITIONS FOR COPYING, DISTRIBUTION AND MODIFICATION
- Subsection b above.)
- NO WARRANTY
- END OF TERMS AND CONDITIONS
Brand : TOSHIBA
Model : IK-WP41A
Category : Security Camera