
VR250D - Concrete Vibrator MAKITA - Free user manual and instructions
Find the device manual for free VR250D MAKITA in PDF.


| Product Type | Concrete Vibrator |
| Brand | Makita |
| Model | VR250D |
| Vibrations per Minute | 13,000 VPM |
| Vibration Amplitude | 1.1 mm |
| Vibrating Head Dimensions (Diameter x Length) | 25 mm x 221 mm |
| Flexible Shaft Assembly Length | 800 mm |
| Overall Length | 1,031 mm |
| Net Weight (with Battery Cartridge) | 2.9 kg |
| Rated Voltage | DC 12 V |
| Power Source | Makita 12V slide-type battery (sold separately) |
| Intended Use | Removing air bubbles from concrete during casting |
| Effective Vibration Range | Approximately 250 mm (10x head diameter) |
| Sound Pressure Level (Typical) | 70 dB(A); may exceed 85 dB(A) under load |
| Vibration Acceleration | Not more than 2.5 m/s² |
| Safety Feature | Hands and face must be kept away from vibrating head during operation |
| Maintenance | Clean with wet cloth after use; avoid water ingress; do not bend flexible hose |
| Accessories (Sold Separately) | Various Makita genuine batteries and chargers |
| Compliance | CE, EN50260, EN55014 |
| Battery Cartridge Lock | Slide-on with click lock; always switch off before insertion/removal |
Frequently Asked Questions - VR250D MAKITA
User questions about VR250D MAKITA
0 question about this device. Answer the ones you know or ask your own.
Ask a new question about this device
Download the instructions for your Concrete Vibrator in PDF format for free! Find your manual VR250D - MAKITA and take your electronic device back in hand. On this page are published all the documents necessary for the use of your device. VR250D by MAKITA.
USER MANUAL VR250D MAKITA

1

2
3

4
1 Button
2 Battery cartridge
3 C o v e r
4 Switch trigger
5 Slope
SPECIFICATIONS
Model VR250D
Vibrations per minute 13,000 VPM
Vibration amplitude 1.1 mm
Vibrating head
(diameter x length) 25 mm x 221 mm
Flexible shaft assembly length 800 mm
Overall length 1,031 mm
Net weight (with battery cartridge) 2.9 kg
Rated voltage D.C. 12 V
- Due to our continuing program of research and development, the specifications herein are subject to change without notice.
- Note: Specifications may differ from country to country.
Intended use
The tool is intended for removing bubbles from concrete when casting concrete.
Safety hints
For your own safety, please refer to the enclosed safety instructions.
IMPORTANT SAFETY INSTRUCTIONS FOR CHARGER & BATTERY CARTRIDGE
ENC004-1
-
Before using battery cartridge, read all instructions and cautionary markings on (1) battery charger, (2) battery, and (3) product using battery.
-
Do not disassemble battery cartridge.
-
If operating time has become excessively shorter, stop operating immediately. It may result in a risk of overheating, possible burns and even an explosion.
-
If electrolyte gets into your eyes, rinse them out with clear water and seek medical attention right away. It may result in loss of your eyesight.
-
Always cover the battery terminals with the battery cover when the battery cartridge is not used.
-
Do not short the battery cartridge:
(1) Do not touch the terminals with any conductive material.
(2) Avoid storing battery cartridge in a container with other metal objects such as nails, coins, etc.
(3) Do not expose battery cartridge to water or rain.
A battery short can cause a large current flow, overheating, possible burns and even a breakdown.
-
Do not store the tool and battery cartridge in locations where the temperature may reach or exceed 50° C ( 122° F).
-
Do not incinerate the battery cartridge even if it is severely damaged or is completely worn out. The battery cartridge can explode in a fire.
- Be careful not to drop or strike battery.
SAVE THESE INSTRUCTIONS.
Tips for maintaining maximum battery life
-
Charge the battery cartridge before completely discharged. Always stop tool operation and charge the battery cartridge when you notice less tool power.
-
Never recharge a fully charged battery cartridge. Overcharging shortens the battery service life.
- Charge the battery cartridge with room temperature at 10° C – 40° C ( 50° F – 104° F). Let a hot battery cartridge cool down before charging it.
- Charge the Nickel Metal Hydride battery cartridge when you do not use it for more than six months.
ADDITIONAL SAFETY RULES FOR TOOL
- Always keep your hands and face away from vibrating head when operating.
- Switch off the tool immediately if you notice abnormal noise or something faulty during operation.
- Inspect the tool carefully for breakage, cracks or deformation if you accidentally drop it or strike it against something.
- Do not charge the battery cartridge in locations where lacquer, paint, benzene, thinner, gasoline, gas or adhesive are stored/used.
- Do not charge on cardboard or paper, cloth or bedding, straw mats, carpeting, vinyl or the like.
- Do not charge in a dusty place or where lint accumulates.
- Do not allow pieces of metal, water or other foreign objects to get into the charger port where the charging terminals are located.
- Do not carry the tool with finger on switch.
- Do not set the tool down and switch it on. The vibrating head may whip around out of control and cause an accident.
- Be careful not to allow water, wet concrete or the like to get into the tool. Do not let the tool fall into wet concrete.
- Insert the vibrating head carefully between iron/steel frames or reinforcing rods not to come in contact with them.
- Do not crush or twist the flexible hose.
- Do not overly bend the flexible hose.
- Use a wet cloth or the like to carefully wipe off any wet concrete left on the tool after use. Extra care should be given to thorough cleaning of the vents, switch area, cover openings, etc.
SAVE THESE INSTRUCTIONS.
OPERATING INSTRUCTIONS
Installing or removing battery cartridge (Fig.1)
- Always switch off the tool before insertion or removal of the battery cartridge.
- To remove the battery cartridge, open the cover and withdraw the battery cartridge from the tool while pressing the buttons on both sides of the cartridge.
- To insert the battery cartridge, align the tongue on the battery cartridge with the groove in the housing and slip it into place. Always insert it all the way until it locks in place with a little click. If not, it may accidentally fall out of the tool, causing injury to you or someone around you.
- Do not use force when inserting the battery cartridge. If the cartridge does not slide in easily, it is not being inserted correctly.
Switch action (Fig. 2)
CAUTION:
Before inserting the battery cartridge into the tool, always check to see that the switch trigger actuates properly and returns to the "OFF" position when released.
To start the tool, simply pull the trigger. Release the trigger to stop.
Operation (Fig. 3)
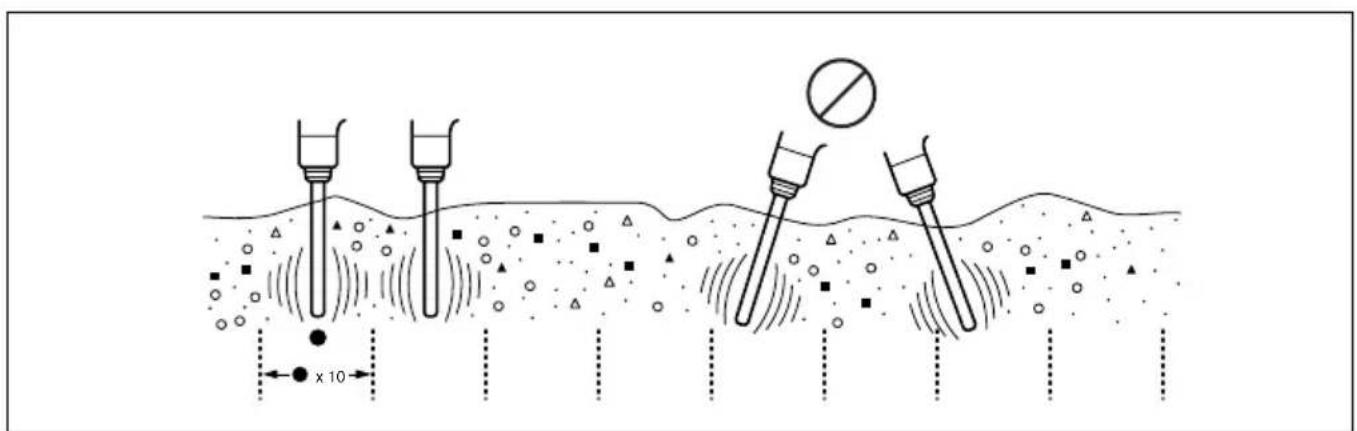
Hold the tool straight when inserting/operating. Use the tool within the effective vibration range at equidistant intervals. The effective air bubble removal range is about ten times the diameter of the vibrating head, or around 250 mm with this tool.
Do not use this tool to move concrete within a form. The mortar will just move away and the coarse aggregate will remain, causing segregation.
Effective leveling and removal of air bubbles
Removal of the air bubbles is complete after you have worked the tool throughout each effective range, the concrete stops shrinking, and the mortar has risen evenly to the surface, giving off a light appearance. Gently remove the operating tool not to leave holes.
NOTE:
- Vibrating too long in a single place causes concrete segregation.
- When the coarse aggregate segregates when placing concrete, shovel out the coarse aggregate and put it where there is plenty of mortar. Then use the tool on it. Don't leave coarse aggregate in the segregated condition.
When concreting a slope site, always pour from the bottom at the beginning. This way the weight of the freshly poured concrete and vibration will lead to effective removal of air bubbles. (Fig. 4)
Conversely, if the pouring is done first from above, the mortar will separate and eventually slide to the bottom.
MAINTENANCE
CAUTION:
Always be sure that the tool is switched off and the battery cartridge is removed before carrying out any work on the tool.
To maintain product safety and reliability, repairs, maintenance or adjustment should be carried out by a Makita Authorized Service Center.
ACCESSORIES
CAUTION:
- These accessories or attachments are recommended for use with your Makita tool specified in this manual. The use of any other accessories or attachments might present a risk of injury to persons. Only use accessory or attachment for its stated purpose.
If you need any assistance for more details regarding these accessories, ask your local Makita service center.
- Various type of Makita genuine batteries and chargers
1 Knop
2 Blokbatterij
3 Deksel
4 Trekschakelaar
5 Schuin terrein
TECHNISCHE GEGEVENS
Model VR250D
Trillingen per minuut ....13 000
Trilbreedte 1,1 mm
Trilnaald (diameter x lengte) 25 mm x 221 mm
VEILIGHEIDSVOORSCHRIFTEN VOOR ACCULADER EN ACCU
EC-DECLARATION OF CONFORMITY
The undersigned, Yasuhiko Kanzaki, authorized by Makita Corporation, 3-11-8 Sumiyoshi-Cho, Anjo, Aichi 446-8502 Japan declares that this product
(Serial No.: series production)
manufactured by Makita Corporation in Japan is in compliance with the following standards or standardized documents,
EN50260, EN55014
in accordance with Council Directives, 89/336/EEC and 98/37/EC.
FRANÇAISE
DÉCLARATION DE CONFORMITÉ CE
Michigan Drive, Tongwell, Milton Keynes, Bucks MK15 8JD, ENGLAND
PORTUGUÊS
EU-DEKLARATION OM KONFORMITET
Undertegnede, Yasuhiko Kanzaki, med fuldmagt fra Makita Corporation, 3-11-8 Sumiyoshi-Cho, Anjo, Aichi 446-8502 Japan, erklærer hermed, at dette produkt (Løbenummer: serieproduktion)
Michigan Drive, Tongwell, Milton Keynes,
Bucks MK15 8JD, ENGLAND
ENGLISH
Noise and vibration
The typical A-weighted sound pressure level is 70 dB (A).
The noise level under working may exceed 85 dB (A).
- Wear ear protection. -
The typical weighted root mean square acceleration value is not more than 2.5 m/s2 .
FRANÇAISE
Bruit et vibrations
- SPECIFICATIONS
- MODEL VR250D
- INTENDED USE
- SAFETY HINTS
- IMPORTANT SAFETY INSTRUCTIONS FOR CHARGER & BATTERY CARTRIDGE
- SAVE THESE INSTRUCTIONS
- TIPS FOR MAINTAINING MAXIMUM BATTERY LIFE
- ADDITIONAL SAFETY RULES FOR TOOL
- OPERATING INSTRUCTIONS
- INSTALLING OR REMOVING BATTERY CARTRIDGE (FIG.1)
- SWITCH ACTION (FIG. 2)
- CAUTION
- OPERATION (FIG. 3)
- EFFECTIVE LEVELING AND REMOVAL OF AIR BUBBLES
- NOTE
- MAINTENANCE
- ACCESSORIES
- TECHNISCHE GEGEVENS
- VEILIGHEIDSVOORSCHRIFTEN VOOR ACCULADER EN ACCU
- EC-DECLARATION OF CONFORMITY
- FRANÇAISE
- DÉCLARATION DE CONFORMITÉ CE
- PORTUGUÊS
- EU-DEKLARATION OM KONFORMITET
- ENGLISH
- NOISE AND VIBRATION
- BRUIT ET VIBRATIONS
Brand : MAKITA
Model : VR250D
Category : Concrete Vibrator