02110 - Heating Fire Sense - Free user manual and instructions
Find the device manual for free 02110 Fire Sense in PDF.


| Brand | Fire Sense |
| Model | 02110 |
| Product Type | Portable Electric Heater |
| Heating Technology | Ceramic Fan Heater |
| Power Rating | 1500W |
| Voltage | 120V / 60Hz |
| Heating Levels | Low (900W), High (1500W) |
| Thermostat | Adjustable thermostat with auto temperature control |
| Fan Modes | Fan-only, low heat, high heat |
| Oscillation | Yes, 60° wide-angle oscillation |
| Timer | Yes, up to 10 hours |
| Dimensions (L x W x H) | 10.6 x 7.5 x 12.2 inches (27 x 19 x 31 cm) |
| Weight | 3.5 lbs (1.6 kg) |
| Safety Features | Tip-over shutdown, overheat protection, cool-touch housing |
| Filter | Washable dust filter |
| Noise Level | Low noise (approx. 45 dB) |
| Power Cord Length | 5 feet (1.5 m) |
| Controls | Touch panel with LED display, remote control included |
| Maintenance | Clean filter every 2 weeks; wipe exterior with damp cloth |
| Spare Parts | Heating element, fan motor, control board, remote |
| Repairability | Screw-open base; parts available via manufacturer |
| Warranty | 1 year limited warranty |
Frequently Asked Questions - 02110 Fire Sense
User questions about 02110 Fire Sense
0 question about this device. Answer the ones you know or ask your own.
Ask a new question about this device
Download the instructions for your Heating in PDF format for free! Find your manual 02110 - Fire Sense and take your electronic device back in hand. On this page are published all the documents necessary for the use of your device. 02110 by Fire Sense.
USER MANUAL 02110 Fire Sense
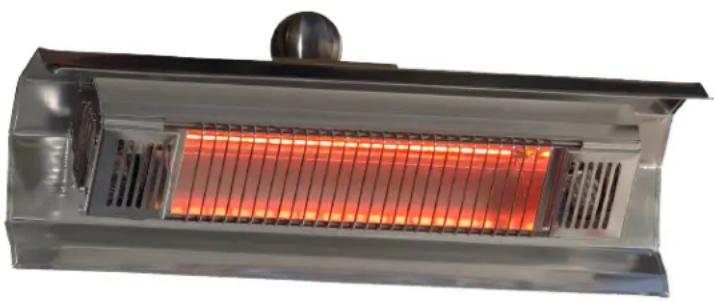
Wall-Mountable Infrared Heater
Item#: 02110 / 60460
natural_image
Exterior view of a modern outdoor heating unit with red LED lighting (no text or symbols visible)WARNING
FOR YOUR SAFETY
- Improper installation, adjustment, alteration, service or maintenance can cause injury or property damage.
- Read the installation, operation, and maintenance instructions thoroughly before installing or servicing this equipment.
- Failure to follow these instructions could result in fire or explosion, which could cause property damage, personal injury, or death.

CAUTION Risk of Electric Shock — Do not open.
No user - serviceable parts inside.

NOTICE:
Recommended for SHELTERED exterior use or indoor use. Do NOT expose to rain or moisture.
For residential use only.

3154846
UNIT MUST BE ON A DEDICATED ELECTRICAL CIRCUIT.
PLEASE READ THESE INSTRUCTIONS CAREFULLY BEFORE USING YOUR NEW HEATER.
WARNING
This product can expose you to chemicals including Lead, Chromium (hexavalent compounds). Di(2-ethylhexyl) phthalate (DEHP) and Diisononyl phthalate (DINP), which are known to the State of California to cause cancer and birth defects or other reproductive harm. For more information, go to www.P65Warnings.ca.gov.

ATTACH YOUR RECEIPT HERE
Keep a copy of your proof of purchase or order confirmation which will be needed if you need to contact us about warranty coverage.
Purchase Date: ____

Questions, problems, missing parts?
Before returning to your retailer, our Florida-based customer service team is available:
Call toll-free
(866) 985-7877
9 a.m. - 9 p.m., EST
9 a.m. - 6 p.m., EST, Monday - Friday
TABLE OF CONTENTS
Before You Begin Page 2
Safety Information Pages 3-4
Package Contents Page 5
Assembly Page 6
Adjustment & Operation Page 7
Specifications, Storage & Maintenance Page 10
Bulb Replacement Page 9
Troubleshooting Page 10
Warranty Page 11

BEFORE YOU BEGIN
Please read and understand this entire manual before attempting to assemble, operate or install this appliance. If you have any questions regarding the product, please contact Customer Service. (English & Spanish speaking.)
Call toll-free 9 a(866)985+7.828T
Email cservice@welltraveled.net
Live chat www.balkenehome.com 9 a.m. - 6 p.m., EST, Monday - Friday
This manual contains important information about the assembly, operation and maintenance of this appliance. General safety information is presented in the first few pages and is also located throughout this manual. Keep this manual for future reference and to educate new users of this appliance.

SAFETY

DANGER
Indicates a potentially hazardous situation which, if not avoided, WILL result in serious injury or death.

CAUTION
Indicates a potentially hazardous situation which, if not avoided, MAY result in moderate injury or damage to the equipment.

WARNING
To Reduce the Risk of Fire
- Do not place any objects such as furniture, papers, clothes and curtains within 3 ft. / .91 m of the head of the heater and keep them away from the sides and rear when the heater is plugged in.
- Do not place the heater near a bed because objects such as pillows or blankets can be ignited by the heater.
- Always unplug the heater if it is not being used.
- Avoid using an extension cord because the extension cord may overheat and cause a risk of fire. However, if you must us an extension cord, the cord should be N014 AWG minimum size and rated not less than 1875 watts.

WARNING
Indicates a potentially hazardous situation which, if not avoided, COULD result in serious injury or death.
NOTICE
Indicates important information which, if not followed, MAY result in damage to the equipment.

CAUTION Risk of Fire
Keep combustible materials such as furniture, papers, clothes and curtains at least .91 m / 3 ft from the front, sides and rear of the heating unit.

CAUTION Risk of Electric Shock — Do not open.
No user-serviceable parts inside.
• Children of less than 8 years old should be kept away unless continually supervised.
• Children aged less than 8 years old shall only switch on/off the appliance provided that is has been placed or installed in its intended normal operating position and they have been given supervision or instruction concerning use of the appliance in a safe way and understand the hazards involved. Children aged under 8 years old shall not plug in, regulate or clean the appliance, or perform user maintenance.
- CAUTION: Some parts of this product can become very hot and cause burns. Particular attention must be given where children and vulnerable people are present.
• Children shall not play with appliance. Cleaning and user maintenance shall not be done by children.
- When the power cord is damaged, it must be replaced by authorized agent or other trained professional to avoid danger.
• DO NOT position immediately above or below an electrical socket to minimize risk of encountering electrical wiring during installation.
WARNING: This heater is not equipped with a device to control the room temperature. Do not use this heater in small rooms when they are occupied by persons not capable of leaving the room on their own, unless constant supervision is provided.

LISTING APPROVALS
This heater has been tested in accordance with the ETL standards.
| Model Number Length Height Depth | |||
| 02110 / 60460 22.125"" 7.25" 8.25" | |||
| Description | Wall-Mountable Quartz Halogen Infrared Heater | ||
| Voltage 120V AC, 60Hz | |||
| Amps 12.5 amps | |||
| Wattage 1500W | |||
| Min. Install/Operation Height 84" (7 ft.) | |||

IMPORTANT SAFETY INSTRUCTIONS
When using electrical appliances, to reduce the risk of fire, electric shock and injury to persons, always follow basic precautions, including the following:
- Read all instructions before use.
- This heater is very hot when in use. To avoid burns, do not let bare skin touch hot surfaces. Grasp only non-heating surfaces when moving this heater.
- Keep flammable materials such as furniture, pillows, bedding, papers, clothes, and 3 ft/1 m or further away from the front, sides, and back of heater.
-
Extreme caution is necessary when any heater is used by or near children or invalids. Whenever the heater is in operation it must not be left unattended.
-
Always unplug the heater when not in use.
-
Do not operate any heater with damaged cord or plug or after the heater has malfunctioned or has been dropped or damaged in any manner. Return heater to an authorized service facility for repair.
-
This heater is not intended for use in bathrooms, laundry areas and similar areas where water may be present. Never locate heater where it may fall into a bathtub, spa, pool, or other water container or body of water.
-
Do not run cord under carpeting. Do not cover cord with throw rugs, runners or the like. Arrange cord away from traffic areas and where it will not be tripped over.
-
To disconnect heater, turn switch to off, then remove plug from outlet.
-
Connect to properly grounded outlet only.
-
Do not insert or allow foreign objects to enter any ventilation or exhaust opening as this may cause an electric shock or fire or damage the heater.
-
To prevent a possible fire, do not block air passages or exhaust ventilation in any manner.
-
Do not use on soft surfaces, like a bed, where openings may become blocked.
-
A heater has hot and arcing or sparking parts inside. Do not use it in areas where gasoline, paint or flammable liquids are used or stored.
-
Use this heater only as described in manual. Any other use not recommended by the manufacturer may cause fire, electric shock, or injury to persons.
-
Avoid using an extension cord because the extension cord may overheat and there is a risk of fire. However, if you must use an extension cord, use either a 12-gauge or 14-gauge wire which is rated not less than 1900 watts. The recommended length for a 14-gauge is up to 50 feet but if you must use a longer cord, use a 12-gauge NO LONGER THAN 100 feet.
-
Always use properly grounded outlets; the appliance may break fused and polarized outlets.
-
Always disconnect power before performing any cleaning or maintenance or relocating the heater.
-
When transporting or storing the heater, keep in a dry place, free from excessive vibration and store to avoid damage.
-
While every effort is made to ensure packing materials are kept outside of the plastic bag which covers your heater in the box, there is some chance that material may lodge itself in the heater part of the unit. If you notice this on inspection, please remove it.
-
When turning on your heater for the first time, it is normal for the heater to emit a mild "new heater" smell which quickly passes.
-
This heater is to be used on a 110 / 120 V, 11.2 AMP, grounded circuit. Do not use in an outlet controlled by a switch or dimmer switch. The cord supplied with the heater has a 2 blade plug with a round pin on the plug for grounding purposes. If a 3-slot receptacle/outlet is not available, you must use an adapter which must be properly grounded to the outlet box. Avoid plugging other appliances into the same circuit as the heater. This unit comes equipped with a Safety Tilt Switch mechanism. Power will shut off automatically should the unit be accidentally knocked over or tilted past 15 degrees. To reset, unplug the unit from the wall outlet, reposition on a flat, level surface, and plug in again.
DANGER
- RISK OF FIRE – THERE IS ALWAYS A RISK OF FIRE WHEN WORKING WITH A HEATER. KEEP IT AWAY FROM FLAMMABLE LIQUIDS AND ANY MATERIAL THAT COULD EASILY CATCH FIRE
- RISK OF FIRE – IF THE HEATER FALLS OVER OR FALLS OFF THE WALL, IT COULD START A FIRE
- RISK OF ELECTRIC SHOCK – DISCONNECT ALL ELECTRICAL POWER BEFORE WORKING ON THE UNIT. THERE IS A CHANCE OF ELECTRIC SHOCK IF YOU WORK ON THIS UNIT WHILE IT IS PLUGGED IN TO POWER. THIS UNIT USES ELECTRICITY TO OPERATE. DO NOT USE THIS HEATER AROUND WATER OR IF THE CORD IS DAMAGED.
- DO NOT OPEN THE UNIT - NO USER-SERVICEABLE PARTS INSIDE
- BURN HAZARD - HIGH TEMPERATURES - KEEP ELECTRICAL CORDS, DRAPERY, AND OTHER FURNISHINGS AT LEAST 3 FT/1 M AWAY FROM THE FRONT/SIDES/BACK OF THE HEATING HEAD UNIT
WARNING
- RISK OF FIRE - KEEP COMBUSTIBLE MATERIAL AWAY FROM TOP OF HEATER
• SERVICING SHOULD BE DONE ONLY WHILE THE HEATER IS UNPLUGGED FROM POWER SUPPLY
This appliance MUST be grounded. When using outdoors, use a certified GFI (Ground Fault Interrupt) outlet to protect against electrical shock. All installations must be in accordance with IEE safety regulations or the equivalent. THIS UNIT MUST BE ON A DEDICATED ELECTRICAL CIRCUIT.
PARTS LIST
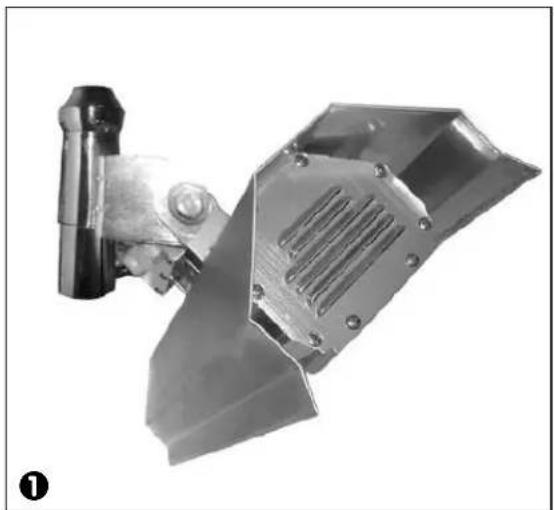
1 - IR Head unit w/Protective Aluminum Shield with:
- Pre-installed wall-mount component
- Alumin um main heating unit w/ 1500W quartz halogen lamp, swivel bracket, and 16/3 grounded electrical cord
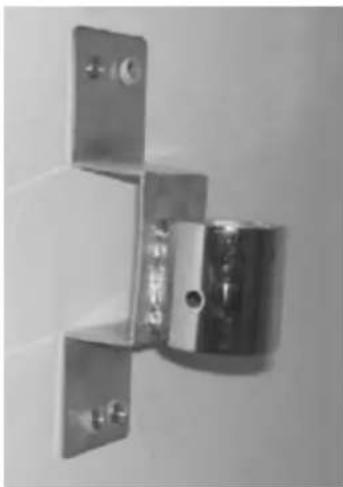
2 - Wall Mounting Bracket
3 - Hardware
• 4x threaded bolts w/ lock washers
- Phillips pan head
- 4x wall anchor
- 1x Short set-screw
natural_image
Metal mechanical component with a cylindrical pin and flange, shown in grayscale (no text or symbols visible)- Ensure that the heater mount bracket is SECURELY fastened to the wall, patio overhang, or house eave.
- Route electrical cable AWAY from main body of heater, which gets very hot.
- Do NOT cover or obstruct the main body of the heater during use.
• Installation must be in accordance with I.E.E. safety regulations or equivalent. If you are unsure, consult an electrical service professional. - Avoid using an extension cord with this appliance.
- Do not place any objects such as furniture, papers, clothing, or curtains closer than 3 ft to the front and sides of the heater.
natural_image
Close-up of a metallic wall-mounted bracket with mounting holes and a cylindrical component (no visible text or symbols)2
The unit MUST be plugged into a dedicated circuit with a grounded outlet. If installed outdoors, use a certified GFI (ground fault interrupt) outlet to protect against electric shock.
natural_image
Close-up of a metallic mechanical component with a cylindrical head and threaded shaft, resting on a wooden surface (no visible text or symbols)
PREPARATION
Before beginning assembly, be sure to read and familiarize yourself with the overall assembly process and instructions in this manual. It may be helpful to have someone assist you with the assembly. You will need the following tools (NOT INCLUDED):
2 or #3 Philips Screwdriver (or standard slotted screwdriver)
Adjustable Wrench, pencil, drill with 5/16 bit, ladder
Complete any assembly on a clean, level, nonabrasive location. A flat piece of cardboard will also work for assembly. Unpack and identify all components listed on page 3 of this manual and lay them out on the carpeted floor or protected work surface, then follow the steps below:

ASSEMBLY
Find a suitable location to mount the heater unit, be sure to comply with ALL minimum required distances and clearance specifications. See illustration below, fig. 3.
* Do not place any objects such as furniture, papers, clothing or curtains closer than 3 ft to the front and sides of the heater.
1 - Position mounting bracket flush against the wall where you want to position the IR unit. Make sure the bracket is level and mark the centers of the holes with a pencil. Note the proper upright orientation of the bracket, see fig. 1.
- Drill 4 pilot holes approx. 1 5/8" deep. For mounting on stucco walls and/or locations where there is not a wood stud, be sure to use appropriate wall anchors to properly secure mounting bracket to wall.
- Attach wall bracket using the 4 screws included (and wall anchors if applicable). Apply all 4 screws loosely at first, check that the bracket is level and then tighten securely.
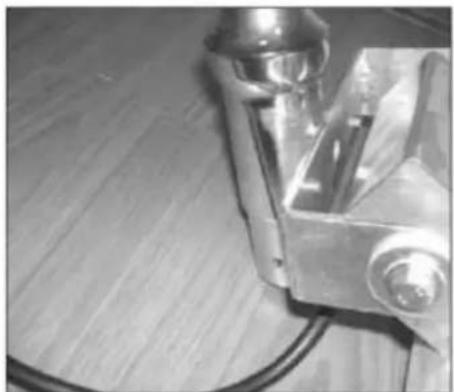
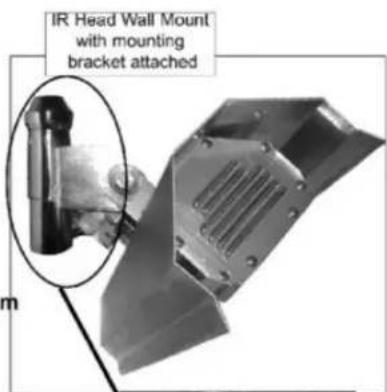
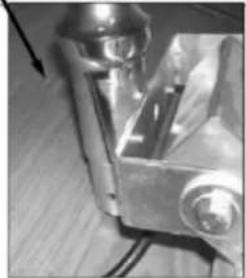
* Insert wall mount assembly from head unit into wall mount bracket. See fig. 2. - Note orientation of bracket and head unit.
* Align and apply 2 threaded bolts and lock washers to bottom of wall bracket and thru the wall mount of the head unit to lock head unit into place. Tighten securely.
*** IMPORTANT NOTE: be sure to route and keep the electrical cord AWAY from the main body of the heater unit. ***
natural_image
Close-up of a mechanical component with metallic parts and a small cylindrical part, no visible text or symbols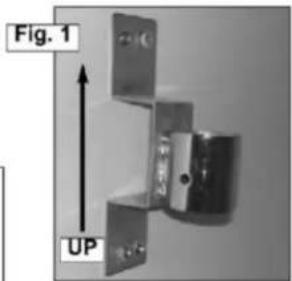
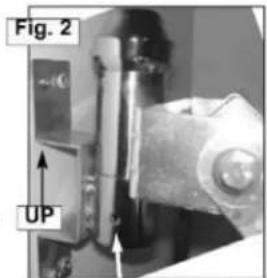
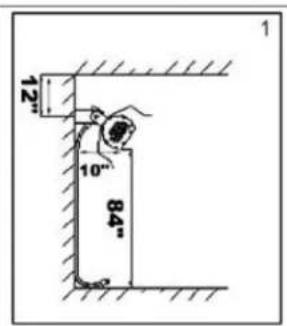
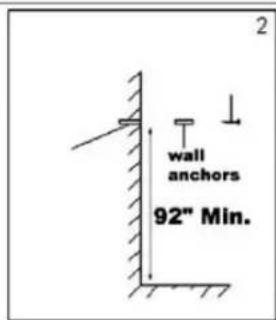
Fig. 3
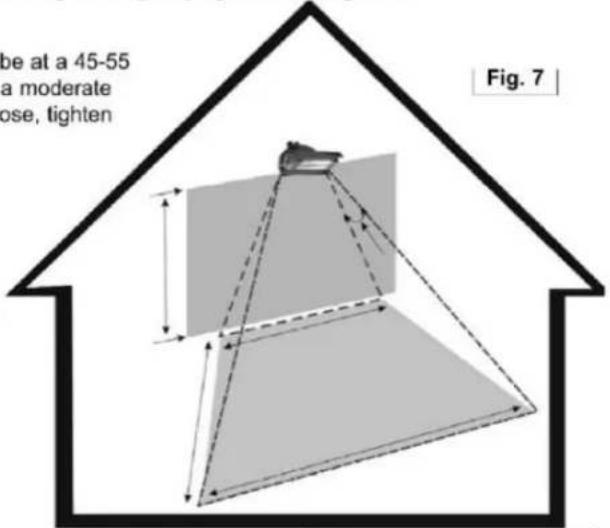
Min. Clearances:
* 83" head unit height
* 10" from mounting wall
* 12" from surfaces above the heater head unit
* 36" from sides and front of head unit
* 45-55 degree angle of operational spread
natural_image
Simple line drawing of a hand holding a small object near a vertical surface, with a checkmark below (no text or symbols)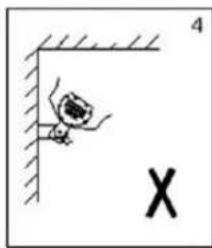
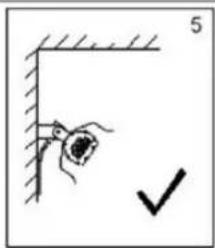
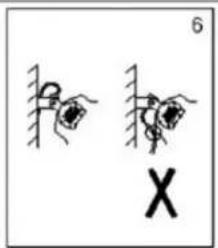
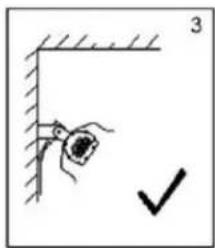
Apply 2 threaded bolts and lock washers to lock position of head unit.

This appliance MUST be grounded.
* When using outdoors, we recommend using a certified GFI (Ground Fault Interrupt) outlet to protect against electrical shock.
* Ensure that the heater mounting bracket is SECURELY fastened to the wall, patio overhang or house eave.
* Route electrical cable AWAY from main body of heater which gets very hot.
* Do NOT cover or obstruct the main body of the heater during use.
* All Installations must be in accordance with I.E.E. safety regulations or equivalent. If you are unsure, consult an electrical service professional.
* Avoid the use of an extension cord with this appliance. If one is used, it MUST be at least a 14/3 wire, grounded cord, 50ft max. length.
* Do not place any objects such as furniture, papers, clothing or curtains closer than 3 ft to the front and sides of the heater.
NOTE: your IR Heater main body, electrical components & bracket comes fully factory assembled. Do NOT attempt repair or disassembly, contact our toll free customer service hotline for assistance.

For optimal performance and safety concerns, we HIGHLY RECOMMEND that the Infrared Heater Head be operated at a min. of 84" ht. with a 45-55 degree angle of operational spread.
To Adjust The IR Head Unit:
Swivel head unit up or down to desired position. The head unit must be at a 45-55 degree angle for optimal operation and output. There should only be a moderate amount of tension to maintain the swivel bracket. If it becomes too loose, tighten hex nuts and bolts at swivel points on head unit bracket.
Note: Be sure electrical cord is routed and positioned away from head unit.
Step 1
Before turning on your Infrared Heating System, adjust the head unit angle as desired. Do NOT touch the head unit during operation or for 30 minutes AFTER shut off. The head units GETS VERY HOT!
Refer to coverage area in Fig. 7 for best positioning location and heat spread/coverage.
Step 2
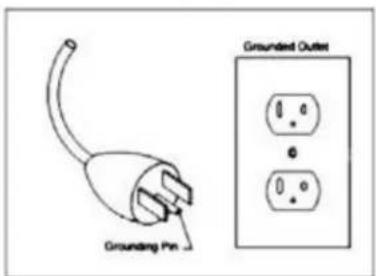
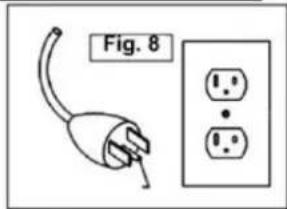
The infrared electric heating system comes equipped with a heavy duty, 16/3 gauge wire and grounded plug. This appliance must be used with an outlet that has been installed and grounded in accordance with all local codes and ordinances. Make sure that the heater is connected to an outlet having the same configuration as the plug shown in
Fig. 8. Do NOT use an adapter with this product. Check with a licensed electrician if the grounding instructions are not understood completely or if the wall outlet does not match the plug.
Always UNPLUG unit when not in use!
Your infrared electric heating system is ready to use. Plug in the heater and enjoy the warmth!
Specifications
| Model: | 02110, 60460 |
| Voltage: | 120 volts |
| Amps: | 12.5 amps |
| Wattage: | 1500 watts |
| Lamp Type: | Quartz Halogen |
| Min. Operational Height: | 84" (7 ft.) |
| Weight: | 7 lbs. |
| Head Unit Dimensions: | 6.25" x 7.25" x 22.125" |

STORAGE Always UNPLUG the unit when not in use!
The IR head unit can be left outside during the season as long as it is mounted in a covered, protected location.
During moderate adverse weather conditions, we recommend wrapping the head unit in plastic and tape or a bungee cord. For extreme weather conditions, it is recommended that you remove the unit from the wall bracket and store in a safe, dry indoor location.
When not in use for extended periods of time, the IR Head Unit can be easily removed from the wall mounting bracket for storage indoors.
The halogen bulb is fragile'; be careful not to hit or jar the head unit.
Store in a dry location placing the head unit on a soft, cushioned surface.
Make sure the electrical cord is properly coiled and out of the way.
MAINTENANCE
This infrared heating system is virtually maintenance-free! A few minutes to wipe down exposed surfaces is all it takes.

Head UNIT & Aluminum Shield - use any non-abrasive cleaner and a soft cloth to wipe off debris and dirt from the exposed surfaces of the aluminum shield and outer body of the head unit and outer grill. NEVER spray any liquids or cleaners into the housing area where the halogen lamp is located.
Do not try to disassemble or clean the inner cavity where the Halogen bulb is located.
NOTE: for any maintenance on the head unit, please call our Customer Service help desk.
For halogen bulb replacement instructions, refer to information on the next page of this manual.

INSTALLATION WARNINGS
Halogen Bulb Replacement
Contact the toll free customer hotline to order approved replacement bulbs and parts. Use ONLY approved original equipment and replacement halogen bulbs to ensure safe, proper and maximum output operation of your heater.
NOTE: Do NOT touch the new halogen lamp with your bare fingers. Oils from your hand could reduce the life of the lamp by causing a heat spot. We recommend using clean cotton or plastic gloves to handle the lamp. A clean paper towel will also work.
MAKE SURE THE HEATER IS TURNED OFF AND DISCONNECTED FROM THE ELECTRICAL OUTLET BEFORE YOU BEGIN!!!!
TO REPLACE THE HALOGEN BULB:
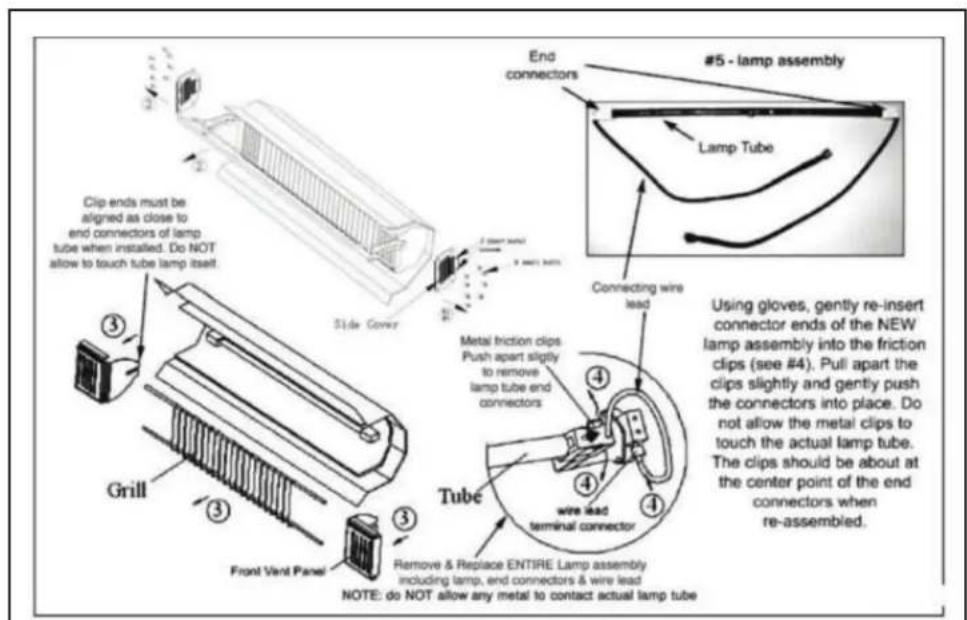
- Ensure the heater is unplugged from the wall outlet. Remove the head unit assembly from the telescopic pole.
- Remove screws from each end of the head unit and pull off end plates (#2). Note the placement of the 2 small sheet metal screws on each end plate. Also note end plate side with beveled holes faces outward when re-assembled.
- Pull out and remove the left and right front air vent panels and protective wire grill (#3). Note the position of end clips on vent panel. They must be aligned as close to the end connectors of lamp tube as possible when re-assembled. Pull or push into place as needed. DO NOT allow metal parts to touch the actual lamp tube when re-assembled.
- Gently pull out entire old bulb assembly from the clips at the terminal connection ends (#4 & 5). Slide and lift the connection ends out from the friction clips by gently pushing apart the clips. Unscrew wire leads from terminal. Remove entire old bulb assembly.
- Using gloves, gently re-insert connection ends of the NEW bulb assembly into the friction clips (#4). Pull apart the clips slightly and gently push the connectors into place. Do not allow the metal clips to touch the bulb tube. The clips should be about at the center point of the end connectors.
- Re-install the safety grill (fits along grooves in housing body), then re-insert the vent panels by gently pushing the end clips into housing body. Align clip ends close to the lamp end connectors and push into place. Re-attach end plates making sure the side with beveled holes faces out.

TROUBLESHOOTING
| Problem Possible Solution | |
| Unit fails to turn on | Check electrical plug connection at wall outlet for a complete, snug fit. |
| Check to make sure unit is on a dedicated electrical circuit. | |
| Make sure unit is on flat ground and tilt switch is LEVEL/horizontal with the ground. | |
| Make sure ON/OFF power switch on pole is in ON position. | |
| If unit is plugged into wall outlet wired to a wall switch, make sure switch is in ON position. | |
| Reset safety tilt switch. Unplug unit from wall outlet and re-position on flat, level surface. Plug heater back in to outlet. | |
| Damaged halogen bulb. Contact Customer Service. | |
| Head unit is loose/ wobbly | Tighten connecting bolts/nuts at swivel bracket. |
| Head unit is hard to adjust | Loosen connecting bolts/nuts at swivel bracket. |
| Smoke appears from head unit | Unplug IMMEDIATELY and contact Customer Service |
| Weak output from halogen bulb | Life span of bulb has been reached, or bulb has been damaged. Contact Customer Service for assistance. NOTE: this product comes with a limited 1-year warranty. After the warranty period, you may purchase replacement bulbs from www.balkenehome.com at the lowest cost available. |
LIMITED WARRANTY
Customers in the Contiguous US
With proof of purchase from an authorized retailer, this product is warranted for a period of 1 year from original purchase date against defects in materials and workmanship under normal use. This warranty does NOT cover normal wear/weathering, exposure to water, freezing temperatures, oils, fluids, or chemicals OR use in a commercial context if the unit is not designated as a commercial model. At Well Traveled Living's sole discretion, products under warranty will be repaired and/or replaced at no charge to the customer. Returns sent back to Well Traveled Living must be sent via prepaid freight in the original retail packaging.
For warranty service, contact Balkene Home/Well Traveled Living at the address, phone numbers or website and email listed in this owner's manual. Be sure to have your sales receipt, date of purchase and catalogue/model numbers available when calling. All warranty service will be coordinated by Well Traveled Living's Amelia Island, Florida service center. This warranty is extended only to the original owner. Proof of purchase will be required before warranty service is rendered. The sales receipt is the only valid proof of purchase. This warranty only covers failures due to defects in materials or workmanship which occur during normal use. Failures and/or damage which result from accident, negligence, misuse, abuse, neglect, mishandling, alteration or modification, failure to maintain, improper assembly or maintenance, service by unauthorized agency or use of unauthorized components or damage that is attributable to acts of God are NOT covered.
This limited warranty gives you specific legal rights and you may also have other rights which vary from jurisdiction to jurisdiction. The provisions of the United Nations Convention on Contracts for the Sales of Goods shall not apply to this limited warranty or the sale of products covered by this limited warranty.
- NTHRENARE NO EXPRESS WARRANTIES EXCEPT AS LISTED.
-N PURCHASE ASSUMES ALL RISKS IN THE ASSEMBLY NANDOPERATION OF THIS UNIT.
·N FAILIE TO FOLLOW WARNINGS AND OPERATIONALNINSTRUCTIONS CONTAINED IN THIS MANUAL CAN RESULT INSEVER EPROPERTY DAMAGE AND/OR PERSONALNINJURY.
·N IN NO EVENTNWIM/ELL TRAVELED LIVING, OR ITS DIRECTORS, OFFICERS OR AGENTS EE LIABLE TO THE PURCHASER OR A NY THIRD PARTY, WHETHER IN CONTRACT, IN TORT, OR ON ANY OTHER BASIS, FOR ANY IN DIRECT, SPECIAL, PUNITIVE, EXEMPLARY, CONSEQUENTIAL I, OR INCIDENTAL LOSS, NCOST, OR DAMAGE ARISING OUTNOF OR IN CONNECTION WITH THE SALE, MAINTENANCE, USE, OR INABILITY TO USE THE PRODUCT, EVEN IF WELL TRAVELD LIVING OR ITS DIRECTORS, OFFICERS OR AGENTS HAVE BEEN ADVISED OF THE POSSIBILITY NOFSUCHOSSES, COSTS OR DAMAGES, OR IFNSUCH LOSSES, COSTS, OR DAMAGES ARE FORESEABLE. IN NO EVENT WILL WELL TRAVELED LIVING, OR ITS OFFICERS, DIRECTORS, OR AGENTS BE LIABLE FOR ANY DIRECT LOSSES, COSTS OR DAMAGES THAT EXCEED THE PURCHASE PRICE OF THE PRODUCT.
·N SOME JURISDICTIONS DO NOTNALLOW THE EXCLUSION OR NLIMITATION OF INCIDENTAL OR CONSEQUENTIAL DAMA GE S, SO THE ABOVE LIMITATION OR NEXCISION MAY NOTAPP I YNTO THE PURCHASER.
EXTEND YOUR WARRANTY
When you purchase a Fire Sense or Balkene Home product from any authorized retailer, you'll have peace of mind in knowing that it comes with a one-year warranty. Extend your warranty for an additional year when you review your item at balkenehome.com within 365 days of purchase.

Important Notice
Before returning to place of purchase—for customer service and warranty issues:
Call toll-free
(866) 985-7877
9 a.m. - 9 p.m., EST
9 a.m. - 6 p.m., EST, Mon - Fri
Distributed by:
Well Traveled Living
716 S 8th Street, Amelia Island, FL 32034
balken ehome.com
- Wall-Mountable Infrared Heater
- WARNING
- FOR YOUR SAFETY
- NOTICE:
- UNIT MUST BE ON A DEDICATED ELECTRICAL CIRCUIT.
- PLEASE READ THESE INSTRUCTIONS CAREFULLY BEFORE USING YOUR NEW HEATER.
- ATTACH YOUR RECEIPT HERE
- Questions, problems, missing parts?
- TABLE OF CONTENTS
- BEFORE YOU BEGIN
- SAFETY
- DANGER
- CAUTION
- To Reduce the Risk of Fire
- NOTICE
- CAUTION Risk of Fire
- CAUTION Risk of Electric Shock — Do not open.
- LISTING APPROVALS
- IMPORTANT SAFETY INSTRUCTIONS
- PARTS LIST
- PREPARATION
- or #3 Philips Screwdriver (or standard slotted screwdriver)
- ASSEMBLY
- Fig. 3
- This appliance MUST be grounded.
- To Adjust The IR Head Unit:
- Step 1
- Step 2
- Always UNPLUG unit when not in use!
- Specifications
- STORAGE Always UNPLUG the unit when not in use!
- MAINTENANCE
- INSTALLATION WARNINGS
- Halogen Bulb Replacement
- MAKE SURE THE HEATER IS TURNED OFF AND DISCONNECTED FROM THE ELECTRICAL OUTLET BEFORE YOU BEGIN!!!!
- TO REPLACE THE HALOGEN BULB:
- TROUBLESHOOTING
- LIMITED WARRANTY
- EXTEND YOUR WARRANTY
- Important Notice
Brand : Fire Sense
Model : 02110
Category : Heating