Hyperion D4 - Machine à effets Froggy's Fog - Free user manual and instructions
Find the device manual for free Hyperion D4 Froggy's Fog in PDF.


| Product Type | Professional Fog Machine |
| Brand | Froggy's Fog |
| Model | Hyperion D4 |
| Dimensions (L x W x H) | 20 x 15 x 15 inches (approx.) |
| Weight | 18 lbs (approx.) |
| Power Consumption | 1500W |
| Voltage | 120V / 60Hz (US) or 230V / 50Hz (EU) |
| Heating Time | 3-5 minutes |
| Output | 4000 CFM (approx.) |
| Fluid Tank Capacity | 1.5 gallons |
| Pump Type | High-pressure piston pump |
| Control Method | Manual control via DMX512 & remote |
| Functions | Continuous fog, timed burst, variable output |
| Maintenance & Cleaning | Flush with distilled water after use; clean heating element regularly |
| Safety Features | Thermal overload protection, low fluid shut-off |
| Spare Parts & Repairability | Fuse, heating element, pump, and DMX board available; user-serviceable |
| Recommended Fluids | Froggy's Fog brand fluids only |
| Certifications | CE, UL, RoHS |
| General Information | Designed for professional use in entertainment venues; includes wireless remote |
Frequently Asked Questions - Hyperion D4 Froggy's Fog
User questions about Hyperion D4 Froggy's Fog
0 question about this device. Answer the ones you know or ask your own.
Ask a new question about this device
Download the instructions for your Machine à effets in PDF format for free! Find your manual Hyperion D4 - Froggy's Fog and take your electronic device back in hand. On this page are published all the documents necessary for the use of your device. Hyperion D4 by Froggy's Fog.
USER MANUAL Hyperion D4 Froggy's Fog
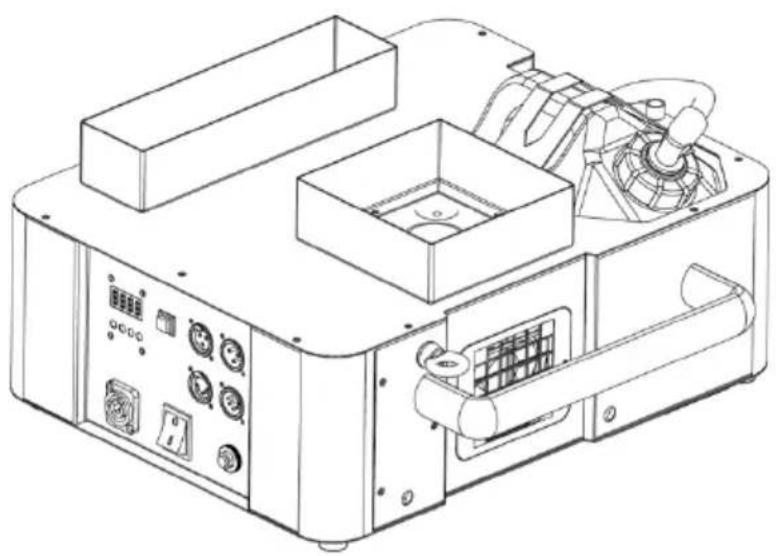
natural_image
Technical line drawing of an industrial machine with control panel and fan (no text or symbols)
CONTENTS
1 BEFORE YOU BEGIN....1
1.1 What Is Included.... 1
1.2 Unpacking Instructions.... 1
1.3 Symbols 1
1.4 Disclaimer....1
1.5 Safety Notes 1
1.5.1 Personal Safety 1
1.5.2 Mounting and Rigging....1
1.5.3 Power and Wiring 2
1.5.4 Operation 2
2 INTRODUCTION....2
2.1 Description.... 2
2.2 Features 3
2.3 Product Overview......Error! Bookmark not defined.
2.4 Product Dimensions....Error! Bookmark not defined.
3 TECHNICAL SPECIFICATIONS....3
4 SETUP 4
4.1 AC Power 4
4.2 AC Plug 4
4.3 Resetting the Breaker....4
4.4 DMX Linking....4
4.5 Mounting....4
4.5.1 Orientation....4
4.5.2 Complex Units....Error! Bookmark not defined.
4.5.3 Rigging 4
5 OPERATION 5
5.1 Preparing for Operation 5
5.2 On-device Control Panel 5
5.3 On-device Control Mode & Operation....5
5.3.1 Programming....5
5.3.2 Manual Output Color ....Error! Bookmark not defined.
5.3.3 Menu Map....6
5.4 DMX Mode & Operation DMX....7
5.4.1 Starting Address....8
5.4.2 DMX Mode Menu Map 8
5.4.3 DMX Channel Assignments and Values DMX 8
5.5 Fluid Sensor 9
5.5.1 Trigger "No-Fluid Protection" 9
5.5.2 Clear "No-Fluid Protection" Warning....9
6 TECHNICAL INFORMATION....10
6.1 Expected LED Lifespan 10
6.2 Maintenance....10
6.3 Storage....10
6.3.1 Machine Storage....10
1 BEFORE YOU BEGIN
1.1 What Is Included
Machine
Power Cord
Safety Eye Stud
Wireless Transmitter (A27 Battery)
User Manual
1.2 Unpacking Instructions
Carefully unpack the product immediately and check the container to make sure all the parts are included and are in good condition.
If the box or the contents (the product and included accessories) appear damaged from shipping, or show signs of mishandling, notify the carrier or dealer/seller immediately. In addition, keep the box and contents for inspection. Please note, machines are routinely inspected for quality control and may have some fluid residual present in the fluid line and tank.
1.3 Symbols
| Symbol | Meaning |
 | CautionCritical installation, configuration, or operation information. Not following these instructions may make the product not work, cause damage to the product, or cause harm to the operator. |
 | ImportantImportant installation or configuration information. Failure to comply with this information may keep the product from working correctly. |
 | InformationUseful information. |
1.4 Disclaimer
The information and specifications contained in this User Manual are subject to change without notice. FROGGYS FOG assumes no responsibility or liability for any errors or omissions and reserves the right to revise or to create this manual at any time.
Copyright © 2019 FROGGYS FOG. All rights reserved.
1.5 Safety Notes
Please read the following Safety Notes carefully before working with the product. The notes include important safety information about installation, usage, and maintenance.
1.5.1 Personal Safety
• Always connect the product to a grounded circuit to avoid the risk of electrocution.
• During heating up and operation, the housing can become extremely hot. Avoid contact.
- The product is very hot during operation and it remains hot for a long time after operation has stopped. Do not touch the fog outlet nozzle.
• Make sure that children, unauthorised people and animals do not obtain access to the machine.
- Avoid direct eye exposure to the light source while the product is on.
1.5.2 Mounting and Rigging
• The product is for indoor use only! To prevent risk of fire or shock, do not expose the product to rain or moisture.
- CAUTION: When transferring product from extreme temperature environments, (e.g. cold truck to warm humid ballroom) condensation may form on the internal electronics of the product. To avoid causing a failure, allow product to fully acclimate to the surrounding environment before connecting it to power.
• Do not mount the product on a flammable surface (linoleum, carpet, wood, paper, carton, plastic, etc.). - Do not use in a confined space. Always install the product in a location with adequate ventilation, at least 20 in (50 cm) from adjacent surfaces.
- When hanging this product, always secure to a fastening device using a safety cable.
- Be sure that no ventilation slots on the product’s housing are blocked or clogged by dust. If necessary, remove the dust.
1.5.3 Power and Wiring
- Always make sure that the voltage of the outlet to which you are connecting the product is within the range stated on the decal or rear panel of the product.
• Make sure the power cord is not crimped or damaged. - Never connect this product to a dimmer pack or rheostat.
• Never disconnect the product from power cord by pulling or tugging on the cord. - To eliminate unnecessary wear and improve its lifespan, during periods of non-use completely disconnect the product from power via breaker or by unplugging it
1.5.4 Operation
- Do not operate this product if you see damage to the housing or cables. Have the damaged parts replaced by an authorized technician at once.
- Do not use the product as a space heater.
• The maximum ambient temperature (Ta) is 104 °F (40 °C). Do not operate the product at higher temperatures. - Do not cover the ventilation slots when operating to avoid internal overheating.
• Do not cover or plug the output nozzle during operation.
• Wipe up any excess fluid immediately. Moisture can damage the electronic components.
• You may hear a loud popping sound during operation. This is normal.
• Never carry the product by the power cord or any moving part. Always use the handles of the machine.
• Drain the tank before transporting the product.
• Always disconnect the product from the power source before cleaning.
• In the event of a serious operating problem, stop using the product immediately. - This product contains no user-serviceable parts. Any reference to servicing in this user manual will only apply to properly trained, certified technicians. Do not open the housing or attempt any repairs which can lead to damage or malfunction.

Keep this user manual for future use. If you sell the product, be sure that the purchaser receives this document.
2 INTRODUCTION
2.1 Description
Introducing the World's First Variable Output Upshot! That means you can control the size of your plume while under DMX control! You can get 1-30 feet from one machine. The Hyperion D Series features Froggy's Instant Stop Technology (IST). This pulls fluid from the core to reduce spitting and allow for 360 degree placement. The D Series outperforms when it comes to output and cutoff.
2.2 Features
• 1500W Variable Output Upshot Fogger
- Instant Stop Technology (IST)
• Dual Zone LED - Inner and Outer Flame Technology
• Low Fluid Sensing Technology
- Max Height: 30
• Hex Colored LED - RGBAW+UV
• 360 degree operation
3 TECHNICAL SPECIFICATIONS
| AC Power | Input Voltage & Rate | 120 V, 60 Hz |
| Current Limiter Type | Breaker | |
| Current Limiter Specifications | 15A 250V | |
| Total Power Consumption | 1,550 W | |
| Heating | Heat Up Time | 4 Min |
| Light Source | LED Color | RGBAWUV |
| LED Type | HEX-Color | |
| Power per LED | 10W | |
| Quantity of LED | 8 pcs | |
| Quantity of Inner LED | 4 pcs | |
| Total Power of Inner LED | 40W | |
| Quantity of Outer LED | 4 pcs | |
| Total Power of Outer LED | 40W | |
| Capacity | Fluid Tank Capacity | 0.66 Gal |
| Output Duration with Fluid Tank Full | 187 X 8 Sec Bursts | |
| Output | Adjustable Output | Under DMX Control |
| Max Output Volume | 32,000 cfm | |
| Max Output Height | 30 ft | |
| Fluid Consumption (100% Output) | 100 ml/min | |
| Maximum Continuous Duration (100% Output) | 8 sec | |
| Continuous Output | N/A | |
| Placement & Mounting | Horizontal | √ |
| Inclined | √ | |
| Vertical | √ | |
| Hang Upside Down | After swapping tank support members | |
| Rigging & Trussing | √ | |
| Control | On-device Manual Control | 7-Seg Digital Display |
| Wireless Control | √ | |
| Wired Control | DMX | |
| Control Protocol | DMX512 | |
| DMX Channel Range | 17 | |
| Weight & Dimensions | Net Weight | 22 lbs |
| Gross Weight | 27.5 lbs | |
| Machine Dimensions | 16.4 x 15.6 x 8.1 in. | |
| Packing Dimensions | 20 x 18.5 x 11.3 in. |
4 SETUP
4.1 AC Power
The machine has a fixed voltage power supply and can work with an input voltage of AC 120 V, 60 Hz, depending on the specific model.
To determine the product's power requirements (circuit breaker, power outlet, and wiring), use the current value listed on the label affixed to the product's back panel, or refer to the product's specifications chart. The listed current rating indicates the product's average current draw under normal conditions.

Always connect the product to a protected circuit (circuit breaker or fuse). Make sure the product has an appropriate electrical ground to avoid the risk of electrocution or fire.

Never connect the product to a rheostat (variable resistor) or dimmer circuit, even if the rheostat or dimmer channel serves only as a 0 to 100% switch.
4.2 AC Plug
The HYPERION D4 comes with a power input cord terminated with an IEC connector on one end and an EU plug on the other end (EU & China market). If the power input cord that came with your product has no plug, or if you need the change the plug, use the table below to wire the new plug:
| Connection | Wire (U.S.) | Wire (Europe) |
| AC Live | Black | Brown |
| AC Neutral | White | Blue |
| AC Ground | Green/Yellow | Green/Yellow |
4.3 Resetting the Breaker
This product is equipped with a resettable breaker. If the breaker trips, all sections of this product will lose power.
- Remove the power cord from mains power.
- Allow unit to cool for 15 minutes.
• After 15 minutes, you may attempt to reset the breaker by pressing the button with your finger. - Plug the product's power cord into the power outlet and continue using as recommended.
4.4 DMX Linking
You can link the HYPERION D4 to a DMX controller using a 3- or 5-pin DMX connection. If using other DMX-compatible products with this product, you can control each individually with a single DMX controller. Instructions for connecting and configuring this product for DMX operation are in the User Manual.
4.5 Mounting
Before mounting the product, read and follow the safety recommendations indicated in the Safety Notes.
4.5.1 Orientation
• Always mount this product in a safe position and make sure there is adequate room for ventilation, configuration and maintenance.
- The machine may be operated on its side, but care must be taken to ensure that the fluid level in the machine does not rise above the neck of the reservoir or leaking will occur.
- To mount and operate the machine upside down, the bottom tank support plate and top tank support strap should be swapped before mounting to maintain the tank's upright position during inverted mounting.
4.5.2 Rigging
FROGGYS FOG recommends using the following general guidelines when mounting this product.
• Before deciding on a location for the product, make sure there is easy access to the product for maintenance and programming purposes.
- Make sure that the structure or surface onto which you are mounting the product can support the product's weight (see the Technical Specifications).
- When mounting the product on the floor, make sure that the product and cables are away from people and vehicles.
- When mounting the product overhead, always use a safety cable. Mount the product securely to a rigging point, whether an elevated platform or a truss.
5 OPERATION
5.1 Preparing for Operation
To prepare the HYPERION D4 for operation, perform the following steps. :
• After checking that all the parts are intact and complete, position the machine on flat.
- Withdraw the fluid tank from its compartment and remove its cap.
- Verify that the two plastic hoses attached to the cap are in place and in good condition.
• Pour fog fluid into the tank (Do NOT exceed the max fluid level) and replace the cap.
• Return the tank back to its compartment in the HYPERION D4.
• Make sure the plastic hose entering the HYPERION D4 from the fluid tank cap is not bent or kinked.
• Always connect the product to a grounded circuit. Before power on, make sure it is connected with the rated voltage.
- Turn on the machine, and "HEAT" shows on the display during the heating-up process. After approx. 4 minutes, the display changes to "Addr" when the machine is ready to output.
5.2 On-device Control Panel
To access the control panel functions, use the four buttons located underneath the LCD display.
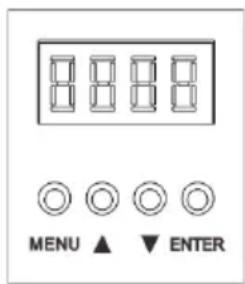
| Button | Function |
| Switch menu pages to select a function | |
| ▲ | Increases the numeric value of current function |
| ▼ | Decreases the numeric value of current function |
| Save current setting and return to standby page. | |
| Manual Fog Button (Green) | Activate Fog Output |
5.3 On-device Control Mode & Operation
5.3.1 Programming
- Refer to the Menu Map to understand the menu options. The menu map shows the main level and a variable number of programming levels for each option.
- To go to the desired main level, press
- To select an option or value within the current programming level, press ▲ or ▼ until the option shows on the display. If there is another programming level, you will see that first option, or you will see the selected value.
- Press
- Press
to go back to Standby Page at any time.
5.3.2 Menu Map
| Display | Description | Parameter Range | |
| Starting Pages | 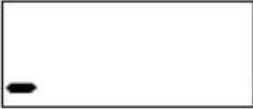 | Wireless pairing | |
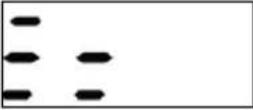 | |||
| Preparing Pages | 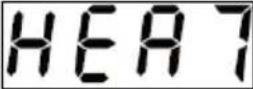 | The machine is heating up | |
| Standby Page |  | Finished heating up, ready to work. | |
| Menu Pages | 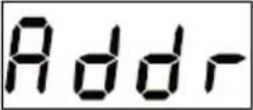 | Press ▲ or ▼ to select DMX starting address | 1-512 |
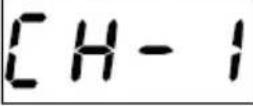 | Output LED | 1-20(SEE COLOR MAP) | |
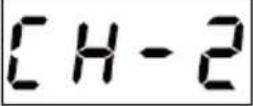 | Output LED | 1-20(SEE COLOR MAP) | |
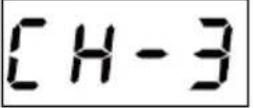 | Output LED | 1-20(SEE COLOR MAP) | |
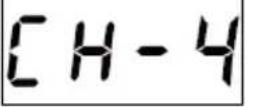 | Output LED | 1-20 | |
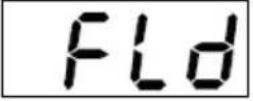 | Low fluid protection | ON/OFF | |
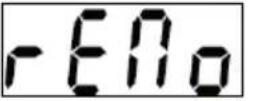 | Wireless Remote Functionality | ON/OFF |
5.3.3 Default Color Map
| Color | Inner Color | Outer Color |
| OFF | OFF | OFF |
| 1 | Red | Red |
| 2 | Green | Green |
| 3 | Blue | Blue |
| 4 | Amber | Amber |
| 5 | White | White |
| 6 | UV | UV |
| 7 | Magenta | Magenta |
| 8 | Yellow | Yellow |
| 9 | Cyan | Cyan |
| 10 | Red | Amber |
| 11 | Amber | Red |
| 12 | Green | Red |
| 13 | Red | Green |
| 14 | Red | Blue |
| 15 | Blue | Red |
| 16 | Cyan | Yellow |
| 17 | Magenta | Cyan |
| 18 | Yellow | Green |
| 19 | Green | Yellow |
| 20 | Auto Color (Color 1-19 rotating every 1 second) | Auto Color (Color 1-19 rotating every 1 second) |
5.4 Wireless Remote-Control Mode & Operation

natural_image
Close-up of a car keychain with three buttons and a black body (no text or symbols visible)• This mode will allow you to control the machine using the wireless controller W-5.
- When REMO is display while scrolling through the MENU, press the ENTER button to set wireless remote function, ▲ to turn it ON, ▼ to turn it OFF.
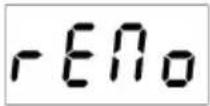
When the wireless control setting is activated, a digital display will show during the first 12 seconds after being powered on:
When "REMO" function is OFF, it will not show the wireless remote registering page when the machine is powered on.
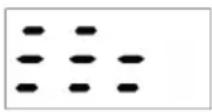

- During start up, the line will increase gradually, and the digital display will exit this page till the line is full (12 lines).
- During this time, press any button on the remote. The digital display will flash twice to indicate that the wireless remote has paired with the machine successfully.
• If no new pairing occurs during the pairing process at start-up, the remote controller(s) last paired will be left attached.
• Once a new pairing occurs, all previously paired remote controller(s) will be forgotten. - During the wireless pairing process at the start-up (if wireless mode is on), one machine can be paired with up to 5 remotes with different RF address codes and be controlled by all of them simultaneously.
• The pairing of the RF wireless remote controllers (up to 5 units) must be done during the same pairing process. - One wireless remote controller can be paired and memorized by multiple machines and will control all the paired machines simultaneously (if within transmitting distance).
- If the machine doesn't need to be controlled by wireless functionality, you may turn off the wireless option in the menu to reduce the possibility of signal interference from other RF devices.
5.5 DMX Mode & Operation DMX
The Machine HYPERION D4 works with a DMX controller.
- Connect the product to a suitable power outlet.
- Turn the product on.
- Connect a DMX cable from the DMX output of the DMX controller to the DMX input socket on the product.
5.5.1 Starting Address
When selecting a starting DMX address, always consider the number of DMX channels. If you choose a starting address that is too high, you could restrict the access to some of the product's channels.

FROGGYS FOG® HYPERION D4 DMX set the starting address in the 001 - 512 DMX range and uses 17 DMX channels, which defines the highest configurable address to 496 to have all channels controllable.

Connect a DMX cable from the DMX output of the DMX controller to the DMX input socket on the product, or press repeatedly "MENU" button until the LCD shows "DMX Address". Press ▲ or ▼ to set desired DMX starting address.
5.5.2 DMX Mode Menu Map
• While the machine is connected to DMX, the display will always show DMX starting address, and you can set or change it at any time.
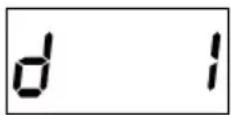
5.5.3 DMX Channel Assignments and Values DMX
| Channel | Function | Value | Description |
| 1 | Fog | 000 - 010 | No function |
| 011 - 255 | 1-100% | ||
| 2 | Inner Red | 000 - 010 | No function |
| 011 - 255 | 1-100% | ||
| 3 | Inner Green | 000 - 010 | No function |
| 011 - 255 | 1-100% | ||
| 4 | Inner Blue | 000 - 010 | No function |
| 011 - 255 | 1-100% | ||
| 5 | Inner Amber | 000 - 010 | No function |
| 011 - 255 | 1-100% | ||
| 6 | Inner White | 000 - 010 | No function |
| 011 - 255 | 1-100% | ||
| 7 | Inner UV | 000 - 010 | No function |
| 011 - 255 | 1-100% | ||
| 8 | Outer Red | 000 - 010 | No function |
| 011 - 255 | 1-100% | ||
| 9 | Outer Green | 000 - 010 | No function |
| 011 - 255 | 1-100% | ||
| 10 | Outer Blue | 000 - 010 | No function |
| 011 - 255 | 1-100% | ||
| 11 | Outer Amber | 000 - 010 | No function |
| 011 - 255 | 1-100% | ||
| 12 | Outer White | 000 - 010 | No function |
| 011 - 255 | 1-100% | ||
| 13 | Outer UV | 000 - 010 | No function |
| 011 - 255 | 1-100% | ||
| 14 | Color Mixing | 000 - 010 | No function |
| 011 - 255 | Color Mixing | ||
| 15 | Auto Color | 000 - 010 | No function |
| 011 - 255 | Color 1-19 rotating, Speed slow to fast | ||
| 16 | Strobe | 000 - 010 | No function |
| 011 - 255 | Strobe, slow to fast | ||
| 17 | Master Dimmer | 000 - 010 | No function |
| 011 - 255 | 1-100% |
5.6 Fluid Sensor
This machine uses software-based fluid sensor to detect whether there is fluid inside tube so as to protect the pump from being damaged. Turn on the "FLd" to activate "No Fluid Protection" function.
5.6.1 Trigger "No-Fluid Protection"
When the FLd is ON, the software-based “no-fluid protection” function will be activated. After the program continues to detect the machine working with no fluid inside the tube for 1 minute, the pump-shutoff will be activated with the flickering warning page showing on the screen.
5.6.2 Clear "No-Fluid Protection" Warning
When the machine is under the no-fluid protection, after refilling the fluid, there are three ways to clear the warning.
• Press and hold Fog Button until the fluid is pumped and fill the tube.
• Under the DMX control mode, bring down channel 1 to OFF (value 0-9), then up to ON (value 10-255),
• Turn off "FLd" in the menu.
6 TECHNICAL INFORMATION
6.1 Expected LED Lifespan
LEDs gradually decline in brightness over time, primarily due to heat. Packaged in clusters, LEDs exhibit higher operating temperatures than in ideal, single-LED conditions. For this reason, using clustered LEDs at their fullest intensity significantly reduces the LEDs' lifespan. Under normal conditions, this lifespan can be 40,000 to 50,000 hours. If extending this lifespan is vital, lower the operating temperature by improving the ventilation around the product and reducing the ambient temperature to an optimal operating range. In addition, limiting the overall projection intensity may also help to extend the LEDs' lifespan.
6.2 Maintenance
Do not allow the Hyperion D4 to become clogged. After every 40 hours of continuous operation, use distilled water or for a more thorough clean Froggys Fully Clean after use to prevent the accumulation of particulate matter in the heating element.
The recommended cleaning procedure is as follows.
1) Unplug the product from power.
2) Empty all fluid from the machine.
3) Dip fluid intake tube into 1 cup of cleaning solution/ distilled water.
4) Connect the product to power and allow it to warm up.
5) Run the product in a well-ventilated area until the cup is empty. Do not allow the pump to run dry.
6) Repeat until satisfied with fog output.
7) Refill with fog fluid to continue using the Hyperion D4. Run the machine briefly to clear any cleaning solution from the pump and heater.
8) Excessive dust, fluid residue and dirt will degrade performance and cause overheating. Remove dust from air vents with air compressor, vacuum or soft brush. The casing could be cleaned by the damp cloth.

Test-run your FROGGYS FOG® HYPERION D4 on a monthly basis to achieve the best performance.
6.3 Storage
6.3.1 Machine Storage
Before storing the machine, clean it as described in the cleaning procedure above.
7 WARRANTY INFORMATION
7.1.1
Save these instructions. 2 Year Limited Warranty: Valid from the date of purchase. Warranty covers manufacturing defects only and does not cover misuse or abuse of the machine. Serial number, place of purchase with dated valid receipt must be submitted at time of service. Warranty is only valid with-in the United States. Buyer may be responsible for shipping fees associated with repairs.
- CONTENTS
- BEFORE YOU BEGIN....1
- INTRODUCTION....2
- TECHNICAL SPECIFICATIONS....3
- SETUP 4
- OPERATION 5
- TECHNICAL INFORMATION....10
- BEFORE YOU BEGIN
- What Is Included
- Unpacking Instructions
- Symbols
- Disclaimer
- Safety Notes
- Personal Safety
- Mounting and Rigging
- Power and Wiring
- Operation
- INTRODUCTION
- Description
- Features
- TECHNICAL SPECIFICATIONS
- SETUP
- AC Power
- AC Plug
- Resetting the Breaker
- DMX Linking
- Mounting
- Orientation
- Rigging
- OPERATION
- Preparing for Operation
- On-device Control Panel
- On-device Control Mode & Operation
- Programming
- Wireless Remote-Control Mode & Operation
- DMX Mode & Operation DMX
- Starting Address
- DMX Mode Menu Map
- Fluid Sensor
- Trigger "No-Fluid Protection"
- Clear "No-Fluid Protection" Warning
- TECHNICAL INFORMATION
- Expected LED Lifespan
- Maintenance
- Storage
- Machine Storage
- WARRANTY INFORMATION
- 7.1.1
Brand : Froggy's Fog
Model : Hyperion D4
Category : Machine à effets