
NMP599-W-2 - Uncategorized VIEWSONIC - Free user manual and instructions
Find the device manual for free NMP599-W-2 VIEWSONIC in PDF.


| Product Type | Network Media Player |
| Brand | ViewSonic |
| Model | NMP599-W-2 |
| Model Number | VS19839 |
| Dimensions (W x H x D) | 166 x 27 x 125.5 mm (6.5 x 1.1 x 4.9 in) |
| Weight | 915 g (2.3 lbs) |
| Power Supply | Input: 100-240V, 50-60Hz, 0.5A; Output: 12V, 1.5A |
| Power Consumption | Max 20.3 W |
| Processor | Not specified; likely ARM-based for Android |
| Operating System | Android (based on RK3368 platform mentioned) |
| Storage | 16 GB onboard eMMC, expandable via microSD card up to 128 GB |
| Video Decoding | H.265/HEVC up to 4K (3840x2160), H.264/AVC up to 1080p, MPEG-4/2/1 up to 1080p, VC-1 up to 1080p |
| Audio Decoding | MP3 up to 320 Kbps |
| Image Support | JPEG and PNG up to 1920x1080 (baseline only) |
| Network Connectivity | IEEE 802.11 a/b/g/n/ac dual-band Wi-Fi (2.4/5 GHz), Gigabit Ethernet, PoE (IEEE 802.3af) |
| I/O Ports | HDMI, USB 2.0 x1, USB 3.0 x1, Ethernet, 3.5mm audio out, micro USB for ADB, SD card slot |
| Wireless Antenna | Embedded dual-band antenna |
| Built-in Speaker | 2W x1 |
| Front Camera | 8 MP auto focus |
| Operating Temperature | -20°C to 50°C |
| Humidity | 10-85% @ 40°C non-condensing |
| Safety Certifications | CE, FCC, RoHS |
| Mounting | VESA mount? Not specified; includes Velcro for mounting on monitor back |
| Warranty | 1 year labor |
| Manufacturer | ViewSonic Corporation |
Frequently Asked Questions - NMP599-W-2 VIEWSONIC
User questions about NMP599-W-2 VIEWSONIC
0 question about this device. Answer the ones you know or ask your own.
Ask a new question about this device
Download the instructions for your Uncategorized in PDF format for free! Find your manual NMP599-W-2 - VIEWSONIC and take your electronic device back in hand. On this page are published all the documents necessary for the use of your device. NMP599-W-2 by VIEWSONIC.
USER MANUAL NMP599-W-2 VIEWSONIC
IMPORTANT: Please read this User Guide to obtain important information on installing and using your product in a safe manner, as well as registering your product for future service. Warranty information contained in this User Guide will describe your limited coverage from ViewSonic Corporation, which is also found on our web site at http://www.viewsonic.com in English, or in specific languages using the Regional selection box in the upper right corner of our website. "Antes de operar su equipo lea cu idadosamente las instrucciones en este manual"
Model No. VS19839
With over 25 years as a world leading provider of visual solutions, ViewSonic is dedicated to exceeding the world's expectations for technological evolution, innovation, and simplicity. At ViewSonic, we believe that our products have the potential to make a positive impact in the world, and we are confident that the ViewSonic product you have chosen will serve you well.
Once again, thank you for choosing ViewSonic!

Compliance Information
FCC Statement
This device complies with part 15 of FCC Rules. Operation is subject to the following two conditions: (1) this device may not cause harmful interference, and (2) this device must accept any interference received, including interference that may cause undesired operation.
This equipment has been tested and found to comply with the limits for a Class B digital device, pursuant to part 15 of the FCC Rules. These limits are designed to provide reasonable protection against harmful interference in a residential installation. This equipment generates, uses, and can radiate radio frequency energy, and if not installed and used in accordance with the instructions, may cause harmful interference to radio communications. However, there is no guarantee that interference will not occur in a particular installation. If this equipment does cause harmful interference to radio or television reception, which can be determined by turning the equipment off and on, the user is encouraged to try to correct the interference by one or more of the following measures:
• Reorient or relocate the receiving antenna.
- Increase the separation between the equipment and receiver.
- Connect the equipment into an outlet on a circuit different from that to which the receiver is connected.
- Consult the dealer or an experienced radio/TV technician for help.
Warning: You are cautioned that changes or modifications not expressly approved by the party responsible for compliance could void your authority to operate the equipment.
For Canada
CE Conformity for European Countries

€ The device complies with the EMC Directive 2004/108/EC and Low Voltage Directive 2006/95/EC.
Following information is only for EU-member states:
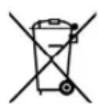
The mark is in compliance with the Waste Electrical and Electronic Equipment Directive 2002/96/EC (WEEE).
The mark indicates the requirement NOT to dispose the equipment including any spent or discarded batteries or accumulators as unsorted municipal waste, but use the return and collection systems available.
If the batteries, accumulators and button cells included with this equipment, display the chemical symbol Hg, Cd, or Pb, then it means that the battery has a heavy metal content of more than 0.0005% Mercury or more than, 0.002% Cadmium, or more than 0.004% Lead.

Declaration of RoHS2 Compliance
This product has been designed and manufactured in compliance with Directive 2011/65/EU of the European Parliament and the Council on restriction of the use of certain hazardous substances in electrical and electronic equipment (RoHS2 Directive), and is deemed to comply with the maximum concentration values issued by the European Technical Adaptation Committee (TAC) as shown below:
| Substance | Proposed Maximum Concentration | Actual Concentration |
| Lead (Pb) | 0.1% | < 0.1% |
| Mercury (Hg) | 0.1% | < 0.1% |
| Cadmium (Cd) | 0.01% | < 0.01% |
| Hexavalent Chromium ( Cr^6+ ) | 0.1% | < 0.1% |
| Polybrominated biphenyls (PBB) | 0.1% | < 0.1% |
| Polybrominated diphenyl ethers (PBDE) | 0.1% | < 0.1% |
Certain components of products as stated above are exempted under the Annex III of the RoHS2 Directives as noted below:
Examples of exempted components are:
- Mercury in cold cathode fluorescent lamps and external electrode fluorescent lamps (CCFL and EEFL) for special purposes not exceeding (per lamp):
(1) Short length ( ≤ 500 mm): maximum 3.5 mg per lamp.
(2) Medium length (☐ 500 mm and ☐ 1,500 mm): maximum 5 mg per lamp.
(3) Long length (☐ 1,500 mm): maximum 13 mg per lamp.
2 Lead in glass of cathode ray tubes.
- Lead in glass of fluorescent tubes not exceeding 0.2% by weight.
- Lead as an alloying element in aluminum containing up to 0.4% lead by weight.
- Copper alloy containing up to 4% lead by weight.
- Lead in high melting temperature type solders (i.e. lead-based alloys containing 85% by weight or more lead).
- Electrical and electronic components containing lead in a glass or ceramic other than dielectric ceramic in capacitors, e.g. piezoelectronic devices, or in a glass or ceramic matrix compound.
Copyright Information
Copyright© ViewSonic Corporation, 2014. All rights reserved.
ViewSonic and the three birds logo are registered trademarks of ViewSonic Corporation. Disclaimer: ViewSonic Corporation shall not be liable for technical or editorial errors or omissions contained herein; nor for incidental or consequential damages resulting from furnishing this material, or the performance or use of this product.
In the interest of continuing product improvement, ViewSonic Corporation reserves the right to change product specifications without notice. Information in this document may change without notice.
No part of this document may be copied, reproduced, or transmitted by any means, for any purpose without prior written permission from ViewSonic Corporation.
For Your Records
Product Name: NMP599-W-2
ViewSonic Network Media Player
Model Number: VS 19839
Document Number: NMP599-W-2_UG_ENG Rev. 1A 11-15-23
Serial Number:
Purchase Date:
Product disposal at end of product life
ViewSonic respects the environment and is committed to working and living green. Thank you for being part of Smarter, Greener Computing. Please visit ViewSonic website to learn more.
USA & Canada: http://www.viewsonic.com/company/green/recycle-program/
Europe: http://www.viewsoniceurope.com/uk/support/recycling-information/
Taiwan: http://recycle.epa.gov.tw/recycle/index2.aspx
Content
1. Introduction ...... 1
1.1. Features.... 1
1.2. Package contents ...... 1
1.3. Physical view and features ...... 2
1.4. Installation....2
2. Configuring the device .... 3
2.1. System connections....4
2.2. Basic settings....4
2.3. Connecting the device to your network....5
2.4. Time zone settings 9
2.5. Content settings....10
2.6. Player information.... 11
2.7. Content configuration – AppStart 12
2.8. Content configuration – FailSafe....13
2.9. Content configuration – EasyPlay 14
2.10. Display settings....16
2.11. Sound settings ...... 20
2.12. System configuration – Time Server ...... 21
2.13. System configuration – Scheduled reboot ...... 22
2.14. System configuration - Firmware upgrades ...... 23
2.15. System configuration - Factory reset 24
2.16. System configuration – Power save....25
2.17. System configuration – Expand Storage by using micro SD card....25
- Content Management ...... 25
- Authoring in HTML5 26
- Working with SMIL 26
5.1. Introduction ...... 26
5.2. www.a-smil.org for developers....26
- Technical Data....27
6.1. Specifications....27 - Troubleshooting 29
1. Introduction
1.1. Features
- Support for HTML5 widgets for dynamic content (W3C Widgets standard)
- 1080p hardware decoding of MPEG, H.264, and VC-1 media formats, 4K hardware decoding of H.265
• 16GB on-board EMMC local storage with micro SD card slot - Integrated audio and video output via HDMI
• Built-in wireless b/g/n network and Ethernet
• Supports full POPAI Screen Media Formats Standards profiles S1 to S12, and E1 to E8 - Multiple 3rd party software solution compatibility
• Industry leading W3C SMIL support for developers
1.2. Package contents
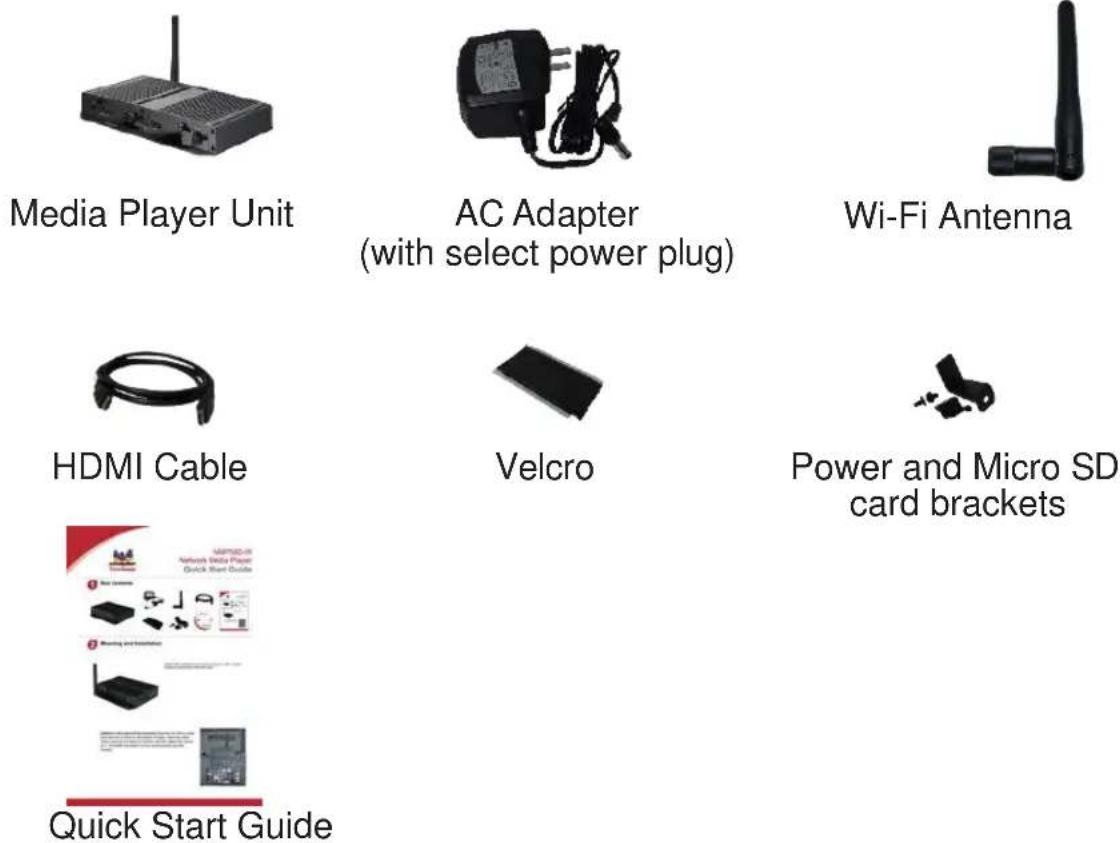
Note: A USB mouse is required for system setup.
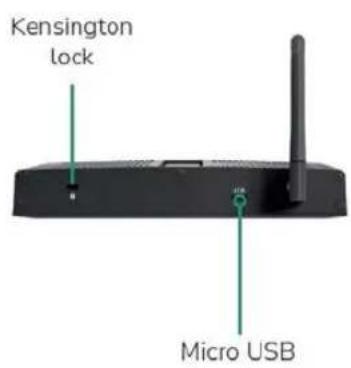
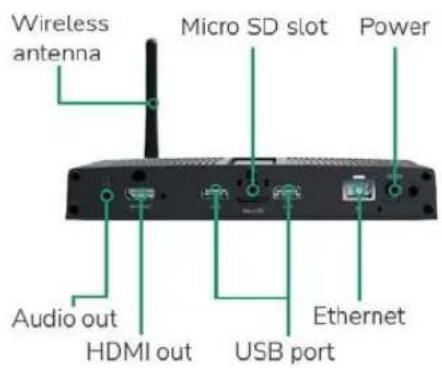
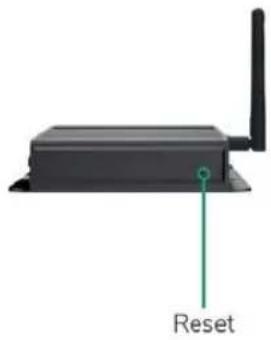
1.3. Physical view and features
natural_image
Black wireless router with antenna and 'Reset' label pointing to its side (no additional text or symbols)1.4. Installation
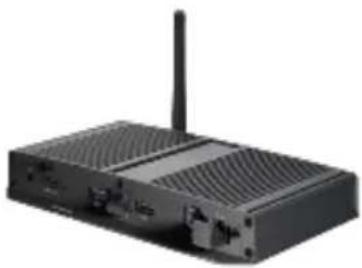
Attach wireless antenna
ATTACH the wireless antenna as shown below, and then screw antenna clockwise onto the post.
natural_image
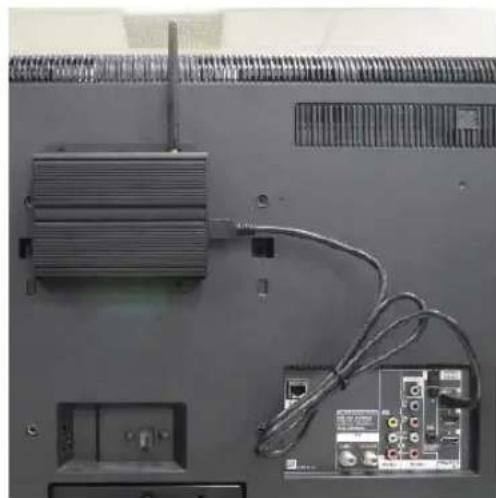
Black wireless router device with ventilation slots and a single antenna (no visible text or labels)Attach the player on the back of the monitor using Velcro
-
Separate the Velcro pads and stick one of them to the bottom of player.
-
Stick the other Velcro pad onto the back of monitor, and then attach the player to it. Use HDMI extension cord to connect player and the monitor
natural_image
Interior view of an electronic control panel with cooling unit, wiring, and electronic device (no visible text or symbols)2. Configuring the device
2.1. System connections
- Attach the AC power adapter to provide power to the unit. After approximately 35 seconds, booting animation will be displayed on the screen below as shown here:
natural_image
Three small white circles of varying shades on a black background, no text or symbols present.- The player boot process takes approximately 60 seconds to complete. After boot up is complete, the signboard will stay in the Basic settings menu if no content service has been configured (i.e. first boot up for a brand new unit or after a factory reset). Plug in a USB mouse to start configuring the signboard. If you have already set content into the signboard, contents will start playing back automatically 15 seconds after boot up.
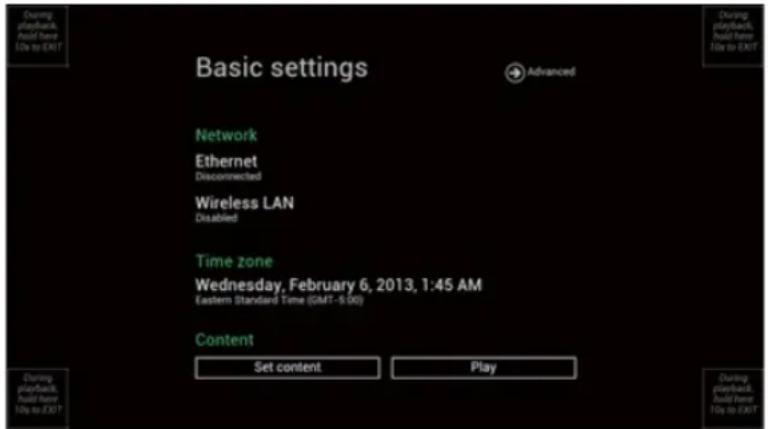
Note: To enter the menu system at any time during playback, plug in a USB mouse and hold the left mouse key in the corner area as shown below for 10 seconds.
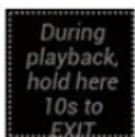
* You will be asked for a password if a password has been pre-configured.
2.2. Basic settings
You must attach a USB mouse to the signboard to configure settings.
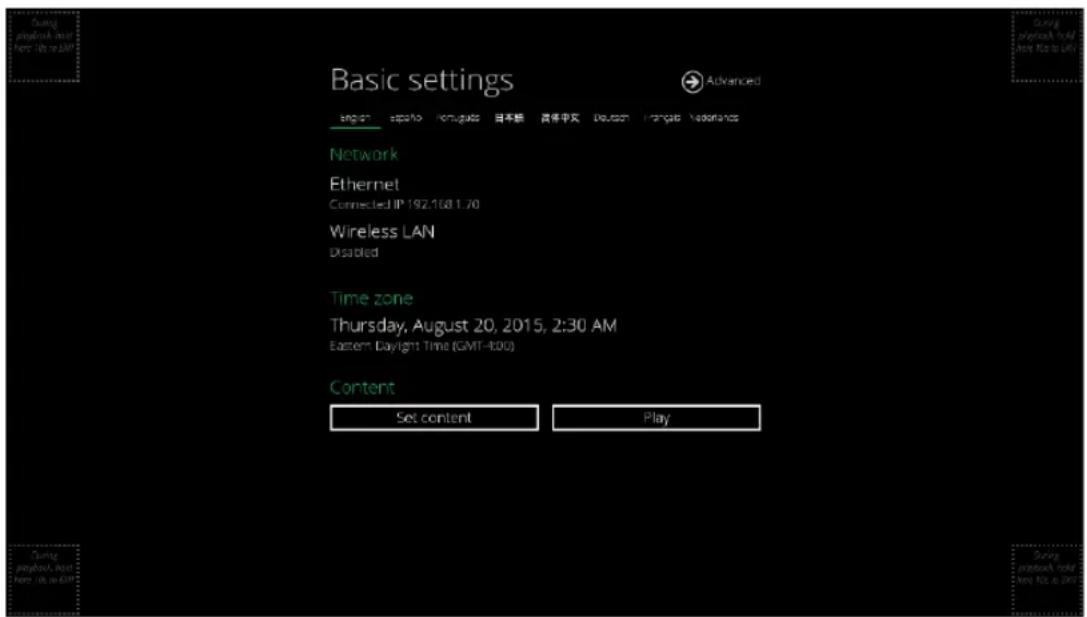
(Fig. 2.2.1)
Basic settings allow users to configure 3 important signage application settings: Network, Time zone and Content.
Each time the Basic settings menu is entered, the signboard will start playback automatically after 15 seconds if content services have been set previously. Auto playback can be canceled by clicking on the button while it's counting down.
To enter the Advanced Setting menu, click the Advanced button.
2.3. Connecting the device to your network
Wireless connection
- Click the Wireless LAN setting, and the wireless configuration UI will be launched.
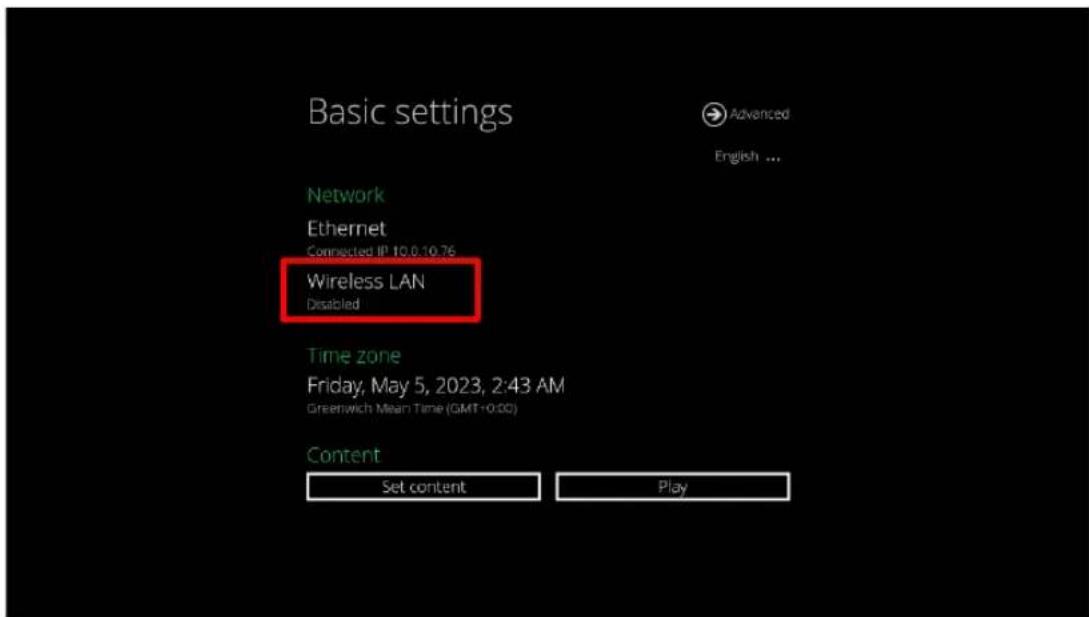
(Fig. 2.3.1)
- Click the ON/OFF button as indicated below to turn the Wireless interface on (Ethernet will be disconnected when the signboard connects to a wireless network).
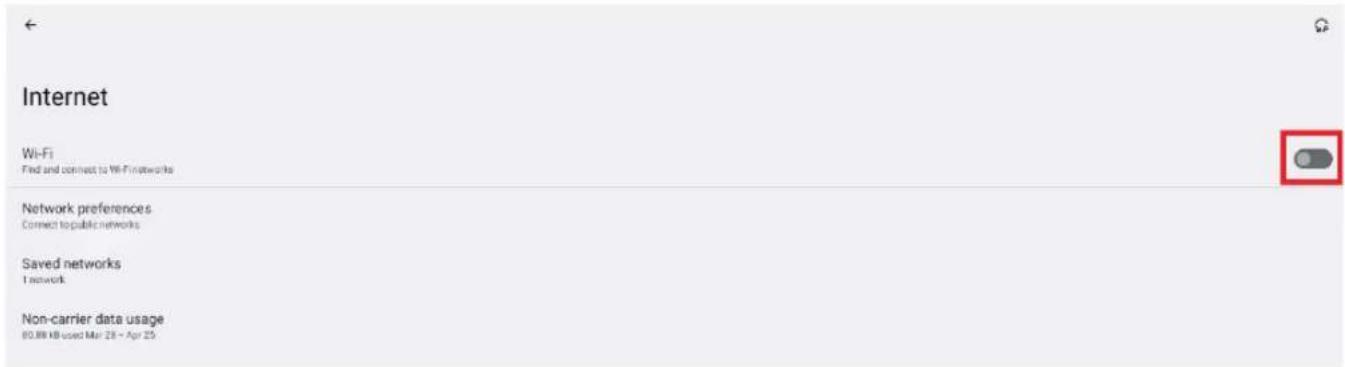
(Fig. 2.3.2)
- The signboard will scan for wireless signals nearby and available AP stations will be listed.
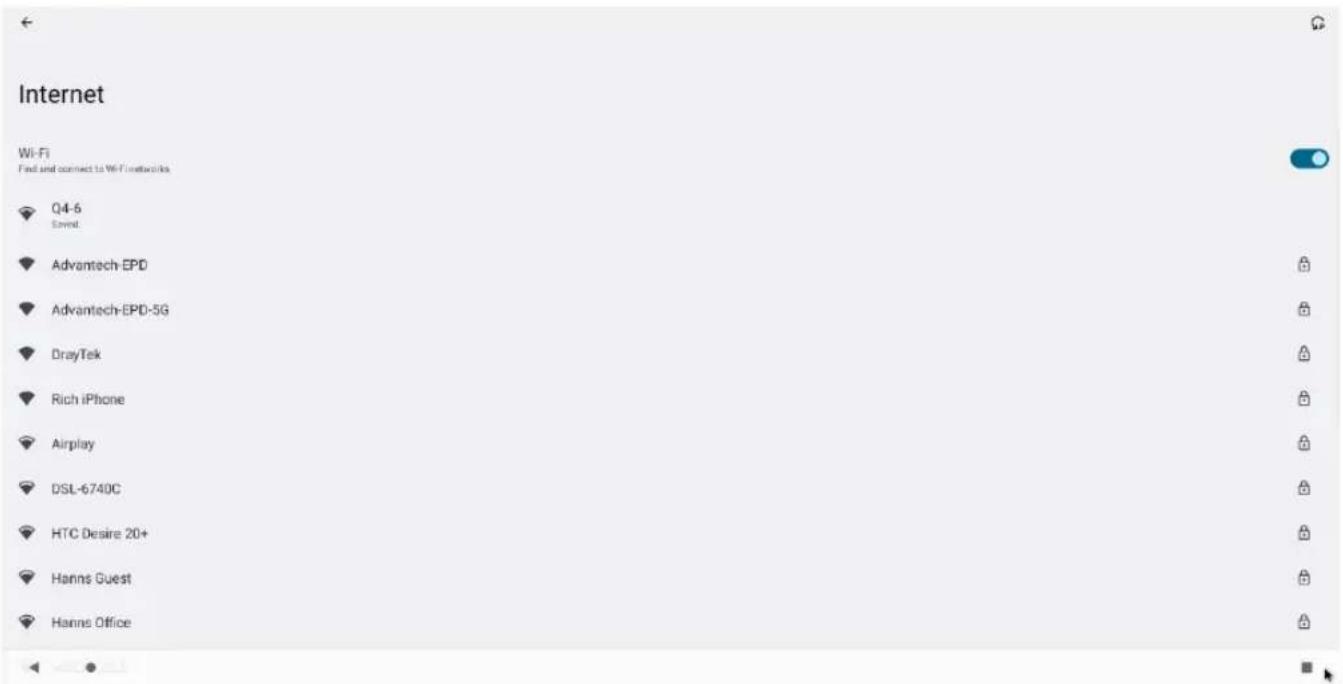
(Fig. 2.3.3)
- Click on the station name to connect. If the network requires authentication, you will be asked to provide the password for access.
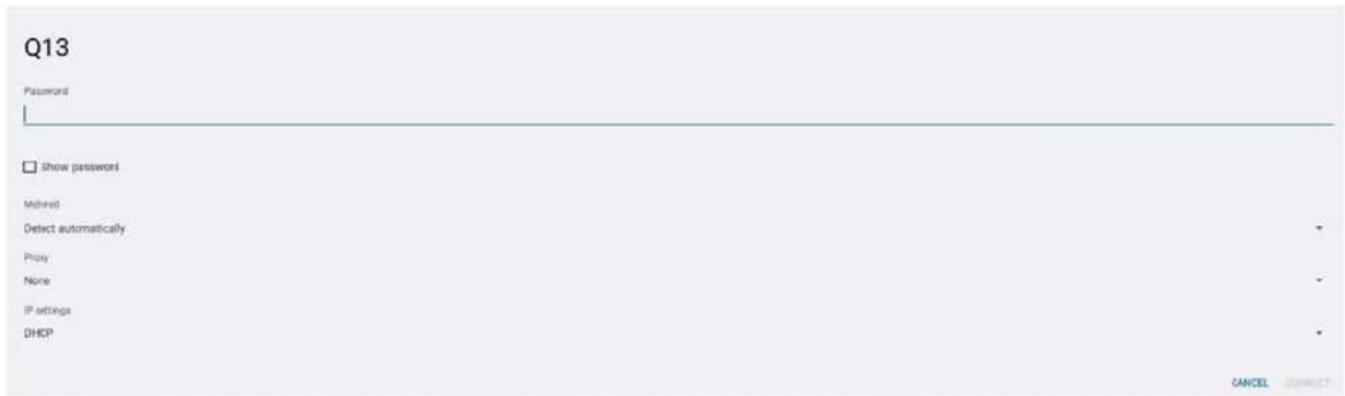
(Fig. 2.3.4)
Wired connection
To use the wired Ethernet connection, first connect an Ethernet cable then disable the Wireless LAN interface.
- Click the Wireless LAN setting, the wireless configuration UI will be launched. (Fig. 2.3.1)
- Click the ON/OFF button as indicated below to turn the Wireless interface off. (Fig. 2.3.2)
DHCP – automatically assign network IP address
- Turn on the Ethernet interface. For DHCP environments, configuration will be finished in this step.
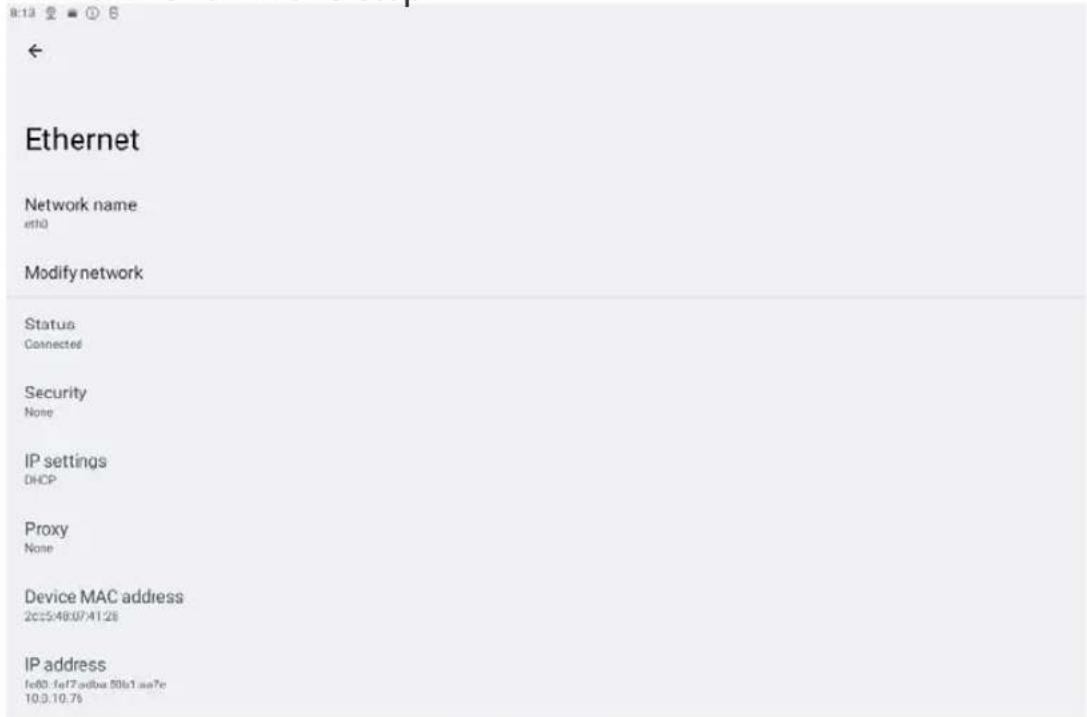
(Fig. 2.3.5)
Static IP – manually assign network IP address
- Click Modify Network to make a static IP configuration.
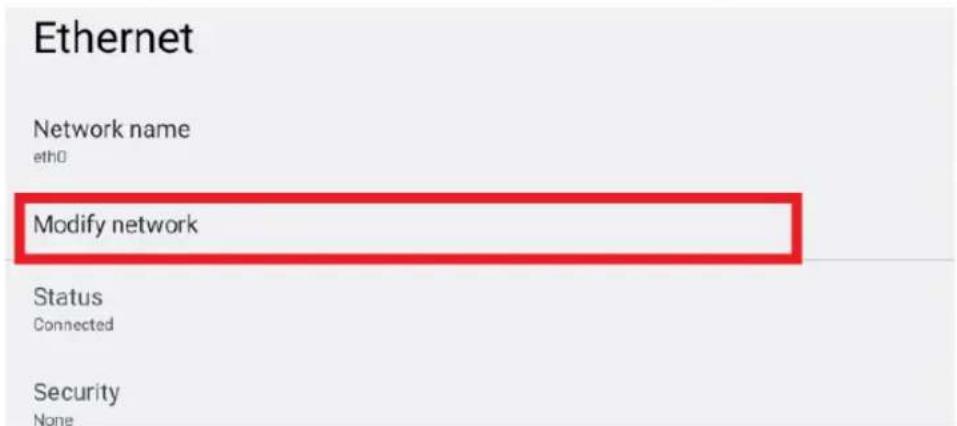
(Fig. 2.3.6)
- Under IP settings, change DHCP to Static.
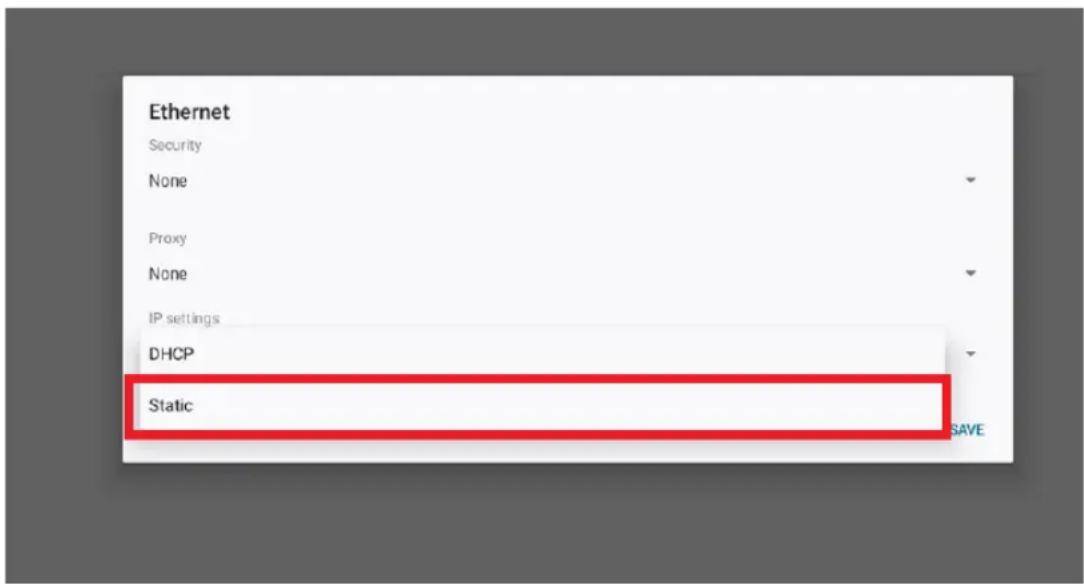
(Fig. 2.3.7)
- Fill the form and click Connect to complete the setting.
(Scroll down/ swipe to see the rest of the menu if needed)
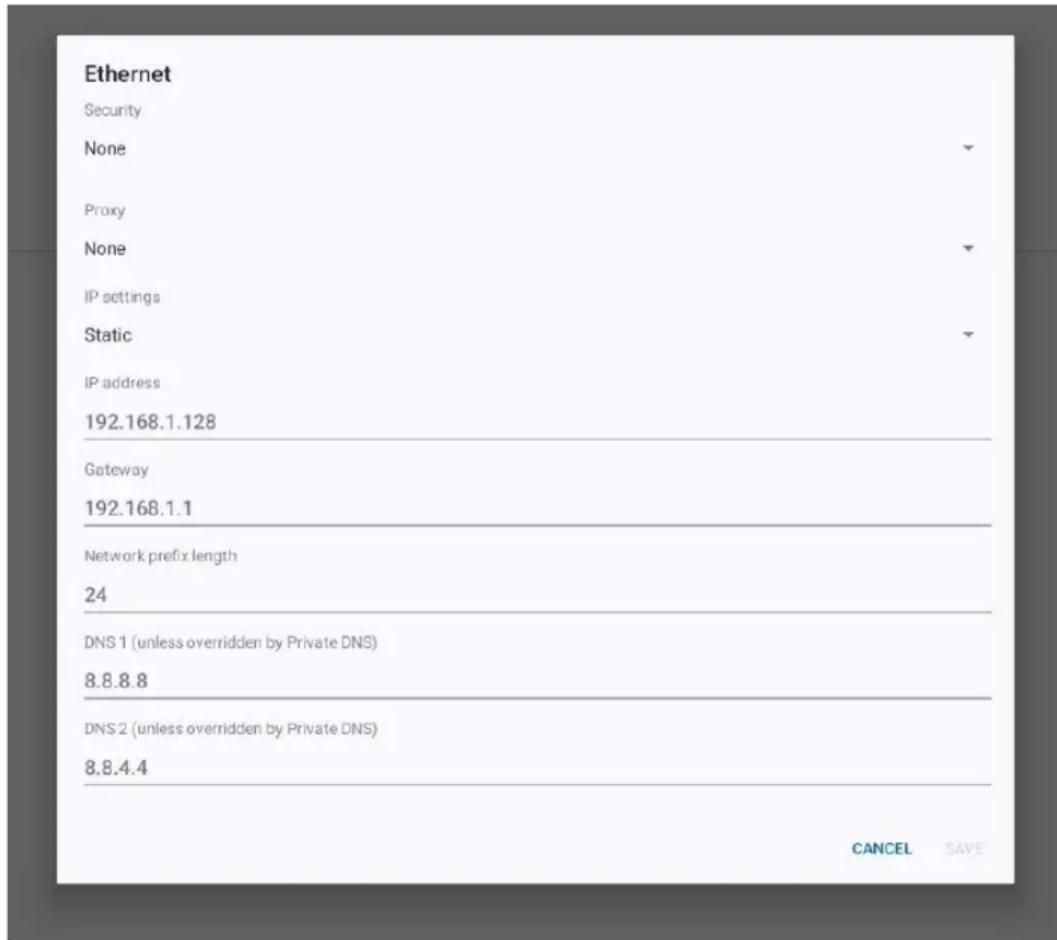
(Fig. 2.3.8)
2.4. Time zone settings
- Click Time zone to launch the configuration menu.
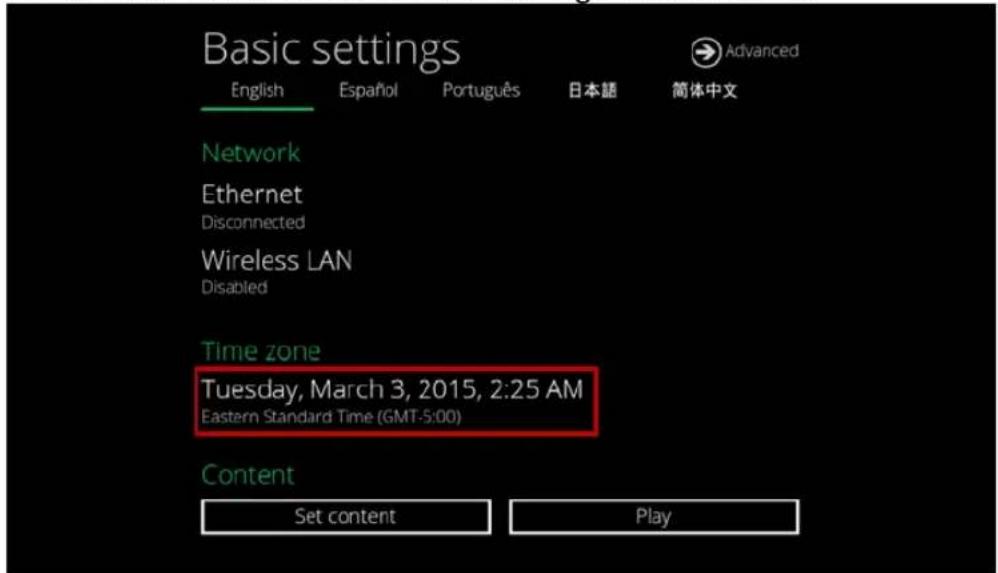
(Fig. 2.4.1)
- Click Select time zone.
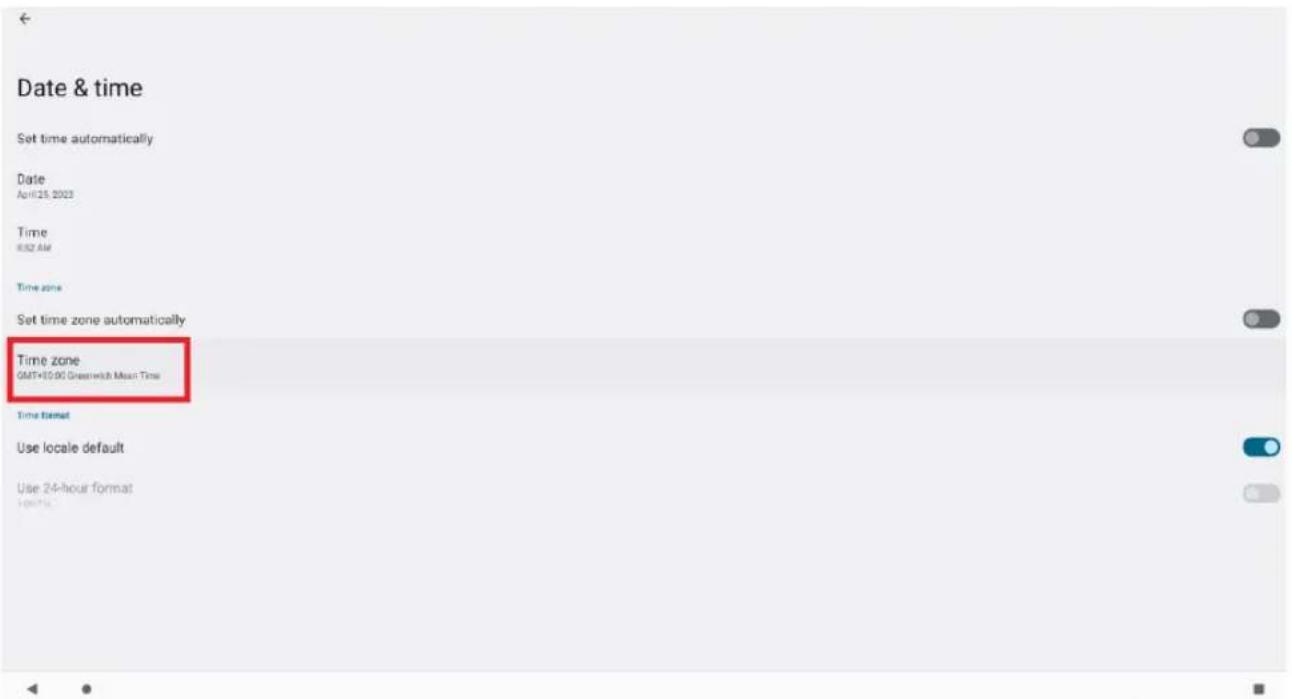
(Fig. 2.4.2)
- Choose the correct time zone from the available options.
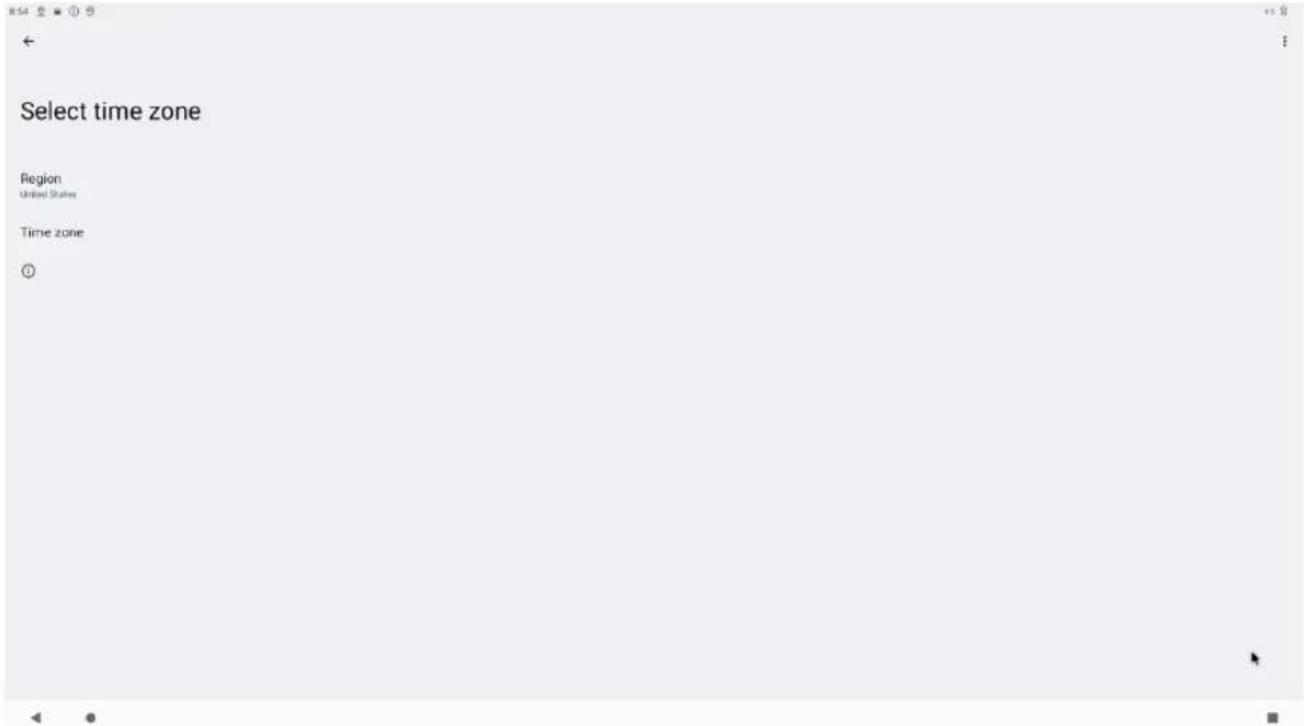
(Fig. 2.4.3)
2.5. Content settings
- Click the Set content button to launch the configuration menu.
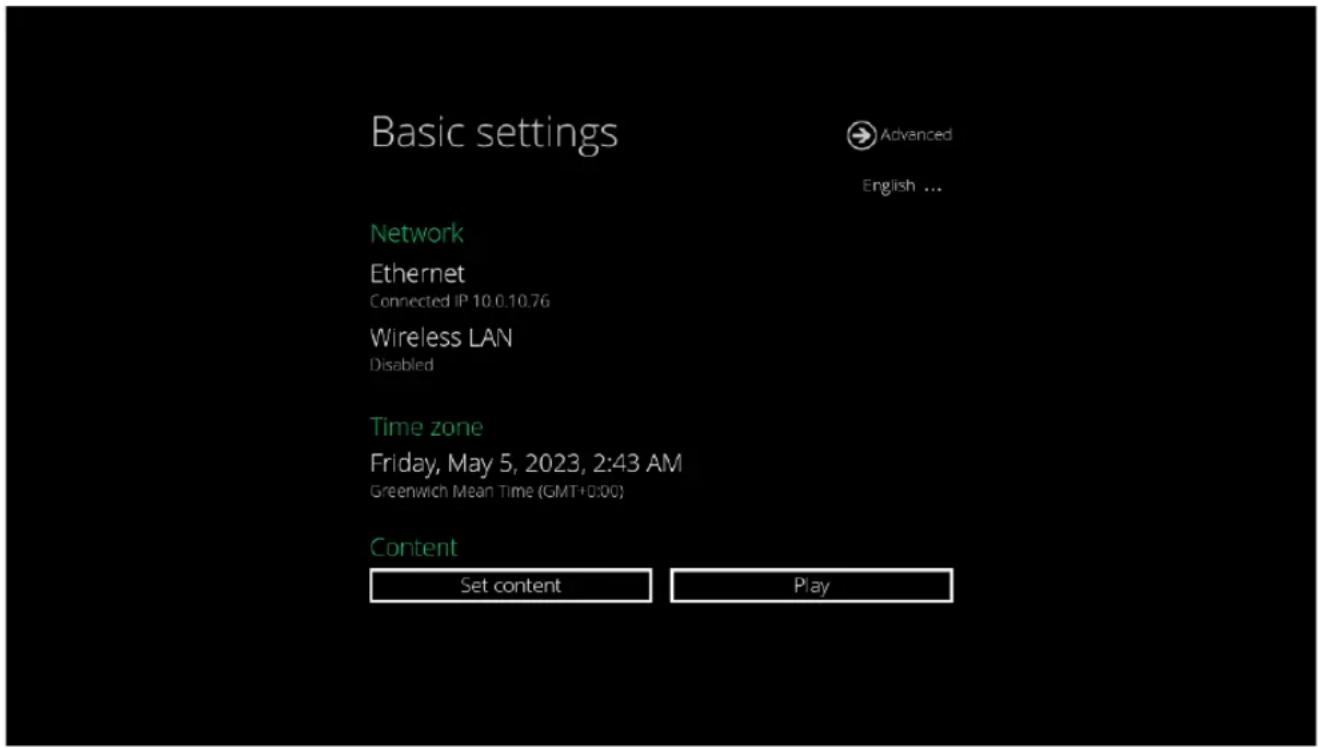
(Fig. 2.5.1)
- Input the content source URL and click on Connect. The signboard will start playback immediately.
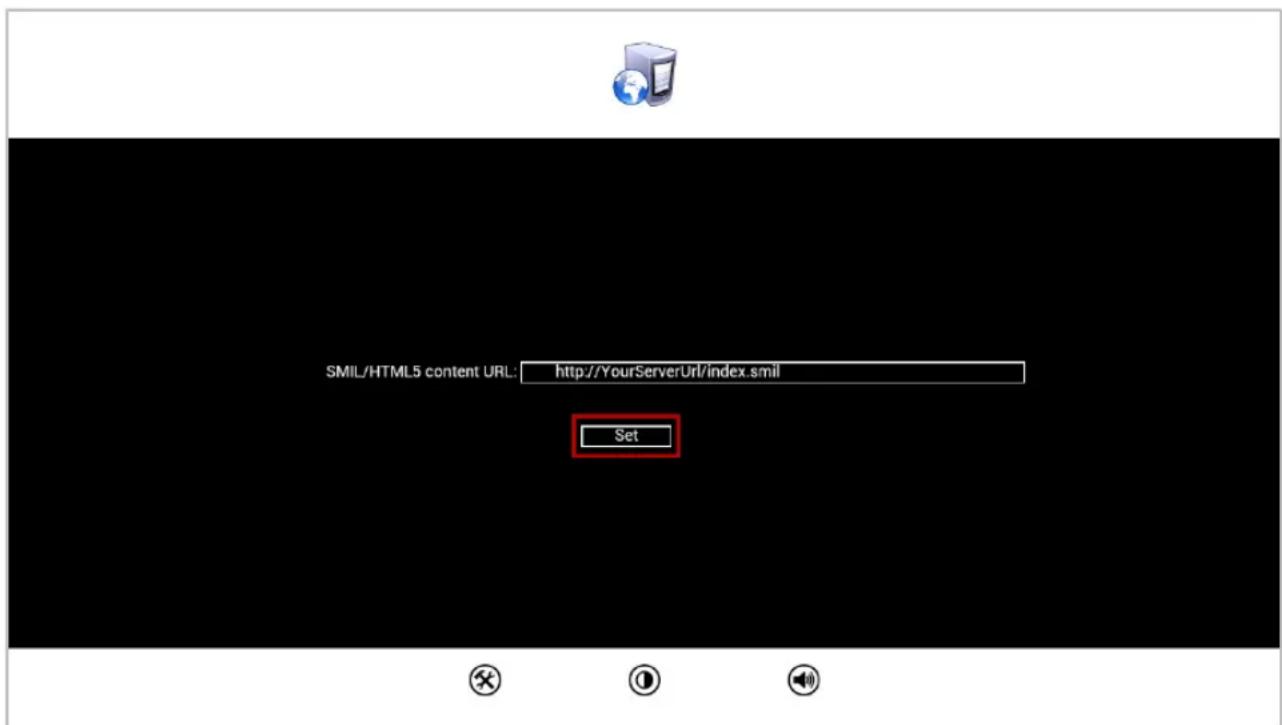
(Fig. 2.5.2)
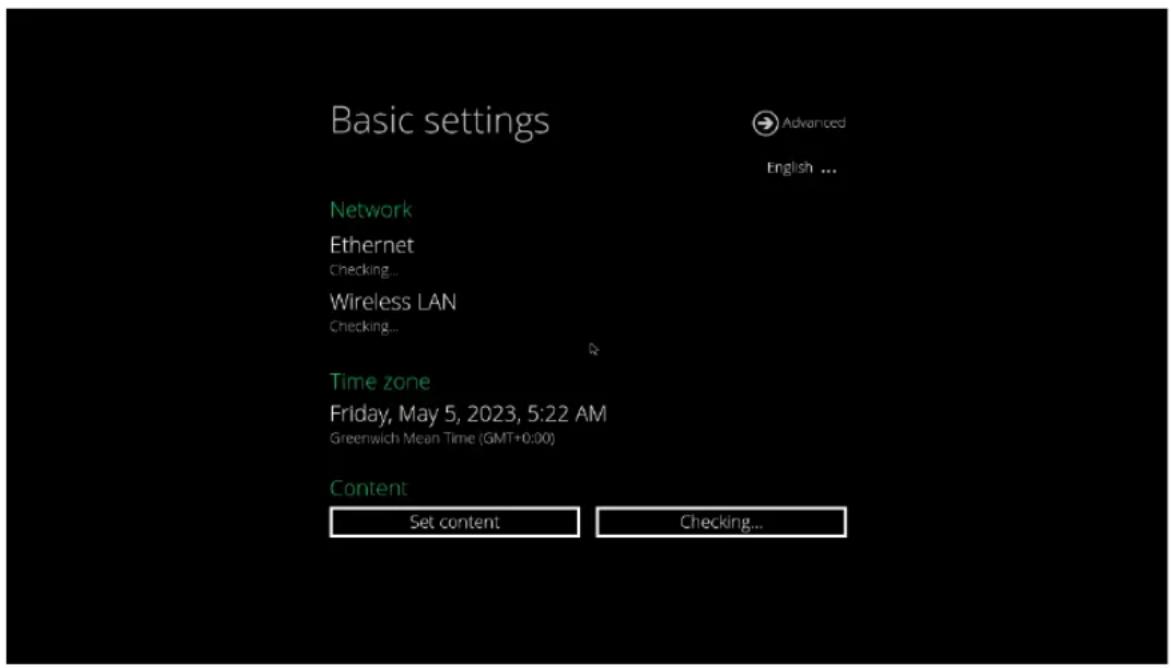
- The player will check the availability of SMIL/HTML5 content URL, with the Play button showing Checking...
The checking action can be canceled by clicking Checking... button, it will change back to Play.
NOTE: It is highly recommended to let the player check the availability of the content URL. Clicking Play button with a bad/invalid URL set would cause the player to reboot, if the FailSafe function is not configured.
(Fig. 2.5.3)
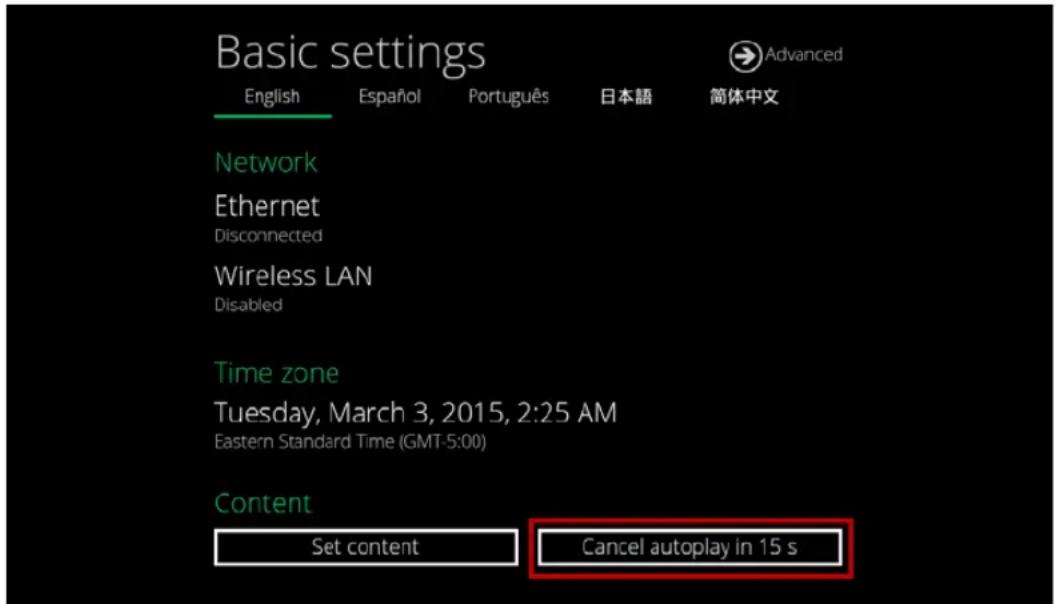
- If the SMIL/HTML5 content URL is available, the Play button will change to a 15-second countdown and the playback will start after the countdown. The countdown can be canceled by clicking the button.
If it keeps showing Checking... for a long time, please go back to Set content to check the correctness of the URL.
(Fig. 2.5.4)
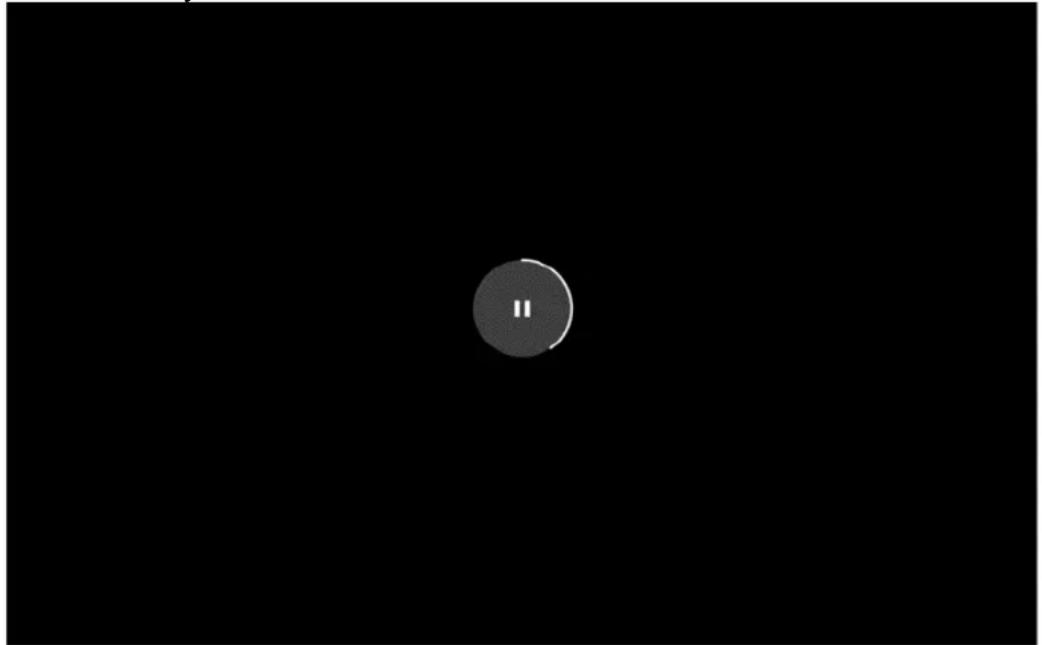
- Every time device reboot, the playback will start automatically. The playback action can be canceled by clicking the pause icon, it will go Basic Settings automatically.
natural_image
A simple circular icon with the number 'II' centered on a black background, no text or symbols present.(Fig 2.5.5)
2.6. Player information
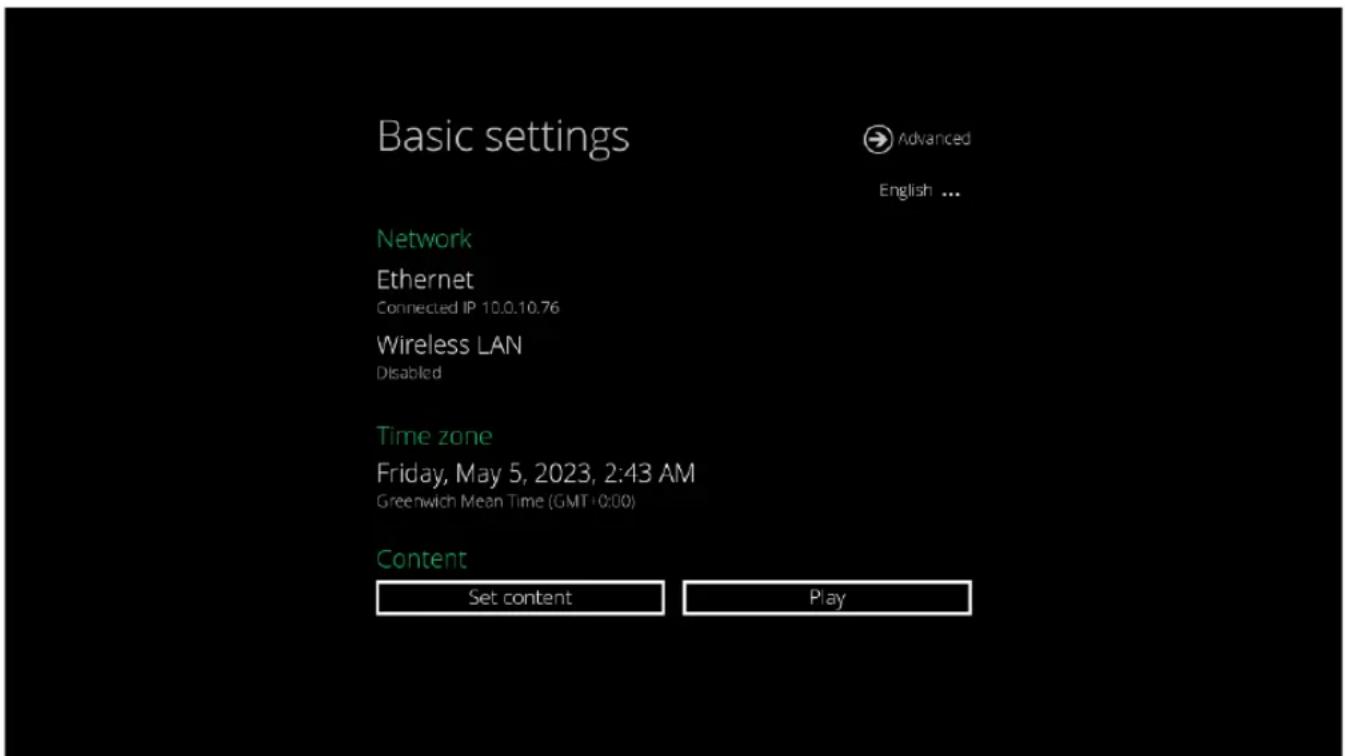
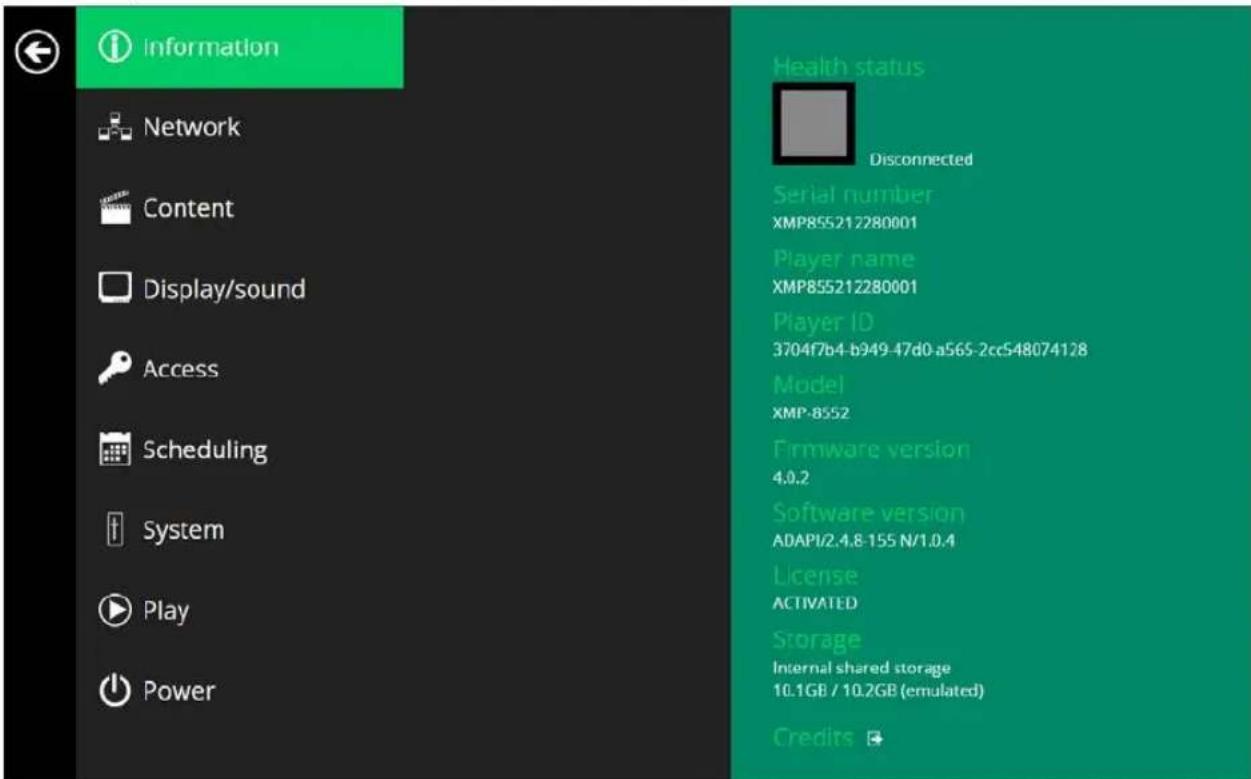
From the signboard you can check the basic information including Health status, Firmware version and Player ID.
- Click Advanced, and the advanced configuration menu will be launched.
(Fig. 2.6.1)
- Click on Information to view Health Status definitions:
Green – Normal > Device connection to the content source URL server is normal.
Blue - Local > Device is playing content from the USB drive or SD card.
Gray – Disconnected > Device is disconnected.
(Fig. 2.6.2)
2.7. Content configuration – AppStart
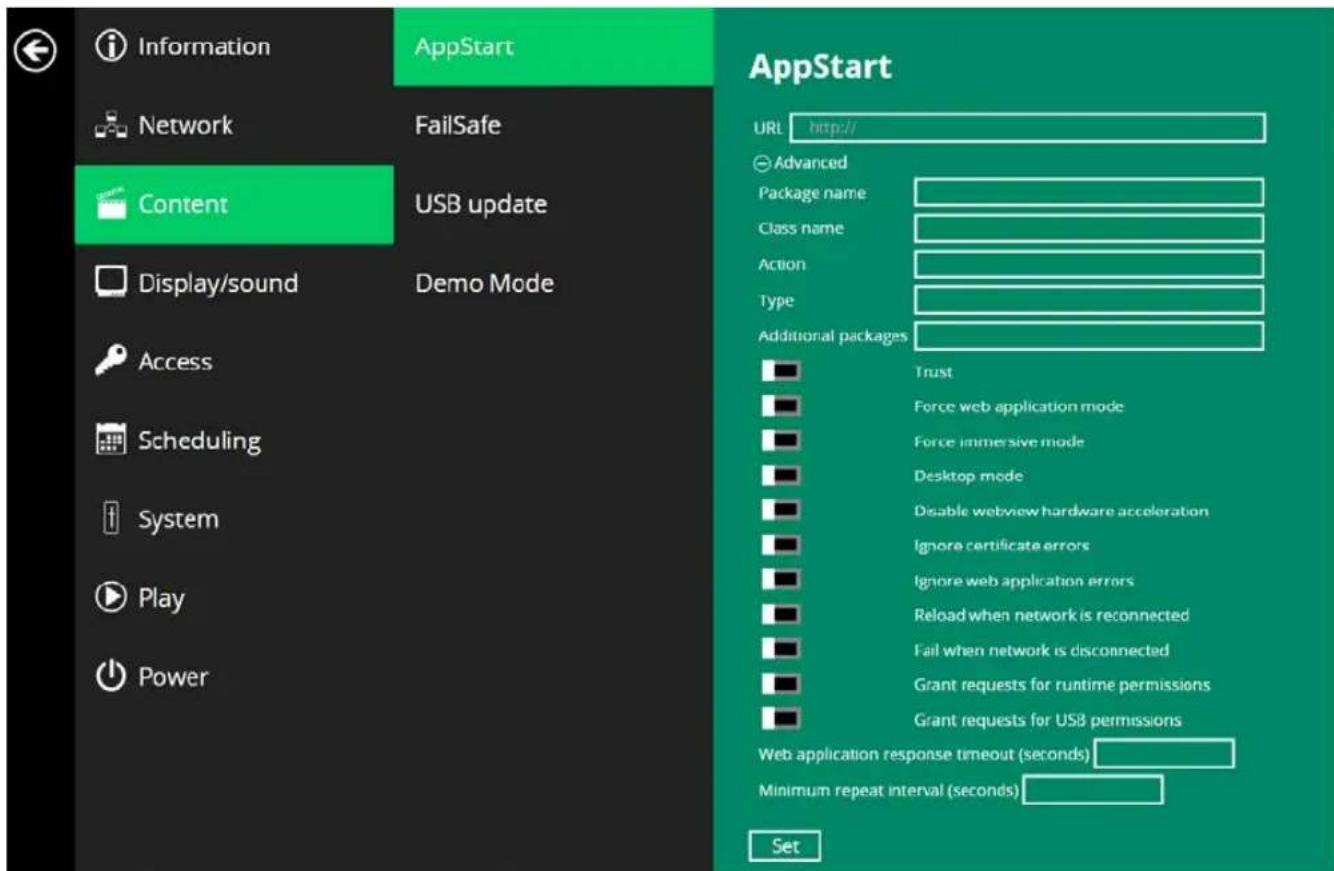
User can assign the URL and App after system start up.
- Click on the Advanced button. The advanced configuration menu will be launched. (Fig. 2.6.1)
- Click on Content, and then click AppStart.
- Enter the valid URL of HTML/SMIL in AppStart.
(Fig. 2.7.1)
The Advanced option is used for the 3rd-party App configurations only.
Trust: Switch to Enabled to set by-pass authentication verification for REST API calls in HTML application which must launched by AppStart.
Force web application mode: Switch to Enabled to disable HTTP status code verification to bypass some cookie related issues. It will ignore "HTTP ERROR STATUS".
Force immersive mode: Switch to Enabled to enter fullscreen and hide navigation bar.
Desktop mode: Switch to Enabled to force player to load content in Desktop mode instead of Tablet mode. Please note: not all the contents is created for Desktop mode, please ask your content provider for details.
Disable webview hardware acceleration: Switch to Enabled to engage solution for broken or distorted images due to the WebView on Android RK3368 Platform. Enabling hardware acceleration is disable the ability to play videos on webpage.
Ignore certificate errors: Switch to Enabled to ignore certificate errors to allow visiting Web Pages that do not have valid certificate. It will ignore "UNTRUSTED ERROR". When Disabled; if there is a certificate on HTML5 content, it will cause a playback error.
Ignore web application errors: Switch to Enabled to ignore serve error codes and continue to playback to avoid screen downtime.
Reload when network is reconnected: Switch to Enabled to reload web page as soon as network connection becomes available.
Fail when network is disconnected: Switch to Enabled to load failover content when network is disconnected.
Grant requests for runtime permissions: Switch to Enabled to grant runtime permissions to external devices as to avoid dialogue box to pop up. Work with Android 6.0+.
Grant requests for USB permissions: Switch to Enabled to grant runtime permissions to external devices as to avoid dialogue box to pop up. Work with Android 4.4.
Keep Alive (Web App Software Watchdog)
RK3188: 2.2.6-125 or higher
RK3288: 2.2.6-93 or higher
RK3368: 3.3.3-94 or higher
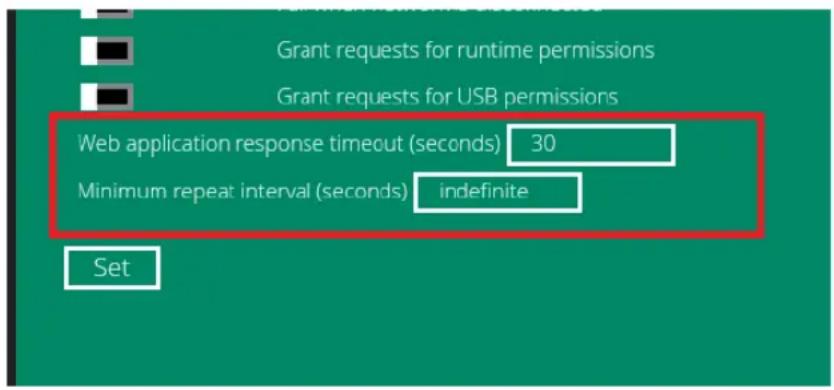
Web Application response time out: Web developers can use this feature to implement a software watchdog and request device to check if their Web App is responding within the set time. The timeout value should be between 30\~86400, if lower or higher than the limit, the closest limit number will be used (e.g. set to 0, 30 will be used. Set to 1000000, 86400 will be used).
Minimum repeat interval: Minimum repeat interval to restart the content when the content stops playing due to reaching end or error. If set to indefinite or a negative value, it will never attempt to reload web page.
(Fig. 2.7.2)
2.8. Content configuration – FailSafe
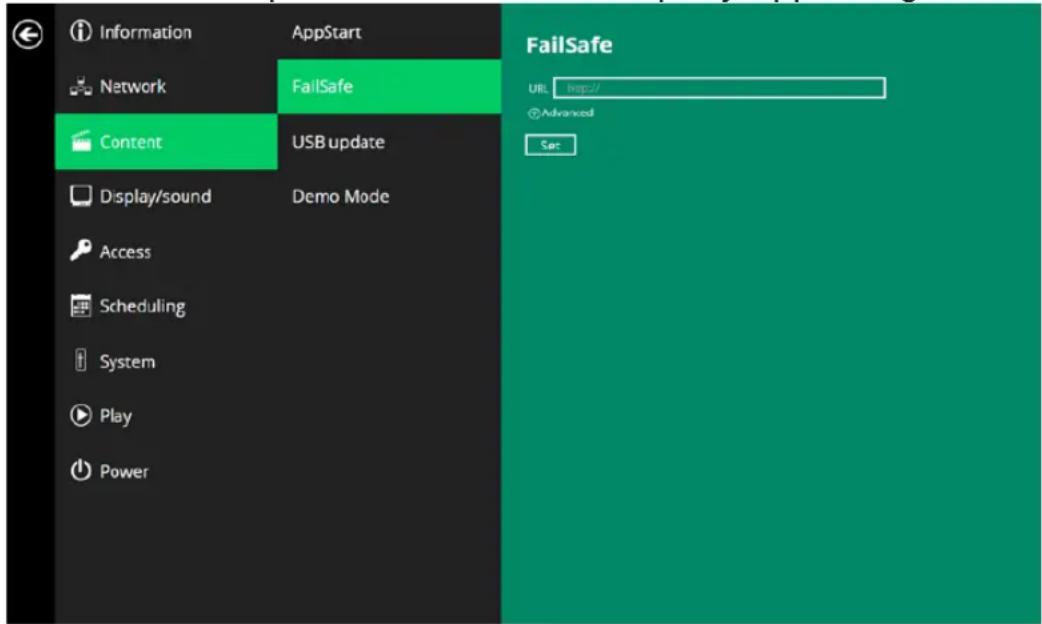
The URL and APP can also be assigned once the system has failed to play the assigned content.
- Click on the Advanced button. The advanced configuration menu will be launched. (Fig. 2.6.1)
- Click on Content, and then click on FailSafe.
- Enter the URL of HTML/SMIL/Media RSS in FailSafe.
- The Advanced option is used for the 3rd-party App configurations only.
(Fig. 2.8.1)
2.9. Content configuration – USB Update
User can enable/disable updates to the playlist through USB storage drive.
- Click on the Advanced button. The advanced configuration menu will be launched. (Fig. 2.6.1)
- Click on Content, and then click on USB Update.
- Enabled: If there is a SMIL folder in the USB drive that has been inserted to the player, the player will download the content to the internal storage and playback automatically.
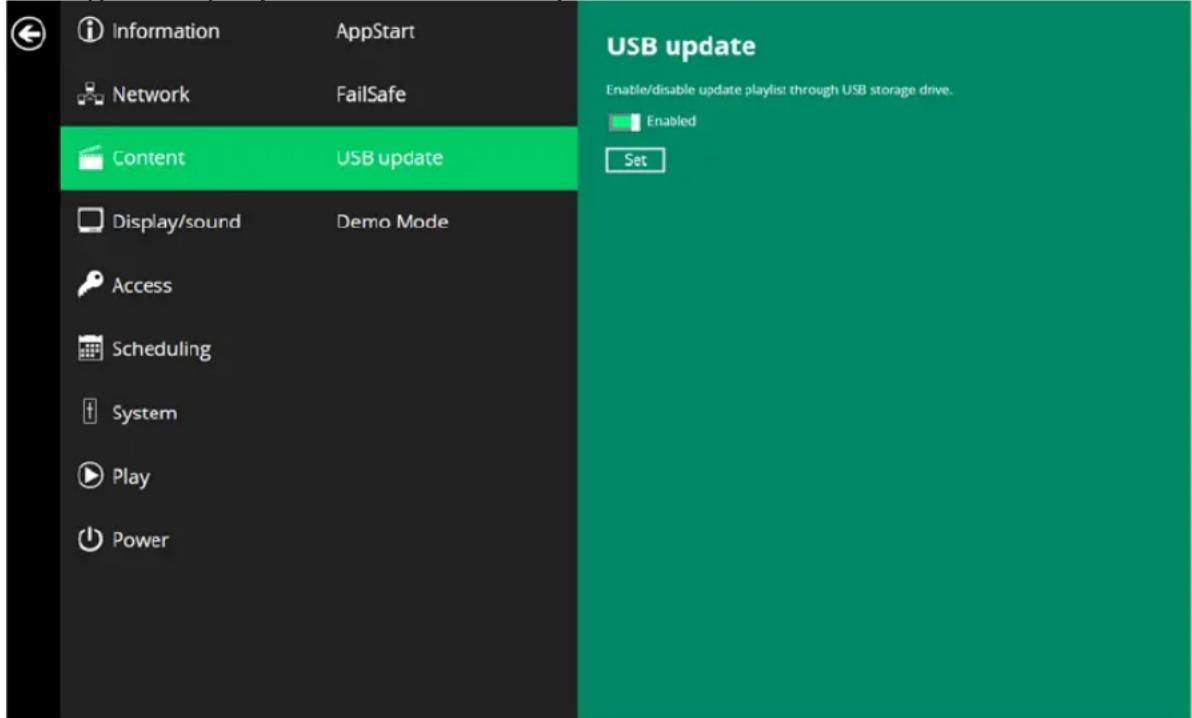
(Fig. 2.9.1)
2.10. Display settings
Resolution Settings for Media Players)
For best quality, set the output resolution to match your display's native resolution to avoid image scaling and blur. (Fig. 2.10.3)
If you are connecting to an LCD monitor, projector, or plasma display via HDMI compatible port, refer to the device specifications for the best matching setting.
- Click on the Advanced button. The advanced configuration menu will be launched. (Fig. 2.6.1)
- Click on Display/sound, and then click on Display. The Display Settings page will be launched.
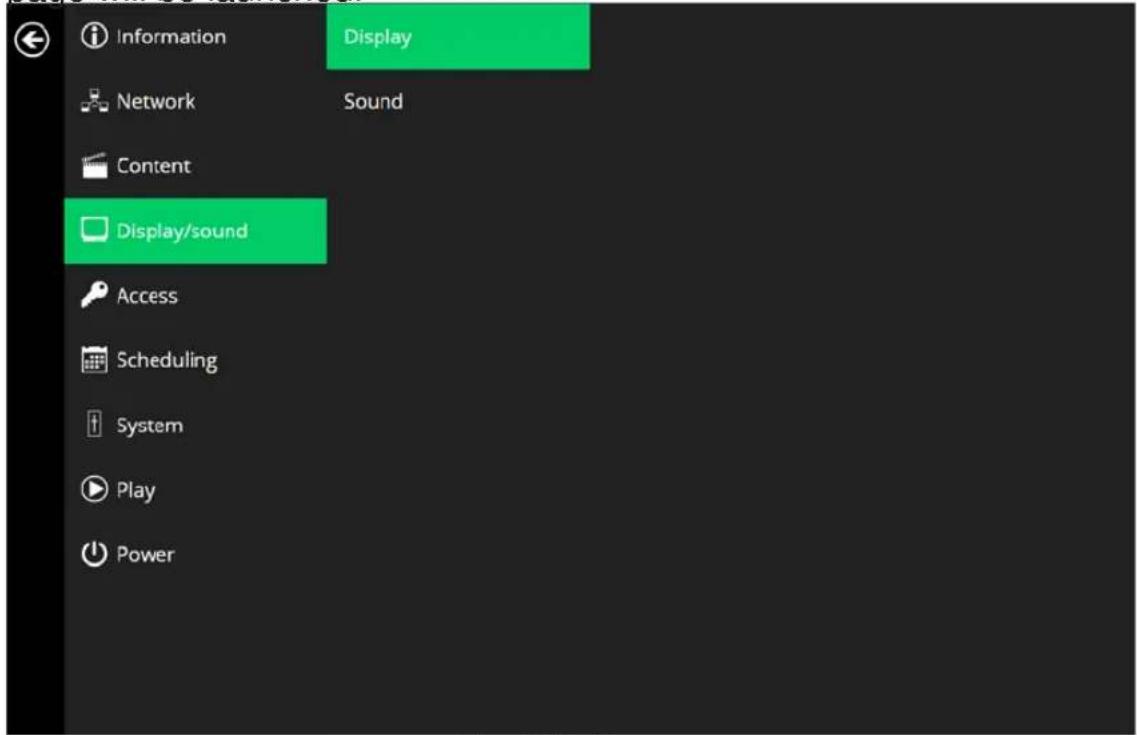
(Fig. 2.10.1)
- Click on Screen settings → Resolution and select a suitable resolution from the popup menu. Default configuration is Auto Detect, player will auto detect and use the best optimized resolution that is supported by your display.
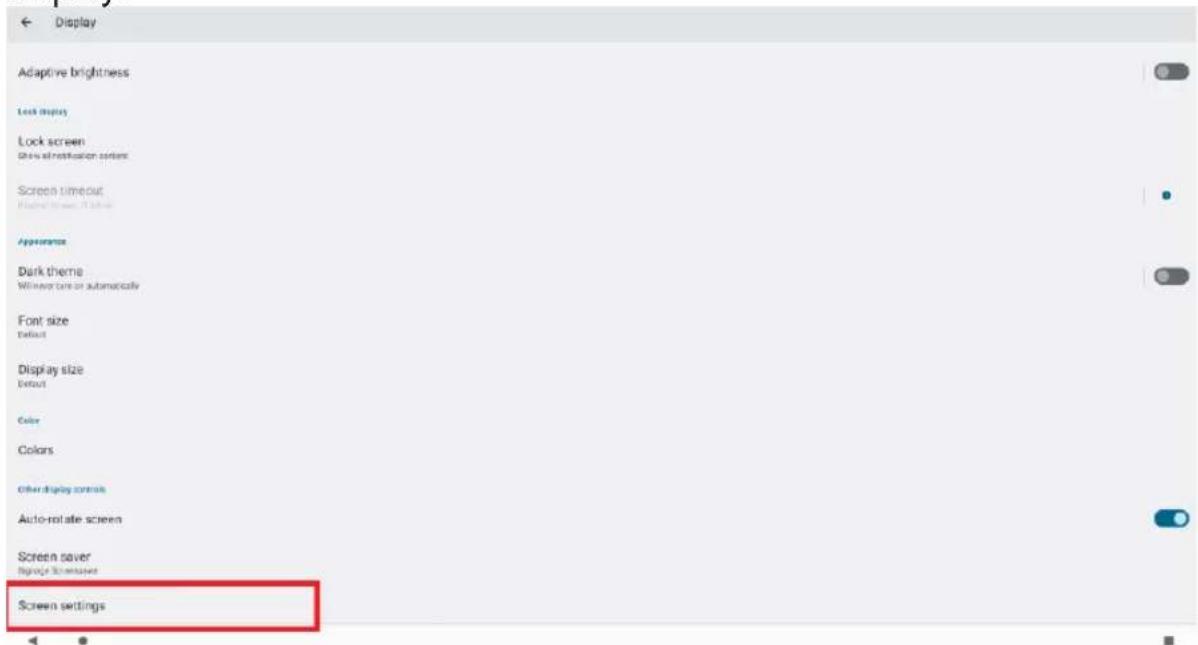
(Fig. 2.10.2)
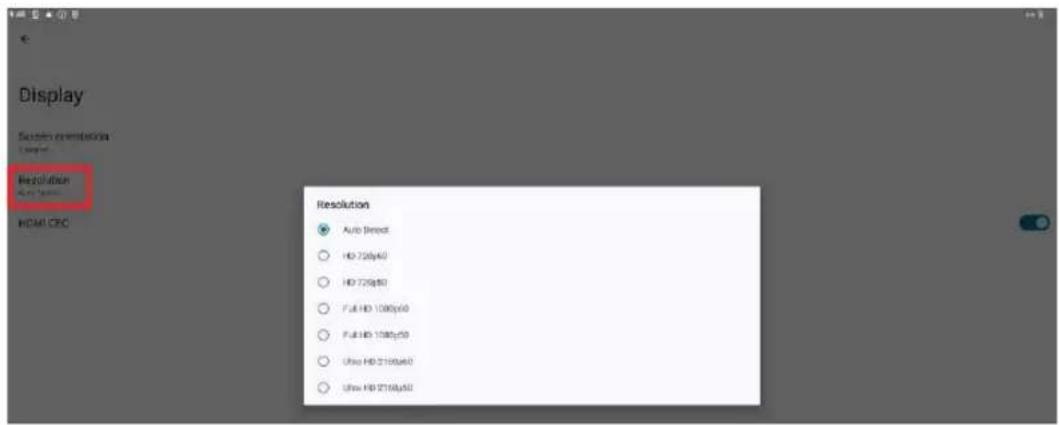
(Fig. 2.10.3)
Brightness Level
The default brightness is set to maximum, and it can be adjusted in the Display settings.
- Click on the Advanced button. The advanced configuration menu will be launched. (Fig. 2.6.1)
-
Click on the Display/sound button, and then click on Display. The Display Settings page will be launched. (Fig. 2.10.1)
-
Click on Brightness Level.
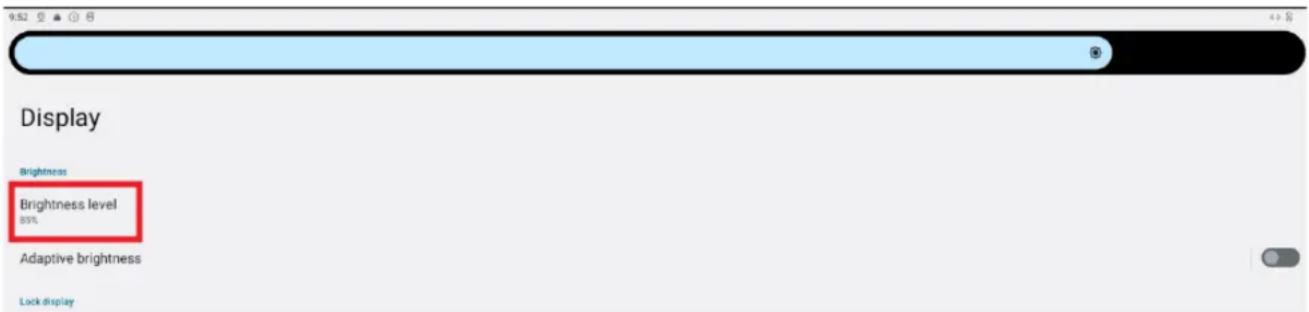
(Fig. 2.10.4)
- Drag the gear toggle to adjust the brightness. Click on OK to save the configuration.
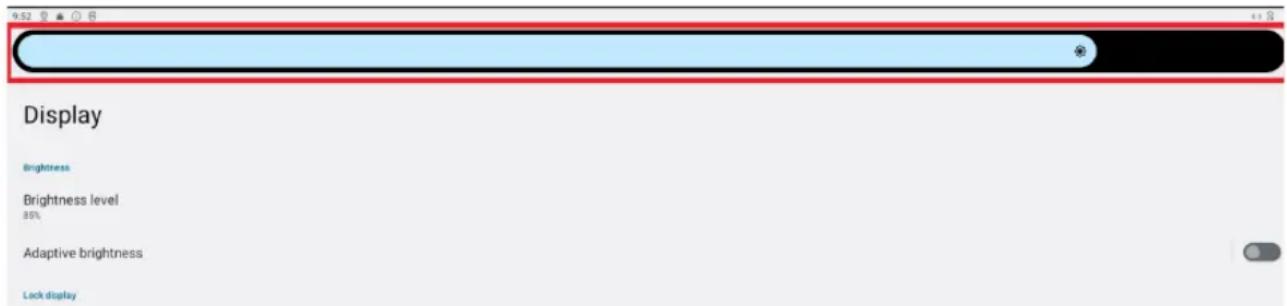
(Fig. 2.10.5)
Screen orientation
Screen orientation allows you to set the display to 90/180/270-degree rotation.
- Click on the Advanced button. The advanced configuration menu will be launched. (Fig. 2.6.1)
-
Click on Display/sound, and then click on Display. The Display Settings page will be launched. (Fig. 2.10.1)
-
Click on Screen settings → Screen orientation, as marked in red below.
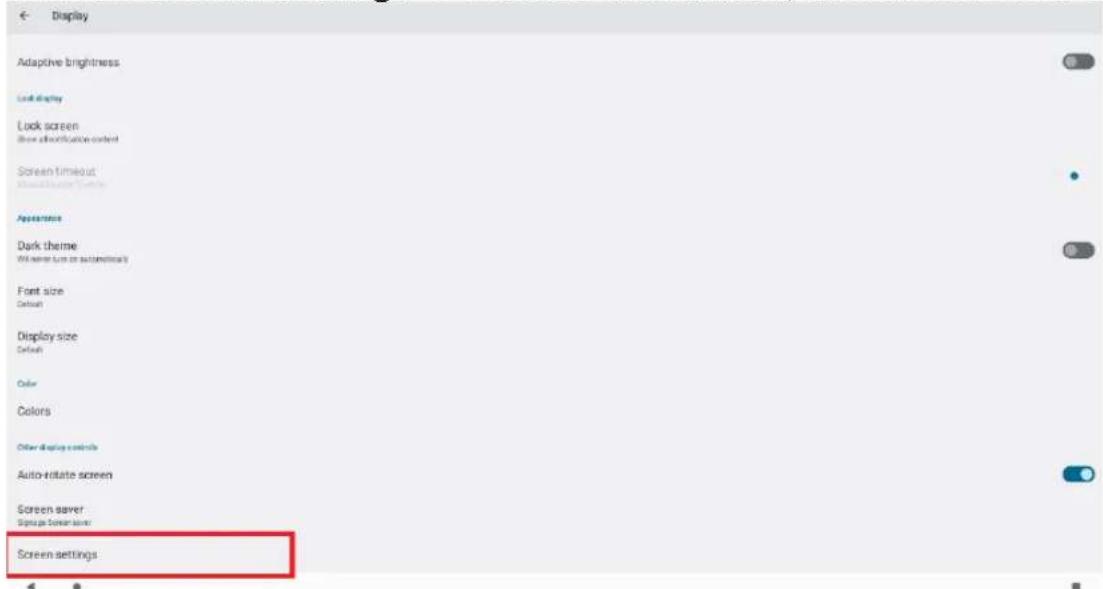
(Fig. 2.10.6)
- Select your preferred angle from the menu. Selecting Auto-rotate allows the display to rotate along with the signboard automatically.
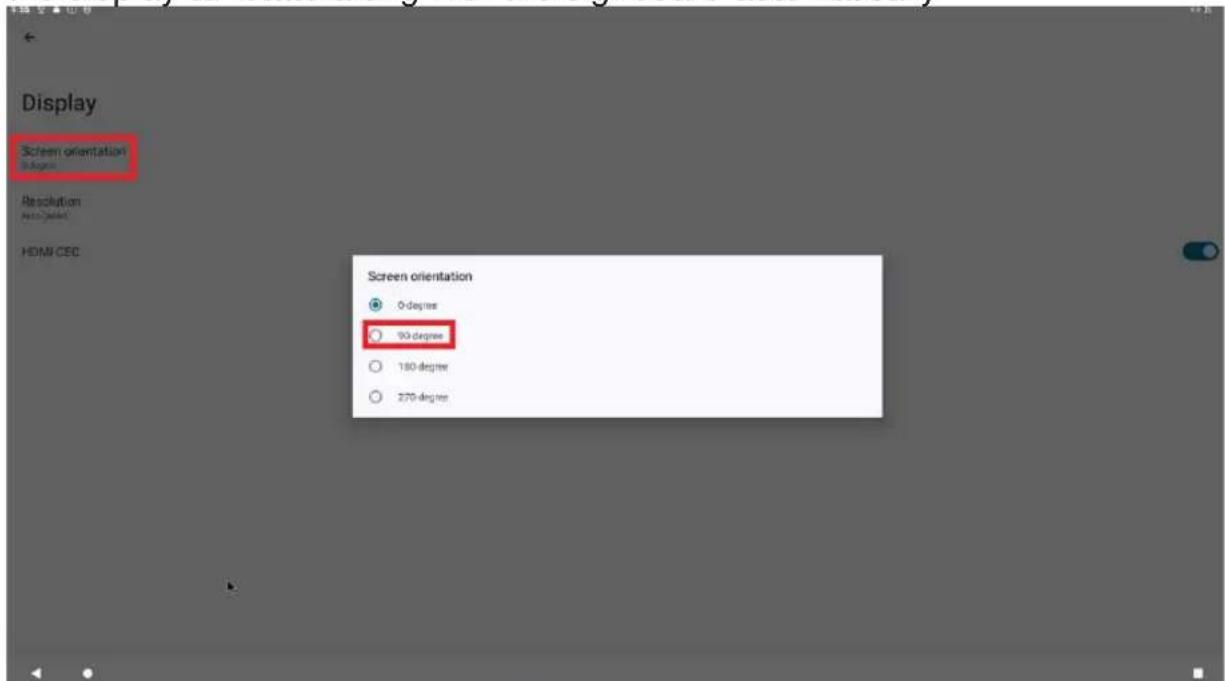
(Fig. 2.10.7)
2.11. Sound settings
To control the output sound volumes and touch sounds:
- Click on the Advanced button. The advanced configuration menu will be launched. (Fig. 2.6.1)
- Click on Display/sound, and then click on Sound. The Sound Settings page will be launched.
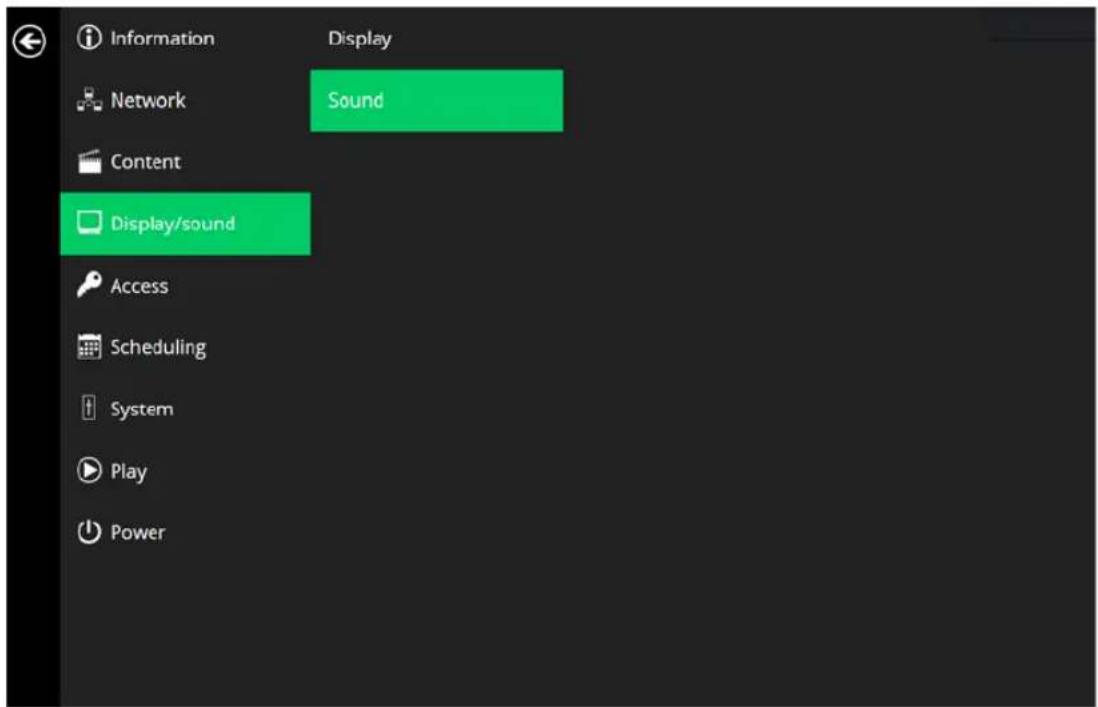
(Fig. 2.11.1)
- Click on Volumes, the Volumes settings page will be launched. Drag the blue sliders to adjust the volumes for the selected options.
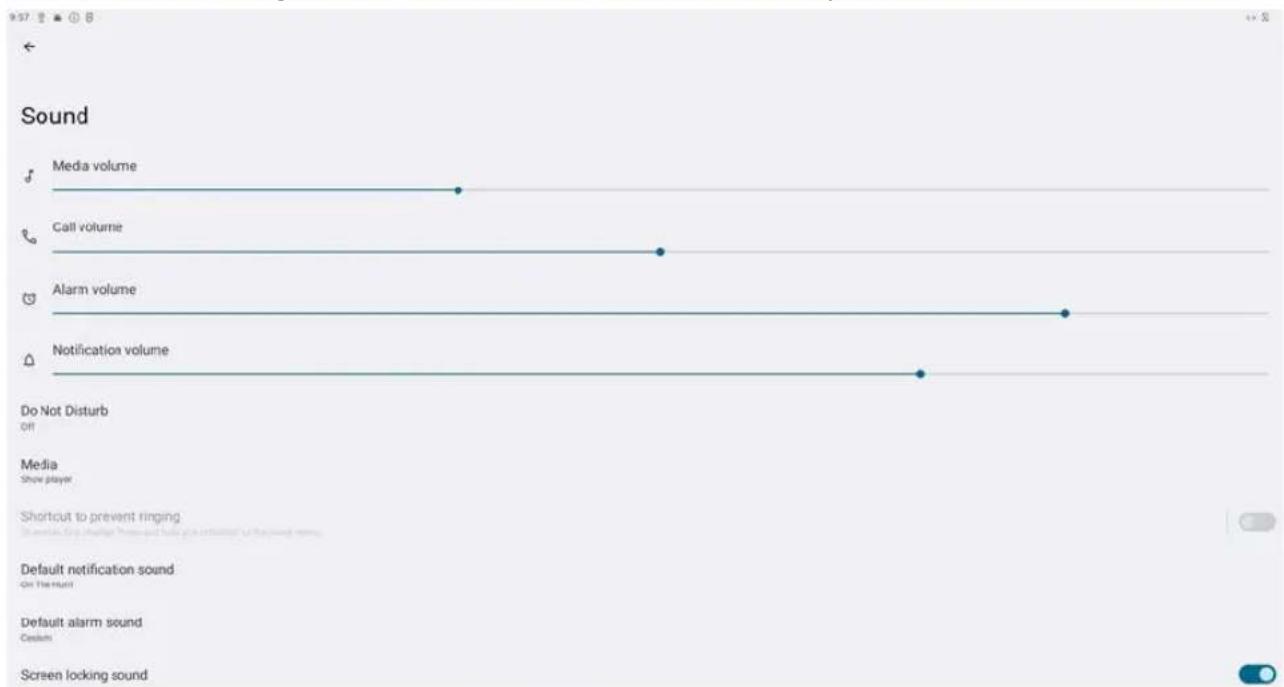
(Fig. 2.11.2)
2.12. Access configuration – Player name
The player's name can be specified so the player can be easily recognized in the management software. (Management software support is required).
- Click the Advanced button, advanced configuration menu will be launched.
- Click on Access, and click on Player name.
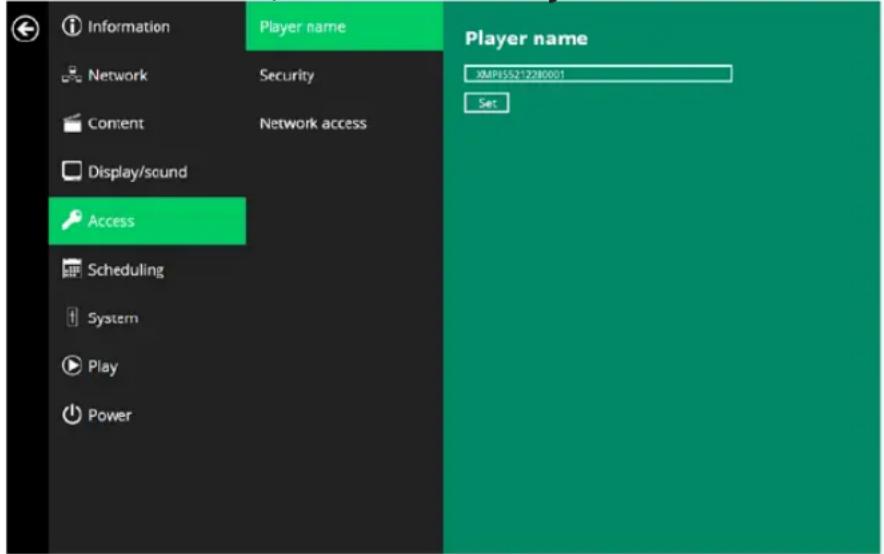
- Input a name for the field and click Set.
2.13. Access configuration – Security
A password can be set to provide authentication for player access. If the password is set, a password prompt will appear if a user is trying to enter the Basic settings menu from playback.
- Click the Advanced button, advanced configuration menu will be launched.
- Click on Access, and click on Security.
3. Enable Security keyguard.
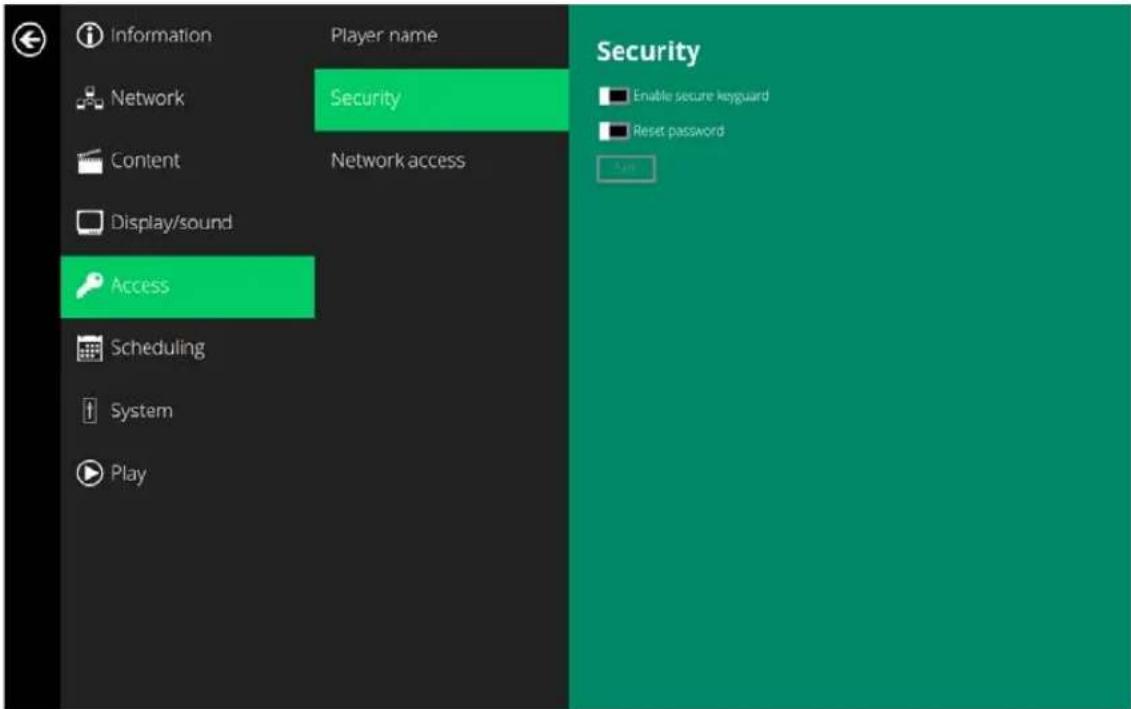
- Click on Reset Password to configure password settings.
- Empty Password: Empty password will remove any password.
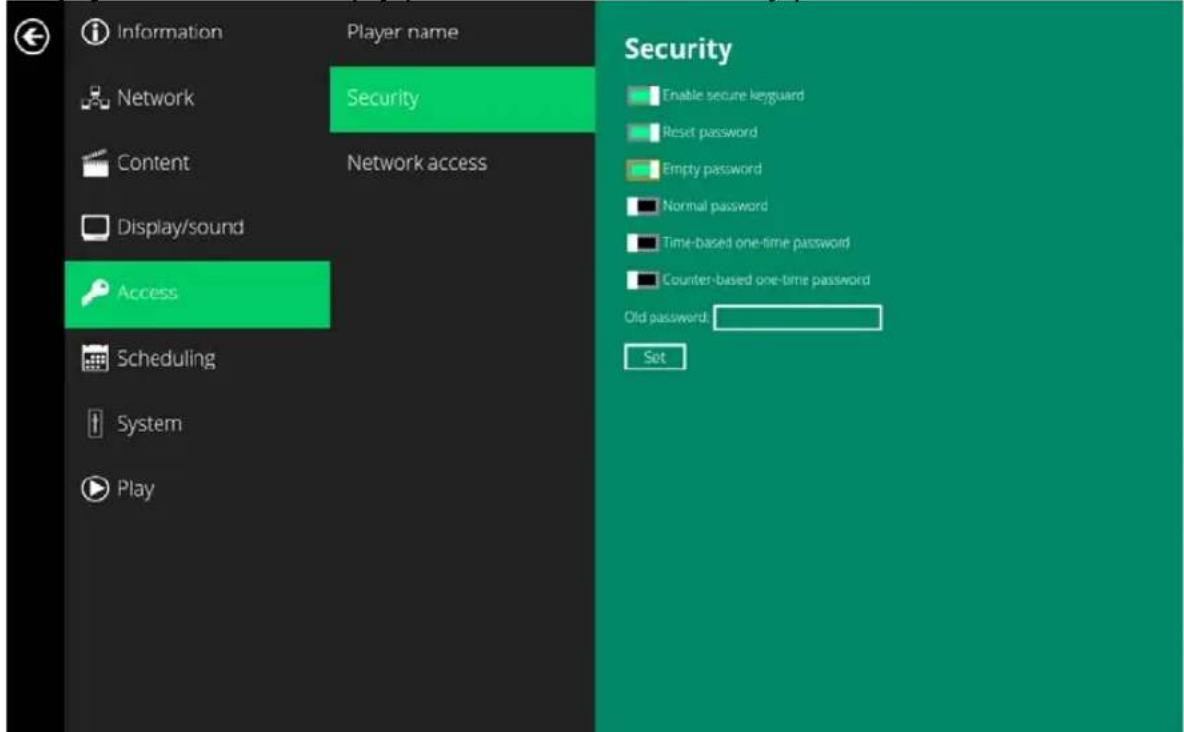
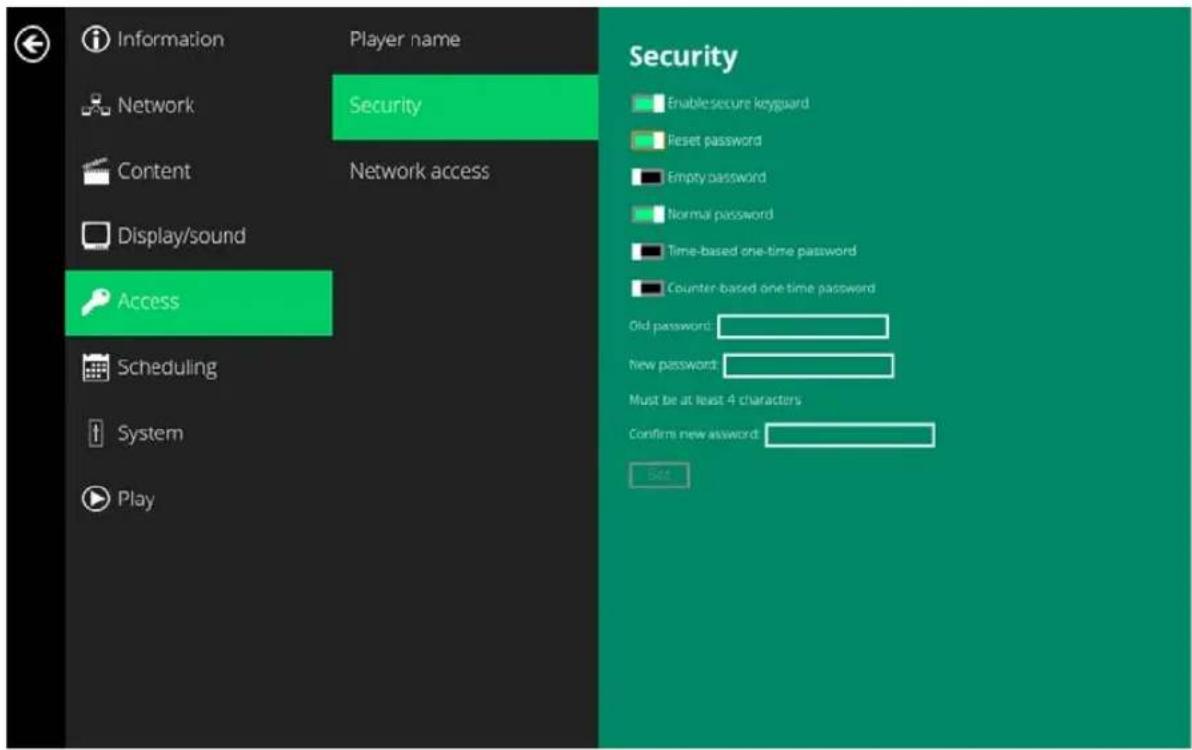
Normal Password : Normal password will allow user to type in any alphanumeric password of their choice.
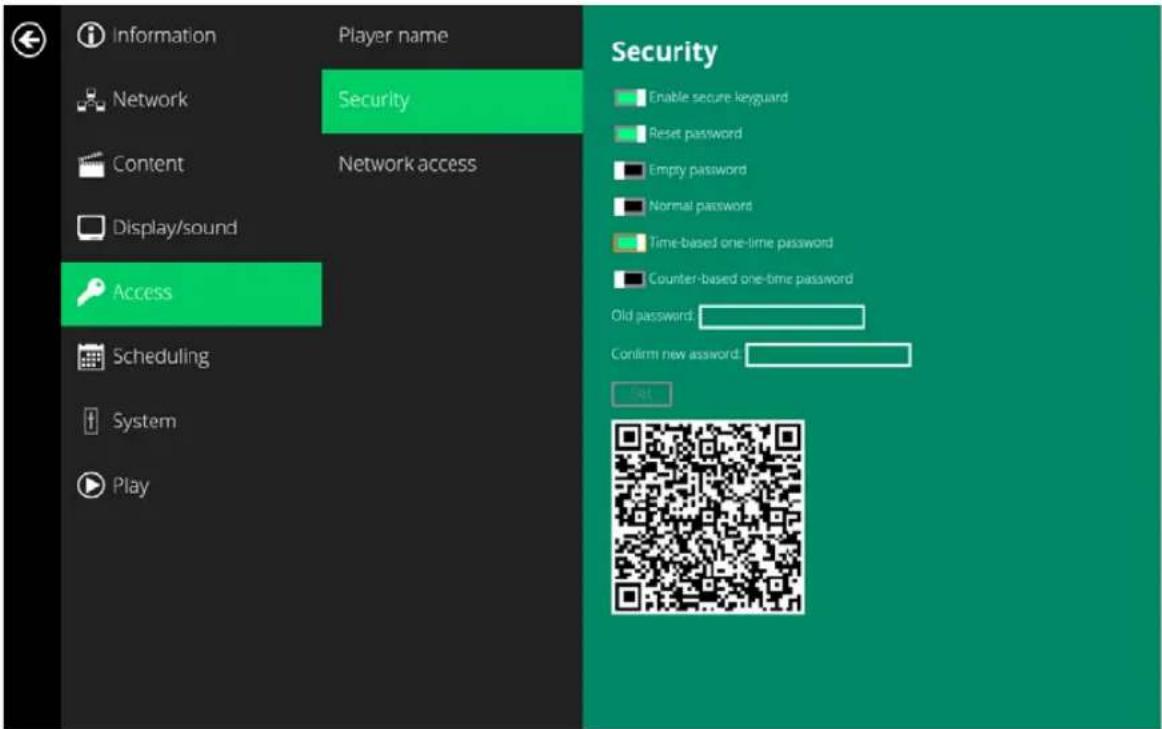
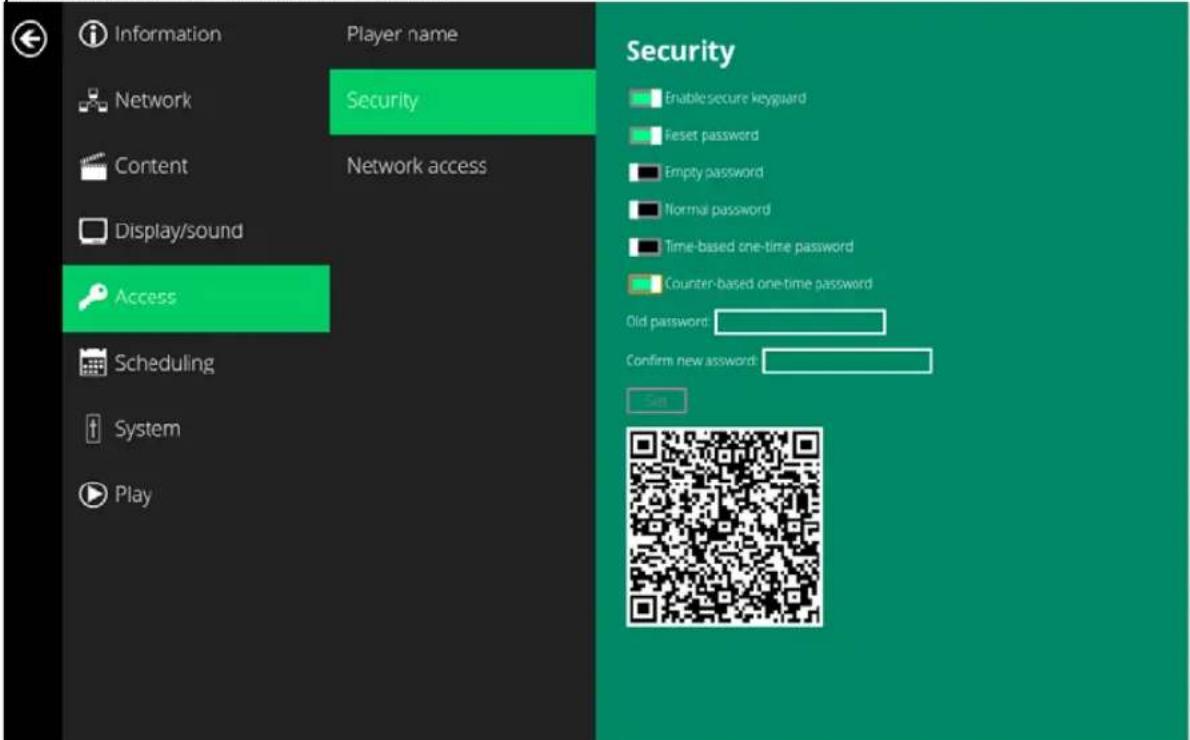
One-Time Password: A secured authentication method that enhance security by using 3 ^rd party authenticator to generate password and make sure the password will either expire overtime or can be used only once. One of recommended authenticator App is “Google Authenticator”. User will need to download it on their mobile device or computer. Open up the Google Authenticator and click on the + button to add a device. Click on Scan QR code. Once you select Time-Based or Counter-Based one-time password, a QR code will populate that you can scan to synchronize your device to the Google Authenticator.
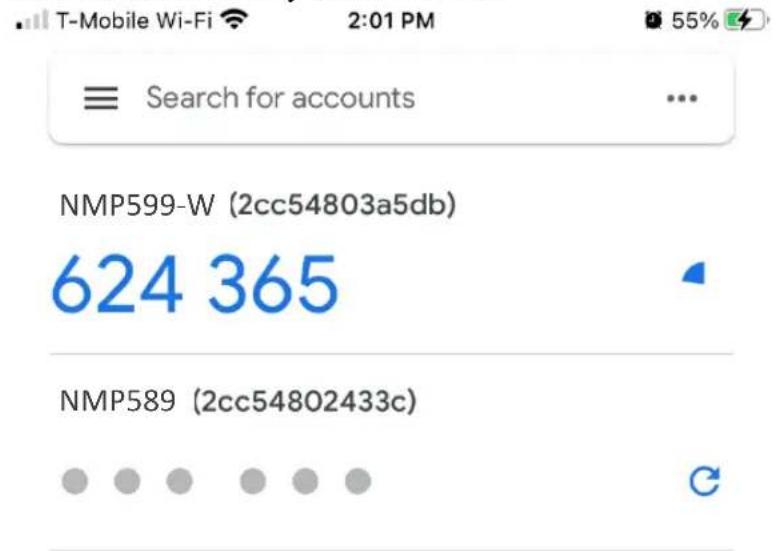
Time-Based one-time password: The password will change in 30-second periods since the Unix epoch (TOTP). The device and Google Authenticator will refresh the password every 30 seconds and any previous password will become invalid. The device and Google Authenticator must be synced with the correct time or time server to avoid an invalid password. Should the time un-sync, the device will need the be factory reset.
Counter-Based one-time password: The password will change based on a counter that is incremented with each new code (HOTP). The device and Google Authenticator will generate passwords based on an algorithm. The password will be generated when it is first synced. A new password can be generated by clicking on the refresh button next to the device name. Once the latest generated password is used to unlock the device, all previous passwords will become invalid.
** To configure a new password configuration, the old password will need to be inputted if there is an existing password.**
Google Authenticator
The Google Authenticator synchronizes with your device to allow for One-Time Passwords. Please download from your Mobile Device App Store.

Through the APP, click on to add a device.
Select QR Code to scan the QR code generated by the device for Time-
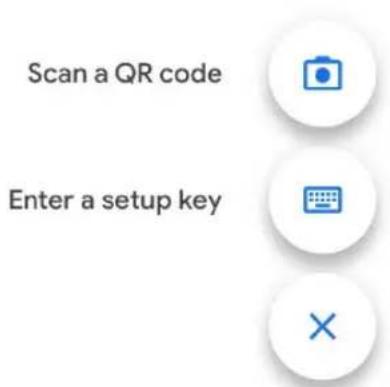
Based OTP or Counter-Based OTP.
Once the device is synched with the Google Authenticator, the device name and MAC ID will appear along with the 6 digit password. The Time-Based OTP will automatically refresh every 30 seconds. The Counter-Based OTP will need to manually be refreshed.
**When setting a password lock on your Android 7.1 device, please utilize the password feature located in the OS menu. If the password lock is set using a PIN code through the Android native menu, SignApps will not enable password lock when exporting content. **
2.14. System configuration – Time and Date
This will bring up Date and time configuration panel as shown below, user can set time as auto or manual, set time zone and time format from here.
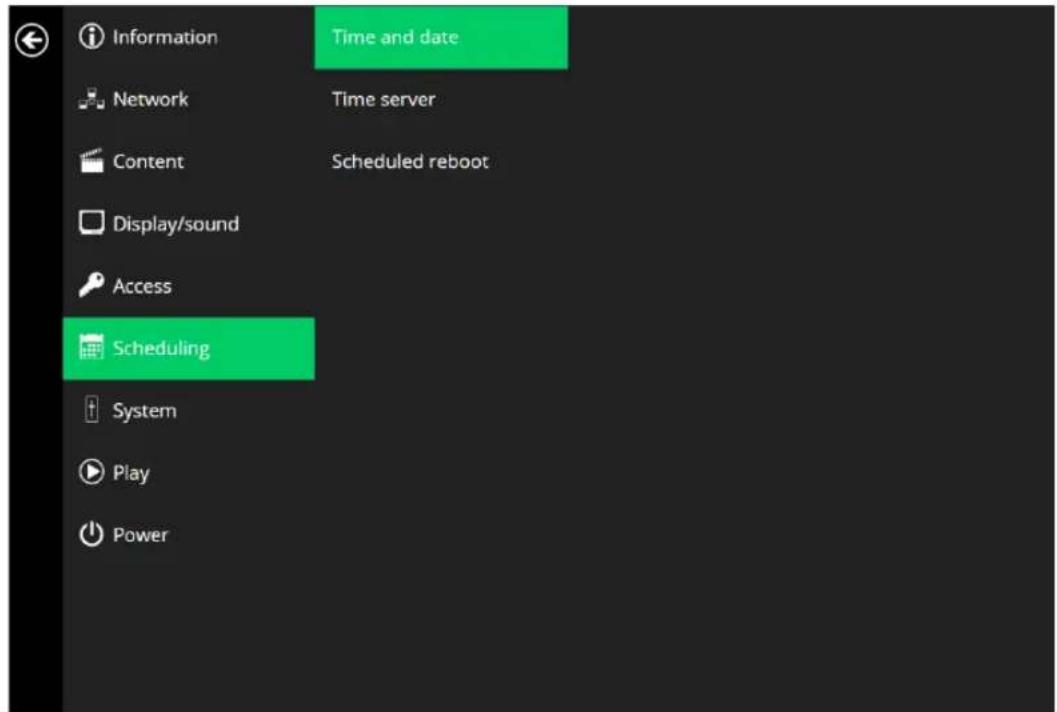
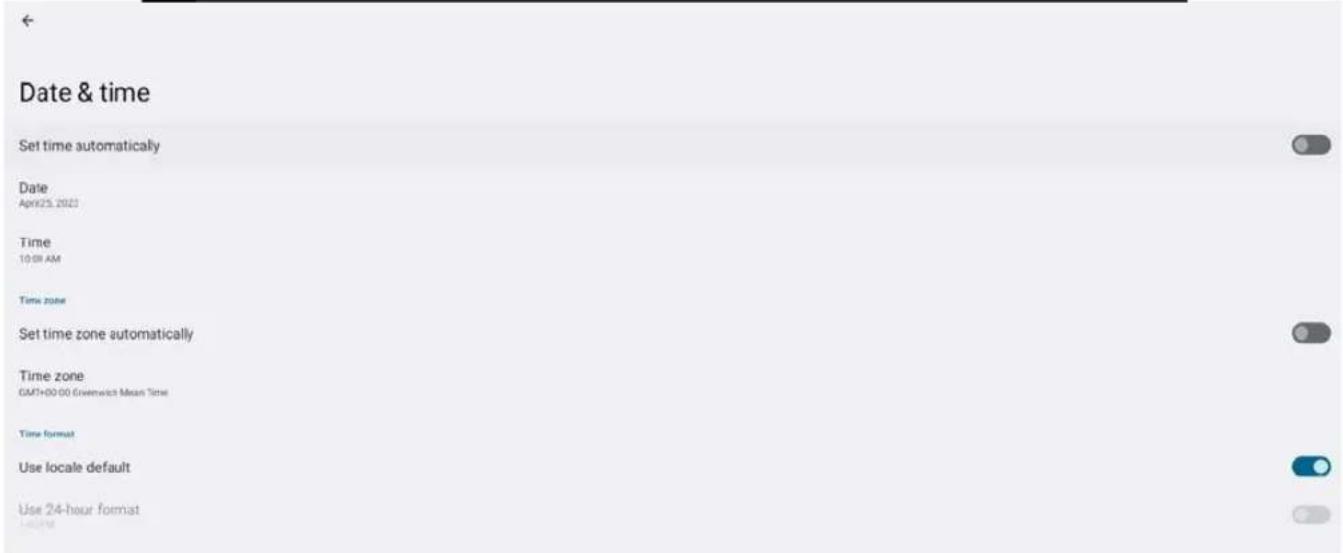
(Fig. 2.14.1)
2.15. System configuration – Time Server
This feature allows the user to synchronize the player's time with the webserver that is hosting the URL within the AppStart.
- Click on the Advanced button. The advanced configuration menu will be launched. (Fig. 2.6.1)
- Click on Scheduling, and then click on Time Server.
- Click on the Use AppStart URL as time server button to enable/disable the time server function.
bled: Player don't synchronize with any server.
- Disabled: Player does not synchronize with any server.
Default: Player synchronize it's time with Android default time server(pool.ntp.org).
Use AppStart URL as time server: Player synchronizes time with the web server where the AppStart URL is hosted (based on the https response header time).
Customized: Player synchronize it's time with customized time server
- Click on Set to save your setting.
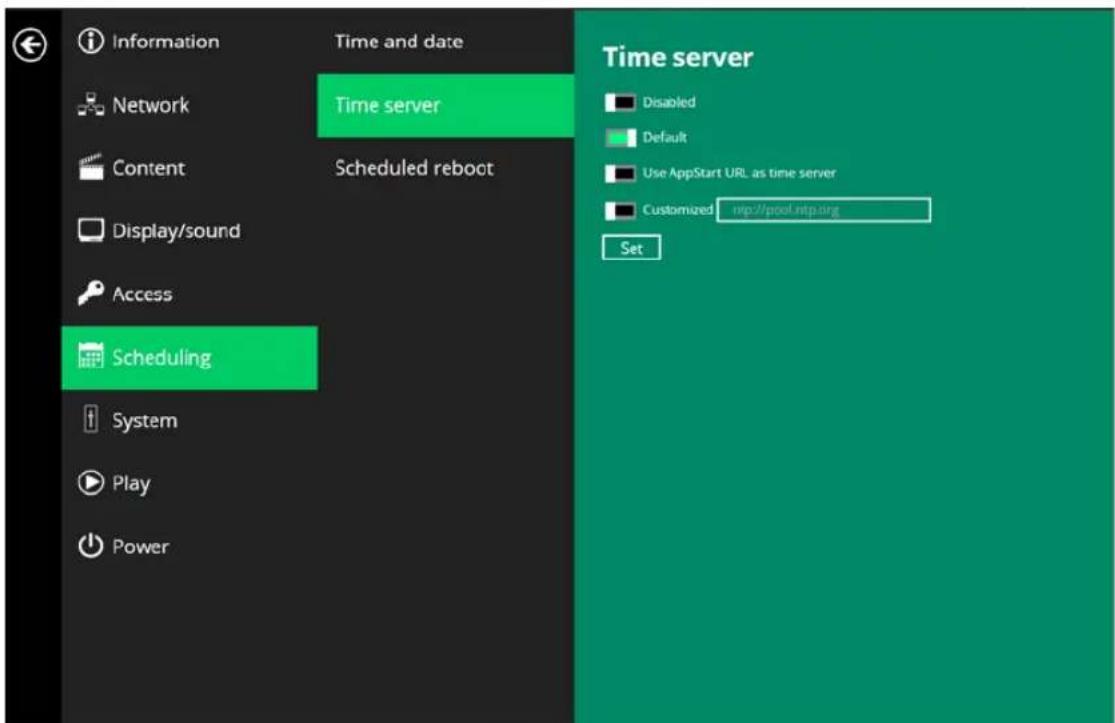
(Fig. 2.15.1)
2.16. System configuration – Scheduled reboot
Scheduled Reboot allows the signboard to reboot at an assigned time automatically every day.
- Click on the Advanced button. The advanced configuration menu will be launched. (Fig. 2.6.1)
- Click on Schedule, and then click on Scheduled Reboot.
- Click on the Enable daily reboot button to enable/disable the daily reboot function. Click on the dialogue box to set the time. The value can be inputted by using the pop-up keyboard or a USB keyboard.
- Click on Set to save your setting.
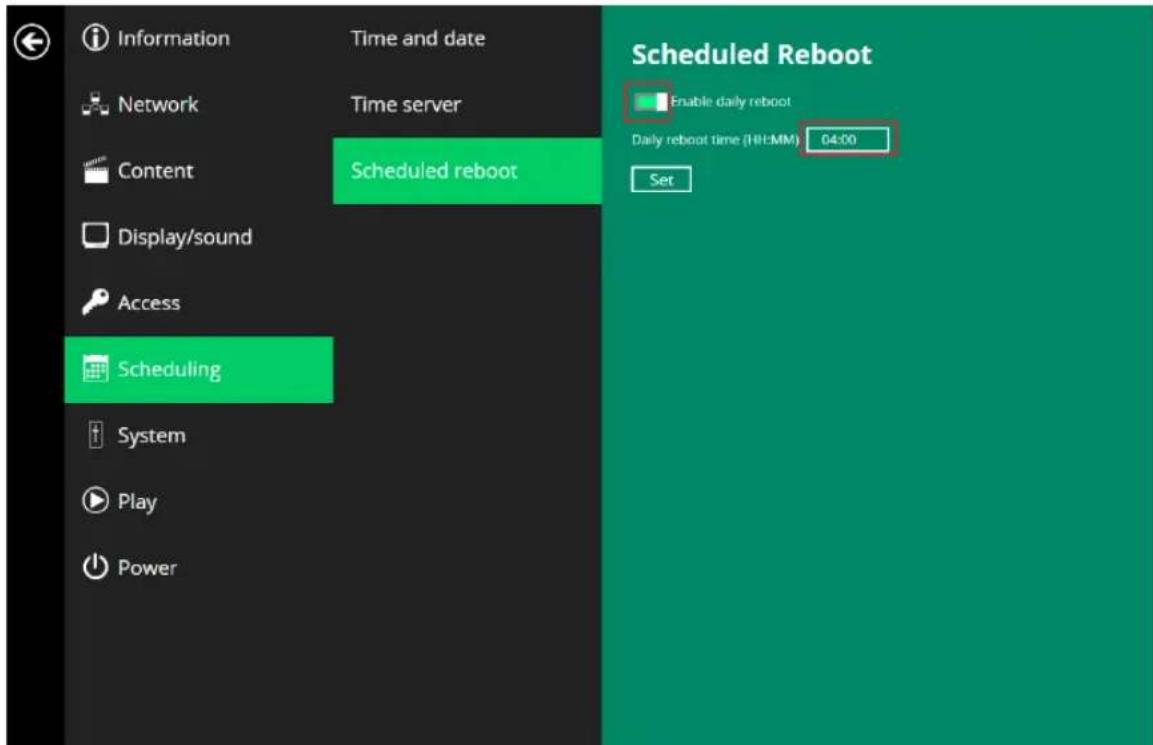
(Fig. 2.16.1)
2.17. System configuration - Firmware Update
Firmware updates can be performed by using a USB flash drive. Please read the release notes carefully regarding the changes that will be made to your signboard before applying the upgrade.
IMPORTANT: DO NOT unplug the USB drive or turn off the signboard while the system is performing a firmware update.
Check latest firmware from internet
1. Click Check latest firmware from internet.
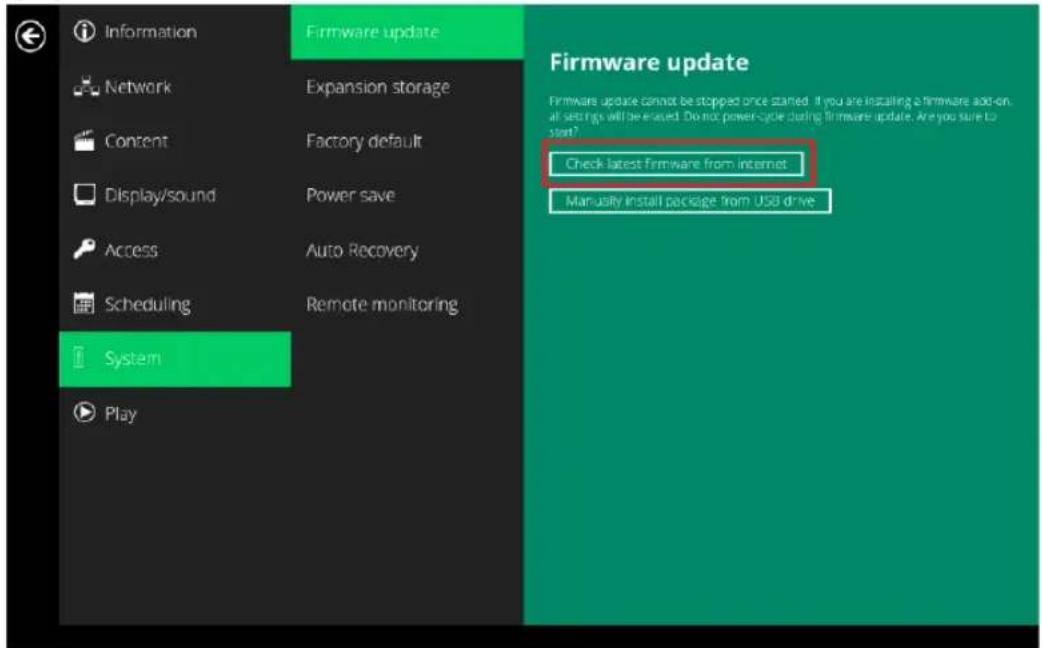
(Fig. 2.17.1)
2. Click Update from internet to begin the firmware update.
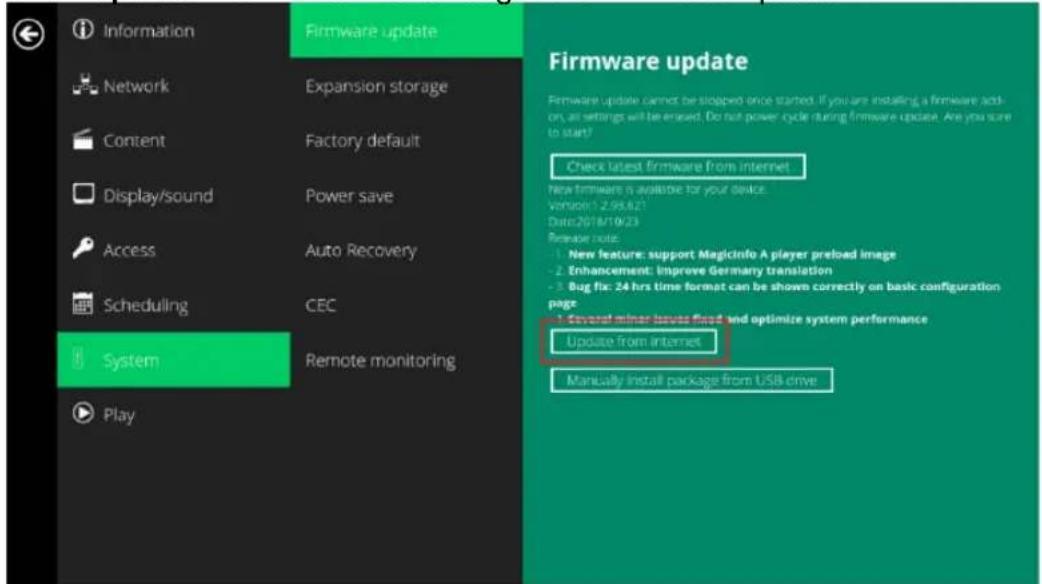
(Fig. 2.17.2)
Manually install package from USB drive
- Download the latest firmware and copy it to the root directory of a USB drive.
- Plug the power cord into the device.
- Plug in a USB mouse to the device to enter the Basic settings menu.
- Click on the Advanced button. The advanced configuration menu will be launched. (Fig. 2.6.1)
- Click on System, and then choose Firmware.
- Click on OK to start the firmware update process.
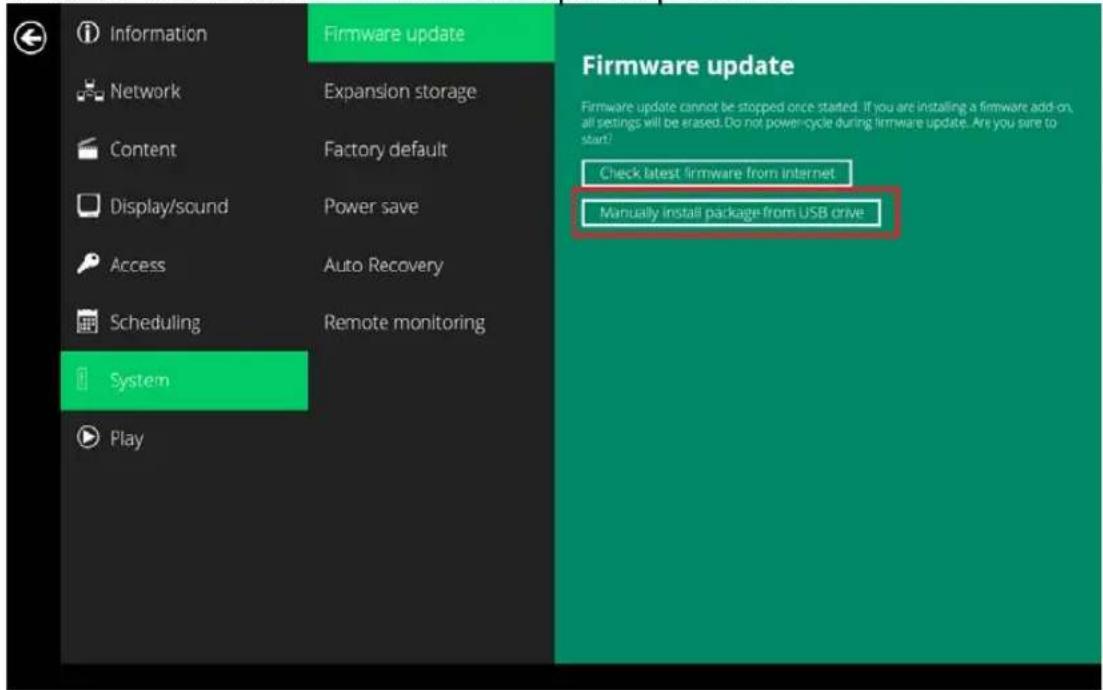
(Fig. 2.17.3)
- Plug in the USB drive once the screen reads Scanning USB drives for firmware package.
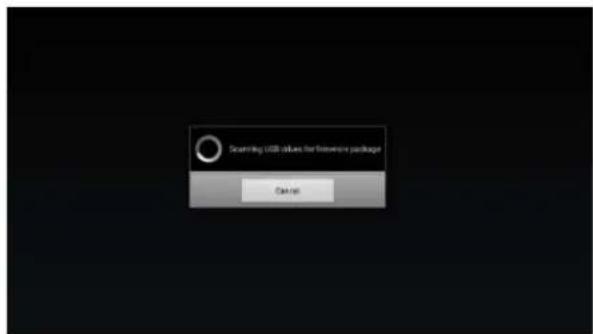
(Fig. 2.17.4)
2.18. System configuration - Factory reset
If you forget your preset system password, you must reset the system to regain access to the signboard.
Using the reset button
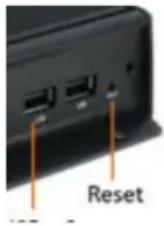
- PRESS and HOLD the reset button with a pin.
- RECONNECT the power cord.
- WAIT for 16 seconds or until the status LED flashes.
- RELEASE the reset button and wait for system to initialize.
Using a USB mouse
System reset will re-initialize the system, clear passwords, and return settings to their default values. Then, perform the following steps:
- CONNECT a USB mouse.
- Click on the Advanced button. The advanced configuration menu will be launched. (Fig. 2.6.1)
- Click on System configuration, and then choose Factory default.
- Click on OK button to reset to factory default.
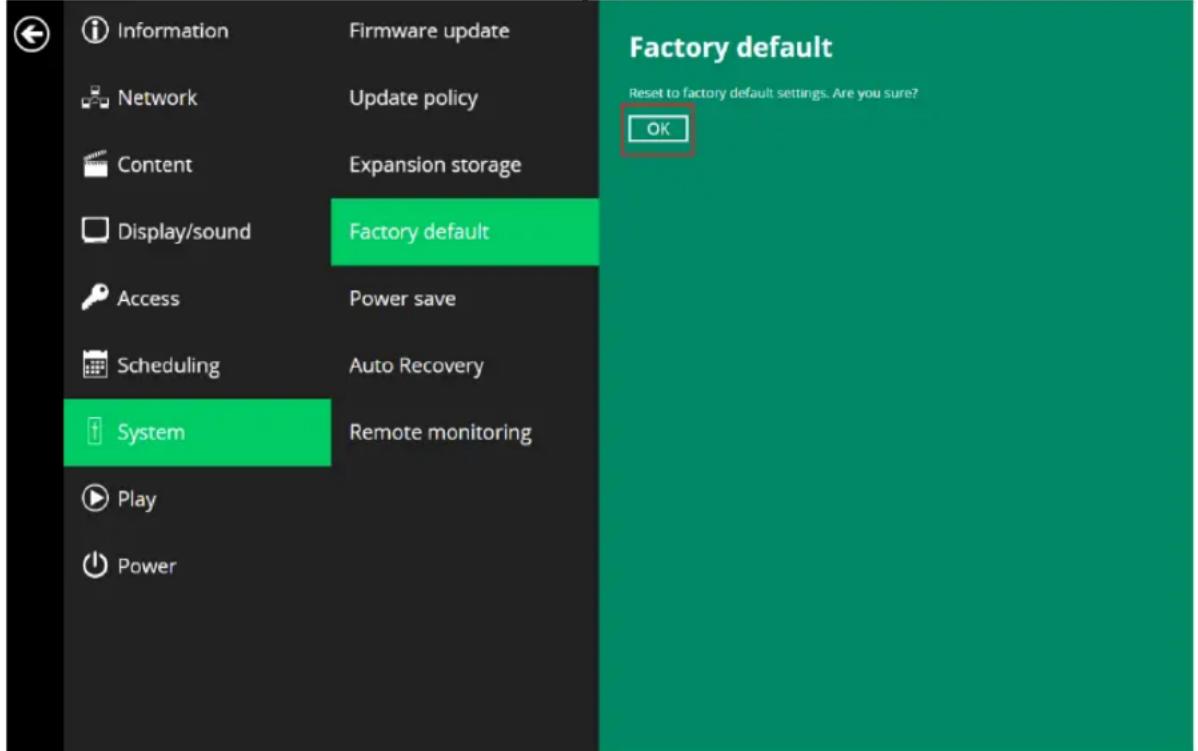
(Fig. 2.18.1)
2.19. System configuration – Power Save
Power save allows the signboard to power off automatically from the Basic settings page if no actions occur after 10 minutes.
- Click on the Advanced button. The advanced configuration menu will be launched.
- Click on System, and then click on Power save.
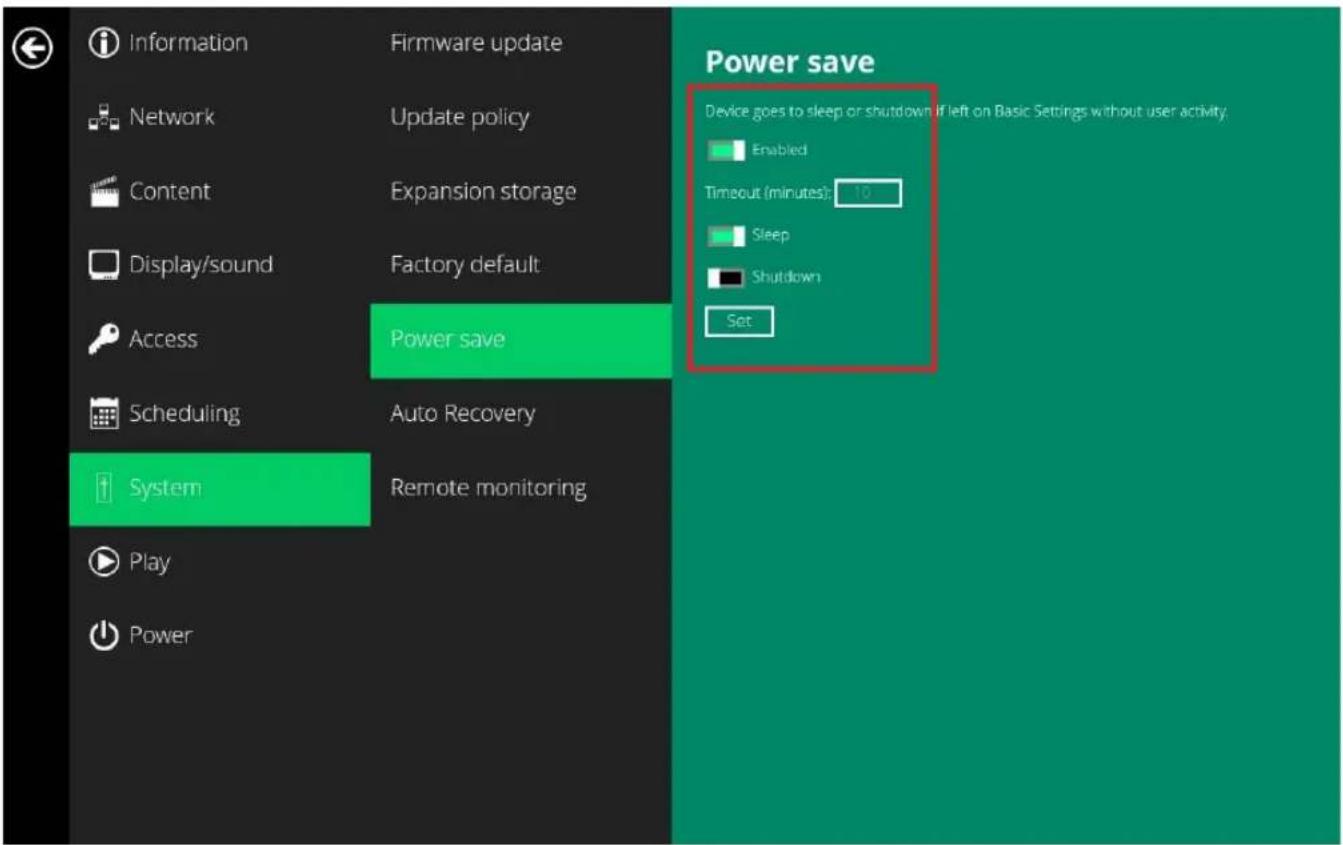
(Fig. 2.19.1)
2.20. System configuration – Auto Recovery
The Auto Recovery feature is designed to automatically re-launch appStart program if it closes unexpectedly, disabling this feature may cause screen to show initial menu if content crash.
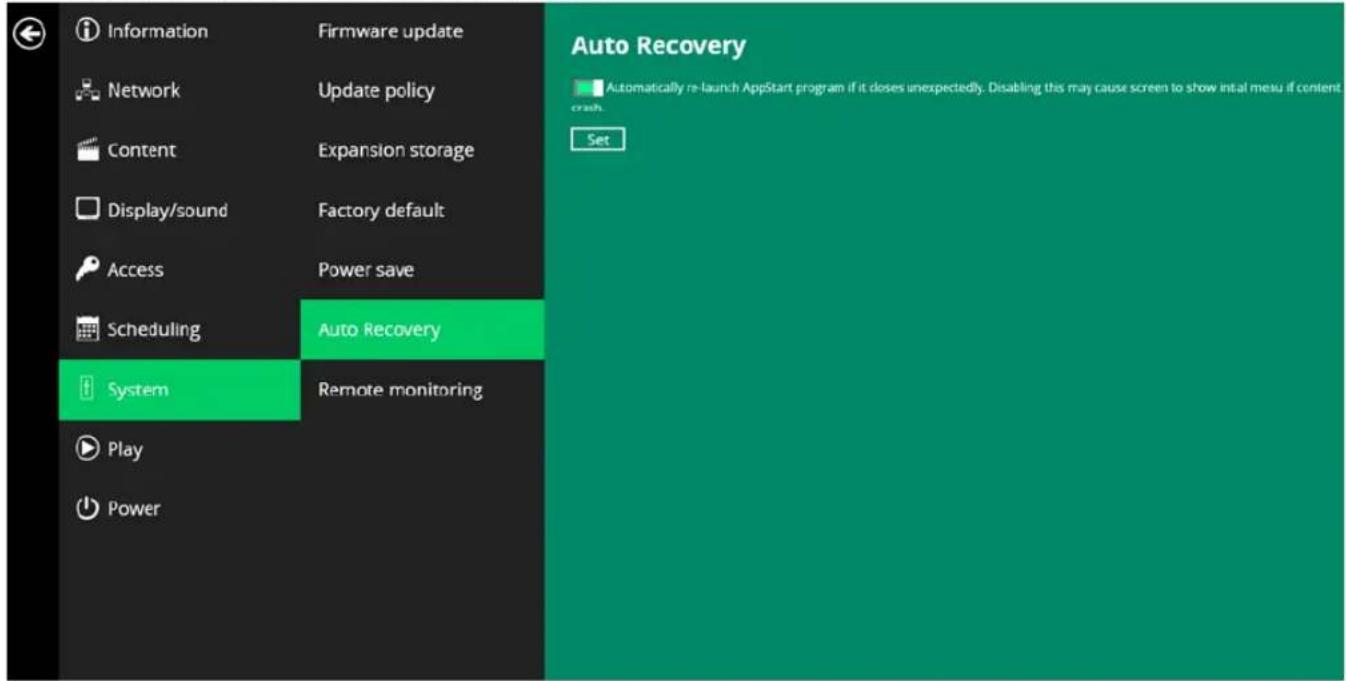
(Fig. 2.20.1)
2.21. System configuration – Expand Storage
User can add extra MicroSD card to replace the internal storage, please note when internal storage is being replaced, player can only use the storage from the MicroSD card as main storage.
Auto Expansion
- In the Basic Settings menu, click the Advanced button, advanced configuration menu will be launched.
- Click on System, click on Expansion storage and enable auto-format.
-
Insert the microSD card and then check player information.
-
The device will now have an expanded storage capacity.
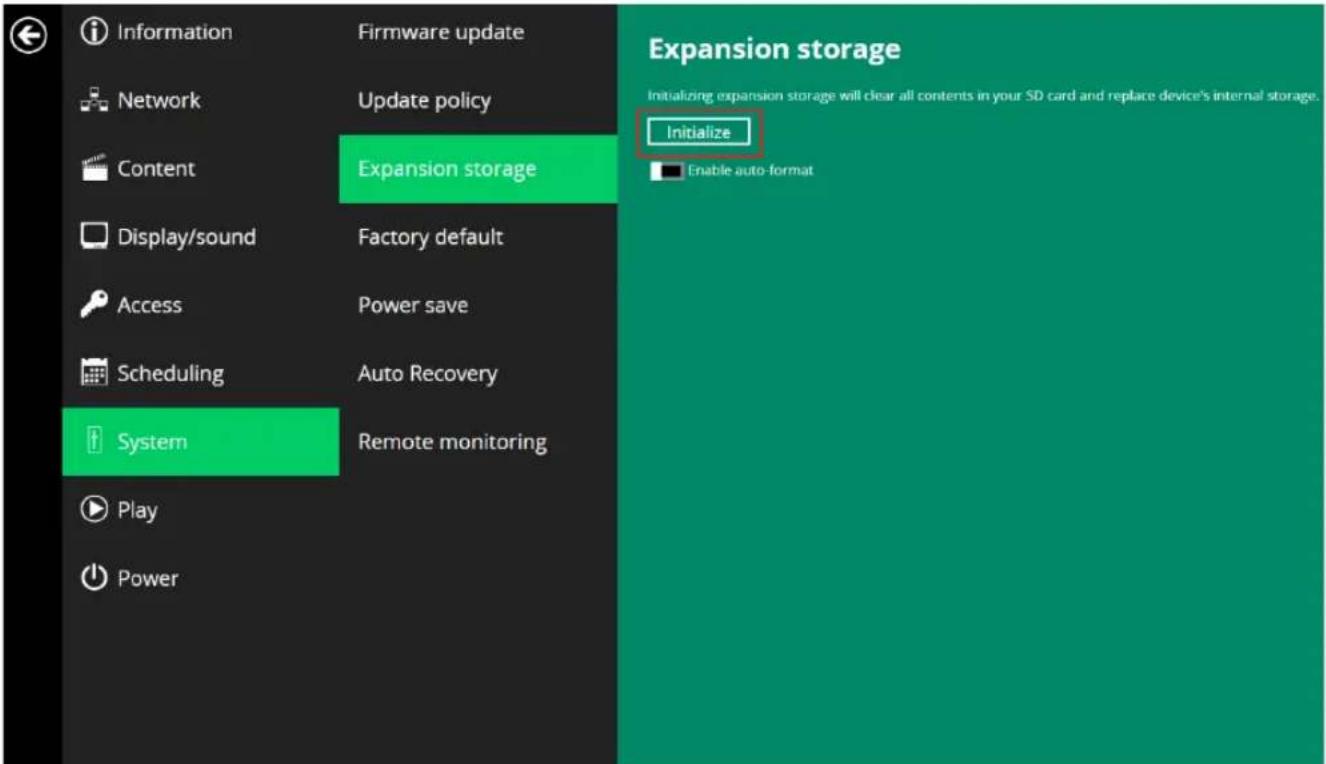
(Fig. 2.21.1)
3. Content Management
The NMP599-W-2 is designed to work with 3rd party management solutions. Please refer to the printed guide for related set up instructions.
4. Authoring in HTML5

A major advancement in the NMP599-W-2 media appliance is the ability to playback HTML5 content which can contain dynamic information.
5. Working with SMIL
The NMP-309W uses open communications protocols for content presentation and playback control. SMIL-compliance means predictable results across multiple devices, and SMIL's non-proprietary nature means that your investments are never obsolete.
5.1. Introduction
Using SMIL (pronounced “smile”), the language created by W3C for multimedia communications, the media player understands the language “spoken” by professional tools from companies such as Adobe, Apple, Microsoft, and Real Networks. What this means is quicker, easier, and better integration of your players into your digital signage networks, opening up avenues of software controls and realizing the full potential of your player hardware down the road.





5.2. www.a-smil.org for developers
The media player operating system utilizes W3C SMIL as the underlying scripting language, which lends well to customization to your project management needs. For resources, downloads, and community support, please visit www.a-smil.org.
6. Technical Data
6.1. Specifications
| Video format support | H.265/HEVC up to 4K (3840 x 2160)H.264/AVC up to 1080p (1920 x 1080)MPEG-4 up to 1080p (1920 x 1080)MPEG-2 up to 1080p (1920 x 1080)MPEG-1 up to 1080p (1920 x 1080)VC-1 up to 1080p (1920 x 1080)VC-1 up to 1080p (1920 x 1080) |
| Image format support | JPEG up to 1920 x 1080PNG up to 1920 x 1080 |
| Audio codec support | MP3 up to 320 Kbps |
| Dynamic content | W3C HTML5 (HTML, JavaScript, CSS)W3C SMIL 3.0 instructions (sub-set)W3C Widgets for HTML delivery AndroidAPI12.0 |
| Physical I/O connectors | IEEE 802.3ab Gigabit EthernetIEEE 802.11a/b/g/n/ac dual-band Wi-Fi (8552)IEEE 802.3af PoE (8552)SD card slot (expendable to 128 GB)Micro USB for ADB (Android Debug Bridge)3.5 mm audio outUSB 2.0 x 1USB 3.0 x 1Ethernet port x 1Power jack x 1Embedded wireless antenna (2.4GHz & 5GHz)Built-in stereo speaker 2 W x 1Front camera: 8 MP Auto Focus |
| Local storage | 16 GB eMMCMicro SD card expansion slot |
| Accessories | HDMI CableVelcroDC Jack BracketMicroSD BracketM2.5 ScrewsQuick start guide |
| Power requirement | Input: 100 - 240V, 50 - 60 Hz, 0.5 A Max.Output: 12V, 1.5 AUL/CB/PSE certified power supply |
| Power consumption* | Max 20.3 W |
| Environmental | Operating temperature: -20 to 50 °CHumidity: 10 – 85 % @ 40 °C / 104 °F non-condensingShock: IEC 60068-2-27 Table A.1 (railway)Vibration: 1.5 G @ 5 - 200Hz, random |
| Dimensions | 166 x 27 x 125.5mm / 6.5 x 1.1 x 4.9" |
| Weight | 915 g (2.3 lbs) |
| Safety & Certifications | CE / FCC / RoHS |
7. Troubleshooting
What video format can I play?
Video files encoded in H.264 up to 1920x1080 resolutions and 10Mbps bitrates or H.265 up to 3840x2160 resolution and 20Mbps should play perfectly. If a certain video is not played as scheduled, or if it plays poorly, please search the support site for “transcode” instructions.
The signboard is placed near my Wi-Fi access point, yet the connection is unreliable.
Wi-Fi appliances in general should be placed 10 feet (3 meters) from the Wi-Fi access point for reliable operation. Try relocating the access point further away from the signboards to improve connection.
What can I do about the gap between video and video?
Video gaps (blank screen) occur before and after each video are played. To minimize the gap, avoid back to back video programming by scheduling an image between each video.
If both Ethernet & WiFi are connected, which one will take precedence?
If both connections are available, WiFi will be used.
What is the maximum file size for a single video file?
The maximum video file size for the NMP599-W-2 is 2GB. We recommend reserving a safety margin to avoid exceeding the limit (i.e. limiting files to 1850MB).
What should I do if I forgot my password?
In this case, please perform a factory reset.
Use the S/W RESET button located at the back of the signboard to restore factory settings. This will also clear the signboard's password.
How do I manage the playback of contents?
The media appliance is designed to be interoperable with leading 3rd party management software solutions or via SMIL open standard commands.
Could the signboard display Flash or Microsoft PowerPoint presentations? The
signboard features limited PowerPoint support, but not Flash support.
While PCs can play many formats with varying degrees of success, RISC-based signboard are designed to reliably play specific video formats (Please see spec for details). While Microsoft PowerPoint native files could not play directly on a RISC-based signboard, the file is converted through other software (i.e. Signage Manager Express) into an image format to be played as an image slideshow.
Why won't some media files play properly?
The video data bit-rate used may have exceeded the recommended bit rate.
The video data bit-rate is the amount of video or audio data used per second to store or play the contents, usually expressed in Mbps (mega-bits per second). Video encoded with excessive bit-rates will not playback smoothly in the media signboard, likely due to storage I/O bottleneck.
Some JPEG images cannot be played in the signboard.
Progressive JPEG are not supported. Please convert to baseline JPEG for maximum compatibility.
JPEG images can be either of 2 types: baseline or progressive compression. Baseline JPEG offers greatest compatibility, while progressive JPEGs are suitable for web site images. Progressive images are downloaded and displayed “progressively,” being rendered more clearly as more data is received over the internet. Progressive images are primarily supported on PCs. For media appliances, make sure to save images as baseline JPEG in your photo editor, or resave them as baseline JPEGs using free tools such as IrfanView (http://www.irfanview.com/).
The device is not playing. What should I do?
Play list errors and scheduling issues are two major causes of playback problems. To determine if the problem is caused by a bad play list, just delete the play list and restart signboard. The signboard should loop through all media files, indicating a fault with the play list.
If the playback is scheduled to play at specific time, check to see if the device is set to the right time zone on the world clock. When nothing seems wrong, the time zone setting is often the reason the program is not played.
Customer Support
For technical support or product service, see the table below or contact your reseller.
Note: You will need the product serial number.
| Country/Region | Website | T= TelephoneC = CHAT ONLINE | |
| AustraliaNew Zealand | www.viewsonic.com.au | AUS= 1800 880 818NZ= 0800 008 822 | service@au.viewsonic.com |
| Canada | www.viewsonic.com | T (Toll-Free)= 1-866-463-4775T (Toll)= 1-424-233-2533 | service.ca@viewsonic.com |
| Europe | www.viewsoniceurope.com | www.viewsoniceurope.com/uk/support/call-desk/ | |
| Hong Kong | www.hk.viewsonic.com | T= 852 3102 2900 | service@hk.viewsonic.com |
| India | www.in.viewsonic.com | T= 1800 419 0959 | service@in.viewsonic.com |
| Korea | ap.viewsonic.com/kr/ | T= 080 333 2131 | service@kr.viewsonic.com |
| Latin America(Argentina) | www.viewsonic.com/la/ | C= http://www.viewsonic.com/la/soporte/servicio-tecnico | soporte@viewsonic.com |
| Latin America(Chile) | www.viewsonic.com/la/ | C= http://www.viewsonic.com/la/soporte/servicio-tecnico | soporte@viewsonic.com |
| Latin America(Columbia) | www.viewsonic.com/la/ | C= http://www.viewsonic.com/la/soporte/servicio-tecnico | soporte@viewsonic.com |
| Latin America(Mexico) | www.viewsonic.com/la/ | C= http://www.viewsonic.com/la/soporte/servicio-tecnico | soporte@viewsonic.com |
| Nexus Hightech Solutions, Cincinnati #40 Desp. 1 Col. De los Deportes Mexico D.F.Tel: 55) 6547-6454 55)6547-6484Other places please refer to http://www.viewsonic.com/la/soporte/servicio-tecnico#mexico | |||
| Latin America(Peru) | www.viewsonic.com/la/ | C= http://www.viewsonic.com/la/soporte/servicio-tecnico | soporte@viewsonic.com |
| Macau | www.hk.viewsonic.com | T= 853 2870 0303 | service@hk.viewsonic.com |
| Middle East | ap.viewsonic.com/me/ | Contact your reseller | service@ap.viewsonic.com |
| Puerto Rico &Virgin Islands | www.viewsonic.com | T= 1-800-688-6688 (English)C= http://www.viewsonic.com/la/soporte/servicio-tecnico | service.us@viewsonic.comsoporte@viewsonic.com |
| Singapore/Malaysia/Thailand | www.ap.viewsonic.com | T= 65 6461 6044 | service@sg.viewsonic.com |
| South Africa | ap.viewsonic.com/za/ | Contact your reseller | service@ap.viewsonic.com |
| United States | www.viewsonic.com | T (Toll-Free)= 1-800-688-6688T (Toll)= 1-424-233-2530 | service.us@viewsonic.com |
Limited Warranty
VIEWSONIC Network Media Player
What the warranty covers:
ViewSonic warrants its products to be free from defects in material and workmanship, under normal use, during the warranty period. If a product proves to be defective in material or workmanship during the warranty period, ViewSonic will, at its sole option, repair or replace the product with a like product. Replacement product or parts may include remanufactured or refurbished parts or components.
How long the warranty is effective:
ViewSonic Network Media Player are warranted for 1 year for labor from the date of the first customer purchase.
Who the warranty protects:
This warranty is valid only for the first consumer purchaser.
What the warranty does not cover:
- Any product on which the serial number has been defaced, modified or removed.
- Damage, deterioration or malfunction resulting from:
a. Accident, misuse, neglect, fire, water, lightning, or other acts of nature, unauthorized product modification, or failure to follow instructions supplied with the product.
b. Repair or attempted repair by anyone not authorized by ViewSonic.
c. Causes external to the product, such as electric power fluctuations or failure.
d. Use of supplies or parts not meeting ViewSonic's specifications.
e. Normal wear and tear.
f. Any other cause which does not relate to a product defect.
- Any product exhibiting a condition commonly known as "image burn-in" which results when a static image is displayed on the product for an extended period of time.
How to get service:
- For information about receiving service under warranty, contact ViewSonic CustomerSupport (please refer to Customer Support page). You will need to provide your product's serial number.
- To obtain warranted service, you will be required to provide (a) the original dated sales slip, (b) your name, (c) your address, (d) a description of the problem, and (e) the serial number of the product.
- Take or ship the product freight prepaid in the original container to an authorized ViewSonic service center or ViewSonic.
- For additional information or the name of the nearest ViewSonic service center, contact ViewSonic.
Limitation of implied warranties:
There are no warranties, express or implied, which extend beyond the description contained herein including the implied warranty of merchantability and fitness for a particular purpose.
Exclusion of damages:
ViewSonic's liability is limited to the cost of repair or replacement of the product. ViewSonic shall not be liable for:
-
Damage to other property caused by any defects in the product, damages based upon inconvenience, loss of use of the product, loss of time, loss of profits, loss of business opportunity, loss of goodwill, interference with business relationships, or other commercial loss, even if advised of the possibility of such damages.
-
Any other damages, whether incidental, consequential or otherwise.
- Any claim against the customer by any other party.
4.3: ViewSonic DMP Warranty
DMP_LW01 Rev.1A 11-01-2023

natural_image
Three colorful bird illustrations perched on a branch against a red background, with 'ViewSonic' branding at the bottom (no other text or symbols)- Compliance Information
- FCC Statement
- For Canada
- CE Conformity for European Countries
- Following information is only for EU-member states:
- Declaration of RoHS2 Compliance
- Copyright Information
- For Your Records
- Product disposal at end of product life
- Content
- Introduction ...... 1
- Configuring the device .... 3
- Introduction
- Features
- Package contents
- Physical view and features
- Installation
- Attach wireless antenna
- Attach the player on the back of the monitor using Velcro
- Configuring the device
- System connections
- Basic settings
- Connecting the device to your network
- Wireless connection
- Wired connection
- DHCP – automatically assign network IP address
- Static IP – manually assign network IP address
- Time zone settings
- Content settings
- Player information
- Content configuration – AppStart
- Keep Alive (Web App Software Watchdog)
- Content configuration – FailSafe
- Content configuration – USB Update
- Display settings
- Resolution Settings for Media Players)
- Brightness Level
- Screen orientation
- Sound settings
- Access configuration – Player name
- Access configuration – Security
- Enable Security keyguard.
- Google Authenticator
- System configuration – Time and Date
- System configuration – Time Server
- System configuration – Scheduled reboot
- System configuration - Firmware Update
- Check latest firmware from internet
- Click Check latest firmware from internet.
- Click Update from internet to begin the firmware update.
- Manually install package from USB drive
- System configuration - Factory reset
- Using the reset button
- Using a USB mouse
- System configuration – Power Save
- System configuration – Auto Recovery
- System configuration – Expand Storage
- Auto Expansion
- Content Management
- Authoring in HTML5
- Working with SMIL
- Introduction
- www.a-smil.org for developers
- Technical Data
- Specifications
- Troubleshooting
- Customer Support
- Limited Warranty
- VIEWSONIC Network Media Player
- What the warranty covers:
- How long the warranty is effective:
- Who the warranty protects:
- What the warranty does not cover:
- How to get service:
- Limitation of implied warranties:
- Exclusion of damages:
Brand : VIEWSONIC
Model : NMP599-W-2
Category : Uncategorized