
Mix-Blender - Blender Radial Engineering - Free user manual and instructions
Find the device manual for free Mix-Blender Radial Engineering in PDF.

| Product Type | Line Mixer / Summing Mixer |
| Model | Mix-Blender |
| Brand | Radial Engineering |
| Dimensions (W x D x H) | 19" x 6.5" x 1.75" (1U rack mount) |
| Weight | 4.2 lbs (1.9 kg) |
| Power Supply | External 15VDC 400mA adapter (included) |
| Input Channels | 8 balanced/unbalanced line inputs (1/4" TRS) |
| Output | Stereo balanced XLR and 1/4" TRS |
| Controls | Individual level per channel, master volume, mono/stereo switch |
| Frequency Response | 20 Hz - 20 kHz (±0.5 dB) |
| THD+N | < 0.005% at 1 kHz, +4 dBu |
| Signal-to-Noise Ratio | > 95 dB (unweighted) |
| Maximum Input Level | +22 dBu |
| Maximum Output Level | +22 dBu (XLR), +20 dBu (TRS) |
| Construction | Steel chassis with 14-gauge faceplate |
| Cooling | Passive convection, no fans |
| Warranty | 3 years, transferable |
| Included Accessories | Power adapter, rack ears, user manual |
| Cleaning Instructions | Wipe with dry cloth; do not use solvents |
| Safety Certifications | FCC, CE, RoHS |
Frequently Asked Questions - Mix-Blender Radial Engineering
User questions about Mix-Blender Radial Engineering
0 question about this device. Answer the ones you know or ask your own.
Ask a new question about this device
Download the instructions for your Blender in PDF format for free! Find your manual Mix-Blender - Radial Engineering and take your electronic device back in hand. On this page are published all the documents necessary for the use of your device. Mix-Blender by Radial Engineering.
USER MANUAL Mix-Blender Radial Engineering
Radial Engineering Ltd.
1845 Kingsway Ave., Port Coquitlam BC V3C 1S9
Tel: 604-942-1001 • Fax: 604-942-1010 • Email: info@radialeng.com
MIX-BLENDER™ MIXER AND EFFECTS LOOP USER GUIDE
Introduction....1
Features 2
Overview....3
Making Connections....4
Using the Mix Section....4-5
Using the Effects Loop 6
Using a Tuner 7
Using a Third Guitar 8
Using the Polarity Reverse Switch 9
Specifications 10
Warranty .... Back Cover

Thank you for purchasing the Radial Mix-Blender™, one of the most exciting new devices ever conceived for your pedalboard.
Although the Mix-Blender is super easy to use, please take a few moments to read through the manual in order to familiarize yourself with the features and functions. This will not only enhance your musical experience, but also help you better understand the problems and fixes that are built in.
If you find yourself asking questions that are not covered herein, please visit the Mix-Blender FAQ page on our website. This is where we post questions and answer from users along with updates. If you still find yourself asking questions, feel free to send us an email at info@radialeng.com and we will do our best to reply in short order.
Now get ready to squeeze your creative juices like a space-aged Osterizer!
FEATURES
-
9VDC POWER: Connection for 9 volt power adapter (not included). Includes a cable clamp to prevent accidental power disconnection.
-
RETURN: ¼" jack brings the effects pedal chain back into the Mix-Blender.
-
SEND: 14 " jack is used to feed the effects pedal chain or a tuner.
-
LEVEL 1 & 2: Used to adjust the relative levels between the two instruments.
-
INPUT 1 & 2: Standard 14 " guitar inputs for two instruments or effects.
-
EFFECTS: Heavy-duty footswitch activates the Mix-Blender's effects loop.
-
OUTPUT: Standard 1/4" guitar level output use to feed a stage amp or other pedals.
-
BLEND: Wet-Dry blend control lets you blend in as much of the effects as you like into the signal path.
-
POLARITY: Toggles the effects SEND relative phase by 180^ to compensate for pedals that may be out of phase with the dry signal path.
-
STEEL ENCLOSURE: Heavy-duty 14-gauge steel enclosure.

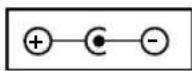
The Mix-Blender requires a 9 volt power supply with a negative center.
OVERVIEW
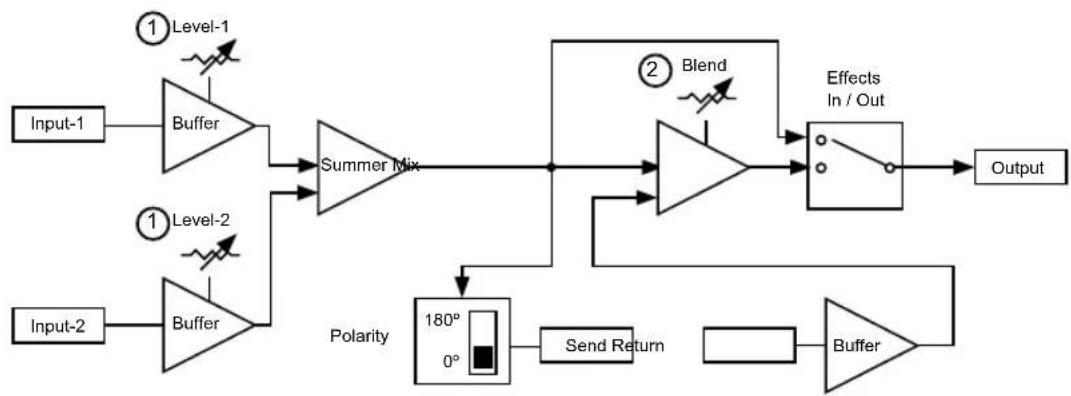
The Mix-Blender™ is in fact two pedals in one. On one hand it is a mini 2 X 1 mixer, on the other, it is an effects loop manager. Following the block diagram below, two of Radial's award wining Class-A buffers drive the inputs which are then summed together to create the relative mix. The signal is then routed to the footswitch where it can feed your amp or – when engaged – can activate the effects loop.
① The Mixer
The Mix-Blender's MIX section lets you combine any two instrument level sources together and set their relative volume levels. You could for instance have a Gibson Les Paul™ with powerful humbuckers connected to input-1 and then a Fender Stratocaster™ with lower output single coil pickups connected to input-2. By setting the levels for each, you can switch between instruments without having to readjust the level on your amp.
② The Effects Loop
A typical effects loop either turns on or off the effects pedal chain that is connected. In this case, the BLEND section lets you blend in the desired amount of the 'wet' effect into the signal path without affecting the original 'dry' signal. This lets you retain the original tone of your bass or clean electric guitar and mix in – for example - a touch of distortion or flanging to your sound while retaining the fundamental tone.
flowchart
graph LR
    Input1["Input-1"] --> Buffer1["Buffer"]
    Input2["Input-2"] --> Buffer2["Buffer"]
    Buffer1 --> SummerMix["Summer Mix"]
    Buffer2 --> SummerMix
    SummerMix --> Block1["Blend"]
    Block1 --> EffectOut["Effects In / Out"]
    EffectOut --> Output["Output"]
    Block1 --> Polarity["Polarity 180° 0°"]
    Polarity --> SendReturn["Send Return"]
    SendReturn --> Buffer3["Buffer"]
    Buffer3 --> EffectOut
    style Buffer1 fill:#f9f,stroke:#333
    style Buffer2 fill:#f9f,stroke:#333
    style SummerMix fill:#ccf,stroke:#333
    style Block1 fill:#cfc,stroke:#333
    style EffectOut fill:#fcc,stroke:#333
MAKING CONNECTIONS
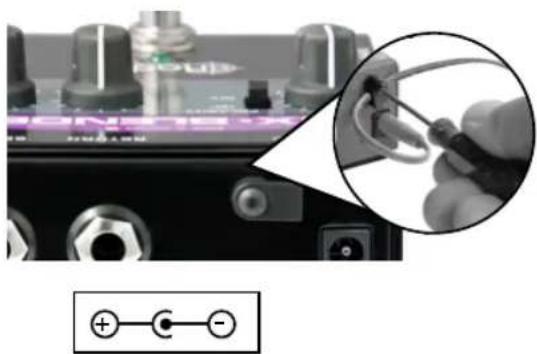
As with all audio equipment, always turn your amp off or volume down before making connections. This will prevent harmful signal spikes from connection or power-on transients from damaging more sensitive components. There is no power switch on the Mix-Blender. To power up, you will need a typical 9V supply, such as used by most pedal manufacturers, or a power connection from a pedalboard power brick. A handy cable clamp is provided that can be used to secure the power supply if needed. Simply loosen with a hex key, slip the power supply cable into the cavity and tighten. Check to see if power is connected by depressing the footswitch. The LED will illuminate to let you know power is on.
USING THE MIX SECTION
Two Guitars
Connect your guitar to input-1 and the Mix-Blender's output to your amp using standard 14 " coaxial guitar cables. Set the input-1 level control to 8 o'clock. Slowly turn up to make sure your connections are working. If you are using the Mix-Blender to mix two instruments together, you can now add a second instrument. Adjust the relative levels to suit. Always test at low volumes as this will prevent connection transients from damaging your system should a cable not be seated correctly.
natural_image
Close-up of a audio jack with a magnified inset showing a cable being inserted, no visible text or symbols.The Mix-Blender requires a 9 volt power supply with a negative center.

Two Pickups
You can also use the MIX section to combine two pickups from the same guitar or bass. For instance, on acoustic, you may have both a magnetic and a piezo with preamp. You can sometimes produce much more realistic sounds when combining the two. Simply connect and adjust the levels to suit. Use the Mix-Blender output to feed your stage amp or a Radial DI box to feed the PA.

flowchart
graph LR
    A["Speaker with stand"] --> B["PA"]
    B --> C["Speaker with stand"]
    C --> D["Radiofer"]
    D --> E["PRODI"]
    E --> F["Direct BoxMixer"]
    F --> G["MIX·BLENDER"]
    G --> H["Radiofer"]
    H --> I["EFFECTS"]
    I --> J["Guitar"]
Two Effects Loops
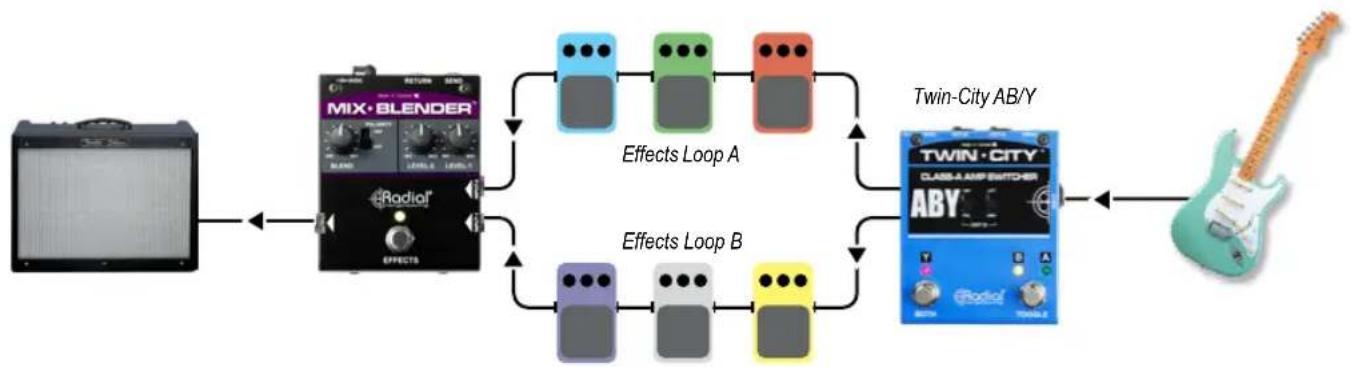
If you are looking to create adventurous sonic pallets of tonal rainbows, split your guitar signal using a Radial Twin-City™ to drive two effects loops. You can then send your instrument signal to one loop, the other or both and remix the two signals together again using the Mix-Blender. This opens the door to creative signal patches that have never been done!
flowchart
graph LR
    A["Audio Player"] --> B["MIX·BLENDER"]
    B --> C["Effects Loop A"]
    B --> D["Effects Loop B"]
    C --> E["Twin-City AB/Y"]
    D --> E
    E --> F["Twin-City CLASS-A AMP SWITCHER"]
    F --> G["Output"]
USING THE EFFECTS LOOP
In the studio, it is common to add in a touch of reverb or delay to a vocal track. This is done using the effects loop that is built into the mixing console or digitally using a workstation. This enables the engineer to add in just the right amount of effect to compliment the track. The Mix-Blender's effects loop lets you achieve the same results using guitar pedals.
To test, we suggest that you keep your effects down to a minimum so that you can first understand the functionality. Connect the 1/4" SEND jack to a distortion pedal or other effect. Connect the output from the effect to the RETURN jack on the Mix-Blender. Set the BLEND control fully counter-clockwise to 7 o'clock. Turn on your amp and turn your amp up to a comfortable level. Depress the Mix-Blender footswitch. The LED will illuminate to let you know the effects loop is on. Turn on your effect, then rotate the BLEND control clockwise to hear the blend between the dry (original instrument) and wet (distorted) sound.
Effects with Bass
The Mix-Blender's effects loop is a very effective tool for both guitar and bass. For instance, when adding distortion to a bass signal, you will likely loose all of the low end. By using the Mix-Blender, you can retain the bottom end – yet add as much distortion as you like to the signal path.
Effects with Guitar
On guitar, you may want to retain the original tone while maybe adding a subtle wah effect to the signal path using the BLEND control. This is where your creativity comes into play. The more you experiment, the more fun you will have!

flowchart
graph TD
    A["Speaker: Hertke"] --> B["MIX-BLENDER"]
    C["Speaker: Rorino"] --> B
    B --> D["Output: Guitar"]
    E["Speaker: Rock"] --> F["MIX-BLENDER"]
    G["Speaker: Propano"] --> F
    F --> H["Output: Electric Guitar"]
USING A TUNER
The Mix-Blender's send jack is always on while the return jack is actually a switching jack that is used to complete the effects loop circuit. This means that if nothing is connected, the effects loop will not work and the signal will pass through the Mix-Blender whether or not the footswitch is depressed. This opens up two options for using the effects loop with a tuner.
Connecting your tuner to the send jack will allow you to constantly monitor your tuning on the fly. Because the effects loop is separately buffered, the tuner will have no effect on your signal path and this will prevent clicking noise from the tuner.
Mute the Signal
You can also set up the Mix-Blender to mute the signal with tuners that have a footswitch mute function. Connect your tuner from the send jack and then complete the circuit by connecting the output from your tuner back to the Mix-Blender via the return jack. Turn the BLEND control fully clockwise to the wet position and then set your tuner to mute.
When you engage the effects loop, the signal will pass through the tuner and be muted to allow you to tune without aggravating the audience. The benefit here is that most tuners do not have a very good buffer circuit or they are not true bypass. This takes the tuner out of the circuit resulting in better overall tone.

flowchart
graph TD
    A["Tuner always on"] --> B["MIX·BLENDER"]
    B --> C["Chronic Tunes"]
    C --> D["Tuner Pedal"]
    D --> E["Output"]
    F["Mute while tuning"] --> G["DRY MET BLEND"]
    G --> H["MIX·BLENDER"]
    H --> I["Chronic Tunes"]
    I --> J["Tuner Pedal"]
    J --> K["Output"]
ADDING A THIRD GUITAR
You can also use the effects loop to add a third guitar by connecting it to the RETURN input jack. This would use the BLEND control to set the level as compared to the other two regular inputs. An example could be having two electrics on the ready and maybe an acoustic on a stand.

flowchart
graph TD
    A["Theo Tano"] --> B["MIX·BLENDER"]
    C["Dry"] --> B
    D["BLEND"] --> B
    E["Radio"] --> B
    F["Guitar"] --> B
    G["Guitar"] --> B
    H["Guitar"] --> B
    I["Radio"] --> B
    B --> J["EFFECTS"]
Acoustic active only when EFFECTS is selected
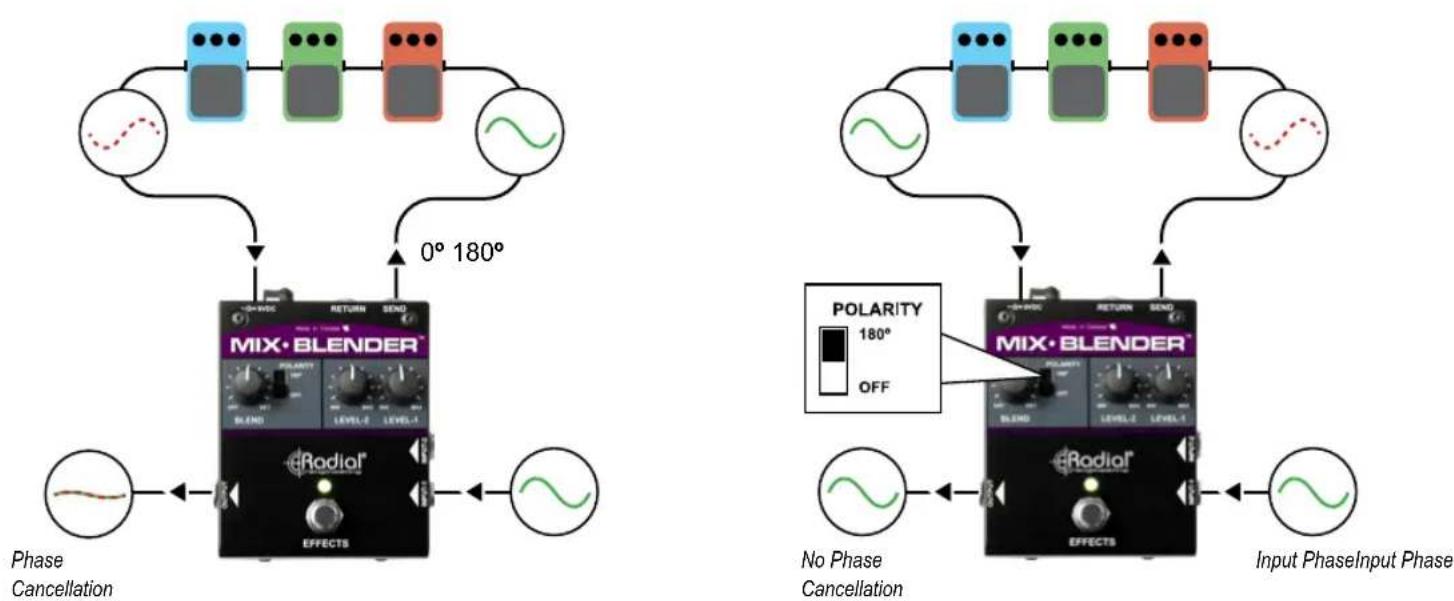
USING THE POLARITY REVERSE SWITCH
Some pedals will reverse the relative phase of the signal. This is normal as pedals are usually in series with each other and changing the phase has no audible effect. When activating the effects loop on the Mix-Blender, you are actually creating a parallel signal chain whereby the dry and wet signals are combined. If the wet and dry signal are out of phase with each other, you will experience phase cancellation.
Set the BLEND control to 12 o'clock. If you notice that the sound gets thin or disappears, this means the pedals are reversing the relative phase and the signal is being cancelled out. Simply push the 180^ degree polarity reverse switch to the up position to compensate.
SPECIFICATIONS
Audio circuit type: Discrete Class-A main audio path - Audio Grade IC send-return loop
Frequency response: 20Hz - 20KHz (+0/-2dB)
Total Harmonic Distortion: (THD+N) 0.001%
Dynamic range: 104dB
Input impedance: 220K
Maximum input: ....> +10dBu
Maximum Gain - Input to Output - FX Off: 0dB
Minimum Gain - Input to Output - FX Off:....-30dB
Maximum Gain - Input to Output - FX On: +2dB
Maximum input - FX Return: +7dBu
Clip Level - Output: > +8dBu
Clip Level - FX Output: ....> +6dBu
Equivalent input noise: -97dB
Intermodulation distortion: 0.02% (-20dB)
Phase Deviation: ....<10° at 100Hz (10Hz to 20kHz)
Power: 9V / 100mA (or more) Adapter
Construction: Steel Enclosure
Size: (LxWxD)....L:4.62" x W:3.5" x H:2" (117.34 x 88.9 x 50.8mm)
Weight: 1.35 lbs (0.61kg)
Warranty: Radial 3-year, transferable
RADIAL ENGINEERING 3 YEAR TRANSFERABLE WARRANTY
RADIAL ENGINEERING LTD. ("Radial") warrants this product to be free from defects in material and workmanship and will remedy any such defects free of charge according to the terms of this warranty. Radial will repair or replace (at its option) any defective component(s) of this product (excluding finish and wear and tear on components under normal use) for a period of three (3) years from the original date of purchase. In the event that a particular product is no longer available, Radial reserves the right to replace the product with a similar product of equal or greater value. In the unlikely event that a defect is uncovered, please call 604-942-1001 or email service@radialeng.com to obtain a RA number (Return Authorization number) before the 3 year warranty period expires. The product must be returned prepaid in the original shipping container (or equivalent) to Radial or to an authorized Radial repair center and you must assume the risk of loss or damage. A copy of the original invoice showing date of purchase and the dealer name must accompany any request for work to be performed under this limited and transferable warranty. This warranty shall not apply if the product has been damaged due to abuse, misuse, misapplication, accident or as a result of service or modification by any other than an authorized Radial repair center.
THERE ARE NO EXPRESSED WARRANTIES OTHER THAN THOSE ON THE FACE HEREOF AND DESCRIBED ABOVE. NO WARRANTIES WHETHER EXPRESSED OR IMPLIED, INCLUDING BUT NOT LIMITED TO, ANY IMPLIED WARRANTIES OF MERCHANTABILITY OR FITNESS FOR A PARTICULAR PURPOSE SHALL EXTEND BEYOND THE RESPECTIVE WARRANTY PERIOD DESCRIBED ABOVE OF THREE YEARS. RADIAL SHALL NOT BE RESPONSIBLE OR LIABLE FOR ANY SPECIAL, INCIDENTAL OR CONSEQUENTIAL DAMAGES OR LOSS ARISING FROM THE USE OF THIS PRODUCT. THIS WARRANTY GIVES YOU SPECIFIC LEGAL RIGHTS, AND YOU MAY ALSO HAVE OTHER RIGHTS, WHICH MAY VARY DEPENDING ON WHERE YOU LIVE AND WHERE THE PRODUCT WAS PURCHASED.
To meet the requirements of California Proposition 65, it is our responsibility to inform you of the following: WARNING: This product contains chemicals known to the State of California to cause cancer, birth defects or other reproductive harm. Please take proper care when handling and consult local government regulations before discarding.
All trademarks belong to their respective owners. All references to these are for example only and are not associated with Radial.

www.radialeng.com
Radial Engineering Ltd.
1845 Kingsway Ave., Port Coquitlam BC V3C 1S9
Tel: 604-942-1001 • Fax: 604-942-1010 • Email: info@radialeng.com


Radial Mix-Blender™ User Guide - Part #: R870 1160 10 Copyright © 2016, all rights reserved. 09-2022
Appearance and specifications subject to change without notice.
Made in Canada

- MIX-BLENDER™ MIXER AND EFFECTS LOOP USER GUIDE
- FEATURES
- OVERVIEW
- ① The Mixer
- ② The Effects Loop
- MAKING CONNECTIONS
- USING THE MIX SECTION
- Two Guitars
- Two Pickups
- Two Effects Loops
- USING THE EFFECTS LOOP
- Effects with Bass
- Effects with Guitar
- USING A TUNER
- Mute the Signal
- ADDING A THIRD GUITAR
- USING THE POLARITY REVERSE SWITCH
- SPECIFICATIONS
- RADIAL ENGINEERING 3 YEAR TRANSFERABLE WARRANTY
Brand : Radial Engineering
Model : Mix-Blender
Category : Blender