Nero HTA4200 - Home Theater OSD Audio - Free user manual and instructions
Find the device manual for free Nero HTA4200 OSD Audio in PDF.


| Product Type | Multi-Channel Home Theater Amplifier |
| Model | Nero HTA4200 |
| Brand | OSD Audio |
| Number of Channels | 5.1 (5 channels plus subwoofer) |
| Power Output (per channel) | 100W RMS into 8 ohms (typical) |
| Total Power | 500W RMS |
| Frequency Response | 20Hz - 20kHz ±0.5dB |
| Input Impedance | 47k ohms |
| Speaker Impedance | 4-8 ohms |
| Total Harmonic Distortion | < 0.05% |
| Signal-to-Noise Ratio | > 100dB |
| Inputs | 3x Stereo RCA, 1x Optical, 1x Coaxial |
| Outputs | 5x Speaker Binding Posts, 1x Subwoofer Pre-out |
| Dimensions (W x H x D) | 17 x 3.5 x 12 inches (approx) |
| Weight | 15 lbs (approx) |
| Power Supply | AC 110-120V / 220-240V, 50/60Hz |
| Power Consumption | 500W (max) |
| Remote Control | Included (IR) |
| Cooling | Internal fan (quiet) |
| Construction Material | Aluminum front panel, steel chassis |
| Package Contents | Amplifier, remote control, power cord, manual |
Frequently Asked Questions - Nero HTA4200 OSD Audio
User questions about Nero HTA4200 OSD Audio
0 question about this device. Answer the ones you know or ask your own.
Ask a new question about this device
Download the instructions for your Home Theater in PDF format for free! Find your manual Nero HTA4200 - OSD Audio and take your electronic device back in hand. On this page are published all the documents necessary for the use of your device. Nero HTA4200 by OSD Audio.
USER MANUAL Nero HTA4200 OSD Audio
This manual contains important instructions for the safe operation of the unit. Read and follow the safety instructions and all other instructions. Keep the manual for future reference. Make sure that it is available to all those using the device. If you sell the unit, please make sure that the buyer also receives this manual.
- Use only an approved power cable and plug or distribution board to connect your amplifier to a power outlet. Do not use an extension cable.
- Never touch the mains plug if your hands are wet.
- Do not attempt to open the equipment. Refer servicing and repair to qualified service personnel. Touching live components inside the case can result in a fatal electrical shock!
- Read the Owner's Manual and Safety Precautions before operating the equipment.
- Keep this Manual in a safe place so that you can refer to it later.
- Please heed all warnings on the equipment itself and in the Owner's Manual.
- Please follow the instructions contained in your Owner's manual and never use this equipment for any purpose other than is explained in this Owner's Manual.
- Only connect this equipment to a power source of the type described in the Owner's Manual and specified for this equipment.
- Make sure that there is adequate ventilation around the equipment to allow proper cooling. Keep the equipment away from direct sunlight. Avoid installing the unit close to sources of heat or in spaces such as bookshelves or cupboards where heat radiation may be obstructed. Avoid excessive temperatures in the room, as these could ultimately damage sensitive components and reduce the service life of your player.
- Never use the unit in damp rooms, at temperatures of below 15^ , or in the open air. When bringing your amplifier in from the cold, allow it time to achieve room temperature before plugging it in.
- Always switch the unit off before removing or inserting interconnects. Doing this with the amplifier switched on can damage not only the amplifier itself but also equipment connected to it.
- If you ever spill water or any other liquid onto the equipment: Do not touch the case! Remove the plug from the wall outlet and contact your dealer or our service department.
- Never remove the earth connection from the plug. It is there to ensure your safety.
- Arrange the power cable so that no one can accidentally stand on it. Avoid locating it under objects that might put pressure on the cable. Pay particular attention to areas where the cable exits from plugs, AC outlets and from the unit itself.
- Never operate the unit without being present. Disconnect the plug from the wall outlet and remove all aerial connections (including cable aerials) when: you clean the unit, you do not expect to use the unit for long periods of time, during an electrical storm.
- If you have an external antenna or cable antenna connected to your hi-fi system, we recommend that you use a signal isolating filter to avoid interference or damage during thunderstorms.
- Problems: If you lose the sound while the amplifier is operating, or if you notice smoke or burning, switch the unit off immediately and contact your dealer or our service department.
- Only replace defective fuses after you have traced and removed the cause of the fault and then only with a fuse of the same rating. Remove the mains plug before changing fuses. Use an insulated screwdriver to remove and replace the fuse.
CAUTION
You are cautioned that any changes or modifications not expressly approved in this manual could void your authority to operate this equipment. Properly shielded and grounded cables and connectors must be used for connection to host computers and/or peripherals in order to meet FCC emission limits. To reduce the risk of electric shock, the speaker cable should be connected to the apparatus and the speakers in accordance with the following instructions.
DO NOT defeat the safety purpose of a grounding or polarized plug by removing ground pins or using unsafe adapters. A polarized plug has two blades - one wider than the other. A grounding plug has a third ground prong in addition to the two main conductors. The wide blade or third grounding prong is provided for your safety. If the provided plug does not fit your outlet, consult an electrician to replace your obsolete outlet. If you replace the power cord, only use one of similar type and equal or greater current rating.

Protective earthing terminal(For class I apparatus with earthing). The apparatus should be connected to a mains socket outlet with a protective earthing connection.

Correct Disposal of this product. This marking indicates that this product should not be disposed with other house-hold wastes throughout the EU. To prevent possible harm to the environment or human health from uncontrolled waste disposal, recycle it responsibly to promote the sustainable reuse of material resources. To return your used device, please use the return and collection systems or contact the retailer where the product was purchased. They can take this product for environmental safe recycling.
WARNING SYMBOLS

TYPE OF DANGER: Warning - Danger Zone

TYPE OF DANGER: Warning - High Voltage

DANGER Hazardous Voltage
Hazardous voltage may be present at cable ends and screw terminals. The connection of screw terminals as well as all maintenance and repair work on the electrical installation of the device must only be performed by qualified electrical personnel in volt-free-condition. Failure to do so may result in electric shock and risk of fire and loss of life.
By all means you have to observe all electrical safety instructions applicable at the place of operation.

DANGER Electric shock caused by short-circuit
Always use proper ready-made insulated mains cabling (power cord) with a protective contact plug. Do not modify the mains cable or plug. Failure to do so could result in electric shock/death or fire. If in doubt, seek advice from a registered electrician.
WARNING: The mains plug/appliance coupler is used as disconnect device, the disconnect device shall remain readily operable.
1) Disconnect the AC power cord from the MAINS.
2) Strip 10 to 15 mm of the wire insulation of the speaker cable.
3) Connect the speaker cable to the apparatus and the speakers carefully so as not to touch the core of speaker cable by hand. Also disconnect the AC power cord from the MAINS before disconnecting the speaker cable from the apparatus and the speakers.
Introduction
Thank you for buying this product and becoming part of the OSD family.
The HTA amplifiers are the latest range of Home Theater Amps from OSD and include some significant improvements over our previous XA amplifiers.
The key areas we worked on were Power output levels (Watts), Distortion (THD) figures, and Signal to Noise Ratio (SNR). Why are these important and what do they mean to you as a new owner?
First, why are high-power levels important? In home theaters we believe most people are trying to re-create the experience of a real movie theater in their own home. The sound systems in commercial theaters are designed to achieve a peak sound pressure level of 105dB – this is very loud and usually not sustained for long periods.
Next comes Distortion. Ideally, this should be kept below 1% for the sound to be clear and accurate, as intended by the movie's sound director.
Finally, SNR. This is a measurement of how noisy the equipment is compared to the soundtrack being played. Think of it this way: in a noisy restaurant you may have to raise your voice to be heard and understood by people nearby. That's because the noise level is high, and you must speak at a level above that noise. All electronics introduce some level of noise, so it's important to choose components carefully to keep this as low as possible. Good amplifiers are rated above 100dB SNR.
Combining all three of these important requirements is difficult and usually very expensive. Our ability to source great components at low prices, coupled with our low overhead and factory-direct prices gives us a tremendous advantage.
To achieve the 105dB sound pressure level, our HTA amps are rated at either 200 Watts or 300 Watts, all channels driven (not just one channel as stated by most competitors). Used with typical speakers, this allows for a sound pressure level of 112-115dB, 7-10dB more than required. The additional dB's mean the amplifier is working well within its normal range and this keeps the distortion low. (A good example of this is when listening to a Bluetooth speaker, if you turn the volume all the way up it does not sound good. This is because the closer you get to full power the higher the distortion.) With this amplifier at 105dB, the distortion is below 0.01%. Then, by choosing the best components, we also achieve 110dB SNR at full power. This combination of performance specifications is hard to find from any amplifier, regardless of price. By choosing an OSD HTA amplifier you have achieved the goal of great performance at an affordable price.
Welcome again to the OSD family, we hope you enjoy our product.
(Shown on HTA7200)
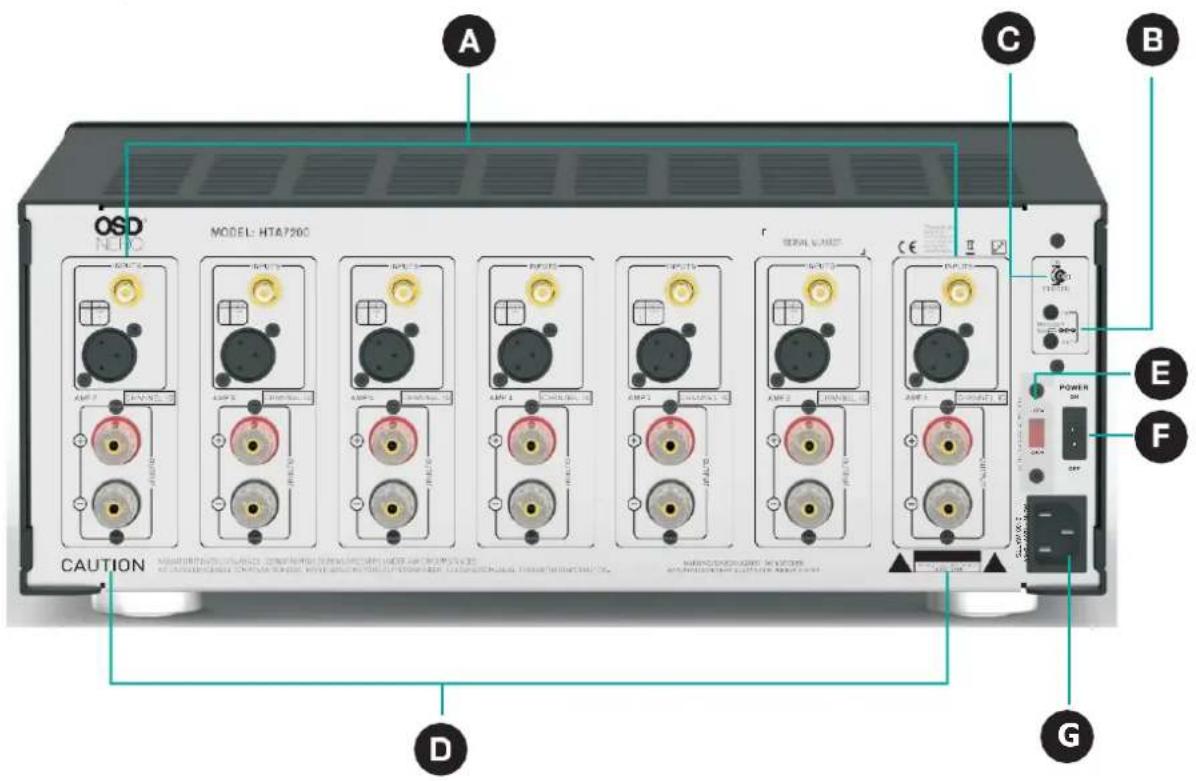
A. Audio Inputs (see page 4)
Inputs for connecting the IATA amplifier to the outputs of an AVR, pre-pro, or other devices.
B. Remote Trigger Input And Output (see page 5)
Power On/Off using 8-24v signal from connected device, such as AVR, control system or processor.
The HTA Amp supply trigger link out to another amplifier (use the 1/8" mono jack connect)
C. ON/Trigger Power Switch
In ON position: the Power switch on the front panel turns the HTA Amp on and off.
In TRIGGER position: the HTA can be turned on and off remotely by a device connected to the REMOTE TRIGGER jack. In this mode, the LED's on the front panel will glow red when the amplifier is in standby mode, and bright blue when powered or.
D. Speaker Outputs (see page 4)
5-way binding posts used to connect the HTA Amp to your speakers.
E. AC Voltage Selector
Before connecting, insure that the voltage selector is set for the correct voltage for your region.
F. Power Switch
Switches the device on and sets it in the standby mode. if the switch is set to the “off” position, the device is disconnected from the mains supply.
G. AC Input
Use the supplied power cord to plug the HTA amperin precautions on page 2).
SPEAKER & INPUT CONNECTIONS : HTA4200/HTA5200/HTA7200
(Shown on HTA7200)
INPUTS:
Non Balanced RCA
Balanced XLR
OUTPUTS:
Connect to Speakers
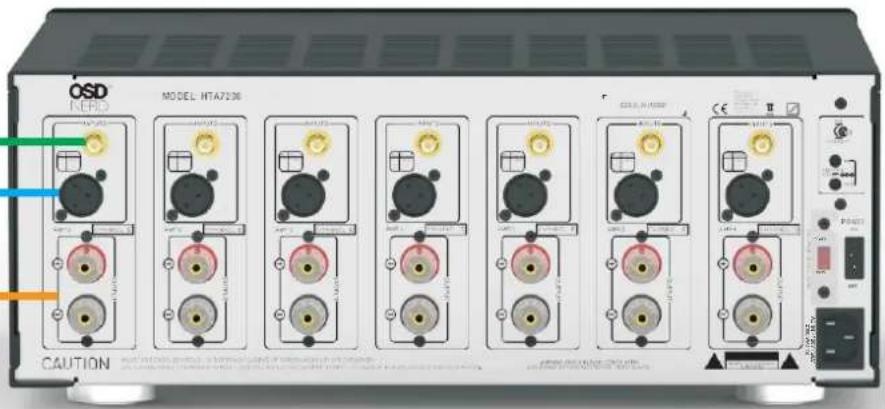
Connecting your speakers:
Use Class 2 wiring for speaker connections.
Wiring the speaker connector with bare wire:
- Strip the insulation of each speaker wire to expose 3/8" (10 mm) of bare conductor.
- Unscrew the output terminal binding post several twists, insert each wire into the correct terminal.
- Tighten binding post by twisting clock-wise until it is firmly clamping the speaker wire.
- For spades or banana plugs, simply insert in correct terminals.
- Ensure + terminal goes to + terminal of speakers and – goes to – do this by checking the marking on the speaker wire. Usually, RED wire is +
Warning: While the amplifier does self-protect under most improper output conditions, misconfiguration of loudspeaker mode and incorrect connection of loudspeakers could damage connected loudspeakers and/or amplifier.
Please refer installation to a qualified installation professional, and always check state and local electrical codes when installing.
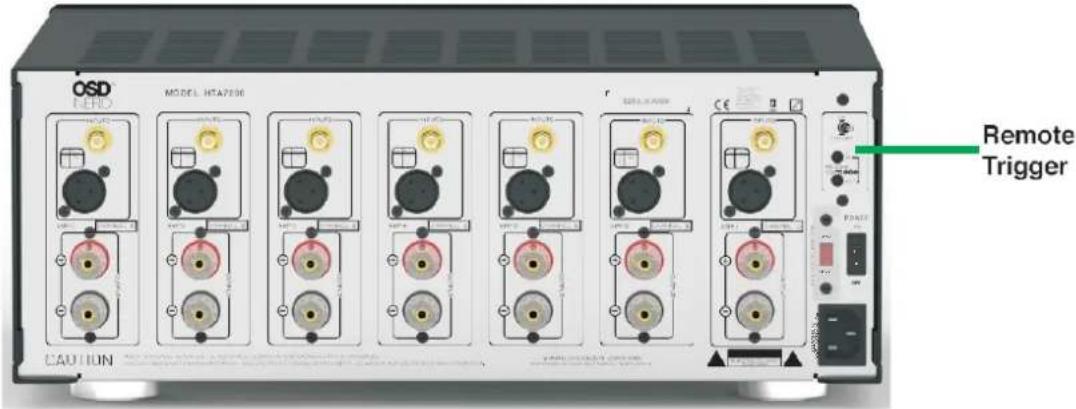
Power Options:
There are 2 options for controlling the power ON/OFF
- Select ON if you want to turn the amp on front the front panel power switch
- The HTA amps can also be powered on automatically by other devices equipped with a 12v trigger output: Select TRIGGER position. When the switch is set to TRIGGER, the HTA amp will turn on when a 12v signal is present and go into standby when there is no signal present.
Note: If you set the ON/SIGNAL/TRIGGER switch to Trigger, but don't connect the HTA amp to another device, the status LED's will be bright blue, but the amplifier will not respond if you press the power button.
SPEAKER & INPUT CONNECTIONS:
HTA4200/HTA5200/HTA7200
QSD®
NERO
(Shown on HTA5200)
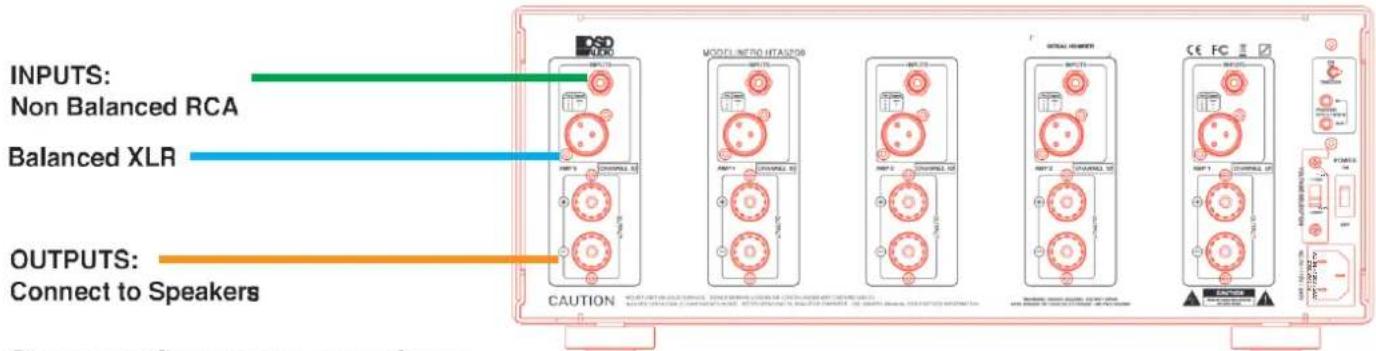
Connecting your speakers.
Use Class 2 wiring for speaker connections
Wiring the speaker connector with bare wire:
- Strip the insulation of each speaker wire to expose 3/8" (10 mm) of bare conductor
- Unscrew the output terminal binding post several twists, insert each wire into the correct termina
- Tighten binding post by twisting clock-wise until it is firmly clamping the speaker wire.
- For spades or banana plugs, simply insert in correct terminals.
- Ensure + terminal goes to + terminal of speakers and – goes to – do this by checking the marking on the speaker wire. Usually, RED wire is +
Warning: While the amplifier does self-protect under most improper output conditions, misconfiguration of loudspeaker mode and incorrect connection of loudspeakers could damage connected loudspeakers and/or amplifier.
Please refer installation to a qualified installation professional, and always check state and local electrical codes when installing
Mono/Stereo Switch
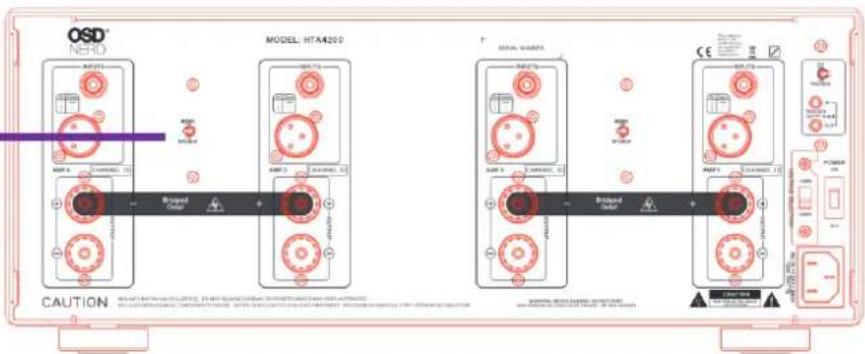
HTA4200
Stereo/Mono Switches
The HTA 4200 is the only HTA series AMP with one or two Stereo/Mono Switches. Otherwise, input, outputs, and power switches are identical for all three amps depending on how many individual amps are for each amp.
Stereo/Mono; These switches allow the two Amps to be paired to be used in stereo or combined in mono. In mono, AMP 1 and AMP 2 inputs are summed, so use one Input, either AMP1 or AMP 2 Balanced or Unbalanced. The same applies to AMP 3 and 4 in mono; use one Input, Balanced or Unbalanced.
Before you begin:
Please check the voltage selector above the power socket and confirm it is correct for your country's voltage. Voltage available for end-users to choose from.
Ensure the amp has air clearance with nothing covering the ventilation slots. 6 inches of clearance is recommended, or, if rack mounted, please use a cooling fan.
Double-check all connections from connected processors or AVR's, and connections to speakers. Make sure all connections are good and that there are no stray wires, or strands of wire.
Tip - If speaker wires are running through walls or ceiling, you can check that the speaker wires are connected correctly by taking a 9V battery and momentarily touching the speaker wire to the + and - terminals. If the speakers are connected there will be a small 'popping' sound. Turn the volume level of the connected Processor or AVR down to zero for all channels.
Power-on - Normal Operation
Press . After a short pause the front panel LED indicators will light-up.
Individual channel, power status indicators
Front Panel Status LEDs
Power: Bright Blue
Standby: All LEDs Turn Red
Protection: Red


Added Image of Front Panel LEDs
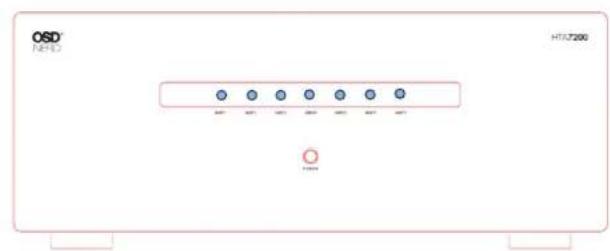
Power:
Blue Lights – The amp is on and working correctly
Standby:
Red Lights – The amp is in standby mode, no signal to speakers, no sound.
Protection:
Red Light – The amp has automatically detected a problem and is in protection mode to prevent damage to speakers. Turn amp off, unplug
and check speaker connections for short circuits (positive and negative wires touching).
Power-on
Press the front panel switch labeled POWER. After a short pause the front panel LED indicators will light-up.
Press this button again, all LEDs will turn red, and the device will enter standby mode.
Power-on - Trigger
Press the front panel switch labeled POWER. After a short pause the front panel LED indicators will light-up.
When the rear panel switch is set to TRIGGER the front panel indicator lights will be Red and the amp will be in Standby mode. When a TRIGGER signal is present the amp will turn on and the indicator lights will be Blue. The amp will stay on as long as there is a TRIGGER signal present. When the TRIGGER signal is removed, the amp will return to Standby and the front panel indicator lights will go to Red.
To turn Off
Press the rear panel switch labeled POWER, all lights will turn off.
If the amp requires cleaning, wipe with a clean, dampened soft cloth. Do not use chemicals and remove any moisture. Do not use abrasive cleaners, as they may damage the paint. Do not expose the amp to insecticide, waxes, polishing agents, or an aerosol spray as moisture may enter the amp.
Service Information
Should you encounter any problems with your HTA amplifier please reset the power by switching off and un-plugging the amp. Re-check all connections from Processors or AVR's and to the speakers. Turn on the amp again and refer to the 'Amplifier Operation and Maintenance' instructions. If a problem still exists, contact OSD Nero's customer service department at OSDAUDIO.COM.
Performance Specs
| HTA 200 Series Specifications | |||||
| Specification for each channel | Parameter | Measured in | HTA4200 HTA5200 HTA7200 | ||
| OUTPUT POWER(RMS)(UNIT:W)@1% THD (SINGLE CHANNEL) | 4 Ohms Watts | 265 | 265 265 | ||
| OUTPUT POWER(RMS)(UNIT:W)@1% THD (SINGLE CHANNEL) | 8 Ohms Watts 180 180 180 | ||||
| OUTPUT POWER(RMS)(UNIT:W)@.1% THD (SINGLE CHANNEL) | 4 Ohms Watts | 235 | 235 235 | ||
| ALL CHANNEL OUTPUT POWER(RMS)(UNIT:W)@0.1% THD | 8 Ohms Watts | 125 | 125 125 | ||
| ALL CHANNEL OUTPUT POWER(RMS)(UNIT:W)@1% THD | 8 Ohms Watts 145 145 145 | ||||
| ALL CHANNEL OUTPUT POWER(RMS)(UNIT:W)@0.1% THD | 4 Ohms Watts 180 180 180 | ||||
| ALL CHANNEL OUTPUT POWER(RMS)(UNIT:W)@1% THD | 4 Ohms Watts 210 210 210 | ||||
| Bridged Rating (RMS)(UNIT:W)@1% THD (SINGLE CHANNEL) | 8 Ohms Watts 400 | ||||
| FREQUENCY RESPONSE @ + or -3dB - Hz | xHz - xKHz | Hz 5Hz - V 1 1 1 | 50KHz 5Hz - 50KHz | 5Hz - 50KHz | |
| Input Sensitivity | |||||
| SIGNAL TO NOISE(A weighted)(UNIT:dB), @1KHz @1% THD, XLR input or named I/O, Rated Power | 8 Ohms dB | 110 110 110 | |||
| SIGNAL TO NOISE(A weighted)(UNIT:dB), @1KHz @1% THD, XLR input or named I/O, 1W | 8 Ohms dB | 105 105 105 | |||
| DAMPING FACTOR rated power | 1 KHz | 0 - 500 165 | 165 165 | ||
| IDLE CURRENT - Amps | Amps Amps | 0.14 0.14 0.14 | |||
| MAX.CURRENT @ALL CH. At rated power - Amps | Amps Amps | 10.7 13.6 | 19 | ||
| EFFICIENCY OF AMPLIFIER - % | x' % | % | 66 | 66 | 66 |
| Amplifier Type (A, AB, H, D) | A, AB, H, D | AB | AB | AB | |
| Transformer type (EI, Toroidal) | EI, Toroidal | Toroidal | 2 x Toroidal | 2 x Toroidal | |
| Capacitors, number and size per channel | uF | 4 x 10000uF | 4 x 10000uF | 4 x 10000uF | |
| Air-cooled or fan cooled | Air or Fan | Air | Air | Air | |
| 12 Volt Triggers | V | Yes, 12V | Yes, 12V | Yes, 12V | |
| Power Supply | 110 or 240v | 110 or 240v | 110 or 240v | 110 or 240v | |
| Rack Mountable | Y/N | Shelf | Shelf | Shelf | |
| Dimensions | Inches | 6.3 x 17.1 x 16.57 | 6.3 x 17.1 x 16.57 | 6.3 x 17.1 x 16.57 | |
| Weight | Lbs | 51 | 63 | 71 | |
All OSD NERO HTA Amplifiers have a (5) year Limited Warranty against defects in materials and workmanship. Proof of purchase must accompany all claims. During the warranty period OSD AUDIO will replace any defective part and correct any defect in workmanship without charge for either parts or labor OSD AUDIO may replace returned speakers with a product of equal value and performance. In such cases, some modification to the mounting may be necessary and are not OSD AUDIO's responsibility.
For this warranty to apply, the unit must be installed and used according to its written instructions. If necessary, repairs must be performed by OSD AUDIO. The unit must be returned to OSD AUDIO at the owner's expense and with prior written permission. Accidental damage and shipping damage are not considered defects, nor is damaged resulting from abuse or from servicing performed by an agency or person not specifically authorized in writing by OSD Audio
OSD AUDIO sells products only through authorized dealers and distributors to ensure that customers obtain proper support and service. Any OSD AUDIO product purchased from an unauthorized dealer or other source, including retailers, mail over dealers and on-line sellers will not be honored or serviced under existing OSD AUDIO warranty policy. Any sale of product by an unauthorized source or other manner not authorized by OSD AUDIO shall void the warranty on the applicable product.
Damage to or destruction of components due to application of excessive power voids the warranty on those parts. In these cases, repairs will be made on the basis of the retail value of the parts and labor. To return for repairs, you must email customer service at RMA@audiogeargroup.com for a Returned Merchandise Authorization (RMA) number# then the unit must be shipped to OSD AUDIO at the owner's expense, along with a note explaining the nature of service required. Be sure to pack the unit(s) in a corrugated container with at least 3 inches of resilient material to protect the unit from damage in transit.
This Warranty Does Not Cover:
Damage caused by abuse, accident, misuse, negligence, or improper operation (installation) • Any products that have been altered or modified • Any product whose identifying number of decal, serial #, etc. has been altered, defaced or removed • Normal wear and maintenance.
- CAUTION
- WARNING SYMBOLS
- DANGER Hazardous Voltage
- DANGER Electric shock caused by short-circuit
- Introduction
- SPEAKER & INPUT CONNECTIONS : HTA4200/HTA5200/HTA7200
- Connecting your speakers:
- Power Options:
- SPEAKER & INPUT CONNECTIONS:
- HTA4200/HTA5200/HTA7200
- Connecting your speakers.
- HTA4200
- Stereo/Mono Switches
- Before you begin:
- Individual channel, power status indicators
- Front Panel Status LEDs
- Power:
- Standby:
- Protection:
- Power-on
- Power-on - Trigger
- To turn Off
- Service Information
- This Warranty Does Not Cover:
Brand : OSD Audio
Model : Nero HTA4200
Category : Home Theater