
DVD600II - DVD player JBL - Free user manual and instructions
Find the device manual for free DVD600II JBL in PDF.


| Type de produit | DVD Player |
| Marque | JBL |
| Modele | DVD600II |
| Dimensions (L x H x P) | 430 x 55 x 250 mm |
| Poids | 3.5 kg |
| Alimentation | AC 110-240V, 50/60 Hz |
| Consommation electrique | 15 W (standby < 1 W) |
| Formats disques compatibles | DVD-Video, DVD-Audio, CD, CD-R/RW, VCD, SVCD, MP3, JPEG, DivX |
| Sorties video | Composite (RCA), S-Video, Component (Y/Pb/Pr), HDMI (optionnel) |
| Sorties audio | Analogique stereo (RCA), Coaxiale numerique, Optique numerique |
| Decodeurs audio | Dolby Digital, DTS, Dolby Pro Logic II |
| Fonctions principales | Lecture progressive (P-Scan), Zoom, Repetition, Programmation, Controle parental, Lecture aleatoire |
| Entretien et nettoyage | Utiliser un kit de nettoyage de lentille; essuyer le boitier avec un chiffon doux et sec; eviter les solvants |
| Securite | Ne pas ouvrir le boitier; eviter l'humidite et les chocs; debrancher en cas d'orage |
| Pieces detachees et reparabilite | Telecommande, lentille laser, transformateur d'alimentation disponibles chez revendeurs agrees |
| Informations generales | Lecteur DVD de salon JBL avec design noir, compatible PAL/NTSC, garantie 2 ans |
Frequently Asked Questions - DVD600II JBL
User questions about DVD600II JBL
0 question about this device. Answer the ones you know or ask your own.
Ask a new question about this device
Download the instructions for your DVD player in PDF format for free! Find your manual DVD600II - JBL and take your electronic device back in hand. On this page are published all the documents necessary for the use of your device. DVD600II by JBL.
USER MANUAL DVD600II JBL
Includes: DCR600Ⅱ, DVD600Ⅱ and SCS135P
DESIGN GOAL: Re-create the excitement of the movies using high-performance separate components in one convenient package.
AUDIO/VIDEO RECEIVER: DCR600; With Dolby* Digital, Dolby Pro Logic* II, DTS* and Logic 7*
SOURCE UNIT: DVD600;Five-Disc Carousel DVD/CD/CD-R/CD-RW/VCD Changer With MP3 Decoding and On Screen Library™ (patent pending) Feature
REMOTE CONTROL: JBL One-Click™ (patent pending) Remote Commander
LOUDSPEAKERS: SCS135P Six-Piece Home Cinema Speaker System With Four Satellites, One Center and One 100-Watt, 8-Inch Subwoofer
JBL
4 Important Safety Information and Unpacking
5 Getting Started
5 What's Included
5 Installing and Connecting the Equipment
5 What We Recommend
6 Quick Installation Diagrams
9 Where to Place the Speakers
9 Mounting Options
10 Connecting the Speakers
10 Making the Audio Connections
11 Making the Video Connections
11 Completing Setup
12 Quick Guide to Using the JBL Cinema ProPack 600
14 DCR600 II Front Panel Controls
16 DCR600 Ⅱ Front Panel Information Display
17 DCR600 II Rear Panel Connections
19 DVD600 11 Front Panel Controls
20 DVD600 11 Front Panel Information Display
21 DVD600 Ⅱ Rear Panel Connections
22 Remote Control Functions
26 Remote Control Function Grid
28 Remote Control Code Tables
38 Configuring the DCR600 11 Receiver
38 Memory Backup
38 Configuring the Speakers
39 Adjusting the Output Levels
40 Setting Delay Times
42 Remote Control Functions
42 Programming the Remote
42 Entering Product Codes
42 Auto-Searching for Product Codes
42 Reading Back the Programmed Code
43 Programming Macros
44 Erasing Macro Commands
44 Device Functions
44 Notes on Using the Remote With Other Devices
44 Volume Control Punch-Through
45 Channel Control Punch-Through
45 Transport Control Punch-Through
45 Reassigning Devices
45 Resetting the Remote Memory
46 Configuring the DVD600 Ⅱ DVD Changer
46 DVD Compatibility & Terminology
47 Using the Remote Control
47 Selecting Audio Output Languages
47 Selecting Subtitle Languages
48 Selecting Menu Languages
48 Parental Lock and Passwords
48 Password Selection and Control Lock
49 Clearing Passwords
49 Changing the Password
50 Setting the Aspect Ratio
50 Setting the Dynamic Range
51 Using the Digital Audio Output
51 Setting the Linear PCM Bit Rate
52 Operating the DCR600 11 Receiver
52 Surround Mode Chart
53 Selecting a Surround Mode
53 Using Digital Sources
53 Dolby Digital
53 DTS
53 Selecting a Digital Source
54 Digital Status Indicators
54 Night Mode
54 Important Notes on Digital Playback
55 PCM Audio Playback
55 Operating the Tuner
55 Station Selection
55 Preset Tuning
55 Recalling Preset Stations
55 Tape Recording
56 Operating the DVD600 II DVD Changer
56 Loading Discs
56 Playback Basics
57 Using the DVD Disc's Menu
58 Using the Menu Bar
58 Menus and Controls
58 Selecting Titles and Chapters
59 Changing Languages (Audio)
59 Changing Camera Angles
60 Playing CDs
60 Selecting a Track
60 Using IntroScan
60 Time Display Selection
60 Playing MP3 and Video CD Discs
61 MP3 Disc Playback
61 Programmed Playback of MP3 Discs
61 Repeat Playback of MP3 Discs
61 VCD Playback
62 Using the On-Screen Status Bar for VCD Playback
62 Playback Control
63 Programmed Play
63 Random Play
63 Repeat Play
63 Repeat A-B
63 Programmed Playlists
64 Bookmarks
64 To Enter a Bookmark
64 To Recall a Bookmarked Scene or Passage
65 DVD Language Codes
66 Troubleshooting
66 Processor Reset
69 Technical Specifications
Typographical Conventions
In order to help you use this manual with the remote control, front panel controls and rear panel connections, certain conventions have been used.
EXAMPLE – (bold type) indicates a specific remote control or front panel button, or rear panel connection jack
EXAMPLE – (OCR type) indicates a message that is visible on the front panel information display
1 – (number in a square) indicates a specific front panel control on the DCR600n receiver
① – (number in a circle) indicates a rear panel connection on the DCR600 _II receiver
1D – (number followed by a capital "D" in a rectangle) indicates a specific front panel control on the DVD600II DVD changer
1D – (number followed by a capital "D" in a circle) indicates a rear panel connection on the DVD600n DVD changer
① – (number in an oval) indicates a button or indicator on the remote
A – (letter in a square) indicates an indicator in the front panel display on the DCR600n receiver
A' – (letter with a prime in a square) indicates an indicator in the front panel display on the DVD6001 DVD changer
read first! Important Safety Precautions!
CAUTION
RISK OF ELECTRIC SHOCK DO NOT OPEN
CAUTION: To prevent electric shock,
do not use this (polarized)
plug with an extension cord,
receptacle or other outlet
unless the blades can
be fully inserted to
prevent blade exposure.

enclosure that
The lightning flash with arrowhead symbol, within an equilateral triangle, is intended to alert the user to the presence of uninsulated "dangerous voltage" within the product's
risk of electric shock to persons.

The exclamation point within an equilateral triangle is intended to alert the user to the presence of important operating and
maintenance (servicing) instructions in the panying the appliance.
-
Read Instructions. All the safety and operating instructions should be read before the product is operated.
-
Retain Instructions. The safety and operating instructions should be retained for future reference.
-
Heed Warnings. All warnings on the product and in the operating instructions should be adhered to.
-
Follow Instructions. All operating and use instructions should be followed.
-
Cleaning. Unplug this product from the wall outlet before cleaning. Do not use liquid cleaners or aerosol cleaners. Use a damp cloth for cleaning.
-
Attachments. Do not use attachments not recommended by the product manufacturer, as they may cause hazards.
-
Water and Moisture. Do not use this product near water – for example, near a bathtub, wash bowl, kitchen sink or laundry tub; in a wet basement; near a swimming pool; or the like.
-
Accessories. Do not place this product on an unstable cart, stand, tripod, bracket or table. The product may fall, causing serious injury to a child or adult, and serious damage to the product. Use only with a cart, stand, tripod, bracket or table recommended by the manufacturer, or sold with the product. Any mounting of the product should follow the manufacturer's instructions, and should use a mounting accessory recommended by the manufacturer.
-
A Product and Cart Combination Should Be Moved with Care. Quick stops, excessive force and uneven surfaces may cause the product and cart combination to overturn.
-
Ventilation. Slots and openings in the cabinet are provided for ventilation and to ensure reliable operation of the product and to protect it from overheating, and
these openings must not be blocked or covered. The openings should never be blocked by placing the product on a bed, sofa, rug or other similar surface. This prod-
uct should not be placed in a built-in installation, such as a bookcase or rack, unless proper ventilation is provided or the manufacturer's instructions have been adhered to.
-
Power Sources. This product should be operated only from the type of power source indicated on the marking label. If you are not sure of the type of power supply to your home, consult your product dealer or local power company. For products intended to operate from battery power, or other sources, refer to the operating instructions.
-
Polarization. This product may be equipped with a polarized alternating-current-line plug (a plug having one blade wider than the other). This plug will fit into the power outlet only one way. This is a safety feature. If you are unable to insert the plug fully into the outlet, try reversing the plug. If the plug should still fail to fit, contact your electrician to replace your obsolete outlet. Do not defeat the safety purpose of the polarized plug.
- Power-Cord Protection. Power-supply cords should be routed so that they are not likely to be walked on or pinched by items placed upon or against them, paying particular attention to cords at plugs, convenience receptacles, and the point where they exit from the product.
- Nonuse Periods. The power cord of the product should be unplugged from the outlet when left unused for long periods of time.
- Outdoor Antenna Grounding. If an outside antenna or cable system is connected to the product, be sure the antenna or cable system is grounded so as to provide some protection against voltage surges and built-up static charges. Article 810 of the National Electrical Code, ANSI/NFPA 70, provides information with regard to proper grounding of the mast and supporting structure, grounding of the lead-in wire to an antenna discharge unit, size of grounding conductors, location of antenna-discharge unit, connection to grounding electrodes, and requirements for the grounding electrode. See Figure A.
- Lightning. For added protection for this product during a lightning storm, or when it is left unattended and unused for long periods of time, unplug it from the wall outlet and disconnect the antenna or cable system. This will prevent damage to the product due to lightning and power-line surges.
- Power Lines. An outside antenna system should not be located in the vicinity of overhead power lines or other electric light or power circuits, or where it can fall into such power lines or circuits. When installing an outside antenna system, extreme care should be taken to keep from touching such power lines or circuits, as contact with them might be fatal.
- Overloading. Do not overload wall outlets, extension cords, or integral convenience receptacles, as this can result in a risk of fire or electric shock.
- Object and Liquid Entry. Never push objects of any kind into this product through openings, as they may touch dangerous voltage points or short-out parts that could result in a fire or electric shock. Never spill liquid of any kind on the product.
- Servicing. Do not attempt to service this product yourself, as opening or removing covers may expose you to dangerous voltage or other hazards. Refer all servicing to qualified service personnel.
- Damage Requiring Service. Unplug this product from the wall outlet and refer servicing to qualified service personnel under the following conditions:
a. The power-supply cord or the plug has been damaged; or
Figure A. Example of Antenna Grounding as per National Electrical Code ANSI/NFPA 70
b. Objects have fallen onto, or liquid has been spilled into, the product; or
c. The product has been exposed to rain or water; or
d. The product does not operate normally when following the operating instructions. Adjust only those controls that are covered by the operating instructions, as an improper adjustment of other controls may result in damage and will often require extensive work by a qualified technician to restore the product to its normal operation; or
e. The product has been dropped or damaged in any way; or
f. The product exhibits a distinct change in performance; this indicates a need for service.
-
Replacement Parts. When replacement parts are required, be sure the service technician has used replacement parts specified by the manufacturer or that have the same characteristics as the original part. Unauthorized substitutions may result in fire, electric shock or other hazards.
-
Safety Check. Upon completion of any service or repairs to this product, ask the service technician to perform safety checks to determine that the product is in proper operating condition.
-
Wall or Ceiling Mounting. The product should be mounted to a wall or ceiling only as recommended by the manufacturer.
-
Heat. The product should be situated away from heat sources such as radiators, heat registers, stoves or other products (including amplifiers) that produce heat.
NOTE: This player is designed and manufactured for compatibility with Region Management Information that is encoded on most DVD discs. This player is designed only for playback of discs with Region Code 1, or for discs that do not contain Region Code information. If there is any other Region Code on a disc, that disc will not play on the DVD600II.

natural_image
Symbolic icon of a globe with the number 1, enclosed in a rounded square border (no text or symbols beyond the numeral)Antenna Lead-In Wire
Ground Clamp
Antenna Discharge Unit (NEC Section 810-20)
Grounding Conductors (NEC Section 810-21)
Electric Service Equipment
Ground Clamps
Power Service Grounding Electrode System (NEC Art. 250, Part H)
Important Safety Information
Verify Line Voltage Before Use
Your JBL Cinema ProPack 6001 home theater system has been designed for use with 120-volt AC current. Connection to a line voltage other than that for which it is intended can create a safety and fire hazard and may damage the system.
If you have any questions about the voltage requirements for your specific model, or about the line voltage in your area, contact your selling dealer before plugging the components into a wall outlet.
Do Not Use Extension Cords
To avoid safety hazards, use only the power cord attached to your components. We do not recommend that extension cords be used with this product. As with all electrical devices, do not run power cords under rugs or carpets or place heavy objects on them. Damaged power cords should be replaced immediately by an authorized service depot with a cord meeting factory specifications.
Handle the AC Power Cord Gently
When disconnecting the power cord from an AC outlet, always pull the plug – never pull the cord. If you do not intend to use the system for any considerable length of time, disconnect the plugs from the AC outlet.
Do Not Open the Cabinet of Any Components
There are no user-serviceable components inside this product. Opening the cabinets may present a shock hazard, and any modification to the product will void your guarantee. If water or any metal object such as a paper clip, wire or a staple accidentally falls inside, disconnect it from the AC power source immediately, and consult an authorized service station.
CATV or Antenna Grounding
If an outside antenna or cable system is connected to this product, be certain that it is grounded so as to provide some protection against voltage surges and static charges. Section 810 of the National Electrical Code, ANSI/NFPA No. 70-1984, provides information with respect to proper grounding of the mast and supporting structure, grounding of the lead-in wire to an antenna discharge unit, size of grounding conductors, location of antenna discharge unit, connection to grounding electrodes and requirements of the grounding electrode.
NOTE TO CATV SYSTEM INSTALLER:
This reminder is provided to call the CATV (Cable TV) system installer's attention to article 820-40 of the NEC that provides guidelines for proper grounding and, in particular, specifies that the cable ground shall be connected to the grounding system of the building, as close to the point of cable entry as possible.
Installation Location
■ To ensure proper operation, particularly of the precision laser transport mechanism and carousel tray in the DVD600II, and to avoid the potential for safety hazards, place the components on a firm and level surface. When placing the components on a shelf, be certain that the shelf and any mounting hardware can support the weight of the product.
■ Make certain that proper space is provided both above and below each component for ventilation. If this product will be installed in a cabinet or other enclosed area, make certain that there is sufficient air movement within the cabinet. Under some circumstances, a fan may be required.
■ Make certain that there is enough room in front of the DVD600u for the disc tray to open fully, and that there is enough space above the unit so that discs may easily be inserted.
■ Do not place the components directly on a carpeted surface.
■ Avoid installation in extremely hot or cold locations, or in an area that is exposed to direct sunlight or heating equipment.
■ Avoid moist or humid locations.
■ Do not obstruct the ventilation slots on the top of any component, or place objects directly over them.
■ Do not place the DVD600 II in a location that is subject to direct sunlight or extreme heat or cold, as these conditions may damage the discs used in the player, or the player itself.
■ If you will be stacking the DCR600 II and DVD600II, place the DVD600II DVD changer on top of the DCR600II receiver, as the receiver is too heavy to be placed on top of the DVD changer.
Cleaning
When the system gets dirty, wipe it with a clean, soft, dry cloth. If necessary, wipe it with a soft cloth dampened with mild soapy water, then a fresh cloth with clean water. Wipe dry immediately with a dry cloth. NEVER use benzene, aerosol cleaners, thinner, alcohol or any other volatile cleaning agent. Do not use abrasive cleaners, as they may damage the finish of metal parts. Avoid spraying insecticide near the components.
Moving the Components
Before moving the components, be certain to disconnect any interconnection cords with other components, and make certain that you disconnect the unit from the AC outlet.
Important Information for the User
This equipment has been tested and found to comply with the limits for a Class-B digital device, pursuant to Part 15 of the FCC Rules.
The limits are designed to provide reasonable protection against harmful interference in a residential installation. This equipment generates, uses and can radiate radio-frequency energy and, if not installed and used in accordance with the instructions, may cause harmful interference to radio communication. However, there is no guarantee that harmful interference will not occur in a particular installation. If this equipment does cause harmful interference to radio or television reception (which can be determined by turning the equipment off and on), the user is encouraged to try to correct the interference by one or more of the following measures:
■ Reorient or relocate the receiving antenna.
■ Increase the separation between the equipment and receiver.
■ Connect the equipment into an outlet on a circuit different from that to which the receiver is connected.
■ Consult the dealer or an experienced radio/TV technician for help.
This device complies with Part 15 of the FCC Rules. Operation is subject to the following two conditions: (1) this device may not cause harmful interference, and (2) this device must accept interference received, including interference that may cause undesired operation.
NOTE: Changes or modifications may cause this system to fail to comply with Part 15 of the FCC Rules and may void the user's authority to operate the equipment.
Unpacking
The carton and shipping materials used to protect your new home theater system during shipment were specially designed to cushion it from shock and vibration. We suggest that you save the carton and packing materials for use in shipping if you move, or should the system ever need repair.
Tominimize the size of the carton in storage, you may wish to flatten it. This is done by carefully slitting the tape seams on the bottom and collapsing the carton. Other cardboard inserts may be stored in the same manner. Packing materials that cannot be collapsed should be saved along with the carton in a plastic bag.
If you do not wish to save the packaging materials, please note that the carton and other sections of the shipping protection are recyclable. Please respect the environment and discard those materials at a local recycling center.
Getting Started
Thank You for Choosing JBL
For more than 50 years, JBL has been involved in every aspect of music and film recording and reproduction, from live performances to the recordings you play in your home, car or office.
We're confident that the JBL system you have chosen will provide every note of enjoyment
that you expected – and that when you think about purchasing additional audio equipment for your home, car or office, you will once again choose JBL.
Please take a moment to complete the enclosed profile card. It enables us to keep you posted on
our latest advancements, and helps us to better understand our customers and build products that meet their needs and expectations.
JBL Consumer Products
What's Included
Your JBL Cinema ProPack 600 _II Home Theater System includes everything you need to connect the system to your television and begin enjoying the cinema experience in your own home:
One DCR600 II Audio/Video Receiver with Dolby Digital, Dolby Pro Logic II, DTS and Logic 7
One DVD600 _II Five-Disc Carousel DVD Changer with MP3 Decoding
One SCS135P Six-Piece Loudspeaker System with four satellites (and wall-mount brackets), one center and an 8-inch subwoofer
One universal, programmable, eight-device remote control with three AAA batteries
One AM loop antenna
One two-conductor 15-foot speaker cable for connecting the receiver to the subwoofer
Five two-conductor, color-coded speaker cables (three 40-foot and two 20-foot) for connecting the receiver to the four satellites and center speaker
One 3-foot, single-lead coaxial digital cable with orange connectors for connecting the digital audio output of the DVD changer to the receiver
One 3-foot, single-lead RCA patch cord with yellow connectors for connecting the composite video output of the DVD changer to the receiver
One 5-foot, triple-lead RCA patch cord with red, white and yellow connectors for connecting the composite video and analog audio outputs from the receiver to your television
One single-lead mini phone jack for connecting the remote-out jack on the receiver to the remote-in jack on the DVD changer
The pages that follow describe in detail the various controls and displays on the system components. Feel free to read them now, or review them at a later time. Please go to the section labeled Where To Place the Speakers on page 9 to begin setting up your JBL Cinema ProPack 600 _II system.
One FM antenna cable
Installing and Connecting the Equipment
When making connections to audio source equipment or speakers, it is always a good practice to unplug the unit from the AC wall outlet. This prevents any possibility of accidentally sending audio or transient signals to the speakers that may damage them.
Refer to the attached Quick Installation diagrams and the Rear Panel Connections diagrams for the DCR600II and DVD600II on pages 17 and 21 when connecting your equipment.
What We Recommend
We recommend a simple connection of your system components to each other, plus a video connection to your television. After you have made these connections, you may wish to read further in this owner's manual for information on connecting other components, such as external tape or digital recorders, CD players, laserdisc players, cable television boxes, satellite dishes, video games or other devices.
IMPORTANT NOTE: Any cables run inside walls should be CL3/FT4 rated, or carry any other certification that is required by the NEC or state and local building and electrical codes. To avoid interference, audio and speaker cables should not be parallel to, or run in the same conduits or path with, AC cables. If you have any questions about wiring, consult your dealer or electrical contractor.
Quick Installation Diagrams
BASIC INSTALLATION: Your TV must at a minimum have a composite video input (this connector usually has a yellow-colored core), and Left (usually has a white-colored core) and Right (red-colored core) Stereo audio preamp-level RCA outputs. All wires for this hookup are included.


NOTES:
1. CONNECT "RIDGED" WIRE TO (+) COLORED TERMINAL AND CONNECT
"SMOOTH" WIRE TO (−) BLACK TERMINAL ON DCR60011 AND SPEAKERS.
2. WIRE COLOR CODES ARE FOR EASE OF CONNECTION.
THE SPEAKER WIRES CAN BE INTERCHANGED IF NECESSARY.
Quick Installation Diagrams
ALTERNATE INSTALLATION FOR BETTER PICTURE QUALITY: Your TV must have an S-Video input, and Left (usually has a white-colored core) and Right (red-colored core) Stereo audio preamp-level RCA outputs. Two pieces of S-Video cable are not included and should be purchased separately.


NOTES:
1. CONNECT "RIDGED" WIRE TO (+) COLORED TERMINAL AND CONNECT
"SMOOTH" WIRE TO (−) BLACK TERMINAL ON DCR600 _11 AND SPEAKERS.
2. WIRE COLOR CODES ARE FOR EASE OF CONNECTION.
THE SPEAKER WIRES CAN BE INTERCHANGED IF NECESSARY.
Quick Installation Diagrams
ALTERNATE INSTALLATION FOR BEST PICTURE QUALITY: Your TV must have Y/Pr/Pb component video inputs (three separate RCA connectors with red-, blue- and green-colored cores), and Left (usually has a white-colored core) and Right (red-colored core) Stereo audio preamp-level RCA outputs. The component video cable is not included and should be purchased separately. This setup requires that the TV's own video switching is utilized to access the DVD picture. All other video switching is still done through the DCR600II.
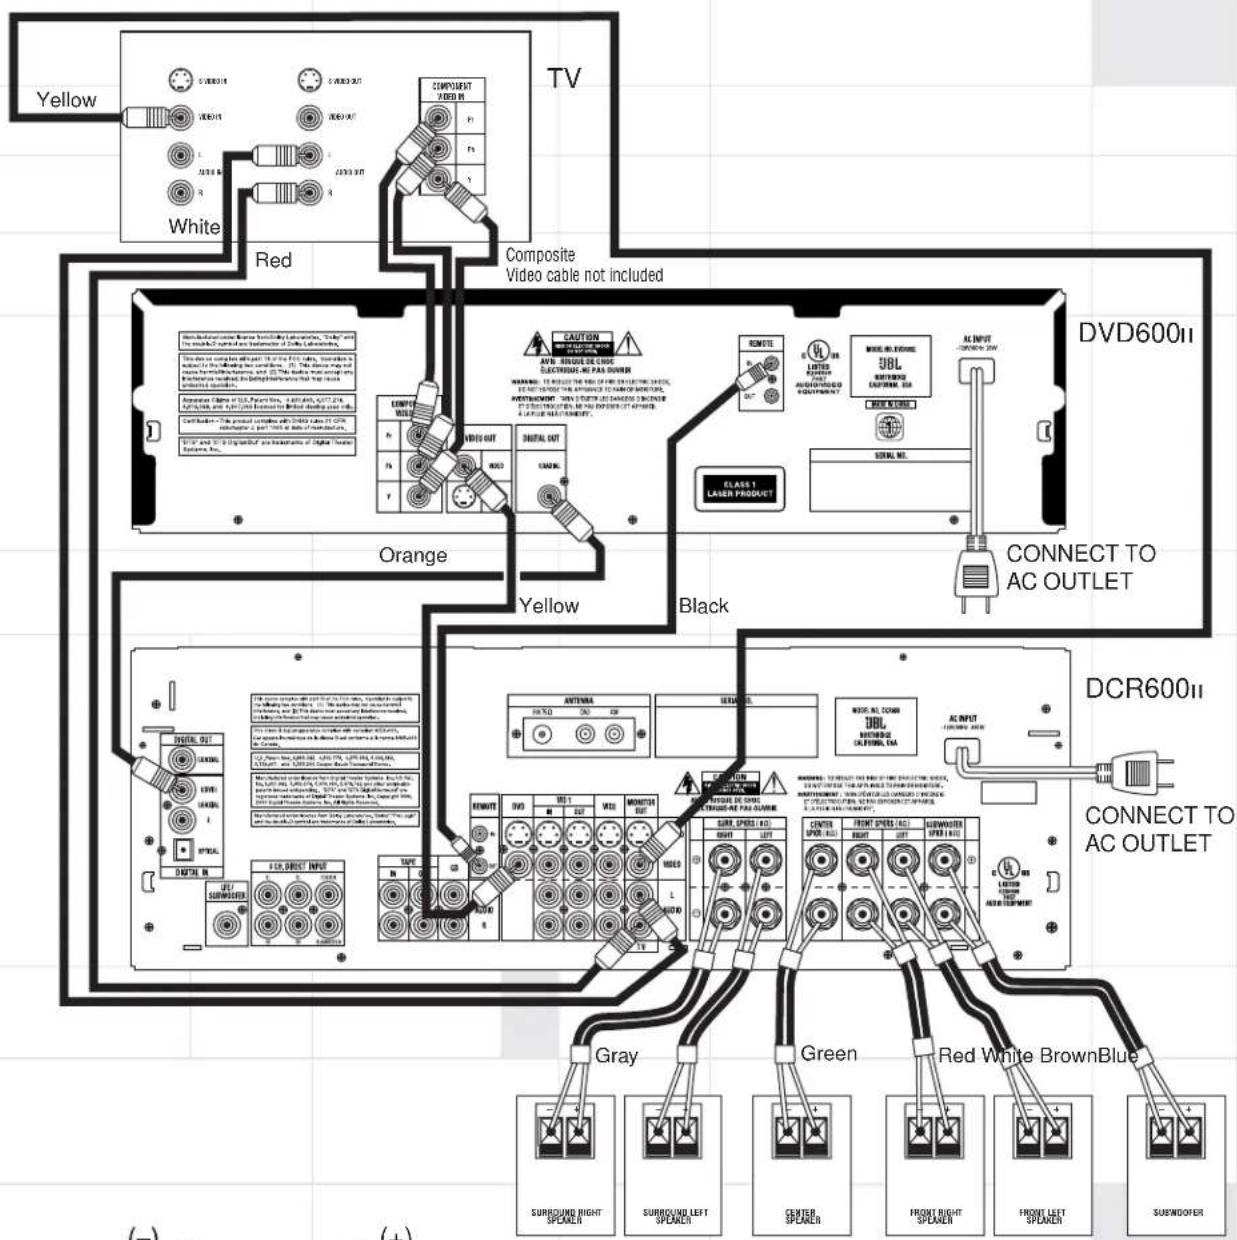

NOTES:
1. CONNECT "RIDGED" WIRE TO (+) COLORED TERMINAL AND CONNECT "SMOOTH" WIRE TO (-) BLACK TERMINAL ON DCR60Q1 AND SPEAKERS.
2. WIRE COLOR CODES ARE FOR EASE OF CONNECTION.
THE SPEAKER WIRES CAN BE INTERCHANGED IF NECESSARY.
3. MUST USE VIDEO SWITCHING THROUGH TV TO ACCESS COMPONENT VIDEO.
Where to Place the Speakers
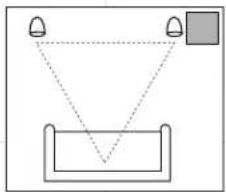
The front speakers should be placed the same distance from each other as they are from the listening position. They should be placed at about the same height from the floor as the listeners' ears will be, or they may be angled toward the listeners.
The center channel speaker should be placed slightly behind the front left and right speakers, and no more than two feet above or below the tweeters of the left and right speakers. It is often convenient to set the center speaker on top of the television set, as shown in the drawing. Use the supplied support leg to aim it toward the listener by screwing the leg in to angle the speaker up, or unscrewing the leg slightly to angle the speaker down.
The two surround speakers should be placed slightly behind the listening position and, ideally, should face each other and be at a level higher than the listeners' ears. If that is not possible, they may be placed on a wall behind the listening position, facing forward. The surround speakers should not call attention to themselves. Experiment with their placement until you hear a diffuse, ambient sound accompanying the main-program material heard in the front speakers.
Front Speakers Center Channel Speaker

natural_image
Simple line drawing of a container with two bell symbols above it, connected by dotted lines (no text or labels)
natural_image
Simple line drawing of a desktop computer setup with two speakers and a monitor, no text or symbols present.Subwoofer
natural_image
Simple diagram showing two bell icons above a rectangular container with a dotted line connecting them (no text or symbols)Surround Speakers

natural_image
Simple line drawing of a rectangular frame with a small rectangular top and two side handles (no text or symbols)
The low-frequency material reproduced by the subwoofer is mostly omnidirectional, and this speaker may be placed in a convenient location in the room. However, the best reproduction of bass will be heard when the subwoofer is placed in a corner along the same wall as the front speakers. Experiment with subwoofer placement by temporarily placing the subwoofer
in the listening position and moving around the room until the bass reproduction is best. Place the subwoofer in that location.
Mounting Options
Satellites and Surrounds

natural_image
Simple line drawing of a rectangular object on a wooden surface (no text or symbols)On shelves.

natural_image
Simple line drawing of a door handle with a curved handle and angle marking (no text or symbols)On the wall. Wall brackets are included.

natural_image
Two identical stand holders with circular bases, no text or symbols visibleOn optional stands (FS300).
Wall-Mounting
The customer is responsible for proper selection and use of mounting hardware, available through hardware stores, to properly and safely wall-mount the speakers.
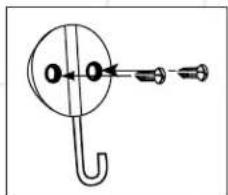
Attach plate to wall. The brackets should be placed, if possible, so that the screws will fasten into a wooden wall stud. If that is not possible, use properly selected wall anchors.

natural_image
Simple line drawing of a mechanical assembly with a bracket and lever (no text or symbols)Slide speaker onto support.

natural_image
Simple line drawing of a door with a vertical line and a U-shaped pipe, no text or symbols present.Place speaker and support on wall plate.
Connecting the Speakers
natural_image
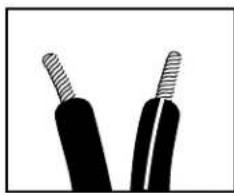
Close-up of two black cables with hatched insulation, no text or symbols visibleSeparate and strip the ends of the speaker wire as shown. Speakers and electronics terminals have corresponding (+) and (−) terminals.
Most manufacturers of speakers and electronics, including JBL, use red to denote the (+) terminal and black for the (−) terminal.
The (+) lead of the speaker wire is noted with a ridge or stripe. It is important to connect both speakers identically: (+) on the speaker to (+) on the receiver and (−) on the speaker to (−) on the receiver. Wiring "out of phase" results in thin sound, weak bass and a poor stereo image.
With the advent of multichannel surround sound systems, connecting all of the speakers in your system with the correct polarity remains equally important in order to preserve the proper ambience and directionality of the program material.
Touse the binding-post speaker terminals on the rear panel of the DCR6001 receiver, and on the subwoofer, unscrew the colored collar until the pass-through hole in the center post is visible under the collar. Insert the bare end of the wire through this hole; then screw the collar down until the connection is tight. The hole in the center of each collar is intended for use with banana-type connectors.
To connect the supplied speaker wires to the satellite and center speaker terminals, press the red or black plastic tab for the desired terminal, insert the bare end of the wire into the hole and release the tab. Gently tug on the wire to make sure that it is fully inserted.
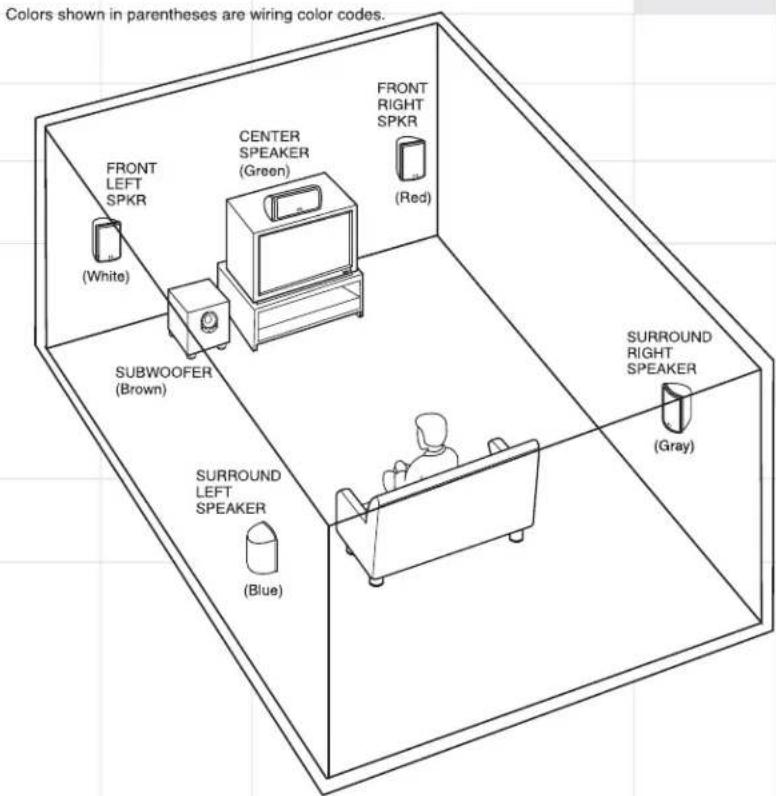
The wires for the three front speakers should all be of the same length even if the speakers will be placed at varying distances from the DCR600n. The same applies to the two rear speakers. To make sure that you use the correct wires for each speaker, we have color-coded them, as shown in the diagram:
Front Left: White Wire
Center: Green Wire
Front Right: Red Wire
Surround Right: Gray Wire
Surround Left: Blue Wire
Subwoofer: Brown Wire
Making the Audio Connections
If you will be stacking the DCR6001 and DVD6001, place the DVD6001 DVD changer on top of the DCR6001 receiver, as the receiver is too heavy to be placed on top of the DVD changer.

natural_image
Diagram showing a device being processed from a laptop to a monitor, with motion arrows indicating movement (no text or symbols present)-
Assemble the supplied AM Loop Antenna as shown above. Connect it to the AM and GND Terminals on the back of the DCR600i.
-
Connect the supplied 75-ohm FM antenna to the FM Terminal 23 on the back of the DCR600II. Note that if you use an optional external FM antenna with 300-ohm twin-lead cable, you must use a 300-ohm-to-75-ohm adaptor (not supplied) to make the connection.
-
Connect one end of the supplied single-lead coaxial digital cable with orange connectors to the COAX 1 (upper) Digital Input ② on the
receiver, and connect the other end to the Coaxial Digital Output in the DVD changer.
- In order to obtain the best possible sound reproduction when watching your television, connect the left and right analog audio outputs of your TV to the TV Audio Inputs 19 on the DCR600, using the red (right) and white (left) leads of the supplied triple-lead RCA cable.
Making the Video Connections
IMPORTANT NOTE: The DCR600 and DVD600 offer both S-Video and composite video inputs and outputs. However, you must choose one type of connection or the other for all connections in your system. This will depend on the type of connections on your television. If both types of connections are available, we recommend that you purchase S-Video cables and make those connections for superior picture quality. The composite video connections will also provide excellent results. However, the DCR600 will not convert from one type of signal to the other.
- Connect one end of the single-lead RCA cable with yellow connectors to the Composite Video Output 30 on the DVD600II and the other end to the DVD Composite Video Input 11 on the receiver. OR
Connect one end of an S-Video cable (not supplied) to the S-Video Output @the DVD600 and the other end to the DVD S-Video Input 📊 on the receiver.
Connect all components as per the Quick Setup Guide, or as per the appropriate diagram on pages 6 through 8 of this manual.
Remove any protective plastic films from the front panel displays of the DCR600 II and DVD600 II .
-
Plug the receiver's Power Cord 21 into an unswitched AC outlet.
-
Press the receiver's Main Power Switch 1 in so that it latches in and is flush with the front panel. Note that the Power Indicator 3 will turn amber, indicating that the unit is in the Standby mode.
-
Install the three supplied AAA batteries in the remote as shown. Be certain to follow the (+) and (−) polarity indicators that are on the bottom of the battery compartment.

-
Turn the DCR600 on, either by pressing the System Power Control 2 on the front panel, or by pressing an Input Selector 4 9 10 11 12 13 14 15 on the remote. The Power Indicator 3 will turn green to confirm that the unit is on, and the Main Information Display 19 will also light up.
-
Connect one of the yellow ends of the triple-lead RCA cable with red, white and yellow connectors to the Video Monitor Composite
Video Output 18 on the receiver, and the other end to the composite video input jack on your television. This jack is often color-coded yellow; however, if you have any questions about which jack to use, consult your television's owner's manual or your dealer for assistance. OR
Connect one end of a second S-Video cable (not supplied) to the Video Monitor S-Video Output 18 on the receiver, and the other end to the S-Video input jack on your television.
-
If your television is equipped with component video (Y/Pr/Pb) inputs, in addition to the above connections, you may use a triple-lead component video cable (not supplied) to connect the Component Video Outputs 10 the DVD600 to the inputs on your television.
-
Connect one end of the black 1/8" mini phone cord to the Remote IR Output ⑩ on the
Completing Setup
Setting the output levels correctly is the key to preserving the enveloping surround sensation that the artists of your favorite movies intended for you to experience.
-
Put the DCR600 in Dolby Pro Logic II mode by pressing the Surround Mode Selector 20 7 repeatedly until DOLBY PRO LOGIC IIMOVIES appears in the Main Information Display U, and the Pro Logic II Indicator F lights.
-
Press the Test Button 17 to start a test tone circulating from speaker to speaker, starting with the front left speaker (indicated by FL in the display), and going around clockwise. Let it circulate once to check that your speakers have been connected correctly.
-
The goal is to obtain the same output level from each speaker. Use the front left speaker as your reference, adjusting the Volume Control 15 19 23 until the sound coming from the front left speaker is at a comfortable level.
-
If any other speaker sounds too loud or soft in comparison to the front left speaker, adjust its output level by pressing the ▲/▼ Buttons 25 31 the remote, or the Selector Buttons 5 on the receiver's front panel. This will cause the test tone to pause at that speaker to allow you to make the adjustment. (DO NOT adjust the volume for any speakers other than the reference front left speaker.)
DCR600, and the other end to the Remote Control Input ⑥ on the DVD600.
If you will not be connecting additional equipment to your system just yet, you may plug in the receiver and DVD changer. The receiver and DVD changer each have a Main Power
Switch 1 which must be pressed in first, and a System Power Control 2, which should be pressed second. The last source selection will appear in the receiver's information display.
The DCR600ii is set at the factory to a default configuration for use with small satellite speakers and a subwoofer such as the JBL SCS135P system. If other speakers are used, then the speaker configurations may need to be changed (see page 38).
Although the DCR600II is set to the correct speaker configuration settings for the speakers supplied with this system at the factory, you will need to adjust the output levels of the speakers to customize the system to your speaker placement and room acoustics.
When you are satisfied with the level of that speaker, simply wait, and the tone will continue to circulate after about 15 seconds.
-
If you are using a sound pressure level (SPL) meter for precise level adjustment, start by setting the volume so that the meter reads 75dB, C-Weighting, Slow.
-
When you are finished adjusting the levels for all speakers (except the subwoofer, which is not adjustable using this procedure – see page 39 for that procedure), press the Test Button 17 to end the test tone.
NOTE: The Bass and Treble levels may be adjusted by pressing the Tone Mode Button 6 until TONE IN appears in the display, followed by the Set Button 16. Use the Selector Buttons 5 to adjust Bass or Treble levels by plus or minus 10dB, then press the Set Button 16 again to enter the settings. When setting the speaker output levels as described above, make sure either to set the Bass and Treble levels to 0dB, or to press the Tone Mode Button 6 until the words TONE OUT appear.
For most installations, your DCR600 Receiver should now be ready for use. If you would like further information on making other, advanced settings, please see the section titled "Configuring the DCR600 Receiver".
Quick Guide to Using the JBL Cinema ProPack 60011
The DVD600 can play discs in the following formats:
- Both 5-inch (12cm) and 3-inch (8cm) discs
- CD audio discs
- DTS audio discs
- CD-R audio discs
- CD-RW audio discs
- DVD movie discs
• VCD video compact discs
• Discs containing MP3 compressed-audio files However, it cannot play:
- DVD discs with a Region Code other than "1" or "All"
• DVD discs using PAL format video
- DVD-ROM data discs
- DVD-RAM discs
- CD-I discs
- CD-G discs
- SVCD discs
- Photo CD discs
- CD-R/RW data discs
Notes on DVD-Audio discs:
- The DVD600 II is not capable of playing selections in the DVD-Audio format. However, many DVD-Audio discs include audio tracks in the PCM, Dolby Digital or other formats which the DVD600 II is capable of playing. You may need to press the Title Button 24 rather than the Menu Button 26 in order to access these formats.
- Some DVD-Audio discs display a still picture while a selection is playing. Sometimes, this picture may disappear when play is stopped and the DVD600 _II is placed in the Resume mode. To restore the picture, fully stop play by pressing the Stop Button ^9D ^161 ore continuing play.
Plug the Power Cord into an unswitched AC outlet.
Press the Main Power Switch 1D e DVD600u so that it latches and the Power Indicator 3D turns amber, indicating that the unit is in the Standby mode. Turn the unit on by pressing the System Power Control Button 2D . The Power Indicator 3D turn green.
Open the Disc Tray 4D pressing the Open/Close Button 70 insert up to five discs in the tray locations, using the Disc Skip Button 510 50 the carousel to access all locations. Make sure each disc is loaded with the label side up, and that it is seated correctly in its location.
When you close the drawer, the DVD600 will automatically engage the On Screen Library™ (patent pending) system, which will read and identify each disc, then display a menu identifying the type (DVD, CD or MP3) and title (if available) by numbered disc location. The process can take approximately one minute. You may press the Stop Button 📋️ 🐎 🐎 the
▲/▼ Buttons 25 31 scroll down to the Exit button, and press the Set Button 28 to interrupt this process. Alternatively, you may use the ▲/▼ Buttons 25 31 scroll to a desired disc, even if the disc has not yet been identified, and press the Set Button 28 begin play. Also, if you closed the disc tray by pressing one of the Direct Access Buttons 1D, the DVD600 will immediately begin to play that disc.
Pressing a Numeric Key 33 40 42 43 while the On Screen Library is displayed will remove it from the display, but will not change the current disc or start play of any disc. Whichever type of disc is playing, make sure that you have selected DVD as the input source on the DCR600u by pressing 4 on the remote, or 11 on the front panel of the receiver until DVD is indicated.
Skip to another disc that was previously loaded in the DVD600i by pressing the Disc Skip Button 5D 51. If you press a Numeric Key 33 34 35 36 37 for any disc position containing a disc within three seconds, the DVD600i will skip directly to that disc. Otherwise, the DVD600i will play the next available disc in order. Press the Disc Skip Button 5D 51 twice in succession for a faster jump to the next disc.
You may also use JBL's exclusive On Screen Library system later during the listening session to display all discs currently loaded by pressing the On Screen Library Button 65, as long as the current disc is stopped. If you had previously interrupted the On Screen Library system while it was in the process of identifying the loaded discs, it will resume that process at this time. Press the DVD Button 4 and use the ▲/▼ Buttons 25 31 select a disc and the Set Button 28 begin playing that disc.
Directly access any track on the current disc while it is playing or in Pause mode by pressing one or more of the Numeric Keys ③-④0 ④2 ④3.
At this time you may find it convenient to quickly program your remote control to have the capability of adjusting the volume control for the DCR600 while it is set to control the DVD600. Press the DVD Selector 4 and the Mute Button 3 at the same time, then press the Volume Up Button 19, then press the MAIN Selector 8.
In addition to the transport keys located in the lower portion of the remote, when in DVD mode, you may use the arrow-key cluster in the middle of the remote to access these basic functions:
Fast-Forward Right Arrow 29 Fast-Reverse Left Arrow 27 Chapter + Up Arrow 25 Chapter – Down Arrow 31 Play/Pause Set 28
When a CD is playing, the arrow keys will not operate the transport controls while the Status Banner is displayed. However, if you press the Status Button 5, the banner will disappear and pressing an arrow key will affect the transport as described above. The Status Banner will then return to the display, and the arrow keys will again have no effect on the transport. Therefore, you should use the regular transport controls at the bottom of the remote 57 - 64 when playing CDs.
For most discs, the DVD600Ⅱ and DCR600Ⅱ will automatically select the correct surround mode. To make sure that audio in the DTS audio format is correctly processed, you must choose that format as the default in the DVD600Ⅱ setup menu. Simply stop play of the disc, and enter the setup menu by pressing Menu 26 on the remote. Use the ▲/▼ Buttons 25 31 to scroll down to Digital Audio Output. Press the Set Button 28 to select this option, and a screen will pop up, allowing you to choose from PCM, Dolby Digital or DTS outputs. Use the ▲/▼ Buttons 25 31 to highlight DTS, then press the Set Button 28 to select this choice. You do not need to reset the audio output for other formats. The DCR600Ⅱ and DVD600Ⅱ will automatically process PCM, Dolby Digital and DTS signals correctly. Press the Menu Button 26 to exit the menu screen. If you press the Menu Button 26 while the disc is playing, you can access the disc's menu to choose the DTS format there as well.
You may wish to experiment with surround modes other than Dolby Digital and DTS using the DCR600 _II receiver's functions. Press the Surround Mode Selector 207 to scroll through such choices as Dolby Pro LogicII (Music, Movies or Emulation), Dolby 3 Stereo, 5-Channel Stereo, Hall 1 or 2, Theater, Logic 7 (Cinema or Music) or Surround Off (Stereo). See page 52 for descriptions of these modes.
Press the Stop Button 91 61 inter Resume mode, in which play will resume from the point where it was stopped. Pressing the Stop Button 41 61 cause play to resume from the beginning of the disc, or the disc's main menu.
You may wish to listen to the tracks of a CD, or view the chapters of a DVD, in a different order than they appear on the disc.
The Random function will play all of the tracks on one CD, or all of the chapters on one DVD, in a random order selected by the DVD600II. The DVD600II does not randomly play selections from all five discs inserted in its tray, since this might result in the odd experience of alternating among audio tracks and disjointed video selections. Simply press the Random Button 50 once to start random play, and press it again to return to standard play, using the disc's main menu.
The DVD600 offers several variations of Repeat Play: Repeat All discs in the unit once; Repeat 1 Disc until play is manually stopped; Repeat Title on a DVD disc until play is manually stopped; Repeat Track/Chapter on either a CD or DVD disc until play is manually stopped; and Repeat A-B, which repeats a programmed selection until play is manually stopped.
Press the Repeat Button 155 scroll through the repeat choices. Repeat play can be stopped by pressing the Repeat Button 651 Repeat Off is selected, or by pressing the Stop Button 9D 61 twice.
Program the Repeat A-B function while a disc is playing. Press the Repeat A-B Button 456 the start of the passage to be repeated, and press it again at the end of the passage. The passage will continue to play until the Stop Button 9D 61 is pressed.
At any time, if a status banner remains on-screen, you may remove it by pressing either the Status Button ⑤ or the Clear Button ⑦. You can program playlists of selected tracks or chapters.
-
Select the DVD600 by pressing the DVD Button 4. While the current disc is stopped, press the Program Button to bring up the Program Edit Screen.
-
Use the ▲/▼ 25 34 ys to select a disc number, and press either Set 28 ▶29 to enter the selection and move to the next option.
-
Use the ▲/▼ 25 34 is to select a track (for a CD) or title (for a DVD), and press either Set o28 ▶ 29 to enter the selection and move to the next option. If "99" appears, it means the DVD600 _1 has not read the disc yet to determine whether it is a CD or DVD.
-
For DVDs only, use the same procedure to enter a chapter.
-
The next choice is to add the selection to the playlist by pressing the Set Button .28
-
Repeat Steps 2–5 to enter up to 32 selections into the playlist.
-
Play the list by using the arrow keys to highlight the Play selection, and the Set Button 28 to begin play. Press the Stop Button 61 twice to stop playback of the list. To cancel the list, press the Clear Button 47
-
Todelete a selection, highlight the item to be deleted, press the Set Button 28d then use the ▲/▼ 25 31s to choose the Delete Button. Press the Set Button 28 again to delete it. Alternatively, highlight the item and press the Clear Button 147 delete it.
-
Insert an entry by highlighting the item in the playlist at the point of insertion, pressing the Set Button, using the ▼ 31 key once to select the Insert option. Follow Steps 2 through 5 above to enter the new selection. You may also edit an entry by pressing the Check Button to step through the items in a playlist. Use the ◀/▶ 27 29 keys to choose a disc, track or chapter to be edited, and the ▲/▼ 25 31 ys to make a change.
Program a playlist of MP3 selections by skipping to a loaded MP3 disc and stopping play of the current track. Press the Program Button 46 to enter MP3 Program Edit mode. Use the ▲/▼ Buttons 25 31 to select a track, and press the Set Button to enter it into the playlist. When you have finished creating your playlist of up to 130 selections, simply press the Play Button 58 10D to begin programmed play.
IMPORTANT NOTE: Due to the nature of this product category, DVD players, while being operated at elevated temperatures, may exhibit certain anomalies such as picture freeze-ups.
If this occurs, the DVD600u needs to be "reset" by powering it down and up again, using its master On/Off switch.
Should this occur with your DVD600 II first check your discs for any damage, scratches and fingerprints. If discs are OK, then ventilation around the DVD600 II needs to be increased to ensure proper operation.
This completes the quick setup and operation of your JBL Cinema ProPack 600II system. Additional information is provided in the following sections for those users with additional components, or those who wish to make other, more advanced, adjustments to their system.
DCR600II Front Panel Controls
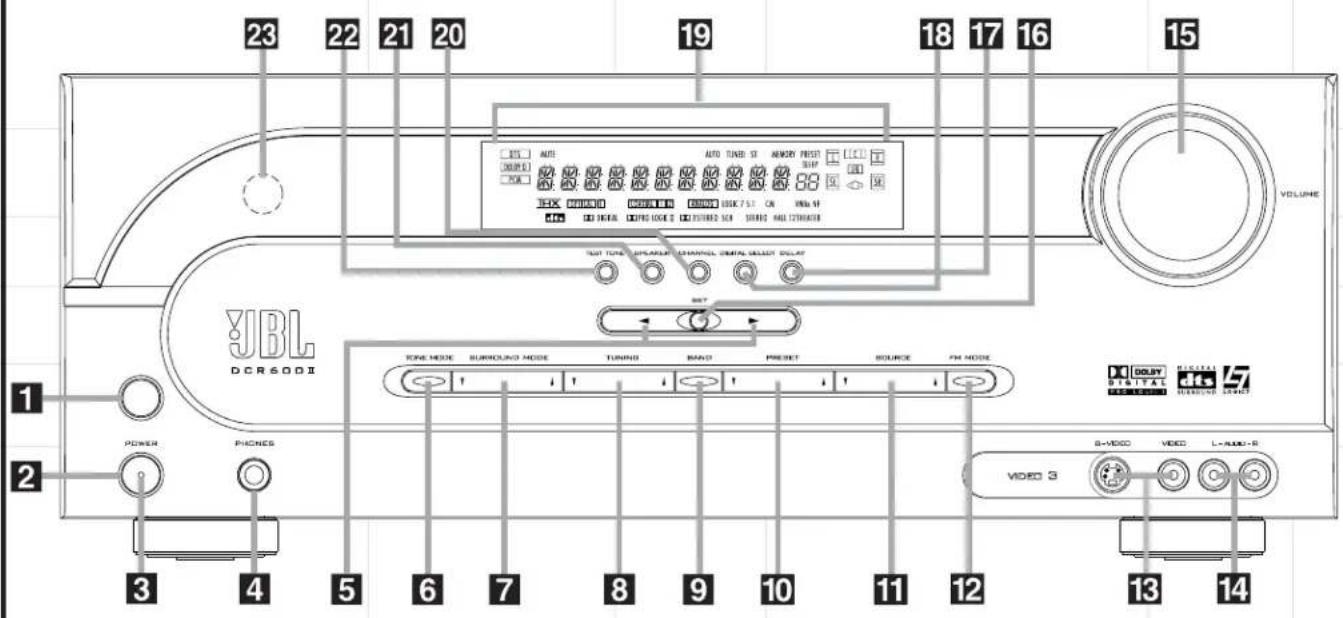
1 Main Power Switch: Press this button to apply power to the DCR600. When the switch is pressed in, the unit is placed in a Standby mode, as indicated by the amber Power Indicator 3 surrounding the System Power Control 2. This button MUST be pressed in to operate the unit. To turn the unit off and prevent the use of the remote control, this switch should be pressed until it pops out from the front panel so that the word "OFF" may be read at the top of the switch.
NOTE: This switch is normally left in the "ON" position.
2 System Power Control: When the Main Power Switch 1 is "ON," press this button to turn on the DCR600; press it again to turn the unit off. Note that the Power Indicator 3 in the center of the switch will turn green when the unit is on.
3 Power Indicator: This LED will be illuminated in amber when the unit is in the Standby mode to signal that the unit is ready to be turned on. When the unit is in operation, the indicator will turn green.
4 Headphone Jack: This jack may be used to listen to the receiver's output through a pair
of headphones. Be certain that the headphones have a standard 1/4" stereo phone plug. Note that the speakers will automatically be turned off when the headphone jack is in use.
5 Selector Buttons: When you are establishing the configuration settings, use these buttons to select from the choices available, as shown in the Main Information Display 19.
6 Tone Mode: Pressing this button enables or disables the Bass and Treble tone controls. When the button is pressed so that the words TONE IN appear in the Main Information Display 19, press the Set Button 16 to access the bass and treble adjustments. Press the Selector Buttons 5 to increase or decrease bass and treble output levels by up to 10dB. When the button is pressed so that the words TONE OUT appear in the Main Information Display 19, the output signal will be "flat," without any bass or treble alteration, no matter how the actual Bass and Treble controls are adjusted.
7 Surround Mode Selector: Press this button to change the surround mode by scrolling through the list of available modes. Note that depending on the type of input, some modes
are not always available. (See page 52 for more information about surround modes.)
8 Tuning Selector: Press the left side of the button to tune lower-frequency stations and the right side of the button to tune higher-frequency stations. When a station with a strong signal is reached, the TUNED Indicator S will be illuminated in the Main Information Display 19.
Totune manually, tap the button lightly and the tuner will step up one frequency increment per button press. When the button is held for a few seconds, the unit will quickly search the frequency band. Release it once the fast tuning starts; the tuner will automatically scan for the next station with an acceptable signal and then stop.
9 Tuner Band Selector: Pressing this button will automatically switch the DCR600u to the Tuner mode. Pressing it again will switch between the AM and FM frequency bands.
10 Preset Stations Selector: Press this button to scroll up or down through the list or stations that have been entered into the preset memory.
11 Input Source Selector: Press this button to change the input by scrolling up or down through the list of input sources. When an audio source is selected, the last video input used remains routed to the Video 1 Output 14 and Video Monitor Output 18. This permits you to simultaneously view and listen to different sources.
12 FM Mode Selector: Press this button to select Auto or Manual tuning. When the button is pressed so that the AUTO Indicator T lights, the tuner will search for the next station with an acceptable signal any time the Tuning Selector 8 45p49sed. When the button is pressed so that the AUTO Indicator T is not lit, each press of the Tuning Selector 8 45l49rease the frequency.
NOTE: When the FM reception of a station is weak, audio quality will be increased by switching to Mono mode by pressing the FM (Tuning) Mode Button 12 41 until the STEREO Indicator R goes out.
13 Video 3 Video Input Jacks: These jacks may be used for temporary connection to the composite or S-Video output of video games, camcorders or other portable video products.
14 Video 3 Audio Input Jacks: These audio/video jacks may be used for temporary connection to video games or portable audio/video products such as camcorders and portable audio players.
15 Volume Control: Turn this knob clockwise to increase the volume, counterclockwise to decrease the volume. If the DCR600 is muted, adjusting the volume control will automatically release the unit from the silenced condition.
16 Set Button: When making choices during the setup and configuration process, press this button to enter the desired setting as shown in the Main Information Display 19 into the DCR600II receiver's memory. The Set button may also be used to change the display brightness, to avoid interfering with video presentations:
Press and hold the Set Button 16 on the front panel for three seconds until the message in the Main Information Display 19 reads VFD FULL. Within five seconds, press the front panel Selector Buttons 5 until the desired brightness display level is shown. Press the Set Button 16 again to enter the setting.
When FULL appears in the Main Information Display 19, the display is at its normal brightness. When HALF appears, the display is at half the normal brightness level. When OFF appears, all of the indicators in the Main Information Display 19 will go dark. Note, however, that the Power Indicator 3 will always remain lit to remind you that the unit is turned on.
Once the desired brightness level is selected, it will remain in effect until it is changed again or until the unit is turned off.
17 Delay: Press this button to begin the sequence of steps required to enter delay time settings.
18 Digital Input Selector: When playing a source that has a digital output, press this button to select between the Optical ③ and Coaxial ② Digital inputs.
19 Main Information Display: This display delivers messages and status indications to help you operate the receiver.
20 Channel Select Button: Press this button to begin the process of trimming the channel output levels using an external audio source.
21 Speaker Select Button: Press this button to begin the process of selecting the speaker positions that are used in your listening room.
22 Test Tone Selector: Press this button to begin the process of adjusting the channel output levels using the internal test tone as a reference.
23 Remote Sensor Window: The sensor behind this window receives infrared signals from the remote control. Aim the remote at this area and do not block or cover it unless an external remote sensor is installed.
DCR600Ⅱ Front Panel Information Display
flowchart
graph TD
    A["96KHz 192KHz"] --> B["dt"]
    B --> C["DTS"]
    B --> D["DOLBY D"]
    B --> E["PCM"]
    B --> F["MUTE"]
    B --> G["OPTICAL 1"]
    B --> H["COAXIAL 1 2"]
    B --> I["ANALOG LOGIC 7 5.1 CM"]
    B --> J["digital"]
    B --> K["PRO LOGIC II"]
    B --> L["STEREO 5CH STEREO HALL 12THEATER"]
    B --> M["L"]
    B --> N["C"]
    B --> O["R"]
    B --> P["S"]
    B --> Q["LFE"]
    B --> R["SL"]
    B --> S["SR"]
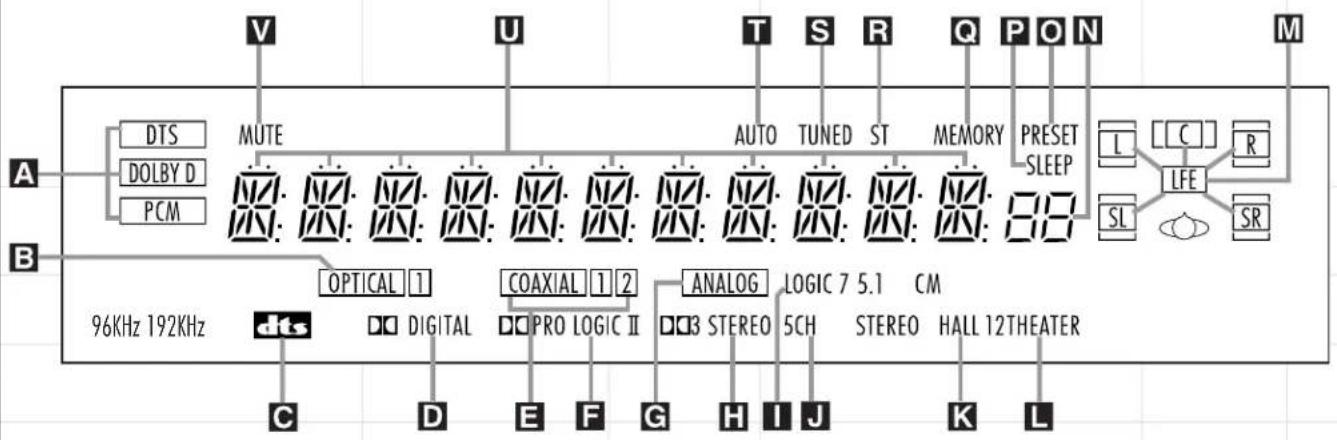
A Bitstream Indicators: When the input is a digital source, these indicators display the specific type of data signal. The DCR600 will also indicate when it detects a digital signal with a resolution of either 96kHz or 192kHz. This can occur when the receiver is used with an external DVD-Audio player or other device that is capable of transmitting this type of signal. You should not expect to see these indicators light when using the DVD600 as your source unit.
B Optical Source: Indicates the Optical Digital Input has been selected.
C DTS: Indicates a DTS-encoded source.
D Dolby Digital: Indicates a Dolby Digital source.
E Coaxial Source: Indicates a Coaxial Digital Input.
F Dolby Pro Logic II: Indicates a Dolby Pro Logic II mode has been selected. Either DOLBY PRO LOGIC II -MOVIES or DOLBY PRO LOGIC II -MUSIC or DOLBY PRO LOGIC II -EMULATION will scroll on the Main Information Display U, depending on the mode selected.
G Analog Input: Indicates an analog input source.
NOTE: Analog audio input is not available when the DVD input is in use.
H Dolby 3 Stereo Indicator: This indicator lights when the Dolby 3 Stereo mode has been selected.
Logic 7 Mode: Indicates that the Logic 7 mode is in use. LOGIC 7C appears for the Cinema version of Logic 7; LOGIC 7M appears for the Music version of Logic 7.
J 5-Channel Stereo: Lights when the 5-Channel Stereo mode has been selected.
K Hall Mode: Lights when one of the two Hall modes has been selected.
L Theater Mode: Indicates that the Theater mode has been selected.
M Speaker/Channel Input: These indicators are multipurpose, indicating either the speaker type selected for each channel or the incoming data-signal configuration. The left, center, right, right surround and left surround speaker indicators are composed of three boxes, while the subwoofer is a single box. The center box lights when a "Small" speaker is selected, and all three boxes light when "Large" speakers are selected. When none of the boxes are lit for the center, surround or subwoofer channels, no speaker has been selected for one of those positions. The letters inside each of the center boxes display active input channels. For standard analog inputs, only the L and R will light, indicating a stereo input. When a digital source is playing, the indicators will light to display the channels being received at the digital input. When the letters flash, the digital input has been interrupted.
N Preset Number/Sleep Timer: In Tuner mode, these numbers indicate the preset memory location in use. In Sleep function mode, it shows the number of minutes remaining before the unit goes into the Standby mode.
- Preset Indicator: This indicator lights when the tuner is in use to show that the Preset Number/Sleep Timer N is showing the station's preset memory number.
P Sleep Indicator: This indicator lights when the Sleep function is in use.
Memory: Flashes when entering presets and other information into the tuner's memory.
R Stereo: Lights when an FM station is being tuned in stereo.
S Tuned: Lights when a station is being received with sufficient signal strength to provide acceptable listening quality.
T Auto: Lights when the tuner is in Auto mode.
U Main Information Display: Shows messages relating to the status, input source, surround mode, tuner, volume level or other aspects of operation.
V Mute: Lights to indicate that the unit has been put in Mute by pressing the Mute Button ③. Press the Mute Button ③ again to return to the previously selected output level.
DCR600II Rear Panel Connections

IMPORTANT NOTES
A. The AC plug connections should always be the last connections made when installing an A/V system. When making subsequent connections to audio source equipment or speakers, it is always a good practice to unplug the unit from the AC wall outlet. This prevents the possibility of sending audio or transient signals to the speakers that may damage them.
B. Connect devices as per the Quick Setup Guide or per pages 6 through 8 of this manual.
C. The DCR6001 offers both composite and S-Video inputs and outputs. However, either S-Video or composite input/output connections should be used throughout the system in order for it to function properly. Do not use S-Video and composite video connections interchangeably.
D. The digital outputs are active only when a digital signal is present, and they do not convert an analog input to a digital signal, or change the format of the digital signal. In addition, any digital recorder used must be compatible with the output signal. For example, the PCM digital input from a CD player may be recorded on a CD-R or MiniDisc, but Dolby Digital or DTS signals may not.
① Coaxial Digital Audio Output: Connect to the coaxial digital input connector on a CD-R or MiniDisc recorder.
② Coaxial Digital Inputs: Connect to coax digital output of a digital source. The signal may be either a Dolby Digital signal, DTS signal or a standard PCM digital source. Do not connect the RF digital output of an LD player to these jacks. To benefit from the factory default setting of the DCR600, it is recommended that you plug the Coaxial Digital Output 4D of the DVD600 into the jack marked "1 (DVD)" on the DCR600.
③ Optical Digital Input: Connect to optical digital output of a digital source. The signal may be either a Dolby Digital signal, a DTS signal or a standard PCM digital source.
④ LFE/Subwoofer Output: Connect to the LFE or line-level input of an optional powered subwoofer. Do not use this connector with the SCS135P subwoofer included.
⑤ 6-Channel Direct Inputs: When an optional, external processor or playback device with 5.1-channel audio capability, such as a DVD-Audio player, is in use, connect the player's output jacks to these inputs.
⑥ Tape Inputs: Connect to PLAY/OUT jacks of an audio recorder.
⑦ Tape Outputs: Connect to RECORD/INPUT jacks of an audio recorder.
⑧ CD Inputs: Connect to output of a CD player.
NOTE: When the CD player has both fixed and variable audio outputs, it is best to use the fixed output unless you find that the input to the receiver is so low that the sound is noisy, or so high that the signal is distorted.
⑨ Remote IR Input: If the DCR60@'s front panel IR sensor is blocked due to cabinet doors or other obstructions, an external IR sensor may be used. Connect the output of the sensor to this jack.
10 Remote IR Output: Permits the IR sensor in the receiver to serve other remote-controlled devices. Connect this jack to the "IR IN" jack on the DVD600 or other compatible equipment.
⑪ DVD Video Inputs: Connect to composite or S-Video output jacks on a DVD.
(continued)
① Video 1 Video Inputs: Connect to PLAY/OUT composite or S-Video jacks on a VCR or other video source.
⑬ Video 1 Audio Inputs: Connect jacks to the PLAY/OUT audio jacks on a VCR or other video source.
14 Video 1 Video Outputs: Connect to RECORD/INPUT composite or S-Video jack on a VCR or other video receiver.
⑮ Video 1 Audio Outputs: Connect to the RECORD/INPUT audio jacks on a VCR or other video recorder.
16 Video 2 Video Inputs: Connect to PLAY/OUT composite or S-Video jacks on a VCR or other video source.
⑰ Video 2 Audio Inputs: Connect to PLAY/OUT audio jacks on a VCR or other video source.
18 Video Monitor Outputs: Connect to composite or S-Video input of a TV monitor or video projector.
⑲ TV Audio Inputs: Connect to output audio jacks on your television or other video source.
20 Speaker Outputs: Connect to matching + and - terminals on front left/right, center, surround left/right and subwoofer speakers.
NOTE: When making speaker connections always make certain to maintain correct polarity by connecting the colored (+) terminals on the DCR600 II to the red (+) terminals on the speakers and the black (−) terminals on the DCR600 II to the black (−) terminals on the speakers.
② AC Power Cord: Connect the AC plug to an unswitched AC wall output.
AM Antenna: Connect to the AM loop antenna supplied. If an external AM antenna is used, make connections to the AM and GND terminals in accordance with the instructions supplied with the antenna.
23 FM Antenna: Connect to the supplied indoor, or an optional external, FM antenna.
DVD600II Front Panel Controls
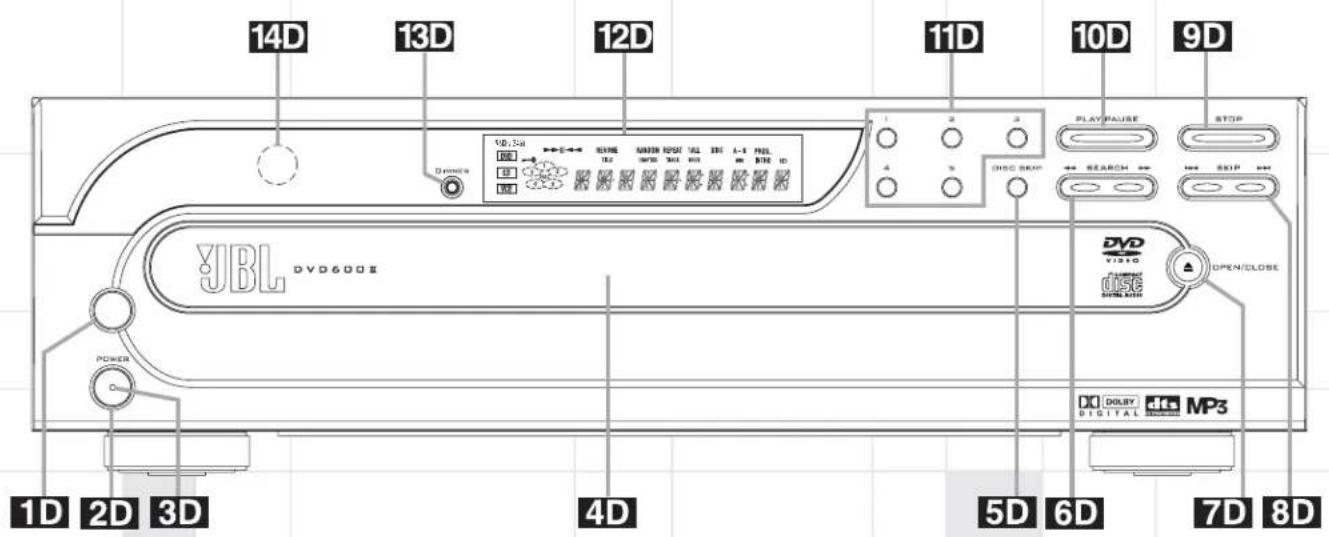
1D Main Power Switch: Press this button to apply power to the DVD600 it. When the switch is pressed in, the unit is placed in a Standby mode, as indicated by the amber Power Indicator 3D funding the System Power Control 2D's button MUST be pressed in to operate the unit. To turn the unit off and prevent the use of the remote control, this switch should be pressed until it pops out from the front panel so that the word "OFF" may be read at the top of the switch.
NOTE: This switch is normally left in the "ON" position.
2D System Power Control: When the Main Power Switch 10N," press this button to turn on the DVD600ir; press it again to turn the unit off. Note that the Power Indicator 3D in the center of the switch will turn green when the unit is on.
3D Power Indicator: This LED will be illuminated in amber when the unit is in the Standby mode to signal that the unit is ready to be turned on. When the unit is in operation, the indicator will turn green.
4D Disc Tray: Holds up to five DVD or CD discs that can be played one at a time in the DVD600II.
5D Disc Skip: Press twice in quick succession to change the disc being played. This will move the tray forward to the next occupied position, skipping over the empty-disc positions.
6D Search Forward/Reverse: Press to move forward or backward through a disc at one of four speeds. Each press and release will increase the search speed, as indicated in the on-screen display. Once you have selected the desired speed, release the button and the disc will continue to search at fast speed. To resume normal playback speed, press the Play Button 10D
7D Open/Close Button: Press to open or close the Disc Tray 4D on closing the disc tray, the On Screen Library system will begin to identify all loaded discs.
8D Skip Forward/Reverse: Press to move forward or backward through the music tracks or chapters on a disc.
9D Stop: Press once to place the disc in the Resume mode, which means that playback will stop, but (as long as the tray is not opened or the disc changed) DVD playback will continue from the same point on the disc when the Play button is pressed again. Resume will also work if the unit was turned off. To stop a disc and have play start from the beginning, press the button twice.
IOD Play/Pause: Press to begin playback of a disc, or to momentarily pause playback. If a DVD is playing, action will freeze and a still picture will be displayed when the button is pressed.
11D Direct Access Buttons: Press one of these buttons to play any of the five discs loaded in the Disc Tray.
12D Information Display: This display contains a variety of indicators that provide information about the status of the DVD600 and the disc currently playing.
13D Display Dim: Press this button to adjust the brightness of the Information Display by 50% or to turn the display off completely in the following order: FULL BRIGHTNESS → HALF BRIGHTNESS → OFF → FULL BRIGHTNESS.
14D Remote Sensor: The sensor that receives the infrared commands from the remote control is behind this area. Do not cover or obscure this part of the front panel, in order to avoid a malfunction with the remote.
DVD600Ⅱ Front Panel Information Display

flowchart
graph LR
    A["A'"] --> B["96KHz 24bit"]
    B --> C["DVD"]
    B --> D["CD"]
    B --> E["VCD"]
    C --> F["1"]
    D --> G["2"]
    E --> H["3"]
    F --> I["DISC"]
    G --> I
    H --> I
    I --> J["5"]
    J --> K["4"]
    K --> L["B'"]
    L --> M["C'"]
    M --> N["D'"]
    N --> O["E'"]
    O --> P["E'"]
    P --> Q["PROG. INTRO"]
    Q --> R["SEC"]
    R --> S["F'"]
    T["M'"] --> U["L'"]
    U --> V["K'"]
    V --> W["J'"]
    W --> X["I'"]
    X --> Y["H'"]
    Y --> Z["G'"]
    Z --> AA["PROG. INTRO"]
    AA --> AB["SEC"]
    AB --> AC["F'"]
    AD["RISUME TITLE"] --> AE["11"]
    AF["RANDOM CHAPTER"] --> AG["1ALL HOUR"]
    AH["REPEAT TRACK"] --> AI["1ALL HOUR"]
    AJ["1ALL HOUR"] --> AK["1ALL HOUR"]
    AL["1ALL HOUR"] --> AM["1ALL HOUR"]
    AN["1ALL HOUR"] --> AO["1ALL HOUR"]
    AP["1ALL HOUR"] --> AQ["1ALL HOUR"]
    AR["1ALL HOUR"] --> AS["1ALL HOUR"]
    AT["1ALL HOUR"] --> AU["1ALL HOUR"]
    AV["1ALL HOUR"] --> AW["1ALL HOUR"]
    AX["1ALL HOUR"] --> AY["1ALL HOUR"]
A Disc Type: Lights to show the type of disc currently being played.
Disc Number: Shows if a disc is loaded in a tray position. The indicator for the disc in play flashes. Note that if a disc is added to or removed from the tray while a disc is playing, the indicator will not show the change until all discs are cycled.
C Title: Shows the DVD title number currently playing.
D Chapter/Track Number: Shows the current chapter (DVD) or current track number (CD).
Program Time: Shows the running time of a DVD; current track time; time remaining in the current track; or the total remaining time of a CD.
NOTE: The Program Time Indicators will also display text messages about the DVD600n's status, including Reading when a disc is loading. Bye when the unit is turned off, and Disc Error when a disc not compatible with the DVD600n is put into the play position.
F Intro: Lights when the IntroScan function is active.
G Program: Lights during programming.
Repeat: Lights to indicate any of the Repeat modes.
Random: Lights when the unit is in the Random Play mode.
Resume: Lights when the Stop button has been pressed once to put the unit in the Resume mode.
K Playback Mode: Lights to show the current playback mode:
▶ Lights when a disc is playing in the Normal mode.
▶ Lights when the disc is in the Fast Search Forward mode. For DVDs, when both triangles glow steadily, the disc plays at 2x normal speed. When the right triangle is flashing, the disc plays at 4x normal speed. When the left triangle is flashing, the disc plays at 8x normal speed. When both triangles are flashing, the
disc plays at 16x normal speed. For CDs, only the first three Fast Search modes are available.
▶ Lights when the disc is paused.
Lights when the disc is in the Fast Search Reverse mode. For DVDs, when both triangles glow steadily, the disc plays at 2x normal speed. When the left triangle is flashing, the disc plays at 4x normal speed. When the right triangle is playing, the disc plays at 8x normal speed. When both triangles are flashing, the disc plays at 16x normal speed. For CDs, only the first three Fast Search modes are available.
Parental Lock Indicator: This indicator lights when the parental-lock system is engaged in order to prevent anyone from changing the rating level without a code.
M ^1 96kHz/24-Bit Indicator: When a high-resolution, linear PCM bitstream with a sampling rate of 96kHz/24 bits is detected, this indicator will light. Such a selection may be found as an alternative audio track on a DVD-Audio disc.
DVD600Ⅱ Rear Panel Connections

10 Component Video Outputs: If your TV or video projector has component video inputs, you may connect these output jacks to the set for the highest video quality available. Note that the component video inputs may be labeled as Y/Pr/Pb or Y/Cr/Cb but, for connection purposes, they are the same. The outputs of these jacks should NOT be connected to a standard composite video input.
20 S-Video Output: Connect this jack to the S-Video input on a television or video projector, or to an S-Video input on an A/V receiver or processor if you are using that type of device for S-Video input switching.
30 Composite Video Output: Connect this jack to the video input on a television or video projector, or to a video input on an A/V receiver or processor if you are using that type of device for video input switching.
④ Coaxial Digital Output: Connect this jack to the coaxial digital input of an A/V receiver or surround processor for Dolby Digital, DTS or PCM audio playback.
NOTE: The coaxial digital output should only be connected to a digital input. Even though it is the same RCA-type connector as standard analog audio connections, DO NOT connect it to a conventional analog input jack.
5D Remote Control Output: Connect this jack to the infrared (IR) input jack of another JBL (or other compatible) remote-controlled product to have the built-in Remote Sensor 14D on the DVD600II provide IR signals to other compatible products.
6D Remote Control Input: Connect the output of a remote infrared sensor, or the remote control output of another JBL (or other compatible) product, to this jack. This will enable the
remote control to operate even when the front panel Remote Sensor IADlocked. This jack may also be used with compatible IR remote control-based automation systems.
⑦ AC Power Cord: Connect this plug to an AC outlet. If the outlet is controlled by a switch, make certain that it is in the ON position.
Remote Control Functions

① Power Off Button: Turns off the power to a device selected by pressing its Input Selector.
② Power On Button: Turns on the power to a device selected by pressing its Input Selector.
③ Mute Button: Press to momentarily silence the DCR600 or TV set being controlled, depending on which device has been selected.
When the remote is being programmed to operate an external device, such as a CD player, this button is pressed, together with the Input Selector button for the new device, to begin the programming process.
4 DVD Input Selector: Pressing this button will perform three actions: 1) If the DCR600 II is not turned on, it will power up. 2) It will select DVD as the input source. 3) It will switch to the page for the DVD600 II , which will cause the remote to operate only the DVD changer. Press the Main Button 8 to return the remote to control of the DCR600 _II receiver.
IMPORTANT NOTE: The remote control for the JBL Cinema ProPack 600u may be programmed to control up to eight devices, including the DCR600u and DVD600u. It is helpful to think of the remote as being organized into "pages," with one page for each device. Depending on which device has been selected, the buttons on that device's page will perform different functions, as listed starting on the next page. These functions may vary from the labels on the remote, and from one device to the next. Some buttons may perform no function at all for a given device.
In order to go to the page for a particular device, such as the DVD600u, you will need to press the Input Selector button for that device (DVD in this case), located in a grouping just below the power buttons. The remote will then function as if it were dedicated to the DVD600u.
If you would like to make an adjustment that affects the DCR600 ^™ receiver, such as turning the volume up or down, you must first go to the page for the DCR600 ^™ by pressing its Input Selector button. This button is labeled "Main" on the remote. The exception to this rule is that the transport functions of the DVD600 ^™ —Play, Forward and Reverse Search, Stop, Pause, and Previous and Next Chapter/Track Skip—may be accessed from the "Main" page, without having to jump to the DVD page.
⑤ Status Button: This button operates only when the DVD600 has been selected. When a disc is playing, pressing this button will display the Status Banner, which contains information about the disc and enables you to change the functions.
67 M1 and M2 Macro Buttons/Open-Close Button: Press these buttons to store or recall a "Macro", which is a preprogrammed sequence of commands stored in the remote.
When the DVD600i has been selected, the M1 Button ⑥ functions to open or close the disc tray drawer. (M2 ⑦ has no function.) If the drawer is opened while a disc is still playing, playback will continue and discs not in use may be changed. If the drawer is opened while the unit is stopped, the disc that was playing will be presented at the front-center position of the tray.
8 Main Input Selector: Pressing this button will perform two actions: 1) If the DCR600 is not turned on, it will power up. 2) It will switch to the page for the DCR600, which will cause the remote to operate only the receiver and the transport functions of the DVD600.
⑨ CD Input Selector: Pressing this button will perform three actions: 1) If the DCR600 is not turned on, it will power up. 2) It will select CD as the input source. 3) It will switch to the page for the CD player whose codes have been programmed into the remote, which will cause the remote to operate only the CD player. Press the Main Button ⑧ to return the remote to control of the DCR600 receiver.
10 Tape Input Selector: Pressing this button will perform three actions: 1) If the DCR600 is not turned on, it will power up. 2) It will select TAPE as the input source. 3) It will switch to the page for the tape deck whose codes have been programmed into the remote, which will cause the remote to operate only the tape deck. Press the Main Button 8 to return the remote to control of the DCR600 receiver.
11 AM/FM Tuner: Selects the receiver's tuner as the listening choice. Pressing this button when the tuner is already in use will select between the AM and FM bands.
12 Video 1 Input Selector (VCR 1): Pressing this button will perform three actions: 1) If the DCR600 is not turned on, it will power up. 2) It will select VIDEO 1 as the input source. 3) It will switch to the page for the video device whose codes have been programmed into the
remote, which will cause the remote to operate only that video device. You may find it convenient to connect your VCR to the Video 1 input, since it is the only video source that also features outputs for recording. Press the Main Button 8 to return the remote to control of the DCR6001 receiver.
13 Video 2 Input Selector (VCR 2): Pressing this button will perform three actions: 1) If the DCR600 II is not turned on, it will power up. 2) It will select VIDEO 2 as the input source. 3) It will switch to the page for the video device whose codes have been programmed into the remote, which will cause the remote to operate only that video device. You may find it convenient to connect a video cassette player to the Video 2 input. Press the Main Button 8 to return the remote to control of the DCR600 II receiver.
14 Video 3 Input Selector (Cable or Satellite): Pressing this button will perform three actions: 1) If the DCR600 II is not turned on, it will power up. 2) It will select Video 3 (the front panel input) as the input source. 3) It will switch to the page for the video device whose codes have been programmed into the remote, which will cause the remote to operate only that device. You may find it convenient to connect your cable television box or satellite receiver to this input. Since it is located on the front panel of the receiver, you may also wish to use this input to temporarily connect a portable camcorder or video game to your system. Press the Main Button ^8 to return the remote to control of the DCR600 II receiver.
15 TV Input Selector: Pressing this button will perform three actions: 1) If the DCR600 II is not turned on, it will power up. 2) It will select TV as the input source. 3) It will switch to the page for the television whose codes have been programmed into the remote, which will cause the remote to operate only that device. You may find it convenient to connect your television to this input, particularly since it does not have a video input associated with it, the assumption being that the program signal originates at the TV, and that the TV is already displaying the video portion of the signal. Press the Main Button 8 to return the remote to control of the DCR600 II receiver.
16 Sleep: Places the DCR600 in the Sleep Timer mode. After the time shown in the display has elapsed, the DCR600 will automatically go into Standby. Each press of this button changes the time until turn-off in intervals of 10 minutes, starting with a maximum of 90 minutes.
This button is also used to change channels on your TV when the TV is selected.
This button is also used during the "Auto Search" procedure when programming the remote.
⑰ Test: Begins the sequence used to calibrate the speaker output levels.
When the CD input has been selected and a CD recorder is in use, this button is used to select among the analog and digital inputs to the CDR.
13 6CH (TV/VID): Press to select the 6-Channel Direct Input 5 as the input source. When used with a compatibly programmed VCR, DVD, TV or Satellite receiver that has a "TV/Video" function, pressing this button will switch between the output of that device and the external video input to that device. Consult the owner's manual for your specific player or satellite receiver for the details of how it implements this function.
⑲ Volume Up: Use to raise the system volume.
20 Surround Mode/Audio: Begins the process of changing the surround mode when the DCR600n is selected. After the button has been pressed, use the ▲/▼ Buttons 25 31 to select the desired surround mode.
When the DVD600II is selected, this button allows you to select from the available audio tracks (including audio surround modes) or languages on a DVD disc that is currently playing. Press this button repeatedly until the desired audio selection appears.
This button is also used to tune channels when the TV is selected.
This button is also used during the "Auto Search" procedure when programming the remote.
21 All Off: This feature of the JBL One-Click™ (patent pending) remote simultaneously sends Power Off commands to all programmed devices controlled by the remote.
22 All On: This feature of the JBL One-Click remote simultaneously sends Power On commands to all programmed devices controlled by the remote.
②3 Volume Down: Use to lower the system volume.
24 Channel/Title/Guide: Starts the process of setting the receiver's speaker output levels using an input source rather than the test tone. Press this button, then use the ▲/▼ Buttons
25 31 select the channel being adjusted, followed by the Set Button. 24u may then use the ▲/▼ Buttons 25 31ain to change the level for that channel. Press the Set Button 2lock in the setting.
When using the DVD600u to play a DVD disc, this button functions as a Title button, and displays the disc's Title Select Menu, or a symbol (∅) if the disc either does not offer this function or has only one title.
When the Video 3 input has been programmed for a cable or satellite service, this button will access the service's programming guide, if the service is active.
25 ▲: Used to change or scroll through items in the on-screen menus, or to change configuration settings, such as output levels. When changing an item such as the surround mode or digital input directly, first press the function or mode to be changed, such as Surround Mode or Digital Input, and then press this button to scroll through the list of available choices. In DVD mode, press this button to skip to the next higher chapter of the current disc.
26 Menu: Used only with video sources. When DVD is selected, pressing this button while a DVD disc is playing stops playback and displays the disc's menu. When the unit is stopped, pressing this button displays the DVD player's Setup Menu.
27: Used to change the menu selection or setting during some of the setup or other procedures. In DVD mode, press this button to play the current disc in Fast Reverse mode.
28 Set: Used to enter settings into the memory of the DCR600, DVD600 or video device selected. Also used in the setup procedures for delay time, speaker configuration and channel output level adjustment. When the DVD600 has been selected, pressing this button will select the item that is highlighted in the Status Banner, or in the on-screen menu displayed by a DVD disc. When the Status Banner has not been activated, pressing this button will alternately Play or Pause the current disc. When the On Screen Library is displayed on-screen, pressing this button will begin play of the currently selected disc.
29 ▶: Used to change the menu selection or setting during some of the setup or other procedures. In DVD mode, press this button to play the current disc in Fast Forward mode.
30 Digital/Subtitle/Exit: When the DCR600 is selected, press this button to assign one of
the digital inputs to a source. When the DVD600 _II is selected, this button is used to change the subtitle choice. For other video devices, it exits the menu.
31 ▼: Used to change or scroll through items in the on-screen menus, or to change configuration settings, such as output levels. When changing an item such as the surround mode or digital input directly, first press the function or mode to be changed, such as Surround Mode or Digital Input, and then press this button to scroll through the list of available choices. In DVD mode, press this button once to return to the beginning of the current chapter or track, and twice to skip to the next lower chapter or track of the current disc.
32 Delay/Return/Prev Ch.: Begins the process for setting the delay times used by the DCR60011 when processing surround sound. After pressing this button, the delay times are entered by pressing the Set Button 28 then using the ▲/▼ Buttons 25 31 change the setting. Press the Set Button 28 again to complete the process.
This button is also used when viewing a menu display from a DVD disc. Press it to return to the previous menu screen.
When the Video 3 Input 1314 has been programmed for a cable or satellite service, this button will skip to the previous channel.
33-40, 42 43 Numeric Keys: These buttons serve as a ten-button numeric keypad to enter tuner preset positions. They are also used with the DVD600 to directly access a disc (when pressed within 3 seconds after the Disc Skip Button track (when pressed while a disc is playing), to enter data for sequential programming, to enter or change the access password for parental control, to enter a language code, or to respond to menu options presented by a disc. When the TV or another video device is selected, they are used to select channel numbers. They may also be used to select track or chapter numbers when playing a CD or DVD.
41 Tuner Mode/Angle: Press this button when the tuner is in use to select between automatic tuning and manual tuning. When the button is pressed so that the AUTO Indicator T goes out, pressing the Tuning Buttons 45 49 8 will move the frequency up or down in single-step increments. When the AUTO Indicator T is lit, pressing the Tuning Buttons 45 49 8 will cause the tuner to search for the next station with an acceptable signal. When the FM band is in use, pressing this button when a station's sig-
nal is weak will change to monaural reception.
When a DVD encoded with multiple-angle information is playing, press to change the angle in use. This function is only available on discs that are specially prepared to take advantage of the multiple-angle function, and only for those parts of the disc that are recorded with multiple-angle content. The DVD600 will display a camera icon on the screen to indicate when this feature is available.
44 Memory: Enters a radio station into the DCR600u's preset memory. Once the MEMORY Indicator Q flashes, you have five seconds to enter a preset memory location using the Numeric Keys 33-40, 42 43. Repeat the process to enter additional stations.
45 49 Tuning Up/Down/Step (Frame Advance) Buttons: When the tuner is in use, these buttons will tune up or down through the selected frequency band. If the Tuner Mode Button 41 12 has been pressed so that the AUTO Indicator T is illuminated, pressing either of the buttons will cause the tuner to seek the next station with acceptable signal strength for quality reception. When the AUTO Indicator T is NOT illuminated, pressing these buttons will tune stations in single-step increments.
When a DVD disc is playing, press these buttons to move forward or backward one frame at a time. Press the Play/Pause Button 58 10D to resume normal play. These buttons do not function when a CD is playing.
46 Direct/Program Button: Pressing this button in tuner mode, or while a CD or DVD is playing, starts the sequence for direct entry of a station's frequency, a CD track or a DVD chapter. After pressing the button, simply press the proper Numeric Keys 33 40 42 43 to select a station, track or chapter. You may also skip to a track or chapter by entering its number, without first pressing the Direct Button 46
When the DVD600 is stopped, press this button to display the program menu and enter a programmed play sequence. When a disc is playing, press to switch between normal play and programmed playback, if a playlist has been programmed.
47 Clear Button: Erases incorrect entries when using the remote to directly enter a radio station's frequency.
When the DVD600 has been selected, press this button to remove the Status Banner or other displays from your video screen. This button is also used to clear items from programmed playlists.
48 52 Preset Up/Down/Slow-Play Buttons: When the tuner is in use, press these buttons to scroll through the stations programmed into the receiver's memory.
When a DVD disc is playing and the DVD600 has been selected, press these buttons to move forward or backward through the disc in slow speed. Each press of these buttons changes the slow-play speed in the following order: 1/16 Normal Speed → 1/8 Normal Speed → 1/4 Normal Speed → 1/2 Normal Speed. To resume normal play, press the Play/Pause Button .58-10 Buttons do not function when a CD is playing.
50 Night Mode/Random: Activates the Night mode of the DCR600 _11 . This mode is available in specially encoded digital sources, and it preserves dialogue (center channel) intelligibility at low volume levels.
When the DVD600ii has been selected, press to begin the playback of all tracks on a disc in random order.
51 Disc Skip Button: Press twice in rapid succession to move to the next available disc in the tray when using a DVD or CD player. This button has no direct effect on the DCR600II. When a single press of this button is followed by a disc number, the DVD600II will skip directly to that disc.
53 Check: This button only functions when the DVD600 has been selected. When a CD is playing, press this button to check the status of the current disc via the on-screen display. This button is also used to verify the contents of a programmed playlist via the front-panel Information Display.
54 Subtitle On/Off: This button only functions when the DVD600 has been selected. When a DVD is playing, press this button to turn the Subtitle Display on or off.
55 Repeat: This button only functions when the DVD600 II or a CD player has been selected. Press to select one of the Repeat-Play modes: Repeat All (discs), Repeat 1 Disc, Repeat Title, Repeat Track/Chapter. Each press of the button shows the choice selected in both the on-screen Status Banner display or in the Repeat Indicators the front panel Information Display.
56 Repeat A-B: This button only functions when the DVD600 is has been selected. Press once to begin the selection of a portion of a disc to be repeated. Press it again to choose the end point of the repeat-play selection. This function is unavailable during programmed or random play.
NOTE: When any of the following buttons 57-64 is pressed while the remote has selected the Main Page, the remote will automatically switch to control of the DVD, as indicated by the DVD Input Selector 4 lighting.
57 Reverse Search/Rewind: When the DVD600 has been selected, press to move backward through a CD or DVD at one of four speeds. Each press and release will increase the search speed, in the following order: R. Search x 2 → R. Search x 4 → R. Search x 8 → R. Search x 16. Once you have selected the desired speed, release the button, and the disc will continue to search at fast speed. To resume normal playback, press the Play/Pause Button 58 10D.
When a tape deck or VCR has been selected, this button rewinds the tape.
58 Play Button: Press to begin playback when the DVD600i has been selected. If the disc tray drawer is open, it will automatically close when the button is pushed. Pressing the Play button when the unit is in the Standby mode will turn the unit on and begin playback of the last disc in use.
When a CD player, tape deck or VCR has been selected, pressing this button will also begin playback. See the owner's manual for that device for more information on the operation of the play function as it affects that device.
59 Forward Search/Fast Forward: When the DVD600ii has been selected, press to move forward through a CD or DVD at one of four speeds. Each press and release will increase the search speed, in the following order: F. Search x 2 → F. Search x 4 → F. Search x 8 → F. Search x 16. Once you have selected the desired speed, release the button, and the disc will continue to search at fast speed. To resume normal playback, press the Play/Pause Button 58 10D. When a tape deck or VCR has been selected, this button fast-forwards the tape.
60 Record Button: This button only functions when a CD/CD-R, tape deck or VCR connected to the Video 1 input has been selected. See the owner's manual for that device for further information on how to make recordings.
61 Stop Button: This button has no effect on the DCR600i. When the DVD600ii has been selected, press this button once to place the disc in the Resume mode. Playback will stop, and as long as the tray is not opened or the disc changed, DVD playback will continue from the same point on the disc when the Play/Pause Button 59-305 again, even if the unit has been turned off in
the interim. To stop a disc without entering Resume mode, press the Stop button twice.
This button also performs the Stop function when a CD player, tape deck or VCR connected to the Video 1 input has been selected.
62 Pause Button: Press to pause the disc in use. To resume playback, either press the Pause button again, or press the Play/Pause Button 58 10D.
63 64 Previous/Next: Press to move backward or forward through the music tracks on a CD disc or the chapters on a DVD disc. This button also scans backward or forward when a VCR connected to the Video 1 input has been selected.
65 On Screen Library™ (patent pending): This feature lists the titles and disc types of all discs currently loaded in the DVD600 on your video screen. The On Screen Library resets automatically every time the DVD600's disc tray is opened. When the tray is closed, the On Screen Library will need to read and identify all five discs, a process which will take approximately one minute. You may interrupt this process by pressing the Stop Button 61 The On Screen Library will resume the process of identifying the discs when you press the On Screen Library Button 65. You may also prevent the On Screen Library from reading and identifying the discs by closing the tray with a press of one of the Direct Access Buttons [1D], which will begin play of that numbered disc.
If you have not opened the disc tray since the last time the On Screen Library was accessed, and if the current disc is stopped, you may press this button to display the On Screen Library, even if you have not selected DVD as the input source on the DCR600ii. While in DVD mode, use the ▲/▼ Buttons 25 41 scroll through the list. Press the Set Button 28 to play the selected disc. Do not press a Numeric Key 33 40 42 43 while the On Screen Library is displayed, as it will remove the display without skipping to a different disc.
Program Indicator LED: Lights while programming the remote with device codes, macros, punch-through functions and device reassignments, or while resetting the remote memory.
Remote Control Function Grid
| # | Button | MAINDCR600n+DVD600n | DVD CD/CD-R Tape VCR 1 | (VID 1) VCR 2 (VID 2) CBL (VID 3) SAT (VID 3) TV | |||||||
| 01 | POWER OFF Power | Off Power Off Power | Off Power Off Power | Off Power Off Power Off Power Off | |||||||
| 02 | POWER ON | Power On | Power On | Power On | Power On | Power On | Power On | Power On | Power On | Power On | |
| 03 | MUTE | Mute | |||||||||
| 04 | DVD | DVD Input Select | DVD Select | DVD Select | DVD Select | DVD Select | DVD Select | DVD Select | DVD Select | DVD Select | DVD Select |
| 05 | STATUS | STATUS | |||||||||
| 06 | M1 | M1 | Open/Close | Open/Close | Cancel | Cancel | PPV | Cancel | Sleep | ||
| 07 | M2 | M2 | Repeat | FAV | FAV | ||||||
| 08 | MAIN | DCR Select | DCR Select | DCR Select | DCR Select | DCR Select | DCR Select | DCR Select | DCR Select | DCR Select | |
| 09 | CD | CD Input Select | CD Select | CD Select | CD Select | CD Select | CD Select | CD Select | CD Select | CD Select | |
| 10 | TAPE | Tape Input Select | Tape Select | Tape Select | Tape Select | Tape Select | Tape Select | Tape Select | Tape Select | Tape Select | |
| 11 | AM/FM | Tuner Select | Tuner Select | Tuner Select | Tuner Select | Tuner Select | Tuner Select | Tuner Select | Tuner Select | Tuner Select | |
| 12 | VID1 | Video 1 Select | Video 1 Select | Video 1 Select | Video 1 Select | Video 1 Select | Video 1 Select | Video 1 Select | Video 1 Select | Video 1 Select | |
| 13 | VID2 | Video 2 Select | Video 2 Select | Video 2 Select | Video 2 Select | Video 2 Select | Video 2 Select | Video 2 Select | Video 2 Select | Video 2 Select | |
| 14 | VID3 | Video 3 Select | Video 3 Select | Video 3 Select | Video 3 Select | Video 3 Select | Video 3 Select | Video 3 Select | Video 3 Select | Video 3 Select | |
| 15 | TV | TV Select | TV Select | TV Select | TV Select | TV Select | TV Select | TV Select | TV Select | TV Select | |
| 16 | Sleep | Sleep | Channel+ | Channel+ | Channel+ | Channel+ | Channel+ | ||||
| 17 | Test Test Time | Input Select | |||||||||
| 18 | 6 CH | 6 Channel Direct Input Select | TV/DVD | CDP Select | TV/VCR | TV/VCR | TV/Cable | TV/Sat | TV/VCR | ||
| 19 | Volume UP | Volume Up | Volume Up | Input Level Up | Volume Up | Volume Up | Volume Up | Volume Up | Volume Up | ||
| 20 | Surround Select | Surround Mode Select | Audio | CDR Select | Channel- | Channel- | Channel- | Channel- | Channel- | ||
| 21 | ALL OFF | Sends 'OFF' Commands Simultaneously for ALL 8 Devices | |||||||||
| 22 | ALL ON | Sends 'ON' Commands Simultaneously for ALL 8 Devices | |||||||||
| 23 | Volume Down | Volume Down | Volume Down | Input Level Down | Volume Down | Volume Down | Volume Down | Volume Down | Volume Down | ||
| 24 | Channel/Guide | Channel Trim | Title | Info/Guide | Info/Guide | ||||||
| 25 | Up | Move/Adjust Up | Up, Chapter + | Track + | Up | Up | Up | Up | Up | ||
| 26 | Menu | Menu | Menu | Menu | Menu | Menu | Menu | ||||
| 27 | Left | Move/Adjust Left | Left, Fast Search | Fast Search | Left | Left | Left | Left | Left | ||
| 28 | Set | Set | Enter, Play/Pause | Play/Pause | Enter | Enter | Enter | Enter | Enter | ||
| 29 | Right | Move/Adjust Right | Right, Fast Search | Fast Search | Right | Right | Right | Right | Right | ||
| 30 | Digital/Exit | Digital Input Select | Subtitle | Exit | Exit | Exit | Exit | Exit | |||
| 31 | Down | Move/Adjust Down | Down, Chapter - | Track- | Down | Down | Down | Down | Down | ||
| 32 | Delay/Prev. Ch. | Delay Adjust | Return | Time | Prov. Channel | Prov. Channel | Prov. Channel | ||||
| 33 | 1 | 1 | 1 | 1 | 1 | 1 | 1 | 1 | 1 | ||
| 34 | 2 | 2 | 2 | 2 | 2 | 2 | 2 | 2 | 2 | ||
| 35 | 3 | 3 | 3 | 3 | 3 | 3 | 3 | 3 | 3 | ||
| 36 | 4 | 4 | 4 | 4 | 4 | 4 | 4 | 4 | 4 | ||
Remote Control Function Grid
| # | Button\Device | MAIN | DVD | CD/CD-R | Tape | VCR 1 (VID 1) | VCR 2 (VID 2) | CBL (VID 3) | SAT (VID 3) | TV |
| 37 | 55555555 | |||||||||
| 38 | 66666666 | |||||||||
| 39 | 77777777 | |||||||||
| 40 | 88888888 | |||||||||
| 41 | Tun-M | Tuner Mode | Angle Select | Random Play | Bypass | Next | ||||
| 42 | 99999999 | |||||||||
| 43 | 00000000 | |||||||||
| 44 | Memory | Memory | ||||||||
| 45 | Tuning Up | Tune Up | Step + | Day+ | Day+ | |||||
| 46 | Direct | Direct Tuner Entry | Program, Chapter Direct | Track Direct | ||||||
| 47 | Clear | Clear | Clear | Clear | Clear | Clear | Clear | Clear | Clear | |
| 48 | Preset Up | Preset Tune Up | Slow Forward | (+10) | Page+ | Page+ | ||||
| 49 | Tuning Down | Tuna Down | Step- | Track Increment | Day- | Day- | ||||
| 50 | Night Night Mode Select | Random | ||||||||
| 51 | D. Skip | Disc Skip | Disc Skip | Disc Skip | ||||||
| 52 | Preset Down | Preset Tune Down | Slow Reverse | Intro Scan | Page- | Page- | ||||
| 53 | CHECK | Check | ||||||||
| 54 | Subtitle On/Off | Subtitle On/Off | ||||||||
| 55 | REPEAT | Repeat | Repeat | |||||||
| 56 | A-B | A-B | ||||||||
| 57 | ◀◀ | REW (DVD) | R. Search | R. Search | Rewind | Rewind | ||||
| 58 | PLAY( ◀◀ ) | PLAY (DVD) | Play | Play | F. Pay | Play | Play | |||
| R. Play | ||||||||||
| 59 | ▶▶ | FF (DVD) | F. Search | F. Search | Fast Fwd. | Fast Fwd. | Fast Fwd. | |||
| 60 | RECORD | Record | Record | Record | ||||||
| 61 | STOP | STOP (DVD) | Stop | Stop | Stop | Stop | Stop | |||
| 62 | PAUSE | PAUSE (DVD) | Pause | Pause | Pause | Pause | Pause | |||
| 63 | PREV. | PREV. CHAP (DVD) | Prev. | Skip- | Scan- | Scan- | ||||
| 64 | NEXT | NEXT CHAP (DVD) | Next | Skip+ | Scan+ | Scan+ | ||||
| 65 | On Screen Library | On Screen Library | On Screen Library | On Screen Library | On Screen Library | On Screen Library | On Screen Library | On Screen Library | On Screen Library | On Screen Library |
Remote Control Code Tables
TV
Maker (Brand) Name Setup Code Number
| A-MARK 103 132 | |||||||||||||
| ADMIRAL 192 | |||||||||||||
| AKAI 123 160 | |||||||||||||
| AMPRO 164 | |||||||||||||
| ANAM 045 103 106 109 112 | 122 | ||||||||||||
| AOC 103 123 128 | |||||||||||||
| BLAUPUNKT 084 | |||||||||||||
| BROKSONIC 205 206 | |||||||||||||
| CANDLE 123 128 | |||||||||||||
| CAPEHART 059 | |||||||||||||
| CENTURION 123 171 | |||||||||||||
| CETRONIC | 045 | ||||||||||||
| CITIZEN | 045 | 123 | 128 | 132 | |||||||||
| CLASSIC 045 | |||||||||||||
| CONCERTO | 128 | ||||||||||||
| CONTEC 045 | |||||||||||||
| CORANDO | 172 | ||||||||||||
| CORONADO | 132 | ||||||||||||
| CRAIG | 045 | 157 | 158 | 159 | |||||||||
| CROWN | 045 | 132 | |||||||||||
| CURTIS MATHES | 123 | 128 | 132 | ||||||||||
| CXC | 045 | ||||||||||||
| DAEWOO | 045 | 087 | 102 | 105 | 106 | 108 | 111 | 114 | 116 | 119 | 127 | 128 | 132 |
| DAYTRON | 128 | 132 | |||||||||||
| CIGI LINK | 200 | ||||||||||||
| DYNASTY | 045 | ||||||||||||
| DYNATECH | 063 | ||||||||||||
| ELECTROHOME | 115 | 132 | |||||||||||
| EMERSON | 045 | 123 | 128 | 132 | 139 | 157 | 158 | 159 | 162 | 205 | |||
| FUNAI | 045 | ||||||||||||
| FUTURETECH | 045 | ||||||||||||
| GE | 087 | 121 | 123 | 128 | 133 | 145 | 159 | 163 | |||||
| GOLDSTAR 101 103 | 110 | 128 | 132 | ||||||||||
| GRUNDIG 193 | |||||||||||||
| HALL MARK 128 | |||||||||||||
| HARMAN KARDON | 201 | ||||||||||||
| HITACHI | 123 | 128 | 132 | 144 | 147 | ||||||||
| INFINITY | 148 | ||||||||||||
| INKEL | 120 | ||||||||||||
| JBL | 148 | ||||||||||||
| JC PENNEY | 115 | 123 | 128 | 132 | 145 | ||||||||
| JENSEN 019 | |||||||||||||
| JVC | 079 | 087 | 134 | ||||||||||
| KAWASHO 173 | |||||||||||||
| KEC | 045 | ||||||||||||
| KENWOOD | 123 | 204 | |||||||||||
| KMC | 132 | ||||||||||||
| KTV | 045 | 123 | 132 | 162 | |||||||||
| LLOYTRON | 172 | 173 | |||||||||||
| LODGENET 069 | |||||||||||||
| LOGIK | 069 | ||||||||||||
| LUXMAN | 128 | ||||||||||||
| LXI | 077 | 145 | 148 | ||||||||||
| MAGNAVOX 123 128 | 132 | 145 | 148 | ||||||||||
| MARANTZ | 115 | 123 | 148 | ||||||||||
| MATSUI | 148 | ||||||||||||
| MEMOREX 069 128 | |||||||||||||
| METZ | 084 |
Remote Control Code Tables
TV
Maker (Brand) Name Setup Code Number
| MGA 115 123 | 28 | ||||||||||||
| MINERVA 084 | |||||||||||||
| MITSUBISHI 077 115 | 123 | 128 | 160 | 167 | 168 | ||||||||
| MTC 175 176 | |||||||||||||
| NATIONAL 148 174 | 179 | 180 | 181 | 182 | |||||||||
| NEC 115 121 123 | 125 | ||||||||||||
| NIKEI 045 | |||||||||||||
| ONKING 045 | |||||||||||||
| ONWA 045 | |||||||||||||
| OPTONICA 077 | |||||||||||||
| ORION 207 208 | 209 | 210 | 211 | ||||||||||
| PANASONIC 087 148 | 169 | ||||||||||||
| PHILCO | 045 | 115 | 123 | 128 | 132 | 148 | |||||||
| PHILIPS | 123 | 128 | 132 | 145 | 148 | ||||||||
| PIONEER | 024 | 123 | 128 | 213 | 214 | ||||||||
| PORTLAND | 128 | 132 | |||||||||||
| PROSCAN | 133 | ||||||||||||
| PROTON | 059 | 122 | 128 | 132 | 165 | ||||||||
| QUASAR | 087 | ||||||||||||
| RADIO SHACK | 045 | 128 | 132 | 180 | 196 | 197 | |||||||
| RCA 115 123 128 | 133 | 145 | 161 | 163 | |||||||||
| REALISTIC | 045 | 196 | 167 | ||||||||||
| RUNCO | 152 | 153 | |||||||||||
| SAA | 183 | ||||||||||||
| SAMPO | 059 | 123 | 128 | ||||||||||
| SAMSUNG | 124 | 128 | 132 | 145 | |||||||||
| SANYO | 054 | ||||||||||||
| SCOTT 045 128 | 132 | ||||||||||||
| SEARS 128 132 | 145 | ||||||||||||
| SHARP | 077 | 128 | 132 | ||||||||||
| SIEMENS | 084 | ||||||||||||
| SIGNATURE | 069 | ||||||||||||
| SONY | 117 | 130 | 136 | 194 | 212 | ||||||||
| SOUNDESIGN | 045 | 128 | |||||||||||
| SPECTRICON | 103 | ||||||||||||
| SSS | 011 | 045 | |||||||||||
| SYLVANIA | 123 | 128 | 145 | 148 | |||||||||
| SYMPHONIC | 184 | ||||||||||||
| TANDY | 077 | ||||||||||||
| TATUNG 063 | |||||||||||||
| TECHNICS | 080 | ||||||||||||
| TECHWOOD | 128 | ||||||||||||
| TEKNIKA | 045 | 069 | 115 | 123 | 128 | 132 | |||||||
| TELERENT | 069 | ||||||||||||
| TERA | 156 | ||||||||||||
| THOMSON | 190 | 191 | |||||||||||
| TMK 128 | |||||||||||||
| TOSHIBA | 063 | 129 | 202 | ||||||||||
| TOTEVISION 132 | |||||||||||||
| VIDEO CONCEPTS | 160 | ||||||||||||
| VIDTECH | 128 | ||||||||||||
| WARDS | 069 | 128 | 132 | 148 | |||||||||
| YAMAHA | 123 | 128 | |||||||||||
| YORK | 128 | ||||||||||||
| YUPITERU | 045 | ||||||||||||
| ZENITH | 069 | 090 | |||||||||||
| ZONDA | 103 | ||||||||||||
Remote Control Code Tables
VCR
Maker (Brand) Name Setup Code Number
| AIWA 040 | |||||||||
| AKAI 048 108 109 126 | |||||||||
| AMPRO 076 | |||||||||
| AMSTRAD 133 | |||||||||
| ASA 134 | |||||||||
| AUDIO DYNAMICS 018 048 | |||||||||
| BROKSONIC 110 147 166 | |||||||||
| CANDLE 134 135 140 | |||||||||
| CANON 135 140 | |||||||||
| CAPEHART 094 | |||||||||
| CITIZEN 134 140 | |||||||||
| CRAIG 094 | |||||||||
| DAEWOO | 134 | ||||||||
| DAYTRON | 045 116 | ||||||||
| DBX | 017 094 104 105 | ||||||||
| DUAL | 094 | ||||||||
| DYNATECH | 018 048 | ||||||||
| ELECTROHOME | 136 | ||||||||
| EMERSON | 040 | ||||||||
| FERGUSON | 131 | ||||||||
| FINLUX | 013 040 042 105 110 112 119 134 143 | ||||||||
| FISHER | 136 | ||||||||
| FUNAI 133 | |||||||||
| GE | 017 142 | ||||||||
| GO VIDEO | 113 117 | ||||||||
| GOLDSTAR 018 107 134 | |||||||||
| GRAETZ | 136 | ||||||||
| HARMAN KARDON | 018 049 | ||||||||
| HITACHI | 040 048 118 130 | ||||||||
| ITT | 136 | ||||||||
| JC PENNEY | 018 045 134 | ||||||||
| JENSEN 048 | |||||||||
| JVC | 018 048 111 130 132 | ||||||||
| KENWOOD | 020 048 | ||||||||
| LLOYD | 040 | ||||||||
| LXI | 020 040 134 | ||||||||
| MAGIN | 045 | ||||||||
| MAGNAVOX | 040 | ||||||||
| MARANTZ 018 | |||||||||
| MARTA | 134 | ||||||||
| MATSUI | 036 | ||||||||
| MEMOREX | 017 020 040 076 115 120 134 | ||||||||
| MGA | 049 131 | ||||||||
| MITSUBISHI | 049 131 145 146 | ||||||||
| MTC | 133 | ||||||||
| MULTITECH | 040 | ||||||||
| NAD | 139 | ||||||||
| NATIONAL 140 | |||||||||
| NEC | 018 048 |
Remote Control Code Tables
VCR
Maker (Brand) Name Setup Code Number
| NORDMENDE 048 | ||||||||||||
| OPTIMUS 159 | ||||||||||||
| ORION 147 166 | ||||||||||||
| PANASONIC 114 125 150 167 172 | ||||||||||||
| PHILCO 040 | ||||||||||||
| PHILIPS 040 134 | ||||||||||||
| PILOT 134 | ||||||||||||
| PROTLAND 094 | ||||||||||||
| PULSAR 076 | ||||||||||||
| QUARTZ 020 | ||||||||||||
| QUASAR 125 161 | ||||||||||||
| RADIO SHACK | 020 | 129 | 133 | 134 | 140 | 142 | 158 | 159 | 161 | |||
| RCA | 095 | 124 | 125 | 127 | 157 | 172 | ||||||
| REALISTIC | 017 | 020 | 040 | 045 | 129 | 133 | 134 | 140 | 142 | 159 | ||
| RICO | 062 | |||||||||||
| RUNCO | 128 | |||||||||||
| SABA | 136 | |||||||||||
| SAISHO | 143 | |||||||||||
| SALORA 020 | ||||||||||||
| SAMSUNG 045 080 | 095 | 105 | 106 | 109 | 124 | 155 | ||||||
| SANSUI 048 116 | 147 | 166 | ||||||||||
| SANYO | 017 | 115 | ||||||||||
| SCHAUB LORENZ | 136 | |||||||||||
| SCOTT 105 110 | 112 | |||||||||||
| SEARS | 017 | 020 | 134 | 142 | ||||||||
| SHARP | 129 | 156 | ||||||||||
| SONY | 062 | 080 | 081 | 129 | ||||||||
| SOUNDESIGN | 040 | |||||||||||
| SYLVANIA | 040 | 131 | ||||||||||
| SYMPHONIC | 040 | |||||||||||
| TANDY | 017 | 040 | ||||||||||
| TASHICO | 134 | |||||||||||
| TATUNG 048 | ||||||||||||
| TEAC | 040 | 048 | ||||||||||
| TEKNIKA | 040 | 134 | ||||||||||
| TELEFUNKEN | 136 | |||||||||||
| THOMAS | 040 | |||||||||||
| THOMSON | 136 | |||||||||||
| THORN 136 | ||||||||||||
| TMK | 013 | |||||||||||
| TOSHIBA | 105 | 112 | 131 | 142 | 155 | |||||||
| TOTEVISION 045 134 | ||||||||||||
| UNITECH | 045 | |||||||||||
| VECTRO RESEARCH | 018 | |||||||||||
| VIDEO CONCEPTS | 018 | 040 | ||||||||||
| VIDEOSONIC | 045 | |||||||||||
| WARDS | 040 | 045 | 105 | 112 | ||||||||
| YAMAHA | 018 | 040 | 048 | |||||||||
| ZENITH | 040 | 062 | 076 | 080 | 083 | 134 | ||||||
Remote Control Code Tables
CATV
Maker (Brand) Name Setup Code Number
| ABC 001 011 | |
| ALLEGRO 111 | |
| AMERICAST 212 | |
| ARCHER 112 | |
| BELCOR 113 | |
| CABLE STAR 033 113 | |
| CITIZEN 111 | |
| COLOUR VOICE 085 090 | |
| DIGI 114 | |
| EAGLE 186 | |
| EASTERN 066 070 | |
| ELECTRICORD 039 | |
| EMERSON 112 | |
| FOCUS | 116 |
| G.I. | 001 011 017 096 097 |
| GC ELECTRONICS | 113 |
| GEMINI | 032 060 |
| GENERAL 210 | |
| GENERAL INSTRUMENT | 168 |
| GOODMIND | 112 |
| HANLIN | 056 099 100 101 117 175 208 |
| HITACHI | 001 188 |
| JASCO | 111 |
| JERROLD 001 002 | 011 017 073 096 097 162 168 188 210 |
| LINSAY | 118 |
| MACOM | 191 |
| MAGNAVOX 017 019 068 | |
| MOVIE TIME | 035 039 |
| NSC | 035 190 |
| OAK | 197 |
| PACE | 179 |
| PANASONIC 053 176 | 177 189 214 |
| PANTHER 114 | |
| PHILIPS | 013 019 020 085 090 |
| PIONEER | 001 041 119 171 209 |
| POPULAR MECHANIC | 116 |
| PRELUDE | 120 |
| PRIMESTAR | 162 |
| PTS | 049 |
| RADIO SHACK | 111 112 213 |
| RCA 053 214 | |
| RECOTON | 116 |
| REGAL | 056 099 100 101 208 |
| REMBRANDT | 032 |
| SAMSUNG | 072 186 |
| SCIENTIFIC ATLANTA | 049 183 203 |
| SEAM | 121 |
| SIGNATURE | 001 188 |
Remote Control Code Tables
CATV
Maker (Brand) Name Setup Code Number
| SPRUCER 053 081 | 177 | 189 | ||||||||||
| STARCOM 002 011 | 163 | |||||||||||
| STARGATE 120 | ||||||||||||
| TANDY 024 | ||||||||||||
| TELECAPATION 028 | ||||||||||||
| TEXSCAN 036 | ||||||||||||
| TFC 122 | ||||||||||||
| TIMELESS 123 | ||||||||||||
| TOCOM 170 205 | ||||||||||||
| UNITED CABLE 011 | ||||||||||||
| UNIVERSAL 033 034 | 039 | 042 | 113 | |||||||||
| VIDEOWAY 124 21 | ||||||||||||
| VIEWSTAR | 019 | 025 | 086 | 089 | 190 | |||||||
| ZENITH | 065 | 125 | 211 | |||||||||
| ZENTEK | 116 | |||||||||||
Remote Control Code Tables
Satellite Receivers
Maker (Brand) Name Setup Code Number
| ALPHASTAR 472 | ||||||||||||
| ALPHASTAR DBS 450 | ||||||||||||
| ALPHASTAR DSR 442 | ||||||||||||
| BIRDVIEW 425 | ||||||||||||
| CHANNEL MASTER 320 321 | 322 | 325 | 361 | |||||||||
| CHAPARRAL 315 316 | 380 | 451 | ||||||||||
| CITOH 360 | ||||||||||||
| DRAKE 313 317 | 318 | 413 | 481 | |||||||||
| DX ANTENNA 331 352 362 | 379 | 483 | ||||||||||
| ECHOSTAR | 395 | 397 | 452 | 453 | 463 | 477 | 478 | 484 | 485 | |||
| ELECTRO HOME | 392 | |||||||||||
| FUJITSU | 324 | 329 | 334 | |||||||||
| GENERAL INSTRUMENT | 303 | 311 | 323 | 365 | 403 | 454 | 468 | 474 | ||||
| HITACHI DBS | 455 | |||||||||||
| HOUSTON TRACKER | 463 | |||||||||||
| HUGHES | 437 | |||||||||||
| JANIEL | 366 | |||||||||||
| JERROLD | 454 | 468 | 484 | |||||||||
| KATHREIN 410 | ||||||||||||
| LEGEND | 453 | |||||||||||
| MACOM | 317 | 365 | 369 | 370 | 371 | |||||||
| MAGNAVOX | 461 | 473 | ||||||||||
| MEMOREX | 453 | |||||||||||
| NEXTWAVE | 423 | |||||||||||
| NORSAT | 373 | |||||||||||
| OPTIMUS | 466 | |||||||||||
| PANASONIC 366 489 | ||||||||||||
| PANASONIC DBS | 457 | |||||||||||
| PANSAT | 420 | |||||||||||
| PERSONAL CABLE | 418 | |||||||||||
| PHILIPS | 375 | |||||||||||
| PICO | 407 | |||||||||||
| PRESIDENT | 381 | 404 | ||||||||||
| PRIMESTAR | 412 | 454 | 468 | 475 | ||||||||
| RCA | 301 | 439 | 465 | |||||||||
| RCA DSS | 458 | |||||||||||
| REALISTIC 349 480 | ||||||||||||
| SAMSUNG | 442 | |||||||||||
| SATELLITE SERVICE | 335 | 388 | ||||||||||
| SCIENTIFIC ATLANTA | 339 | |||||||||||
| SONY | 405 | |||||||||||
| STAR CHOICE DBS | 459 | |||||||||||
| STARCAST | 347 | |||||||||||
| SUPER GUIDE | 327 | 423 | ||||||||||
| TEECOM | 330 | 333 | 390 | 391 | 393 | 409 | ||||||
| TOSHIBA | 302 | 426 | 460 | 461 | 462 | 470 | ||||||
| UNIDEN | 323 | 332 | 348 | 349 | 350 | 351 | 354 | 355 | 381 | 383 | 389 | 403 |
| ZENITH | 384 | 385 | 387 | 394 | 419 |
Remote Control Code Tables
CD Players
Maker (Brand) Name Setup Code Number
| ADCOM 063 069 | ||||||||||||
| AIWA 072 111 | 118 | 156 | 170 | |||||||||
| AKAI 050 177 | 184 | |||||||||||
| AUDIO TECHNICA 053 | ||||||||||||
| AUDIOACCESS 125 | ||||||||||||
| AUDIOFILE 211 | ||||||||||||
| BSR 044 | ||||||||||||
| CALIFORNIA AUDIO 015 109 | ||||||||||||
| CAPETRONIC 070 | ||||||||||||
| CARRERA 087 | ||||||||||||
| CARVER 136 140 | 141 | 143 | 144 | 145 | 185 | 186 | ||||||
| CASIO | 117 | 122 | 166 | |||||||||
| CLARINETTE | 122 | 168 | ||||||||||
| DENON | 187 | 188 | 213 | |||||||||
| EMERSON | 052 | 093 | 108 | |||||||||
| FISHER | 055 | 068 | ||||||||||
| FRABA | 117 | |||||||||||
| FUNAI | 126 | |||||||||||
| GE | 164 | |||||||||||
| GENEXXA | 108 | |||||||||||
| GOLDSTAR | 016 | 087 | ||||||||||
| HAITAI | 099 | 214 | ||||||||||
| HARMAN KARDON | 001 | 002 | 025 | 054 | 190 | 218 | 219 | |||||
| HITACHI 093 | ||||||||||||
| INKEL | 216 | |||||||||||
| JC PENNEY | 098 | 147 | ||||||||||
| JENSEN | 153 | |||||||||||
| JVC | 176 | 195 | 196 | |||||||||
| KENWOOD | 030 | 062 | 078 | 079 | 148 | 151 | 176 | 178 | 181 | |||
| LOTTE | 108 | |||||||||||
| LUXMAN | 077 | 102 | ||||||||||
| LXI | 164 | |||||||||||
| MAGNAVOX | 039 | 113 | ||||||||||
| MARANTZ 058 084 | 191 | 192 | 193 | |||||||||
| MCINTOSH | 194 | |||||||||||
| MCS | 080 | 098 | ||||||||||
| MITSUMI | 152 | |||||||||||
| MODULAIRE | 122 | 166 | ||||||||||
| NAD | 013 | 074 | 197 | 198 | ||||||||
| NAKAMICHI | 199 | 200 | 201 | |||||||||
| NEC | 069 | |||||||||||
| NIKKO | 053 | 055 | ||||||||||
| ONKYO | 037 | 038 | 045 | 046 | 171 | 175 | 202 | 203 | ||||
| OPTIMUS | 065 | 089 | 091 | 092 | 099 | 104 | 212 | |||||
| PANASONIC | 015 | 075 | 109 | 119 | 158 | 183 | 204 | |||||
| PHILIPS | 039 | 138 | 149 | 209 | ||||||||
| PIONEER | 071 | 094 | 100 | 112 | 123 | 131 | 161 | 162 | 215 | |||
| PROTON | 210 | |||||||||||
| OUASAR | 015 | 109 | ||||||||||
| RADIO SHACK | 122 | 126 | 213 | |||||||||
| RCA | 024 | 081 | 093 | 150 | ||||||||
Remote Control Code Tables
CD Players
Maker (Brand) Name Setup Code Number
| RCX 169 | ||||||||||||||
| REALISTIC | 058 | 093 | 095 | 104 | 105 | 108 | 164 | 166 | ||||||
| SANSUI | 047 | 081 | 134 | 157 | 172 | |||||||||
| SANYO | 033 | 068 | 082 | 095 | 168 | |||||||||
| SCOTT 108 | ||||||||||||||
| SHARP | 058 | 105 | 114 | 151 | 159 | 167 | 180 | 181 | ||||||
| SHERWOOD | 003 | 041 | 058 | 105 | 133 | |||||||||
| SONY | 103 | 115 | 116 | 118 | 132 | 139 | 163 | 205 | 206 | 207 | 208 | 212 | 217 | |
| SOUNDSTREAM | 124 | |||||||||||||
| SYMPHONIC | 059 | 110 | ||||||||||||
| TAEKWANG | 177 | |||||||||||||
| TEAC | 011 | 058 | 085 | 086 | 106 | 107 | 110 | 121 | 137 | 146 | 154 | |||
| THETADIGITAL | 039 | |||||||||||||
| TOSHIBA | 013 | 074 | 097 | 151 | 155 | 173 | ||||||||
| VECTOR RESEARCH | 087 | |||||||||||||
| VICTOR | 120 | 130 | ||||||||||||
| WARDS | 095 | |||||||||||||
| YAMAHA | 019 | 031 | 053 | 061 | 135 | 169 | ||||||||
| YORX | 122 | 166 | ||||||||||||
Receivers
Maker (Brand) Name Setup Code Number
| JBL DCR600n | 001 | |||
| HARMAN KARDON | 001 |
Tape Deck
Maker (Brand) Name Setup Code Number
| HARMAN KARDON | 001 |
Remote Control Code Tables
DVD Players
Maker (Brand) Name Setup Code Number
| CALIFORNIA AUDIO 040 | |
| DENON 002 019 | 022 034 051 |
| GE 003 004 | |
| GOLDSTAR 005 | |
| HARMAN KARDON 001 032 | |
| JBL DVD600II | 001 |
| JVC 006 | |
| KENWOOD 007 050 | |
| LOTTE 008 | |
| MAGNAVOX 009 033 056 | |
| MARANTZ | 033 |
| MITSUBISHI | 023 036 |
| NAD | 010 |
| ONKYO | 015 048 |
| OPTIMUS | 011 050 |
| PANASONIC | 024 025 034 035 044 052 |
| PHILIPS 033 056 | |
| PIONEER | 012 020 038 041 046 047 |
| PROSCAN | 037 |
| RCA | 018 037 |
| RUNCO | 027 |
| SAMSUNG 031 053 054 | |
| SANYO | 013 049 |
| SHARP | 021 028 050 |
| SONY | 015 029 043 045 |
| TECHNICS | 026 |
| THOMSON 003 004 | |
| TOSHIBA | 033 047 057 |
| YAMAHA | 016 017 030 |
| ZENITH | 033 055 |
| ZENITH DIVX | 039 |
Configuring the DCR600II Receiver
Once the speakers have been placed in the room and connected, the remaining steps in the setup process are to calibrate the output levels and set the delay times used by the surround sound processor.
The DCR600 II features an advanced memory system that enables you to establish different configurations for the speaker configuration, surround mode, delay times and output levels for each input source. This flexibility enables you to custom-tailor the way in which you listen to each source and have the DCR600 II memorize those settings. This means, for example, that you may use different output levels or trims for different sources, or set different speaker configurations with the resultant changes to the bass management system. Once these settings are made, they will automatically be recalled whenever you select that input.
The factory default settings for the DCR600u have all inputs (except DVD) configured for an analog source, and stereo as the surround mode. Before using the unit, you will probably want to change the settings for most inputs so that they are properly configured to reflect the use of digital or analog inputs, and the surround mode specifics. Remember that since the DCR600u memorizes the settings for each input individually, you will need to make these adjustments for each input used. However, once they are made, further adjustment is only required when system components are changed.
Once you have completed the settings for the first input, many settings may be duplicated for the remaining inputs. Remember that once the settings are made for one input, they must be made for all other input sources in your system.
Memory Backup
This product is equipped with a memory backup system that preserves the system configuration information and tuner presets if the unit is accidentally unplugged or subjected to a power outage. This memory will last for approximately two weeks, after which time all information must be reentered.
Configuring the Speakers
The following instructions are to be followed only if the DCR600II is NOT used with JBL SCS135P, or if speaker settings have been accidentally altered from the default settings, which are SMALL for all positions with the subwoofer set to SUB L/R+LFE. Otherwise, go to the output level adjustments section on page 39. For each of these settings use the LARGE setting if the speakers for a particular position are traditional full-range loudspeakers that are capable of reproducing sounds below 100Hz. Use the SMALL setting for smaller, frequency-limited satellite speakers that do not reproduce sounds below 100Hz. Note that when "Small" speakers are used, a subwoofer is required to reproduce low-frequency sounds. Remember that the "Large" and "Small" descriptions do not refer to the actual physical size of the speakers, but their ability to reproduce low-frequency sounds. If you are in doubt as to which category describes your speakers, consult the specifications in the speakers' owner's manual, or ask your dealer.
With the DCR600 _II turned on, follow these steps to configure the speakers:
-
Put the DCR600II in the Dolby Pro Logic II mode by pressing the Surround Mode Selector 7 on the front panel or by pressing the Surround Mode Selector 20 on the remote, until DOLBY PRO LOGIC II MOVIES appears in the Main Information Display U and the PRO LOGIC II Indicator F lights.
-
Press the Speaker Button 21 on the front panel. The words FNT SPEAKER will appear in the Main Information Display U.
-
Press the Set Button 16.
-
Press the Selector Buttons 5 on the front panel until either LARGE or SMALL appears, matching the type of speakers you have at the front-left and front-right positions, as described by the definitions shown in the preceding section.
When SMALL is selected, low-frequency sounds will be sent to the subwoofer output only. Note that if you choose this option, and there is no subwoofer connected, you will not hear any low-frequency sounds from the front channels.
When LARGE is selected, a full-range output will be sent to the front-left and front-right outputs, and NO low-frequency signals will be sent to the subwoofer output.
-
When you have completed your selection for the front channel, press the Set Button 16, and then press the Selector Buttons 5 on the front panel to change the display to CEN SPEAKER.
-
Press the Set Button 16 again, and use the Selector Buttons 5 on the front panel, to select the option that best describes your system, based on the speaker definitions shown in the preceding section.
When CEN SMALL is selected, low-frequency center-channel sounds will be sent to the subwoofer output only. Note that if you choose this option and there is no subwoofer connected, you will not hear any low-frequency sounds from the center channel speaker.
When CEN LARGE is selected, a full-range output will be sent to the center-speaker output, and NO center-channel signal will be sent to the subwoofer output. This selection is not available when Logic 7 has been selected as the surround mode.
When CEN NONE is selected, no signals will be sent to the center-channel output. The receiver will operate in a "phantom" center-channel mode and center-channel information will be sent to the front-left and front-right channel outputs.
-
When you have completed your selection for the center channel, press the Set Button 16, and then press the Selector Buttons 5 on the front panel to change the display to SUR SPEAKER.
-
Press the Set Button 16 again, and then use the Selector Buttons 5 on the front panel to select the option that best describes your system, based on the speaker definitions shown in the preceding section.
When SUR SMALL is selected, low-frequency surround-channel sounds will be sent to the subwoofer output only. Note that if you choose this option and there is no subwoofer connected, you will not hear any low-frequency sounds from the surround speaker.
When SUR LARGE is selected, a full-range output will be sent to the surround-channel outputs, and NO surround-channel signals will be sent to the subwoofer output.
When SUR NONE is selected, surround sound information will be split between the front-left and front-right outputs. Note that for optimal performance when no surround speakers are in use, the Dolby 3 Stereo mode should be used instead of Dolby Pro Logic II.
Configuring the DCR600II Receiver
-
When you have completed your selection for the surround channel, press the Set Button 16, and then press the Selector Buttons 5 on the front panel to change the display to S-W SPEAKER.
-
Press the Set Button 16, and then press the Selector Buttons 5 on the front panel to select the option that best describes your system.
The choices available for the subwoofer position will depend on the settings for the other speakers, particularly the front left/right positions.
If the front left/right speakers are set to SMALL, the subwoofer will automatically be set to SUB, which is the "on" position.
If the front left/right speakers are set to LARGE, three options are available:
- If no subwoofer is connected to the DCR600, press the Selector Buttons 5 so that SUB NONE appears in the Main Information Display U. When this option is selected, all bass information will be routed to the front left/right "main" speakers.
- If a subwoofer is connected to the DCR600II, you have the option to have the front left/right "main" speakers reproduce bass frequencies at all times, and have the subwoofer operate only when the DCR600II is being used with a digital source that contains a dedicated Low-Frequency Effects, or LFE, soundtrack. This allows you to use both your main and subwoofer speakers to take advantage of the special bass created for certain movies. Press the Selector Buttons 5 so that SUB (LFE) appears in the Main Information Display U.
- If a subwoofer is connected and you wish to use it for bass reproduction in conjunction with the main front left/right speakers, regardless of the type of program source or surround mode you are listening to, press the Selector Buttons 5 so that SUB L/R+LFE appears in the Main Information Display U. When this option is selected, a "complete" feed will be sent to the front left/right "main" speakers, and the subwoofer will receive the bass frequencies.
- When all speaker selections have been made, press the Set Button 16 to return to normal operation.
Adjusting the Output Levels
Output level adjustment is a key part of the configuration process for any surround sound product. It is particularly important for a Dolby Digital receiver such as the DCR600 _II , as correct outputs will ensure that you hear soundtracks in their proper place with the proper directionality and intensity.
IMPORTANT NOTE: Listeners are often confused about the operation of the surround channels. While some assume that sound should always be coming from each speaker, most of the time there will be little or no sound in the surround channels. This is because they are only used when a movie director or sound mixer specifically places sound there to create ambience or a special effect, or to continue action from the front of the room to the rear. When the output levels are properly set, it is normal for surround speakers to operate only occasionally. Artificially increasing the volume to the rear speakers may destroy the illusion of an enveloping sound field that duplicates the way you hear sound in a movie theater or concert hall.
Before beginning the adjustment process, make certain that all speaker connections have been properly made. The system volume should be set to the level that you will use during a typical listening session. The Bass and Treble controls should be set to 0dB, or press the Tone Mode Button 6 to disable them. To adjust the Bass and Treble controls, press the Tone Mode Button 6, followed by the Set Button 16, and use the Selector Buttons 5 to adjust the Bass, then Treble, by up to plus or minus 10dB.
To assist in making speaker configuration settings, the icons in the Speaker/Channel Input Indicators M change as the speaker type is selected at each position. When only the center icon box containing the abbreviation for the speaker position is lit, the speaker is set for "Small." When the inner box and the two outer boxes are lit, the speaker is set for "Large." When no indicator appears at a speaker location, that position is set for "None" or "No" speaker.
For example, in the following figure, the front left and front right speakers are set for LARGE, the center, surround left (SL) and surround right (SR) speakers are set for SMALL, and a subwoofer is set, as shown by the box with the abbreviation "LFE", which stands for "low-frequency effects."
![L [C] R LFE SL SR](/content/2026/05/1064683/images/4f32341be7fce9e562b356b014cf0085cb0a5d659515bd24ac824a10cfb19c49.jpg)
To adjust and calibrate the output levels, follow these steps. For accurate calibration, it is a good idea to make these adjustments while seated in your favorite listening position:
-
Put the DCR600II in the Dolby Pro Logic II mode by pressing the Surround Mode Selector 7 on the front panel, or by pressing the Surround Mode Selector 20 on the remote, until DOLBY PRO LOGIC II -MOVIES appears in the Main Information Display U and the PRO LOGIC II Indicator F lights up.
-
Press the Test Button ⑰ on the remote. T-T FL OdB will appear in the Main Information Display U and the letters FL will flash once each second.
-
The test noise will immediately begin to circulate in the speakers in a clockwise rotation, pausing at each position for three seconds. As the test noise rotates, the speaker position will be shown in the Main Information Display U.
NOTE: This is a good time to verify that the speakers have been properly connected. As the test noise circulates, listen to make certain that the sound comes from the speaker position shown in the Main Information Display. If the sound from a speaker location does NOT match the position indicated in the display, turn the DCR60Q1 off using the Main Power Switch 1 and check the speaker wiring to make certain that each speaker is connected to the correct output terminal.
- After checking for speaker placement, let the test noise circulate, and listen to see which channels sound louder than the others. Use the front left (FL in the display) speaker as a reference by adjusting the volume to a comfortable level while the test tone is at the front left speaker. For the other channels, do not adjust the volume. Instead, press the ▲/▼ Buttons 25 31 the remote or the Selector Buttons 5 on the front panel for each channel to begin to bring them to the same level. Note that when one of the buttons is pushed, the test noise circulation will pause
Configuring the DCR600II Receiver
at the channel being adjusted to give you time to make the adjustment. When you release the button, the circulation will resume after 15 seconds.
- Continue to adjust the individual speakers until they all have the same volume. Note that adjustments should be made with the ▲/▼ Buttons 25 31 the remote or the Selector Buttons 5 on the front panel only. NOT the main volume controls, except when setting the reference level of the front left speaker. If you are using a sound pressure (SPL) meter for precise level adjustment, set the volume so that the meter reads 75dB, C-Weighting Slow.
NOTE: The subwoofer output level is not adjustable using the test tone. To change the subwoofer level, press the Channel Select Button 20 24 while playing a favorite selection, and use the ▲/▼ Buttons 25 31 Selector Buttons 5 to choose the subwoofer channel, followed by the Set Button 16 to select it, and then the ▲/▼ Buttons 25 31 or Selector Buttons 5 to adjust the channel outputs to a desired level, and the Set Button 28 16 to memorize the change.
- When you have adjusted the outputs so that all channels have the same level, press the Set Button 1628 to complete the adjustment.
NOTE: The output levels may be separately trimmed for each digital and analog surround mode. If you wish to have different trim levels for a specific mode, select that mode and follow the instructions in steps 2 through 5 above.
Setting Delay Times
Due to the different distances between the front-channel speakers and the listening position compared to the surround speakers and the listening position, the amount of time it takes for sound to reach your ears from the front or surround speakers is different. You may compensate for this difference through the use of the delay settings to adjust the timing to match the specific speaker placement and acoustic conditions in your listening room or home theater.
The factory setting is appropriate for most rooms, but some installations create an uncommon distance between the front and surround speakers that may cause the arrival of frontchannel sounds to become disconnected from surround-channel sounds.
Toresynchronize the front and surround channels, follow these steps:
-
Measure the distance from the listening/viewing position to the front speakers.
-
Measure the distance from the listening/viewing position to the surround speakers.
-
Subtract the distance to the surround speakers from the distance to the front speakers.
a. When setting the delay time for the Dolby Digital surround modes, the optimal delay time is the result of that subtraction. For example, if the front speakers are 10 feet away and the surround speakers are five feet away, the optimal delay time is figured as 10–5–5. Thus, in this example, the delay time for Dolby Digital should be set at five milliseconds.
b. When setting the delay time for the Dolby Pro Logic II mode, take the result of the subtraction and add 15 to obtain the optimal delay time. For example, if the front speakers are 10 feet away and the surround speakers are five feet away, the optimal delay time is figured as 10-5+15=20. Thus, in this example, the Pro Logic II delay should be set at 20 milliseconds.
NOTE: The Theater and Hall modes use a fixed, nonadjustable delay time.
The Dolby Digital mode also includes a separate setting for the center channel delay mode, since the discrete nature of these signals makes the location of the center channel speaker more critical. To calculate the delay for the center channel, measure the distance from the preferred listening position in the center of the room to both the center channel speaker and either the left or right speaker.
If the distances are equal, no further adjustment is required and the center delay should be set to zero. If the distance to the front speakers is greater than the distance to the center speaker, you may wish to reposition the speakers by moving the front-left and front-right speakers closer to the listening position or the center speaker further away from the listening position.
If repositioning of the speakers is not possible, adjust the center delay time, adding one millisecond of center channel delay for every foot closer to the listening position the center speaker is than the front speakers. For example, if the front-left and front-right speakers are each 10 feet from the listening position and the center channel speaker is eight feet away, the delay is figured as 10–8=2, suggesting an optimal center delay of two milliseconds.
To set the delay times, follow these steps:
-
Put the DCR600 in the Dolby Pro Logic II mode by pressing the Surround Mode Selector 7 on the front panel or by pressing the Surround Mode Selector 20 on the remote, until DOLBY PRO LOGIC II MOVIES appears in the Main Information Display U and the PRO LOGIC II Indicator F lights up.
-
Press the Delay Button 32 17 on the remote or front panel. The words S DELAY TIME will appear in the Main Information Display U.
-
Press the Set Button 28 16
-
Adjust the delay time by pressing the ▲/▼ Buttons 25 31 the remote or the Selector Buttons 5 on the front panel until the delay time figure calculated using the formula entered above appears in the display.
-
If only analog sources will be used, no adjustment is needed for the center channel delay. In that case, press the Set Button 28 16 to enter the surround delay settings into the receiver's memory. However, if you will be using digital sources and the calculations outlined above indicate that the center channel delay requires an adjustment, continue with the following steps.
-
Before setting the center channel delay time, make certain that a digital source such as the DVD600u has been selected. If a digital source is playing, COAXIAL E or OPTICAL B will appear in the Main Information Display 19. If a digital source is already connected and playing, press the Delay Button i7 32d then the ▲/▼ Buttons on the remote 25 31 or the front panel Selector Buttons 5 until the words C DELAY TIME appear in the Main Information Display U and proceed to Step 10. If a digital source is not playing, follow Steps 7 through 10.
Configuring the DCR600II Receiver
7. Press the Set Button
-
Select the Dolby Digital mode either by pressing the front panel Surround Mode Selector 7 or by pressing the Surround Mode Selector 20 on the remote until DOLBY DIG appears in the Main Information Display U.
-
Press the Delay Button 17 32 on the remote or front panel. The words S DELAY TIME appear in the Main Information Display U.
-
Press the ▲/▼ Buttons 25 31 the remote once, so that C DELAY TIME appears in the Main Information Display U or in the on-screen display.
-
Press the Set Button 28 16
-
Press the ▲/▼ Buttons 25 31 the remote or the Selector Buttons 5 on the front panel until the desired delay time for the center channel appears in the display.
-
Press the Set Button 28 16 to enter the setting into the receiver's memory.
Remote Control Functions
The JBL Cinema ProPack 600 1 is equipped with a powerful remote control that will control the functions of not only the DCR600 1 receiver and DVD600 _1 DVD changer, but also most popular brands of audio and video equipment, including CD players, cassette decks, TV sets, cable boxes, VCRs, satellite receivers and other home theater equipment. Once the remote is programmed with the codes for the products you own, it is possible to eliminate most other remotes and replace them with the convenience of a single, universal remote control.
Programming the Remote
As shipped from the factory, the remote is fully programmed for all DCR600i and DVD600ii functions. In addition, by following one of the methods below, you may program the remote to operate a wide range of devices from other manufacturers.
We suggest that you refrain from reprogramming the main and DVD functions. Should you reprogram them inadvertently, you may reprogram each of these buttons individually to code 001 to reset it without disturbing other functions programmed into the remote.
Entering Product Codes
This method is the easiest way to program your remote to work with different products.
- Use the tables on pages 28 to 37 to determine the three-digit code or codes that match both the product type (e.g., VCR, TV) and the specific brand name. If there is more than one number for a brand, make note of the different choices.
- Turn on the unit you wish to program into the remote.
- Press and hold both the Input Selector 9 10 12-15 for the product you wish to control (e.g., VCR, TV) and the Mute Button 3 at the same time. When the Program Indicator LED lights, release the buttons. The light under the Input Selector key will appear. It is important that you begin the next step within 20 seconds.
-
Point the remote towards the unit to be programmed, and enter the first three-digit code number using the Numeric Keys 33-40 42 43 correct code has been entered. Press the Input Selector 9 10 12-15 again, and note that the red light will flash three times before going dark to confirm the entry.
-
If the device to be programmed in does NOT turn off, continue to enter three-digit code numbers until the equipment turns off. At this point, the correct code has been entered. Press the Input Selector 9 10 12-15 again and note that the red light under the Input Selector will flash three times before going dark to confirm the entry.
- Try all of the functions on the remote to make certain that the product operates properly. Keep in mind that many manufacturers use a number of different combinations of codes, so it is a good idea to make certain that not only the power control, but the volume, channel and transport controls work as they should. If all functions do not work properly, you may need to use a different remote code.
- If a code cannot be entered to turn the unit off, if the code for your product does not appear in the tables in this manual, or if not all functions operate properly, try programming the remote with the Auto Search Method.
Auto-Searching for Product Codes
If the unit you wish to include in the remote is not listed in the code tables in this manual or if the code does not seem to operate properly, you may wish to program the correct code using the Auto Search method that follows:
- Turn on the unit that you wish to include in the remote.
- Press the Input Selector ⑨ ⑩ ⑫–⑮ for the type of product to be entered (e.g., VCR, TV) and the Mute Button ③ at the same time. Hold both buttons until the red light under the Input Selector ⑨ ⑩ ⑫–⑮ and the Program Indicator LED stay lit. Note that the next step must take place while the red light is on, and it must begin within 20 seconds after the light appears.
- Point the remote towards the unit to be programmed, and press either the ▲ or ▼ Button 25 31ch press will send out a series of codes from the remote's built-in database. When the unit being programmed turns off, release the ▲ or ▼ Button 25 31s that is your indication that the correct code is in use. If the unit turns off, the
-
Press the Input Selector 9 10 12-15 and note that the red light under the Input Selector will flash three times before going dark to confirm the entry.
-
Try all of the functions on the remote to make certain that the product operates. Keep in mind that many manufacturers use a number of different combinations of codes, and it is a good idea to make certain that not only the power control works, but also that the volume, channel and transport controls operate, as appropriate. If all functions do not work properly, you may need to Auto-Search for a different code, or enter a code via the Direct Code Entry method.
Reading Back the Programmed Code
When the code has been entered using the Auto Search method, it is always a good idea to find out the exact code so that it may be easily reentered if necessary. You may also read the codes to verify which device has been programmed to a specific Control Selector button.
-
Press and hold both the Input Selector 9 10 12-15 for the device for which you wish to find the code and the Mute Button 3 at the same time. Note that the Program Indicator LED and the light under the Input Selector 9 10 12-15 will light. Release the buttons and begin the next step within 20 seconds.
-
Press the Set Button 23. The Program Indicator LED will then blink in a sequence that corresponds to the three-digit code, with a one-second pause between digits. Count the number of blinks between pauses to determine the digit of the code. One blink is the number 1, two blinks is the number 2, and so forth, while 10 blinks are used to indicate a "0."
Example: One blink, followed by a one-second pause, followed by six blinks, followed by a one-second pause, followed by 10 blinks indicates that the code has been set to 160.
For future reference, enter the Setup Codes for the equipment in your system here:
CD
VID1/VCR ____ VID2/TV ____
VID3/CBL/SAT
VID4
TAPE
Remote Control Functions

Programming Macros
Macros enable you to easily repeat frequently used combinations of commands with the press of a single button on the remote control. Once programmed, a macro will send out up to 19 different remote codes in a predetermined sequential order, enabling you to automate the process of turning on your system, changing devices, or other common tasks. The remote can store up to three separate macro command sequences: one that is associated with the Power On Button ②, and two more that are accessed by pressing the Macro Buttons ⑥ ⑦.
The JBL One Click™ remote also features two preprogrammed functions, ALL OFF 21 and ALL ON 22, that turn all eight programmed devices off or on when the appropriate key is pressed.
-
Press the Mute Button ③ and the Macro Buttons ⑥ ⑦ to be programmed or the Power On Button ② at the same time. Note that the Program Indicator LED will light.
-
Enter the steps for the macro sequence by pressing the button for the actual command step. The first step of the macro must be to press the Input Selector 4 8-10 12-15 for the first device for which you are programming a command. That will cause the light under that Input Selector to turn on. Although the macro may contain up to 19 steps, each button press, including those used to change devices, counts as a step. The Input Selector 4 8-10 12-15 will flash to confirm each button press as you enter commands.
NOTE: While entering commands for Power On/Off of any device during a macro sequence, press the Mute Button ③. DO NOT press the actual Power button.
- When all the steps have been entered, press the Macro Button 267 to enter the commands. The Program Indicator LED will blink three times and then turn off.
Example: To program the Macro 1 button so that it turns on only the DCR600, TV and a Cable Box, follow these steps:
- Press the Macro 1 ⑥ and Mute ③ buttons at the same time and then release them.
- Note that the Program Indicator LED will light.
(continued)
Remote Control Functions
- Press the MAIN Selector 8.
- Press the Mute Button ③ to store the DCR6001's Power On command.
- Press the TV Input Selector Button 15 to indicate the next command is for "TV Power On."
- Press the Mute Button ③ to store the TV Power On command.
- Press the VID 3 Input Selector Button 14 to indicate the next command is for "Cable Power On."
- Press the Mute Button ③ to store the Cable Power On command.
- Press the Macro 1 Button ⑥ to complete the process and store the macro sequence.
After following these steps, each time you press the Macro 1 Button ⑥, the remote will send the Power On/Off command to only those devices.
Erasing Macro Commands
To remove the commands that have been programmed into one of the Macro buttons, follow these steps:
- Press the Mute Button ③ and the Macro Buttons ② ⑥ ⑦ that contain the commands you wish to erase.
- Note that the Program Indicator LED will turn red.
- Within ten seconds, press the Surround Mode Selector Button 20, followed by the Macro Buttons 267 that contain the commands you wish to erase.
- The Program Indicator LED will flash three times before it goes out.
- When the Program Indicator LED goes out, the Macro has been erased.
Device Functions
Once the remote has been programmed for the codes of other devices, press the appropriate Input Selector 4 9 10 12-15 to change the remote from controlling the DCR600 1 and DVD600 1 to controlling the additional product. When you press any one of the selectors, it will briefly flash in red to indicate that you have changed the device being controlled.
When operating a device other than the DCR600 or DVD600, the controls may not correspond exactly to the function printed on the remote or button. Some commands, such as the transport controls, will operate the same way for that device as they do for the DCR600 and DVD600. Other buttons will change their function so that they correspond to a secondary label on the remote. For example, the Sleep 16 and Surround Mode Selector 20 buttons also function as the Channel Up and Channel Down buttons when operating most TV sets, VCRs or cable boxes. The Channel Up/Down indication is printed directly on the remote. For many standard CD players, cassette decks, VCRs and DVD functions, the standard function icons are printed on top of the buttons.
For some products, however, the function of a particular button does not follow the command printed on the remote. In order to see which function a button controls, consult the Function List tables on pages 26 and 27. To use those tables, first check the type of device being controlled (e.g., TV, VCR). Next, look at the remote control diagram. Note that each button has a number on it.
To find out what function a particular button has for a specific device, find the button number on the Function List and then look in the column for the device you are controlling. For example, button number 7 is the Macro 2 button for the DCR600, but it is the Repeat button for CD players, and the Favorite Channels button for cable boxes and satellite receivers. Button number 32 is the Delay button for the DCR600, but the Time button for CD players, and Preview Channel button for many TVs, cable television boxes and satellite services.
Notes on Using the Remote With Other Devices
- Manufacturers may use different code sets for the same product category. For that reason, it is important that you check to see whether the code set you have entered operates as many controls as possible. If it appears that only a few functions operate, check to see whether another code set will work with more buttons.
- When a button is pressed on the remote, the red light under the Input Selector 4 8 -10 12 -15 for the product being operated should flash briefly. If the Device Control Selector flashes for some but not all buttons for a particular product, it does NOT indicate a problem with the remote but rather that no function is programmed for the button being pushed. Consult the Function List on
pages 26 and 27. Blank squares indicate that no function is programmed for that button for the corresponding device. Consult the device's owner's manual for further information.
Volume Control Punch-Through
The remote may be programmed to operate the Volume Control 19 23 and Mute 3 functions of either the TV or the DCR600 in conjunction with any of the devices controlled by the remote. For example, since the DCR600 will likely be used as the sound system for TV viewing, you may wish to have the volume control on the DCR600 activated, although the remote is set to run the TV. To program the remote for Volume Punch-Through, follow these steps:
- Press the Input Selector 4 9 10 12—15 for the source unit you wish to have associated with the volume control and the Mute Button 3 at the same time until the red light appears under the Input Selector 4 9 10 12—15 and note that the Program Indicator LED will light.
- Press the Volume Up Button 19 and note that the Input Selector 4 9 10 12 will flash once.
- Press either the MAIN Selector 8 or the Input Selector 4 9 10 12-15, depending on which system's volume control you wish to have attached for the punch-through mode. The Program Indicator LED will go out and the Input Selector 4 9 10 12-15 you pressed in Step 1 will blink three times and then go out to confirm the data entry.
Examples:
- To adjust the volume control for the DCR600 while the remote is set to control the DVD600, press the DVD Selector 4 and the Mute Button 3 at the same time, then press the Volume Up Button 19, then press the MAIN Selector 8.
- To have the volume control for the DCR600 _II activated even though the remote is set to control the TV, first press the TV Input Selector 15 and the Mute Button 3 at the same time. Next, press the Volume Up Button 19, followed by the MAIN Selector 8.
NOTE: Should you wish to return the remote to the original configuration after entering a Volume Punch-Through, you will need to repeat the steps shown above. However, press the same Input Selector 4 9 10 12 - 15 in Steps 1 and 3.
Remote Control Functions
Channel Control Punch-Through
The remote may be programmed to operate so that the channel control function for either the TV, cable or satellite receiver used in your system may be used in conjunction with one of the other devices controlled by the remote. For example, while using and controlling the VCR, you may wish to change channels on a cable box or satellite receiver without having to change the device selected by the DCR6001 or the remote. To program the remote for Channel Control Punch-Through, follow these steps:
-
Press the Input Selector Button 4 9 10 12-15 for the device with which you wish to have the channel control associated and the Mute Button 3 at the same time until the red light appears under the Input Selector 4 9 10 12-15 and the Program Indicator LED lights.
-
Press the Volume Down Button 23. The Program Indicator LED will flash once.
-
Press and release the Input Selector Button 4 9 10 12-15 for the device that will be used to change the channels. The Program Indicator LED will go out and the Input Selector 4 9 10 12-15 you pressed in Step 1 will blink three times and then go out to confirm the data entry.
Example: To control the channels using your cable box or satellite receiver while the remote is set to control the VCR, first press the VID 1/VCR 1 Input Selector Button ⑫ and the Mute Button ③ at the same time. Next, release them and press the Volume Down Button ②3, followed by the VID 3/CATV/SAT Input Selector Button ⑭.
NOTE: To remove the Channel Control Punch-Through and return the remote to its original configuration, repeat the steps shown in the example above. However, press the same Input Selector 4 9 10 12-15 in Steps 1 and 3.
Transport Control Punch-Through
The remote may be programmed to operate so that the Transport Control Stancials (Play, Stop, Fast Forward, Rewind, Pause and Record) for a VCR, DVD or CD will operate in conjunction with one of the other devices controlled by the remote. For example, while using and controlling the TV, you may wish to start or stop your VCR or DVD without having to change the device selected by the DCR600 or the remote. To program the remote for Transport Control Punch-Through, follow these steps:
-
Press the Input Selector 4 9 10 12-15 for the device with which you wish to have the transport control associated and the Mute Button 3 at the same time until the red light appears under the Input Selector 4 9 10 12-15 and the Program Indicator LED lights.
-
Press the Play Button .5the Input Selector 4 9 10 12-15 will flash once.
-
Press and release the Input Selector Button 4 9 10 12-14 for the device that has the transport (e.g., VCR). The Program Indicator LED will go out and the Input Selector 4 9 10 12-15 you pressed in Step 1 will blink three times and then go out to confirm the data entry.
Example: To control the transport of a DVD player while the remote is set to control the TV, first press the TV Input Selector Button 15 and the Mute Button 3 at the same time. Next, release them and press the Play Button 58, followed by the DVD Input Selector Button 4.
NOTE: To remove the Channel Control Punch-Through and return the remote to its original configuration, repeat the steps shown in the example above. However, press the same Input Selector 4 9 10 12–15 in Steps 1 and 3.
NOTE: Before programming the remote for Volume, Channel or Transport Punch-Through, make certain that any programming needed to assign the remote to control the specific TV, CD, DVD, cable or satellite receivers has been completed.
Reassigning Devices
Although each Input Selector 4 9 10 12-15 is normally assigned to the category of product shown on the remote, it is possible to reassign one of these buttons to operate a second device of another type. For example, if you have a cable box and satellite receiver, but only one VCR, you may program the "VID2" button to operate a cable box. Before following the normal programming steps for either three-digit entry or Auto Search code entry, you must first reassign the button with the following steps:
-
Press the Input Selector 4 9 10 12-15 you wish to reassign and the Mute Button 3 at the same time until the red light appears under the Input Selector 4 9 10 12-15 and the Program Indicator LED lights.
-
Press the Input Selector 4 9 10 12 - 15 for the device you wish to program into the reassigned button.
-
Enter the three-digit code for the specific model you wish the reassigned button to operate, and the Program Indicator LED will flash.
-
Press the same Input Selector ④ ⑨ ⑩ ⑫-15 pressed in Step 1 once again to store the selection. The red LED under the reassigned Input Selector will flash three times and then go out.
Example: To use the VID2 button to operate a cable box, first press the VID2 Input Selector 13 and the Mute Button 3 at the same time until the red light glows under the VID2 Button 13. Press the CBL/SAT Button 14, followed by the three-digit code for the specific model you wish to control. Finally, press the VID2 Button 13 again.
Resetting the Remote Memory
As you add components to your home theater system, occasionally you may wish to totally reprogram the remote control without the confusion of any commands, macros or "Punch-Through" programming that you may have done. Todo this, it is possible to reset the remote to the original factory defaults and command codes by following these steps. Note, however, that once the remote is reset, all commands or codes that you have entered will be erased and will need to be reentered:
-
Press any of the Input Selector Buttons 4 8-10 12-15 and the "0" Button 43 at the same time until the Program Indicator LED lights.
-
Press the "3" Button three times.
-
The red LED under the Input Selector ④⑧-1012-15 will flash once for each press. The Program Indicator LED will flash three times and go out.
-
When the Program Indicator LED goes out, the remote has been reset to the factory settings.
Configuring the DVD600II DVD Changer
DVD Compatibility & Terminology
The DVD600 _II is more than a DVD player; it will play the following disc formats:
• Both 5-inch (12cm) and 3-inch (8cm) discs
- CD audio discs
• DTS audio discs
- CD-R audio discs
• CD-RW audio discs
• DVD movie discs
• VCD (video CD) discs
- MP3 audio discs
However, it will NOT play the following:
• DVD discs with a Region Code other than the one for which the player is set
• DVD discs with PAL format video
• DVD-Audio discs
• DVD-ROM data discs
• DVD-RAM data discs
• CD-R/RW data discs
- CD-I discs
- CD-G discs
- SVCD discs
- Photo CD discs
Notes on DVD-Audio discs:
- The DVD60Q1 is not capable of playing selections in the DVD-Audio format. However, many DVD-Audio discs include audio tracks in the PCM, Dolby Digital or other formats which the DVD60Q1 is capable of playing. You may need to press the Title Button 24 rather than the Menu Button 26 in order to access these formats.
- Some DVD-Audio discs display a still picture while a selection is playing. Sometimes, this picture may disappear when play is stopped and the DVD600 is placed in the Resume mode. To restore the picture, fully stop play by pressing the Stop Button 90-6 Store continuing play.
NOTE: Due to differences in the format of certain discs, it is possible that some discs may include a mix of features that are not compatible with the DVD60Q1. Similarly, although the DVD60Q1 is capable of a wide range of features, not all discs include every capability of the DVD system. For example, although the DVD60Q1 is compatible with multi-angle discs, that feature is only possible when the disc is specially encoded for multiple-angle play. In addition, the DVD60Q1 is capable of playing back both Dolby Digital and DTS soundtracks, but the number and types of tracks available will vary from disc to disc. To make certain that a specific feature or soundtrack option is available, please check the options noted on the disc jacket.
- Playback of DTS audio discs requires connection to a processor or receiver with a DTS decoder, such as the DCR600 _II .
- Playback capability for CD-R/RW discs may vary due to variations in the quality of the CD-R/RW disc and the recorder used to create the disc.
Since they share some of the characteristics and technology of CD players, many of the terms and operational concepts used in a DVD player are similar to what you may be familiar with from CD players and changers, or older video disc formats such as Laser Disc. However, if this is your first DVD product, some of the terms used to describe the features of a DVD player may be unfamiliar. The following explanations should solve some of the mysteries of DVD, and help you to enjoy all the power and flexibility of the DVD format and the DVD.
Aspect Ratio: This is a description of the width of a video image in relation to its height. A conventional video screen is four units wide for every three units of height, making it almost square. Newer, wide-aspect ratio video displays are 16 units wide for every nine units of height, making them more like the screen in a movie theater. The program material on a DVD may be recorded in either format and, in addition, you may configure the DVD to play back in either format, depending on the features recorded on a disc.
Chapter: DVD programs are divided into chapters and titles. Chapters are the subsections programmed into a single title on a disc. Chapters may be compared to the individual tracks on an audio CD. Press the Menu button to see a listing of the chapters on a disc.
Component Video: This is an advanced form of video signal which eliminates many of the artifacts of traditional composite-video signals by splitting the signal into a separate luminance channel and two color-difference signals. With a component-video connection, you will see greater picture resolution and eliminate many picture imperfections, such as the moiré patterns often seen on check-patterned cloths. However, in order to benefit from component video, you must have a video display with Y/Pr/Pb component-video inputs. Do not connect the component-video outputs of the DVD600 to the standard composite or S-Video inputs of a TV or recorder.
MP3: MP3 is a format of data file containing a compressed version of an audio selection. Numerous MP3 files are available for download from the Internet onto your personal computer. Many users are able to copy these files onto compact discs. Until recently, it has not been possible to play these discs in a standard CD or DVD player. However, the DVD600i is capable of recognizing and playing program material on MP3 audio discs.
Multiple Angle: DVDs have the capability to show up to four different views of the same scene in a program. When a disc is encoded with multiple-angle information, pressing the Angle button will enable you to switch between these different views. Note that, at present, few discs take advantage of this capability and, when they do, the multiple-angle technology may only be present for short periods of time within the disc. Producers will usually insert some sort of icon or graphic in the picture to alert you to the availability of multiple-angle scenes.
Reading: This is a message that you will see when you first press the Play button. It refers to the fact that the player must first examine the contents of the disc to see whether it is a CD or DVD, and then extract the information about the type of material on the disc, such as languages, aspect ratios, subtitles, number of titles and more. The slight delay while the contents of the disc are read is normal.
Resume: The operation of the Stop button on the DVD600II works differently from what you are used to on CD or CD players. On a traditional CD player, when you press the Stop button, the unit does just that: it stops playback. On a CD player, when you press the Start button again, the disc starts from the beginning. With the DVD600II, however, you have two options when playing CDs or DVDs (but not MP3 discs). Pressing Stop once will stop the playback, but it actually puts the unit in the Resume mode. This means that you can turn the machine off and, when you press Play the next time, the disc will resume or continue from the point on the disc where the Stop button was pressed. This is helpful if you are watching a movie and must interrupt your viewing session but wish to pick up where you left off. Pressing the Stop button twice will stop the machine in a traditional manner and, when the disc is played again, it will start from the beginning.
Title: For a DVD, a title is defined as an entire movie or program. For a DVD-Audio disc, the title may be defined as the audio track, e.g., linear PCM or 5.1-channel Dolby Digital. There may be as many chapters within a title as the producers decide to include. Most discs include
Configuring the DVD600II DVD Changer
only one title, but some may have more than one, to give you a "Double Feature" presentation or to include special presentations that take you "behind the scenes" of the main feature. Press the Title button to see a listing of the titles on a disc. When a disc has only one title, pressing the Title button may show a list of the chapters.
The DVD600 is turned on in two steps. First, press the Main Power Switch 1D the front panel until it latches and the Power Indicator 3D lights. Then, press the System Power Control 2D or use the remote control to select DVD 4 and turn on the unit 2.
Using the Remote Control
To access the Setup Menu, press the Menu Button 26. The Setup Menu will appear on the video display screen (Figure 1a). The left side of the screen will show the various options, and the box on the right side of the screen will show the current defaults. The box in the lower left corner of the screen will read "Resume" if you were playing a disc and pressed the Stop Button 9D 61 once, thus placing the DVD600 in Resume mode (see Figure 1a). If you pressed the Stop Button 971 51 this box will read "Play" (see Figure 1b).
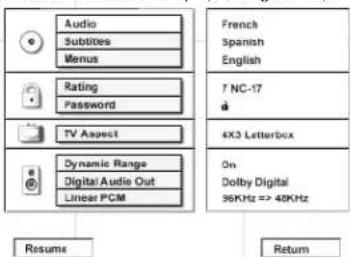
Figure 1a
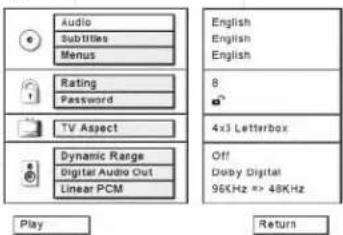
Figure 1b
To navigate through the settings on the screen, use the ▲/▼ Buttons 25 31 scroll up or down through the list of settings or the list of options. Press the ◀/► Buttons 27 29 move back and forth between the list of settings and the list of options for those settings. To choose a specific option, use the ▲/▼ Buttons 25 31 until it is highlighted. Press the Enter Button 28 to select the choice. When a selection is made, you may confirm the choice by checking to see that a dot fills the "radio button" circle next to the choice. This filled circle, not the highlighted option, is the active choice.
Selecting Audio Output Languages
The Audio Language option sets the default choice for the language that will be played from a DVD disc. To select the language default, go to the Setup Menu (Figure 1), which is available by pressing the Menu Button 26 while the unit is in the Stop mode. Audio Language Selection is the first option and will be highlighted in teal when the Setup Menu is displayed. To change the default language, press the
▶ Button 29: the list of system defaults will be replaced with a list of available options, as shown in Figure 2. The current language choice will be indicated by a filled-in circle on the right side of the screen.

Figure 2
Tochange the default setting, press the ▲/▼ Buttons 25 31 til the desired choice is highlighted, and then press the Enter Button 28 . Note that the circle for your choice will fill in, and the menu will return to the default listings.
If you wish to change the default to a language other than English, Spanish or French, press the ▲/▼ Buttons 25 31 til the "Other" line on the bottom is highlighted. Consult the Language Codes list on page 65 for the desired language. Press the Enter Button 28 then enter the four-digit code from the list using the Numeric Keys 33 40 42 .43 Although your selection will be entered, the word "Other" will appear on the default list.
Note that when a default language is selected, it will be used whenever that language is present on the DVD disc being played. However, when that language is not present, the language used will be the one preprogrammed into the disc itself. (Typically, that default will be English for discs sold in Region 1, but the selection will vary at the discretion of the disc's producer.) Although the default will set the language that will be used when a disc is first put into play, the language may easily be changed at any time by using the Audio Button 20.
If you have no other changes to make after setting this default, press the Menu Button 26 to remove the Setup Menu from the screen, or press the Play/Pause Button 158 10D begin or resume playback.
Selecting Subtitle Languages
The Subtitle Language option sets the default choice for the language that will be displayed when subtitles are turned on during DVD playback.
Toselect the Subtitle Language default, you must be viewing the Setup Menu (Figure 1), which is available by pressing the Menu Button 26 while the unit is in the Stop mode. At the Setup Menu, press the ▼ Button 61 the Subtitle Language option is highlighted.
Tochange the default Subtitle Language, press the ▶ Button 249 note that the list of system defaults will be replaced with a list of the available options, as shown in Figure 3. The current subtitle language choice will be indicated by a filled-in circle in the list on the right side of the screen.

Figure 3
To change the default setting, press the ▲/▼ Buttons 25 31 till the desired choice is highlighted, and then press the Enter Button 28 Note that the circle for your choice will fill in, and the menu will return to the default listings.
If you wish to change the subtitle default to a language other than English, Spanish or French, press the ▲/▼ Buttons 25 31 til the "Other" line on the bottom is highlighted. Consult the Language Codes list on page 65 for the desired language. Press the Enter Button ,28 and then enter the four-digit code from the list using the Numeric Keys 33 40 ,42 43 . Although your selection will be entered, the word "Other" will appear on the default list.
(continued)
Configuring the DVD600II DVD Changer
Note that when a default subtitle language is selected, it will be used whenever that language is present on the DVD disc being played. However, when that language is not present, the language used will be the one preprogrammed into the disc itself. (Again, typically that default will be English for discs sold in Region 1, but the selection will vary at the discretion of each disc's producer.)
Although the default will set the language that will be used when the disc is first put into play, the language may easily be changed at any time by using the Subtitle Button .30
If you have no other changes to make after setting this default, press the Menu Button 26 to remove the Setup Menu from the screen, or press the Play/Pause Button 158 10D begin or resume playback.
Selecting Menu Languages
The Menu Language option sets the default choice for the language that will be used for the on-screen menu displays. This default setting DOES NOT impact the playback of DVD discs.
To select the Menu Language default, you must be viewing the Setup Menu (Figure 1), which is available by pressing the Menu Button 26 while the unit is in the Stop mode. At the Setup Menu, press the ▼ Button 31 the Menus option is highlighted.
To change the default Menu Language, press the ▶ Button 2.9 note that the list of system defaults will be replaced with a list of the available options, as shown in Figure 4. The current language choice will be indicated by a filled-in circle in the list on the right side of the screen.

Figure 4
To change the default setting, press the ▲/▼ Buttons 25 31 till the desired choice is highlighted, and then press the Enter Button 28 Note that the circle for your choice will fill in, and the menu will return to the default listings.
If you have no other changes to make after setting this default, press the Menu Button 26 to remove the Setup Menu from the screen, or press the Play/Pause Button 58 10D begin or resume playback.
Parental Lock and Passwords
The DVD600 _II enables you to control the discs that are viewed by setting a ratings level. When a disc that's ready to play has a rating level greater than the default, it will not play. To further protect against unauthorized viewing of restricted discs, the ratings-level option may be locked so that only authorized persons (such as a parent) may change the ratings level after a password is entered.
The ratings system is dependent on information encoded into the DVD disc being played so, although most movies will carry an MPAA or other rating symbol, the disc may or may not contain that rating in its software. In addition to the five MPAA ratings of G, PG, PG-13, R and NC-17, the DVD600 will accommodate a total of eight ratings steps, as set by the creators of the DVD format. These additional steps allow for more critical control of program playback for all audiences.
To select the permitted ratings values, you must be viewing the Setup Menu (Figure 1), which is available by pressing the Menu Button 26 while the unit is in the Stop mode. At the Setup Menu, press the ▼Button u41 the Ratings option is highlighted.
Tochange the default Ratings setting, press the ▶ Button 29 note that the list of system defaults will be replaced with a list of the program ratings, as shown in Figure 5. Some ratings will be highlighted in light blue, while others will be highlighted in purple. Discs with a rating in the light blue color band will play without any further action by the viewer. Discs with ratings in the purple band will only play after a password is entered.
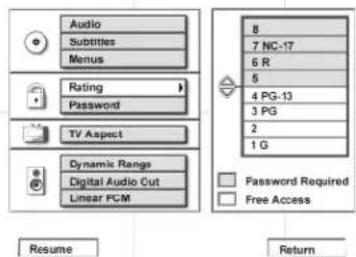
Figure 5
Tochange the range of ratings that may be viewed without a password, press the ▲/▼ Buttons 25 31 til the desired range is set, and then press the Enter Button .28 Note that the circle for your choice will fill in, and the menu will return to the default listings. The listing in the default settings will show the highest rated program that may be viewed without entering a password.
If you have no other changes to make after setting this default, press the Menu Button 26 to remove the Setup Menu from the screen, or press the Play/Pause Button t53 10D begin or resume playback.
Password Selection and Control Lock
The Password System is used to control viewing of restricted programs and one's capability to change the password itself. The DVD600 is shipped without a password and with the settings for the password system unlocked. The following instructions will show how to add a password and to lock the settings.
To set a password or lock the password system, you must be viewing the Setup Menu (Figure 1), which is available by pressing the Menu Button 26 while the unit is in the Stop mode. At the Setup Menu, press the ▼ Button u31 the Password option is highlighted.
To enter a password, press the ▶ Button 29 and note that the list of system defaults will be replaced with a list of the three password options (Figure 6). If you change your mind and decide not to enter, clear or change a password, press the ◀ Button 27 to return to the main menu.
To enter a password, check to make certain that the words "Set Password" are highlighted and then press the Enter Button. The Enter Password screen will then appear on your video display (Figure 7).

Configuring the DVD600II DVD Changer
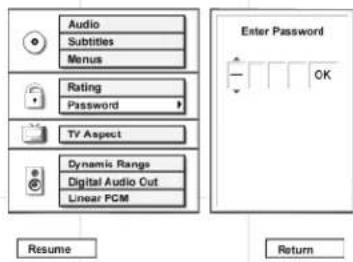
Figure 7
To enter a password, you may either enter the four-digit number directly, using the Numeric Keys 33-40 42 43,
▲/▼ Buttons 25 41 select the number for a position, and then press the ▶ Button 29 to move to the next position. Note that as each number is entered, it will turn to a solid circle when you move to the next position to protect the password's privacy. When all four numbers of the password have been entered, press the Enter Button 28
After the password has been entered once, a second set of data entry boxes will appear, asking you to confirm the entry (see Figure 11). Using the same method described earlier, enter the password again. When all four numbers have been repeated, press the Enter Button set the password in the DVD changer's memory. If the two passwords do not agree, an "Incorrect Password" message will appear to ask you to try entering the number again.
Once this password is entered, you will need to use this four-digit number to view a disc when the rating of the disc exceeds the settings entered in the Ratings Menu. If a password has been entered, it will also be required in order to change the settings range in the Ratings Menu. Finally, the password is required if you wish to unlock the system again to permit access to the Ratings Menu.
If you have no other changes to make after setting this default, press the Menu Button 26 to remove the Setup Menu from the screen, or press the Play/Pause Button t58 10D begin or resume playback.
Clearing Passwords
Once a password has been entered, the system remains locked until the password is cleared. To clear a password so that the ratings may be changed or to permit any movie to be viewed regardless of ratings, you must be viewing the Setup Menu (Figure 1), which is available by pressing the Menu Button 26 while the unit is in the Stop mode. At the Setup Menu, press
the ▼ Button 61 the Password option is highlighted (Figure 7). As the system is locked, you will first be asked to enter the password previously set. Enter that password using the Numeric Keys 33-40 42 43 and then press the Enter Button 28
To clear the password lock once you have entered the correct password, press the
▼ Button 31 that the words "Clear Password" are highlighted in light blue (Figure 8). Next, press the Enter Button 126 complete the process. Note that the wording for "Clear Password" will dim as a confirmation that the system is now unlocked. Press the ▲ Button 27 to return to the main menu.

Figure 8
If you have no other changes to make after setting this default, press the Menu Button 26 to remove the Setup Menu from the screen, or press the Play/Pause Button t58 i0D begin or resume playback.
Changing the Password
If you feel that the password has become known to an unauthorized person, you may change the password without unlocking the system. To change a password, you must be viewing the Setup Menu (Figure 1), which is available by pressing the Menu Button 26 while the unit is in the Stop mode. At the Setup Menu, press the ▼Button 31 the Password option is highlighted. As the system is locked, you will first be asked to enter the password previously set (Figure 9). Enter that password using the
Numeric Keys -3nd then 42 43 press the Enter Button 28

Figure 9

Figure 10
To change the password, press the ▼ Button 31 so that the words "Change Password" are highlighted in light blue (Figure 10). Next, press the Enter Button 26 the next screen that appears (Figure 7), enter the new four-digit password directly by using the Numeric Keys 33-40 42 43, or you may use the ▲/▼ Buttons 25 select the number for a position, and then press the ▶ Button 29 to move to the next position. Note that as each number is entered, it will turn to a solid circle when you move to the next position to protect the password's privacy. When all four numbers of the password have been entered, press the
Enter Button 28
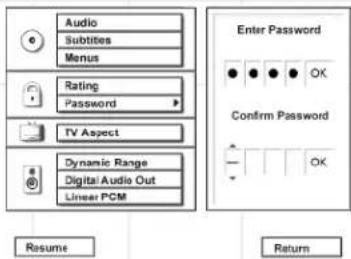
Figure 11
After the password has been entered once, a second set of data entry boxes will appear, asking you to confirm the entry (Figure 11). Using the same method described above, enter the password again. When all four numbers have been repeated, press the Enter Button to set the password in the memory (Figure 12). If the two passwords do not agree, an "Incorrect Password" message will appear to ask you to try entering the number again.

(continued)
Configuring the DVD600II DVD Changer
Once the new password has been entered, the system remains locked with the new password in effect. Press the ◀ Button 27 to return to the main menu. If you have no other changes to make after setting this default, press the Menu Button 26 to remove the Setup Menu from the screen, or press the Play/Pause Button 58 to begin or resume playback.
Setting the Aspect Ratio
The aspect ratio of a television picture is the relationship between its width and height, and it defines the shape of the picture. Television sets have traditionally had an aspect ratio of 4 x 3, which is to say that they are almost square, with slightly more width than height. Almost all television programming is presented in the 4 x 3 aspect ratio so that the pictures fit within the confines of the TV screen.
Movies, on the other hand, have a variety of what are known as "wide aspect ratio" formats that are significantly wider in relation to their height than traditional television pictures. Indeed, the development of wide-screen movies was something that was popularized in the 1950s in response to the success of television; movie producers wanted to provide a wider vista than what was afforded by TVs.
However, since many movies are produced for a wider screen than the TV set they are played on, a problem arises that is like fitting a square peg into a round hole. In many instances this is taken care of by the disc's producers, who reformat the image to fit within a standard 4 x 3 TV screen. Discs such as this require no special setting. The only downside to this is that when wide-screen movies are converted to 4 x 3, some of the information at the sides of a scene may be cut off due to the difference in picture shape. This is also called a "pan and scan" presentation, as a 4 x 3 viewing area is moved across the wider cinema image.
Other discs are produced in what is called a "letterbox wide-screen" format. In this case, the entire wide image is fit inside the 4 x 3 screen shape from side to side. This means that you see the entire picture as the movie's director intended, but the height of the picture is reduced to accommodate the added width. The blank areas that appear at the top and bottom of the screen make the image in the center appear as if you are looking through a mail slot, giving this sort of presentation the nickname of "letterbox."
The DVD format accommodates both of these formats, though it is up to the producer of the disc to select which way to convert the movie to video. Sometimes you will have only one of the two formats, while some discs offer a full screen, with the pan-and-scan version on one side of a disc and the wide-screen, but letterbox version, on the other side.
The DVD600 will play either type of disc, and you may select a default that tells which way to present the image when there is a choice.
To select an aspect ratio default, you must be viewing the Setup Menu (Figure 1), which is available by pressing the Menu Button 26 while the unit is in the Stop mode. At the Setup Menu, press the ▼Button 611 the Aspect Ratio option is highlighted. Next, press the Enter Button 28 elect one of the three choices in the options box (Figure 13) using the
▲/▼ Buttons 25 31

Figure 13
Depending on the type of television set you have, choose one of these three options:
- 4 x 3 Letterbox: Choose this setting if you have a standard 4 x 3 television set and prefer to see movies in their original aspect ratio. You will see the entire movie but, when it is presented in a letterbox fashion, there will be black bars at the top and bottom of the screen. Movies or other programs recorded in a 4 x 3 format will appear normal.
- 4 x 3 Pan and Scan: Choose this setting if you have a standard 4 x 3 television set and always want the image to fill the entire screen. When a wide-screen movie is shown, you may not see parts of the picture at one side of the screen or the other. Note, however, that even when you select this option, playing a wide-screen-only movie will result in black letterbox bars at the top and bottom of the screen. This is due to the way the disc was produced, and it cannot be changed.
- 16 x 9 Wide-Screen: Choose this setting only if you have a wide-screen television set
(16 x 9 aspect ratio). With this setting, the DVD600 _II will adjust the output for wide-screen movies so that they fill the entire screen in the proper aspect ratio. Note, however, that in this setting a disc recorded in the 4 x 3 aspect ratio will appear in the wide screen as a boxed image in the center, with black columns on the left and right sides of the screen.
NOTE: If the wide-screen option is chosen and a wide-screen movie is played on a conventional 4 x 3 aspect ratio set, the image will be distorted due to vertical compression.
When you have made your selection using the ▲/▼ Buttons 25 31 highlight the desired option, press the Enter Button 26 note that the circle next to your choice will fill in. The menu system will then automatically return to the status listing.
If you have no other changes to make after setting this default, press the Menu Button 26 to remove the Setup Menu from the screen, or press the Play/Pause Button 38 10D begin or resume playback.
Setting the Dynamic Range
With the DVD format you have the opportunity to hear a program's soundtrack in the most accurate and realistic presentation possible, thanks to the use of digital audio technology. However, in certain instances you may wish to slightly compress the dynamic range of the audio output (the difference between the loudest sounds and the quietest ones) so that you may listen to a movie at a lower volume that does not disturb others without losing dialogue intelligibility.
In most cases, it is desirable to leave the Dynamic Range setting at "OFF" so that no compression is applied to the audio, but if you wish to change to a compressed setting, follow these steps:
First, you must be viewing the Setup Menu (Figure 1), which is available by pressing the Menu Button 26 while the unit is in the Stop mode. At the Setup Menu, press the ▼Button 311 the Dynamic Range option is highlighted. Next, press the Enter Button 28 and select one of the two choices in the options box using the ▲/▼ Buttons 25 31 (Figure 14). The choices are as follows:
- Off: Select this option to turn off the Dynamic Range compression and have the soundtrack presented exactly as it was authored.
Configuring the DVD600II DVD Changer
- On: Select this option to turn on the Dynamic Range compression circuitry so that the dialogue will remain clear even at low volume levels.

Figure 14
When you have made your selection using the ▲▼ Buttons 25 31 to highlight the desired option, press the Enter Button 28 note that the circle next to your choice will fill in. The menu system will then automatically return to the status listing.
If you have no other changes to make after setting this default, press the Menu Button 26 to remove the Setup Menu from the screen, or press the Play/Pause Button 158 10D begin or resume playback.
Note that the performance of the Dynamic Range function is dependent on the audio format of the disc being played, and whether or not the disc's soundtrack is capable of this feature.
Note that you can achieve the same effect by using the DCR600i's Night mode. Simply press the Main Input Selector 8, the Night Button 50, then the ▲/▼ Buttons 25 31 to scroll through the dynamic range choices. Press the Set Button to enter the selection. If you choose to use the Dynamic Range/Night Mode feature, select it using either the DVD600i or the DCR600i, but not both simultaneously.
Using the Digital Audio Output DVD players accommodate a variety of audio formats, including Dolby Digital, DTS and the PCM audio format used by conventional CD discs and some DVD playback. The DCR600 II receiver can automatically detect any of these digital formats. Depending on the format of the discs in your library, you need to set a default for the type of audio outputs accommodated. Although the DVD600 II will play all of these disc types, this setting creates a default that tells which way to present the soundtracks when there is a choice.
To select a Digital Audio Output default, you must be viewing the Setup Menu (Figure 1), which is available by pressing the Menu Button 26 while the unit is in the Stop mode. At the Setup Menu, press the ▼ Button 31 until the Digital Audio Out option is highlighted. Next, press the Enter Button 28 elect one of the three choices in the options box (Figure 15) using the ▲/▼ Buttons 25 31 The choices are as follows:
• PCM: Choose this setting if most of your library consists of conventional CDs.
- Dolby Digital: Choose this setting only if you do not plan on listening to any DTS selections. Should you choose to watch a DVD movie or listen to a CD which has a DTS audio track, you must return to this menu and change this selection to DTS.
- DTS: We recommend that you choose this setting, since the DCR600 _11 receiver included with your system is capable of automatically detecting and decoding any of the three formats of DTS, Dolby Digital and PCM.

Figure 15
NOTE: If you select the DTS option, your receiver or processor MUST be capable of decoding DTS audio. If the DTS option is chosen and the unit is connected to a product that cannot support DTS, no audio will be heard when a DTS disc is played.
Remember, regardless of the option chosen, you may still have to adjust the settings on your DVD disc or audio equipment, if you do not use the DCR600 II , to match the output of the DVD600 II . In addition, the choice of which audio formats are available is limited by the type of material recorded on the disc when it was authored.
When you have made your selection using the ▲/▼ Buttons 25 31 highlight the desired option, press the Enter Button 26 note that the circle next to your choice will fill in. The menu system will then automatically return to the status listing.
If you have no other changes to make after setting this default, press the Menu Button 26 to remove the Setup Menu from the screen, or press the Play/Pause Button 153 10D begin or resume playback.
Setting the Linear PCM Bit Rate If the DVD600II detects a high-resolution, 96kHz audio signal encoded on a disc, it can either pass the signal through to the receiver or, if the receiver is not capable of processing a 96kHz bit rate signal, the DVD600II can downsample the signal to 48kHz. The Linear PCM menu enables you to configure the DVD600II to match your receiver by selecting which bit rate the DVD600II should apply.
The bit rate is set at the factory to default to passing the full 96kHz signal through, as the DCR600 II receiver is capable of processing this signal. Therefore, you should not adjust this feature unless you use the DVD600 II with another receiver that is not capable of processing a 96kHz signal.

Figure 16
Operating the DCR600II Receiver
Surround Mode Chart
MODE FEATURES DELAY TIME RANGE
| Dolby Digital | Available only with digital input sources encoded with Dolby Digital data. It provides up to five separate main audio channels and a special dedicated Low-Frequency Effects channel. Surround: 0 ms -15 ms | Center: 0 ms - 5 msInitial Setting = 0 msInitial Setting = 0 ms | |
| DTS Available only with digital input sources encoded with DTS data. Available on special Delay time not adjustable DVD, LD and audio-only compact discs, DTS provides up to five separate main audio channels and a special dedicated low-frequency channel. | |||
| Dolby Pro Logic II Movie, Music and Emulation | Dolby Pro Logic II is the latest version of Dolby Laboratories' benchmark surround technology that decodes full-range, discrete left, center, right, surround right and surround left channels from either matrix surround-encoded programs or conventional stereo sources.The Dolby Pro Logic II Movie mode is optimized for movie soundtracks, while the Pro Logic II Music mode should be used with musical selections. The Pro Logic II Emulation mode re-creates original Pro Logic processing for those who prefer that presentation. | 15 ms - 30 msInitial Setting = 15 ms | |
| Logic 7 C Logic 7 M | Logic 7 is an advanced mode that extracts the maximum surround information from either surround-encoded programs or conventional stereo material. The Logic 7 C, or Cinema, mode should be used with any source that contains Dolby Surround or similar matrix encoding. Logic 7 C delivers increased center-channel intelligibility, and more accurate placement of sounds with fades and pans that are much smoother and more realistic than with other decoding techniques. The Logic 7 M, or Music, mode should be used with analog or PCM stereo sources. Logic 7 M enhances the listening experience by presenting a wider front soundstage and greater rear ambience. Both Logic 7 modes also direct low-frequency information to the subwoofer (if installed and configured) to deliver maximum bass impact. | Delay time not adjustable | |
| Dolby 3 Stereo | Uses the information contained in a surround-encoded or two-channel stereo program to create center-channel information. In addition, the information that is normally sent to the rear-channel surround speakers is carefully mixed in with the front left and front right channels for increased realism. Use this mode when you have a center channel speaker but no surround speakers. | No surround channels | |
| Theater | This mode uses matrix surround decoding to simulate a standard movie or stage theater. | Delay time not adjustable | |
| Hall 1, 2 | The Hall modes offer a matrix surround choice that simulates a small (Hall 1) or medium-sized (Hall 2) chamber hall. | Delay time not adjustable | |
| 5-Channel Stereo | This mode takes advantage of multiple speakers to place a stereo signal at both the front and back of a room. Ideal for playing music in situations such as a party, it places the same signal at the front left and surround left, and front right and surround right speakers. The center channel is fed a summed mono mix of the in-phase material of the left and right channels. | No delay is available for this mode | |
| Surround Off (Stereo) channel | This mode turns off all surround processing and presents the pure left- and right- presentation of two-channel stereo programs. | No surround channels | |
Operating the DCR600II Receiver
Selecting a Surround Mode
One of the most important features of the DCR600 is its ability to reproduce a full multi-channel, surround sound field from digital sources, analog matrix surround-encoded programs and standard stereo programs. In all, a total of thirteen listening modes are available on the DCR600.
Selection of a surround mode is based on personal taste, as well as the type of program source material being used. For example, motion pictures or TV programs bearing the logo of one of the major surround-encoding processes, such as Dolby Surround, DTS Stereo or UltraStereo may be played in either the Dolby Digital, Dolby Pro Logic II Movies or Logic 7 Cinema surround modes, depending on the source material.
NOTE: Once a program has been encoded with matrix surround information, it retains the surround information as long as the program is broadcast in stereo. Thus, movies with surround sound may be decoded via any of the analog surround modes such as Pro Logic II or Logic 7, when they are broadcast via conventional TV stations, cable, pay-TV and satellite transmission. In addition, a growing number of made-for-television programs, sports broadcasts, radio dramas and music CDs are also recorded in surround sound. You may view a list of these programs at the Dolby Laboratories Web site at www.dolby.com.
Even when a program is not listed as carrying intentional surround information, you may find that the Pro Logic II, Logic 7, Hall 1, Hall 2 or Theater modes often deliver enveloping surround presentations through the use of the natural information present in all stereo recordings. However, for stereo – but not surround – programs, we suggest that you experiment with the other modes.
Surround modes are selected using either the front panel controls or the remote. To select a surround mode from the front panel, press the Surround Mode Selector 7 to scroll up or down through the list of available modes. To select a surround mode using the remote, press the Surround Mode Selector 20 and then press the ▲/▼ Button 25 change the mode. As you press the buttons, the Surround mode name will appear in the Main Information Display U, and an individual mode indicator will also light up CDFH1 JKL.
Note that the Dolby Digital and DTS modes may only be selected when a digital input is in use. In addition, when a digital source is present, the DCR600 _II will automatically select and switch to the correct mode (Dolby Digital or DTS), regardless of the mode that has been previously selected. For more information on selecting digital sources, see the following section of this manual.
To listen to a program in traditional two-channel stereo, using the front left and front right speakers only (plus the subwoofer if installed and configured), follow the instructions shown above for using the remote until SURR OFF appears in the Main Information Display U. Note that the DCR600II does not include a balance control. Also, as described elsewhere in this manual, the bass and treble adjustments are accessed by pressing the Tone Mode Button 6 followed by the Set Button 16.
Using Digital Sources
Digital audio is a major advance over older systems such as the original version of Dolby Pro Logic. It delivers five discrete channels: front left, center, front right, surround left and surround right. Each channel reproduces full frequency range (20Hz to 20kHz) and offers dramatically improved dynamic range and significant improvements to signal-to-noise ratios. In addition, digital systems have the capability to deliver an additional channel that is specifically devoted to low-frequency information. This is the ".1" channel referred to when you see these systems described as "5.1". The bass channel is separate from the other channels, but since it is intentionally bandwidth-limited, sound designers have given it that unique designation.
Dolby Digital
Dolby Digital (originally AC-3 ^® ) is a standard part of DVD, and is available on satellite broadcasts and is a part of the new high-definition television (HDTV) system. Some digital cable television systems also provide a Dolby Digital signal. However, due to cable's inherent bandwidth limitations, this may be only a 2.0-channel version rather than full 5.1-channel Dolby Digital. Check with your cable provider.
Note that an optional, external RF demodulator is required to use the DCR600 II to listen to the Dolby Digital soundtracks available on laser discs. Connect the RF output of the LD player to the demodulator and then connect the digital output of the demodulator to the Optical or Coaxial Inputs ②③ of the DCR600 I . No demodulator is required for use with DVD players or DTS-encoded laser discs.
DTS
DTS is another digital audio system that is capable of delivering 5.1 audio. Although both DTS and Dolby Digital are digital, they use different methods of encoding the signals, and thus they require different decoding circuits to convert the digital signals back to analog.
DTS-encoded soundtracks are available on select DVD discs, as well as on special audio-only DTS discs. You may use any CD player equipped with a digital output to play DTS-encoded discs with the DCR6001. All that is required is to connect the player's output to either the Optical or Coaxial Input ②③ on the rear panel.
In order to listen to DVDs encoded with DTS soundtracks, the DVD player must be compatible with the DTS signal as indicated by a DTS logo on the player's front panel. This does not indicate a problem with the DCR600 II , as some players cannot pass the DTS signal through to the digital outputs. Note that, although early DVD players may not be able to play DTS-encoded DVDs, the DVD600 II is compatible. If you are in doubt as to the capability of your DVD player to handle DTS discs, consult the player's owner's manual.
Selecting a Digital Source
Toutilize either digital mode, you must have properly connected a digital source to the DCR600II. Connect the digital outputs from DVD players, HDTV receivers, satellite systems or CD players to the Optical or Coaxial Inputs ②③. The DCR600II automatically assigns the Coaxial 1 Input ② to the DVD video input. Make sure to connect the Coaxial Digital Output ④D on the back of the DVD600II to this input.
Since the DCR600u does not have an analog audio input available for the DVD source, if, in the future, you decide to use a different DVD player, one requiring an analog audio connection, you may wish to connect that player to the VID1, VID2 or VID3 input instead.
When playing a digital source, first select the input using the remote or front panel controls as outlined in this manual. Next, select the digital source by pressing the Digital Input Selector Button 30 18 and then using the ▲/▼ Buttons 25 31 on the remote or the Selector Buttons 5 on the front panel to choose any of the OPTICAL or COAXIAL Inputs, as they appear in the Main Information Display U, or Source Indicators BE. This procedure may also be used to select an input source's analog audio input, if available. The DCR600u does not offer an analog audio input for DVD. Note that the DVD input of the DCR600u is configured at the factory to default to the COAX 1 digital input.
(continued)
Operating the DCR600II Receiver
When the digital source is playing, the DCR600 _II will automatically detect whether it is a multi-channel Dolby Digital or DTS source, or a conventional PCM signal, which is the standard output from CD players. A Bitstream Indicator A will light in the Main Information Display 19 to confirm that the digital signal is Dolby Digital, DTS or PCM.
Digital Status Indicators
When a digital source is playing, the DCR60Q1 senses the type of bitstream data that is present. Using this information, the correct surround mode will automatically be selected. For example, DTS bitstreams will cause the unit to switch to DTS decoding, and Dolby Digital bitstreams will enable Dolby Digital decoding. When the unit senses PCM data from CDs, it will allow the appropriate surround sources to be selected manually. Since the range of available surround modes is dependent on the type of digital data that is present, the DCR60Q1 uses a variety of indicators to let you know what type of signal is present. This will help you to understand the choice of modes.
When a digital source is playing, a Bitstream Indicator A will light to show which type of signal is playing:
DOLBY D: When the DOLBY D Indicator A lights, a Dolby Digital bitstream is being received. Depending on the settings on the source player and specific surround information and number of channels on the disc, a number of surround modes are possible. For discs with full 5.1 audio, only the Dolby Digital mode is available. When the Dolby Digital signal is only two-channel, you may also select from the Logic 7 Cinema/Music, Hall, Theater, Dolby Pro Logic II Movies/Music/Emulation, or Dolby 3 Stereo modes. When the receiver detects a 2.0-channel Dolby Digital signal, it will automatically select Dolby Pro Logic II as the surround processing mode, and both the Dolby Digital D and Dolby Pro Logic II F indicators will light, in accordance with the requirements of Dolby Laboratories.
DTS: When the DTS Indicator A lights, a DTS bitstream is being received. When the unit senses this type of data, only the DTS mode may be used.
PCM: When the PCM Indicator A lights, a standard Pulse Code Modulation, or PCM, signal is being received. This is the type of digital audio used by conventional compact disc and laser disc recordings. When a PCM bitstream is present, all modes except Dolby Digital and DTS are available.
In addition to the bitstream indicators, the DCR600 _II features a set of unique channel-input indicators that tell you how many channels of digital information are being received and/or whether the digital signal is interrupted.
These indicators are the L/C/R/SL/SR/LFE letters that are inside the center boxes of the Speaker/Channel Input Indicators M in the front panel Main Information Display 19. When a standard analog signal is in use, only the "L" and "R" indicators will light, as analog signals have only left and right channels, respectively.
Digital signals, however, may have two, five or six separate channels, depending on the program material, the method of transmission and the way in which it was encoded. When a digital signal is playing, the letters in these indicators will light in response to the specific signal being received. It is important to note that although Dolby Digital, for example, is referred to as a "5.1" system, not all Dolby Digital DVDs or programs are encoded for 5.1. Thus, it is sometimes normal for a DVD with a Dolby Digital soundtrack to trigger only the "L" and "R" indicators.
NOTE: Many DVD discs are recorded with both "5.1" and "2.0" versions of the same soundtrack. When playing a DVD, always be certain to check the type of material on the disc. Most discs show this information in the form of a listing or icon on the back of the disc jacket. When a disc does offer multiple soundtrack choices, you may have to make some adjustments to your DVD player (usually with the "Audio Select" button or in a menu screen on the disc) to send a full 5.1 feed to the DCR600II. It is also possible for the type of signal feed to change during the course of a DVD playback. In some cases, the previews of special material will only be recorded in 2.0 audio, while the main feature is available in 5.1 audio. As long as your DVD player is set for 6-channel output, the DCR600II will automatically sense changes to the bitstream and channel count and reflect them in these indicators.
The letters used by the Speaker/Channel Input Indicators M also flash to indicate when a bitstream has been interrupted. This will happen when a digital input source is selected before the playback starts, or when a digital source such as a DVD is paused. The flashing indicators remind you that the playback has stopped due to the absence of a digital signal and not through any fault of the DCR600 _II . This is normal, and the digital playback will resume once the playback is started again.
Night Mode
A special feature of Dolby Digital is the Night mode, or Dynamic Range Compression mode, which enables these input sources to be played back with full digital intelligibility while reducing the minimum peak level by 1/4 to 1/3. This prevents abruptly loud transitions from disturbing others, without reducing the impact of the digital source. The Night mode is available only when Dolby Digital signals with special data are being played.
The Night mode may be engaged when a Dolby Digital DVD is playing by pressing the Night Mode Button 50 on the remote. Next, press the ▲/▼ Buttons 25 31 to select either the middle range or full-compression versions of the Night mode. To turn the Night mode off, press the ▲/▼ Buttons 25 31 until the message in the lower third of the video display and the Main Information Display U reads D-Range Off.
IMPORTANT NOTES ON DIGITAL PLAYBACK
- When the digital playback source is stopped, or in a Pause, Fast Forward or Chapter Search mode, the digital audio data will momentarily stop, and the channel position letters inside the
Speaker/Channel Input Indicators M will flash. This is normal and does not indicate a problem with either the DCR600 or the source machine. The DCR600 will return to digital playback as soon as the data is available and when the machine is in a standard play mode.
-
Although the DCR600 II will decode virtually all DVD movies, CDs and HDTV sources, it is possible that some future digital sources may not be compatible with the DCR600 II
-
Note that not all digitally encoded programs contain full 5.1-channel audio. Consult the program guide that accompanies the DVD to determine which type of audio has been recorded on the disc. Also, due to bandwidth limitations, digital cable television signals may contain only a 2.0-channel Dolby Digital signal. Check with your cable provider. The DCR600 will automatically sense the type of digital surround encoding used and adjust to accommodate it.
-
When a digital source is playing, you may not be able to select some of the analog surround modes such as Dolby Pro Logic II, Dolby 3 Stereo, Hall, Theater or Logic 7.
Operating the DCR600II Receiver
- When a Dolby Digital or DTS source is playing, it is not possible to make an analog recording using the Tape 7 and Video 1 Record Outputs 14 15. However, the digital signals will be passed through to the Digital Audio Output 1.
PCM Audio Playback
PCM (Pulse Code Modulation) is the noncompressed digital audio system used for compact discs and laser discs. The digital circuits in the DCR600i are capable of high-quality digital-to-analog decoding, and they may be connected directly to the digital audio output of your CD player.
Connections may be made to the rear panel Optical or Coaxial Inputs ②③.
Tolisten to a PCM digital source, first select the input for the desired source (e.g., CD). Next press the Digital Select Button 18 30 and then use the ▲▼ Buttons 25 31 on the remote, or the Selector Buttons 5 on the front panel, until the desired digital input choice, e.g. COAX 2 or OPTICAL 1, appears in the Main Information Display U.
When a PCM source is playing, the PCM Indicator A will light. During PCM playback, you may select any surround mode except Dolby Digital or DTS.
Playback from PCM sources may also benefit from the Logic 7 mode. When playing back a surround-encoded PCM source, such as a surround-encoded CD, use the Logic 7 C (or Cinema) mode. When playing true stereo recordings, use the Logic 7 M (or Music) mode for a wider soundstage and increased rear-channel ambience.
Similarly, the Dolby Pro Logic II modes may also increase your enjoyment of PCM and analog sources. Choose the Music mode for stereo recordings. For surround-encoded sources, you may choose either the Emulation mode or the Movies mode, which more closely re-creates a Dolby Digital sound field with discrete information provided to the surround channels.
With the great variety of surround modes available on the DCR600 _n receiver, you are encouraged to experiment to find the modes that suit your tastes, as well as different modes depending on the source material.
Operating the Tuner
The tuner of the DCR600n is capable of tuning AM, FM and FM Stereo broadcast stations. Stations may be tuned manually, or they may be stored as favorite station presets and recalled from a 30-position memory.
Station Selection
-
Press the AM/FM Tuner Select Button ⑪ on the remote to select the tuner as an input. The tuner may be selected from the front panel by either pressing the Input Source Selector ⑪ until the tuner is active or by pressing the Tuner Band Selector ⑨ at any time.
-
Press the AM/FM Tuner Select Button 11 or Tuner Band Selector 9 again to switch between AM and FM so that the desired frequency band is selected.
-
Press the FM Mode Button 12 41 to select manual or automatic tuning.
When the AUTO Indicator T is illuminated in the Main Information Display U the tuner will stop only at those stations that have a signal strong enough to be received with acceptable quality.
When the AUTO Indicator T is not illuminated, the tuner is in a manual mode and will stop at each frequency increment in the selected band. Press and hold the Tuning Selector Button 8 45 49 to search more quickly.
-
To select stations, press the Tuning Selector Button 8 45 49. When the AUTO Indicator T is lit, press the button for two seconds and then release to cause the tuner to search for the next highest- or lowest-frequency station that has an acceptable signal. When tuning FM stations in the Auto mode, the tuner will select only stereo stations. To tune to the next station, press the button again. If the STEREO Indicator R is not lit, tap the Tuning Selector Button 8 45 49 to advance one frequency increment at a time, or press and hold it to locate a specific station. When the TUNED Indicator S lights, the station is properly tuned and should be heard with clarity.
-
Stations may also be tuned directly by pressing the Direct Button 45 and then pressing the Numeric Keys 3 that 40 42 43 correspond to the station's frequency. The desired station will automatically be tuned. If you press an incorrect button while entering a direct frequency, press the Clear Button 47 to start over.
NOTE: When the FM reception of a station is weak, audio quality will be increased by switching to Mono mode by pressing the FM Mode Button 12 41 until the STEREO Indicator R goes out.
Preset Tuning
Using the remote, up to 30 stations may be stored in the receiver's memory for easy recall using the front panel controls or the remote. To enter a station into the memory, first tune the station using the steps outlined above. Then:
-
Press the Memory Button ☑ the remote. Note that the MEMORY Indicator ☑ will be illuminated and flash in the Main Information Display 19.
-
Within five seconds, press the Numeric Keys 33 — responding to the location where you wish to store this station's frequency. Once entered, the preset number will appear in the Preset Number/Sleep Timer Display N.
-
Repeat the process after tuning any additional stations to be preset.
Recalling Preset Stations
- Tomanually select a station previously entered in the preset memory, press the Numeric Keys — That 40 42 43 correspond to the desired station's memory location.
- Tomanually tune through the list of stored preset stations one by one, press the Preset Stations Selector Buttons 10 48 52 the front panel or remote.
Tape Recording
In normal operation, the audio or video source selected for listening through the DCR600 _II is sent to the record outputs. This means that any program you are watching or listening to may be recorded simply by placing machines connected to the outputs for Tape Outputs ⑦ or Video 1 Outputs ⑭ ⑮ in the Record mode.
When a digital audio recorder is connected to the Digital Audio Output ①, you are able to record the digital signal using a CD-R, MiniDisc or other digital recording system.
NOTES:
- The digital outputs are active only when a digital signal is present, and they do not convert an analog input to a digital signal, or change the format of the digital signal. In addition, the digital recorder must be compatible with the output signal. For example, the PCM digital input from a CD player may be recorded on a CD-R or MiniDisc, but Dolby Digital or DTS signals may not.
- Please make certain that you are aware of any copyright restrictions on any material you copy. Unauthorized duplication of copyrighted materials is prohibited by federal law.
(continued)
Operating the DVD600II DVD Changer
Loading Discs
To load discs in the DVD600, first make certain that the unit is turned on by pressing the Main Power Switch 1D so that it latches, and then the System Power Control 2the Open/Close Button 7D 6 or Play/Pause Button 10D 58. The Status Indicator 3D turns green.
Next, if needed, press the Open/Close Button 7D 6 until the Disc Tray opens.
Holding the discs by the edge, gently place each one into one of the compartment slots in the drawer. Note that there is a number embossed onto the drawer tray at the right of the disc slot. This is the number for that specific disc position; it will be used to indicate the disc in both the Information Display and the on-screen displays.
When loading discs, please note the following:
- The DVD600 will play discs with the following logos only. DO NOT attempt to play another type of disc, as shown in the list on page 46.


- The DVD600u will only play discs in the NTSC video format. It will not play discs for other standards such as PAL or SECAM.
- Playback capability for CD-RW discs will vary according to the quality of the CD-RW disc. On some occasions, it is possible that CD-RW discs may not play on the DVD600 II . This does not indicate any problem with the DVD600 II .
- The DVD600u will only play discs that are coded for Region 1 or discs that are open to being played in all regions. Discs that contain a Region Code of 2, 3, 4, 5 or 6 (as noted by a number inside a world map logo on the disc's cover jacket or case) will not play.
- Both 5-inch (12cm) and 3-inch (8cm) discs may be used.
- When loading CD audio discs, load the discs with the label side up.
- When loading DVD discs with printed labels, load them label side up.
- Some DVD discs are double-sided. The title information for these will be printed on the inner ring of the disc, very close to the center hole. The title for the side you wish to play should be facing up.
- The DVD600 _II is also capable of playing discs containing MP3 audio files.
Notes on DVD-Audio discs:
- The DVD600 II is not capable of playing selections in the DVD-Audio format. However, many DVD-Audio discs include audio tracks in the PCM, Dolby Digital or other formats which the DVD600 II is capable of playing. You may need to press the Title Button 24 rather than the Menu Button 26 in order to access these formats.
- Some DVD-Audio discs display a still picture while a selection is playing. Sometimes, this picture may disappear when play is stopped and the DVD600 _II is placed in the Resume mode. To restore the picture, fully stop play by pressing the Stop Button 9D:61 fore continuing play.


Figure 17. On Screen Library Display
To move the discs in the tray so that you may insert discs in slots that are partially hidden inside the disc tray drawer, press the Disc Skip Button 5D 51. Each press of the button will move the carousel tray one position to the left (counterclockwise). There may be a slight delay of several seconds before the carousel moves to the next disc, which is normal. You may avoid the delay by pressing the Disc Skip Button 5D 51 twice.
- To access all disc positions, the unit must be in the full-stop position. If the unit is in the Play mode, press the Stop Button 9D 61 twice.
- If the disc tray drawer is opened while a disc is playing, the Play Exchange feature allows you to change the remaining four discs. Simply press the Disc Skip Button 5D 51 to move the discs in the tray in one direction or the other.
IMPORTANT NOTES ON DISC LOADING
- Remove all discs from the tray before moving the player.
- Make certain that all discs are properly seated before closing tray drawer.
-
Do not push the disc tray drawer with the power off.
-
Do not attempt to change or touch the disc tray carousel while it is moving.
- Do not attempt to rotate the disc tray by hand. If the tray drawer or carousel tray appears to be stuck, contact your local JBL authorized service center.
- Do not load more than one disc in each slot in the tray and do not attempt to place a standard 5-inch (12cm) disc over a smaller 3-inch (8cm) disc.
Once the discs are loaded, press the Open/Close Button 7D 6 to close the disc tray. When the tray drawer closes, the disc that was last in the center position facing outward in the tray will be readied for playback. After the drawer closes, you will see an indication of Reading in the Information Display to alert you to the fact that the unit is determining the type of disc (DVD, MP3 or CD) and is reading the data for track, chapter, title and other information about the disc. At the same time, the Disc Number Indicator 6' the disc in use will begin to flash, indicating which disc is ready to be played.
You will also see the On Screen Library displayed (see Figure 17). It will take about one minute for all discs to be identified. You may interrupt the process by pressing Stop, by pressing Enter to select a disc, or by scrolling down to the Exit button. When the process is complete, press Play to play the current disc, or scroll to select any disc.
If the tray was closed by pressing one of the five Direct Access Buttons FID the front panel, the On Screen Library will not be activated.
You may access the On Screen Library later by stopping play of the current disc and pressing the On Screen Library Button 65.e the ▲▼ Buttons 25 31 to scroll to the desired disc, and the Set Button 28 begin play of that disc.
Once the disc's data has been read, the type of disc (DVD or CD) will be displayed by the Disc Type Indicator A and the disc will begin playing. The disc's track timing information and other relevant data will appear in the Information Display CD discs only, a Status Menu Bar will appear in the on-screen display. To view this display for DVD discs, press the Status Button 5.
The Disc Number Indicator 📂 I show a lighted number for the disc slot positions that are occupied, and the disc in use will flash.
Playback Basics
Basic playback with the DVD6001 involves functions similar to those you may be familiar with for conventional CD players or changers:
Operating the DVD600II DVD Changer
- Turn the unit on by pressing the System Power Control 2D, if it has not already been engaged. If there are already discs loaded in the unit, the last disc to be played will automatically begin playing.
- If the disc was stopped using the Resume function, (by pressing the Stop Button 9D once) playback will begin from the point where it was stopped. If the disc was stopped by pressing the Stop Button 9D twice, the disc will begin playing from its beginning.
- Load any new discs as indicated in the previous section.
- After loading discs, press the Open/Close Button 7D 6 to proceed to the On Screen Library, or press a Direct Access Button 11D to begin play of the disc in that numbered position.
Playback Features for DVD and CD Discs:
- Tomove to the next disc in the unit, press the Disc Skip Button 5D 51
- Toselect a specific disc in the player, press the Direct Access Button 112 sponding to the slot where that disc is loaded. Or, using the remote, press the Disc Skip Button 51, followed within 3 seconds by the number of the disc you wish to play. Or, press the On Screen Library Button 27 display on-screen a list of the discs currently loaded. Use the ▲/▼ Buttons 25 31 select a disc, and press the Set Button 28 to begin play.
- Tomomentarily pause playback and freeze the current picture frame on a DVD, press the Play/Pause Button 10D 62 resume playback after pressing the Pause button, press the Play/Pause Button 10D 58 again.
- Tomove forward or backward through the tracks on a CD or the chapters on a DVD, press the Skip Forward/Reverse Buttons 8D on the front panel or the Previous/Next Buttons 63 64 or the ▲/▼ Buttons 25 31 the remote.
- To skip directly to a specific track while the current disc is playing, simply enter the track number using the Numeric Keys 33-40 42 43
- Tomove forward or backward through the DVD or CD disc being played at fast speed, press the Search Forward/Reverse Buttons 6D 57 59 or the ◀▶ Buttons 27 29 Once one of these buttons is pressed, the fast search will continue until the Play/Pause Button 30D 58
pressed. Note that the fast-play speeds vary for CD discs and DVDs.
For DVD playback, there are four fast-play speeds. Each press of the Search Forward/Reverse Buttons 6D 57 59 27 29|| cycle to the next speed in the following order:
- In Fast Search x2, the ◀◀ and ▶▶ Playback Mode Indicators K ^K both light steadily.
- In Fast Search x4, the outside ◀◀ or ▶▶ Playback Mode Indicator KI flash and the inside indicator will remain steadily lit.
- In Fast Search x8, the inside ◀◀ or ▶▶ Playback Mode Indicator K ^1 flash and the outside indicator will remain steadily lit.
- In Fast Search x16, both ◀◀ and ▶▶ Playback Mode Indicators K will flash.
Note that there will be no audio playback during fast-forward or -reverse play of DVD discs. This is normal for DVD, as A/V receivers and surround processors cannot process the digital audio streams during fast-play modes; audio will be heard during fast-play of conventional CDs.
For CD playback, there are three fast-play speeds. Each press of the of the Search Forward/Reverse Buttons 6D 57 59 will cycle to the next speed in the following order:
- In Fast Search x2, the ◀◀ and ▶▶ Playback Mode Indicators ⚫ both light steadily.
- In Fast Search x4, the outside ◀◀ or ▶▶ Playback Mode Indicator 📂 flash and the inside indicator will remain steadily lit.
- In Fast Search x8, the inside ◀◀ or ▶▶ Playback Mode Indicator K⁺ flash and the outside indicator will remain steadily lit.
When playing a DVD disc, you may move forward or backward through the program being played in one of four speeds by pressing the Slow-Play Buttons 48h52mote.
Each press of the buttons will move to the next speed in the following order:
- In 1/16 Speed Slow mode, the ◀ and ▶▶ Playback Mode Indicators 📊 all flash.
- In the 1/8 Speed Slow mode, the inside ◀ and ▶▶ Playback Mode Indicator 📁 flash and the outside indicator will remain steadily lit.
- In the 1/4 Speed Slow mode, the outside ◀◀ or ▶▶ Playback Mode Indicator K will flash and the inside indicator will remain steadily lit.
- In the 1/2 Speed Slow mode, both the ◀◀ and ▶▶ Playback Mode Indicators K* will remain steadily lit.
The frame-by-frame Step Advance function is available in either the forward or reverse direction by pressing the Step+ of Step- 49 button. The DVD600II will be placed in Pause mode, and will step up or down one frame at a time with each press of one of the Step Advance buttons.
Note that there will be no audio playback during slow-forward or -reverse play of DVD discs. This is normal for DVD, as A/V receivers and surround processors cannot process the digital audio streams during slow modes. Slow play is not available for CD discs.
- When a camera icon appears on the screen, this is your indication that there is multiple-angle information on the disc being played. To change the angle, press the Angle Button 41 until the desired angle view appears. An on-screen banner message will appear to indicate the angle view in use.
Using the DVD Disc's Menu
One of the unique features of the DVD system is that it offers a producer the opportunity to include a wide range of features on a disc, including multiple-language tracks; subtitles in a variety of languages; special information such as movie trailers and cast information; as well as other custom-tailored information. In addition, producers may divide a movie or program into chapters that allow for quick access to specific parts of the program. These chapters may be accompanied by thumbnail pictures of a scene from the specific chapter to help you select the desired spot on the disc.
When a disc is playing, press the Menu Button 26 to pause the playback and display the disc's menu. As there are no hard rules about style and content of DVD menus, the way they appear on the screen and the information they contain will vary from one disc to another. However, the following general rules apply to most menus:
- The first menu that appears is the Main Menu, and you may move through the options with the ▲/▼/◄► Buttons 25 31 27 29 as the disc's programming allows. The option selected will typically be highlighted in a certain color or inside an outline box.
- To select a highlighted option, which may either play a portion of the disc or move to a submenu, press the Enter Button 28 or Play/Pause Button 10D 58.
(continued)
Operating the DVD600II DVD Changer
- On some discs, when you select the DVD menu during the playback of a movie, the disc will return to the point in the program where the menu was selected by offering a "Play Movie" option. Press the Enter Button 28 or Play/Pause Button 10D 58 resume play. However, not all discs offer this feature, and selecting the menu while playing a movie may mean that you will either have to go back to the beginning of the program or the start of a chapter. This feature is out of the control of the DVD600II, as it is set by the disc's internal programming.
- Some DVD discs also feature a Chapter Selection menu. Press the Title Button 24 to proceed directly to the disc's Chapter Selection option.
IMPORTANT NOTES ON DVD PLAYBACK
Due to the nature of this product category, DVD players, while being operated at elevated temperatures, may exhibit certain anomalies such as picture freeze-ups. If this occurs, the DVD600 1 needs to be "reset" by powering it down and up again, using its master On/Off switch. Should this occur with your DVD600 11 , first check your discs for any damage, scratches and fingerprints. If discs are OK, then ventilation around the DVD600 _1 needs to be increased to ensure proper operation.
The DVD600i is capable of all the features and options covered by the DVD standards. However, it is up to the producer of a DVD disc to decide which of those features and functions are available on any given disc. For that reason, not all discs will function identically, and some discs will not have many of the features of the DVD system. For example, most current DVD discs do not take advantage of the multiple-angle feature. When the player displays the "Feature Prohibited" icon "∅", this indicates that the disc has not been programmed for that feature.
In addition, it is common for the producers of DVD discs to block the use of certain functions during only some parts of a disc. For example, many discs prohibit the use of fast-play buttons or prohibit access to the Chapter Menu display during the playback of copyright notices, studio logos, movie credits or trailers. The appearance of the "Feature Prohibited" icon "∅",or the inability of certain features to operate when the disc itself has prohibited them, does not indicate a problem with the DVD600 _1 , as these features are outside of the unit's control.
Using the Menu Bar
The DVD600i is equipped with a powerful onscreen display system that serves the dual purpose of showing you the current status of the DVD600 _II while enabling quick and easy changes to settings and functions. Depending on whether a DVD or CD is in use, the menu will vary to display information that is specific to the type of disc in play.
Menus and Controls
When a disc is playing, press the Status Button 5 to view the status of the current disc and to change the setting for key playback functions (Figure 18).

Figure 18
Title: The number shown indicates the number of the title that is currently playing.
Chapter: The number shown indicates the number of the chapter that is currently playing.
Audio: The number and abbreviation show the audio language soundtrack that is currently playing. Consult the DVD jacket for the key to available audio tracks on the disc.
Subtitles: The number and abbreviation show the subtitle language that is currently playing. Consult the DVD jacket for the key to available subtitle languages on the disc. A pound sign (#) displayed next to the language selection indicates that subtitles are active.
Angles: The number shown indicates the multiple-angle view that is currently playing.
Bookmarks: Highlight this area and press the Enter Button to mark or go to previously bookmarked locations on a disc.
Disc Type: The type of disc playing (DVD or CD) is shown.
Disc Number: The slot number of the disc being played is shown.
Time Indicator: The elapsed time of the current title is shown.
Once the Menu Bar appears, press the ▶/▶ Buttons 27 move across the display to select the desired option. When the option to be changed is highlighted in white with yellow brackets on both sides, press the Enter Button 28 to change the setting for that option.
Selecting Titles and Chapters
Some discs contain more than one title. Remember that a disc may contain one title or two separate program titles, or the disc may use the Title function to separate the special feature sections or audio tracks on the disc. The use of titles is optional with the producer of each DVD disc, as is the way in which he/she may choose to implement the feature. You may directly access any chapter while the disc is playing or in Pause mode simply by entering its number using the remote.
Tochange the title on those discs using the Menu Status Bar, follow these steps:
-
During disc playback, press the Status Button 5.
-
If needed, press the ◀/▶ Buttons 27 29 until the disc icon for the current title, with the letter "T" underneath it, is highlighted in white between yellow brackets.
-
Press the Enter Button 28
-
Note that the number to the right of the "T" will be replaced with two dashes (—).
-
Use the Numeric Keys -33 40 42 43 to enter the number of the title to be accessed.
-
The desired title will automatically be started.
Titles may also be selected during the playback of a DVD by pressing the Title Button 24. However, the action of the disc when pressing this button will vary from disc to disc. On occasion, pressing this button will take you to the disc's main menu while, in other cases, pressing this button will result in no action at all.
The movies or programs on most discs are divided into individual chapters, as selected by the disc's producer. Using the on-screen Menu Bar, you may view the number of the current chapter and move to any chapter on the disc.
Tochange the chapter using the Menu Status Bar, follow these steps:
-
During disc playback, press the Status Button 5.
-
Press the ◄/▶ Buttons 27 29 until the icon showing a disc and a file folder (second from left), with the letter "C" beneath it, is highlighted in white between yellow brackets.
-
Press the Enter Button 28
-
Note that the number to the right of the "C"
Operating the DVD600II DVD Changer
will be replaced with two dashes (—).
-
Using the Numeric Keys 33-40 42 43, enter the number of the chapter to be accessed.
-
The desired chapter will automatically be started.
You may also simply enter the chapter number while the disc is playing to skip to that chapter.
Changing Languages (Audio)
DVD discs may contain a variety of audio tracks, including foreign languages, special commentaries, descriptive video for the sight-impaired, and various digital formats. Some DVD-Audio discs that contain linear PCM or Dolby Digital 5.1 audio tracks may allow you to access these tracks using the Audio feature described in this section. In normal play, the unit will always look for the default setting for the audio track, but you may change the audio track at any time using the Menu Status Bar and following these steps:
- During disc playback, press the Status Button 5.
- Press the ◀/▶ Buttons 27 29 until the speaker icon (third from the left) is highlighted in white between yellow brackets.
- Press the Enter Button .28
- Note that the main Menu Bar will be replaced with a single display of the current language type (Figure 19).

Figure 19
- Press the Enter Button under the desired audio track is displayed. Note that the audio tracks available on a disc will vary and that they are always listed on the disc's jacket or cover.
- Within a few seconds, the disc will continue play with the newly selected audio track.
Note that the audio track type selected in this fashion is temporary and will only remain in effect until the player is turned off. When the unit is turned on for subsequent play, the default audio type will always be used.
The audio track may also be selected during the playback of a DVD by pressing the Audio Button 20. After pressing the button, the audio track may be changed by pressing the Enter Button 28 until the desired audio track is shown. Note, however, that some discs do not
allow audio track change while a disc is playing. When the Audio Button 20 is pressed on this type of disc, the player will go to the disc's own menu page for audio track selection. In this case, use the ◄/▶/▲/▼ Buttons 25 27 29 31 to make the selection from the menu screen and then press the Enter Button .28
The functionality of the Audio Button 20 may vary from disc to disc. Many discs will allow you to change the playback language while the disc is playing, as noted earlier. However, when the Audio Button 20 is pressed with some discs, playback will stop and you will be taken to the disc's own audio menu. At that menu, use the ▲/▶/▲/▼ Buttons 25 27 29 h31 light the desired playback language. Press the Enter Button when the choice is made and the disc will either resume playback or take you to the disc's main menu. Note that these functions are controlled by information programmed within the disc, and are outside of the control of the DVD600.
DVD discs may contain a variety of subtitles. In normal play, the unit will always look for the default setting for the subtitle language, but you may change that language at any time using the Menu Status Bar and by following these steps:
- During disc playback, press the Status Button 5.
- Press the ◀/▶ Buttons 27 29 until the letter "S" icon (fourth from the left) is highlighted in white between yellow brackets.
- Press the Enter Button .28
- Note that the main Menu Bar will be replaced with a single display of the subtitle language (Figure 20).
Figure 20
- Press the Enter Button (28) the desired subtitle language is displayed. Note that the subtitles available on a disc will vary, and they are always listed on the disc's jacket or cover. Some discs may not offer alternative subtitles, or any subtitles at all.
- Press the Subtitle On/Off Button 54 and the Enter Button 238 within a few seconds the disc will continue to play with the newly selected subtitle language.
Note that the subtitle language selected in this fashion is temporary, and will remain in effect
until the player is turned off. When the unit is turned on for subsequent play, the default subtitle language will always be used.
The subtitle language may also be selected during the playback of a DVD by pressing the Subtitle Button 340er pressing the button, the language may be changed by pressing the Enter Button 28 the desired choice is shown. Note, however, that some discs do not allow audio track change while the disc is playing. When the Subtitle Button 30 pressed, the player will go to the disc's own menu page for subtitle disc selection. In this case, use the ▶/▶▲/▼ Buttons 25 27 29 31 to make the selection from the menu screen and then press the Enter Button 28
IMPORTANT NOTE: The steps indicated on the page allow you to change the subtitle language, but they do not determine whether the subtitles are actually displayed on the screen. To have the subtitles appear at any time, press the Subtitle On/Off Button toggle the subtitles on or off with each press of the button. When the subtitles are active, a check-mark icon "√" will appear in the box to the right of the subtitle description as shown earlier.
Also note that some DVD discs do not contain subtitles. When the Subtitle On/Off Button 54 is pressed on a disc with no subtitles, the Prohibit icon "∅" will appear on screen.
Changing Camera Angles
A special feature of the DVD format is its capability of showing more than one view, or camera angle, of the same scene. This feature enables you to become the director, selecting the view of a scene that you wish. Note, however, that this feature does not appear on many discs and, when it does appear, it will typically be for only certain scenes and not for the entire disc's program. If you attempt to use the multiple-angle feature on a disc that is not programmed for it, you may see the "Prohibited Feature" icon "∅" on the screen. This is not a fault of the player; it simply indicates that the feature is not available on the disc being played.
To see whether a disc contains multiple angles, check the disc's cover or jacket. When a disc does contain scenes with multiple angles, the producers will usually include some sort of special on-screen icon to alert you to the availability of different angles of view. When you see such an icon, the angle may be changed by the following steps:
- Press the Status Button ⑤ (continued)
Operating the DVD600II DVD Changer
- Press the ◀▶ Buttons 27 29 until the camera icon with the letters "Ang" below it (fifth from the left) is highlighted in white between yellow brackets.
- Press the Enter Button 28
- Note that the main Menu Bar will be replaced with a single display of the angle number (Figure 21).
Figure 21
- Press the Enter Button 261 the desired angle is shown. Note that the number of angles available is set by the disc's producer, not the DVD6001, and it may vary from disc to disc.
You may also change the angle directly by pressing the Angle Button 41 in multiple angles are present, until the desired angle appears on the screen.
Playing CDs
The DVD600i allows you to take advantage of the on-screen Menu Bar even when playing CDs. The use of this graphical display makes it easy to select CD Functions.
When a CD is playing, the Menu Bar will automatically appear in your video display, even though there is no video on the CD itself. To remove the Menu Bar at any time, press the
Clear Button 47 the Menu Bar is not present, press the Status Button 5 to have it appear on the screen (Figure 22).
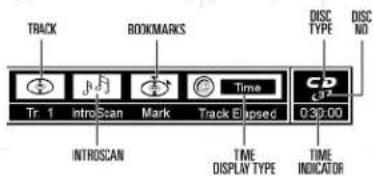
Figure 22
Track: The number shown indicates the number of the track that is currently playing.
IntroScan: When the IntroScan feature is active, the musical notes in this icon will change.
Bookmarks: Highlight this area and press enter to enter or go to bookmarked locations on a disc.
Time Display Type: This shows the type of time indication being shown: Time Remaining for the Current Track, Total Elapsed for the Disc, or Total Remaining for the Disc.
Disc Type: Shows the type of disc being played.
Disc Number: The slot number of the disc being played is shown.
Time Indicator: The time indication selected is shown.
Once the Menu Bar appears, press the ↙▶ Buttons 27 29 move across the display to select the desired option. When the option to be changed is highlighted, press the Enter Button 28 to change the setting for that option.
Selecting a Track
To select any track on a CD, follow these steps:
Enter the track number while the disc is playing or in Pause mode by entering its number, or:
-
During disc playback, press the Status Button ⑤ if the Menu Bar is not already on the screen.
-
If needed, press the ◀/▶ Buttons 27 29 until the disc icon with the letter "T" underneath it is highlighted in white between yellow brackets.
-
Press the Enter Button. 28
-
Note that the number to the right of the "T" will be replaced with two dashes (—).
-
Using the Numeric Keys -33 40 42,43 enter the number of the track to be accessed.
-
The desired title will automatically be started.
Using IntroScan
The IntroScan feature allows you to sample the tracks on a CD by playing the first ten seconds of each track and then moving to the next track. Touse IntroScan, follow these steps:
- During disc playback, press the Status Button ⑤ if the Menu Bar is not already on the screen.
- If needed, press the ◀/▶ Buttons 27 29 until the musical score icon with the phrase "IntroScan" underneath it (second from the left) is highlighted.
- Press the Enter Button .28
- Note that the disc will immediately begin to play the first track on the disc and the musical notes in the icon will change and flash.
-
The unit will play the first ten seconds of each track on the disc, moving from one track to the next.
-
Toplay a track during IntroScan, press the Play/Pause Button 10D 58
-
If no track is selected, the disc will stop playing when it has played the first ten seconds of each track in order.
Note that while the IntroScan feature is in use, the Intro Indicator 📋I appear in the Information Display [2D]
Time Display Selection
When playing CDs, the DVD600 is capable of displaying the time displays that you are familiar with from traditional CD-only players. The choice of a time display is made through the use of the on-screen Menu Bar, but any changes to the display will also change the Time Display mode for the Information Display.
Tochange the time display during CD playback, follow these steps:
- During disc playback, press the Status Button ⑤ if the Menu Bar is not already on the screen.
- If needed, press the ◀/▶ Buttons 27 29 until the clock icon with the word "Time" next to it is highlighted.
-
Press the Enter Button to select one of these four choices. Each press of the button will select the next option:
-
Track Elapsed: This shows the time that has elapsed for the current track. At the start of each track this display will reset to zero and begin to count up again.
- Track Remain: This shows the time remaining for the current track. At the start of each track the time will begin to count down again, starting with the total time of the track.
- Disc Elapsed: This shows the total time that the current disc has played for all tracks.
- Disc Remain: This shows the total time remaining for all tracks on the disc that have not yet been played.
Playing MP3 and Video CD Discs
The DVD600 _II is rare among DVD players in that it is able to play discs containing MP3 audio files. This means that you may enjoy the latest music, using discs created in your computer, through the high quality audio components in your home theater system. As the way that MP3 files are recorded on discs differs from the way conventional CD audio discs are structured, MP3 playback is somewhat different from standard CDs.
Operating the DVD600II DVD Changer
MP3 Disc Playback
When the DVD600I reads a disc and recognizes it as an MP3 disc, no Disc Type Indicator A will light; however, a listing of all the directories and tracks on the disc will appear on the video screen. (Figure 23). Note that the right side of the screen will initially be blank, as that is used for programming playlists for MP3 playback. The black box in the upper left corner of the screen will show the Play symbol while a track is playing, or the Play/Pause symbol when a track has been paused, or no symbol when the unit is in Stop mode. The box in the top center of the display will contain the file name of the currently selected track.
The second row of boxes will display, from left to right, an indication of whether the current mode is Standard Play, Random Play or Repeat Play; the track number currently playing, and the elapsed time of the current track.
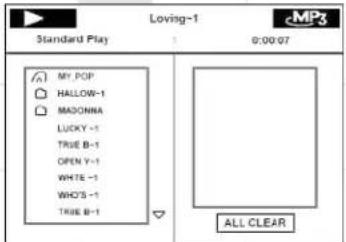
Figure 23
Toplay a track, press the ▲/▼ Navigation Buttons 25 31til the desired track name is highlighted. If the list of tracks is longer than will fit on the screen, a ▲ or ▼ indicator will appear at the top or bottom of the track list to remind you that you may scroll through the list to see additional titles.
To begin playback, press the Play/Pause Button 10D 58 or the Enter Button 28
During MP3 playback most of the standard CD/DVD playback controls operate in their normal fashion:
- You may skip forward to the next track on the disc by pressing the Next Button 64
- You may skip back to the previous track on the disc by pressing the Previous Button 63
- Press the Pause Button 📂 momentarily stop playback. Press it again to resume play.
- Press the Enter Button 2 Begin play, or to restart play of the current track from the beginning.
NOTES ON MP3 PLAYBACK
- The Fast Forward and Reverse Search modes are not available during MP3 playback.
- During MP3 playback the Program Time Indicators 📄 all show the elapsed time of the track being played. Other time display options are not available with MP3 playback.
- The DVD600 is only compatible with standard MP3-encoded discs. Other compressed audio formats used for Internet audio downloads will not play on the DVD600.
- Due to the differences in various versions of the MP3 format, and the many differences between the CD-R machines used to record MP3 discs on a computer, it is possible that some MP3 discs may not play on the DVD600i even though they will work on a computer. This is normal and does not indicate a fault with the unit.
- When a multisession disc with both standard CD audio and MP3 content is in use, the DVD600 will play only the CD audio sections of the disc.
- When an MP3 disc with multiple directories is playing, the DVD6001 will search out all MP3 files on the disc and list them in the on-screen display in the order in which the directories are structured on the disc. Note that if the same title is used for tracks in different directories, this may result in the same title appearing more than once in the track listings.
Programmed Playback of MP3 Discs
The DVD600ii is capable of creating playlists up to 130 tracks long with the MP3 files on a properly recorded disc. To create a playback list for MP3 titles, follow these steps:
Step 1: Load a compatible MP3 disc, but do not put it into play or stop play if it begins automatically.
Step 2: Press the Program Button 46 open a playlist. The screen will change to Program Play Mode, as indicated in the upper left corner of Figure 24. The Program Indicator G will also light in the Information Display 12D
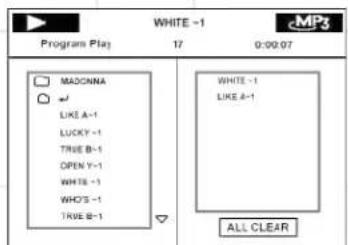
Figure 24
Step 3: Use the ▲/▼ Navigation Buttons 25 highlight the first track to be placed in the list and press the Enter Button. Note that the track name will now appear on the right side of the screen.
Step 4: Repeat the step above until all desired tracks are added to the playlist.
Step 5: To remove a track from the playlist, first press the navigation Buttons so that the highlight moves to the right side of the screen under the PROGRAM listing. Use the
▲/▼ Navigation Buttons 25 31 to highlight the track to be deleted and press the Clear Button 47.
Step 6: To clear all the tracks in the playlist and start over, press the Navigation Buttons 27 29 until the ALL CLEAR box at the bottom of the right side of the screen is highlighted and press the Enter Button 28
Step 7: To play the tracks on the list, press the Play/Pause Button 10D 58
Once a playlist is created, it will remain available as long as the disc is not changed or the power turned off. You may play any track on the disc without erasing the playlist by pressing the Navigation Buttons 27 / 29 return the highlight bar to the left side of the screen
Repeat Playback of MP3 Discs
Repeat playback operation for MP3 discs differs somewhat from the steps used for repeat play-back of standard DVD discs. Press the Repeat Button 55 to cycle through the following options, which will be displayed on the screen:
Repeat All Discs, Repeat 1 Disc, Repeat 1 Folder, Repeat Track, Standard Play The Repeat Indicators 📂 I also light to reflect the current mode. The Repeat A–B func- tion is not available for MP3 discs.
For Random Play of the files on the MP3 disc, press the Random Button 50 toggle between Random Play and Standard Play, as displayed on the screen.
VCD Playback
VCD is a format that predates DVD which is based on a different compression format than DVD and a recording method that is similar to CDs. Although the DVD has, for the most part, replaced VCD as a format, the DVD6001 offers VCD playback so that you may play your existing library of VCD discs.
(continued)
Operating the DVD600II DVD Changer
There are two versions of the VCD format: an early version which is simply called "VCD" and a later version with Playback Control which is called "Version 2.0" or "PBC". The DVD600i is compatible with both forms of VCD, although playback will vary according to which version is used and the specific way in which the disc was created.
However, the DVD60Q1 is not capable of playing SVCD (Super Video CD) discs. Also, do not confuse the Video CD format with the photo CDs that you may receive when developing a roll of film. Photo CDs may not be viewed using the DVD60Q1.
Even though VCD discs provide video, since the format is based on CD technology, the playback functions for a VCD disc operate very closely to those for CD. To play a VCD disc, place it in the DVD6001 as you would any other CD or DVD disc. After the unit takes a few seconds to read the disc's contents the VCD segment of the
Disc Type Indicators Will light and the disc will begin playing. If the disc has been created under VCD Version 2.0, or if it otherwise allows Playback Control functionality, the letters PBC will appear in the Title/Track Indicators
D. However, keep in mind that the exact level of functionality for any VCD will vary widely and it is ultimately determined by the way the disc was created, not by the DVD600 _1 .
When playing VCD discs, most standard DVD/CD playback controls function as normal, including Play, Stop, Pause, Forward or Reverse Slow Play, and Fast Forward or Reverse Search (x2, 4x and 8x speeds). The indications for fast play in either direction work as described for CD playback.
Using the On-Screen Status Bar for VCD Playback
When playing many VCD discs, it is possible to access the disc's features using the on screen menu bar in the same manner as shown for CD playback. Note, however, that the while the IntroScan icons will appear in the menu bar, the IntroScan feature is not available for VCD discs.
Use of other functions will vary according to the disc type. With some VCD discs, you may select a track using the Track function on the menu bar. If the menu bar is not visible on the screen press the Status Button 5 to recall it to the screen. Note that when PBC appears under the disc icon in the far left position of the menu bar it is not possible to change track numbers directly.
Depending on the disc's functionality, some VCD discs allow the time display to be changed in the same manner as described for CD discs.
Playback Control
VCD discs made under the Revision 2.0 specification will usually offer PBC, or playback control. With PBC many discs include chapter selection menus that are similar to those found on DVDs. However, on VCD discs the menus are recalled and controlled differently than on DVD discs.
- Toview the menu options on a PBC disc, press the Next 64 Previous 63 buttons on the remote or the Skip Forward/Reverse Buttons 8D on the front panel.
- Once the menu options appear on the screen, make your selection by pressing the Numeric Button 33 - 40t 42. Responds to your desired choice. The desired selection will begin playingautomatically.
Note that the Menu Button used during DVD playback is not used for VCD playback.
Operating the DVD600II DVD Changer
Programmed Play
The DVD600 _11 is equipped with a wide range of programmed play functions that enable you to have the unit select or repeat tracks for you, or you may program a specific order for discs and tracks to play.
Random Play
The Random Play function will play all of the tracks on a CD or chapters on a DVD in a random order, as selected by the DVD600. Once the disc has played all of the tracks, it will stop.
To select Random Play at any time while a CD or DVD is playing, press the Random Button 50 The Random Play Banner (Figure 25) will appear on the screen and the Random Indicator P will appear in order to confirm your selection. Toremove the Random Play Banner from the screen, press the Clear Button 47

Random Play
Figure 25
Toreturn to Standard Play, with tracks or chapters playing in order, press the Random Button 50 again. Note that a Standard Play Banner (Figure 26) will appear in order to confirm your selection and the Random Indicator go out. The DVD600 may return to the disc's main menu.

Standard Play
Figure 26
Repeat Play
The DVD600 _II offers five repeat functions that allow you to take advantage of the five-disc capacity of the unit for unattended playback:
- Repeat All: Plays all discs in the unit in order from beginning to end.
- Repeat 1 Disc: Plays the current disc from start to finish until the disc is manually stopped.
- Repeat Title: For DVD discs only, this mode repeats the title currently being played until the disc is manually stopped.
- Repeat Track/Chapter: Repeats the CD track or DVD chapter currently being played until the disc is manually stopped.
- Repeat A–B: Repeats any selected portion of a disc until the disc is manually stopped.
To select Repeat All, Repeat 1 Disc, Repeat Title or Repeat Track/Chapter, simply press the Repeat Button 55 until the banner display with the desired playback method appears on the screen.
The selection process will follow this order:
- For DVD Discs: Repeat All Discs → Repeat 1 Disc → Repeat Title → Repeat Chapter → Repeat Off
- For CD Discs: Repeat All Discs → Repeat 1 Disc → Repeat Track → Repeat Off
Also, when the video display is not available, the Repeat Indicators 41 light in the Information Display 125 show the options in use.
Tostop any Repeat Play function, press the Repeat Button (55) the Repeat Off Banner appears in the on-screen display or the Repeat Indicators iH the Information Display 12D go out.
Repeat Play may also be stopped by pressing the Stop Button 30661
Repeat A-B
The Repeat A–B function allows you to select any portion of a DVD or CD and have it repeat continually unit the unit is manually stopped.
Toinitiate a Repeat A–B playback sequence, follow these steps while a disc is playing:
- Press the Repeat A-B Button a56 the start of the sequence to be repeated. Note that a Repeat A- Banner (Figure 27) will appear on the video screen and the Repeat A Indicator H will light in the Information Display.

Figure 27
- When at the end of the sequence to be repeated, note that the on-screen banner message will change to Repeat A-B (Figure 28), as will the Repeat A-B Indicator iH' the Information Display.

Figure 28
- The selected sequence will now play continually until the Stop Button pressed.
Programmed Playlists
Programmed play allows you to select any track, title or chapter from any disc in the DVD600i for playback in a specific order. This type of programming is particularly useful for parties or other situations where you want continual playback of specific selections for a long period of time. To program the discs in the DVD600i for playback, follow these steps:
- Press the Program Button 46 the remote. Note that the Program Edit Screen (Figures 29a and 29b) will appear on the video display.
![PROGRAM EDIT Dec Track Chapter Add 1 2 All Delete [12] (0) Play Done Playset D T C 1 4 0](/content/2026/05/1064683/images/493a122217778c73e25616700936e6a52ff397deb9c7f8db146143a2f08f5580.jpg)
Figure 29a. CD Selected

Figure 29b. DVD Selected
- Select the disc position for the first playback selection by pressing the ▲/▼ Buttons 25 31 When the desired disc number appears in the disc's box, press the Enter Button 28 or ▶ Button □ move to the next selection.
- The second box will now be highlighted to indicate that a selection for track or title is to be made. As the DVD600II already knows the disc type for the position selected, the heading over the box will indicate "Track" for CD discs and "Title" for DVD discs. The number in parentheses under the box shows the maximum number of tracks or titles on the disc. If "99" appears, it indicates that the disc selected has not yet been played and the unit does not yet know the type of disc and how many titles or tracks are available.
- Press the ▲/▼ Buttons 25 31 scroll through the list of available tracks or titles. Press the Enter Button 28 Button 29 to move to the next selection.
Note that most DVD movie discs use "Title 1" for movies, while "Title 2" is used for the opening logos and piracy warnings. Before selecting a DVD title number, you may wish to preview the disc while the on-screen Menu Bar is active to see which title numbers refer to each portion of the disc. This is particularly important in discs with large amounts of special feature material.
(continued)
Operating the DVD600II DVD Changer
-
The third box will now be highlighted to indicate that a selection for chapter should be made. This choice is available only for DVD discs, as CD discs do not have chapter capability. The number in parentheses under the box shows the maximum number of chapters on the disc. If "999" appears, it indicates that the disc selected has not yet been played and the unit does not yet know the type of disc and how many titles or tracks are available. If "0" appears, this is your indication that the disc is a CD.
-
Press the ▲/▼ Buttons 25 scroll through the list of available chapters. Press the Enter Button 28 or ▶ Button 29 to move to the next selection area.
-
The highlighted box will now appear in a column where the options are "Add," "Delete," "Play" and "Done," and the "Add" box should be highlighted. Since this is the first selection to be entered, press the Enter Button 26 note that the selected disc, track, title and chapter will be added to the Playlist column. The highlight will return to the disc box to allow you to enter additional selections by repeating Steps 2 through 7.
-
Repeat the steps as needed, noting that the selections will be added to the playlist up to a maximum of 32 steps.
- Todelete an entry from the playlist, press the ▶ and ▲/▼ Buttons 25 26 till 31e selection to be deleted is highlighted in the playlist. Press the Enter Button 25 then press the ▼ Button 41e, so that the word DELETE is highlighted. Press the Enter Button 28 the selection will be deleted. A selection may also be deleted by following this step to highlight it and then pressing the Clear Button .47
- To insert an entry into a playlist that has already been created, press the ▶ and ▲/▼ Buttons 25 26 to place on the playlist where you wish to insert a selection is highlighted. Press the Enter Button 28 and then press the ▼ Button 31 once so that the word INSERT is highlighted, and then follow Steps 2 through 7. When you have entered the data for the selection, highlight the word INSERT and press Enter.
-
When you have completed the playlist, you may play the programmed selections by pressing the ▶ and ▲/▼ Buttons 25 24il 31 PLAY is highlighted. Press Enter 28 to begin playback of the entire playlist. During Programmed Play, the Program Indicator 61 light.
-
To exit from the programming screen, press the Return Button 32
Notes on Programmed Play
- Tostop the playback of a programmed playlist, press the Stop Button 9D 61 twice. Pressing the Stop Button 61 once will stop play of the current track, but will allow you to resume play of that track and the playlist by pressing the Play Button 10D 58 again.
- Tocancel programmed playlists, press the Clear Button 47
- To edit the contents of a playlist using the Information Display 12.9 and not the on-screen display, follow these steps:
- Press the Check Button 53
- Press the Check Button 58 in to step through each of the programmed items. The Program Sequence Number will appear on the far right side of the Information Display 12D, next to the PR indication.
- Use the ◀/▶ Buttons 27 29 to select the disc, track or chapter to be edited.
- Use the ▲/▼ Buttons 25 31 change the selection.
- Press the Clear Button to remove a program step.
- When all steps have been programmed, press the Play Button to begin programmed play, or the Return Button to exit the programming function and return to normal operation.
Bookmarks
Bookmarks are a feature of the DVD6001 that allows you to mark up to nine different points on a disc and to quickly return to those points later. The Bookmarks feature works on both DVD and CD discs.
To Enter a Bookmark
-
During disc playback, press the Status Button 5 if the Menu Bar is not already on the screen.
-
Press the ◄▶ Buttons 27 24 til the disc icon with the word "Mark" below it is highlighted.
-
Press the Enter Button 28 view the Bookmark Banner (Figure 30).

Figure 30
-
At any point during playback where you wish to mark a spot so that you may return to it later, press the Enter Button 28 note that a check mark "✓" will appear in the box on both the "Go To" and "Mark" lines.
-
To enter additional Bookmark points, press the ◀/▶ Buttons 27 29 until another empty box on the "Mark" line is highlighted. Press the Enter Button 28
-
Repeat Steps 4 and 5 for up to nine Bookmark points on a disc.
-
To exit the Bookmark Banner, press the ◄/▶ Buttons 27 29 until the box at the right side of the banner with the arrow and open door icons is highlighted. Press the Enter Button 28 return to normal play. Press the Clear Button
47 to remove the Bookmark menu bar from the on-screen display.
The marked spots will remain in the memory of the DVD600i as long as the disc is not changed. The Bookmark memory will remain active if the disc is stopped or the unit turned off, but it will be lost if the disc is removed from the player, or if the disc tray drawer is opened when the unit is the Stop mode.
To Recall a Bookmarked Scene or Passage
Note that a check mark "✓" will appear in the box on both the "Go To" and "Mark" lines.
-
During disc playback, press the Status Button ⑤ if the Menu Bar is not already on the screen.
-
Press the ◀/▶ Buttons 27 29 until the disc icon with the word MARK below it is highlighted.
-
Press the Enter Button 28 view the Bookmark banner.
-
Press the ▲ Button 25 so that a box on the top "Go To" line of the banner is highlighted.
-
Press the ◀/▶ Buttons 27 28 that the box below the number of the desired Bookmarked spot is highlighted.
-
Press the Enter Button 28 to go directly to the selected point on the disc.
-
To exit the Bookmark Banner, press the ▶/▶ Buttons 27 29 until the box at the right side of the banner with the arrow and open door icons is highlighted. Press the Enter Button 28 to return to normal play. Press the Clear Button 47 to remove the Bookmark menu bar from the on-screen display.
Note that at any time while the Bookmark Banner is displayed, entering any Numeric Key 33-40 42 will highlight that numbered mark, but will not proceed to a different chapter or track on the disc.
Operating the DVD600Ⅱ DVD Changer
DVD Language Codes
The availability of specific languages for the main audio track or subtitles is dependent on the choices made by a disc's producer. You should always consult the disc's jacket for information on languages for any disc. In the case of some languages, you may be required to enter a code from the list below to access that language. See pages 47 and 48 for more information on entering language codes.
Language Code
| Abkhaizian | 6566 | Hungarian | 7285 | Russian | 8285 | |
| Alar 6565 | Icelandic | 7383 | Samoan 8377 | |||
| Afrikaans | 6570 | Indonesian | 7378 | Sangho | 8371 | |
| Albanian 8381 | Interlingua | 7365 | Sanskrit | 8365 | ||
| Ameharic 6577 | Interlingue | 7369 | Scots Gaelic | 7168 | ||
| Arabic 6582 | Junpiak | 7375 | Serbian | 8382 | ||
| Armenian 7289 | Irish | 7165 | Servo-Groatian | 8372 | ||
| Assamese 6583 | Italian | 7384 | Sesotho | 8384 | ||
| Aymara | 6588 | Japanese 7465 | Setswana | 8478 | ||
| Azerbaijani | 6590 | Javanese 7487 | Shona | 8378 | ||
| Bashkir 6665 | Kannada | 7578 | Sindhi | 8368 | ||
| Basque 6985 | Kashmiri | 7583 | Singhalese | 8373 | ||
| Bengali, Bangla 6678 | Kazakh | 7575 | Siswati | 8383 | ||
| Bhutani | 6890 | Kinyarwanda | 8287 | Slovak | 8375 | |
| Bihari | 6672 | Kirghiz | 7599 | Slovenian | 8376 | |
| Bislama | 6673 | Kirundi | 8278 | Somali | 8379 | |
| Breton | 6682 | Korean | 7579 | Spanish | 6983 | |
| Bulgarian | 6671 | Kurdish | 7585 | Sundanese | 8385 | |
| Burmese 7789 | Laothian | 7679 | Swahili | 8387 | ||
| Byelorussian | 6669 | Latin | 7665 | Swedish | 8386 | |
| Cambodian | 7577 | Latvian, Lettish | 7686 | Tagalog | 8476 | |
| Catalan | 6765 | Lingala | 7678 | Tajik | 8471 | |
| Chinese 9072 | Lithuanian | 7684 | Tamil | 8465 | ||
| Corsican | 6779 | Macedonian | 7775 | Tatar | 8484 | |
| Croatian | 7282 | Malagsy | 7771 | Telugu | 8469 | |
| Czech | 6783 | Malay | 7783 | Thai | 8472 | |
| Danish 6865 | Malayalam | 7776 | Tibetan | 6679 | ||
| Dutch | 7876 | Maltese | 7784 | Tigrinya | 8473 | |
| English | 6978 | Maori 7773 | Tonga | 8479 | ||
| Esperanto | 6979 | Marathi | 7782 | Tsonga | 8483 | |
| Estonian | 6984 | Moldavian | 7779 | Turkish | 8482 | |
| Faroese | 7079 | Mongolian | 7778 | Turkmen | 8475 | |
| Fiji | 7074 | Naru | 7885 | Twi | 8487 | |
| Finnish | 7073 | Nepali | 7889 | Ukrainian | 8575 | |
| French 7082 | Norwegian | 7879 | Urdu | 8582 | ||
| Frisian | 7069 | Occitan | 7967 | Uzbek | 8590 | |
| Galician 7176 | Oriya | 7982 | Vietnamese | 8673 | ||
| Georgian | 7565 | Oromo (Afani) 7977 | Volapuk | 8679 | ||
| German | 6869 | Panjabi | 8065 | Welsh | 6789 | |
| Greek | 6976 | Pashto, Pushto | 8083 | Wolof | 8779 | |
| Greenlandic 7576 | Persian | 7065 | Xhosa | 8872 | ||
| Guarani | 7178 | Polish | 8076 | Yiddish | 7473 | |
| Gujarati | 7185 | Portuguese | 8084 | Yoruba | 8979 | |
| Hausa | 7265 | Quechua | 8185 | Zulu | 9085 | |
| Hebrew | 7387 | Rhaero-Romance | 8277 | |||
| Hindi | 7273 | Romanian | 8279 |
Troubleshooting
Processor Reset
In the rare case where the receiver's operation or the displays seem abnormal, the cause may involve the erratic operation of the system's memory or microprocessor.
To correct this problem, first unplug the unit from the AC wall outlet and wait at least three minutes. After the pause, reconnect the AC power cord and check the unit's operation. If the system still malfunctions, a system reset may clear the problem.
To clear the receiver's entire system memory including tuner presets, output level settings, delay times and speaker configuration data, first put the unit in Standby by pressing the System
Power Control Button 2. Next, press and hold the Tone Mode 6 and the FM Mode Selector 12 buttons for three seconds.
The unit will turn on automatically and display the RESET message in the Main Information Display U.
NOTE: Resetting the processor will erase any configuration settings you have made for speakers, output levels, surround modes and digital input assignments, as well as the tuner presets. After a reset, the unit will be returned to the factory presets, and all settings for these items must be reentered.
If the system is still operating incorrectly, there may have been an electronic discharge or severe AC line interference that has corrupted the memory or microprocessor.
If these steps do not solve the problem, consult an authorized JBL service center.
In the event that you forget the password for the DVD600u, you may reset it to the factory default by following this procedure: In Standby mode, press the Search Reverse CD
Skip Forward 8D ns on the front panel simultaneously for more than 3 seconds. The Information Display 12D light, and a test pattern will appear on your TV. Press the System Power Control 2D proceed.
SYMPTOM PROBABLE CAUSE SOLUTION
| DCR600II does not function when Main Power Switch is pushed a live outlet. | No AC Power Make certain AC power cord is plugged intoCheck to see whether outlet is switch-controlled. | ||
| DVD600II does not turn on • Main Power Switch turned off • Press in Main Power Switch.No AC power Check AC power plug and make certain any switchedoutlet is turned on. | |||
| Display lights, but no sound | Intermittent input connectionsMuteis onVolume control is down | Make certain that all input and speaker connections are secure.Press Mute Button3.Turn up volume control. | |
| Unit turns on, but front panel display does not light up | Display brightness is turned off | Follow the instructions in the Display Brightness section so that the display is set to VFD FULL. | |
| No sound from any speaker; light around power switch is red | Amplifier is in Protection mode due to possible shortAmplifier is in Protection mode due to internal problems | Check speaker wire connections for shorts at receiver and speaker ends.Contact your local JBL service center. | |
| No sound from any speaker | No audio signal is being transmitted to the speakersIf in DVD mode, make sure that analog input is not accidentally assignedIntermittent connectionsIncorrect digital audio selectionDVD disc is in Fast or Slow mode | Check that DCR600II is on and a source is playing.Check all wires and connections between the DCR600II and speakers. Make sure all wires are connected. Make sure none of the speaker wires are frayed, cut or punctured.Review proper operation of the DCR600II.Check Input assignment for DVD Input. DVD Input should be set to COAX 1 and the DVD600II Digital Output should be connected to Coaxial 1 Digital Input2on the DCR600II.Check all audio connections.Check digital audio settings.There is no audio playback on DVD discs during Fast or Slow modes. | |
Troubleshooting
No sound from one speaker • Balance is not at "12 o'clock" • Check the Balance control on the DCR600
II.
- No audio signal is being transmitted • Check all wires and connections between the DCR600 and to the speakers speakers. Make sure all wires are connected. Make sure
none of the speaker wires are frayed, cut or punctured.
- In Dolby Digital or DTS modes, make sure that the DCR600II is configured so that the speaker in question is enabled.
No sound from surround or • Incorrect surround mode • Select a mode other than Stereo.
center speakers • Make sure the movie or TV show you are watching is
recorded in a surround sound mode. If it is not, try using another surround mode.
- Input is monaural - There is no surround information from mono sources.
- Stereo or Mono program material - The surround decoder may not create center- or rear-channel information from nonencoded programs.
- Review the operation of your DVD player and the jacket of your DVD to make sure that the DVD features the desired Dolby Digital or DTS mode, and that you have properly selected that mode using both the DVD player's menu and the DVD disc's menu.
- No audio signal is being transmitted - Check all wires and connections between the DCR600 // and to the speaker speaker. Make sure all wires are connected. Make sure
- Incorrect configuration - If the DCR600 none of the speaker wires are frayed, cut or punctured. ii is set in Dolby Pro LogicII mode, make sure the center speaker is not in Phantom mode.
- If the DCR600II is set in Dolby Digital or DTS mode, make sure it is configured so that the center speaker is enabled.
- In Dolby Digital or DTS modes, make sure the DCR600i is configured so that the surround speakers are enabled.
- Check all wires and connections between the DCR600ii and speakers. Make sure all wires are connected. Make sure none of the speaker wires are frayed, cut or punctured.
| System plays at low volume but shuts off as volume is increased | • Speaker impedances are dropping too low for receiver to handle | • Check all wires and connections between the DCR600n and speakers. Make sure all wires are connected. Make sure none of the speaker wires are frayed, cut or punctured.• Do not use more than one pair of main speakers. |
| Low (or no) bass output | • Speakers are connected out of phaseSubwoofer output of DCR600n not enabled | • Make sure the connections to the left and right Speaker Inputs have the correct polarity (+ and -).• In Dolby Digital or DTS modes, make sure the DCR600n is configured so that the subwoofer and LFE output is enabled. |
| Unit does not respond to remote commands | • Weak batteries in remote• Wrong device selected• Remote sensor is obscured | • Change remote batteries.• Press the Main 8 or DVD 4 selector.• Make certain front panel sensor is visible to remote or connect remote sensor. |
| Intermittent buzzing in tuner | • Local interference | • Move unit or antenna away from computers, fluorescent lights, motors or other electrical appliances. |
| Letters flash in the channel indicator display and digital audio stops | • Digital audio feed paused | • Resume play for DVD.• Check that Digital Input is selected. |
(continued)
Troubleshooting
Disc does not play • Disc loaded improperly • Load disc label-side up.
- Incorrect disc type
- Check to see that disc is CD, CD-R, CD-RW, DVD-Movie, MP3 or Video CD; other types will not play.
- Invalid Region Code • Use Region 1 disc only.
- Rating is above parental preset • Enter password to override or change rating settings.
- Wrong source for CD was selected - If you are playing a CD in the DVD600
you must select the DVD source on the DCR600II, not the CD source.
No picture • Intermittent connections • Check all video connections.
- Wrong input - Check input selection of TV or DCR600
II.
• Different types of video connections in use connections from the DVD600
- You may not mix video connection types. If you use S-Video into the DCR600, you must also use the S-Video input on your television. If you use the composite video connections from the DVD600 to the DCR600, you must also use the composite video input on your television.
Picture is distorted or jumps during • MPEG-2 decoding • It is a normal artifact of DVD playback for pictures Fast Forward or Reverse Play to jump or show some distortion during rapid play.
Picture jumps or freezes during normal play
- Unit may be overheating
- Due to the nature of this product category, DVD players, while being operated at elevated temperatures, may exhibit certain anomalies such as picture freeze-ups. If this occurs, the DVD600II needs to be "reset" by powering it down and up again, using its master On/Off switch. Should this occur with your DVD600II, first check your discs for any damage, scratches, and fingerprints. If discs are OK, then ventilation around the DVD600II needs to be increased to ensure proper operation.
Some remote buttons do not operate during DVD play
• Function not available for this disc
- Some discs do not include all DVD features.
The menu is in a foreign language
- Incorrect menu language
- Change menu language selection.
"∅" symbol appears
- Requested function not available at this time
- Certain functions may be disabled during passages of a disc.
Picture is displayed in the wrong aspect ratio to disc
- Incorrect match of aspect ratio settings
- Change Aspect Ratio settings.
Disc will not copy to VCR
- Macrovision protection
- Most DVDs are encoded with Macrovision to prevent copying to VCR.
Technical Specifications
DCR60011
Audio Section
Two-Channel Stereo Mode
100W per channel continuous RMS power into 8 ohms at 0.08% THD, 80Hz to 20kHz
Five-Channel Cinema Mode
100W per channel dynamic RMS power into 8 ohms at 0.08% THD, 80Hz to 20kHz (Plus 100W into 8 ohms at 0.08% THD, 20Hz to 80Hz for subwoofer)
Input Sensitivity/Impedance 200mV/47k ohms
Signal-to-Noise Ratio 95dBA
Surround System Adjacent Channel Separation Analog Decoding 40dB Dolby Digital 55dB DTS 55dB
Frequency Response 10Hz–100kHz (+0, -3dB)
FM Tuner Section
Frequency Range 87.5–108MHz Usable Sensitivity 1.3μV/13.2dBf Signal-to-Noise Ratio 70dB (mono) 68dB (stereo)
Distortion 0.2% (mono) 0.3% (stereo)
Stereo Separation 40dB @ 1kHz Selectivity ±400kHz, 70dB Image Rejection 80dB IF Rejection 90dB Tuner Output Level 500mV at 1kHz, ±75kHz Deviation
AM Tuner Section
Frequency Range 520kHz–1710kHz Signal-to-Noise Ratio 45dB Usable Sensitivity 500μV (loop) Distortion 0.8% (1kHz, 50% Modulation) Selectivity 30dB at ±10kHz
Video Section
Format NTSC Input Level/Impedance 1Vp-p/75 ohms Output Level/Impedance 1Vp-p/75 ohms Video Frequency Response 10Hz to 8MHz (-3dB)
General
Unit Power Consumption 72W idle, 580W maximum Unit Dimensions Width 17.3 inches (440mm) Height 6.5 inches (165mm) Depth 17.1 inches (435mm) Unit Weight 31 lb (14.1kg)
Depth measurement includes knobs, buttons and terminal connections. Height measurement includes feet and chassis. All features and specifications are subject to change without notice.
JBL On Screen Library is a trademark of JBL, Inc. (patent pending).
JBL One-Click is a trademark of JBL, Inc. (patent pending).
*Manufactured under license from Dolby Laboratories. "Dolby," "Pro Logic," "AC-3" and the Double-D symbol are trademarks of Dolby Laboratories. Confidential Unpublished Works. ©1992–1999 Dolby Laboratories, Inc. All rights reserved.
DTS and DTS Surround are registered trademarks of Digital Theater Systems, Inc.
UltraStereo is a trademark of UltraStereo Corp.
Logic 7 is a registered trademark of Lexicon, Inc., a Harman International Company.
Crystal is a registered trademark of Cirrus Logic Corp.
Technical Specifications
DVD600II
Playback Media: 5-inch (12cm) or 3-inch (8cm)
DVD-Video: Region 1, single or dual sides/layers, linear PCM,
Dolby Digital or DTS
CD, CD-R, CD-RW: Linear PCM Audio
MP3
Video CD (VCD): MPEG-1 Video, Linear PCM Audio
Video Section:
Signal format: NTSC
Composite Output: 1V p-p/75 ohms, sync, negative polarity
S Output: Y/Luminance: 1V p-p/75 ohms, sync, negative polarity
C/Chrominance: 0.286V p-p
Component Outputs: Y: 1V p-p/75 ohms, sync, negative polarity
Pr: 0.648V p-p/75 ohms
Pb: 0.648V p-p/75 ohms
Audio Section:
Coaxial Digital Output: 0.5V p-p/75 ohms
Frequency Response: 2Hz to 22kHz, +/- 0.5dB (44.1kHz sampling rate)
Dynamic Range: DVD: 105dB (20-bit)
CD: 100dB
Channel Separation: 90dB
THD: 0.0035%
Signal-to-Noise Ratio: 100 dB
Wow and Flutter: below measurable limits
General:
Unit Power Consumption: 25W
Unit Dimensions: Width: 17.3 inches (440mm)
Height: 5.1 inches (130mm)
Depth: 16.9 inches (420mm)
Unit Weight:
14.4 lb (7.6kg)
Depth measurement includes knobs and buttons.
Height measurement includes feet and chassis.
All features and specifications are subject to change without notice.
This product incorporates copyright protection technology that is protected by method claims of certain U.S. patents and other intellectual property rights owned by Macrovision Corporation and other rights owners. Use of this copyright protection technology must be authorized by Macrovision Corporation and is intended for home and other limited viewing uses only, unless otherwise authorized by Macrovision Corporation. Reverse engineering or disassembly is prohibited.
Technical Specifications
SCS135P
Overall Frequency Response: 35Hz - 20kHz (-6dB)
Satellites
Configuration: 2-Way, video-shielded
Recommended Amplification: Use with DCR600 11 only
Impedance: 8 Ohms nominal
Sensitivity: 86dB @ 1 watt/1 meter
Tweeter: One 1/2" titanium-laminate dome
Midrange: One 3" cone
Unit Dimensions: Width: 3.19 inches (81mm)
Height: 4.38 inches (111mm)
Depth: 3.75 inches (95mm)
Unit Weight: 1.1 lb (0.5kg)
Center
Configuration: 2-Way, video-shielded
Recommended Amplification: Use with DCR600 II only
Impedance: 8
Ohms nominal
Sensitivity: 86dB @ 1 watt/1 meter
Tweeter: One 1/2" titanium-laminate dome
Midranges: Dual 3" cones
Unit Dimensions: Width: 7.63 inches (194mm)
Height: 3.25 inches (83mm)
Depth: 3.75 inches (95mm)
Unit Weight: 1.89 lb (0.86kg)
Subwoofer
Configuration: Floor-firing, bass-reflex ported enclosure
Woofer: 8" cone
Unit Dimensions: Width: 13 inches (330mm)
Height: 15 inches (381mm)
Depth: 14 inches (356mm)
Unit Weight: 30 lb (13.6kg)
All features and specifications are subject to change without notice.
Technical Specifications
Cinema ProPack 600Ⅱ System
General
Power Requirement: AC 120V 60Hz
Contents: DCR600
II, DVD600II, Programmable Master Remote Control,
SCS135P speaker system, basic hookup wiring
Carton Dimensions:
Width: 36-5/8 inches (930mm)
Height: 17-5/8 inches (448mm)
Depth: 22-1/8 inches (562mm)
Shipping Weight: 82.7 lb (37.6kg)
All features and specifications are subject to change without notice.
OWNER'S GUIDE
MODEL NUMBER: CINEMA PROPACK™ 600II
Includes: DCR600II, DVD600II and SCS135P
DESIGN GOAL: Re-create the excitement of the movies using high-performance separate components in one convenient package.
AUDIO/VIDEO RECEIVER: DCR60Q, With Dolby* Digital, Dolby Pro Logic* II, DTS* and Logic 7*
SOURCE UNIT: DVD600;Five-Disc Carousel DVD/CD/CD-R/CD-RW/VCD Changer With MP3 Decoding and On Screen Library™ (patent pending) Feature
REMOTE CONTROL: JBL One-Click™ (patent pending) Remote Commander
LOUDSPEAKERS: SCS135P Six-Piece Home Cinema Speaker System With Four Satellites, One Center and One 100-Watt, 8-Inch Subwoofer
JBL
PRO SOUND COMES HOME™
JBL Consumer Products
250 Crossways Park Drive, Woodbury, NY 11797
8500 Balboa Boulevard, Northridge, CA 91329
800-336-4JBL (4525) (USA only)
www.jbl.com
©2002 JBL, Incorporated, JBL is a registered trademark
of JBL, Incorporated
Part No. ai5193

H A Harman International Company

- Typographical Conventions
- read first! Important Safety Precautions!
- CAUTION
- RISK OF ELECTRIC SHOCK DO NOT OPEN
- Important Safety Information
- Verify Line Voltage Before Use
- Do Not Use Extension Cords
- Handle the AC Power Cord Gently
- Do Not Open the Cabinet of Any Components
- CATV or Antenna Grounding
- NOTE TO CATV SYSTEM INSTALLER:
- Installation Location
- Cleaning
- Moving the Components
- Important Information for the User
- Unpacking
- Getting Started
- Thank You for Choosing JBL
- What's Included
- Installing and Connecting the Equipment
- What We Recommend
- Quick Installation Diagrams
- Where to Place the Speakers
- Mounting Options
- Satellites and Surrounds
- Wall-Mounting
- Connecting the Speakers
- Making the Audio Connections
- Making the Video Connections
- Completing Setup
- Quick Guide to Using the JBL Cinema ProPack 60011
- DCR600II Front Panel Controls
- IMPORTANT NOTES
- DVD600Ⅱ Rear Panel Connections
- Remote Control Functions
- Remote Control Code Tables
- TV
- CD Players
- Receivers
- Tape Deck
- DVD Players
- Configuring the DCR600II Receiver
- Memory Backup
- Configuring the Speakers
- Adjusting the Output Levels
- Setting Delay Times
- Press the Set Button
- Programming the Remote
- Entering Product Codes
- Auto-Searching for Product Codes
- Reading Back the Programmed Code
- Programming Macros
- Erasing Macro Commands
- Device Functions
- Notes on Using the Remote With Other Devices
- Volume Control Punch-Through
- Examples:
- Channel Control Punch-Through
- Transport Control Punch-Through
- Reassigning Devices
- Resetting the Remote Memory
- Configuring the DVD600II DVD Changer
- DVD Compatibility & Terminology
- Using the Remote Control
- Selecting Audio Output Languages
- Selecting Subtitle Languages
- Selecting Menu Languages
- Parental Lock and Passwords
- Password Selection and Control Lock
- Clearing Passwords
- Changing the Password
- Setting the Aspect Ratio
- Setting the Dynamic Range
- Operating the DCR600II Receiver
- Surround Mode Chart
- Selecting a Surround Mode
- Using Digital Sources
- Dolby Digital
- DTS
- Selecting a Digital Source
- Digital Status Indicators
- Night Mode
- IMPORTANT NOTES ON DIGITAL PLAYBACK
- PCM Audio Playback
- Operating the Tuner
- Station Selection
- Preset Tuning
- Recalling Preset Stations
- Tape Recording
- NOTES:
- Operating the DVD600II DVD Changer
- Loading Discs
- IMPORTANT NOTES ON DISC LOADING
- Playback Basics
- Using the DVD Disc's Menu
- IMPORTANT NOTES ON DVD PLAYBACK
- Using the Menu Bar
- Menus and Controls
- Selecting Titles and Chapters
- Changing Languages (Audio)
- Changing Camera Angles
- Playing CDs
- Selecting a Track
- Using IntroScan
- Time Display Selection
- Playing MP3 and Video CD Discs
- MP3 Disc Playback
- NOTES ON MP3 PLAYBACK
- Programmed Playback of MP3 Discs
- Repeat Playback of MP3 Discs
- VCD Playback
- Using the On-Screen Status Bar for VCD Playback
- Playback Control
- Programmed Play
- Random Play
- Repeat Play
- Repeat A-B
- Programmed Playlists
- Notes on Programmed Play
- Bookmarks
- To Enter a Bookmark
- To Recall a Bookmarked Scene or Passage
- Operating the DVD600Ⅱ DVD Changer
- DVD Language Codes
- Troubleshooting
- Processor Reset
- Technical Specifications
- DCR60011
- Audio Section
- FM Tuner Section
- AM Tuner Section
- Video Section
- General
- DVD600II
- Video Section:
- Audio Section:
- SCS135P
- Satellites
- Center
- Subwoofer
- Cinema ProPack 600Ⅱ System
- OWNER'S GUIDE
- JBL
- PRO SOUND COMES HOME™
Brand : JBL
Model : DVD600II
Category : DVD player