TSW-200 - Loudspeaker Taga Harmony - Free user manual and instructions
Find the device manual for free TSW-200 Taga Harmony in PDF.


| Product Type | Active Subwoofer |
| Model | TSW-200 |
| Brand | Taga Harmony |
| Enclosure Type | Bass-reflex |
| Amplifier | High-power, high-current built-in amplifier |
| Driver | Single woofer driver with advanced design for low distortion |
| Frequency Response | Deep, dynamic bass with ultra-low distortion at all volume levels (exact range not specified) |
| Power Supply | AC mains (voltage as per rear panel marking) |
| Power Cable | Detachable, included |
| Inputs | LOW INPUT (L/R and SUB via RCA), HIGH INPUT (speaker level connectors) |
| Controls | POWER switch, VOLUME regulator, CROSSOVER regulator, PHASE switch, AUTO POWER switch (ON/AUTO) |
| Auto Power Mode | Standby when no signal detected; auto wake on signal |
| Crossover Adjustment | Continuous low-pass filter adjustment (range marked on rear panel) |
| Phase Switch | 0/180 degrees for integration with main speakers |
| Indicators | POWER Status LED (blinks during startup, steady on when active) |
| Fuse | Replace only with same type (value indicated on rear panel) |
| Kit Contents | Subwoofer (1), Single RCA-RCA cable (1), Power cable (1), Instruction manual (1) |
| Cleaning | Use a dry, soft cloth; unplug before cleaning |
| Placement Guidelines | Avoid corners for best definition; near wall recommended; final position depends on room acoustics |
| Safety Class | Designed in compliance with EU directives 2014/30/EU and 2014/35/EU |
Frequently Asked Questions - TSW-200 Taga Harmony
User questions about TSW-200 Taga Harmony
0 question about this device. Answer the ones you know or ask your own.
Ask a new question about this device
Download the instructions for your Loudspeaker in PDF format for free! Find your manual TSW-200 - Taga Harmony and take your electronic device back in hand. On this page are published all the documents necessary for the use of your device. TSW-200 by Taga Harmony.
USER MANUAL TSW-200 Taga Harmony
To Achieve Glorious Acoustics
Active Subwoofers
AUDIO-VIDEO (TSW, VIGOR) / inMOVE Series
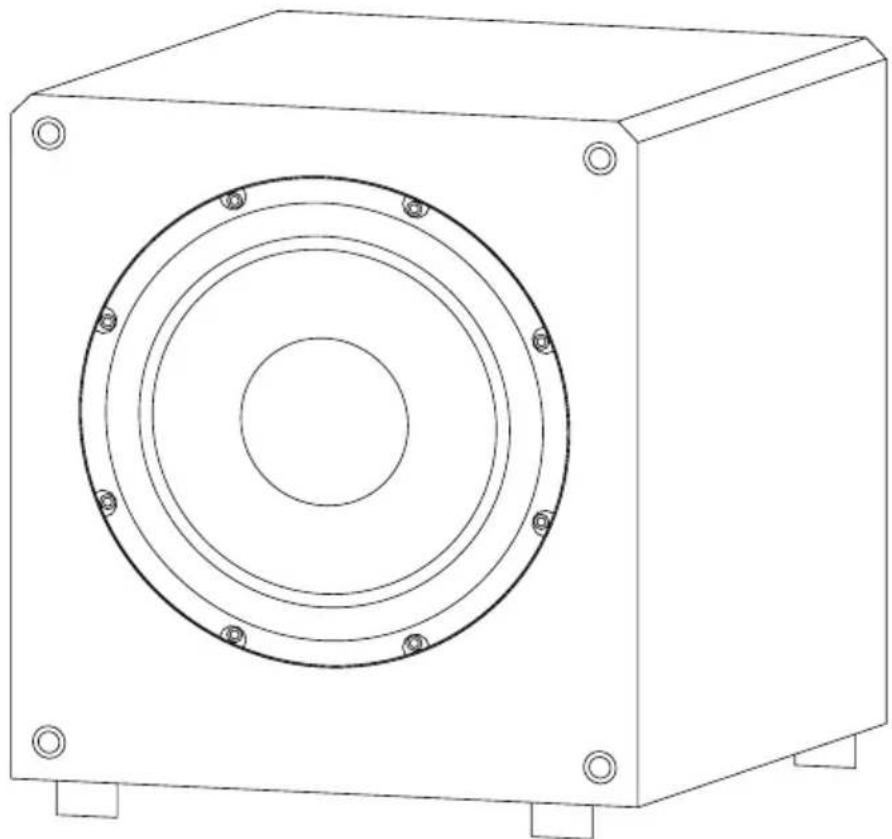
natural_image
Line drawing of a rectangular electronic device with concentric circular components and mounting feet (no text or symbols)Instruction Manual
Introduction
Thank you for purchasing this TAGA Harmony subwoofer.
This subwoofer is a single driver and bassreflex construction with a high-current built-in amplifier.
The high-power and high-current amplifier delivers deep, dynamic bass with very low noises and a perfect definition.
The advanced woofer driver ensures superior flat power response and ultra-low distortions at any volume levels.
This subwoofer is an ideal partner for your sound system.
Cleaning
Do not use strong or abrasive cleaners. Use a dry, soft cloth for cleaning.
Specifications
Full technical specifications are available on the www.Tagaharmony.com website.
Contents
Safety Instructions 4
Important Safety Instructions 5
Unpacking the Subwoofer 6
Placement 6
Controls And Displays - Rear Panel 7
Hooking Up The Subwoofer 8
Operation 9
Additional Information 10
Kit content 10
Safety Instructions
IMPORTANT
READ THIS SECTION CAREFULLY BEFORE PROCEEDING!
CAUTION
RISK OF ELECTRIC SHOCK DO NOT OPEN

WARNING: TO REDUCE THE RISK OF FIRE OR ELECTRIC SHOCK, DO NOT EXPOSE THIS PRODUCT TO RAIN OR MOISTURE. DO NOT REMOVE CHASSIS (OR BACK). NO USER-SERVICEABLE PARTS INSIDE. REFER SERVICING TO QUALIFIED SERVICE PERSONNEL.
The triangle containing a lightning symbol is intended to alert the user to the presence of uninsulated dangerous voltages within the product's enclosure that may be of sufficient magnitude to constitute a risk of electric shock to persons.

An exclamation mark in a triangle is intended to alert the user to the presence of important operating and maintenance (servicing) instructions in the literature accompanying the appliance.
WARNING: TO REDUCE THE RISK OF FIRE OR ELECTRIC SHOCK, DO NOT EXPOSE THIS APPARATUS TO RAIN OR MOISTURE, AND OBJECTS FILLED WITH LIQUIDS, SUCH AS VASES, SHOULD NOT BE PLACED ON THIS APPARATUS.
CAUTION: TO PREVENT ELECTRIC SHOCK, MATCH WIDE BLADE OF PLUG TO WIDE SLOT, FULLY INSERT.
CAUTION: FOR CONTINUED PROTECTION AGAINST RISK OF FIRE, REPLACE THE FUSE ONLY WITH THE SAME AMPERAGE AND VOLTAGE TYPE. REFER REPLACEMENT TO QUALIFIED SERVICE PERSONNEL.
WARNING: UNIT MAY BECOME HOT. ALWAYS PROVIDE ADEQUATE VENTILATION TO ALLOW FOR COOLING. DO NOT PLACE NEAR A HEAT SOURCE, OR IN SPACES THAT CAN RESTRICT VENTILATION.
- Read Instructions – All the safety and operating instructions should be read before the product is operated.
- Retain Instructions – The safety and operating instructions should be retained for future reference.
- Heed Warnings – All warnings on the product and in the operating instructions should be adhered to.
- Follow Instructions – All operating and use instructions should be followed.
- Cleaning - Unplug this product from the wall outlet before cleaning. Do not use liquid cleaners or aerosol cleaners. Use a damp, soft cloth for cleaning.
- Water and Moisture - Do not use this product near water - for example, near a bath tub, wash bowl, kitchen sing or laundry tub; in a wet basement; or near a swimming pool; and the like.
- Accessories - Do not place this product on an unstable cart, stand, tripod, bracket or table. The product may fall, causing serious injury to a child or adult, and serious damage to the product. Use only with a cart, stand, tripod, bracket or table recommended by the manufacture, or sold with the product. Any mounting of the product should follow manufacture's instructions and should use a mounting accessory recommended by the manufacture.
- Ventilation - Slots and openings in the cabinet are provided for ventilation and to ensure reliable operation of the product and to protect it from overheating, and these openings must not be blocked or covered. The openings should never be blocked by placing the product on a bed, sofa, rug, or other smimilar surface. This product should not be placed in a built-in installation such as a bookcase or rack unless proper ventilation is provided or the manufacture's instructions have been adhered to.
For products equipped with a separate power adapter make sure to leave at least 5 cm (2 inches) free space on all sides and top of the adapter.
- Power Sources - This product should be operated only from the type of power source indicated on the marking label. If you are not sure of the type of power supply to your home, consult your product dealer or local power company. For products intended to operate from battery power, or other sources, refer to the operating instructions.
- Grounding and Polarization - This product may be equipped with a polarized alternating-current line plug (a plug having one blade wider than the other). This plug will fit into the power outlet only one way. This is safety feature. If you are unable to insert the plug fully into the outlet, try reversing the plug. If the plug should still fail to fit, contact your electrician to replace your obsolete outlet. Do not defeat the safety purpose of the polarized plug.
- Power-Cord Protection - Power supply cords should be routed so that they are not likely to be walked on or pinched by items placed upon or against them, paying particular attention to cords at plugs, convenience receptacles, and the point where they exit from the product.
-
Lightning - For added protection for this product during a lightning storm, or when it is left unattended and unused for long periods of time, unplug it from the wall outlet and disconnect the antenna or cable systems. This will prevent damage to the product due to lightning and power-line surges.
-
Overloading - Do not overload wall outlets, extensions cords, or integral convenience receptacles as this cas result in a risk of fire or electric shock.
- Object and Liquid Entry - Never push objects of any kind into this product through openings as they may touch dangerous voltage points or short-out parts that could result in a fire or electric shock. Do not expose this apparatus to dripping or splashing, and ensure that no objects filled with water, such as vases, are placed on the apparatus.
- Servicing - Do not attempt to service this product yourself as opening or removing covers may expose you to dangerous voltage or other hazards. Refer all servicing to qualified service personnel.
-
Damage Requiring Service - Unplug this product from wall outlet and refer servicing to qualified personnel under the following conditions:
-
When power supply cord or plug is damaged;
- If liquid has been spilled, or objects have fallen into product;
- If the product does not operate normally by following the operating instructions. Adjust only those controls that are covered by the operating instructions as an improper adjustment of other controls may result in damage and will require extensive work by a qualified technician to restore the product to its normal operation;
- If the product has been dropped or damaged in any way;
-
If the product exhibits a distinct change in performance - this indicates a need for service.
-
Replacement Parts - When replacement parts are required, be sure the technician has used replacement parts specified by the manufacturer or have the same characteristics as the original part. Unauthorized substitutions may result in fire, electric shock, or other hazards.
-
Safety Check - Upon completion of any service or repairs to this product, ask the service technician to perform safety checks to determine that the product is in proper operating condition.
- Wall or Ceiling Mounting - The product should be mounted to a wall or ceiling only as recommended by the manufacturer.
- Heat - The product should be situated away from heat sources such as radiators, heat registers, stoves, or other products (including amplifiers) that produce heat.
- [Refers to products equipped with vacuum tubes] Tube Cage - For your safety and to protect the vacuum tubes this product may be equipped with the factory installed vacuum tube cage.
It is not recommended to remove the cage unless it is required to change the vacuum tubes.
When the cage is removed - do not touch the vacuum tubes - they may be hot and burn the skin!
Unpacking the subwoofer
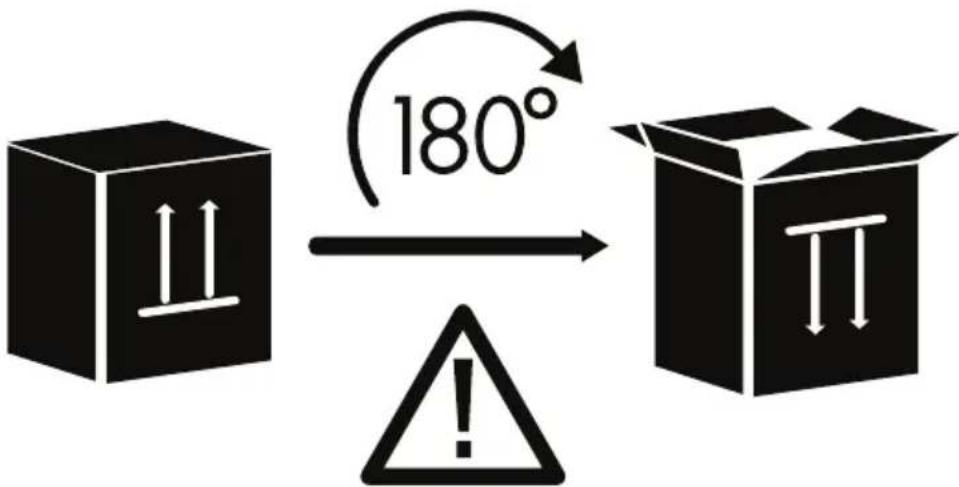
OPEN FROM THE BOTTOM
Place the carton with the subwoofer on the floor in the upside down position and open it from the bottom, remove the internal packaging which protects the subwoofer on the bottom.
Carefully turn the carton with the subwoofer upside down. When the subwoofer is securely placed on the floor remove the carton and internal packaging - your subwoofer is ready for placement in your room.
Placement
The placement of the subwoofer in the room is not so critical as for speakers but there are general guidelines as shown below:

natural_image
Solid black square centered within a white square frame (no text or symbols)Placing the subwoofer in the center of the room usually gives less bass but with better precision and definition.

natural_image
Simple geometric shape with black and white corners, no text or symbols present.Placing the subwoofer near the walls usually gives more bass with quite good precision and definition.

natural_image
Empty white square with four black squares at corners (no text or symbols)Placing the subwoofer in the corners usually gives much amount of bass but with less precision and definition.
Note! If it is possible we recommend to place the subwoofer between the front speakers close to the wall for better integration with your sound system.
Note! Final placement depends on your sound system, room acoustics and space, and your listening preferences.
Controls and Displays - Rear Panel
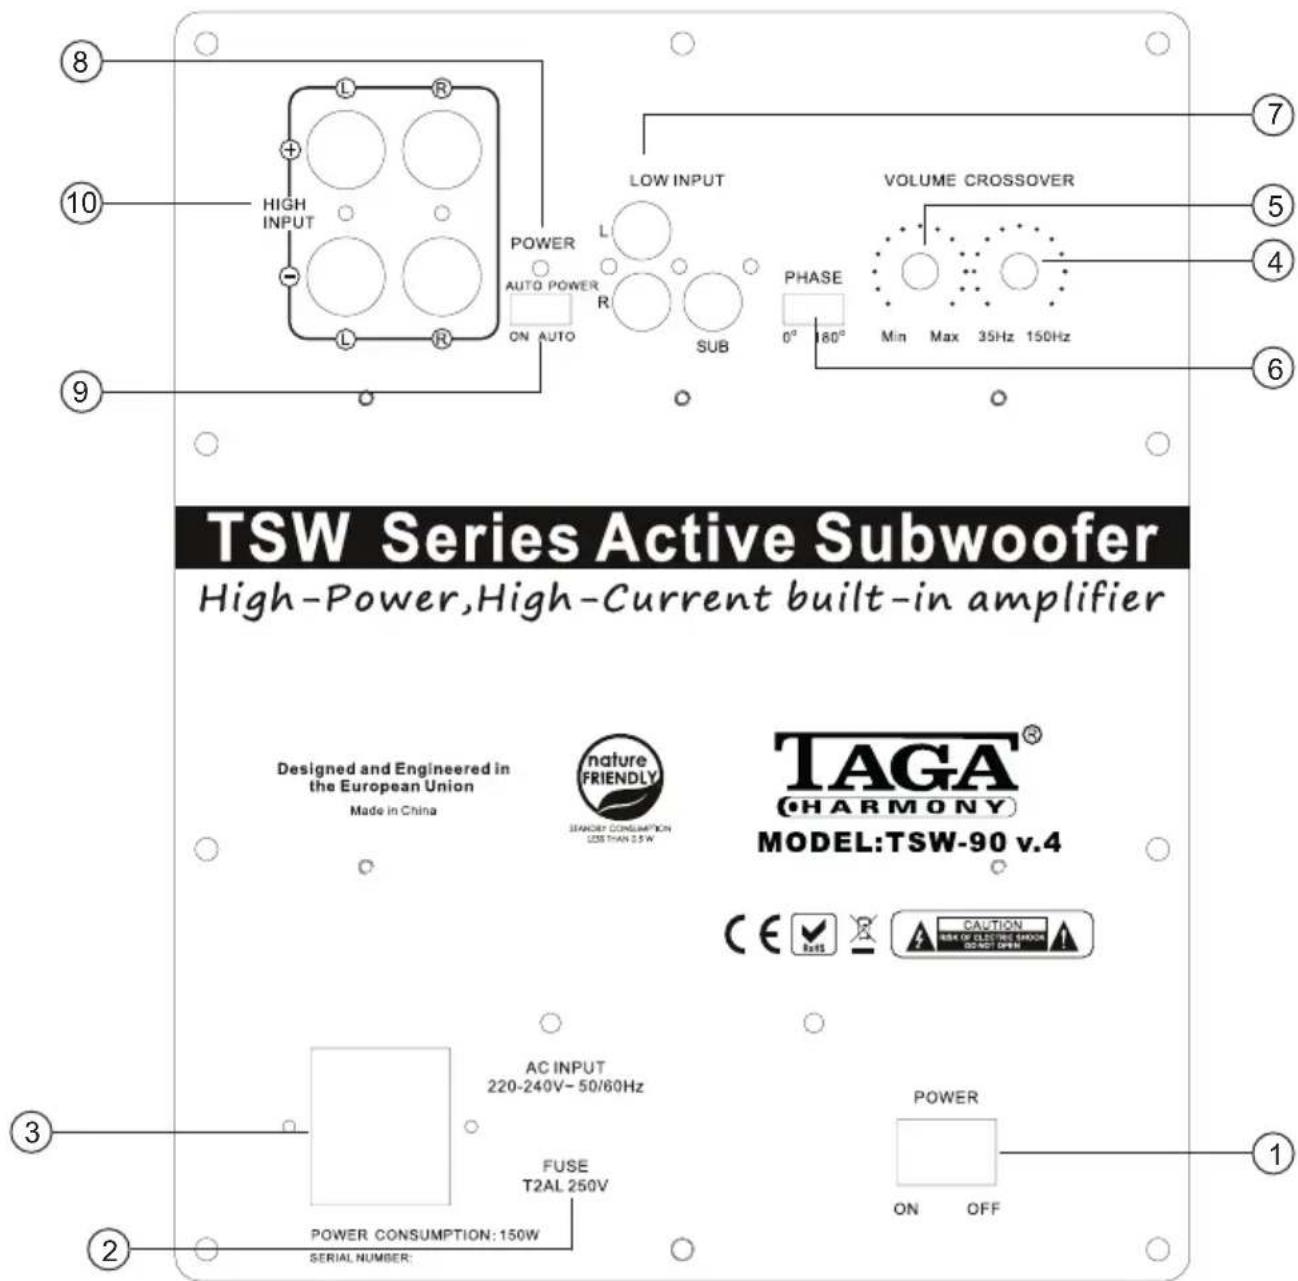
Available controls and inputs as well as their placement on the rear panel vary depending on the model. The above figure shows the TSW-90 v.4 subwoofer rear panel.
Rear Panel:
- POWER Switch (ON and OFF)
- FUSE
Note! A blown fuse should be only exchanged for exactly the same type as indicated on the rear subwoofer panel. The Power Cable should be disconnected!
- Power Cable Input
- CROSSOVER Regulator
- VOLUME Regulator
- PHASE Switch
- LOW INPUT Left/Right and SUB
- POWER Status LED
- AUTO POWER Switch (ON and AUTO)
- HIGH INPUT Connectors (Left and Right)
Hooking Up The Subwoofer
- Make sure that the subwoofer is turned off (the POWER Switch is in the OFF position and the Power Cable is removed).
- Make sure that your audio equipment (amplifi er/preamplifi er/AV receiver) is turned off.
- Turn the VOLUME regulator to MIN (max counter clockwise).
- Choose one of the following connection methods:
TSW Series Active Subwoofer
High-Power, High-Current built-in amplifier


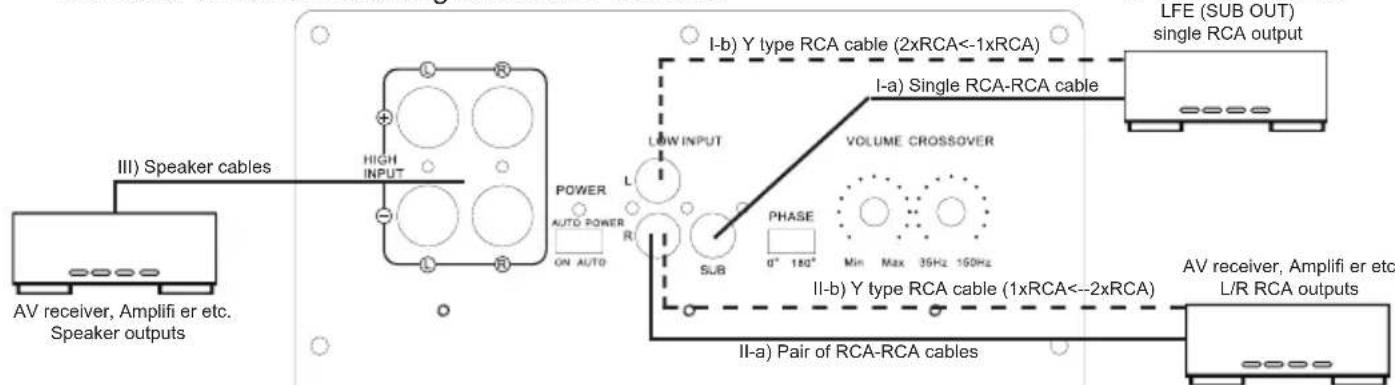
I. CONNECT USING LFE(SUB OUT) SUBWOOFER OUTPUT [PREFERRED]
This connection is recommended if your audio equipment is equipped with a single fi Itered RCA subwoofer output (usually marked as LFE, SUB OUT, SUBWOOFER etc.).
There are 2 options of connection:
a) Using a single RCA subwoofer cable - connect the LFE output with the SUB low level input on the rear of the subwoofer.
b) Using an Y-type subwoofer cable (1xRCA to 2xRCA) - connect the 1xRCA plug to the LFE output and the 2xRCA plugs to the L and R low inputs on the rear of the subwoofer.
Note! The Y type connection increases the bass output of the subwoofer by a few decibels.
II. CONNECT USING STEREO RCA OUTPUT (L/R)
If your audio equipment is not equipped with a fi Itered LFE(SUB OUT) subwoofer output then you can use regular stereo RCA outputs (non-fi Itered).
There are 2 options of connection:
a) Using a pair of RCA subwoofer cable - connect the L/R RCA outputs of your audio equipment to the L and R low inputs on the rear of the subwoofer.
b) Using an Y-type subwoofer cable (1xRCA to 2xRCA) - connect the 2xRCA plugs to the L/R RCA outputs of your audio equipment and the 1xRCA plug to the L or R low input on the rear of the subwoofer.
III. CONNECT USING SPEAKER OUTPUTS
You can use regular speaker cables to connect the subwoofer with your audio equipment – this process is the same as connecting basic stereo speakers.
Using the speaker cables connect speaker output connectors located on your audio equipment to the HIGH INPUT connectors on the rear of the subwoofer (Left with Left, Right with Right).
Pay attention to connecting the polarity of the audio equipment correctly with the subwoofer in each speaker connector group (the subwoofer should be connected RED + with RED + audio equipment connector, BLACK – with BLACK – audio equipment connector).
Hooking Up The Subwoofer
The HIGH INPUT connectors can accommodate up to 10AWG speaker cables as well as most of popular plugs (banana etc.). A 10AWG cable is recommended for longer connections (longer than 20 meters / 66 feet). For shorter lengths you can use 12/14 or 18 AWG cables. It is recommended to leave about 150 cm (5 feet) of extra cable at the subwoofer end to facilitate positioning and installation of the subwoofer. Do not use staples, nails or other metal objects to secure the cables. You will get the best sound quality and least amount of hum by keeping the cables away from other electrical wires and cables.
Note! Avoid to short-circuit of cables – it can damage this subwoofer or your audio equipment. This may void your warranty.
Note! Not all connection cables are provided with this product – refer to the KIT CONTENT.
Please refer to your audio equipment instruction manual for more information.
Your subwoofer is ready for operation.
Operation
- Plug the Power Cable to the subwoofer and into the electrical outlet.
- Turn on the subwoofer – press the POWER switch to ON. The POWER Status LED will be blinking for a few seconds and should turn on otherwise the subwoofer is working in abnormal conditions – turn off the subwoofer and check the cables and connections.
- AUTO POWER switch (selected models) – some models maybe be additionally equipped with the auto audio signal detection feature.
When the subwoofer is turned on choose one of the two operating modes:
AUTO POWER (ON) – when the POWER switch is in the ON position, the subwoofer will remain continuously on. The POWER Status LED will remain turned on.
AUTO POWER (AUTO) – when the POWER switch is in the ON position: if no input audio signal is detected for a some period of time the subwoofer will go into the standby mode (the POWER Status LED will turn off). If the subwoofer receives the input audio signal it will automatically go out of the standby mode and will start working (the POWER Status LED will turn on).
Note! If the input audio signal is too weak, the AUTO POWER (AUTO) mode may not operate properly - try to increase the subwoofer output level in your audio equipment settings or use the AUTO POWER (ON) mode.
Note! The time necessary to turn on and off of the AUTO POWER (AUTO) mode may vary on the input audio signal strength and the time of the subwoofer's activity.
- CROSSOVER regulator (L/R LOW INPUT ONLY) – it allows the adjustment of the low-pass filter. The adjustment can be smoothly made between the frequencies ranges as marked on the rear panel below this regulator. After it is set it will determine the highest frequency that the subwoofer will reproduce.
Adjust the CROSSOVER regulator until the frequency range of the subwoofer blends well with that of the front speakers. Setting the crossover at the too low level will create a gap between the frequency response of the front speakers and the subwoofer. Setting the crossover frequency too high will cause that certain frequencies will be duplicated or offset.
5.PHASE switch – it helps to fully integrate the subwoofer with the rest of your sound system. When you hear that the subwoofer bass is weak or offset, it may mean that the subwoofer works out-of-phase – try to change the phase using this switch.
- VOLUME regulator – you can adjust the sound volume of the subwoofer from minimum (the knob – max counterclockwise) to maximum (the knob – max clockwise).
Note! Distortion and sound quality worsening may occur when the knob is in the maximum position. It may damage the subwoofer. This may void your warranty.
Additional information
The power transformer of the subwoofer may generate a quiet hum both during the operation and in the standby mode.
This is consistent with the standards of the manufacturer and does not reduce the sound quality. It is recommended to turn off (POWER OFF) the subwoofer when not in use for a longer period of time.
We strongly advise to contact a professional installer or dealer in order to install TAGA Harmony products.
We recommend using high quality TAGA Harmony cables and other installation accessories.
Kit Content
Subwoofer 1EA
Single RCA-RCA subwoofer cable 1EA
Power Cable 1EA
Instruction Manual
1EA

Your product is marked with the symbol as showed on the left.
For EU (European Union) member users:
This product has been tested and found in compliance with
requirements of the European Community
2014/30/EU and 2014/35/EU directives.
natural_image
Simple line drawing of a trash bin with crossed lines indicating no waste or discharge (no text or symbols)
IMPORTANT!
Your product is marked with the symbol as showed on the left.
For EU (European Union) member users:
According to the WEEE (Waste electrical and electronic equipment)
Directive, do not dispose of this product as household waste or commercial waste.
Waste electrical and electronic equipment should be appropriately collected and recycled as required by practices established for your country.
For information on recycling of this product, please contact your local authorities, your household waste disposal service or the shop where you purchased the product.
TAGA EUROPE
POLPAK POLAND Sp. z o.o.
AL.JEROZOLIMSKIE 333A
05-816 REGUŁY k/WARSZAWY, POLAND
Email: Sales@TagaHarmony.com
- Active Subwoofers
- Introduction
- Cleaning
- Specifications
- Contents
- Safety Instructions
- IMPORTANT
- READ THIS SECTION CAREFULLY BEFORE PROCEEDING!
- CAUTION
- RISK OF ELECTRIC SHOCK DO NOT OPEN
- Unpacking the subwoofer
- Placement
- Controls and Displays - Rear Panel
- Rear Panel:
- Hooking Up The Subwoofer
- TSW Series Active Subwoofer
- CONNECT USING LFE(SUB OUT) SUBWOOFER OUTPUT [PREFERRED]
- CONNECT USING STEREO RCA OUTPUT (L/R)
- CONNECT USING SPEAKER OUTPUTS
- Operation
- Additional information
- Kit Content
- IMPORTANT!
Brand : Taga Harmony
Model : TSW-200
Category : Loudspeaker