HC-11LX Pro - Tumble drier Taiji - Free user manual and instructions
Find the device manual for free HC-11LX Pro Taiji in PDF.

| Product Type | Tumble Dryer |
| Brand | Taiji |
| Model | HC-11LX Pro |
| Capacity | 7 kg |
| Dimensions (W x D x H) | 60 x 54 x 85 cm |
| Weight | 35 kg |
| Power Supply | 220-240 V / 50 Hz |
| Power Consumption | 2000 W |
| Energy Class | A++ |
| Drying Programs | Cottons, Synthetics, Delicates, Mix, Quick 30 min, Eco, Air Fluff |
| Key Functions | Anti-crease, Delay Start, Child Lock, Overheating Protection, Reverse Tumbling |
| Filter Type | Lint filter (clean after each cycle) |
| Condenser Cleaning | Manual cleaning every 6 months |
| Noise Level | 65 dB(A) |
| Spare Parts Availability | Yes, through authorized service centers |
| Repair Index | 7.5 / 10 |
| Warranty | 2 years |
Frequently Asked Questions - HC-11LX Pro Taiji
User questions about HC-11LX Pro Taiji
0 question about this device. Answer the ones you know or ask your own.
Ask a new question about this device
Download the instructions for your Tumble drier in PDF format for free! Find your manual HC-11LX Pro - Taiji and take your electronic device back in hand. On this page are published all the documents necessary for the use of your device. HC-11LX Pro by Taiji.
USER MANUAL HC-11LX Pro Taiji
natural_image
Technical line drawing of two rectangular electronic devices with ventilation grilles (no text or symbols)Model
HC-1 1 LX Pro
HC-21LX Pro
Thank you very much for purchasing our "HOT&COOLCONVERTIBLE CABI."
CAUTION : Read the instructions before using the machine.
Contents
■ Product Specifications……■ Checking Prior to Use and Setting……7-8
■Safety Precautions....2-5 ■Sequence of Usage....9
■After-Purchase Servicing……■After Use and Maintenance……10
■Purpose of Use....●Troubleshooting....11
■Operational Mechanism....Circuit Diagram....12
■ Designation of Parts……6-7
Product Specifications
| Model | HC-11LX Pro | HC-21LX Pro |
| Rated voltage | Single-phase 220-240V 50-60Hz | |
| Power consumption | 125W | 250W |
| Temperature control | Microcomputer control | |
| Temperature | Hot : 70 - 80°C (when ambient temperature is under 30°C)Cool : 7 - 10°C (when ambient temperature is 25°C) | |
| Heating and cooling system | Peltier element | |
| Cabinet dimensions | W450 mm×D363mm×H322mm | W450 mm×D363mm×H562mm |
| Inner box dimensions | W348mm×D207mm×H152mm | Two sets of W348mm×D207mm×H152mm |
| Cabinet capacity | 11 L (approx. 55 hand towels) 22 L (approx. 110 hand towels) | |
| Weight | 10 kg | 17 kg |
| Accessories | 1×basket, 1×drain tray | 2×baskets, 1×drain tray |
| Manufacturer | TAIJI & CO., LTD. | |
| Country of manufacture | Japan | |
The specifications or appearance are subject to change without notice.
Safety Precautions
■ Please peruse these “Safety Precautions” carefully so that you can use your product in the proper way.
■ Please keep these “Safety Precautions” handy for future reference after being read.
■Precautionary measures referred to herein are matters which should be abided by for safe use and to prevent harm and/or damage being inflicted on yourself or others. Furthermore, the particulars of the precautionary measures have been classified into “Warning” and “Caution” to express the degree or extent of conceivable harm and damage which can be assumed to occur from mishandling. They are both of importance as far as safety is concerned and should be strictly abided by.
 | What is assumed to possibly result in death or serious injury. |
 | What is assumed to possibly result only in bodily injury or physical damage. |
■ What precautionary measures should be abided by are expressed by certain marks and explained as follows:
 | △ indicates “Warning and caution is urged.”(The one on the left indicates beware of electrical shock.) |
 | ⊗ indicates “Forbidden.”(The one on the left indicates disassembling forbidden.) |
 | ● indicates “Instructions” which should be followed by all means.(The one on the left indicates grounding is a requirement.) |
WARNING
 | Attention required for setting | (1) To be set upon a stable and flat location and not to be moved while plug is connected to power source. Could result in abnormal performance. |
 | Disassembling forbidden | (2) Absolutely should not be disassembled, repaired, or modified by anyone other than a repair technician. Could result in ignition or abnormal performance. |
 | Dousing with water forbidden | (3) Do not immerse in or douse with water. Such could result in electric shock or short-circuit. |
 | Inspect and clean | (4) Periodically confirm that the plug contacts are kept clean and that they are firmly inserted in the power outlet. Dust accumulation or imperfect contact could be the cause of an electric shock or fire. |
 | Many loads on one electrical outlet forbidden | (5) Ensure power source is from dedicated outlet of at least 15A. Using branch sockets could be the cause of abnormal heat, fire, etc. |
| WARNING | |
 Forbidden Forbidden | (6) Handle the power cord with care.In case the power cord is processed, pulled, bundled, or a heavy item is placed upon or squeezes it, the cord is apt to be damaged and could cause an electric shock or fire.The power cord should not come into contact with a heat source. |
 Removing plug Removing plug | (7) The appliance shall be disconnected from its power source during service and when replacing parts.The removal of the plug has to be such that an operator can check from any of the points to which he has access that the plug remains removed. |
 Forbidden Forbidden | (8) Do not intentionally bend plug contacts to prevent the plug from dropping out of the electric outlet. Imperfect contact could be the cause of fire. |
 Removing plug Removing plug | (9) In the event of abnormal odor or sound, emission of smoke, or in case water or a foreign substance should enter the cabinet, switch off the unit immediately and remove the plug from the electric outlet. Such could possibly lead to an electric shock and outbreak of fire. |
 Wet hands forbidden Wet hands forbidden | (10) Do not touch or manipulate electrical parts such as the plug, power source switch, etc. with wet hands. It could be the cause of an electric shock. |
 Outdoors forbidden Outdoors forbidden | (11) Do not use outdoors. Using the product where there is rainfall could cause electric leakage and/or electric shock. |
 Discarding forbidden Discarding forbidden | (12) Discarding of this product should be requested of specialized contractor, public agency, or the distributor from where the product was purchased. (A disposal fee is usually charged.) Discarding it at random could result in third party remodeling, using it for purposes other than as designed, which could result in an unexpected accident. |
 Attention required for using Attention required for using | (13) This appliance can be used by children aged from 16 years and above and persons with reduced physical, sensory or mental capabilities or lack of experience and knowledge if they have been given supervision or instruction concerning use of the appliance in a safe way and understand the hazards involved.- Children shall not play with the appliance.- Cleaning and user maintenance shall not be made by children without supervision. |
 Grounding connection Grounding connection | (14) Ensure grounding is connected.Imperfect grounding could lead to electric shock. CAUTION CAUTION |
| Hold plug to remove | (1) Hold the plug and not the cord when removing the plug from the electric outlet. Not doing so could result in an electric shock or ignition. |
| Caution | (2) Do not drop this product or inflict severe shock to it. It could result in failure or fire. |
| Caution | (3) Discard immediately the polyethylene bag the product was packed inside. Keep it out of children's reach to prevent incidents of suffocation. |
| Removing plug | (4) Remove the plug from the electric outlet as soon as thunder is heard. In the event of a nearby lightning strike, abnormal current/abnormal voltage could infiltrate through the power source line, etc. and possibly damage the product. |
| When not in use | (5) Switch off and remove the plug from electric outlet when not in use. If you do not, it could be the cause of an electric shock, electric leakage fire, etc. |
| Forbidden | (6) Do not use when the power cord or plug is damaged or when the electric outlet is loose. Using under such conditions could cause an electric shock, short-circuit, ignition, etc. |
| Forbidden | (7) Do not place heavy items or water containers on top of this product. Such could cause damage, injury, short-circuit, electric shock, corrosion, failure, etc. |
| Forbidden | (8) Do not place heavy items on this product or place one's weight on it with its door open. Such could be the cause of damage or toppling. |
| Caution!High temperatures | (9) To avoid burns, do not touch the surface of the inner cabinet when in Hot mode. Use caution when taking out or placing towels in the inner box when it is switched on. |
| Use individually wrapped towels | (10) Use towels which come in polyethylene wrapper when in Hot mode. Towels sometimes get dry or discolor if not polyethylene pouched.When using towels from home (as opposed to those provided by special suppliers), wring them out rather tightly (to some two and a half times the dry weight), place them in a polyethylene wrapper and seal the wrapped towels for use. However, despite being wrapped, towels left inside the inner box for longer periods may become towels dry or discolor. |
| Use heat resisting polyethylene wrapper | (11) Use heat resisting (at least 120°C) polyethylene wrapper.When polyethylene wrappers with a low heat resisting property are used, they may at times melt making towels useless, dry or cause discoloration. |
CAUTION
| CAUTION | |
| Use basket | (1 2) Always place towels on the basket and then store in this appliance when in Hot mode. If not, wrapper could melt and make towels useless or cause discoloration. |
| Forbidden | (1 3) Do not leave a towel within the inner box for more than one day. It could be the cause of discoloration and bad odor. |
| Eliminating moisture | (1 4) Wipe off moisture within the inner box as well as the body after use and remove any foreign substances. Leaving moisture or any substances inside will cause the discoloration and bad odor of towels. It will also lead to malfunctioning when used thereafter.(1 5) Empty drain tray frequently. Accumulation of water could lead to overflowing and cause bad odor. |
| Create clearance around the product | (1 6) Create clearance (at least 10 cm) around the product. If there is no clearance, exhaust heat can become trapped, causing a failure. |
| Cleaning filter | (1 7) Clean the filter periodically (every month or so). If not, exhaust heat can become trapped, causing a failure. |
In case the plastic part of this product is touched with oily hands or the unit is placed where oil is used in large quantities, make it a rule to wipe plastic parts daily with a soft cloth soaked in neutral detergent solution diluted with hot water and dry off with a soft cloth.
* Plastic parts could at times become deformed or crack under the influence of oils, etc.
Do not dispose of the device in normal domestic waste.
After-Purchase Servicing
For after sales service, contact the store where you have purchased your towel warmer, or nearest TAIJI sales representative or TAIJI & CO., LTD. in Japan. If the supply cord is damage, it must be replaced by its service agent or similarly qualified persons in order to avoid a hazard.
TAIJI & CO., LTD.
8-2, Okawa-cho, Kawasaki-ku, Kawasaki-shi, Kanagawa, 210-0858 Japan
TEL: +81-44-329-6338, FAX: +81-44-326-5860
E-mail: overseas@taiji.co.jp
This product is an electric towel warmer and/or cooler for exclusive use indoors and is fabricated to warm wet and/or cool towels.
Operational Mechanism
This product is equipped with a Peltier unit to heat or cool inside the inner box. The Peltier unit is installed in the back of the inner box. The Hot mode and Cool mode are prepared, and you can switch between them. In the Hot mode, the temperature is kept at 70^ C to 80^ C, and in the Cool mode, the temperature is kept at 7^ C to 10^ C.
* The Peltier unit is a kind of semiconductor, and it is a heat exchange unit which controls heating and cooling by using the Peltier element.
Designation of Parts
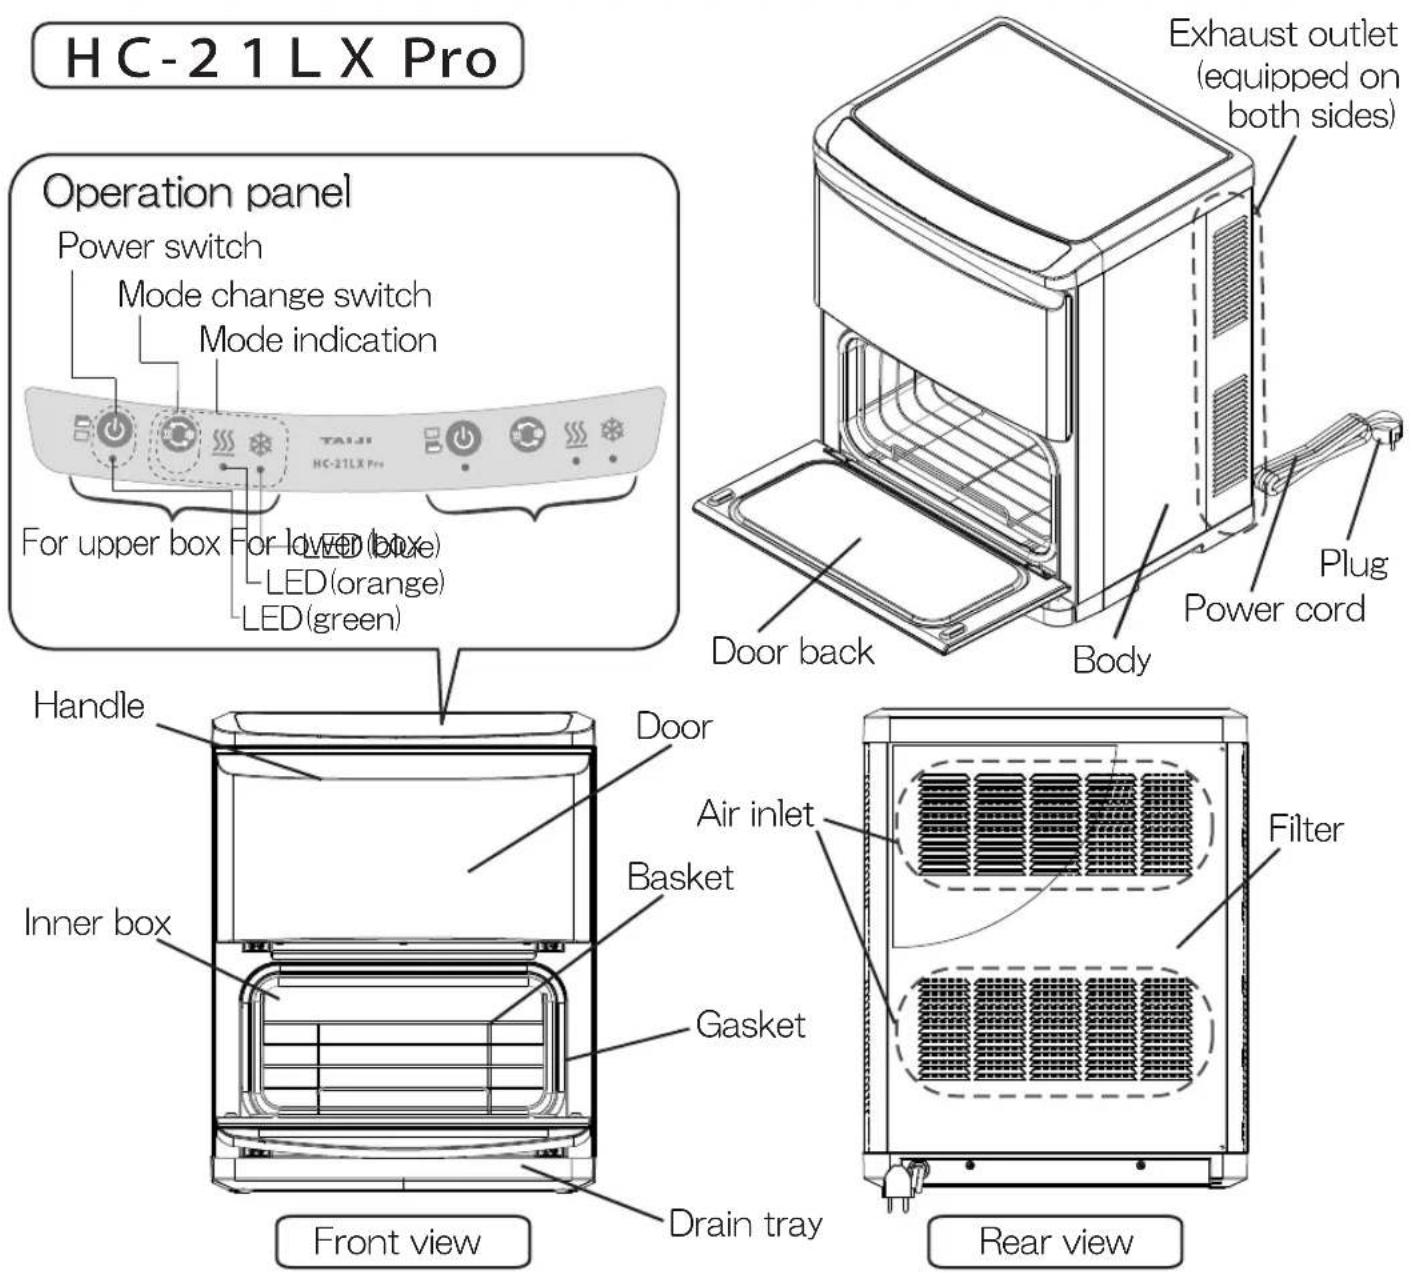
text_image
HC-2 1 L X Pro Operation panel Power switch Mode change switch Mode indication For upper box For Ioved (box) LED (orange) LED (green) Handle Inner box Front view Drain tray Door back Body Exhaust outlet -equipped on both sides) Plug Power cord Filter Air inlet Basket Gasket Door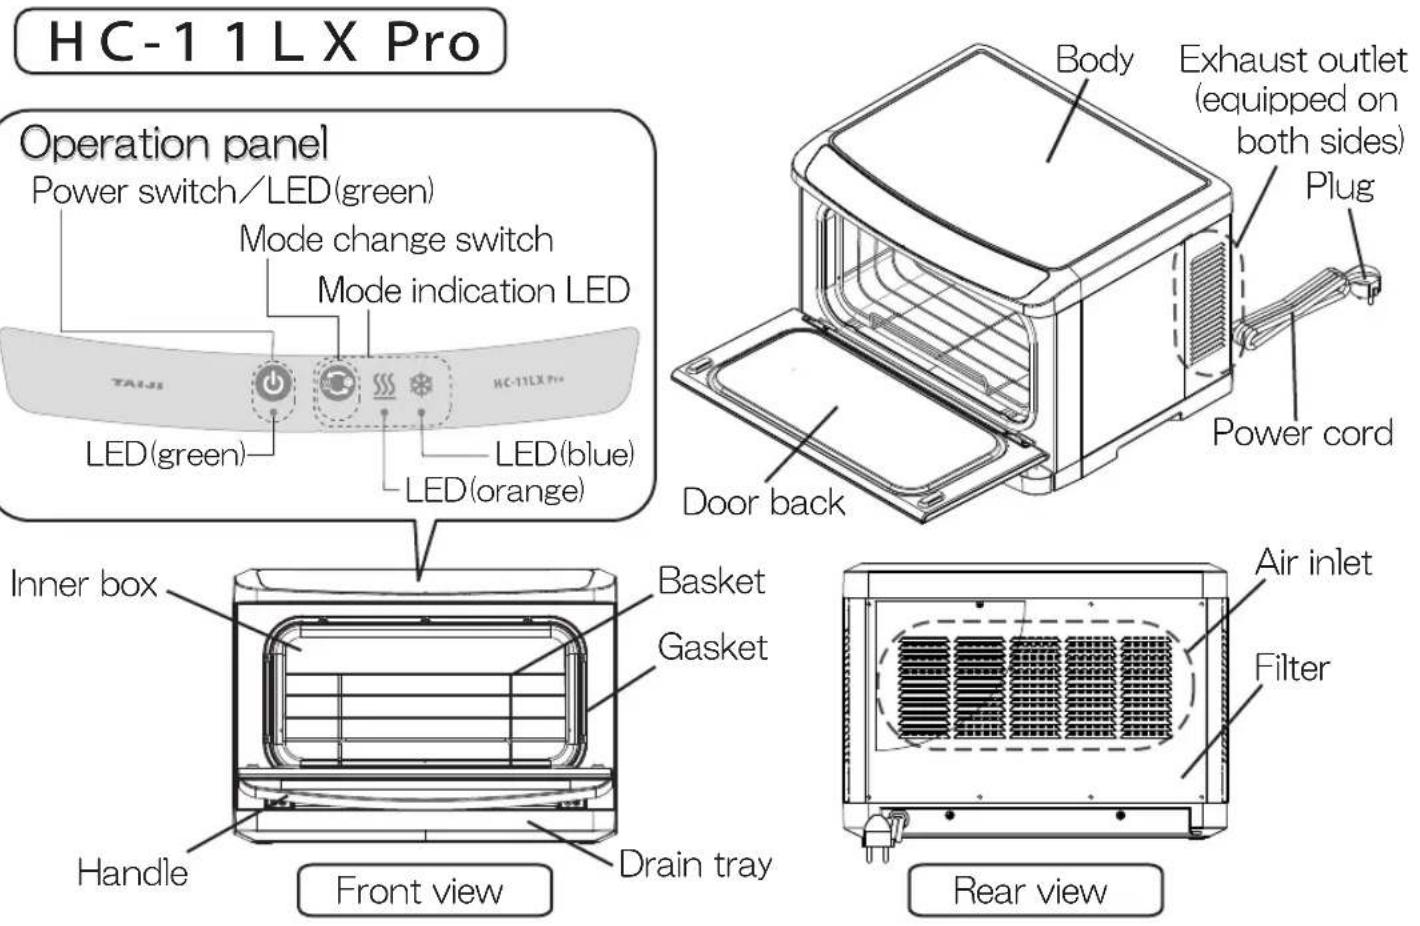
text_image
HC-1 1 L X Pro Operation panel Power switch/LED(green) Mode change switch Mode indication LED TAI-JS LED(green) LED(blue) LED(orange) HC-11LX Pro Body Exhaust outlet -equipped on both sides) Plug Power cord Door back Inner box Basket Gasket Handle Front view Drain tray Air inlet Filter Rear viewChecking Prior to Use and Setting
-
Remove the product from packing carton and make sure that Instruction Manual and Accessories are included.
-
Set the product as follows:
●At a place where it is flat and stable.
- At a place where it is not affected by heat and avoid places where there is direct sunlight, and near stoves, microwave ovens, etc. (To be set away from such units by at least 50cm.)
● Away from moist places or where it is susceptible to being splashed with water.
●Do not block the air inlet on the back or the exhaust outlet on the side.
●Make a 10cm or more clearance around the air inlet side, the exhaust outlet side, and the top side of the product. When placing the product on a shelf or the like, equip an air inlet on the back and an exhaust outlet on the side to prevent heat from becoming trapped. (If the temperature rises around the air inlet, performance can be degraded or a failure can result.)
text_image
10 cm at least 10 cm at least Exhaust air Intake air 10 cm at least Exhaust air Exhaust air 10 cm at least Intake air 10 cm at leastChecking Prior to Use and Setting (cont.)
3. Grounding
Ensure correct grounding is secured to protect against electric shock.
Consult with your dealer for details.
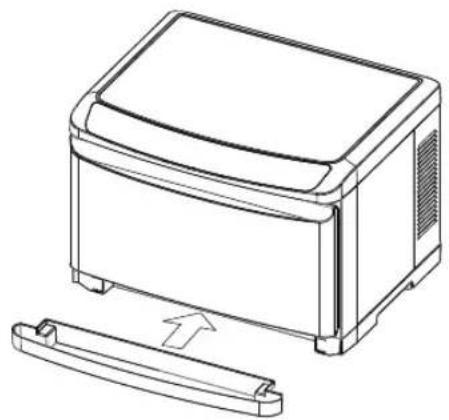
4. Affixing drain tray
●Hold both sides of drain tray horizontally and push in until firmly inserted.
- When water accumulates in the tray, remove and empty carefully.
Reinsert drain tray after being emptied.
natural_image
Line drawing of a microwave oven with a side panel and an arrow indicating rotation (no text or symbols)Sequence of Usage
- If moisture or dirt remains in the body or inner box, remove them with a dry towel etc.
- Insert the power plug, and then press the power switch ⏻.
The Peltier unit will be activated and the fan will be rotated at the same time.
* The LEDs of the power switch and the mode indication will light up.
* The Cool ✿ mode is engaged by default.
- Press the mode change switch 📋 to select your desired mode.
* The mode indication LED to be lit is changed every time you press the mode change switch.
* When you change the mode, the changed mode will be memorized.
Cool ✿ mode
(Blue)LED lights

Press to change
Hot
- Insert basket in the inner box and place wet rolled towels on the basket.
*In the event the amount of towels put into the box is low, place them on the basket as flat and as far apart as possible.
When using in Hot mode
* The interior of the cabinet becomes heated from the backside.
Place towels inside the cabinet so that they do not come into contact with such surfaces.
*When warm towels are needed in a hurry, please use towels that have been rolled after having been immersed in warm water.
* Put towels in heat resisting polyethylene wrap. If used without such wrapper, towels are apt to drying up quickly or becoming discolored.
When using in Cool mode
* The interior of the cabinet becomes cool from the backside.
* This product is to keep cool towels, etc. and it may take time to cool. Therefore, switching on well in advance or prior cooling of towels, etc. to be placed in the unit
- Close the door tightly.
About the protection function when changing the mode
When changing the mode, the protection function will work until a certain temperature is reached after the mode is changed to prevent deterioration of components owing to rapid temperature changes.(The longest: approx. 30 minutes)
●While the protection function is working, the power LED will light up and the LED of the selected mode will blink, letting you know that the protection function is working. When the status of the LED of the selected mode changes from blinking to lighting, the operation will be resumed.
*How long the protection function works differs depending on the ambient temperature, temperature inside the inner box, and installation condition.
* The fan will continue to rotate even while the protection function is working.
- Select the mode within 5 minutes after turning on the power switch.
Otherwise, the protection function may work depending on the temperature inside the inner box.
- When you turn on the power switch again within 30 minutes after you turn off the power switch, the protection function may work after the mode change depending on the temperature inside the inner box.
After Use and Maintenance
Post-use Instructions
- Switch off then remove plug from electric outlet after the fan stops completely.
* The fan will continue to rotate for about 10 seconds to cool the components.
-
Take out remaining towels, etc. and wipe inner box clean to remove residual moisture.
-
Empty water accumulated in the drain tray. Wash clean when considerably stained.
-
Stains on the body should be wiped clean with a dry cloth or a tightly wrung wet cloth.
*Use a neutral detergent when stains are severe. Do not use cleansers containing abrasives or solvents such as paint thinners.
* The appliance shall not be cleaned with a water jet.
- Leave the door of the cabinet open for a while for moisture to dry as a means to prevent odors.
Maintenance for every week or so
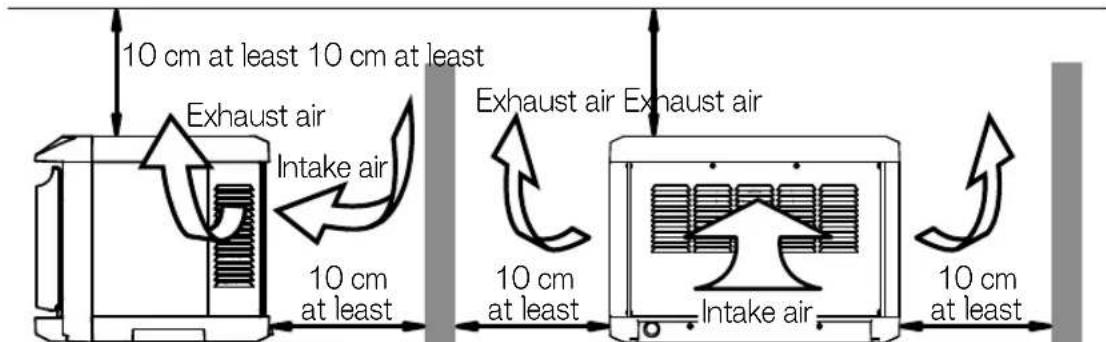
Filter
- Hold both sides of the filter, raise it upward to detach its bottom end from the body, and pull it diagonally downward to remove it.

text_image
Diagram showing a microwave oven with labeled components and directional arrows indicating process flow or movement.-
Suck dust by using a vacuum cleaner, etc.
-
Reattach the filter by the reverse procedure of that for removal.
* Frequent cleaning of filters is a requisite for the cabinet's best performance.
* Do not operate the product while the filter is detached. Otherwise, dust can enter into the body, causing a failure.
If an indication below appears
Remove the power cord once, and then switch on the power again.
If normal status cannot be recovered even after doing that, confirm the error details and request repair.
| Indication Details/Countermeasures | |
| LED (green) blinks | An error in the temperature sensor. |
| LED(green)+LED(orange)+LED(blue)blink | An error in the temperature control.It can be assumed that heat has been generated and the temperature has risen exceeding the normal range.●Check the installation condition.→ Install the product by following the instructions on page |
| LED(orange)blinkorLED(green)+LED(orange)blink | An error in the Peltier unit.There is a possibility of a failure in the Peltier unit. |
| LED(blue)blinkorLED(orange)+LED(blue)blink | An error in the fan.●Check if there is something caught in the air inlet on the back or around it.→ If there is, disconnect the power cord once, and then remove it. |
Troubleshooting
| Situation Details/Countermeasures | |
| The LED of the power switch does not light up. | ●Is the power plug disconnected? |
| It does not become heated or cooled even after waiting for a while. | ●Is the power plug disconnected?●Are there any abnormal indications? * Check "If an indication below appears" above. |
| Noises are heard during use. | ●Is the product installed in a stable and flat location?●Noises are heard from the fan that cools the components.●Small noises can be heard during use or immediately after use owing to expansion or contraction in the surface inside the inner box, but it is not a failure. |
| There is an abnormal smell. | ●Have you wiped off dirt and moisture attached to the inside of the inner box regularly?●Have you emptied water accumulated in the drain tray regularly |
Circuit Diagram
HC-1 1 L X P r

flowchart
graph TD
    A["Power cord"] --> B["Switching power source"]
    B --> C["Control board"]
    C --> D["Fan"]
    C --> E["Peltier element"]
    C --> F["Peltier element"]
    C --> G["Thermistor"]
    C --> H["Operation panel"]
    H --> I["Mode change switch"]
    H --> J["Power switch"]
    H --> K["Cool mode LED"]
    H --> L["Hot mode LED"]
HC-21LXPr

flowchart
graph TD
    A["Power cord"] --> B["Switching power source"]
    B --> C["Power switch LED"]
    C --> D["Operation panel"]
    D --> E["Mode change switch"]
    D --> F["Cool mode LED"]
    D --> G["Hot mode LED"]
    G --> H["Control board Switching"]
    H --> I["Thermistor"]
    H --> J["Peltier element"]
    H --> K["Peltier element"]
    H --> L["Fan"]
    L --> M["Power switch LED"]
    M --> N["Operation panel"]
    N --> O["Mode change switch"]
    N --> P["Cool mode LED"]
    N --> Q["Hot mode LED"]
    Q --> R["Peltier element"]
    Q --> S["Fan"]
    S --> T["Power switch LED"]
    T --> U["Operation panel"]
    U --> V["Cool mode LED"]
    U --> W["Thermistor"]
    U --> X["Peltier element"]
    U --> Y["Fan"]