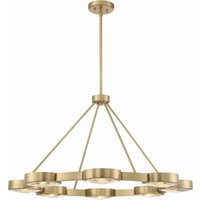
Orson ORS-738-MG - Lighting Crystorama - Free user manual and instructions
Find the device manual for free Orson ORS-738-MG Crystorama in PDF.


| Brand | Crystorama |
| Model | Orson ORS-738-MG |
| Product Type | Ceiling Light / Chandelier |
| Category | Lighting |
| Dimensions | Approximately 24 inches (height) x 20 inches (width) |
| Weight | Approximately 8 lbs |
| Power Source | Hardwired, 120V AC |
| Bulb Type | E26 Medium Base, up to 60W each (bulbs not included) |
| Number of Bulbs | 6 |
| Dimmable | Yes, when using dimmable bulbs and compatible dimmer switch |
| Material | Metal frame with matte gold finish |
| Functions | On/off pull chain or wall switch control |
| Care and Cleaning | Wipe with a soft, dry cloth; do not use harsh chemicals |
| Safety | Must be installed by a qualified electrician; follow local electrical codes |
| Spare Parts | Replacement glass shades available from Crystorama |
| Warranty | 1-year limited warranty against manufacturing defects |
| Installation | Ceiling-mounted, includes mounting hardware |
| Environment | Indoor use only, dry location |
Frequently Asked Questions - Orson ORS-738-MG Crystorama
User questions about Orson ORS-738-MG Crystorama
0 question about this device. Answer the ones you know or ask your own.
Ask a new question about this device
Download the instructions for your Lighting in PDF format for free! Find your manual Orson ORS-738-MG - Crystorama and take your electronic device back in hand. On this page are published all the documents necessary for the use of your device. Orson ORS-738-MG by Crystorama.
USER MANUAL Orson ORS-738-MG Crystorama
ASSEMBLY INSTRUCTION MODEL #ORS-738-MG


WARNING:

Electrical Danger

Turn Power Off
All electrical components must be installed by a licensed electrician in accordance with the National Electric Code and the appropriate local electrical codes.

C

You will need 8 - Candelabra Bulb 40 Watts Recommended 60 Watts Ma USE LED BULBS FOR EXTENDED USE This fixture is Dry Rated.
How to Install
- Attach one end of the rod onto the frame with screws by aligning the holes on the tab with the holes on the band ring..
- Attach other end of rod to top distributor box. Secure it with washer and hex nut.
- Place the metal plate over top distributor box and secure with washer and nut. Place the cap over the hex nut.
- Determine correct length of stem needed for hanging height.
- Slip the wire through the stems and connect them together. Screw one end of the stem assembly onto the fixture body and the other end onto the swivel on the canopy.
- Attach mounting plate to the outletbox using box screws. Connect the fixture wires to the supply wires.
- Mount the fixture to the outlet box with ball nuts.
- Unscrew the candle sleeve from the socket, Gently insert the crystal along the edge of metal ring onto the bottom of ring.
- Screw Candle Sleeve back onto socket.
- Install the bulb (Not included) in accordance with the fixture's specifications. (DO NOT EXCEED THE MAXIMUM WATTAGE RATING
PART NUMBER MODEL #ORS-738-MG

Brand : Crystorama
Model : Orson ORS-738-MG
Category : Lighting