2692035 - Lawn mower Victa - Free user manual and instructions
Find the device manual for free 2692035 Victa in PDF.

User questions about 2692035 Victa
0 question about this device. Answer the ones you know or ask your own.
Ask a new question about this device
Download the instructions for your Lawn mower in PDF format for free! Find your manual 2692035 - Victa and take your electronic device back in hand. On this page are published all the documents necessary for the use of your device. 2692035 by Victa.
USER MANUAL 2692035 Victa
Thank you for purchasing your VICTA product. VICTA prides itself in the quality and performance of all its products.
This instruction manual will aid in the assembly, safe operation and maintenance of your product.
Please read the following warnings to ensure safety and the long life of your product.

WARNING
Do not attempt to operate this product until you have read thoroughly and understood completely all instructions, safety rules, etc, contained in this manual. Failure to comply may result in accidents involving electric shock, fire, and/or serious personal injury.
INTENDED USE
This product is intended for domestic lawn mowing only. The cutting blade should rotate approximately parallel to the ground over which it is being wheeled. All four wheels should touch the ground while mowing. It is a pedestrian controlled walk behind mower.
NOTE: The mower should never be operated with the wheels off the ground, it should not be pulled or ridden on. It should not be used to cut anything other than domestic grass lawns.
Do not use the product for any task, except for that which it is intended.
General safety

Warning!

Read the directions for use before operating the machine.

Wear safety goggles and ear protection that meet safety standards.

Wear sturdy, non-slip footwear.

Wear safety gloves.

Do not use machine in wet conditions, protect the machine from rain and damp.

Be careful of objects being thrown out!

Ensure bystanders are kept at least 50' (15m) away & stop the machine if approached.

Keep away from heat and/or open flame.

Beware of electric shock hazard when charging.
Read the directions before carrying out any maintenance work.

Wait for all components of the machine to completely stop & remove the battery.
Keep hands and feet away from cutting area. Contact with the blades can amputate hands & feet.
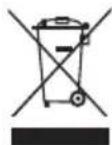
Should NOT be disposed of with house hold items.

Never use the mower unless the grass catcher or guard is in position.
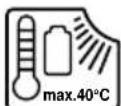
Ambient temperature 40°C Max.

Do Not immerse in water.
Table of Contents

Safety & Handling
| General | Safety | 1 |
| Product Disporal | 3 | |
| Emergency Contact | 3 |

Features & Definitions
| Product Features | 4 |
Assembly Procedures
| Handle assembly parts | 7 |
| Attaching the lower handle | 7 |
| Installing Batteries | 9 |
| Removing Battery | 10 |
| Grasscatcher Assembly | 10 |
| Grasscatcher Assembly (Fabric) | 11 |

Operating Instructions
| Quick Set Up Guide | 12 |
| Starting and Stopping | 13 |
| Battery Capacity Indicator | 13 |
| Height Adjustment | 14 |
Mowing Tips

Maintenance & Care
| Emptying Grass Catcher Cleaning | 15 | 15 | |
| Storage | 16 | ||
| Blade Replacement | 17 | Battery | 18 |
| Service | 18 | ||
| Maintenance Chart Troubleshooting | 19 | Secification | 21 |
| 20 |

Warranty
NOTE - WARRANTY DETAILS ARE NOT WRITTEN WITHIN THIS OPERATOR'S MANUAL. REFER TO THE WARRANTY LEAFLET SUPPLIED WITH THE MACHINE FOR PRODUCT WARRANTY DETAILS.
General Safety
- Keep this manual in a safe place for future reference, and consult it regularly. Ensure other users read this manual and are aware of the product safety risks.
- The machine should be operated only with a genuine Briggs & Stratton Lithium-ion battery. When using battery operated machine basic safety precaution should always be followed to reduce the risk of leaking batteries and personal injury.
- Serious injury can occur as a result of the machine being pulled over the operator's foot during a fall caused by slipping or tripping.
- In the event of a trip or fall, release the handle bail immediately. Do not hold onto the machine handle bail during an accident.
- When needing to reverse with the machine, only do so once the machine has come to a complete stop and always look behind for hazards before moving.
- Do not operate the machine while under the influence of alcohol or drugs.
- Stay alert & do not operate the machine when you are tired. Pay attention to what you are doing and ensure others are aware of your task intentions before commencing.
- Before inspecting, adjusting, servicing or cleaning the machine, always stop & remove both the batteries & safety key.
- Stop the machine when crossing gravel driveways, walkways, or roads.
- If the machine starts to vibrate excessively, discontinue use until the machine has been inspected and assessed. Having a machine assessed for vibration problems generally reduces the risk for injury or product failure.
- Don't force the machine beyond its cutting capacity. The machine will perform better and safer if allowed to cut at the pace for which it is rated for.
- Do not use the machine indoors. Only store the machine indoors in a dry & secure location. Keep the machine out of reach of children.
- Use extreme care when approaching blind corners, doorways, shrubs, trees, or other objects that may obscure your view & the path of the machine.
- Do not operate the machine in any way which will allow the blades to be exposed and only use with all 4 wheels on the ground. Do not lift or carry the machine while operating.
Training
- Read the instructions carefully. Be familiar with the controls and the correct use of the machine.
- Never allow children or people unfamiliar with these instructions to use the machine. Local regulations can restrict the age of the operator.
- Never operate the machine while people, especially children, or pets are nearby.
- Keep in mind that the operator or user is responsible for accidents or hazards occurring to other people or their property.
Preparation
- While operating the machine always wear substantial footwear and long trousers. Do not operate the machine when barefoot or wearing open sandals. Avoid wearing clothing that is loose fitting or that has hanging cords or ties.
- Always wear a face mask or dust mask when operating the machine in a dusty environment.
- Thoroughly inspect the area where the machine is to be used and remove all objects which can be thrown by the machine.
- Before using, always visually inspect to see that the blade, blade bolt and the blade assembly are not worn or damaged. Replace worn or damaged components in sets to preserve balance. Replace damaged or unreadable labels.
Operation
- The machine can be powered only with a genuine Briggs & Stratton Lithium-ion battery. When using battery operated machine, basic safety precaution should always be followed to reduce the risk of leaking batteries and personal injury.
- Operate the machine only in daylight or in good artificial light.
- Avoid operating the machine in wet grass.
• Always be sure of your footing on slopes.
- Walk, never run.
- Mow across the face of slopes, never up and down.
• Exercise extreme caution when changing direction on slopes.
- Do not mow excessively steep slopes.
- Use extreme caution when reversing or pulling the machine towards you.
- Stop the blade(s) if the machine has to be tilted for transportation when crossing surfaces other than grass, and when transporting the machine to and from the area to be used.
- Never operate the machine with defective guards or shields, or without safety devices, for example deflectors and/or grass collector, in place.
- Switch on the motor carefully according to instructions and with feet well away from the blade(s).
- Do not start the machine when standing in front of the discharge opening.
- Do not put hands or feet near or under rotating parts. Keep clear of the discharge opening at all times.
- Do not transport the machine while the power source is running.
- Stop the machine, and remove the safety key and battery. Make sure that all moving parts have come to a complete stop
- whenever you leave the machine,
- before clearing blockages or unclogging chute,
- before checking, cleaning or working on the machine,
- after striking a foreign object. Inspect the machine for damage and make repairs before restarting and operating the machine;
If the machine starts to vibrate abnormally (check immediately)
- inspect for damage,
- replace or repair any damaged parts,
- check for and tighten any loose parts.
Maintenance and storage
- Keep all nuts, bolts and screws tight to be sure the machine is in safe working condition.
- Check the grass collector frequently for wear or deterioration.
- Be careful during adjustment of the machine to prevent entrapment of the fingers between moving blades and fixed parts or the machine.
• Always allow the machine to cool down before storing - When servicing the blades be aware that, even though the power source is switched off, the blades can still be moved.
- Replace worn or damaged parts for safety. Use only genuine replacement parts and accessories.
Remove both the B&S 18V batteries from lawn mower prior storring or performing any maintenance activities.
Product Disposal
CORRECT DISPOSAL OF THE PRODUCT

Waste electrical products should not be disposed of with household waste. Please recycle where facilities exist. Check with your local authority or retailer for recycling advice. The battery contains material which is hazardous to you and the environment. It must be removed and disposed of separately at a facility that accepts lithium-ion batteries.

Refer to Briggs & Stratton 18V Battery & Charger manual for further information relating to battery and charger disposal.
CORRECT DISPOSAL OF THE PACKAGING

The packaging consists of cardboard and correspondingly marked plastics that can be recycled. Make these materials available for recycling.
Information about the residual risks that remain despite the inherit safe design measures, safeguarding and complementary protective measures adopted.
Emergency Contact
In the rare case a battery is damaged & any of the contents leaks or comes into contact with a persons skin, eyes, or is ingested, follow the first aid instructions inside the battery & charger manual. Seek further medical attention immediately.

WARNING
Do not store the batteries in the product. Remove them from product after use and place them in the charger.

WARNING
Do not operate the product if any component is missing or damaged. Have the missing components and or products replaced.
Product Features
LAWN MOWER 18V TWIN BATTERY
NOTE: FOR VICTA 18" STEEL DECK MOWERS AND 19" ALLOY DECK MOWERS.

text_image
Technical diagram of a lawn mower with numbered parts and exploded view, including labeled components and internal parts.- Victa Lawn Mower
- 18V Twin Battery Powerhead
- Battery Cover
- Control Panel
- Bail
- Control Cable and Wiring
- Battery Charge Indicator
- Handle Knob
- Handle Bracket
- Handle Insulation Bracket
- Lower Handle
-
Upper Handle
-
Rear Flap
- Height Adjustment Lever
- Rear Wheel
- Rear Wheel Hubcap
- Conlink Rod
- Conlink Spring
- Front Wheel
- Front Wheel Hubcap
- Cable Clamps x 2
- B&S 18V Twin Charger
- B&S 18V Batteries
- Safety Key
-
Grass Catcher
-
Battery & Charger Instruction/Safety Manual (not shown)
- Mower Instruction/Safety Manual (not shown)
Product Features
LAWN MOWER 16INCH 18V TWIN BATTERY
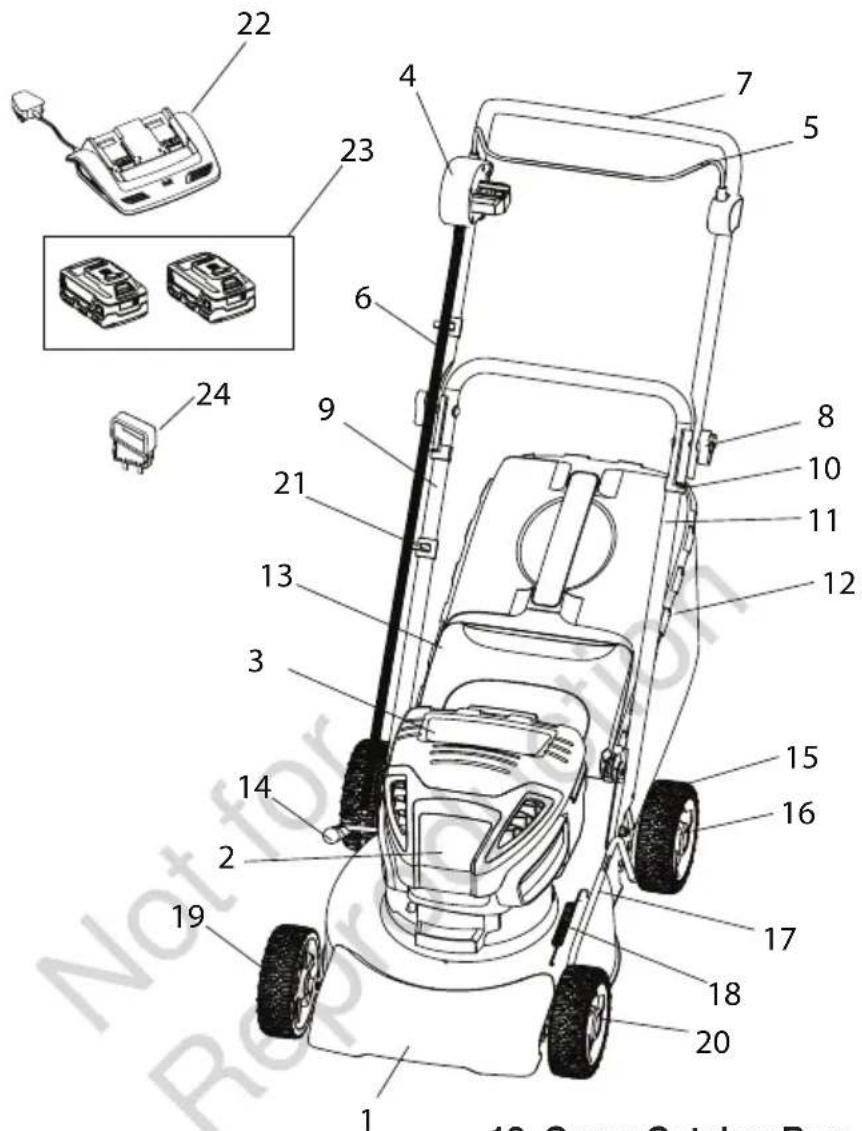
text_image
22 4 7 5 23 6 8 10 11 12 24 9 21 13 3 14 2 15 16 17 18 20 19 10 Cross Catcher Box- Victa 18" Steel Lawn Mower
- 18V Twin Battery Powerhead
- Battery Cover
- Control Panel
- Bail
- Control Cable and Wiring
- Top Handle
- Knob
- Lower Handle
- Handle Insulation Bracket
-
Grass Catcher Top
-
Grass Catcher Bag
- Rear Flap
- Heigh Adjustment Lever
- Rear Wheel
- Rear Wheel Hubcap
- Conlink Rod
- Conlink Spring
- Front Wheel
- Front Wheel Hubcap
- Cable Clamps x 2
- B&S 18V Twin Charger
- B&S 18V Batteries
-
Safety Key
-
Battery & Charger Instruction/Safety Manual (not shown)
- Mower Instruction/Safety Manual (not shown)
Handle assembly parts (18Inch Lawn Mower Models)
Your lawnmower should include a kit with the following parts.
Refer to the product feature pages for your lawn mower's final assembled view.

text_image
Lower handles Bail Upper handle See note Control Box 2 Insulation Brackets 2 Handle Knobs Bolts M8 x 45 2 Bolts M8 x 28mm 2 Flange nuts 2 Cable clamps Fig. 1Note: The control box comes assembled to upper handle and wires connected to the power head motor on the lawn mower. Insulation brackets comes assembled on lower handle.
Attaching the lower handle (18Inch Lawn Mower Models)
- Place lower pin through the mounting bracket, handle and saddle plate holes. Secure with the nut but do not fully tighten at this stage.
- Repeat on other side and tighten all two nuts securely.
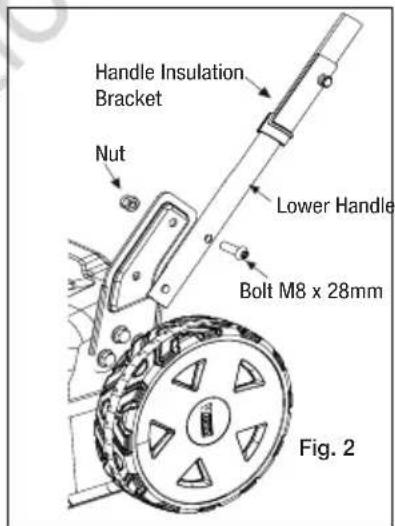
text_image
Handle Insulation Bracket Nut Lower Handle Bolt M8 x 28mm Fig. 2Attaching the upper handle (All Lawn Mower Models)

text_image
Upper Handle Bolt M8 x 45mm Lower Handle Handle Bracket Knob Fig. 3- Attach the upper handle to the lower handles using the knobs and bolts provided. The knobs should be on the outside.

Remove batteries or do not insert batteries when assembling components on lawn mower.

When folding or unfolding the handles, ensure that the cable is not caught or stretched, as that can damage the cable.

Ensure all cables and inside handles. Use the cable clamps provided.
Handle assembly parts (16Inch Lawn Mower Models)
Your lawnmower should include a kit with the following parts.
Refer to the product feature pages for your lawn mower's final assembled view.
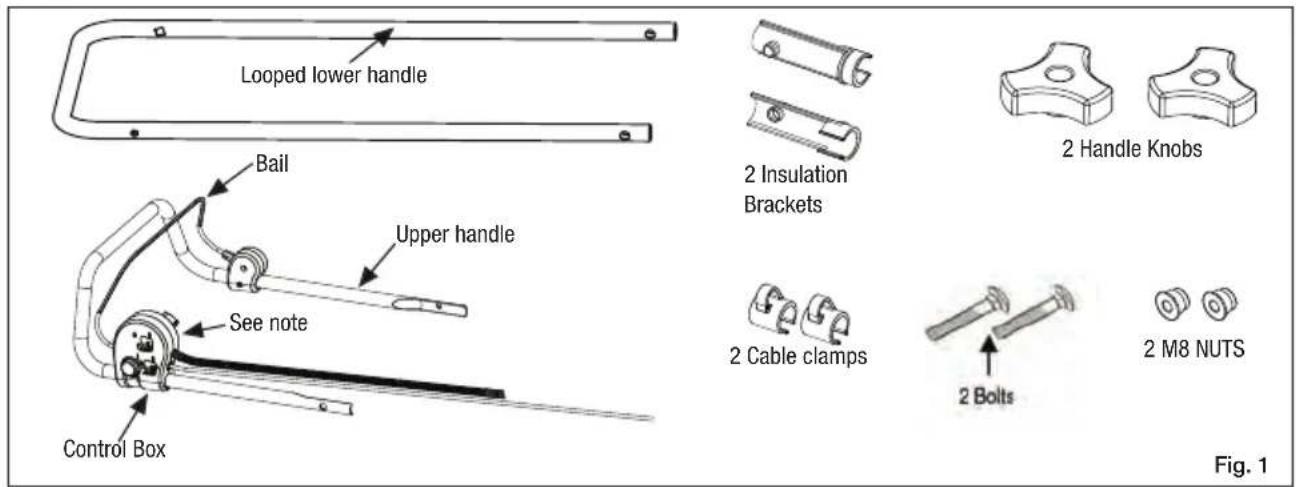
text_image
Looped lower handle Bail Upper handle See note Control Box 2 Insulation Brackets 2 Cable clamps 2 Bolts 2 Handle Knobs 2 M8 NUTS Fig. 1Note: The control box comes assembled to upper handle and wires connected to the power head motor on the lawn mower. Insulations brackets come assembled on lower handle.
Attaching the lower handle (16Inch Lawn Mower Models)
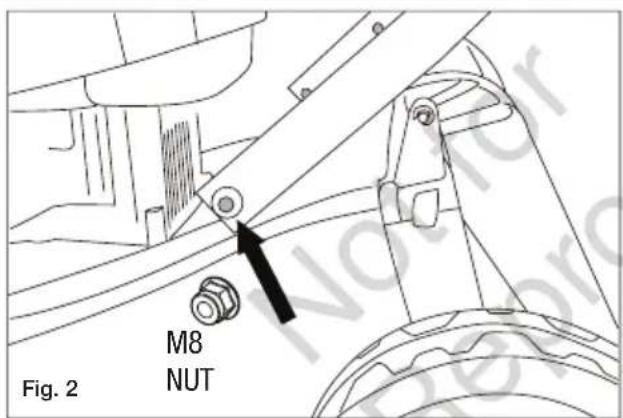
text_image
M8 NUT Fig. 2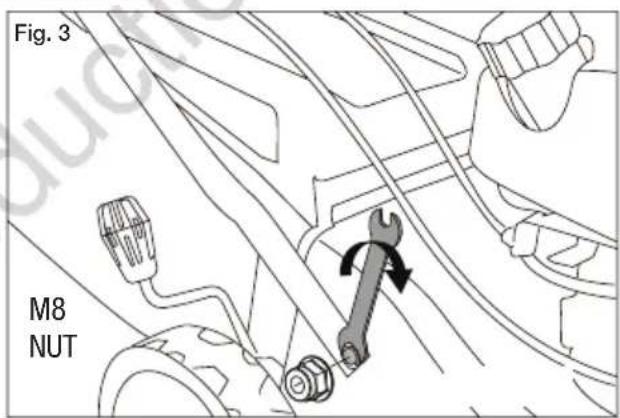
text_image
Fig. 3 M8 NUTAttaching the lower handle (All Lawn Mower Models)

text_image
Cable clamp Control Cable Upper handle Handle knob Insulation Bracket Bolt Looped lower handle Fig. 4- Attach the upper handle to the lower handles using the knobs and bolts provided. The knobs should be on the outside.

Remove batteries or do not insert batteries when assembling components on lawn mower.

When folding or unfolding the handles, ensure that the cable is not caught or stretched, as that can damage the cable.

Ensure all cables and inside handles. Use the cable clamps provided.
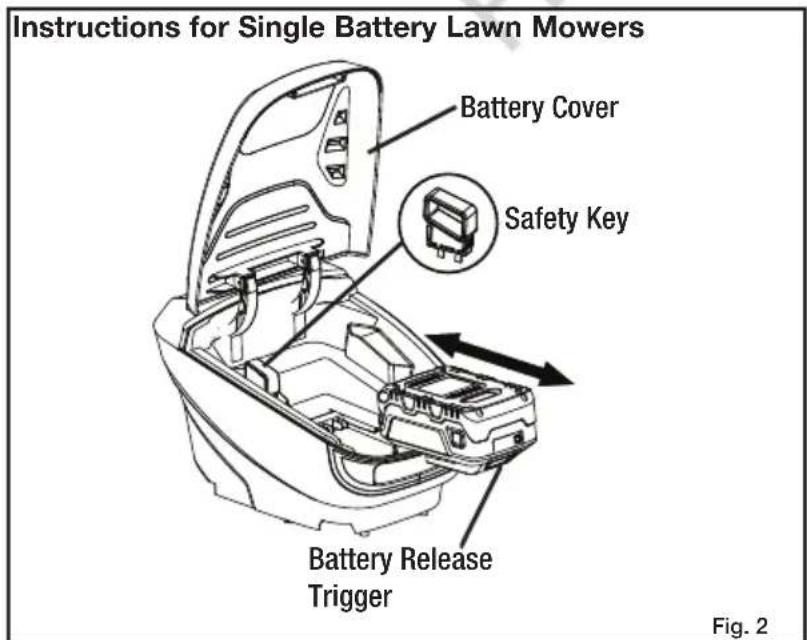
Installing Batteries
Note: Refer to figure 1 & 2.
- Lift and hold up the battery cover.
- Place the batteries in the mower. Align guided ribs on battery with grooves in the product's battery port.
- Make sure the latch on bottom of the battery snaps in place and that the battery is fully seated (will "click" into place) and secure in the mower before beginning operation.
- Insert the safety key.
- If the machine is not going to be used immediately, do not insert the safety key.
- Close the battery cover gently to avoid damage.

text_image
Instructions for Twin Battery Lawn Mowers Release Trigger Batteries Battery Cover Insert Batteries push to lock in. Safety Key Fig. 1
Twin Battery Lawn Mower is a 36V system so it needs two B&S 18V Batteries to function.
Will not function with one battery. It is recommended that both batteries are equally charged for optimum performance.
Refer Battery Manual for further details on batteries and chargers.
text_image
Instructions for Single Battery Lawn Mowers Battery Cover Safety Key Battery Release Trigger Fig. 2
Single Battery Lawn Mower is a 18V system so it needs one B&S 18V Battery to function.
Refer Battery Manual for further details on batteries and chargers.
ASSEMBLY PROCEDURES
Removing Batteries
- Release the bail to stop the product.
- Remove the safety key.
- Press and hold the battery release trigger button at the bottom of the battery.
- Slide outward to remove the battery from the product.

Do not insert any object into the battery recess other than the battery supplied.
Do not force the battery. It should glide smoothly if inserted or released correctly.
Remove safety key if product has batteries installed.
Remove batteries in place in charger after use.
Do not store batteries in product.
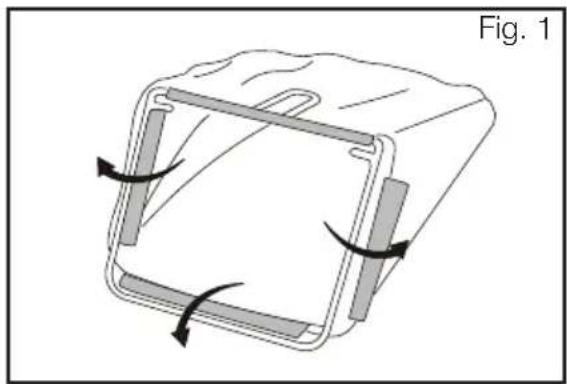
Grasscatcher - hard/solid type
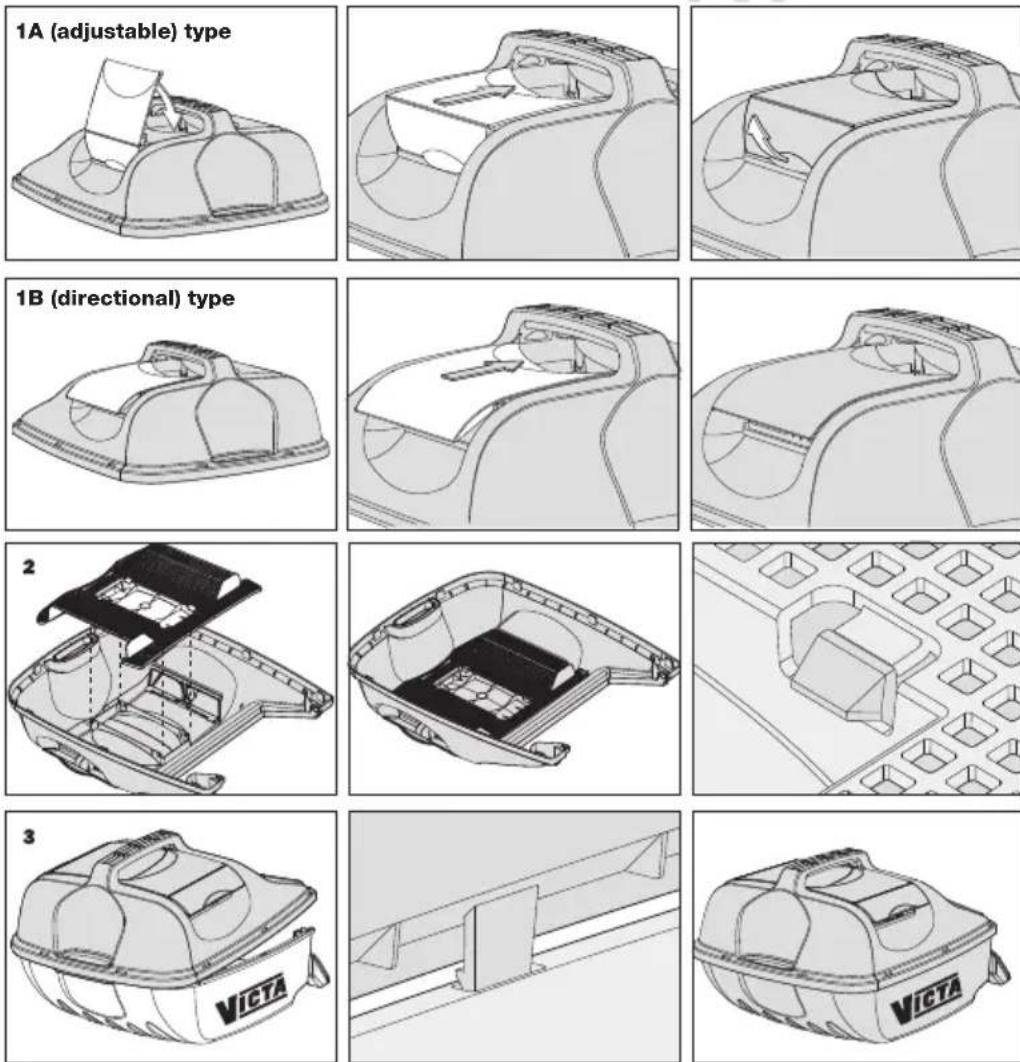
Grasscatcher - hard/solid type
Assembling the grasscatcher
1 Assemble the covers 1A or 1B to the top half of the grasscatcher.
2 Locate the centre protrusion of the mesh into the centre hole on the inside of the grasscatcher top, ensuring the curved edge of the mesh faces the rear handle. Firmly push the mesh into the top half of the grasscatcher, making sure that the four snap hooks engage securely.
3 Loosely locate the rear handle areas of the top and bottom grasscatcher halves then loosely locate the side edges. Check that all eight hooks from the top half are loosely located in the slots on the bottom half then firmly push the two halves together over each snap hook. Check that all of the snap hooks have engaged securely.
4 Tighten the two screws fitted to the front of the grasscatcher.
NOTE: Some models may have steps 1 to 3 already compete.
Grasscatcher Assembly 16Inch

natural_image
Technical line drawing of a mechanical component with no visible text or symbolsFig. 1
natural_image
Close-up of a metallic panel or cover with visible internal structure and mounting brackets (no text or symbols)Fig. 2 Fig. 3

natural_image
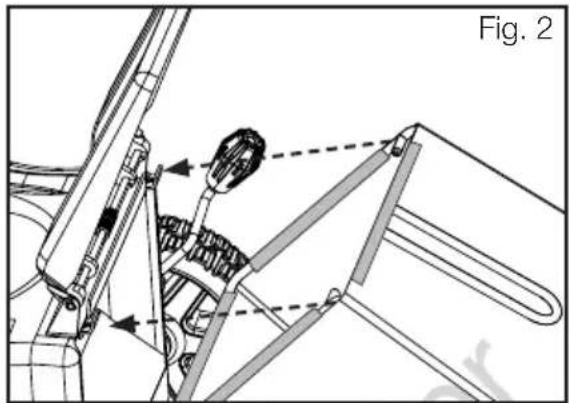
Close-up of a mechanical assembly with no visible text or symbolsFitting the Hard Top Fabric Grasscatcher
- Fit and secure the catcher handle as shown in figure 1. Note: Some models the catcher handle is not assembled.
- Raise the rear flap and hook the grasscatcher on the bar at the rear of the mower as shown in figures 2 & 3. Lower the rear flap to retain the grasscatcher.
- To remove the grasscatcher, lift the rear flap and grasp the handle on the grasscatcher and unhook from the rear bar.

STOP the motor before fitting or removing the grasscatcher.
Ensure the catcher handle is securely fitted to the grasscatcher before use to prevent the grasscatcher from falling off which may cause injury or damage.
Never use the mower unless the rear flap is closed or the grasscatcher is correctly fitted.
Grasscatcher - Fabric Catcher
natural_image
Diagram of a rectangular device with internal components and directional arrows indicating rotation (no text or symbols)Fitting the Fabric Grasscatcher
- Stop the engine.
- Attach the grasscatcher to the frame by fixing all plastic hooks as shown in figure 1.
- Raise the rear flap, and hook the grasscatcher onto the mower as shown in figure 2. Lower the rear flap to retain the grasscatcher.
- To remove the grasscatcher, lift the rear flap and grasp the handle on the grasscatcher and unhook from the mower.
natural_image
Technical line drawing of a mechanical assembly with no visible text or symbols
STOP the motor before fitting or removing the grasscatcher.
Never use the mower unless the rear flap is closed or the grasscatcher is correctly fitted.

OPERATING INSTRUCTIONS
Load sensing technology
The Mower has built in load sensing technology. Under certain conditions the lawn mower detects excess load and increases the blade cutting speed. This feature takes less than second to work and will continually change speed to meet demand. This feature is provided for a seemless and smooth cut. It simulates the high torque and power feeling that the Victa petrol lawn mower is known for.
But this can also increase the motor temperature, draw excessive current from the battery and reduce the battery runtime.
There is a high current cut off built into the lawn mower. This feature is provided to prevent burning or damaging the electric dc brushless motor. Load protection can activate the current cutoff resulting in the stalling of the lawn mower.
Avoid frequently over-loading the mower as this may increase battery temperatures & turn on the Battery Thermal Protection. The Battery Thermal Protection will require the machine to be rested sufficiently to cool.
OPERATING INSTRUCTIONS
Quick Setup Guide


text_image
HIGHER 1 2 LOWER
text_image
SHORT - LIGHT THIN GRASS FAST SLOW TALL - HEAVY THICK GRASS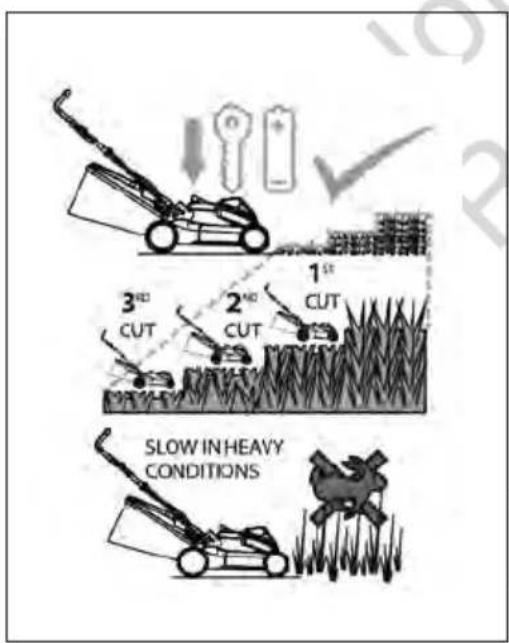
text_image
3rd CUT 2nd CUT 1st SLOW IN HEAVY CONDITIONS1 - READY
- Remove battery or batteries & key
- Check if the grass is tall or thick
- Check catcher & deck are empty of grass
- Check the battery is fully charged
✗ Don't adjust the mower with battery or key inserted.
√ Remove battery & key before adjusting the mower.
× Don't cut when catcher is full or if chute is blocked.
√ Empty catcher prior to mowing.
2 - SET
- Increase cut height in tall or heavy grass
- Clean the catcher & deck of cut grass
- Push the mower slower in heavy grass
✗ Don't cut low in long, thick or wet grass.
√ Adjust to cut higher in overgrown lawn.
✗ Don't force mower through thick lawn.
√ Slow down if grass becomes thicker.
3 - GO
- Insert battery & key
• Try cutting grass at selected height - Increase height & cut grass more frequently as required in long heavy grass
- If LOAD PROTECTION* stops the mower, repeat Step 1,2,3 by increasing the height pushing slower or clean grass from the catcher & deck.
- When mowing if catcher indicator flap is down, catcher is full.
✗ Don't continue cutting if mower frequently cuts out.
√ Avoid frequent load protection cutouts.
× Don't continue if battery over heats.
√ Allow the battery to cool if the battery thermal protection is activated.

Avoid frequently over-loading the mower as this may reduce runtime increase battery temperatures. This will result in the stalling of the lawnmower.
Starting & Stopping
To START the Mower:
- Open the battery cover and insert the safety key into the slot. (See Fig.)
- Press and hold the safety lock-out button (1). (See Fig.)
- Pull the bail (2) upward to the handle to start the mower and release the safety lock button with feet well away from blades.
To STOP the Mower:
- Release the bail.
- Wait for mower to completely stop, then remove safety key.
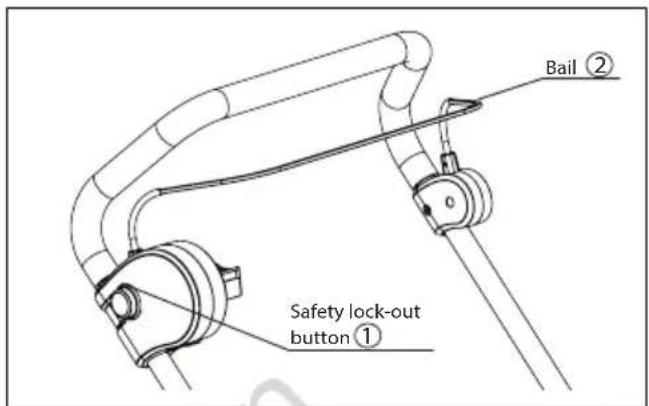
text_image
Bail ② Safety lock-out button ①SOFT-START
This Mower is equipped with a "Soft-start" feature. When initially starting up, the mower will take approximately 3 seconds to get up to full speed. If the mower does not initially start: Remove the battery and check under the mower deck to ensure there is nothing obstructing the blade and that the blade can spin freely by hand. Even a small amount of grass on start up will prevent the "soft-start" from turning the mower on.

WARNING
Do not attempt to override the operation of E-Safety lock-out button or bail, do not lock the bail in any way.
Do not leave the mower running unattended.
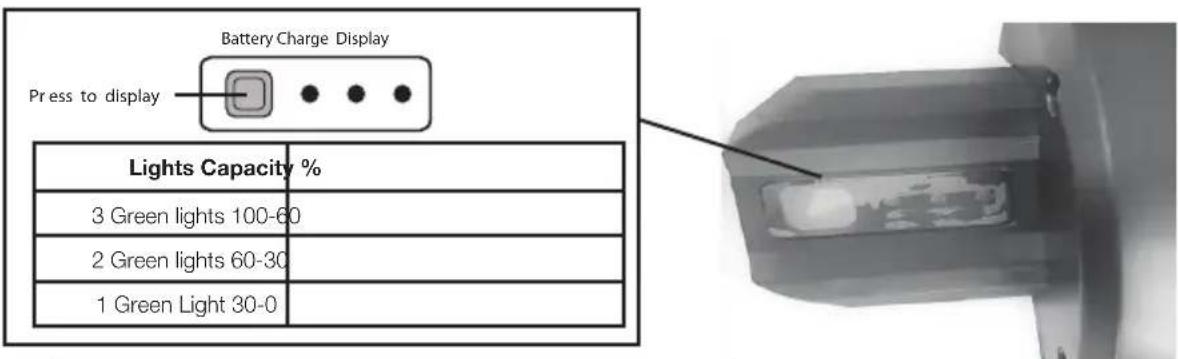
Battery Capacity Indicator
NOTE: Refer individual battery for exact charge capacity percentage.
NOTE: Only available with twin battery lawn mowers.
Checking the battery capacity:
Press the battery capacity indicator (BCI) button located on the battery. The lights will illuminate according to the batteries capacity level. See chart below:
text_image
Battery Charge Display Press to display Lights Capacity % 3 Green lights 100-60 2 Green lights 60-30 1 Green Light 30-0NOTE: This feature is not available on all models. Only on applicable models.
Height Adjustment

text_image
1 2- Height adjustment allows lawn to be cut at different lengths. Set cut height by adjusting the height lever.

STOP the motor before adjusting the cutting height.
Remove Safety key before adjusting the cutting height.
Mowing Tips
A sharp blade will greatly enhance the performance of the mower, especially when cutting high grass. Be sure to check the blade and to replace it at least once per year, as described in the Maintenance section.
- Verify that the lawn is free of stones, sticks, wires and other objects that could damage the blades or the motor. These objects could be accidentally thrown by the mower in any direction, and could cause serious personal injury to the operator and to others. In order to prevent electric shock, do not operate the mower in damp or wet conditions.
- When cutting thick grass, reduce walking speed in order to allow for a more effective cut and a proper discharge of the clippings.

WARNING
The mower is fitted with a current overload device, under heavy conditions the mower may cut out (or "stall") e.g. long, thick or moist lawns or some grass types. If this occurs, increase the cutting height in order to reduce the load or effort on the mower.
Mow across the face of slopes, never up & down. Exercise extreme caution when changing direction on slopes. Do not mow excessively steep slopes, always be sure of your footing on slopes.
- Set mower to the highest cutting height when mowing on uneven ground or in tall weeds.
- Walk at a steady pace. Overlap the cutting rows. Do not let the grass get too tall. If the grass gets too long, start at the highest cutting position and work down to the desired cutting height.

The Mower has built in load sensing technology. Under certain conditions the Mower may reset due to the LOAD PROTECTION* feature.
Avoid frequently over-loading the mower as this may increase battery temperatures & turn on the Battery Thermal Protection. The Battery Thermal Protection will require the machine to be rested sufficiently to cool.
Grasscatcher - Fitting 18in & 19in models

natural_image
Mechanical assembly diagram showing a hand operating a tool on a vehicle's side panel (no text or symbols visible)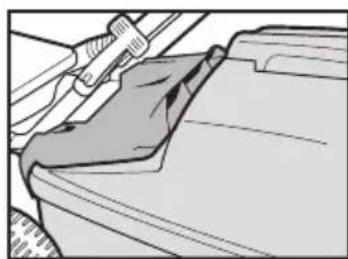
natural_image
Diagram of a hand using a tool to cut or spread material on a vehicle surface (no text or symbols visible)Fitting the grasscatcher
- Stop the engine.
- Raise the rear flap. Locate the grasscatcher tongue over the rear axle and insert the grasscatcher under the rear flap.
- Lower the rear flap to retain the grasscatcher.
Mulching Plug - mulch Capable models only
text_image
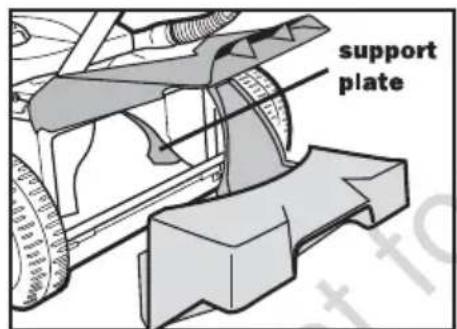
support plate
natural_image
Technical line drawing of a vehicle's front wheel assembly (no text or symbols)
natural_image
Technical line drawing of a vehicle's internal components, showing chassis, wheels, and structural details (no text or symbols)
natural_image
Technical line drawing of a vehicle chassis with tire, frame, and wheel components (no text or symbols)- Stop the engine and set the mower height setting.
- Mulching is most effective between height settings 4 and 10.
- Lift the rear flap and identify the support plate as shown. Note the orientation of the mulching plug.
- Insert the mulching plug into the baseplate by first inserting the tongue to the right, then swing the left side into position. The mulch plug should rest on the rear cross-member
- Ensure that the mulching plug is resting on the support plate and is positioned against the inside of the baseplate. Push the mulching plug down so that it rests flush against the rear cross member.
- Close the rear flap ensuring that it closes fully. The rear flap should rest on the mulching plug as shown in the sectional illustration.
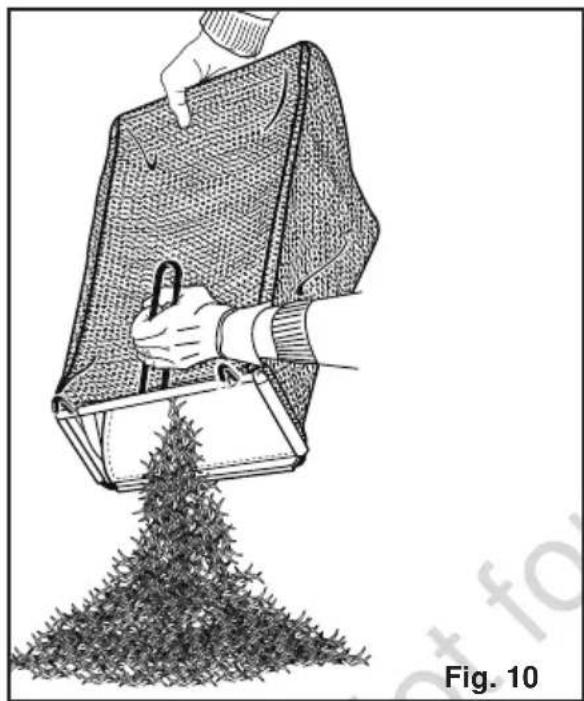
Emptying the Grass Catcher
- Stop mower, allow blades to completely stop, and remove battery & safety key.
- Lift the rear flap.
- Lift the grass catcher by its handle to remove from mower.
• Empty grass clippings. - Lift the rear flap and reinstall the grass catcher as described earlier in this manual.
natural_image
Illustration of a person handling a briefcase with a pile of pine needles emerging from it (no text or symbols)
- Check grass catcher frequently & replace if grass catcher is worn or damaged.
- Do not store grass in catcher. Always empty after use.
- Do not use the catcher for other purposes than collecting grass.
- Do not mow over or collect hot materials, ashes or remains from camp fires or smouldering materials.
- Allow bag to dry in wet conditions.
Cleaning

WARNING
To prevent serious personal injury remove the battery and key from the mower before servicing, cleaning, or removing debris.
The underside of the mower deck should be cleaned after each use, because grass clippings, leaves, dirt, and other debris will accumulate, which will cause rust and corrosion. Remove any build-up of grass and leaves on or around the motor cover. If debris builds up on the underside of the mower during use, stop the motor, remove the battery, and then tilt the mower forward or on its side, and scrap it clean using an appropriate tool.
- Clean the unit using a damp cloth with a mild detergent.
- Do not immerse the mower or any part of it in water.
- Moisture can cause a shock hazard. Wipe off any moisture with a soft dry cloth & ensure the machine is dry before replacing the battery & key.
- Use a small brush or vacuum cleaner to clean the air vents on the product
- Keep the air vents free of obstructions.
Do not use solvents, strong detergents, certain aromatic oils such as pine and lemon when cleaning plastic parts. Chemicals can damage, weaken or destroy plastic component which may result in serious personal injury.
Storing the Lawn Mower
The following steps should be taken in order to prepare the machine for storage.
- Clean the machine as described in the previous section.
- Inspect the blade, and replace it or sharpen it, if required (refer to the Maintenance section).
- Store the mower in a dry, clean location. Do not store it next to corrosive materials, such as fertilizer or fuel.
- Store the mower indoors, in a cool, dry place, out of the reach of children.
The handle may be folded away completely for storage.
- Release the handle locks on the sides of the handle to unlock, and fold the upper handle down.
- Release the lower handle locks to unlock and disengage the cams from the mounting bracket. Fold the lower handle forward. Make sure not to bend or kink the power cord.
- Remove the batteries and store it in a cool dry location.

WARNING
Refer to Briggs & Stratton 18V Battery & Charger manual for further information relating to battery and charger disposal.

WARNING
Do not operate the product if any component is missing or damaged. Have the missing components and or products replaced.

WARNING
Do not store the batteries in the product. Remove them from product after use and place them in the charger.
Blade Replacement 18in & 19in models
For Your Safety
- Before starting the mower check blades and bolts for damage or wear.
- Victa recommends that all maintenance, repair and inspection work be carried out by a Victa Authorised Service Centre.
• Work from the grasscatcher flap.
With the rear flap secured, in a raised position undo the blade nut, applying upward pressure to the bolt head into the blade disc. (the head of the bolt will not rotate due to the diamond shape in the underside of the head).
Assembly: Fit as per the drawing remembering to push the head of the bolt into the blade disc (this will stop the bolt head from turning). Ensure correct order of assembly.
- We recommend changing blades, bolts, nuts and washers as a set. Metal fatigue and damage may occur which may not be visible to the operator. Always replace all blades to ensure correct balance, reducing vibration and wear.
• Always turn the nut to check tightness, not the bolt.
Use only genuine replacement parts made and guaranteed by Victa. Insist on them from your parts and service dealer.
Detailed fitting instructions are printed on genuine Victa blade packs. Use of non-genuine blades may void your warranty, and could result in damage or injury.

Refer to the Briggs & Stratton 18V Battery & Charger instruction manual for further information relating to battery & charger use, servicing, storage and safety.

Always protect hands by wearing heavy gloves and/or wrapping the cutting edges of the blade with rags and other material when performing blade maintenance. Contact with the blade could result in serious personal injury.
Never modify the blades or cutting system.
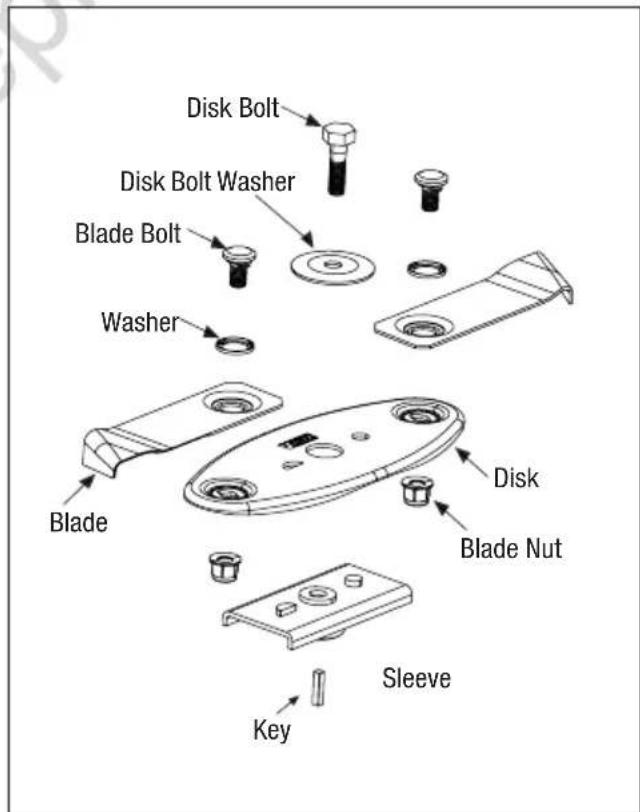
text_image
Disk Bolt Disk Bolt Washer Blade Bolt Washer Blade Disk Blade Nut Sleeve KeyBlade Replacement
For Your Safety
- Never use the mower unless the grasscatcher or the guards supplied by the manufacturer are in position.
- Before starting the mower check blades and bolts for damage or wear.
- If you strike an obstruction, stop the engine and check the blades for damage.

Worn and damaged blades are major hazards.
WARNING: Periodically inspect the blade adaptor for cracks, especially if you strike a foreign object. Replace when necessary.
Use only genuine replacement parts made and guaranteed by Briggs & Stratton. Insist on them from your parts and service dealer.
Detailed fitting instructions are printed on genuine Briggs & Stratton blade packs. Use of non-genuine blades may void your warranty, and could result in damage or injury.

text_image
Key Sleeve Blade Washer Hex bolt
text_image
BLADE Loose Tight WOOD- Before reassembling the blade and the blade adaptor to the unit, lubricate the engine crankshaft and the inner surface of the blade adaptor with light oil. Install the blade adaptor on the crankshaft. Refer to the figure above. Place the blade with the part number facing away from the adaptor. Align the washer over the blade, insert the hex bolt and securely tighten.
Note: Your service dealer will assist you with blade replacement to ensure correct assembly and is safely fitted by tightening to the correct torque value.

WARNING
Always protect hands by wearing heavy gloves and/or wrapping the cutting edges of the blade with rags and other material when performing blade maintenance. Contact with the blade could result in serious personal injury.
Never run mower without blades or with damaged blades.
Never modify the blades or cutting system.
Blade Bar Replacement Cont'd
NOTE: Check all fasteners often, always be sure mower is in safe operating condition. Only use VICTA genuine replacement blades. Replace worn or damaged blades and bolts in sets to preserve balance.
- Stop the mower and allow the blade to come to a complete stop.
- Remove the battery and safety key.
- Turn the mower on its side.
- Wedge a block of wood between the blade and mower deck to prevent the blade from turning (Refer to Fig).
- Loosen the blade bolt by turning it counterclockwise (as viewed from bottom mower) using a wrench or socket (not provided).
- Remove the blade bolt and blade (Refer to Fig).
- To install the blade locate the two mounts on the shaft sleeve. These are marked in circles in Fig. Align the blade with these two mounts.
- Install the blade on the shaft carefully. Blade must fit onto these two mounts properly. Make sure there is no gap. Refer to Fig.
- Screw the blade bold and tighten to fix the blade.
Battery Replacement
Never dispose of battery in fire or regular household trash.
Refer to Battery & Charger instruction manual for further information relating to battery and charger safety and disposal.
Service
Servicing requires extreme care and knowledge and should be performed only by a qualified service technician. For service we suggest you return the product to your nearest Authorized service centre for repair. When servicing, use only genuine replacement parts.
- Keep the handles dry, clean, and free of oil and grease.
- In order to reduce the risk of fire, keep the motor free of grass, leaves, and debris build-up.
- Check the blade and motor mounting bolts for proper tightness frequently. Visually inspect blade for damage (e.g., bent, cracked, or worn).
- For best and safest performance, maintain the mower with care. Keep the mower blade sharp and clean. Mower blades are sharp, and can cut. Wrap the blades or wear gloves, and use extra caution when servicing.
- Keep all nuts, bolts, and screws tight in order to be sure that the equipment is in safe working condition.
Maintenance Chart
| Features Requirements | Before use | After use | Recharging | Weekly | Monthly | If faulty | If damaged | As required | |
| Lawnmower Visual inspection. | ● | ● | |||||||
| Battery Check operation and for damage. | ● | ● | |||||||
| Cutting system (Blades) | Inspect and check assembly | ● | |||||||
| Replace | ● | ● | |||||||
| Rear flap Inspect and check assembly | ● | ● | |||||||
| Chassis Check for buildup of grass | ● | ||||||||
| ● | |||||||||
| Replace | ● | ||||||||
| All accessible fasteners Check | ● | ||||||||
| ● | |||||||||
| Motor mounting bolts Check and retighten | ● | ||||||||
| Mulching Plug (If available) | Inspect and check assembly | ● | ● | ||||||
| Grasscatcher Check | ● | ||||||||
| ● | |||||||||
| Replace | ● | ||||||||

Before carrying out maintenance, remove the batteries and safety key.
Never attempt maintenance that is not outlined in this manual. All repair work must be carried out by an Victa Authorised Service Centre.
- Never tamper with safety devices. Check them regularly for proper operation.
NOTE: Refer to warranty card supplied with this product for service contact details.
Do not at any time let brake fluids, gasoline, petroleum based products, penetrating oils, etc, to come in contact with plastic parts. Chemicals can damage, weaken, or destroy plastic which may result in serious personal injury.
Do not lubricate any of the wheel components. Lubrication may cause the wheel components to fail during use, which could result in serious personal injury to the operator and/or mower or property damage.
Troubleshooting
| PROBLEM POSSIBLE CAUSE SOLUTION | ||
| The mower does not start. | The battery is not charged.The safety key is defective.Grass wrapped on blades, grass catcher jammed.The battery is not fitted correctly.Battery may require service or replacement.Safety key is not installed. | Charge the battery.Replace the safety key.Remove battery, check under deck & grass catcher for clogged grass.Check fitment of battery, ensure retaining tab is engaged correctly.Replace battery.Insert the safety key. |
| The mower cuts the grass unevenly. | The lawn is rough or uneven.The cutting height is not set properly. | Check the mowing area.Increase / decrease the cutting height. |
| The mower does not mulch properly. | Wet grass clippings are sticking to the underside of the deck.The mulch plug is missing. | Wait until the grass dries before mowing.Install the mulch plug. |
| The mower is hard to push. | The grass is too tall, or the cutting height is too low.The rear of the mower housing and the blade are dragging in thick grass. | Raise the cutting height.Empty the grass clippings from the grass catcher. |
| The mower is excessively noisy and vibrates. | The motor shaft is bent.The blade is unbalanced. | Stop the motor, and inspect for damage.Repair before restarting. If vibration persists, contact authorized service centre. |
| The mower cuts out ("stalls") when cutting grass. | The mower blade is overloaded due to mowing conditions, e.g. long, thick, moist grass or the grass type.The mower grass catcher is full / catcher outlet is blocked / clogged grass under deck | Stop the motor, increase the cutting height and try to cut again.Wait for the grass to dry and attempt mowing again.Empty catcher bag & clear catcher outlet, clean under the deck, increase height and try again. |
Specifications
| PRODUCT SPECIFICAITONS | |||
| Description MWR 18IN CRVT 18V | TWIN MWR 16IN CRVT 18V TWIN | MWR 19IN CRVT 18V TWIN | |
| Model Number 2691861 2691891 | 2692035 | ||
| Applicable Batteries B&S 18V 4Ah or greater B&S 18V 4Ah or greater | B&S 18V 4Ah or greater | ||
| Battery Qty 2 2 2 | |||
| Deck Type Steel Steel | Alloy | ||
| Deck Size | 18 Inch | 16 Inch | 19 Inch |
| Front Wheel Size | 8Inch | 6.5" | 8Inch |
| Rear Wheel Size | 8Inch | 6.5" | 8Inch |
| Wheel Bearing | Yes | Yes | Yes |
| Catcher Capacity | 42L | 40L | 50L |
| Catcher Material | Hybrid(Plastic Top/Fabric Bag) | Hybrid(Plastic Top/Fabric Bag) | Full Plastic |
| Mulch | No | No | Yes |
| Push/Self Proppelled | Push Push | Push | |
| Blade Disk | Yes | No | Yes |
| Blade Size 18 Inch | 16 Inch | 19 Inch | |
| Blade Type | 2 Swivel back blades | Blade Bar | 2 Swivel back blades |
| Blade Fitment Torque | 25-30Nm | 25-30Nm | 25-30Nm |
| Handle Type | Comfort | Comfort | Comfort |
| Motor Type DC Brushless | DC Brushless DC Brushless | ||
| Motor Specifications | 36V - 1200W 36V - 900W | 36V - 1400W | |
| Motor Shaft Diameter | 22.2mm | 22.2mm | 22.2mm |
| Start System | Soft Start | Soft Start | Soft Start |
| Load Sensing | Yes, 3200 to 3500RPM <1Sec | Yes, 3200 to 3500RPM <1Sec | Yes, 3200 to 3500RPM <1Sec |
| Safety Mechanisms | Yes, Thermal and Current | Yes, Thermal and Current | Yes, Thermal and Current |
| Max Motor Speed | 3500RPM | 3500RPM 3500RPM | |
| Running Speed | 3200RPM | 3200RPM 3200RPM | |
| Sound Power Level (Mesured) | 92 LWA 90LWA | 93 LWA | |
| Weight (No Battery) | 30Kg | 26Kg | 24Kg |
| Weight (Packaged) | 35Kg | 30Kg | 28Kg |
©2023 Briggs & Stratton Australia Pty Ltd
No part of this booklet may be reproduced by any means without prior written permission.
All information herein is subject to change without notice.
VICTA is a registered trademark of Briggs & Stratton Australia.