BG-N19 - Uncategorized Vello - Free user manual and instructions
Find the device manual for free BG-N19 Vello in PDF.


| Product Type | Battery Grip |
| Compatibility | Select Canon EOS DSLR models (e.g., 5D, 6D, 7D series) |
| Battery Type | 6x AA batteries or 1x LP-E6 rechargeable battery |
| Dimensions | Approx. 140 x 70 x 50 mm |
| Weight | Approx. 230 g (without batteries) |
| Shutter Release | Vertical shutter release button with half-press |
| Control Dials | Main dial, multi-controller, AF-ON button |
| Power Saving | Auto power off after idle period |
| Battery Indicators | LED for battery status (green/orange) |
| Construction | Durable plastic with ergonomic grip |
| Maintenance | Wipe with a soft, dry cloth. Avoid liquids. |
| Safety | Use only recommended batteries; do not short-circuit. |
| Spare Parts | Contact Vello support for replacement components. |
| Warranty | 1-year limited warranty |
| Included Accessories | Battery grip, user manual |
Frequently Asked Questions - BG-N19 Vello
User questions about BG-N19 Vello
0 question about this device. Answer the ones you know or ask your own.
Ask a new question about this device
Download the instructions for your Uncategorized in PDF format for free! Find your manual BG-N19 - Vello and take your electronic device back in hand. On this page are published all the documents necessary for the use of your device. BG-N19 by Vello.
USER MANUAL BG-N19 Vello
natural_image
Close-up of a black DSLR camera with visible lens and adjustment knobs (no text or symbols)BG-N19
BATTERY GRIP
Designed for the Nikon
D850 DSLR Camera

VELLO®
Thank you for choosing Vello.
The Vello BG-N19 is compatible with the Nikon D850 DSLR camera. The BG-N19 accepts one Nikon EN-EL15a rechargeable battery, in addition to the camera's internal battery. Eight AA batteries (alkaline, NiMH, or lithium) can be used instead for added convenience. And this battery grip is capable of employing the Nikon BL-5 with EN-EL18b type batteries. The BG-N19 is equipped with an alternate shutter release, control lock, function, and AF-ON buttons, as well as a multi selector and main and sub-command dials, for shooting in a vertical position.
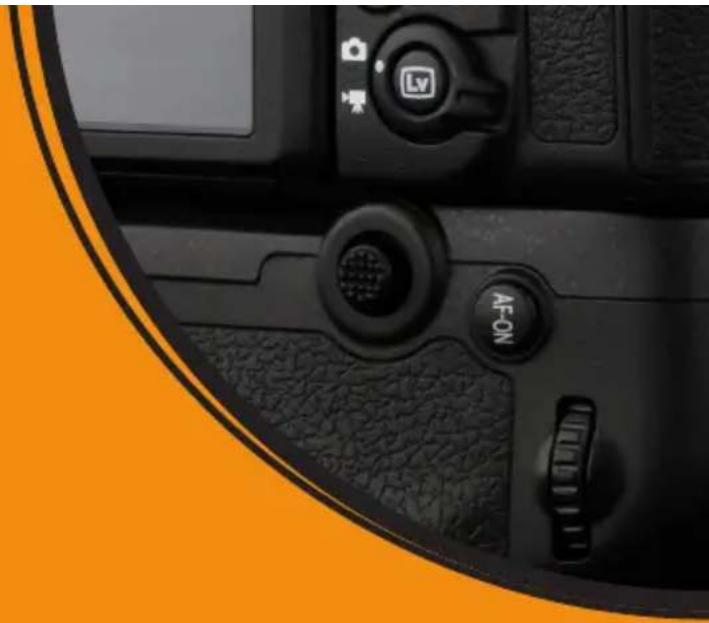
natural_image
Close-up of a camera mode dial showing settings like LV, AF-ON, and control buttons (no readable text beyond icons)Please read through this entire manual before using the BG-N19 battery grip.
Precautions
- The BG-N19 should be used only with the compatible devices specified in this manual.
- Use only with batteries and battery holders recommended in this manual. The BG-N19 cannot be used with other batteries or battery holders.
- When the BG-N19 is not attached to the camera, cover the power/signal contacts with the contact cap. This prevents electrical shorts caused by metal coming into contact with the power/signal contacts.
- When the battery holder is removed from the grip, remove the batteries or place the holder in a container to prevent electrical shorts caused by contact with other metal objects.
-
The memory card access lamp may glow temporarily when the BG-N19 is mounted or removed from the camera. This is part of the normal operation.
-
If you notice smoke, noise, or an unusual smell from the battery pack, discontinue use immediately. Remove the batteries and contact Vello Customer Service.
- The BG-N19 does not have a power switch. Instead, use the camera power switch to turn the power on or off.
- The battery level may not display properly if batteries are inserted before mounting the grip.
- Remove batteries from the grip when not in use.
- In cold temperatures, batteries can discharge at a faster rate. Warming up a cold battery can recover some of its lost charge and help improve its performance.
- Keep this device away from water or extreme humidity, and store it in a dry and cool place.
- Keep out of reach of children.
Overview
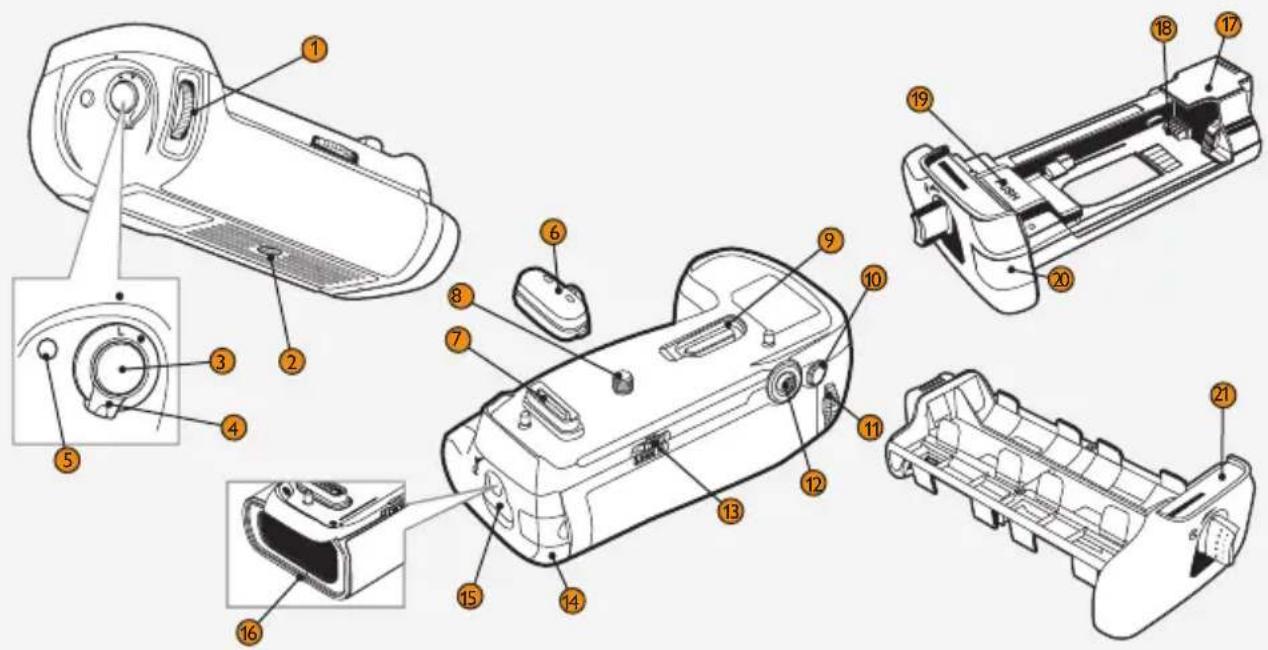
① Sub-command Dial *
② Tripod Socket
③ Shutter-Release Button *
④ Control Lock Switch
To prevent accidental triggering, the control lock switch locks the shutter-release button, function button, AF-ON button, multi selector, and main and sub-command dials on the BG-N19. Unlock prior to use by switching to the ● position. The control lock is not a power switch.
⑤ Function Button
Can be programmed in the Custom Settings menu on your camera.
⑥ Contact Cap
⑦ Power/Signal Contacts
⑧ Mounting Screw
⑨ Camera Contact Cover Holder
10 AF-ON Button *
11 Main Command Dial *
12 Multi Selector *
13 Locking Wheel
14 Battery Holder
15 Battery Holder Latch
16 Battery Chamber
⑰ EN-EL15a Battery Holder
Holder for Nikon EN-EL15a battery.
18 Power Terminals
(EN-EL15a Battery Holder)
19 Push Button
Ejects the battery in the EN-EL15a Battery Holder.
20 AC Power Supply Socket
Nikon EP-5B Power Supply Connector port (connector not included).
21 AA Battery Holder
Holds eight AA batteries.
* These controls perform the same functions as their on-camera equivalents and are affected by changes to the Custom Settings menu. See camera manual for details.
Attaching the Grip
natural_image
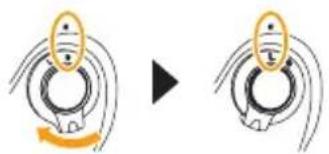
Two identical diagrams showing a circular object with internal features before and after transformation (no text or symbols)- Ensure that the power is turned off on the camera and that the Control Lock on the BG-N19 is in the L position before attaching the grip.
natural_image
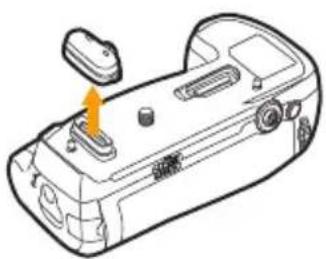
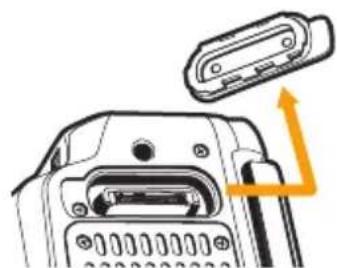
Line drawing of a device rear panel with a highlighted orange arrow pointing to the front panel (no text or symbols present)- Remove the contact cap from the BG-N19 battery grip. (When the BG-N19 is not attached to the camera, replace the contact cap to protect the contacts.)
natural_image
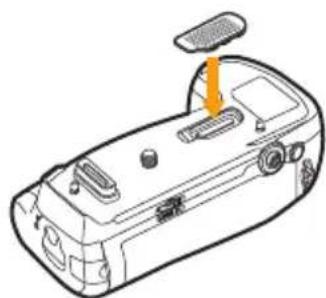
Diagram of a device with an attached component and an arrow indicating direction (no text or symbols)- The contacts for the BG-N19 are on the bottom of the camera, where they are protected by a rubber contact cover. Remove the contact cover from the camera before mounting the grip.
natural_image
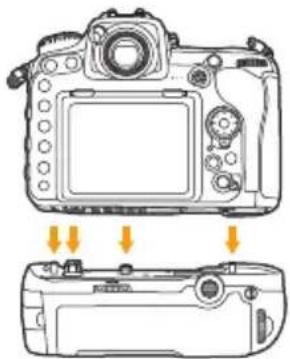
Line drawing of a car interior with a sensor and dashboard (no text or symbols)- To prevent loss, place the camera contact cover into the contact cover holder on the BG-N19.
natural_image
Diagram of a DSLR camera showing front and side views with no text or symbols- Connect the BG-N19 grip to the camera while aligning the grip's mounting screw with the camera's tripod socket.
natural_image
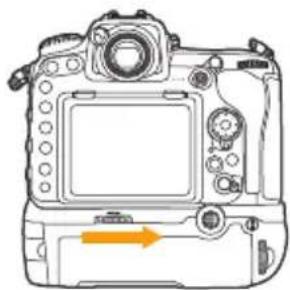
Line drawing of a DSLR camera with no visible text or symbols on the body (pure technical diagram)- Rotate the attachment wheel in the direction shown by the arrow until the grip is secure.
Inserting Batteries
natural_image
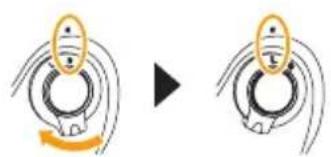
Two identical diagrams showing a circular object with a central element, connected by a black arrow (no text or symbols)- Ensure that the power is turned off on the camera and the Control Lock on the BG-N19 is in the L position.
natural_image
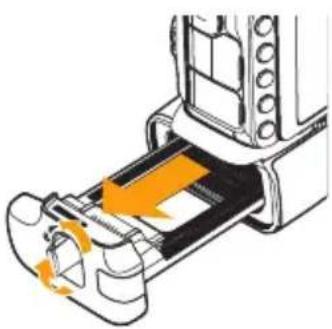
Mechanical assembly diagram showing a piston and lever mechanism with orange arrows indicating motion (no text or symbols)- Lift the battery holder latch so you can rotate it counterclockwise and pull the battery holder out of the grip. The EN-EL15a battery holder comes pre-installed.
natural_image
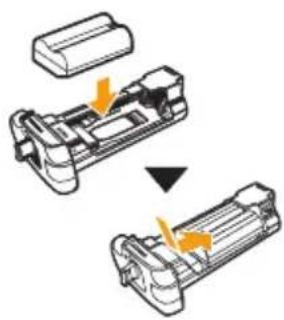
Diagram showing three stages of a battery pack assembly with arrows indicating process direction (no text or labels)- Nikon EN-EL15a Battery: Align the indentations on the battery with the EN-EL15a holder. Then press the battery down, and slide it in the direction of the arrow until the power terminals click into place.
natural_image
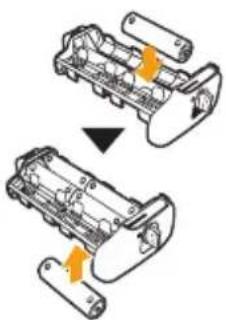
Two mechanical components with orange arrows indicating assembly or transformation (no text or symbols)AA Batteries: Place eight AA batteries of the same type in the AA battery holder as shown. Make sure the batteries are in the correct orientation.
natural_image
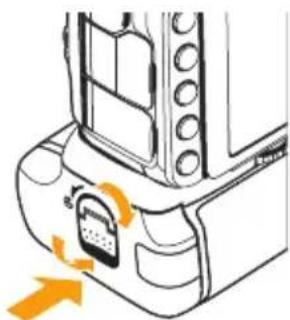
Diagram of a device's internal structure with an orange arrow indicating motion or force (no text or symbols present)- Make sure the battery holder latch is rotated counterclockwise, and slide the battery holder all the way into the grip. Rotate the latch clockwise, and reposition it so it's flush with the side of the grip. Turn on your camera, unlock the BG-N19 via its Control Lock switch, and check the battery level in the control panel or viewfinder.
Battery Info
The camera displays the following battery levels.
Nikon EN-EL15a Battery:
| LCD/Control Panel | Viewfinder Description | |
 | — | Battery fully charged. |
 | — | Battery partially discharged. |
 | ||
 | ||
 |  | Low battery.Prepare spare batteries. |
 (blinking) (blinking) |  (blinking) (blinking) | Battery exhausted.Shutter release is disabled. |
AA Batteries:
| LCD/Control Panel | Viewfinder Description | |
 | — | Batteries fully charged. |
 |  | Low battery power. Prepare spare batteries. |
 (blinking) (blinking) |  (blinking) (blinking) | Batteries exhausted.Shutter release is disabled. |
AA Battery Settings
To ensure that the camera shows the correct battery level when AA batteries are used, choose the appropriate setting in the Setup menu (in the D850 camera menu under the MB-D18 battery type battery type).
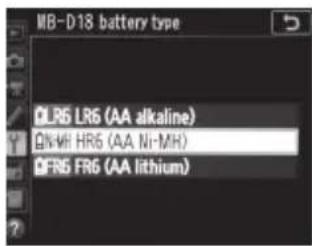
Note: The menu screens on this page are from the D850.
Nikon Rechargeable Batteries
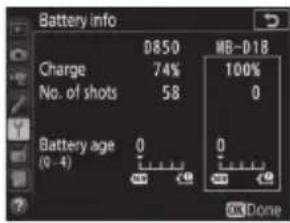
The camera can display information (including calibration information) for Nikon EN-EL15a batteries via the Battery Info option in the Setup Menu. For AA batteries, only battery levels are displayed.
Battery Order
Set the order in which the internal camera and BG-N19 batteries are used via the Setup menu (Battery order). When the camera is drawing power from the BG-N19, the battery gauge for the grip is displayed in the control panel (BP).
![P 1/125 F5.6 ISO 100 A FX 坐部FF sRGB 巴 A AUTO [1] [4.0] [5] AF-S [3]](/content/2026/05/1064351/images/18c78f1497af911f799ebf9e951eaa84238f5234f508c9c05d037b9ac2fa5971.jpg)
Removing the Batteries
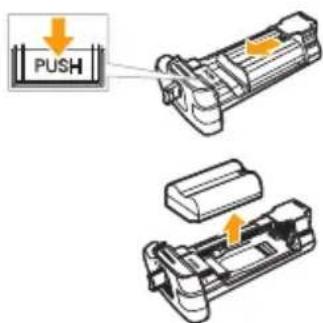
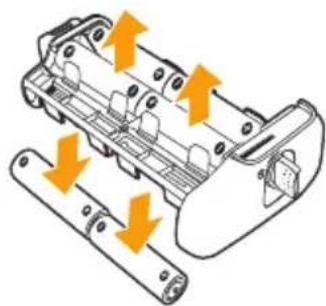
- EN-EL15a Battery Holder: While pressing and holding the PUSH button on the holder, slide the battery toward the button and lift up to remove.
natural_image
Diagram of a mechanical device with orange arrows indicating force or movement (no text or symbols present)- AA Battery Holder: Remove the batteries one row at a time (as shown). Be sure that the batteries do not drop during this process.
Specifications
| Power Source • One EN-EL15a rechargeable Li-ion battery orEight LR6 Alkaline, HR6 NiMH or FR6 Lithium AA batteries orNikon BL-5 Battery-Chamber Cover with EN-EL18b rechargeable Li-ion batteryNikon EP-5B Power Supply Connector |
| Operating Temperature 32°F to 104°F (0°C to 40°C) |
| Dimensions (W × H × D) 6 × 2 × 3.2 in. (15.1 × 5.3 × 8.1 cm) |
| Weight 8.1 oz. (231 g) with EN-EL15a battery holder (excluding battery) |
Specifications and design are subject to change without notice.
One-Year Limited Warranty
This VELLO product is warranted to the original purchaser to be free from defects in materials and workmanship under normal consumer use for a period of one (1) year from the original purchase date or thirty (30) days after replacement, whichever occurs later. The warranty provider's responsibility with respect to this limited warranty shall be limited solely to repair or replacement, at the provider's discretion, of any product that fails during normal use of this product in its intended manner and in its intended environment. Inoperability of the product or part(s) shall be determined by the warranty provider. If the product has been discontinued, the warranty provider reserves the right to replace it with a model of equivalent quality and function.
This warranty does not cover damage or defect caused by misuse, neglect, accident, alteration, abuse, improper installation or maintenance. EXCEPT AS PROVIDED HEREIN, THE WARRANTY PROVIDER MAKES NEITHER ANY EXPRESS WARRANTIES NOR ANY IMPLIED WARRANTIES, INCLUDING BUT NOT LIMITED TO ANY IMPLIED WARRANTY OF MERCHANTABILITY OR FITNESS FOR A PARTICULAR PURPOSE. This warranty provides you with specific legal rights, and you may also have additional rights that vary from state to state.
To obtain warranty coverage, contact the Vello Customer Service Department to obtain a return merchandise authorization (“RMA”) number, and return the defective product to Vello along with the RMA number and proof of purchase. Shipment of the defective product is at the purchaser’s own risk and expense.
For more information or to arrange service, visit vellogear.com or call Customer Service at 212-594-2353.
Product warranty provided by the Gradus Group. www.gradusgroup.com VELLO is a registered trademark of the Gradus Group. © 2018 Gradus Group LLC. All Rights Reserved.
All other trademarks are the property of their respective owners.
All images are for illustrative purposes only.

VELLO®
www.vellogear.com

VELLO*
A Gradus Group Brand
GG2
Brand : Vello
Model : BG-N19
Category : Uncategorized