XOA36S - Range hood XO - Free user manual and instructions
Find the device manual for free XOA36S XO in PDF.


| Product Type | Range Hood |
| Brand | XO |
| Model | XOA36S |
| Width | 36 inches |
| Rated Voltage | 120V |
| Rated Frequency | 60Hz |
| Total Power Consumption | 300W |
| Motor Power | 2 x 130W |
| Light Power | 2 x 20W (Halogen) |
| Number of Motors | 2 |
| Amperage | 2.5 Amps |
| Mounting Height | 26" to 32" above cooktop |
| Duct Options | 6" Round or 3.25" x 10" Rectangular (Vertical/Horizontal) |
| Control Type | Electronic touch panel with display |
| Timer Delay | Yes, adjustable 3-15 minutes |
| Bulb Type | Halogen JCD, 12V, 20W max, G-4 base |
| Material | Stainless Steel |
| Filter Type | Removable grease guards |
| Warranty | Limited 1 year |
| Installation Type | Ducted only (not recirculating) |
| Thermal Protection | Motor thermal fuse |
| Safety Compliance | NFPA and ASHRAE standards |
| Cleaning Recommendation | Warm water with mild detergent; avoid abrasive cleaners |
Frequently Asked Questions - XOA36S XO
User questions about XOA36S XO
0 question about this device. Answer the ones you know or ask your own.
Ask a new question about this device
Download the instructions for your Range hood in PDF format for free! Find your manual XOA36S - XO and take your electronic device back in hand. On this page are published all the documents necessary for the use of your device. XOA36S by XO.
USER MANUAL XOA36S XO
natural_image
Technical line drawing of a mechanical housing component (no text or symbols)XOA30
XOA36
READ AND SAVE THE INSTRUCTIONS
Call our ventilation experts at 800-966-8300
XO Hood Warranty Proof of original purchase date and invoice is needed to obtain service under warranty.
What is covered Limited 1 Year Warranty.
For 1 year from the original date of purchase, we will provide, free of charge, parts and service labor in your home to repair or replace any part of the hood that fails because of a manufacturing defect.
The warranty is extended to the original purchaser for products purchased for ordinary home use in North America.
Should you require service for your XO product call a product service specialist at 800.966.8300
What is not covered Improper Installation. Service trips to the home to teach you how to use the product. Resetting circuit breakers. Damage caused after delivery.
EXPECT MORE FROM XO
When buying any XO appliance you can be confident you have purchased a high quality, innovative, and stylish product, from a company who cares about you
Dear Customer,
If you follow the recommendations contained in this Instruction Manual, our appliance will give you constant high performance and will remain efficient for many years to come.
CONTENTS
WARNING & CAUTION
CHARACTERISTICS
INSTALLATION & USE
MAINTENANCE & CLEAN
Product Specification & Technical Parameters
| Rated Voltage | 120V |
| Rated Power Frequency | 60Hz |
| Light Power | 2x20W High Efficiency Bulbs |
| Motor Power | 2x130W |
| Total Power | 300W |
| Motor | 2 |
| Parameters of Ducting Outlets Options | - 6" Round Vertical Duct- 3 1/4" x 10" Rectangle Vertical Duct- 3 1/4 x 10" Rectangle Horizontal Duct |
| Ampere | 2.5 Amps |
| Mounting height | 26" to 32" from cooking surface |
XO How Beautiful K itch hens B rea th
DUCT FITTINGS:
| This Hood Must Use an 6" Round Duct. It Can Transition to 3-1/4" x 10" or 3-1/4" x 12" Duct. |
Use this chart to compute maximum permissible lengths for duct runs to outdoors.
NOTE: Do not exceed maximum permissible equivalent lengths!
Maximum duct length: 100 feet for range ho-ods.
Flexible ducting:
If flexible metal ducting is used, all the equivalent feet values in the table should be doubled. The flexible metal duct should be straight and smooth and extended as much as possible.
DO NOT use flexible plastic ducting.
NOTE: Any home ventilation system, such as a ventilation hood, may interrupt the proper flow of combustion air and exhaust required by fireplaces, gas furnaces, gas water heaters and other naturally vented systems. To minimize the chance of interruption of such naturally vented systems, follow the heating equipment manufacturer's guidelines and safety standards such as those published by NFPA and ASHRAE.
| Duct Piece: | Dimensions: | Equivalent Number Length*: | Quantity Used: | Total Equivalent Length: |
| Round, straight | 1 ft. (per foot length) | |||
| 3-1/4" x 10" straight | 1 ft. (per foot length) | |||
| 90" elbow | 12 ft. | |||
| 45" elbow | 7 ft. | |||
| 3-1/4" x 10"3-1/4" x 12"90" elbow | 14 ft.10 ft. | |||
| 3-1/4" x 10"3-1/4" x 12"45" elbow | 8 ft.6 ft. | |||
| 3-1/4" x 10"3-1/4" x 12"90" elbow | 33 ft.24 ft. | |||
| 6" round to rectangular | 2 ft. | |||
| Rectangular to 8" round | 2 ft. | |||
| 3-1/4" x 10"3-1/4" x 12"6" round to rectangular transition 90" elbow | 4 ft.4 ft. | |||
| 3-1/4" x 10"3-1/4" x 12"Rectangular to 6" round transition 90" elbow | 4 ft.4 ft. | |||
| Round wall cap with dramper | 24 ft. | |||
| 3-1/4" x 10"3-1/4" x 12"Rectangular wall cap with dramper | 24 ft.18 ft. | |||
| Round roof cap | 33 ft. | |||
| *Actual length of straight duct plus duct fitting equivalent. Equivalent length of duct pieces are based on actual tests conducted by GE Evaluation Engineering and reflect requirements for good venting performance with any ventilation hood. | Total Duct Run = | |||
WARNING
TO RUDUCE THE RICK OF FIRE, ELECTRIC SHOCK OR INJURE TO PERSONS, PLEASE OBSERVE THE FOLLOWINGS:
- Installation work and electric wiring (including switch location) must be done by the qualified person(s) in accordance with local applicable codes and standards, including fire-rated construction.
- This hood may have sharp edges. Be careful to avoid cuts and abrasions during installation and cleaning.
- The hood must be placed at a minimum distance of 26" and a maximum of 32" from the cooktop for best capture of cooking impurities and a minimum distance of 28" from gas range.
- Provide sufficient air for proper combustion and exhausting of gases through the chimney of the burning equipment to prevent back drafting. Follow the heating equipment manufacturer's guideline and safety standards such as those published by the National Fire Protection Association (NFPA), and the American Society for Heating, Refrigeration and Air Conditioning Engineer (ASHRAE), and the local code authorities.
- Ducted fans must always be vented to the outdoors.
- This appliance is design to be operated by adults. Children should not be allowed to temper with the controls or play with this appliance.
- To reduce the risk of fire or electric shock, do not use this fan with any solid-state speed control device.
- When cutting or drilling into wall or ceiling, do not damage electrical wiring and other hidden utilities.
- Before servicing or cleaning unit, switch power off at service panel and lock the service disconnecting means to prevent power from being switched on accidentally. When the service disconnecting means cannot be locked, securely fasten a prominent warning device, such as a tag, to the service panel.
- Use this unit only in the manner intended by manufacturer. If you have questions, please contact the manufacturer or local agent.
- This unit must be grounded.
WARNING-TO REDUCE THE RISK OF FIRE, USE ONLY THE METAL DUCTWORK.
WARNING - TO REDUCE THE RISK OF A RANGE TOP GREASE FIRE:
- Never leave surface units unattended at high settings. Boilovers cause smoking and greasy spillovers that may ignite. Heat oils slowly on low or medium settings.
- Always turn hood ON when cooking at high heat or when cooking flaming foods (i.e. Crepes Suzette, Cherries Jubilee, and Peppercorn Beef Flambé).
- Clean ventilating fans frequently. Grease should not be allowed to accumulate on fan or grease guards/cup/pan
- Use proper pan size. Always use cookware appropriate for the size of the surface element.
WARNING – TO REDUCE THE RISK OF INJURY TO PERSONS IN THE EVENT OF A RANGE TOP GREASE FIRE, OBSERVE THE FOLLOWING:
- SMOTHER FLAMES with a close-fitting lid, cookie sheet, or metal tray, then turn off the burner. BE CAREFUL TO PREVENT BURNS. If the flames do not go out immediately, EVACUATE AND CALL THE FIRE DEPARTMENT.
- NEVER PICK UP A FLAMING PAN – You may be burned or spread the fire.
- DO NOT USE WATER, including wet dishcloths or towels – violent steam explosion will result.
- Use an extinguisher ONLY if:
a. You know you have a Class ABC extinguisher and you already know how to operate it.
b. The fire is small and contained in the area where it started.
c. The fire department is being called.
d. You can fight the fire with your back to an exit.
Based on "Kitchen Fire Safety Tips" published by NFPA.
CAUTION
- For indoor use only.
- For general ventilating use only. Do not use to exhaust hazardous or explosive materials and vapors.
- To avoid motor bearing damage and noisy and/or unbalanced impeller, keep drywall spray, construction dust, etc., off power unit.
- Your hood motor has a thermal fuse which will automatically shut off the motor if it becomes overheated.
- The hood MUST NOT BE LESS than 26" and at a maximum of 32" above cooktop for
best capture of cooking impurities.
- This hood is not intended to be used as a shelf.
- Please read specification for further information and requirements.
CHARACTERISTICS
Dimension

INSTALLATION & USE
NOTE: on the stainless steel hoods, carefully remove the plastic protective film from exterior of the surfaces of the hood prior to final installation.
Caution: To Reduce Risk of Fire and Electric Shock, install this range hood only with integral blowers supplied by manufacturer.
DESCRIPTION / CONNECTION
This appliance can only be installed in ducted version. Use proper installation template, for replacement of ductwork and electrical cutout in cabinet or wall.
DUCTED VERSION
The hood discharge kitchen air saturated with odor and fume passes it through the grease guards and expels it to the outside through an outlet pipe.
- Determine whether the hood will discharge vertically (3 1/4"×10" or 6" round) or horizontally (3 1/4"×10" only). For vertical or horizontal discharge, run ductwork between the hood location and a roof cap or wall cap. For best results, use a minimum number of transitions and elbows.

** Duct and roof cap/wall cap are not supplied.
Warning: to avoid the risk of fire, use only the metal ductwork.
HOOD PREPARATION
- Remove the bottom panel of the hood by removing its (7) mounting screws and set aside.

- Punch out the wiring knock-out located on the top or back of the Unit.
HOOD PREPARATION-VERTICAL DISCHAREG INSTALLATION
- Install the small shutoff plate inside the back of the hood. Using 10 screws

natural_image
Exterior view of a rectangular electronic component or enclosure with mounting holes (no visible text or symbols)- Install the large shutoff plate on the back of the hood. Using 5 screws.

natural_image
Blank rectangular panel with no visible text, symbols, or markings- Install the rubber gasket (Included) on the top of the hood. As shown below.

natural_image
Metal bracket with arched cutouts and central vertical seam, no visible text or symbols6" ROUND DUCT INSTALLATION
- Mount 6" round duct on the top of the hood, using 10 screws

natural_image
Exterior view of a circular mechanical component with mounting holes (no text or symbols visible)5.Seal with duct tape.

natural_image
Close-up of a circular mechanical component with a central seam, mounted on a rectangular base (no visible text or symbols)3 1/4'×10' DUCT INSTALLATION
- Mount 3 1/4" × 10" duct on the top of the hood, using 5 screws (Included).

natural_image
Transparent rectangular metal frame with a curved top edge, no visible text or symbols5.Seal with duct tape.

natural_image
Close-up of a transparent plastic panel with a curved top and textured base (no visible text or symbols)HOOD PREPARATION-HORIZONTAL DISCHAREG INSTALLATION 3 1/4"×10" DUCT INSTALLATION
- Install the gasket (Included) on the top of the hood, as shown below.

natural_image
Metallic mechanical bracket with arched cutouts and central seam (no text or symbols)- Mount the shutoff plate on the top of the hood, using 10 screws (Included)

natural_image
Pure geometric diagram of a rectangular frame with rounded corners and mounting holes (no text or symbols)3.Seal with duct tape.

natural_image
Architectural sketch of an arched structure with visible grain and construction details (no text or symbols)- Install the adapter in the back of the hood, using 6 screws.

HOOD INSTALLATION
-
Insert the power cable in the hood and tighten the wire clamp to screw the cable.
-
Align hood's keyhole mounting slots over the 4 partially installed screws.
-
Making sure the duct positions over the hood's duct adapter, push the hood against the rear wall.
ELECTRICAL CONNECTION
- Using provided wire connectors, connect wires as follow: BLACK wire to BLACK wire (A), WHITE wire to WHITE wire (B), GREEN or BARE wire to GREEN wire (C).

natural_image
Close-up of a mechanical component with labeled parts A, B, and C (no readable text or symbols beyond labels)- Reinstall the wiring box cover.
- Plug back the small connector inside the hood.
- Reinstall the bottom plate, make sure both grease guides are aligned with the holes, install the grease pan.
- Using long nose pliers. Pull out each of grease guides (A), then set them in such a way their flange slightly protrudes above the bottom of surface (B).

natural_image
Front view of a dual air fan with visible blades and central hub (no text or symbols)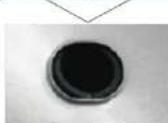


LIGHT BULB
This range hood may require two halogen bulbs (Type JCD, 12V, 20W Max, G-4 Base)
WARNING: Always switch off the electrical supply before carrying out any operation on the appliance.
To change bulbs:
- Kick off the halogen bulb cover by using the flat screw driver.
- Remove the bulb by pulling sideward (DO NOT ROTATE).
- Replace with Type JCD, 12V, 20W Max, G-4 Base halogen bulb. Do not touch replacement bulb with bare hands!

natural_image
Close-up of hands adjusting a mechanical component with a tool (no visible text or symbols)CAUTION:
- THE SURFACE, THE COVER OF THE HALOGEN BULBS MAY BE HOT. TAKE CARE WHEN TAKING THE REPLACEMENT.
2.BULBS MAY BE HOT. TAKE CARE WHEN TAKING THE REPLACEMENT.
OPERATION
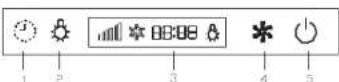
The hood is operated using electronic switch on the front panel.
ELECTRONIC SWITCH
1 -TIMER DELAY OFF SWITCH
2 - LAMP SWITCH
3 DISPLAY
4 - FAN SPEED SWITCH
5 ON/OFF SWITCH
LOCK ADJUSTMENT
When using this hood for the first time, or after a power failure, the display flashes regularly. To stop flashing, press on/off key for more than 5 seconds, the hood will be set to time setting mode. By pressing lamp key or fan speed key to change time setting, each single press or keep keys pressing can changes the time by 1 or 3 either up or down. Press the on/off key for confirmation when the right time appears.
- The timer delay off switch, user can adjust the time 3-6-9-12-15-0 minutes by pressing this button in turn, if no action occurs within 3 seconds, the countdown will start automatically. The hood will be off when the countdown ends.
- The lamp switch button,
• Controls the lamp on and off;
- Change the time down in time setting mode.
3. Display, shows the hood operation status and setting.
4. Fan speed button (six speeds)
- Change the time up in time setting mode.
- On/off switch button
• Controls the hood on and off if pressing less than 5 seconds.
• Entry to time setting mode if pressing more than 5 seconds.
MAINTENTANCE & CLEAN
-
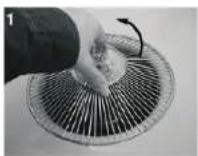
Disengage the grease pan from the hood body.
-
Disengage the small grease guard cups from the grease guard by turning counterclockwise and remove.
-
Remove the screw retaining the grease guard to the hood.
-
Remove the grease guard from the hood. Then remove the bottom plate.
-
Unscrew the clips and remove the wheel grease collector.
-
Remove the wheel center cap.
-
Loosen the wheel set screw in order to disengage the wheel from its motor shaft.
Let soak for 30 minutes all removed parts in warm water with soft soap. Then wash with nylon brush, rinse and dry completely before reinstalling.

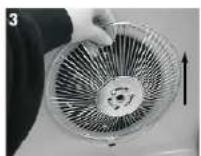
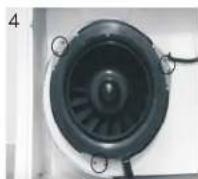
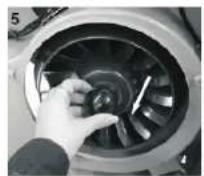

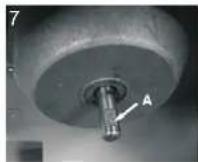
NOTE: When reinstalling the wheel, align the end of the set screw with the flat part of the motor shaft (A).
HOOD CLEANING
Stainless steel is one of the easiest materials to keep clean. Occasional care will help preserve its fine appearance.
Cleaning tips:
* Hot water with soap or detergent is all that is usually needed.
* Follow all cleaning by rinsing with clear water. Wipe dry with a clean, soft cloth to avoid water marks.
* For discolorations or deposits that persist, use a non-scratching household cleanser or stainless steel polishing powder with a little water and a soft cloth.
* For stubborn cases use a plastic scouring pad or soft bristle brush together with cleanser and water. Rub lightly in direction of polishing lines or "grain" of the stainless finish. Avoid using too much pressure that may mar the surface.
* Do not allow deposits to remain for long periods of time.
^a Do not use ordinary steel wool or steel brushes. Small bits of steel may adhere to the surface causing rust.
* Do not allow salt solutions, disinfectants, bleaches, or cleaning compounds to remain in contact with stainless steel for extended periods. Many of these compounds contain chemicals that may be harmful. Rinse with water after exposure and wipe dry with a clean cloth.
^a Painted surfaces should be cleaned with warm water and mild detergent only.
REPLACEMENT PARTS
Light Bulb: Model: XOPXOAB (Type JCD, 12V, 20W Max, G-4 Base) Replacement Grease Guard: Model: XOPXOAG

- EXPECT MORE FROM XO
- CONTENTS
- Maximum duct length: 100 feet for range ho-ods.
- Flexible ducting:
- WARNING
- TO RUDUCE THE RICK OF FIRE, ELECTRIC SHOCK OR INJURE TO PERSONS, PLEASE OBSERVE THE FOLLOWINGS:
- WARNING - TO REDUCE THE RISK OF A RANGE TOP GREASE FIRE:
- WARNING – TO REDUCE THE RISK OF INJURY TO PERSONS IN THE EVENT OF A RANGE TOP GREASE FIRE, OBSERVE THE FOLLOWING:
- Based on "Kitchen Fire Safety Tips" published by NFPA.
- CAUTION
- CHARACTERISTICS
- INSTALLATION & USE
- DESCRIPTION / CONNECTION
- DUCTED VERSION
- HOOD PREPARATION
- HOOD PREPARATION-VERTICAL DISCHAREG INSTALLATION
- 6" ROUND DUCT INSTALLATION
- HOOD INSTALLATION
- ELECTRICAL CONNECTION
- LIGHT BULB
- OPERATION
- LOCK ADJUSTMENT
- MAINTENTANCE & CLEAN
- HOOD CLEANING
- REPLACEMENT PARTS
Brand : XO
Model : XOA36S
Category : Range hood