RVCGM-80B - Dash cam CRUX - Free user manual and instructions
Find the device manual for free RVCGM-80B CRUX in PDF.

| Brand | CRUX |
| Model | RVCGM-80B |
| Product Type | Dash Cam / Car Video Recorder |
| Dimensions | Approximately 2.0 x 1.5 x 1.2 inches (50 x 38 x 30 mm) |
| Weight | Approximately 3.5 ounces (100 grams) |
| Power Input | 5V DC via USB cable (car charger included) |
| Battery | Built-in rechargeable lithium-ion battery (for parking mode) |
| Video Resolution | 1080p Full HD (1920 x 1080) at 30 fps |
| Lens Angle | 170° wide angle |
| Recording Mode | Loop recording, G-sensor impact detection, parking mode |
| Storage | Supports microSD card up to 32 GB (Class 10 or higher) |
| Display | 2.0 inch LCD screen |
| Connectivity | Mini USB for power, AV out for monitor |
| Night Vision | Built-in infrared LEDs for low-light recording |
| Mount | Suction cup mount for windshield |
| Maintenance | Clean lens with soft cloth; format SD card monthly |
| Safety | Do not install where it obstructs driver's view; keep away from airbags |
| Spare Parts / Repairability | Replacement power cable, mount, and battery available; no user-serviceable parts inside |
| General Info | User manual included; operation temperature -10°C to 60°C |
Frequently Asked Questions - RVCGM-80B CRUX
User questions about RVCGM-80B CRUX
0 question about this device. Answer the ones you know or ask your own.
Ask a new question about this device
Download the instructions for your Dash cam in PDF format for free! Find your manual RVCGM-80B - CRUX and take your electronic device back in hand. On this page are published all the documents necessary for the use of your device. RVCGM-80B by CRUX.
USER MANUAL RVCGM-80B CRUX
- Adds front and rear aftermarket camera inputs.
- Retains functionality of the OEM backup camera if present.
- Front camera automatically shows on the screen after changing the gear from reverse to drive.
- Programmable front camera delay OFF time using the OSD menu.
PARTS INCLUDED:
text_image
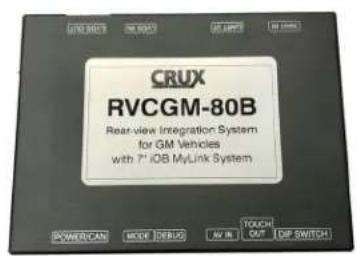
CRUX RVCGM-80B Rear-view Integration System for GM Vehicles with 7th iOB MyLink System POWERCAN MODE DEBUG TOUCH OUT DIP SWITCH
natural_image
Coiled electrical cable with multicolored wires and connectors (no visible text or symbols)
natural_image
Coiled black USB connector with red cable, no visible text or symbolsRVCGM-80B Module RVCGM-80B Power Harness LVDS Cable

natural_image
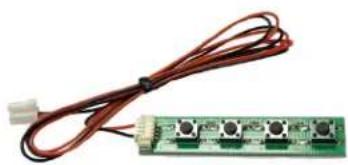
Coiled black and red electrical connector with two yellow connectors (no text or symbols visible)AV Cable Keypad
natural_image
Electronic circuit board with four connected components and a connector (no visible text or symbols)WIRING DIAGRAM:

flowchart
graph TD
    A["Front Camera 12V Power & Ground"] --> B["Fuse"]
    C["Front Camera"] --> B
    D["REAR CAMERA"] --> B
    E["Rear Camera 12V Power & Ground"] --> B
    B --> F["LVDS Adapter Cable"]
    F --> G["To the LVDS Connector behind the radio"]
    G --> H["From the LVDS Connector behind the radio"]
    H --> I["CRUX® RVCGM-80B Front & Rear Camera Integration Interface for CHLVROLT and GMC Vehicles with 7" MyLink O8 Radios"]
    I --> J["Main"]
    K["OSD Control Pad"] --> L["To the 10-pin connector behind the radio"]
    L --> M["From the 10-pin connector behind the radio"]
    M --> N["To the 10-pin connector behind the radio"]
    N --> O["OSD Control Pad is used to adjust the settings. Must be unplugged and stored after."]
REAR CAMERA CONNECTION

text_image
USING OEM CAMERA Turn DIP#2 to OFF REAR CAM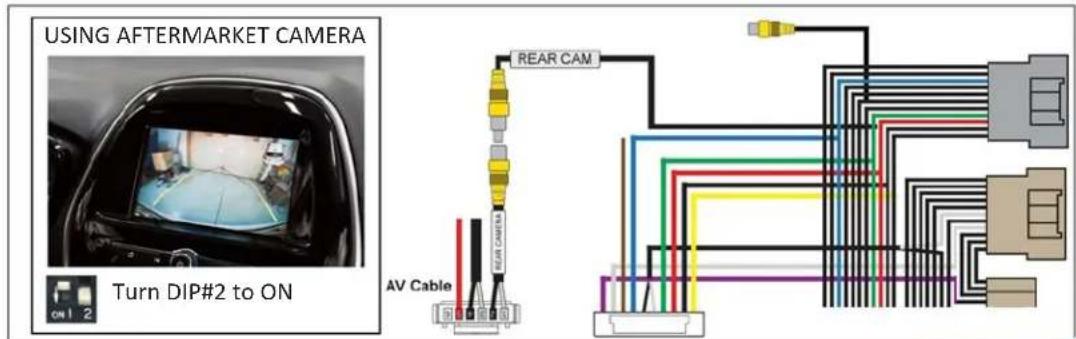
text_image
USING AFTERMARKET CAMERA Turn DIP#2 to ON AV Cable REAR CAMWhen using the OEM backup camera, set DIP#2 to OFF. Plug the male RCA (Rear Camera) to the female RCA (OEM Camera) found on the power harness. If an aftermarket backup camera is used, plug the male RCA (Rear Camera) to the female RCA (Rear Camera) of the AV Cable. Plug the front camera RCA to the female RCA (Front Camera) of the AV Cable. Use the RED wire (Front and Rear Camera +12V) to power both the front and rear cameras.
DIP SWITCH SETTINGS:
| PIN ON ( ) OFF ( ) ▼ | ▲ |
| 1 Set to OFF | |
| 2 Aftermarket Backup Camera OEM Backup Camera | |
| 3 Front Camera ON Front Camera OFF | |
| 4 Set to OFF | |
ON SCREEN DISPLAY (OSD) SETTINGS:
Plug the Key Pad to the MODE port on the RVCGM-80B module and press the SEL button once to enter the OSD settings menu.

flowchart
graph LR
    A["Input"] --> B["Terminal Block"]
    B --> C["MENU"]
    B --> D["SEL"]
    B --> E["UP"]
    B --> F["DOWN"]
| BUTTON | FUNCTION | OPERATION |
| 2SEL | Enter Settings Menu | Short Press |
| 1MENU | Back to previous Menu | Short Press |
| 2SEL | Select Value | Short Press |
| 3UP 4DOWN | Move Pointer and adjust settings | Short Press |
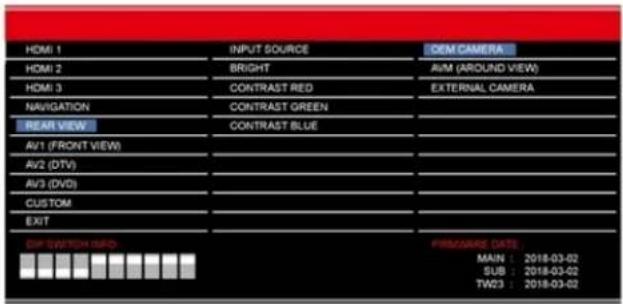
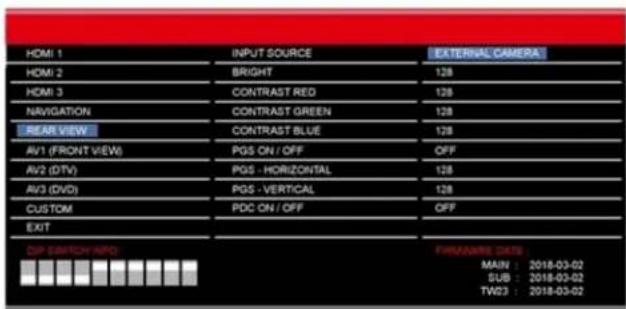
REAR VIEW CAMERA SETTINGS
REAR VIEW
INPUT SOURCE
OEM CAMERA
AVM (NOT APPLICABLE)
EXTERNAL CAMERA (AFTERMARKET)
OPTIONS:
BRIGHTNESS & CONTRAST
Adjust Brightness and Contrast
PGS (Parking Guidance System)
Turn parking lines ON or OFF
Adjust position of parking guide lines
text_image
HDMI 1 HDMI 2 HDMI 3 NAVIGATION PEAR VIEW AV1 (FRONT VIEW) AV2 (DTV) AV3 (DVD) CUSTOM EXIT DIFF SWITCH INFO: BRIGHT CONTRAST RED CONTRAST GREEN CONTRAST BLUE FIRI/ORSE DATE: MAIN : 2018-03-02 SUB : 2018-03-02 TW23 : 2018-03-02
text_image
HDMI 1 HDMI 2 HDMI 3 NAVIGATION REAR VIEW AV1 (FRONT VIEW) AV2 (DTV) AV3 (DVD) CUSTOM EXIT PDC ON / OFF AVM KEEPING TIME R → D AVM KEEPING TIME P → D PGS ON / OFF PGS - HORIZONTAL PGS - VERTICAL PDC ON / OFF DEFAULT 128 128 128 128 7 Sec 7 Sec OFF 128 128 OFF FAMWARE DATE: MAIN : 2018-03-02 SUB : 2018-03-02 TW23 : 2018-03-02REAR VIEW
INPUT SOURCE
OEM CAMERA
AVM (NOT APPLICABLE)
EXTERNAL CAMERA (AFTERMARKET)
OPTIONS:
BRIGHTNESS & CONTRAST
Adjust Brightness and Contrast
PGS (Parking Guidance System)
Turn parking lines ON or OFF
Adjust position of parking guide lines
text_image
HDMI 1 HDMI 2 HDMI 3 NAVIGATION REAR VIEW AV1 (FRONT VIEW) AV2 (DTV) AV3 (DVD) CUSTOM EXIT DIP SWITCH INFO: BRIGHT CONTRAST RED CONTRAST GREEN CONTRAST BLUE PGS ON / OFF PGS - HORIZONTAL PGS - VERTICAL PDC ON / OFF EXTERNAL CAMERA OFF 128 128 128 128 128 OFF FINANCIAL DATA MAIN : 2018-03-02 SUB : 2018-03-02 TW03 : 2018-03-02FRONT CAMERA SETTINGS
AVI (FRONT VIEW)
INPUT SOURCE
OEM CAMERA
OPTIONS:
CAM KEEPING TIMER
Set the time the front camera is ON when
changing gear from Reverse to Drive.
(example: 7 sec.)
AVI (FRONT VIEW)
INPUT SOURCE
EXTERNAL CAMERA (Aftermarket Camera)
OPTIONS:
BRIGHTNESS & CONTRAST
Adjust Brightness and Contrast
CAM KEEPING TIMER
Set the time the front camera is ON when changing gear from Reverse to Drive.
(example: 7 sec.)

text_image
HOMI 1 HOMI 2 HOMI 3 NAVIGATION REAR VIEW AV1 (FRONT VIEW) AV2 (DTV) AV3 (DVD) CUSTOM EXIT DIP SWITCH INFO : CAM KEEPING TIME R → D CAM KEEPING TIME P → D 7 Sec 7 Sec FORMAIRE DATE: MAIN : 2018-03-02 SUB : 2018-03-02 TW23 : 2018-03-02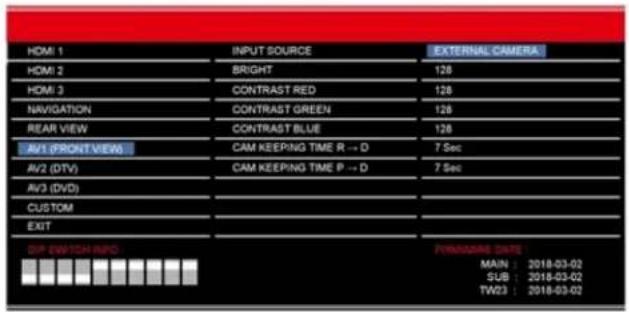
text_image
HDMI 1 HDMI 2 HDMI 3 NAVIGATION REAR VIEW AV1 (FRONT VIEW) AV2 (DTV) AV3 (DVD) CUSTOM EXIT DIP SWITCH INFO: BRIGHT CONTRAST RED CONTRAST GREEN CONTRAST BLUE CAM KEEPING TIME R → D CAM KEEPING TIME P → D 7 Sec 7 Sec PENNSKINE STATE: MAIN : 2018-03-02 SUB : 2018-03-02 TW23 : 2018-03-02VEHICLE APPLICATIONS:
Compatible with 7" MyLink iOB Systems
CHEVROLET
| 2016 - 2018 | Colorado |
| 2016 - 2018 | Impala |
| 2016 - 2018 | Silverado |
| 2016 | Spark |
GMC
| 2017 | Acadia |
| 2016 - 2018 | Canyon |
| 2016 - 2018 | Sierra |

text_image
50° 12:007" iOB Radio with a Knob in the middle