
Eclipse 384 - Audio Interface Antelope Audio - Free user manual and instructions
Find the device manual for free Eclipse 384 Antelope Audio in PDF.


| Product Type | Multi-Input/Output Stereo A/D and D/A Converter with Monitoring Control |
| Brand | Antelope Audio |
| Model | Eclipse 384 |
| Dimensions (W x H x D) | 482 mm x 89 mm x 203 mm (19" x 3.5" x 8") |
| Weight | 8 kg (17 lb approx.) |
| Power Supply | AC Universal input 95-245 VAC, 40W max |
| Sampling Rates | 32, 44.1, 48, 88.2, 96, 176.4, 192, 352.8, 384 kHz |
| Clock Stability | <+/-0.02 PPM, oven controlled at 64.5 °C |
| A/D Dynamic Range | 123 dB |
| D/A Dynamic Range | 129 dB |
| Analog Inputs | 3 x Combo Balanced (XLR/TRS), 2 x TRS Insert points, 1 x TRS Talkback, 1 x TRS Footswitch |
| Digital Inputs | 3 x AES/EBU (XLR), 2 x S/PDIF (RCA), 2 x TOSLINK optical |
| Analog Outputs | 2 x XLR D/A, 3 x Balanced Monitor (1 XLR + 2 TRS), 1 x XLR LFE, 2 x TRS Cue HP, 2 x TRS Front HP |
| Digital Outputs | 2 x AES/EBU A/D, 2 x De-jittered AES/EBU, 1 x De-jittered S/PDIF, 1 x De-jittered TOSLINK |
| USB | USB 2.0 Hi-Speed, Type B, up to 384 kHz |
| Word Clock I/O | 1 x Input BNC, 4 x Output BNC, 1 x 10M Atomic Clock Input BNC |
| Headphone Outputs | 2 x Front (1/4" TRS), 2 x Cue Mix (1/4" TRS) |
| Main Features | 64-bit Acoustically Focused Clocking, Stepped relay volume, Anti-thumping protection, Dual-stage headphone driver, Software control panel, Presets |
| Operating Temperature | 0-50 °C (32-122 °F) |
| Cleaning | Use specialized electronics cleaners; avoid harsh chemicals |
| Safety | Class 1 construction, grounded mains required; disconnect power in emergencies; no user-serviceable parts inside |
| Spare Parts & Repairability | No user-serviceable parts; refer servicing to qualified personnel; firmware updates available via software |
| In the Box | Eclipse 384 unit, Owner's Manual, Connectivity Chart, USB cable, Power cable |
Frequently Asked Questions - Eclipse 384 Antelope Audio
User questions about Eclipse 384 Antelope Audio
0 question about this device. Answer the ones you know or ask your own.
Ask a new question about this device
Download the instructions for your Audio Interface in PDF format for free! Find your manual Eclipse 384 - Antelope Audio and take your electronic device back in hand. On this page are published all the documents necessary for the use of your device. Eclipse 384 by Antelope Audio.
USER MANUAL Eclipse 384 Antelope Audio
- Front Panel Explained 16
- Rear Panel Explained 20
- Software Control Panel 22
7.1. Inputs & Outputs tab 22
7.2.AD/DA tab 25
7.3. Clock tab 28
7.4. Monitor / Cue Mix tab 30
7.5. Preferences tab 34
- Advanced Notes 39
- Ground Loop Hum and Noise 39
- Additional Information 39
- Calibration Mode 39
- Device Information 40
- In the box 40
- Technical Specifications 41
1. Safety Notes

To reduce the risk of electrical shocks, fire, and related hazards:
- CAUTION! Keep in mind that this device can cause hearing damage when operating at high volume levels.
- Do not remove screws, cover, or cabinet. There are no user serviceable parts inside. Refer servicing to qualified service personnel.
- If anything goes wrong, turn off the device first and then unplug the power. Do not attempt to repair the device yourself: consult authorized service personnel or your dealer.
- Do not expose this device to rain, moisture or spillover from liquid containers liquid of any kind (glasses, bottles, aquariums, etc.).
- Should any form of liquid or a foreign object enter the device, do not use it. Switch off the device and then unplug it from the power source. Do not operate the device again until the foreign object is removed or the liquid has completely dried and its residues fully cleaned up. If in doubt, please consult the manufacturer.
- Do not use harsh chemicals to clean your Unit. Clean only with specialized cleaners for electronics equipment.
- Do not handle the power cables with wet hands!
- WARNING! This device is a Class 1 construction and should be connected only to grounded mains inlets!
- Make sure the device is switched off when plugging/unplugging it to/from the power source.
- Ensure that your main plug is grounded.
- Connect all your devices before powering your Unit.
- CAUTION! The only way of fully turning off the device is to unplug it from the mains inlet or detach the mains cable from the rear panel of the device. In cases of emergency, turning the device off using the power button on the front panel is not adequate to ensure safety. Turning off the device and leaving the device in standby are two completely different states.
- Do not cover the device with any materials at all costs (newspapers, magazines). Also do not use any type of decorative covers or cloths. In particular avoid blocking parts of the device chassis that are involved in heat management.
- Avoid placing items on the cabinet, particularly not any source of fire (candles, gas lamps, etc.).
- Do not use the device in a narrow and poorly ventilated place which could affect its operation or the operation of other closely located components.
- Do not install near any heat sources such as radiators, stoves, or other apparatus (including amplifiers) that produce heat.
- The device is designed to operate in a temperate environment, with a correct Operating Temperature of: 0-50 °C, 32-122 °F
- During the firmware update we advise to disconnect all other devices from your Antelope unit except the computer.
2. Introduction
Thank you for purchasing the Eclipse 384 from Antelope Audio.
The technological fusion of Antelope Audio's best innovations has now been utilized to create this new product:
A sophisticated Multi-Input/Output Stereo A/D and D/A Converter, utilizing Antelope's 64-bit Oven Controlled Clocking and precise Monitoring Control.
Eclipse 384 is designed to deliver bit perfect, transparent sound — digital audio that doesn't sacrifice the warmth and fullness typically associated with analog gear.
Separate A and D power supplies virtually eliminate digital cross-talk and this is further enhanced by keeping those circuits on separate boards. These boards utilize large internal ground plains, cancelling noise and voltage shifts.
The Custom designed USB controller chip streams data at 480Mbits, allowing audio up to 384kHz with native drivers for both Mac and PC. Dual-stage headphone driver architecture delivers smooth sound at both high and low levels.
For further information, you can also visit our support area online for the FAQ, Help Desk and to register your product at: www.antelopeaudio.com
Enjoy working with the new Eclipse 384!
All the best, The Antelope Team
3. Features
- Up to 384kHz sampling rate through USB and AES/EBU Outs (in Dual Wire AES/EBU mode when 384kHz is selected on the Clock).
- Stepped relay volume attenuator for precise stereo balance (matched to 0.05 dB) for both monitoring and headphone outputs.
- Antelope Oven Controlled Clock with Ultra Low Jitter
- Built in 64-bit Acoustically Focused Clocking, that greatly reduces jitter from all digital inputs
- De-Jittered, re-clocked Digital Outputs: 2x AES/EBU, 1 x TOSLINK and 2 x S/PDIF
- Anti-thumping Speaker & Ear protection on power up & source change
- Inputs: 3 x Stereo Balanced analog Combo XLR / ¼ TRS, 1 x Computer Data (USB), 3 x AES/EBU on XLR, 2 x TOSLINK optical, 2 x SPDIF on RCA, 2 x A/D TRS Inserts, World Clock and 10M Inputs on BNC, 1 x Stereo Footswitch ¼ TRS Jack, 1 x Talkback Mic ¼ TRS
- Outputs: 3 x Stereo Balanced analog (1 x XLR & 2x 14 TRS), 1 x LFE Balanced XLR, 2 x A/D out on AES/EBU XLR, 1 x Stereo Pair of Main D/A XLR, 2 x Front Headphones on 14 TRS, 2 x Cue Mix Headphones on 14 TRS, 4 x Word Clock on BNC and 2 x AES/EBU/1 x SPDIF/1 x TOSLINK De-jittered outs
- Dual-stage headphone driver architecture for superior matching with professional headphone coils
- Volume control for monitor analog outputs and a separate volume control for front headphones
- Mute and dim of main out levels
- Adjustable (120 Ω or 0 Ω) headphone output impedance
- USB compatible with Windows 7/Vista/XP/2000 and Mac OS X without driver installation
• Word Clock and 10M Atomic Clock Input
• PC/MAC software control panel
- Meets FCC and CE requirements
- USB recording available using the Eclipse as an Audio Interface
4. Quick Start
It only takes a few moments to harness the benefits of the Eclipse 384 sound.
Follow these simple steps to connect the Eclipse 384 to your system setup:
- Connect to the AC power source via AC Mains Outlet.
- Connect your USB cable to the Eclipse 384 and your computer. The guest operating system will recognize the new output audio device (Eclipse 384). You should redirect sound from the computer to your newly indicated output – Eclipse 384.
Mac OS:
In your Apple Menu, go to System Preferences and choose Sound, Select the Output tab and select Eclipse 384 from the list.
Windows:
Click on your PC's START menu, then select:
SETTINGS / CONTROL PANEL / SOUNDS & AUDIO DEVICES / AUDIO and ensure that the Eclipse 384 is selected as default audio device.
- Download and install the software control panel from the Antelope Audio website.
- Install the latest firmware update for your device by clicking on the firmware update button on the preferences tab (of the software control panel).
- Connect your choice of Analog/Digital Inputs and Outputs on the rear panel of the device.
- Turn on the device by pressing the power button on the front panel or in the software control panel once you have opened it.
- Adjust your Inputs/Outputs' Trim levels on the I/O section of the software control panel.
4.1 Quick Start for Analog Input Playback
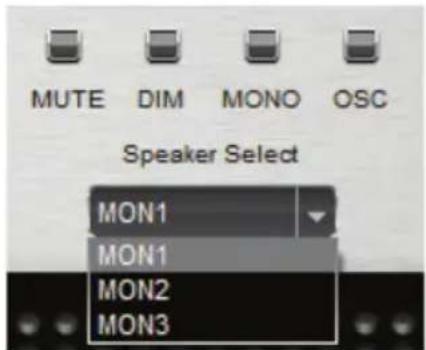
- Go to the Monitor / Cue Mix tab and select a pair of monitor speakers in the dropdown menu
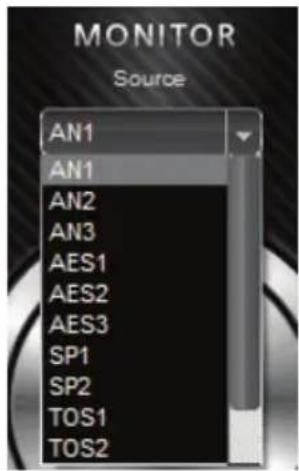
- Select the Analog Input in the Monitor source dropdown menu.
- Adjust the Volume with the Main Volume controller and enjoy the music!
4.2 Quick Start for Digital Input Playback
- Go to the Monitor / Cue Mix tab.
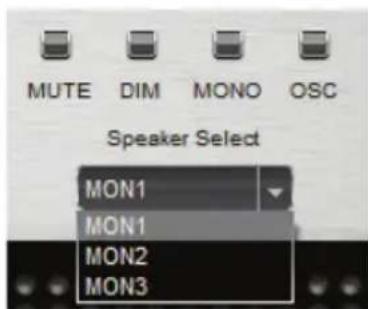
- Select a pair of monitor speakers in the dropdown menu.
- Select your digital source in the monitor source dropdown menu.

- Go to the Clock tab and under the Source dropdown menu, select Follow Monitor. This way the Eclipse 384 will be locked to the incoming digital signal. Keep in mind that if you have USB selected as a source, the clock source will state: Follow Monitor: Oven, and you will have to manually select the sample rate in order to match it with that of your USB device.

-
Wait for the Lock Light to illuminate.
-
In the Clock A section, select Follow Source, if you just want to listen to the source. If your setup is working in a different sample rate than the one of your source, then choose the sample rate of your set up on the Clock A dropdown menu.

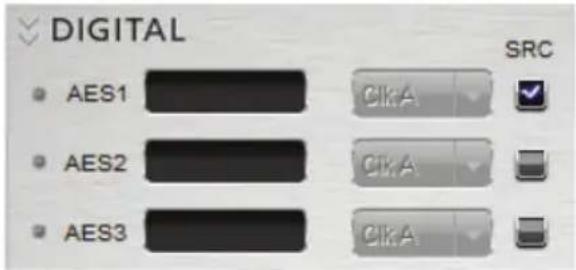
- Now go to the I/O tab and SRC the source to match the sample rate of your setup.
4.3 Quick Start for A/D Conversion
-
Go to the AD/DA tab.
-
In the A/D Source dropdown menu, select which analog input you want to convert.
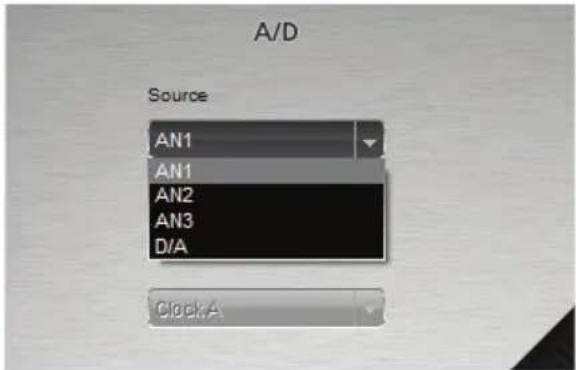
- If you have a device connected to your A/D inserts and don't want to use it, just click bypass on the AD Inserts bypass box.

- Select the clock that will be used for the conversion (The default setting will be Clock A - Single Clock mode).

- Go to the Clock tab and under the selected clock for the conversion, select the desired sample rate.
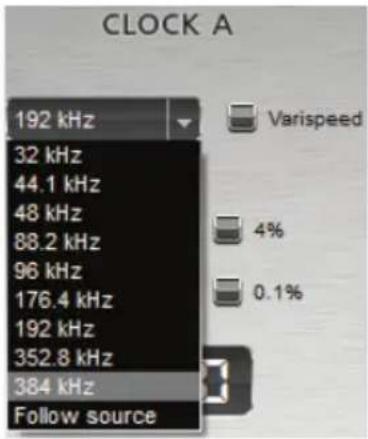
- If you want to monitor the converted signal, go to the Monitor tab and in the Monitor Source dropdown menu, select A/D.

- The converted signal will be output from the A/D Outputs on the rear panel of the device. (NOTE that for 384kHz it will be automatically dual-wired using both outputs 1 and 2 as for L and R).
4.4 Quick Start for D/A Conversion
-
Go to the AD/DA tab.
-
Under the D/A tab select the source that you want to convert.
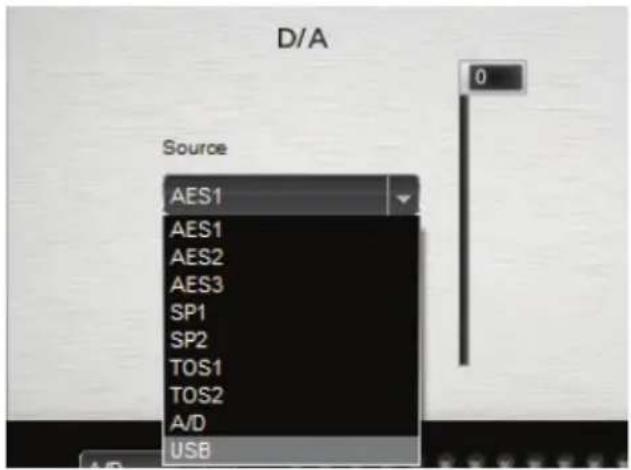
- Go to the Clock tab.
- On the source dropdown menu, select Follow D/A.

- On the Clock a dropdown menu (Default - single clock mode), select: Follow source.

- Go to the AD/DA tab and adjust the D/A output volume level with the fader. The signal will be output from the D/A Outputs on the rear panel of the Eclipse 384.

- If you want to monitor the source you are currently converting, go to the Monitor tab and select it on the Monitor Source dropdown menu
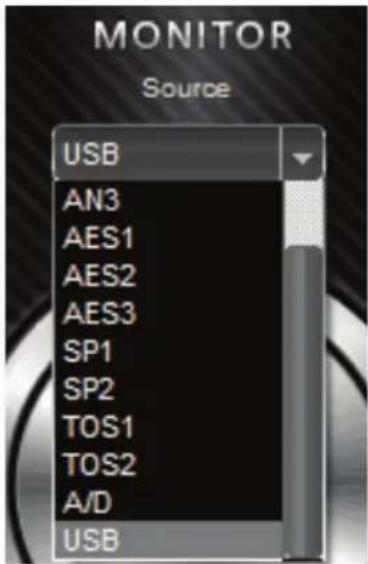
4.5 Quick Start for recording through USB
There is the ability to use the Eclipse 384 as an "Audio Interface" for recording purposes. This works via the USB.
-
You can select which input will be sent for recording from the USB menu on the AD/DA tab.
-
Then, start your recording software program and use the Eclipse as an Input device as you could do with any ither audio interface.

- Be sure to match all the sample rates in your audio chain: Clock sample rate from the Software Control Panel of the Eclipse, Eclipse sample rate on sound preferences on your Windows system or Audio MIDI preferences on your MAC, and recording software sample rate.

- Keep also in mind that, when you want to playback or record through USB, the Eclipse is the "USB Master". So in a software recording program the "sync mode" should be changed to external.
NOTE! When you want to record a source keep in mind that the Clock setting MUST be in Oven with proper setting of the sample rate (same as the Input source). The Eclipse will not change that automatically.
5. Front Panel Explained

1. Power button
Toggles standby/ operation state
2. LCD Display
Multi-function display can show Sample Rate, Main volume level and the currently selected Source Input. The default screen displays the following:

- Sync: indicates the selected sync option. (Oven for internal sync, 10M for atomic clock reference and WC for syncing through the Word Clock Input).
- Clk: indicates the currently selected sample rate for the clocks that are in use.
• HP: indicates the current level of the Headphone Output
• MONITOR: indicates the current level of Monitor Output.
3. Peak Meters
Two separate, precise 32 LED bar graphs are assignable to any input or output available. The scale reads from -40dB to 0dB.
4. Main volume
Adjusts the level for the currently selected MON output. The level is shown on the display (2) when adjusting, with a range of -95dB to 0dB. A click is heard as each relay engages the precision resistors.
5. Headphone volume
Adjusts level of headphone amplifier to the front panel HP (Headphone) outputs with a range of -95dB to 0 dB (11).
6. Antelope button
Pressing the Antelope button once activates the LCD menu. You can navigate through the menu by pressing buttons 1 and 2.
*Note that if the LCD menu is not activated, clicking the numbered buttons will recall the stored presets.

- Pressing the Antelope button takes you to the first option screen, which indicates what is currently displayed on the Peak Meters.

- Pressing button 2 takes you to the second option screen, which indicates what is currently fed to each corresponding output.

- Pressing button 2 a second time, takes you to the third option screen, which indicates the sample rates for the corresponding clocks, sync source for the Eclipse, Sample Rate Frequency of the sync source and currently selected Preset.
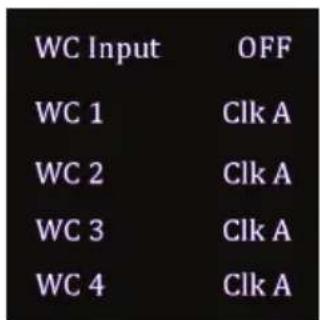
- Pressing button 2 a third time, takes you to the forth option screen, which indicates Word clock Inputs and Outputs. This includes: which clock is assigned to which Word clock output.
Pressing button 1 at any point, steps you backwards through the available option screens.
7. Preset buttons
Five Preset buttons store and recall your 'favorite' set-ups. For more information see page 34, section 11.
The Preset buttons can also be used to take you through a range of other option screens:

- Hold down Preset button 1 and press the Power button to display the device information screen (See Device Information, page 40) To return the device to operation mode, click any other Preset button (apart from 1).

- Hold down Preset button 2 and press the Power button to display the Calibration Mode screen (See Calibration Mode, page 39) To return the device to operation mode, click any other Preset button (apart from 2).

- Hold down Preset button 3 and press the Power button to display the use of the current USB Mode. You can change the USB Mode by pressing Preset button 3 (and cycling through the options). To return the device to operation mode, click any other Preset button (apart from 3).

- Hold down Preset button 5 and press the Power button to restore your stored presets to the factory settings. To return the device to operation mode, click any other Preset button (apart from 5).

- A further screen appears automatically to confirm that your Factory presets have been restored.
8. Mute button
Press the button once for full mute. Press once again to restore normal volume.
9. Dim button
Press the button to activate the -20dB attenuator. Press once more to restore normal volume.
10. Mono button
Pressing the mono button sets the currently selected MON output to mono. The mono feature is only available on digital sources. This button corresponds to the last setting selected in the Mono effects dropdown menu in the software control panel.
11. Headphone Outputs
Two 1/4" TRS Stereo Headphone jacks for connecting headphones for a wide range of impedances.
6. RearPanel Explained

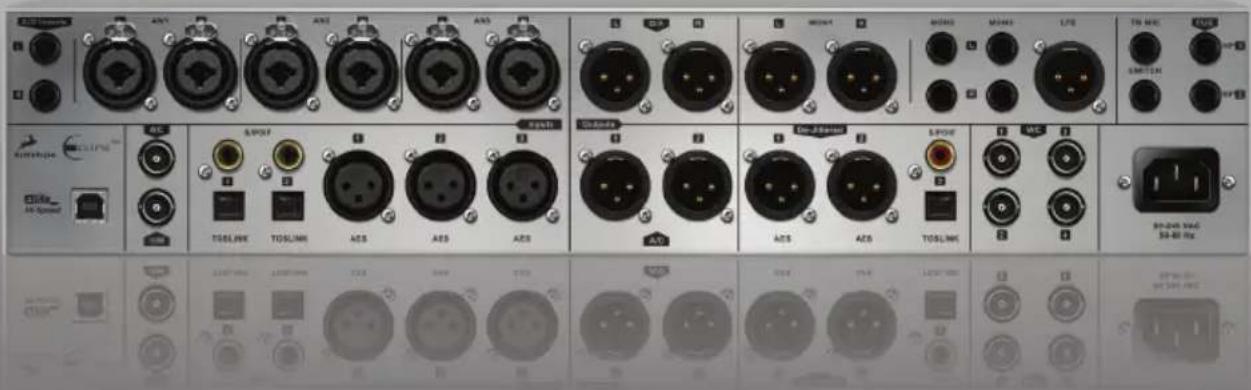
1. AD Inserts
Two 1/4" TRS insert points (L & R) for connecting analog gear such as dynamics processors or EQ's, just before the A/D conversion
2. Analog Inputs
Three combo stereo pairs of balanced XLR / 1/4" TRS Inputs for connecting Analog sources to the Eclipse 384
3. D/A Outputs
One pair of balanced XLR Outputs for feeding the signal directly from the main D/A converter
4. Monitor Outputs
Three stereo pairs (1x XLR, 2x TRS) of balanced outputs to connect different pairs of monitors
5. Balanced LFE Outputs
LFE stands for Low Frequency Effect. Balanced XLR to connect sub woofer
6. TB MIC Input
1/4" TRS Talkback Mic Input for connecting Microphone
7. Switch Input
1/4" TRS "Foot Switch" connector
8. CUE HP Outputs
Two stereo 1/4" Balanced TRS Headphone Outputs for listening to the CUE MIX output through headphones
9. USB Hi-Speed
Hi-Speed USB (up to 480Mbits). The Eclipse 384 uses USB connector Type B and operates up to 384kHz sample rate with native drivers on some operating systems.
10. WC Input
BNC connector used to accept Word Clock reference
11. 10M Input
This BNC Input Connector allows the Eclipse 384 to receive timing reference from an Atomic Clock such as the Antelope 10M, to increase the Oscillator accuracy. The “Atomic LED” light on the software control panel illuminates and the atomic device becomes the primary timing reference, thus providing better sample accuracy, more detailed sound and greater stability.
12. Digital Inputs
S/PDIF Inputs
Two Coaxial digital inputs on RCA connectors using the S/PDIF connectivity standard
TOSLINK Inputs
Two Optical connectors using the TOSLINK connectivity standard
AES/EBU Input
Three XLR connector-type Inputs using the 110 Ω AES/EBU connectivity standard
13. A/D Outputs
Two AES/EBU digital outputs on XLR connectors that feed the signal directly from the D/A converter. When 384kHz is selected on the clock, these inputs are dual-wired at this frequency.
14. De-Jittered Outputs
AES/EBU
Two 'jitter-free' XLR connector-type Inputs for compatible equipment using the 110 Ω AES/EBU connectivity standard. Note that AES 1 and AES 2 can be dual-wired to 384kHz automatically when 384kHz is selected on the clock.
S/PDIF Digital Output
One coaxial 'jitter-free' S/PDIF Output on RCA connector
TOSLINK Digital Output
One optical 'jitter-free' TOSLINK Digital Output for use with compatible equipment
15. Word Clock Outputs
Four Word Clock Outputs with BNC connectors. These outputs can be individually selected to be clocked from Clock A or B.
16. Mains Power Connection
The AEC connector supports a range from 95-245 VAC. This enables the device to automatically accommodate mains voltage in every country.
7. Software Control Panel
7.1 Inputs & Outputs tab
This section of the control panel is used to configure inputs, outputs and also set names for them.

1. Naming the Analog inputs.
You can type in names of the inputs, corresponding to the devices you have connected to the rear panel inputs of the Eclipse 384.
2. Adjusting the input trim:
You can adjust the input signal level by trimming it, using the digitally controlled analogue trims. Settings range from 11dBu to 26dBu (or -1dBv to -14dBv if the dBv box is checked).

3. Select type of signal:
dBv for Unbalanced and dBu for Balanced signals. The trimming rates will change accordingly.
4. Name of Digital Input:
You can name your inputs to the Eclipse 384, corresponding to the devices you have connected.
5. Select clock:
By selecting the clock A or B, you are determining to which clock generator you will feed the appropriate input. (Note this option is available when dual clock mode is selected on the preferences tab).
6. SRC:
By clicking on the SRC (Sample Rate Converter), the chosen input is sample rate converted to match the sample rate of the selected clock. (e.g. If you want the clock to run at 192kHz and my input is at 44.1kHz, simply choose SRC and up-sample the input to match the sample rate frequency of the clock).
7. Naming your Monitors:
You can name the pairs of connected monitors on the Eclipse 384.
8. Adjusting the output trim for monitors:
You can adjust the output signal level by trimming it using the digitally controlled analogue trims. Settings go from 19dBu to 26dBu (or 13dBv to 20dBv if Unbal is selected from the signal types described below).
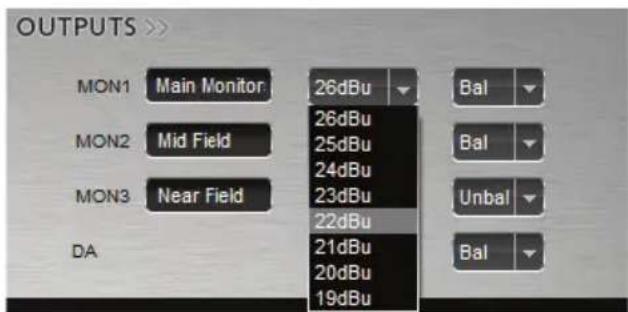
9. Select type of signal:
You can select between balanced, unbalanced and dBv signal types from the dropdown menu. (The dBv option stands for Unbalanced consumer level signal, e.g. for a consumer amplifier. That matches consumer electronic devices typically rated -10dBv to a +6dBv peak).
10. Tone Oscillator:
The Eclipse 384 features a built in tone oscillator for calibrating your monitors/set up.

11. Selecting frequencies:
You can select between 440Hz and 1kHz.

12. Level and Mute:
Selects the level of the tone oscillator. The mutes correspond to the right and left channel of the oscillator.

13. System Clock
These two check boxes enable you to select how the Eclipse 384 is to be synchronized. Select Oven/10M for internal sync (with or without 10M atomic clock reference) or Word Clock to sync the Eclipse 384 to an external device through the Word clock Input.

7.2 AD/DA tab
This section of the control panel is used to select the AD/DA and USB settings

1. A/D Source:
By clicking on the source tab of the A/D Converter, you select which analog input will feed the A/D converter directly. The result will be fed to the main A/D output on the rear panel of the Eclipse 384.
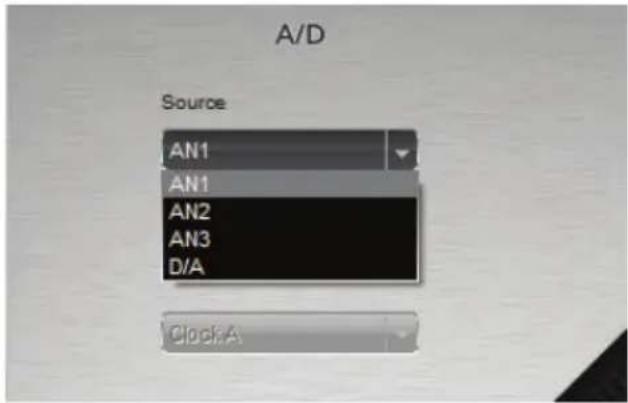
2. A/D Options:
Bypass Inserts: Bypasses the A/D Inserts in/outs on the rear panel of the Eclipse 384
3. Select Clock:
Select one of the two clocks that will be used for the A/D Conversion of the selected input. (Note that this option is available only when the dual clock mode is selected on the preferences tab).
4. D/A Source:
Select the input that will be fed directly to the D/A Converter output on the rear panel

5. D/A Options:
Mute: Mutes the D/A Output
OSC: Enables the oscillator on the D/A Output
6. D/A Fader:
Adjusts the output volume level of the D/A Output
7. Digital Out Source:
Select the digital source that will feed the digital out to the rear panel of the Eclipse 384.

8. OSC Option:
Enables the oscillator on the selected Digital Output.
9. USB Source:
This dropdown menu allows you to select what will be fed to your USB.
NOTE: If A/D is selected, the Clock setting must be set on OVEN with the same sample rate setting (matching the source you have selected on the USB dropdown menu). The USB is always the master and it cannot be slaved to any other source.

10. OSC Option:
Enasbles the oscillator on the USB Output.
7.3 Clock tab:
This enables you to adjust various Clocking parameters for the Eclipse 384.

1. Source Clock and Sample Rate Display:
This dropdown menu enables you to select how the Eclipse 384 is being locked. The options available in the dropdown are affected by "Oven/10M" or "Word Clock" in the System Clock options in the I/O tab. If you have selected Oven/10M then "Oven" will appear as the first option in the dropdown menu. If you have selected Word Clock, then "Word Clock" will appear as the first option in the dropdown menu.
Oven: The Eclipse 384 acts as a master clock.
Word Clock: The Eclipse 384 will sync to any external device connected to the WC Input on the rear panel.
Follow D/A: The Eclipse 384 syncs to the source that has been selected to feed the D/A Converter.
Follow Monitor: The Eclipse 384 syncs to the digital input that feeds the current monitor being used. (Note that if you choose an analog input or the A/D, the Eclipse 384 will be automatically locked to the system clock.
Follow Digital Out: The Eclipse 384 syncs to the selected source that feeds the De-Jittered digital outputs.

2. Clock A/B Sample-rate:
Set the sampling rate used by the corresponding clock (A or B). Sample rates can go up to 384kHz (only through USB or AES/EBU Dual Wire Output mode).
3. Varispeed:
You can adjust varispeed up/down to 12,256% or -+ 200 cents.


4. -/+ Options:
Options of -+4% or -+0,1%
5. Sampling Rate Display
Displays the current sample rate used by the corresponding clock
6. Atomic Indicator:
When this light is lit, the device is receiving timing reference from an Atomic Clock (Such as the Antelope 10M).
7. Oven Indicator:
When lit, this indicates that the device is the master clock.
8. Lock Indicator:
When lit, this shows that the device is locked to a signal.
9. WC Outputs:
You can select which clock will be fed on which individual WC output. Note that in single clock mode (factory setting), you cannot adjust this option and Clock A clocks all the outputs.
7.4 Monitor / Cue Mix tab:
This enables you to adjust and select settings related to the Monitor Outs and Headphones (both front HP and Cue Mix ones).

1. Source
Select the source that you want to listen to through the monitors.
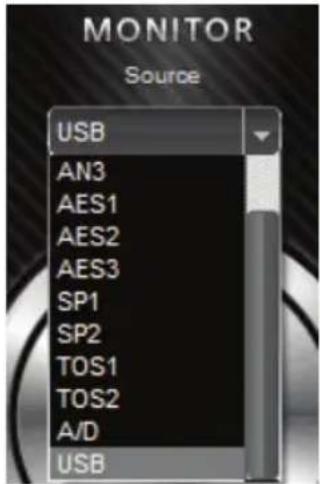
2. Main Volume Knob:
Adjusts the volume for the monitors currently used. Measurements go from -95dB to 0dB. You can make adjustments with your mouse by clicking and dragging, using your mouse wheel or the up and down arrow keys on your computer keyboard.
3. Mono effect:
You can choose between various mono effects. The “L-R” (Left minus Right) or “R-L” (Right minus Left) options make it possible to monitor only the “side” information of a stereo mix.

4. Stereo effect:
You can choose between several stereo effects, including options to flip the L and R to R and L, or Phase invert either one or both channels.

5. Monitor Out options:
MUTE: Mutes the selected monitors' output.
DIM: Dims the output of the current selected monitors by 20dB
MONO: This switches the playback from Stereo to Mono
OSC: Enables the tone oscillator on the selected monitor speakers
6. Monitor Select:
Here you can select the pair of monitors you want to listen to, adjust the volume from the Main Volume control on the center.

7. CUE MIX Source:
Here you select which input will be fed to your cue mix outputs (Rear panel headphones). The fader below the dropdown menu adjusts the volume of the corresponding source for the Cue Mix.

8. CUE MIX TB Mic Fader:
This fader adjusts the volume of the Talkback Mic for the Cue Mix.
9. CUE MIX Mute:
Mutes the signal fed to the cue mix outputs.
10. CUE MIX OSC:
Sends the Frequency Oscillator signal to the cue mix outputs.
11. Mic On Air button:
Press to talk from your talkback microphone connected on the rear panel, to the Cue Mix outs. Left click enables the talkback instantly, and right click enables it permanently.
12. Front HP Source:
Selects the source that is going to be fed on the Front Headphone outs. You can either select what is being fed on the monitors (What you hear on your monitor outs), or the Cue Mix (the same that goes to the Cue mix outs on the rear panel).

13. Front HP Volume control:
Adjusts the volume for the Front HP Outs. Measurements go from -95dB to 0dB.
14. Front HP Mute:
Mutes the output of the Front HP
7.5 Preferences tab:
Click on the preferences emblem at the top left of the control panel to select the preferences tab:
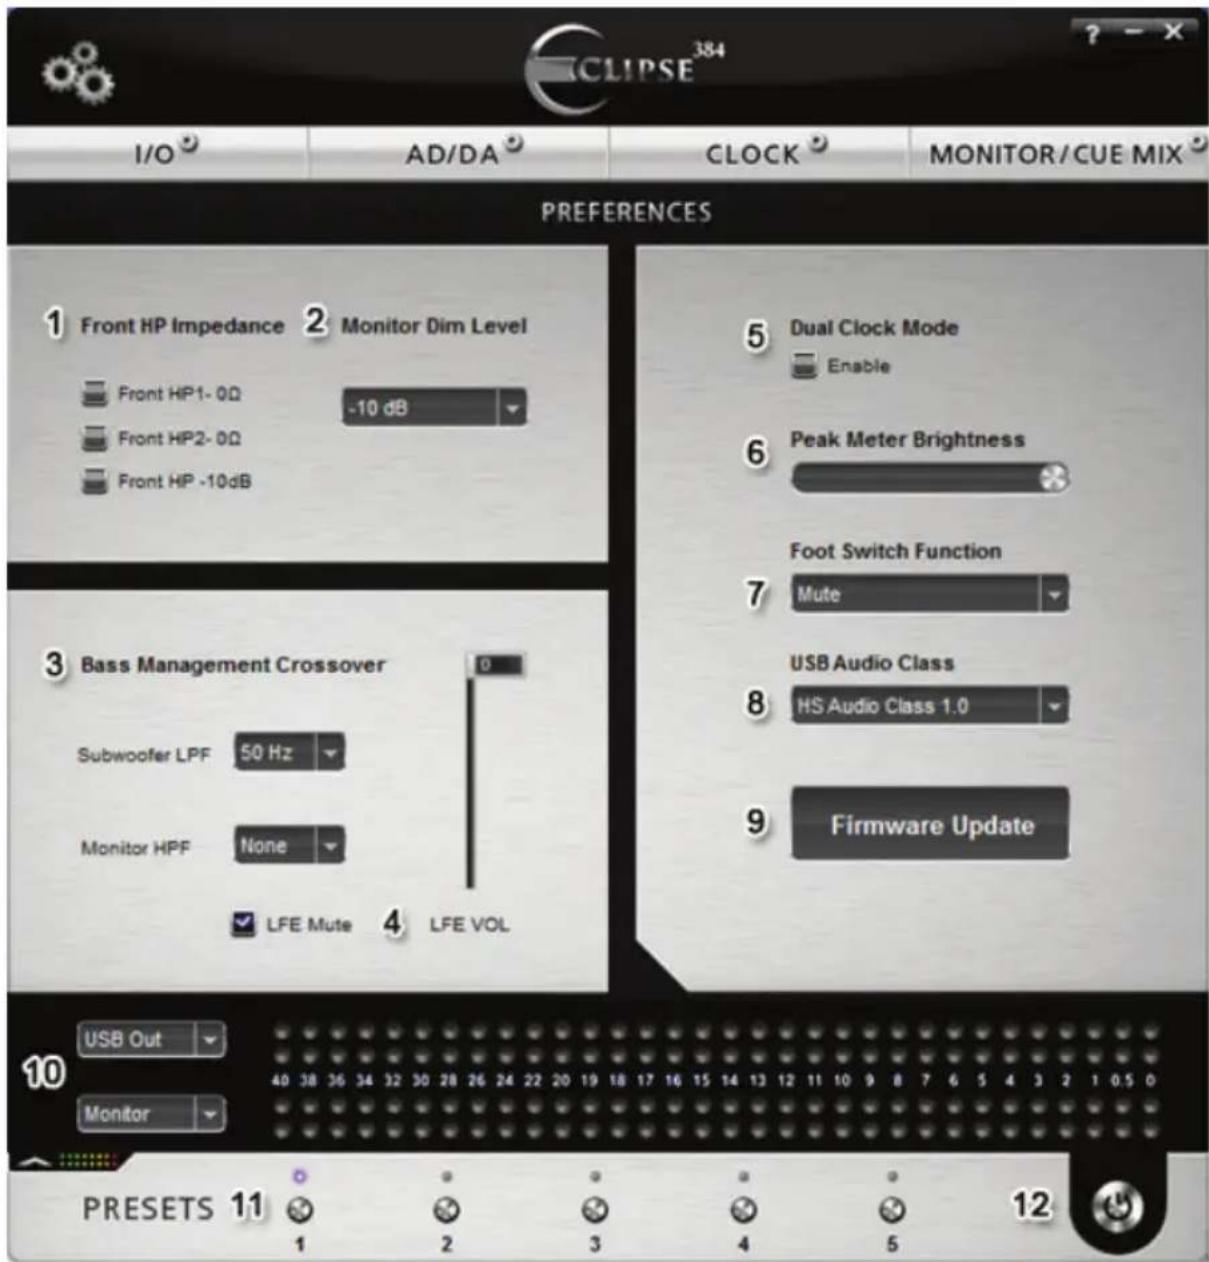
On the preferences tab you have the following options:
1. Front HP Impedance:
Adjust the impedance for the front Headphone outs if you are using higher or lower impedance headphones as well as diming them down by 10dB. Default level for the impedance is 120 Ω.
2. Monitor Dim Level:
Selects the dim level that will be applied on the Main Volume outs whenever the Dim button is pressed on the front panel of the Eclipse 384 or the footswitch is pressed when on Dim mode. default Dim level is -10dB.

3. Bass Management Crossover:
Subwoofer LPF: Select the cut-off frequency for the LFE output. (Frequencies higher than this value will not be fed to your LFE out).
Monitor HPF: Select a high pass filter for the monitors (Frequencies lower than this value will not be fed to your monitor outs).

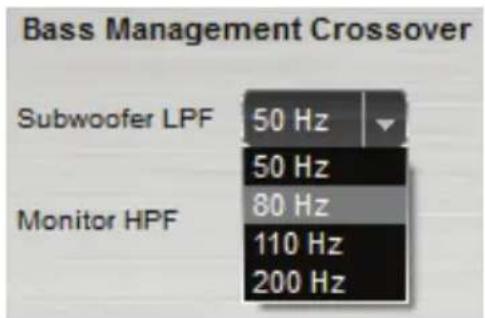
4. LFE Volume and Mute:
This fader adjusts the volume for the subwoofer. Clicking the 'LFE Mute' box mutes it.
5. Dual Clock Mode:
By checking this box, you enable both Clock A and Clock B to be used simultaneously.
6. Peak Meter Brightness:
This fader adjusts the brightness of the peak meter LEDs.
7. Footswitch function:
Select the function for the footswitch mode:
Mute: If selected the footswitch mutes all outputs.
Dim: If selected the footswitch dims all the outputs according to the selected level on the Monitor Dim Level section.
Talkback: If selected the footswitch enables talkback to the cue mix outs from the talkback device selected.
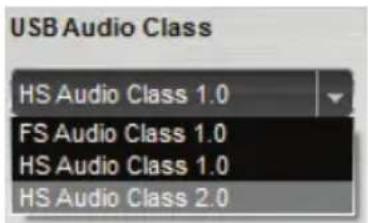
8. USB Audio Class:
You can select the type of USB Descriptor class here:
- UF1 – USB Full Speed Mode (12Mbits), USB Audio Class 1.0, Sample rates up to 96kHz;
- UH1 – USB High Speed Mode (480Mbits), USB Audio Class 1.0, Sample rates up to 192kHz;
- UH2 - USB High Speed Mode (480Mbits), USB Audio Class 2.0, Sample rates up to 384kHz (only for Mac OS X and Linux Ubuntu).
You can also do this by following the steps below:
- While on standby mode (device turned off), press preset button 3 and while holding it press the power button.
- Press preset button 3 to select the desired USB mode.
- Press any other preset button to turn on the device.
NOTE: As of Jan. 2012, the only OS that supports USB Audio Class 2.0 is MAC OSX. For more information, visit the support pages of www.antelopeaudio.com

9. Firmware Update:
By clicking here, the software control panel will take you to the firmware update dialogue box from where you can update your Eclipse 384 with the latest version of the software.
- Open the Software Control Panel application and go to the preferences tab (gears icon on the upper left corner). If there is a new firmware version available, the button will turn red.
- Click on the Firmware Update button.
- You will be transferred to the Eclipse 384 update panel, which will now give you the option to update the Eclipse 384 device firmware.
- The Eclipse 384 device's LED bar graphs on the front panel will indicate "LOADER".
- If there is a new firmware version you will be able to see it in the 'View newer updates'. If not, your device is up to date. (If you want to 'roll back' to a previous version of the firmware, simply click on the 'View all updates' option and select the version that you wish to 'roll back' to.
-
Click on the Update button on the bottom of the Update panel.
-
The Update Panel will start updating the device and you will be able to see the steps while the process takes place.
- Once the Update Panel indicates that the firmware update has completed successfully, follow the instructions on the screen and please disconnect the power cable and reconnect it again. Your Eclipse 384 will now function effectively with the latest firmware.
- Congratulations, you have successfully updated Eclipse 384.
NOTE: It is possible to check the current version of software control panel by clicking on the “?” symbol at the top right-hand corner.

Troubleshooting:
If the device is malfunctioning after the update:
If the update wasn't successful, if you can't access the Program Update Panel or if you are receiving the message ‘No connected devices’ please follow these steps:
- With the device in standby mode (turned off), unplug the power cable from the rear panel of the Eclipse 384 device.
- Press and hold the power button on the front panel while reconnecting the power cable.
- The device should now be in loader mode and 'LOADER' should be displayed on the bar graphs on the front panel of the device
- Follow steps 5 to 9 of the update guide.
10. Bar Graph Selection
Here you can select the source that you wish to be represented on the Bar graphs.


11. Presets:
Five different presets are available to save your favorite setups for easy access. To save a new preset:
- Hold down Ctrl (PC) or Command (MAC) & mouse-click on the preset button (in the software control panel) or;
- Press Ctrl (PC) or Command (MAC) & press the according number on your keyboard.
It is possible to name your 5 different presets by clicking on the text & typing (8 characters maximum).

You can reset the presets to the factory setting by following these steps:
- With the device on standby mode (turned off), press preset button 5 and while holding it, press the power button.
- Press any other preset button to bring the device into operational mode.
12. Power button:
Click on the small power button (bottom right of control panel) to switch off the Eclipse 384.
natural_image
Close-up of a black button with a power symbol and dotted pattern (no text or symbols visible)This will also return the Software Control Panel to the main Power button panel.
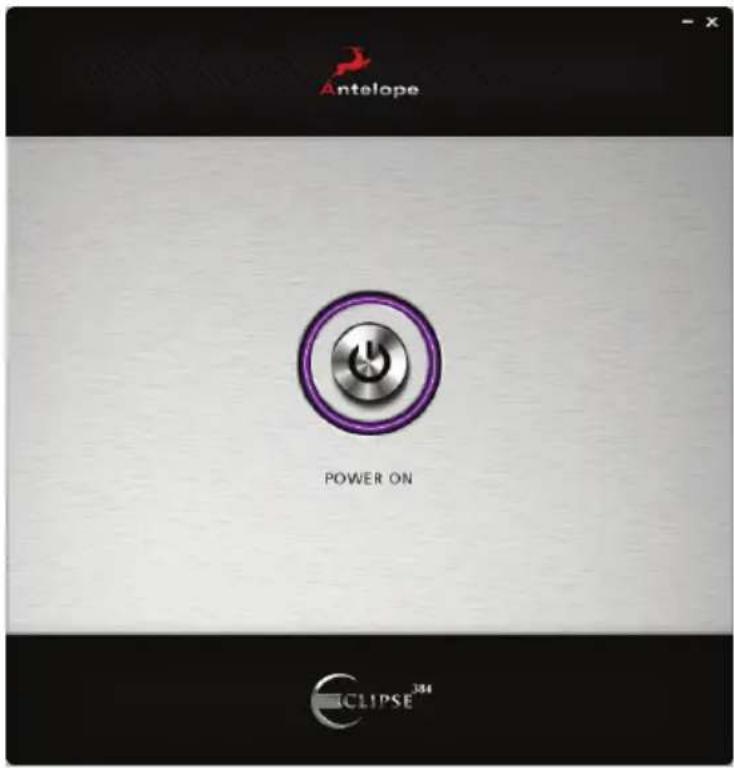
If there is no USB connection or Power connection with the device, the following screen will be displayed.

8. Advanced Notes
Proper Digital Audio cables should be used for SPDIF and AES/EBU: Avoid using standard analog audio cables for digital signal. Even though they might look the same, they are not designed for digital audio and performance will be compromised.
- AES/EBU use 110Ω shielded twisted-pair digital cables.
- SPDIF use 75 Ω coaxial (video) cables.
- WC uses 75 Ω BNC cables. And please do not exceed 6 meters in length.
As for Analog Cables, please use:
- Standard high quality cables with XLR connectors;
- Standard high quality cables with TRS connectors.
Connectivity Chart: See 'pull out' page included with this manual.
9. Ground Loop Hum and Noise
The design of Eclipse 384 minimizes the possibility of ground loop hum and noise. However, we recommend the use of short cables and balanced connections for all the audio signals of your system. All power cables of the system should be connected to a dedicated outlet box or power conditioner unit to avoid ground current noise affecting the audio signal path. It's also advisable to keep signal and power cables separate.
10. Additional Information
Additional information regarding operating systems, audio software and media players will be updated through the support area at www.antelopeaudio.com
11. Calibration Mode
The Eclipse 384 can be calibrated periodically in order to calibrate the accuracy of the internal clock by connecting it to the 10M Atomic Clock. This is not something that necessarily needs to be done very often, but if desired please follow these instructions:
- Connect the 10M to Eclipse 384 via the dedicated 10M input;
- Power on the 10M and wait until it reaches operating temperature;
- With the Eclipse 384 on standby mode, press and hold Preset button 2 (immediately to the right of the Antelope button);
- While holding it, click the power button of the Eclipse 384;
- Leave the buttons and wait for 1 minute to allow the units to stabilize;
- You will see “Calibration” displayed on the LCD Screen along with “Heating Up” and the temperature of the Oven;
- Wait for the calibration to take place;
- When the Err. Number becomes stable, press the Preset button 1 again to end the calibration;
- You will see "DONE" displayed on the LCD screen.
12. Device Information
Device information, such as Firmware version, Hardware version and Serial Number can be displayed on the LCD screen by following these steps:
- With the device on standby mode (turned off), press Preset 1 and while holding it press the power button;
- Press any other Preset button to bring the device to operating mode.
13. In the box
Eclipse 384kHz Stereo HD Mastering A/D, D/A CCM
Owner's Manual
Connectivity Chart
USB cable
Power cable
14. Technical Specifications
Inputs:
Analog Inputs: 3 x Combo Balanced Analog Ins (XLR/TRS 1/4")
2 x 1/4" TRS Balanced Insert points
1 x 1/4" TRS Balanced Talkback input
1 x 1/4" TRS Balanced Foot switch input
Digital Inputs: 3 x AES/EBU on XLR (32kHz to 192kHz) @ 110 Ohms terminated
2 x S/PDIF on RCA (32kHz to 192kHz) @ 75 Ohms terminated
2 x TOSLINK on optical fiber: up to 96kHz
Outputs
Analog Outputs: 2 x Balanced XLR Outputs from D/A Converter
3 x Balanced Outputs for monitors (1 x XLR and 2 x TRS)
1 x Balanced XLR LFE Out
2 x 1/4" TRS Cue Mix Headphones
2 x 1/4" TRS Front Headphones
Digital Outputs: 2 x AES/EBU on XLR for the A/D Converter out (32kHz to 192kHz; 384kHz for dual wire when 384kHz is selected in the clock) @ 110
Ohms terminated
2 x De-jittered AES/EBU on XLR (32kHz to 192kHz; 384kHz for dual wire when 384kHz is selected in the clock) @ 110 Ohms terminated
1 x De-jittered S/PDIF on RCA (32kHz to 192kHz) @ 75 Ohms terminated
1 x De-jittered TOSLINK on optical fiber: up to 96kHz
USB: USB 2.0 Hi-Speed; Data stream up to 480Mbits/384kHz, Type B
Word Clock: 1 x 10M Atomic Clock Input @ 75 Ohms 3Vpp on BNC 44.1 - 384kHz
1 x Word Clock Input @ 75 Ohms 3Vpp on BNC 44.1 - 384kHz
4 x Word Clock Outputs @ 75 Ohms 3Vpp on BNC 44.1 - 384kHz square wave signal
D/A Converter
Dynamic Range: 129dB
THD + N: 0.0004 %
A/D Converter:
Dynamic Range: 123dB
THD + N: 0.0004 %
Clock Specifications
Clocking System: 4th Generation Acoustically Focused Clocking
64-bit DDS
Oven Controlled Crystal Oscillator
Clocking Stability: <+/-0.0 2 PPM, oven controlled at 64.5 °C
Clock Aging: < 1 PPM per year
Clock Calibration: <+/-0.001 PPM
Atomic Clock Input: 10MHz @ 1Vpp, BNC
Sample Rates (kHz): 32, 44.1, 48, 88.2, 96, 176.4, 192, 352.8, 384
Clock Generators: 2 Independent Clock Generators
Varispeed: +/-200 cents
+ 12.246 %
10.910%
Operating Temperature: 0-50 °C, 32-122 °F
Weight: 8 kg, 17 lb Approx.
Dimensions (Approx): 482mm(W) x 89mm(H) x 203mm (D)
19"(W) × 3.5"(H) × 8"(D)
Power Supply: AC Universal input 95-245VAC
Power Consumption: 40Watts Max
Fuses:

natural_image
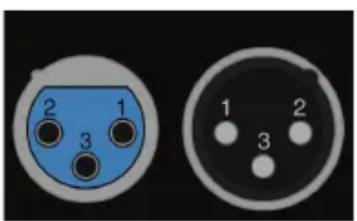
Two circular electronic components with numbered pins, one blue and one black, against a black background (no text or symbols)Pin layout:
Pin 1 – Ground
Pin 2 – Hot
Pin 3 - Cold
NOTES
NOTES
NOTES
NOTES
NOTES

Correct Disposal of This Product (Waste Electrical & Electronic Equipment)
(Applicable in the European Union and other European countries with separate collection systems)
This marking shown on the product or its literature, indicates that it should not be disposed with other household wastes at the end of its working life. To prevent possible harm to the environment or human health from uncontrolled waste disposal, please separate this from other types of wastes and recycle it responsibly to promote the sustainable reuse of material resources.
Household users should contact either the retailer where they purchased this product, or their local government office, for details of where and how they can take this item for environmentally safe recycling.
Business users should contact their supplier and check the terms and conditions of the purchase contact. This product should not be mixed with other commercial wastes for disposal.


- Safety Notes
- Introduction
- Features
- Quick Start
- Mac OS:
- Windows:
- Quick Start for Analog Input Playback
- Quick Start for Digital Input Playback
- Quick Start for A/D Conversion
- Quick Start for D/A Conversion
- Quick Start for recording through USB
- Front Panel Explained
- Power button
- LCD Display
- Peak Meters
- Main volume
- Headphone volume
- Antelope button
- Preset buttons
- Mute button
- Dim button
- Mono button
- Headphone Outputs
- RearPanel Explained
- AD Inserts
- Analog Inputs
- D/A Outputs
- Monitor Outputs
- Balanced LFE Outputs
- TB MIC Input
- Switch Input
- CUE HP Outputs
- USB Hi-Speed
- WC Input
- 10M Input
- Digital Inputs
- S/PDIF Inputs
- TOSLINK Inputs
- AES/EBU Input
- A/D Outputs
- De-Jittered Outputs
- AES/EBU
- S/PDIF Digital Output
- TOSLINK Digital Output
- Word Clock Outputs
- Mains Power Connection
- Software Control Panel
- Inputs & Outputs tab
- Naming the Analog inputs.
- Adjusting the input trim:
- Select type of signal:
- Name of Digital Input:
- Select clock:
- SRC:
- Naming your Monitors:
- Adjusting the output trim for monitors:
- Select type of signal:
- Tone Oscillator:
- Selecting frequencies:
- Level and Mute:
- System Clock
- AD/DA tab
- A/D Source:
- A/D Options:
- Select Clock:
- D/A Source:
- D/A Options:
- D/A Fader:
- Digital Out Source:
- OSC Option:
- USB Source:
- OSC Option:
- Clock tab:
- Source Clock and Sample Rate Display:
- Clock A/B Sample-rate:
- Varispeed:
- -/+ Options:
- Sampling Rate Display
- Atomic Indicator:
- Oven Indicator:
- Lock Indicator:
- WC Outputs:
- Monitor / Cue Mix tab:
- Source
- Main Volume Knob:
- Mono effect:
- Stereo effect:
- Monitor Out options:
- Monitor Select:
- CUE MIX Source:
- CUE MIX TB Mic Fader:
- CUE MIX Mute:
- CUE MIX OSC:
- Mic On Air button:
- Front HP Source:
- Front HP Volume control:
- Front HP Mute:
- Preferences tab:
- Front HP Impedance:
- Monitor Dim Level:
- Bass Management Crossover:
- LFE Volume and Mute:
- Dual Clock Mode:
- Peak Meter Brightness:
- Footswitch function:
- USB Audio Class:
- Firmware Update:
- Bar Graph Selection
- Presets:
- Power button:
- Advanced Notes
- As for Analog Cables, please use:
- Ground Loop Hum and Noise
- Additional Information
- Calibration Mode
- Device Information
- In the box
- Technical Specifications
- Inputs:
- Outputs
- D/A Converter
- Clock Specifications
- NOTES
- Correct Disposal of This Product (Waste Electrical & Electronic Equipment)
Brand : Antelope Audio
Model : Eclipse 384
Category : Audio Interface