KAWDACC17TA - Air conditioner Kogan - Free user manual and instructions
Find the device manual for free KAWDACC17TA Kogan in PDF.


| Product Type | Portable Air Conditioner |
| Model | KAWDACC17TA |
| Brand | Kogan |
| Cooling Capacity | 17000 BTU |
| Power Supply | 230V ~ 50Hz |
| Power Consumption | 1500W |
| Dimensions (W×D×H) | 450 × 380 × 750 mm |
| Weight | 30 kg |
| Airflow | 400 m³/h |
| Refrigerant | R32 |
| Functions | Cool, Fan, Dehumidify |
| Timer | 24-hour programmable |
| Remote Control | Yes |
| Noise Level | 55 dB (low fan) |
| Exhaust Hose Length | 1.5 m |
| Slide Window Kit | Included |
| Filter | Washable |
| Drainage | Gravity drain or continuous |
| Safety Features | Auto-restart, overheat protection, tip-over switch |
| Energy Efficiency | EER 3.0 |
Frequently Asked Questions - KAWDACC17TA Kogan
User questions about KAWDACC17TA Kogan
0 question about this device. Answer the ones you know or ask your own.
Ask a new question about this device
Download the instructions for your Air conditioner in PDF format for free! Find your manual KAWDACC17TA - Kogan and take your electronic device back in hand. On this page are published all the documents necessary for the use of your device. KAWDACC17TA by Kogan.
USER MANUAL KAWDACC17TA Kogan
natural_image
Line drawing of a front-mounted air conditioner unit with ventilation grilles and fan slots (no text or symbols)WINDOW AIR CONDITIONER
(1.7KW, 2.7KW, 4.2KW)
KAWDAC C17TA, KAWDAC R27TA & KAWDAC R41TA
Safety & Warnings 3
Overview 7
Installation 10
Operation 14
Cleaning & Care 17
Specifications 19
Troubleshooting 20
Notes 21
SAFETY & WARNINGS
Safety Warnings
Ensure to read the user guide thoroughly before installation, use, and maintenance. Failure to do so may lead to injury or damage.
Introduction to Refrigerants R32
Refrigerants used in air conditioners, such as R32, are environmentally friendly hydrocarbons. R32 is flammable and odorless, and under certain conditions, it can burn or explode. However, by following proper installation guidelines and using the air conditioner correctly in appropriately sized rooms, risks of burning or explosion are mitigated. Compared to conventional refrigerants, R32 is eco-friendly, does not damage the ozone layer, and has a low greenhouse effect.
Installation and Maintenance:
- Only use methods recommended by the Kogan.com to accelerate defrosting or cleaning.
- Do not pierce or burn the appliance.
- Store the appliance in a room without continuous operating sources, such as open flames or operating electric heaters.
- Do not repair this appliance yourself. Contact help.Kogan.com for support. Only qualified personnel should perform maintenance, strictly following this user guide.
- Adhere to national regulations for handling, installation, storage, servicing, and disposal of the appliance.
- Ensure the refrigerant is cleared from the system before maintenance or disposal. Be aware that refrigerants may not have an odour.
Usage:
- This appliance is not intended for use by individuals (including children) with reduced physical, sensory, or mental capabilities unless supervised or instructed by a responsible person.
• Supervise children to ensure they do not play with the appliance. - The unit's operating limits are 61-110°F (outdoor) and 61-90°F (indoor) with 80% relative humidity.
Additional Warnings for R290/R32 Refrigerants
- Transport: Follow transport regulations for equipment containing flammable refrigerants.
- Marking: Adhere to local regulations for marking equipment.
- Disposal: Follow national regulations for disposing of equipment using flammable refrigerants.
- Storage: Store equipment per the manufacturer's instructions. Protect packaged equipment from mechanical damage to prevent refrigerant leaks. Local regulations determine the maximum number of stored equipment pieces.
Information on Servicing
Perform safety checks before working on systems containing flammable refrigerants to minimize ignition risks. Follow these precautions for repair work:
- Conduct work under controlled procedures to minimize the presence of flammable gases or vapours.
- Instruct maintenance staff and others in the area about the work nature. Avoid confined spaces and section off the workspace. Control flammable materials in the area.
- Use appropriate refrigerant detectors before and during work to check for flammable atmospheres. Ensure detection equipment is non-sparking and intrinsically safe.
- Have a dry powder or CO2 fire extinguisher nearby if conducting hot work on the refrigeration equipment.
- Avoid sources of ignition when working on pipework containing flammable refrigerants. Display no smoking signs and ensure no ignition risks are present before starting work.
- Ensure adequate ventilation before breaking into the system or conducting hot work. Maintain ventilation to safely disperse any released refrigerant.
- Ensure electrical components meet the correct specifications and follow the manufacturer's maintenance guidelines. Contact help.Kogan.com for support
- Perform initial safety checks and inspections of electrical components. Ensure capacitors are discharged safely, and no live components are exposed.
Repair to Intrinsically Safe Components
Avoid applying permanent inductive or capacitance loads to the circuit. Use only intrinsically safe components when working live in flammable atmospheres. Replace components with Kogan.com specified parts to avoid igniting refrigerant leaks.
Cabling
Check cabling for wear, corrosion, pressure, vibration, sharp edges, and adverse environmental effects. Consider aging effects and vibrations from compressors or fans.
Detection of Flammable Refrigerants
Do not use ignition sources to detect refrigerant leaks. Avoid using halide torches or other detectors with naked flames.
Leak Detection Methods
Use electronic leak detectors calibrated for flammable refrigerants. Ensure the detector is non-sparking and suitable for the refrigerant used. Use leak detection fluids compatible with refrigerants, avoiding chlorine-based detergents. If brazing is needed, recover all refrigerant from the system and purge with OFN before and during brazing.
Removal and Evacuation
- Follow these steps when breaking into the refrigerant circuit:
- Remove refrigerant.
- Purge the circuit with inert gas.
- Evacuate.
- Purge again with inert gas.
- Open the circuit by cutting or brazing.
- Recover refrigerant into appropriate cylinders, flush with OFN, and repeat as needed to ensure no refrigerant remains. Vent to atmospheric pressure before starting work.
Charging Procedures
Follow conventional charging procedures and ensure no contamination of different refrigerants. Keep hoses short and cylinders upright. Ensure the refrigeration system is earthed before charging. Label the system after charging. Avoid overfilling the system and pressure test with OFN before commissioning.
Decommissioning
Familiarise yourself with the equipment and its details. Safely recover refrigerants and handle refrigerant cylinders according to standards. Use personal protective equipment and supervise the recovery process. Do not overfill cylinders and ensure all isolation valves are closed after recovery.
Labelling
Label equipment indicating it has been decommissioned and emptied of refrigerant. Date and sign the label, stating the equipment contains flammable refrigerant.
Recovery
Use appropriate recovery cylinders for refrigerants and ensure they are correctly labelled. Follow safety procedures for compressors and oils, evacuating them before returning to suppliers. Use only electric heating for the compressor body and safely drain the oil.
By following these guidelines, you ensure the safe and efficient use of your wall air conditioner, minimizing risks associated with flammable refrigerants.
Electric Shock Hazard
- The air conditioner has a specific voltage rating. It must have its own fuse or circuit breaker, and no other device or unit should be operated on the same fuse or circuit breaker.
- To avoid the possibility of personal injury, disconnect power to the unit before installing or servicing.




OVERVIEW
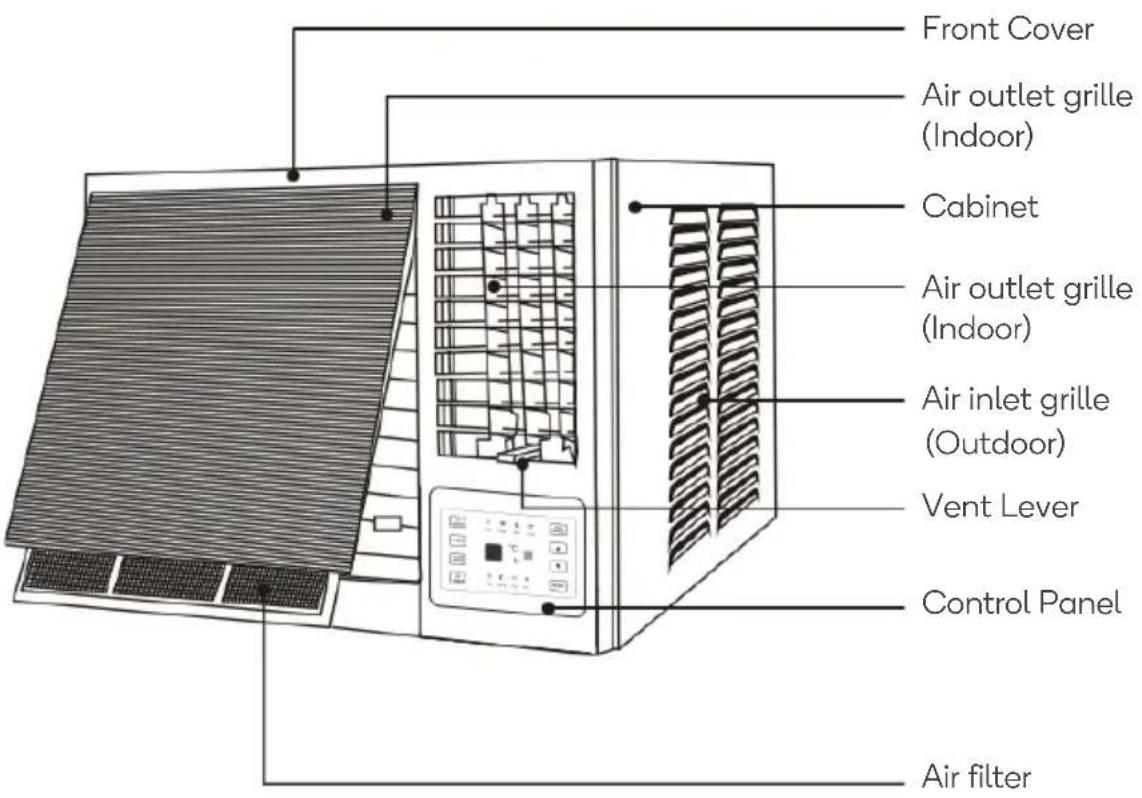
Control Panel
Control panel may appear different depending on what model you have purchased.
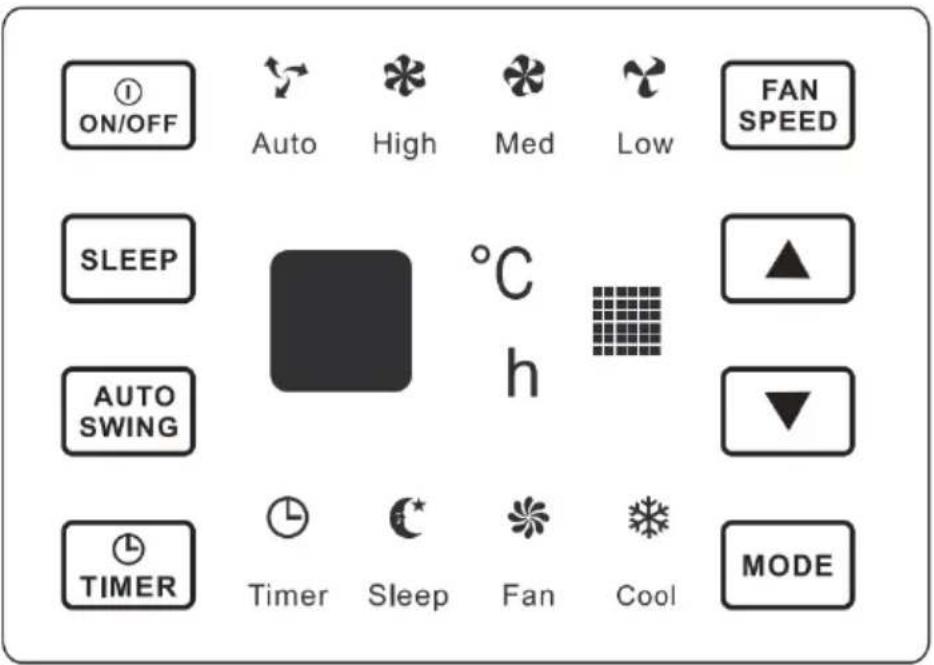
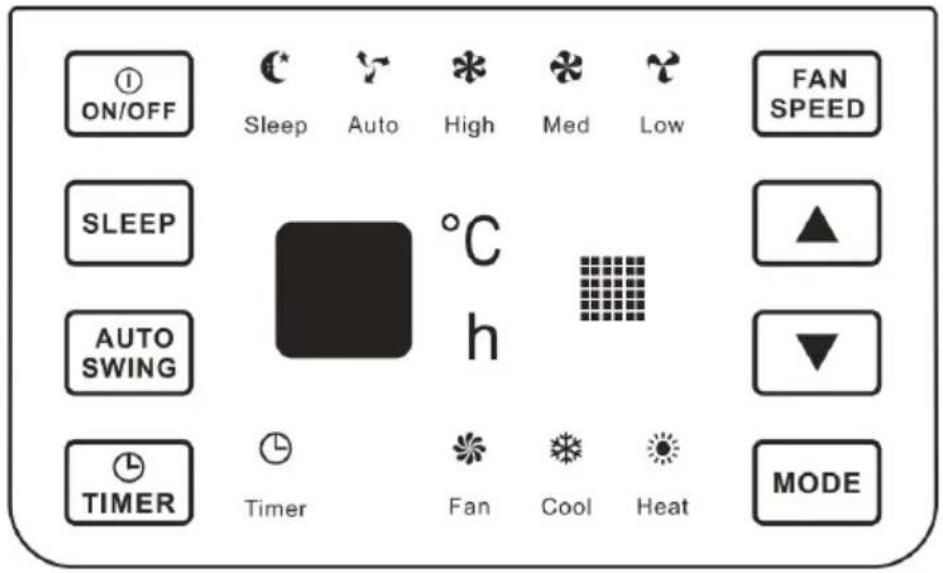
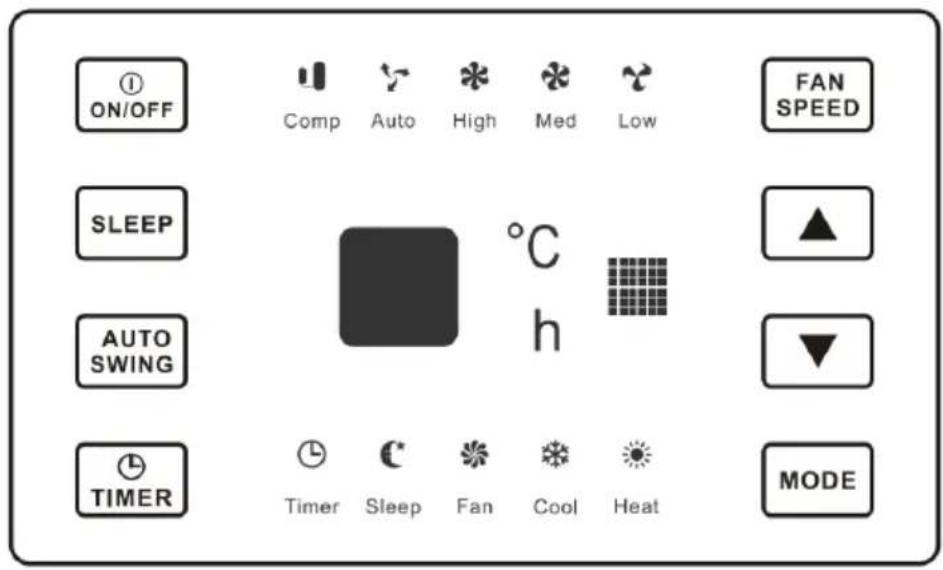
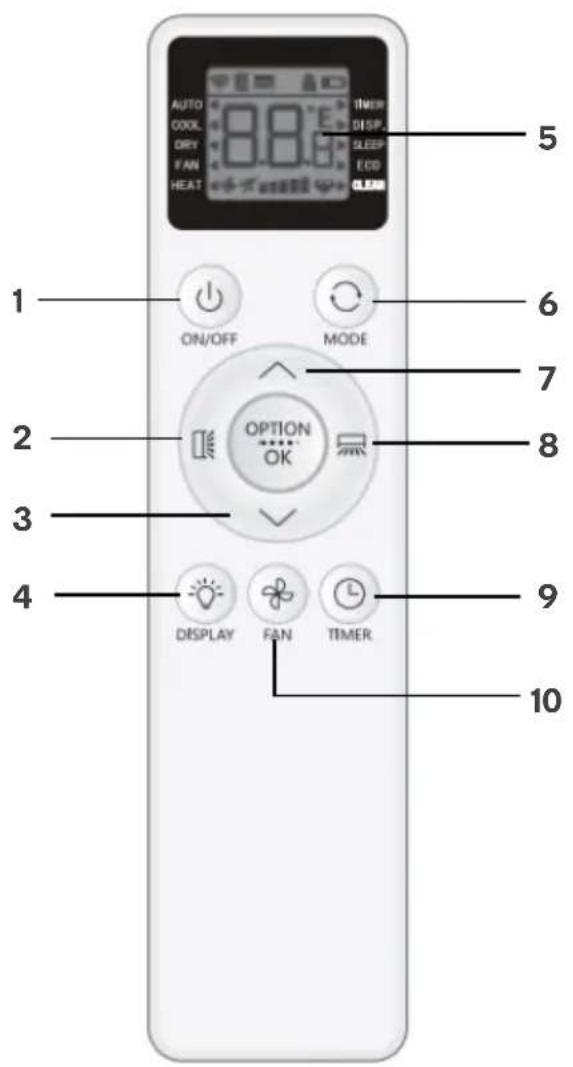
1 Power button 6 Mode button
2 Vertical adjust button 7 Increase button
3 Decrease button 8 Horizontal adjust button
4 Display button 9 Timer button
5 LCD display 10 Fan speed button
INSTALLATION
Location
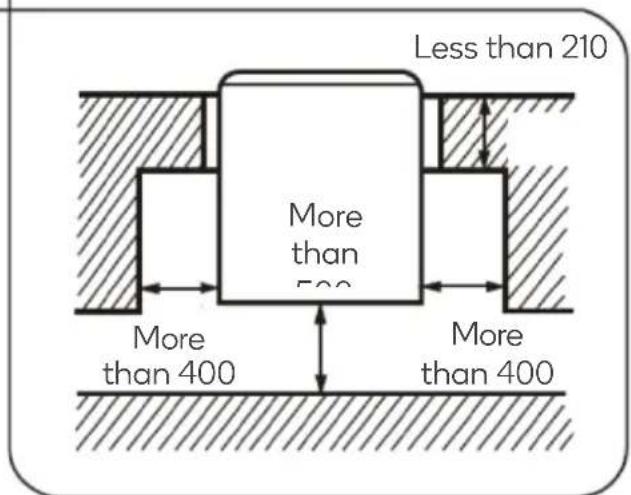
- Select a location that can support the weight of the air conditioner and will not cause increased operation noise or vibration.
- Avoid direct sunlight for efficient cooling.
- Select a place where there are no obstructions near the air inlet and outlet.
Caution:
- Installation parts must be corrosion resistant, especially if the air conditioner will be installed near the sea or hot springs.
- Do not install the air conditioner in places where flammable gas leaks are possible.
- The minimum clearance from the appliance to combustible surfaces is 100mm (only for electric heating).
The range of external static pressure at which the appliance was tested is 0-5Pa.
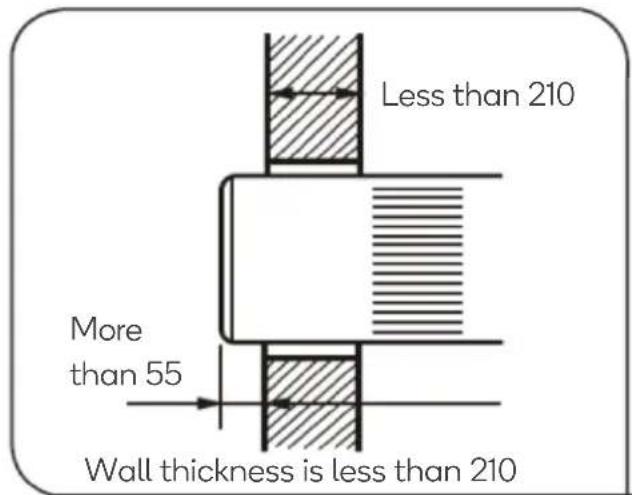
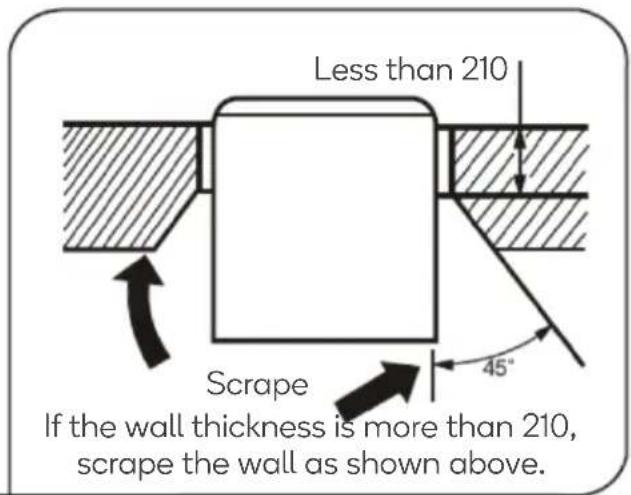
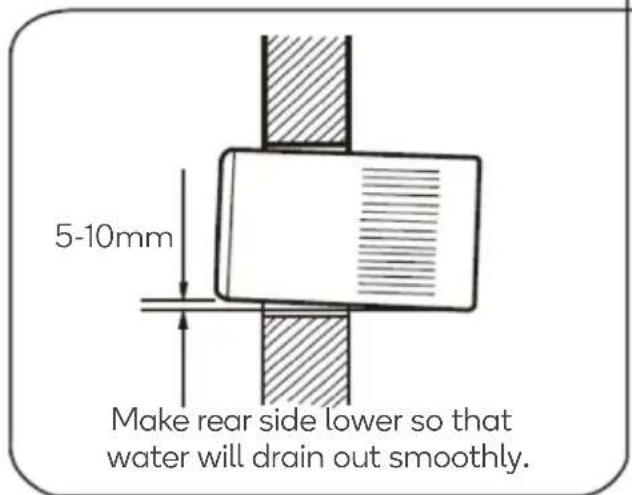
Caution:
- Before installation, ensure the operation switch is in the off position and disconnect the power cord.
- This appliance is not intended for use by persons (including children) with reduced physical, sensory, or mental capabilities, or lack of experience and knowledge, unless they have been given supervision or instruction concerning the use of the appliance by a person responsible for their safety. Children should be supervised to ensure that they do not play with the appliance.
- The appliance is fitted with means for disconnection from the supply mains having a contact separation in all poles that provide full disconnection under overvoltage category III conditions, and these means must be incorporated in the fixed wiring in accordance with the wiring rules.
Installing the Unit
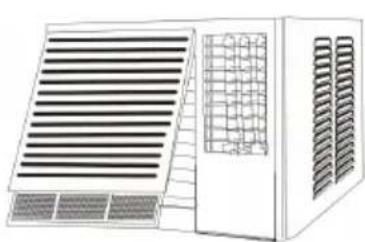
- Remove the front panel. (Figure 1)
Remove the air filter. (Figure 2)
Remove screws at the bottom of the front panel. (Figure 3)
Open the panel cover.
natural_image
Illustration of a white industrial air conditioner unit with ventilation grilles and fan grilles (no text or symbols)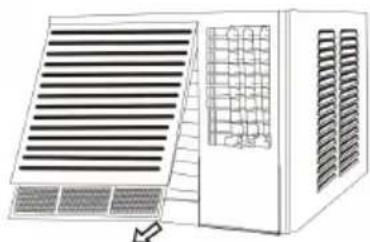
natural_image
Illustration of a front-mounted air conditioner unit with ventilation grilles and ventilation grilles (no text or symbols)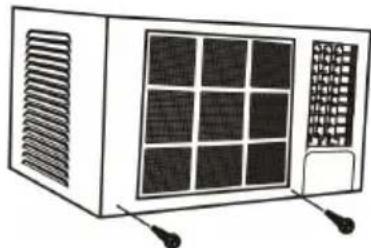
natural_image
Line drawing of a microwave oven with heat sinks and ventilation grilles (no text or symbols)Figure 1 Figure 2 Figure 3
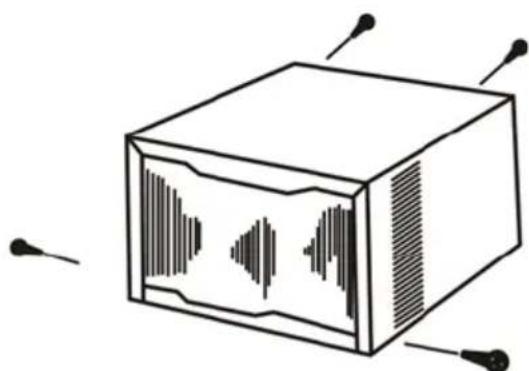
- Remove the screws in the chassis-fixing board and cabinet. Some models have two more screws on the back of the cabinet. (Figure. 4)
natural_image
Simple line drawing of a rectangular electronic device with sound waves and four small pins (no text or symbols)Figure 4
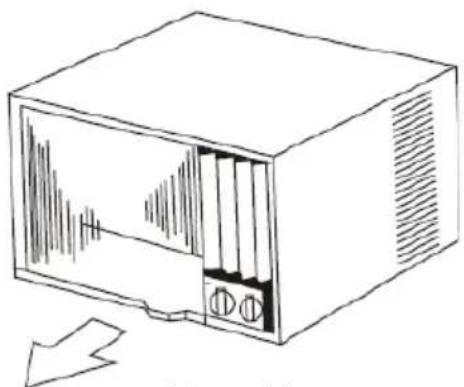
- Grasp the handle on the front of the chassis and carefully slide the air conditioner unit out of the cabinet. (Figure 5)
natural_image
Line drawing of a vintage television set with front panel and buttons (no text or symbols)Figure 5
- Install the drain tube connection into the hole provided at the rear of the air conditioner chassis. (Figure 6). To meet the different requirements of different types of air conditioners, there are two methods for treating the condensed water: back drainage or bottom drainage.
Bottom drainage: The drain tray is fixed in position using four screws, and the flare nut is used to block the back drainage hole. (Figure 7)
Back drainage: Use the flare nut to block the bottom drainage hole and use a water outlet pipe to connect the back drainage hole. Pay attention to the sealing ring to prevent water leakage. (Figure 8)
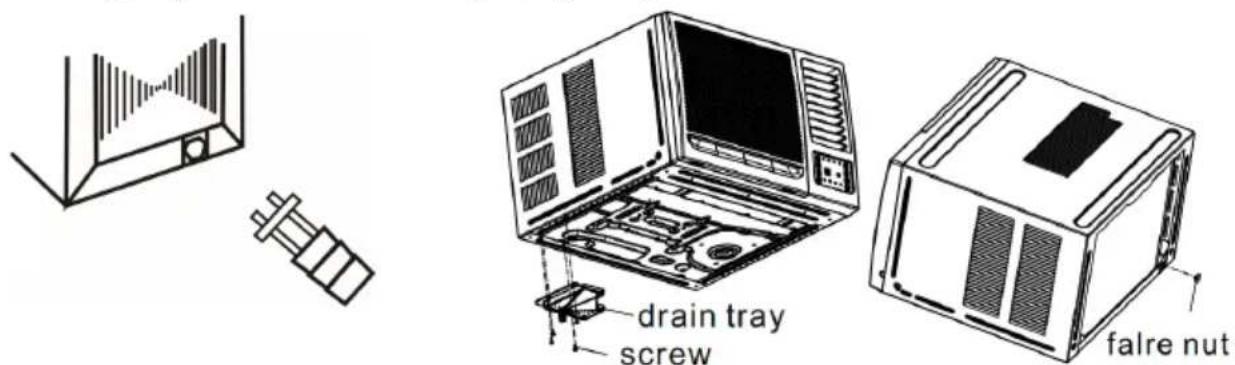
Figure 6 Figure 7
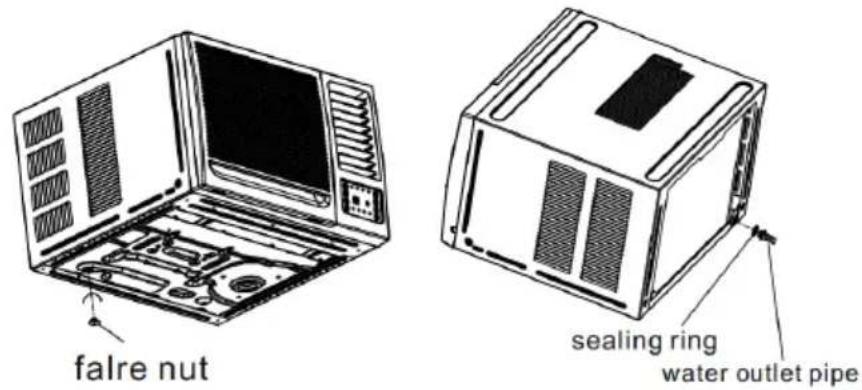
Figure 8
- Install the air conditioner cabinet on the installation shelf (not included) with screws. (Figure 9)
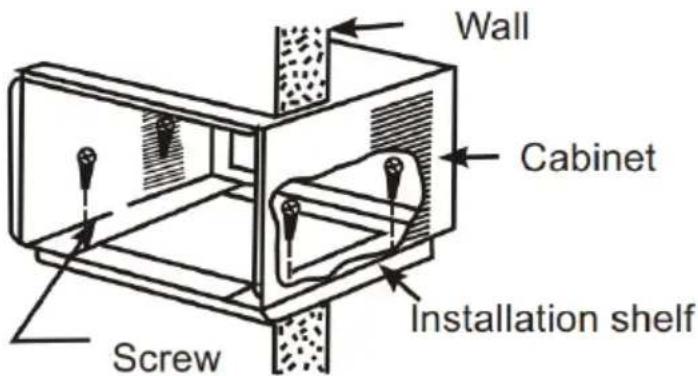
Figure9
- Carefully slide the unit back into the cabinet. (Figure 10)
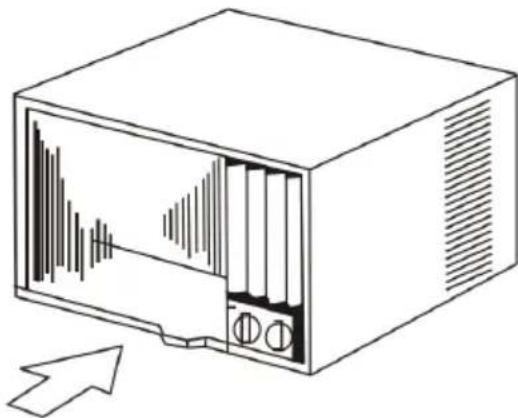
natural_image
Line drawing of a vintage television box with sound waves and ventilation slots, showing no text or symbols.- Reinstall the retaining bracket, front panel, and previously removed mounting screws. (Figure. 3, 4, 11)
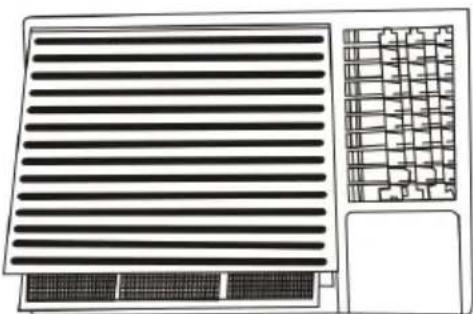
- Reinstall the air filter. (Figure. 12)
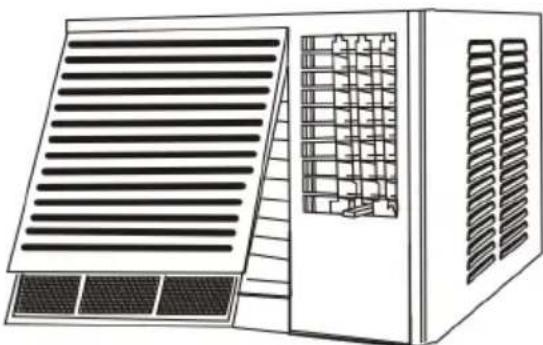
natural_image
Illustration of a modular air conditioner unit with ventilation grilles and heat sinks (no text or symbols)Figure 11 Figure 12
natural_image
Top-down architectural diagram of a building facade with horizontal slats and a grid-patterned wall (no text or symbols)OPERATION
You can operate this air conditioner by pressing the relevant button on the control panel as well as the remote control.
| Button Function | |
 | Used to adjust airflow direction. |
 | Used to set or cancel timer operation.When the unit is in operation, you can set OFF TIMER. When the unit is off, you can set ON TIMER. Timer setting range is 0.5 - 24 hours.If the OFF TIMER is set, the timer LED displays the remaining time to turn off the unit for only 10 seconds, then LED shifts to display set temperature. If you press TIMER button within the 10 seconds, OFF TIMER will be cancelled.If the ON TIMER is set, the timer LED displays the remaining time to turn on the unit. If you want to cancel ON TIMER, press TIMER button. |
 | Used to turn the air conditioner ON/OFF. |
 | Every time you press this button, the operation mode is changed in sequence: COOLING → FAN ONLY → HEATING → COOLING. |
 | Press to cycle through the fan speeds in sequence:AUTO → LOW → MID → HIGH. |
  | This button is used to set room temperature or used to set time in TIMER mode. |
 | To activate the “SLEEP” function. |
Control panel
The below symbols turn on when the relevant mode is in use.
| Button Function | |
 | Timer |
 | Cooling |
 | Heating |
 | Fan Only |
 | Sleep |
 | Display set temperature/display set timer |
 | Low fan speed |
 | Mid fan speed |
 | High fan speed |
 | Auto fan speed |
 | Compressor running |
Remote control
The remote control transmits signals to the system. The unit will confirm the command with a beep.
| Button Function | |
 | To turn the air conditioner ON/OFF. |
 | To select the mode of operation (AUTO, COOLING, DRY, FAN, HEATING). |
 | Increase the temperature or time by 1 unit. |
 | Decrease the temperature or time by 1 unit. |
 | Press and hold “^ & √” buttons for 2 seconds to enable/disable the lock function. |
 | To adjust the air flow direction up and down (if applicable, Optional) |
 | To adjust the air flow direction left and right. |
 | To select SLEEP/ECO/CLEAN |
 | To confirm the OPTION selection. |
 | To turn the indoor display ON/OFF. |
 | To select the fan speed (mute/low/low-mid/mid/mid-high/high/turbo). |
 | Set or cancel timer operation. |
Notes:
- The display and some functions of the remote control may vary according to the model.
- The shape and position of buttons and indicators may vary according to the model, but their functions are the same.
- The unit confirms the correct reception of each button press with a beep.
- You will hear a beep when you press the button ☐, though the actual model may not have this function.
CLEANING & CARE
Never use hot water above 50^ C, benzine, gasoline, acid, thinner, or brushes to wipe off dirt as they will damage the plastic surface and the coating.
Air Filter
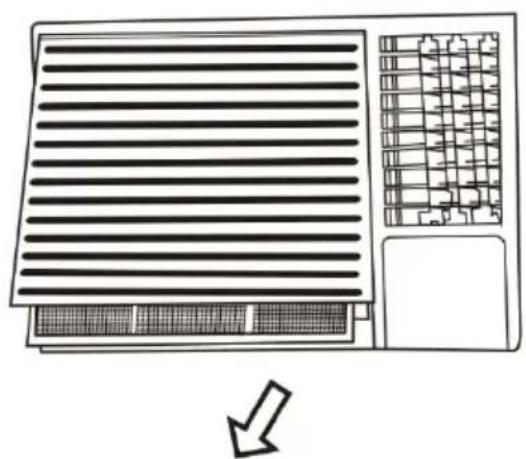
- The air filter should be washed at least once a month. If the air filter remains full of dust, the air flow will decrease, and the cooling capacity will be reduced.
- The filter is behind the cover and can be pulled out from the right-hand side.
- Wash the air filter with water and mild detergent.
- Rinse with clean water and dry it before reinstalling.
natural_image
Diagram of an air conditioner unit with ventilation grilles and a grid-patterned panel, showing airflow direction (no text or symbols)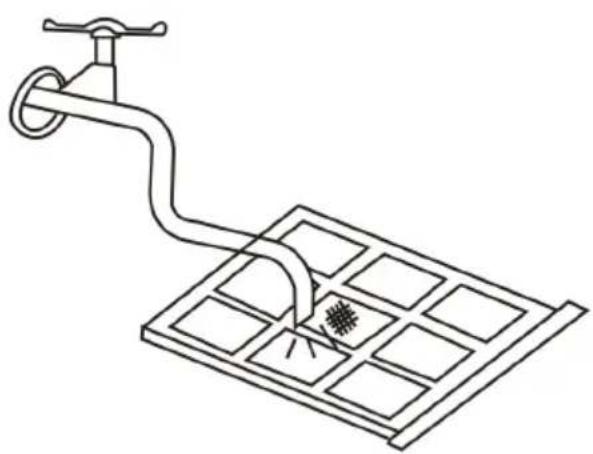
natural_image
Line drawing of a faucet with a grid-patterned base and a small object inside (no text or symbols)CAUTION:
- Do not use hot water above 40°C for washing the air filter.
- Let the filter dry thoroughly in the shade before reinstalling. Do not expose it to direct sunlight.
- Do not operate the air conditioner with the filter removed.
Air Cleaning Filter
The air cleaning filter is attached to the air filter. Wash the air cleaning filter as well when washing the air filter.
Operating Conditions
Your air conditioner is designed to operate efficiently within specific temperature ranges, categorized as T1 and T3 conditions:
T1 Condition:
- Cooling Mode: The air conditioner will cool effectively when the ambient temperature is between 18°C and 43°C.
- Heating Mode: The air conditioner will heat effectively when the ambient temperature is between -5^ and 20^ .
T3 Condition:
- Cooling Mode: The air conditioner will cool effectively when the ambient temperature is between 25°C and 52°C.
- Heating Mode: The air conditioner will heat effectively when the ambient temperature is between -5^ and 20^ .
Ensure to use the air conditioner within these temperature ranges for optimal performance and efficiency.
Extended Downtime Maintenance
- Operate the fan alone ("LOW FAN" or "HIGH FAN") for half a day to dry out the inside of the unit.
- Turn off power and remove plug from power outlet.
- When you are about to use the air conditioner after an extended downtime period, clean the condenser (at the rear) and evaporator (at the front) fins by using a soft brush or vacuum cleaner.
CAUTION: Be careful not to damage the fins during cleaning.
Front Cover
- The front cover will accumulate dirt and dust. To clean it, wipe it with a soft dry cloth. When it is excessively dirty, wipe it with a soft cloth dampened with warm water or mild soap and then wipe it again thoroughly with a soft dry cloth.
- Never use hot water above 50°C, benzene, gasoline, acid, thinner or brushes to wipe off dirt, as they will damage the plastic surface and the coating.
SPECIFICATIONS
| Rated volts 250 | ||
| Amps 3.15 | ||
| Climate class rating | T1 | ambient temperature for cooling: 18~43°C. |
| ambient temperature for heating: -5~20°C. | ||
| T3 | ambient temperature for cooling: 25~52°C. | |
| ambient temperature for heating: -5~20°C. | ||
Electrical Specifications
- All wiring must comply with local and national electrical codes and must be installed by a qualified electrician. If you have any questions regarding the following instructions, contact a qualified electrician.
- Check the available power supply and resolve any wiring problems before installing and operating this unit.
- For your safety and protection, this unit is grounded through the power cord when plugged into a matching wall outlet. If you are not sure whether your wall outlet is properly grounded, please consult a qualified electrician.
- The rating plate on the unit contains electrical and other technical data. The rating plate is located on the right side of the unit. Make sure to use the correct power supply according to the rating plate of your air conditioner.
TROUBLESHOOTING
Check the following points before requesting repairs or service. If the malfunction persists, cease use immediately and contact help.Kogan.com for support.
| Faults | Cause |
| Does not operate | Is the power off?Is the fuse blown?Is the voltage extremely high or low?Is the operation dial set to "off"? |
| Does not cool effectively | Is the air filter full of dust or dirt?Does sunlight fall directly on the unit?Is the airflow on the rear side obstructed? Ensure there is a space of 500mm behind the rear side of the air conditioner.Are doors or windows opened widely, or are there other sources of heat in the room?Is the temperature dial set to a colder position? Turn the dial further clockwise if necessary.Is the ventilation damper opened? |
NOTES
Need more information?
We hope that this user guide has given you the assistance needed for a simple set-up.
For the most up-to-date guide for your product, as well as any additional assistance you may require, head online to help.kogan.com
kogan.com
- WINDOW AIR CONDITIONER
- SAFETY & WARNINGS
- Safety Warnings
- Introduction to Refrigerants R32
- Installation and Maintenance:
- Usage:
- Additional Warnings for R290/R32 Refrigerants
- Information on Servicing
- Repair to Intrinsically Safe Components
- Cabling
- Detection of Flammable Refrigerants
- Leak Detection Methods
- Removal and Evacuation
- Charging Procedures
- Decommissioning
- Labelling
- Recovery
- Electric Shock Hazard
- OVERVIEW
- Control Panel
- INSTALLATION
- Location
- Caution:
- Installing the Unit
- OPERATION
- Remote control
- Notes:
- CLEANING & CARE
- Air Filter
- Air Cleaning Filter
- Operating Conditions
- T1 Condition:
- T3 Condition:
- Extended Downtime Maintenance
- Front Cover
- SPECIFICATIONS
- Electrical Specifications
- TROUBLESHOOTING
- NOTES
- Need more information?
Brand : Kogan
Model : KAWDACC17TA
Category : Air conditioner