
Backtrack - Audio Equipment Radial Engineering - Free user manual and instructions
Find the device manual for free Backtrack Radial Engineering in PDF.


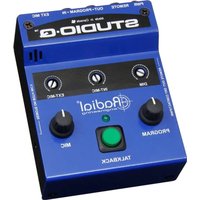
| Product Type | Stereo Backing Track Switcher |
| Number of Channels | 2 stereo channels (A and B) |
| Inputs | Two stereo inputs: 1/4" TRS (rear) and 3.5mm TRS (front) per channel |
| Outputs | Balanced XLR with Ground Lift, 1/4" TRS Monitor Outputs, 1/4" TRS Headphone Output |
| Power Supply | 15VDC, 100mA, center-positive (included adapter with cable lock) |
| Frequency Response | 20Hz - 20kHz (-0.5dB/+0.5dB) |
| Dynamic Range | >+130dBu |
| Maximum Input Level | >+25dBu |
| Total Harmonic Distortion | 0.007% @ 0dBu, 1kHz |
| Common Mode Rejection Ratio | 34dBu @ 60Hz, 42dBu @ 3kHz |
| Insertion Loss | 0dB (unity gain) |
| Construction | 14-gauge steel chassis with durable powder coat finish |
| Controls | Input Select (A/B), Mute, Cue Select, Headphone Level |
| Indicators | LEDs for Input Select, Mute, Cue Select |
| Remote Control | JR-2 footswitch (optional) via 1/4" TRS REMOTE IN jack |
| Multi-Unit Linking | LINK OUT to REMOTE IN for daisy-chaining multiple Backtracks |
| Headphone Amplifier | Built-in with independent CUE SELECT and level control |
| Ground Lift | On XLR outputs to eliminate ground loop hum |
| Warranty | 3-year transferable limited warranty |
Frequently Asked Questions - Backtrack Radial Engineering
User questions about Backtrack Radial Engineering
0 question about this device. Answer the ones you know or ask your own.
Ask a new question about this device
Download the instructions for your Audio Equipment in PDF format for free! Find your manual Backtrack - Radial Engineering and take your electronic device back in hand. On this page are published all the documents necessary for the use of your device. Backtrack by Radial Engineering.
USER MANUAL Backtrack Radial Engineering
Stereo Backing Track Switcher

User Guide
Radial Engineering Ltd.
1588 Kebet Way, Port Coquitlam
British Columbia, Canada, V3C 5M5
Tel: 604-942-1001 • Fax: 604-942-1010
Email: info@radialeng.com
Radial® Backtrack™ User Guide
Table of Contents Page
Overview....1
Features 2-3
Making Connections....4-5
Operation....6
Using the JR-2 Remote 6
Linking Multiple Backtracks 7
Block Diagram 8
Specifications 9
Warranty ....Back cover
Thank you for purchasing the Radial Backtrack™ stereo audio switcher. The Backtrack is designed to provide a simple redundant backup for stereo audio tracks on stage, with optional footswitch control and the ability to monitor your tracks via headphones.
We recommend you take a few minutes to read this short manual before employing the Backtrack as part of your next performance, as it covers the various features of the device and tips for setup. Should you have any questions about the Backtrack, please visit our website at www.radialeng.com, where we post frequently asked questions from our customers as well as product updates. If you still do not find what you're looking for, feel free to drop us a line at info@radialeng.com and we will do our best to respond in short order.
OVERVIEW
The Backtrack is a two channel redundant switcher used for live performances where backing tracks are being utilized. Should the primary playback device fail, the Backtrack allows you to quickly and seamlessly switch over to a backup device; this is done using a switch on the Backtrack itself, or using an optional remote footswitch.
The primary and backup playback devices can be connected to the Backtrack via 14 " TRS connectors or 3.5mm jacks that allow easy connection to the outputs of smartphones, laptops and tablets. Balanced and transformer isolated XLR outputs are provided to feed the backing tracks to the PA system with a ground lift to eliminate hum and buzz from ground loops. The outputs can also be monitored with a pair of powered speakers by utilizing the 14 " TRS monitor outputs. To silently test each playback source, a headphone amplifier is built into the Backtrack, which includes a separate level control and the ability to listen to input A or B without affecting the output to the PA.

flowchart
graph TD
    A["Laptop"] -->|A (R)| B["BACKTRACK"]
    C["Smartphone"] -->|B| B
    D["Headphones"] -->|C| B
    E["Audio Input"] --> B
    F["Audio Remote"] --> B
    B --> G["HEADPHONES"]
    G --> H["Left Right Ground"]
    H --> I["Headphones"]
    style A fill:#f9f,stroke:#333
    style C fill:#f9f,stroke:#333
    style D fill:#f9f,stroke:#333
    style E fill:#f9f,stroke:#333
    style F fill:#f9f,stroke:#333
    style G fill:#ccf,stroke:#333
    style H fill:#ccf,stroke:#333
FEATURES

- 3.5MM INPUTS: Allow you to connect the output of a laptop, phone, or tablet.
- INPUT SELECT: Chooses between stereo inputs A and B.
- MUTE: Cuts signal to the Main and Monitor outputs.
- CUE SELECT: Chooses whether the headphones monitor Input A or Input B.
- HEADPHONE LEVEL: Sets the volume of the headphone output.
- PHONES: 1/4" TRS jack for connecting a set of headphones.

- POWER: 15VDC input for the Backtrack power supply. Handy cable lock ensures supply will not be accidentally disconnected.
- LINK OUT: 14 " TRS output to feed the remote input on a second Backtrack to operate both simultaneously.
- REMOTE IN: 14 " TRS jack for connecting a JR-2 remote footswitch.
- MAIN OUTPUT: XLR outputs feed the PA system, with transformer isolation to eliminate hum and buzz from ground loops.
- GROUND LIFT: Lifts the audio ground path on the XLR outputs to further reduce hum and buzz from ground loops.
- MONITOR OUT: 14 " outputs for connection to a pair of powered speakers.
- 14 " TRS INPUTS: Stereo inputs A and B for connection to two playback sources.
- NON SLIP PAD: Provides electrical & mechanical isolation and keeps the unit from sliding around.
MAKING CONNECTIONS
Before connecting to the Backtrack, ensure that your audio system is turned down to prevent plug-in transients from damaging sensitive components such as tweeters.
The Backtrack is powered via a 15VDC center-pin positive supply (included). There is no on/off power switch; the Backtrack will simply spring to life as soon as power is connected and the LEDs for the A inputs will illuminate.
Connecting Your Playback Sources
You can connect your playback devices to the Backtrack using 14 " or 3.5mm TRS connectors. The 14 " connectors allow you to connect to the output of a recording interface, while the 3.5mm jacks make it easy to connect to a smartphone, laptop, or tablet. When a cable is connected to the 14 " inputs on the rear of the backtrack, the corresponding 3.5mm inputs on the front panel will be disabled. However, you can mix and match the input type used – for example, connecting a laptop with a recording interface to the left and right 14 " A inputs, with a smartphone connected to the 3.5mm B input.
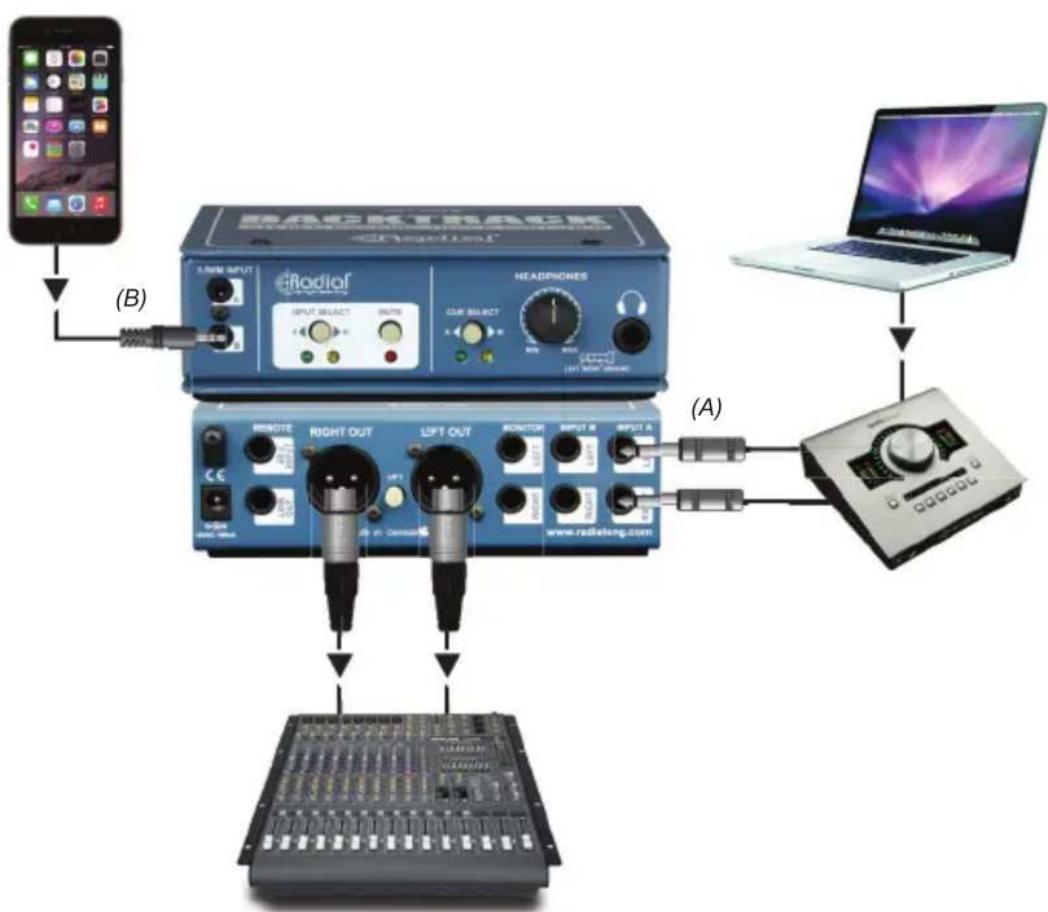
flowchart
graph TD
    A["Smartphone"] -->|B| B["8.5MM INPUT"]
    B --> C["8.5MM OUTPUT"]
    C --> D["2.4V 100A"]
    D --> E["INPUT SELECT"]
    E --> F["HEAD"]
    F --> G["HEAD SELECT"]
    G --> H["OR"]
    H --> I["OR"]
    I --> J["OR"]
    J --> K["OR"]
    K --> L["OR"]
    L --> M["OR"]
    M --> N["OR"]
    N --> O["OR"]
    O --> P["OR"]
    P --> Q["OR"]
    Q --> R["OR"]
    R --> S["OR"]
    S --> T["OR"]
    T --> U["OR"]
    U --> V["OR"]
    V --> W["OR"]
    W --> X["OR"]
    X --> Y["OR"]
    Y --> Z["OR"]
    Z --> AA["OR"]
    AA --> AB["OR"]
    AB --> AC["OR"]
    AC --> AD["OR"]
    AD --> AE["OR"]
    AE --> AF["OR"]
    AF --> AG["OR"]
    AG --> AH["OR"]
    AH --> AI["OR"]
    AI --> AJ["OR"]
    AJ --> AK["OR"]
    AK --> AL["OR"]
    AL --> AM["OR"]
    AM --> AN["OR"]
Connecting the Outputs
The Backtrack has two stereo outputs: the main XLR outs and the Monitor 14 " TRS outputs. We recommend using the XLR outputs to feed a pair of line inputs on the PA system, as they feature transformer isolation to help eliminate the possibility of encountering hum or buzz from ground loops. A ground lift is also provided on the XLR outputs to further reduce noise should you encounter a ground loop.
The 1/4" TRS monitor outputs allow you to feed a set of powered speakers on stage to listen locally to the Backtrack outputs.

The Backtrack features a headphone output to allow you to test your primary and backup playback systems. This is equipped with a level control and CUE SELECT switch which will choose whether the headphones monitor input A or B. Note that this switch will not affect the main or monitor outputs of the Backtrack, so you can use the headphones to ensure both sets of backing tracks are playing back in time and at the same volume.

OPERATION
Once you've made your connections you can test your audio system. Start with the MUTE switch engaged and begin playback on both source devices – listen to each device separately on headphones, using the CUE SELECT button to switch between them. Check that the volume levels between the two playback devices are the same and that they are playing in time with each other, so if you need to switch to the backup source it will happen seamlessly.
After you've confirmed that both devices are playing back properly, unmute the Backtrack and use the INPUT SELECT switch to choose your primary playback source. The Backtrack will now pass audio through to the PA system and your stage monitors (if connected). Check the levels and increase the outputs of your playback devices if necessary. The Backtrack passes audio at unity gain, so the signal level present at the inputs will be the same as its outputs.
At this point you're ready to start the performance. Should you experience problems with your primary backing track source device mid-show, simply hit the INPUT SELECT button on the Backtrack or the JR-2 footswitch to switch to your backup device and ensure that the show goes off without a hitch.
USING THE JR-2 REMOTE
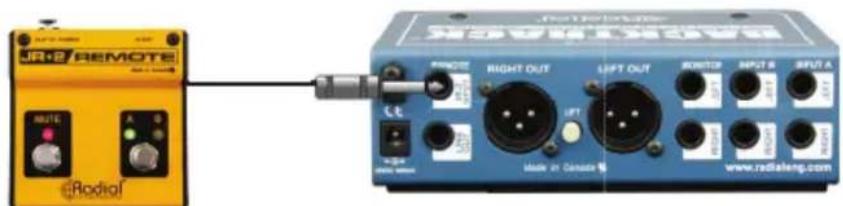
The optional Radial JR-2™ is a compact switcher that is equipped with two footswitches with accompanying LED indicators. When connected to the Backtrack, it allows you to remotely control the mute and A/B input select functions – so switching can occur seamlessly on stage. Use a 1/4" TRS cable to connect the remote to the JR-2 input on the Backtrack, which will provide it power for the LEDs. When the JR-2 is connected, the INPUT SELECT and MUTE switches on the Backtrack itself will no longer function; these features will only be controlled by the footswitches.
LINKING MULTIPLE UNITS
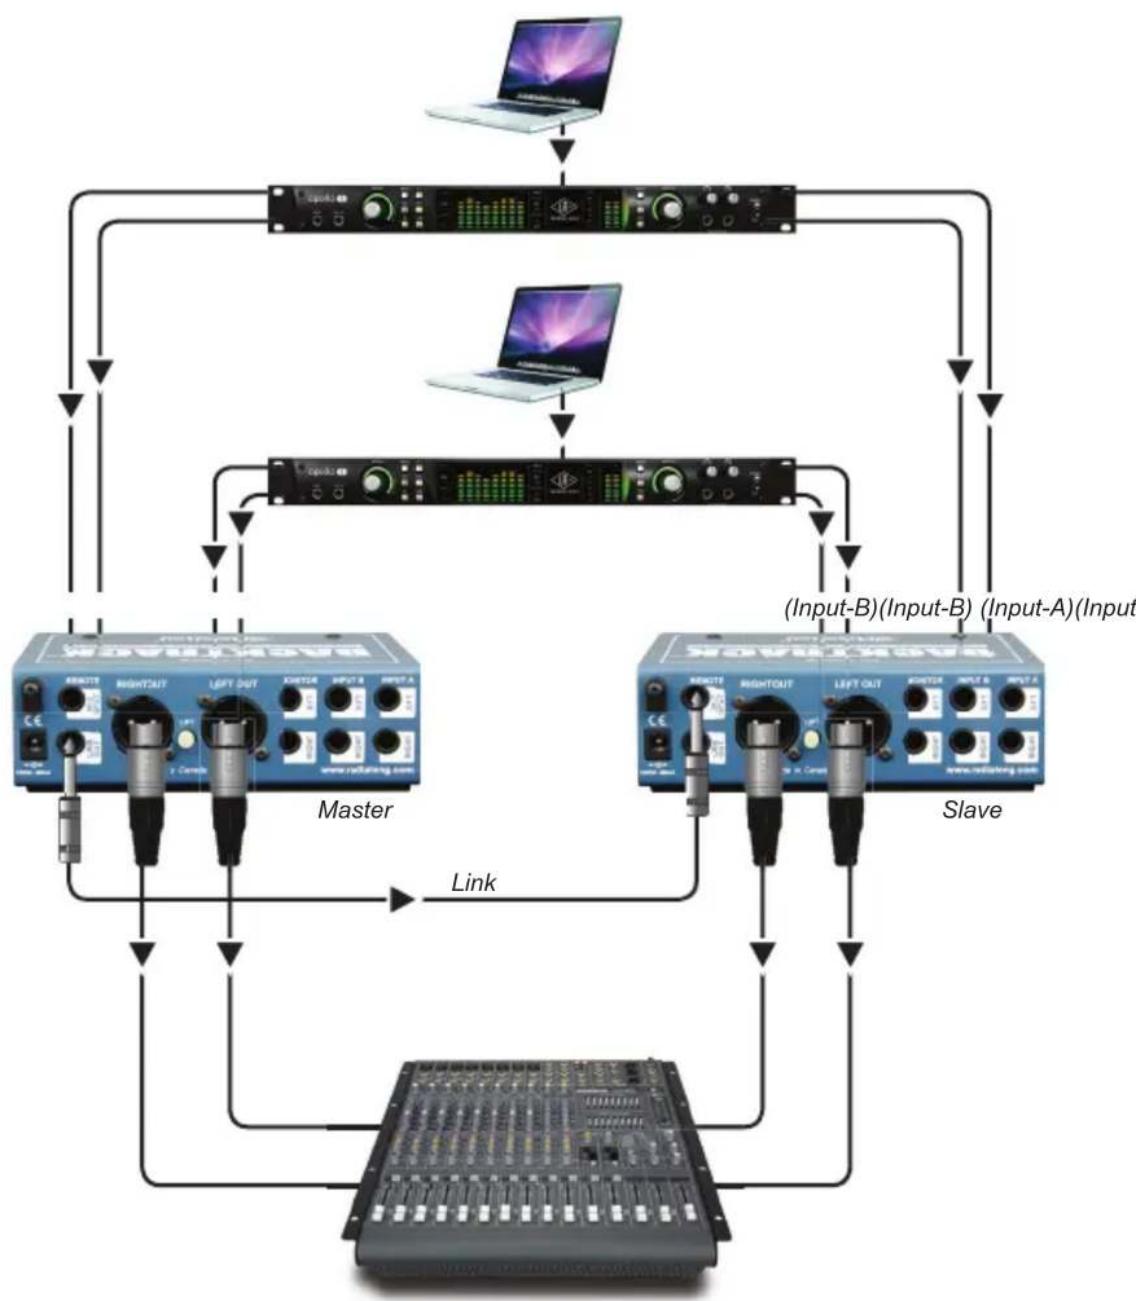
Should you have more than two channels of backing tracks in your performance, you can link together multiple Backtracks and have them work in tandem. If you have 8 or more tracks, you might consider using the Radial SW8, which is better suited to larger playback systems.
To link two or more Backtracks together, simply take a 14 " TRS cable and connect the LINK OUT on the master unit to the JR-2 INPUT on the second Backtrack. Repeat this process for any subsequent Backtracks that you wish to link up. The master Backtrack will control the INPUT SELECT and MUTE functions for all of the linked units, but the headphone section on each unit will remain independent to allow for testing of each input.
flowchart
graph TD
    A["Laptop"] --> B["Audio Processor"]
    B --> C["Master"]
    C --> D["Slave"]
    D --> E["Master"]
    D --> F["Slave"]
    C --> G["Link"]
    F --> G
    G --> H["Master"]
    G --> I["Slave"]
    style A fill:#f9f,stroke:#333
    style B fill:#ccf,stroke:#333
    style C fill:#cfc,stroke:#333
    style D fill:#fcc,stroke:#333
    style E fill:#ffc,stroke:#333
    style F fill:#fcc,stroke:#333
    style G fill:#cfc,stroke:#333
BLOCK DIAGRAM*

flowchart
graph TD
    A["IN PUT A 3.5M M"] --> B["SELECT"]
    C["IN PUT A RIGHT T"] --> B
    D["IN PUT A LEFT T"] --> B
    E["IN PUT B 3.5M M"] --> F["HEADPHONE SELECT"]
    G["IN PUT B RIGHT T"] --> F
    H["IN PUT B LEFT T"] --> F
    B --> I["MUTE"]
    F --> I
    I --> J["MAIN OUT"]
    I --> K["GND LIFT"]
    I --> L["MONITOR OUTPUT"]
    F --> M["BALTO UNBAL"]
    M --> N["HEADPHONE LEVEL"]
    N --> O["HEADPHONE AMP"]
    O --> P["HEADPHONE OUTPUT"]
* Subject to change without notice.
SPECIFICATIONS\*
Audio Circuit Type: ......Passive Audio Circuit with Active Headphone Amplifier
Number of Channels: 2
Frequency Response: 20Hz to 20kHz (-0.5dB/+0.5dB)
Noise Floor: -105dBu
Dynamic Range: ....>+130dBu
Maximum Input: ....>+25dBu
Intermodulation Distortion: 0.002% @ 0dBu, 1kHz
Total Harmonic Distortion: 0.007% @ 0dBu, 1kHz
Common-Mode Rejection Ratio: 34dBu @ 60Hz, 42dBu @ 3kHz
Insertion Loss: 0dB
Features
Input connections: 1/4" TRS, 3.5mm TRS
Ground Lift:....on XLR outputs
LED Indicators:....Input Select, Mute, Cue Select
Output Connectors: ....XLR, 1/4" TRS
Mounting Options: ....SA series rack mount available
Extras: JR-2 remote with Link output
General
Power: 15VDC 100mA
Construction: 14-gauge Steel Chassis
Finish: Durable Powder Coat

Headphone Safety Warning Caution: Very Loud Amplifier
As with all products capable of producing high sound pressure levels (SPL), users must be very careful to avoid the hearing damage that may occur from prolonged exposure. This is particularly important when applied to headphones, as prolonged listening at high SPL's will eventually cause tinnitus and can lead to partial or complete loss of hearing. Please be aware of the recommended exposure limits within your jurisdiction and follow them closely. The user agrees that Radial Engineering Ltd is not liable for any health effects resulting from the use of this product and the user clearly understands that he or she is entirely responsible for the safe and proper use of this product. Please consult the Radial Limited Warranty for further details.
THREE YEAR TRANSFERABLE LIMITED WARRANTY
RADIAL ENGINEERING LTD. ("Radial") warrants this product to be free from defects in material and workmanship and will remedy any such defects free of charge according to the terms of this warranty. Radial will repair or replace (at its option) any defective component(s) of this product (excluding fi nish and wear and tear on components under normal use) for a period of three (3) years from the original date of purchase. In the event that a particular product is no longer available, Radial reserves the right to replace the product with a similar product of equal or greater value. In the unlikely event that a defect is uncovered, please call 604-942-1001 or email service@radialeng.com to obtain an RA number (Return Authorization number) before the 3 year warranty period expires. The product must be returned prepaid in the original shipping container (or equivalent) to Radial or to an authorized Radial repair centre and you must assume the risk of loss or damage. A copy of the original invoice showing date of purchase and the dealer name must accompany any request for work to be performed under this limited and transferable warranty. This warranty shall not apply if the product has been damaged due to abuse, misuse, misapplication, accident or as a result of service or modifi cation by any other than an authorized Radial repair center.
THERE ARE NO EXPRESSED WARRANTIES OTHER THAN THOSE ON THE FACE HEREOF AND DESCRIBED ABOVE. NO WARRANTIES WHETHER EXPRESSED OR IMPLIED, INCLUDING BUT NOT LIMITED TO, ANY IMPLIED WARRANTIES OF MERCHANTABILITY OR FITNESS FOR A PARTICULAR PURPOSE SHALL EXTEND BEYOND THE RESPECTIVE WARRANTY PERIOD DESCRIBED ABOVE OF THREE YEARS. RADIAL SHALL NOT BE RESPONSIBLE OR LIABLE FOR ANY SPECIAL, INCIDENTAL OR CONSEQUENTIAL DAMAGES OR LOSS ARISING FROM THE USE OF THIS PRODUCT. THIS WARRANTY GIVES YOU SPECIFIC LEGAL RIGHTS, AND YOU MAY ALSO HAVE OTHER RIGHTS, WHICH MAY VARY DEPENDING ON WHERE YOU LIVE AND WHERE THE PRODUCT WAS PURCHASED.
To meet the requirements of California Proposition 65, it is our responsibility to inform you of the following:
WARNING: This product contains chemicals known to the State of California to cause cancer, birth defects or other reproductive harm.
Please take proper care when handling and consult local government regulations before discarding.

Made in Canada

www.radialeng.com
Radial Engineering Ltd.
1588 Kebet Way, Port Coquitlam, British Columbia, V3C 5M5
Tel: 604-942-1001 • Fax: 604-942-1010 • Email: info@radialeng.com

- Stereo Backing Track Switcher
- User Guide
- Radial® Backtrack™ User Guide
- Table of Contents Page
- OVERVIEW
- FEATURES
- MAKING CONNECTIONS
- Connecting Your Playback Sources
- Connecting the Outputs
- OPERATION
- USING THE JR-2 REMOTE
- LINKING MULTIPLE UNITS
- SPECIFICATIONS\*
- General
- Headphone Safety Warning Caution: Very Loud Amplifier
- THREE YEAR TRANSFERABLE LIMITED WARRANTY
Brand : Radial Engineering
Model : Backtrack
Category : Audio Equipment