RPC 520 - Range hood Robinhood - Free user manual and instructions
Find the device manual for free RPC 520 Robinhood in PDF.

User questions about RPC 520 Robinhood
0 question about this device. Answer the ones you know or ask your own.
Ask a new question about this device
Download the instructions for your Range hood in PDF format for free! Find your manual RPC 520 - Robinhood and take your electronic device back in hand. On this page are published all the documents necessary for the use of your device. RPC 520 by Robinhood.
USER MANUAL RPC 520 Robinhood
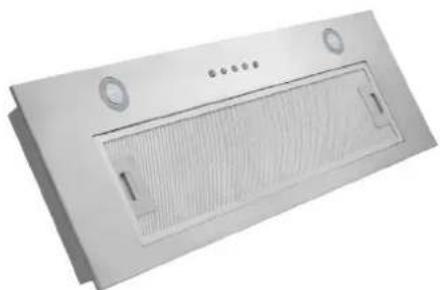
Description : Robinhood Power Pack with Stainless Steel/Matte Black Face Plates
Model Number : RPC3CL52SS/MB (52cm); RPC3CL70SS/MB (70cm)

natural_image
Exterior view of a stainless steel kitchen air vent with ventilation grilles (no text or symbols visible)RPC3CL52SS/MB
natural_image
Exterior view of a stainless steel kitchen ventilation cover (no text or symbols visible)RPC3CL70SS/MB
*Actual unit may vary from above model picture
Contents
Congratulations!
Thank you for choosing one of our appliances. Before you use the appliance, we strongly recommend that you read through the whole user manual which provides important safety instructions and description of the product and the proper use of its functions.
To avoid the ever-present risks involved with using an electrical appliance it is vital that the oven is installed correctly and that you read the safety instructions carefully to avoid misuse and hazards. It is important that you retain these instructions and your proof of purchase along with any other important documents about this product for future reference.
Due to continual product development, Shriro reserves the right to alter specifications or appearances without notice.
Important Safety Instructions....1
Appliance Details....2
Installation Instructions....3
Operating Instructions....6
Troubleshooting 7
Cleaning and Maintenance....8
Warranty Certificate....11
DISPOSAL INFORMATION
- Most of the packing materials are recyclable. Please dispose of these materials through your local recycling depot or by placing them in appropriate collection containers.
- If you wish to discard this product, please contact your local authorities and ask for the correct method of disposal.
IMPORTANT: Read the assembly instruction section and safety precautions of this booklet carefully before removing the contents of this carton.
- In certain circumstances electrical appliances may be a safety hazard.
- This appliance is not intended for use by persons (including children) with reduced physical, sensory or mental capabilities, or lack of experience or knowledge, unless they have been given supervision or instruction concerning the use of the appliance by a person responsible for their safety. Young children should be supervised to ensure that they do not play with the appliance.
- Do not check the status of the filters whilst the cooker hood is operating.
- Do not touch the light bulbs after use.
- Do not disconnect the appliance with wet hands.
- Do not disconnect the power supply by pulling on the cable.
- Do not flambé underneath the range hood.
- Avoid free flame, as it may cause damage to the filters and can be a fire hazard.
- Unplug the appliance before carrying out maintenance, cleaning or replacing lamps.
-
If the power cord is damaged, it must be replaced by the manufacturer, an authorized service center or similarly qualified persons to avoid a hazard.
-
For indoor use only.
-
It is recommended to operate the range hood prior to cooking.
-
It is recommended to leave the range hood in operation for 15 minutes after cooking is terminated in order to completely eliminate cooking vapors and odors.
-
Turn off the range hood when not in use.
-
Do not use the range hood if it is damaged, especially the supply cord and the case.
-
Do not immerse the range hood in liquid.
-
The exhaust air must not be discharged into a flue which is used for exhausting fumes from an appliance burning gas or other fuels (not applicable to appliances that only discharge the air back into the room).
-
Regulations concerning the discharge of air must be fulfilled.
-
There shall be adequate ventilation of the room when the range hood is used at the same time as appliances burning gas of other fuels (not applicable to appliances that only discharge the air back into the room).
-
Clean the surface of the cooker hood regularly using a cloth moistened with denatured alcohol or a non-abrasive liquid detergent.
-
There is a fire risk if cleaning is not carried out in accordance with the instructions.
-
The range hood must be mounted at a minimum distance of 60cm above the cooking surface.
-
CAUTION: Accessible parts may become hot when used with cooking appliances.
-
Warning: Failure to install the screws or fixing device in accordance with these instructions may result in electrical hazards.
-
The power plug must be accessible for installation.

text_image
300 Φ150 254 260 483 296 520 10RPC3CL52SS/MB
text_image
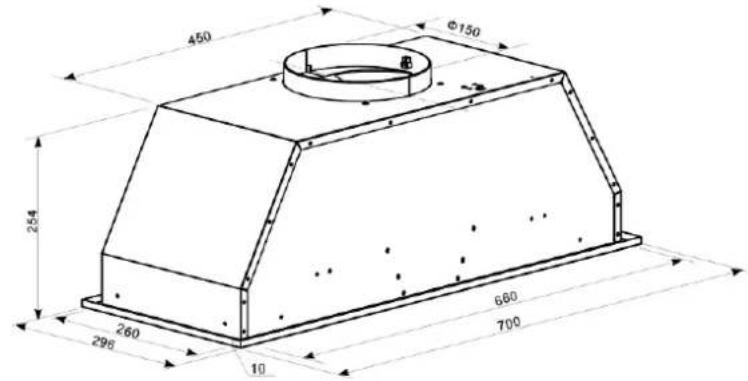
450 Φ150 254 260 296 10 680 700RPC3CL70SS/MB
| Voltage & Frequency: | 220-240V 50Hz |
| Lamp Max: | 2 x 1.5W LED |
| Rated Input Power: | 81W |
General Information
Before installing and operating the rangehood, carefully read the following important information regarding installation safety and maintenance. Keep this information booklet accessible for further consultations. The appliance has been designed to exhaust cooking fumes externally. Before installation, please ensure that the following have been supplied and that the tools listed below are readily available.
Contents of packaging:
- 1 x Cooker hood
• 1 pair of V-flap (150) - 8 x Screws (ST4*18mm)
Typical equipment required:
- Electric drill
- Screwdriver
- Tape measure
- Spirit level
- Duct tape (if ducting)
- Jig saw (if ducting)
- Ladder (if ducting)
MOUNTING OF THE V-FLAP
If the cooker hood does not have an assembled V-flap 1, you should mount the half-parts to its body. The images only show an example of how to mount the V-flap, because the outlet may vary according to different models and configurations.
To mount the V-flap 1 you should:
- Mount two half-parts 2 into the body 6
• The pin 3 should be top oriented
• The axis 4 should be inserted into the holes 5 on the body - Repeat all the operations for the 2nd half-part

text_image
Technical diagram showing mechanical assembly with numbered components and a close-up of a dome-like component with a pin inserted.INSTALLATION
- If you have an outlet to the outside, your cooker hood can be connected as below picture by means of an extraction duct (enamel, aluminum, flexible pipe, or non-flammable material with an interior diameter of 150mm)

natural_image
Diagram of airflow around a mechanical structure with directional arrows (no text or symbols)• Before installation, turn the unit off and unplug it from the outlet.

Installation Instructions
- When installing the rangehood, the lower edge of the unit must be a minimum of 600mm (650mm for gas cooker) above the cooking range. (Shown as below). The recommended position for the hood is 650mm above the hotplates.

text_image
600mm-750mmNote: Minimum height from the hob surface to the underside face of the rangehood is 600mm for electric hob, 650mm for gas hob.
Note: Any installation above 750mm will compromise performance.
Installation
Cut a hole in the cabinet to fit the rangehood centered above the cooktop.
Cut out dimensions for RPC3CL52SS/MB and RPC3CL70SS/M are shown as below:
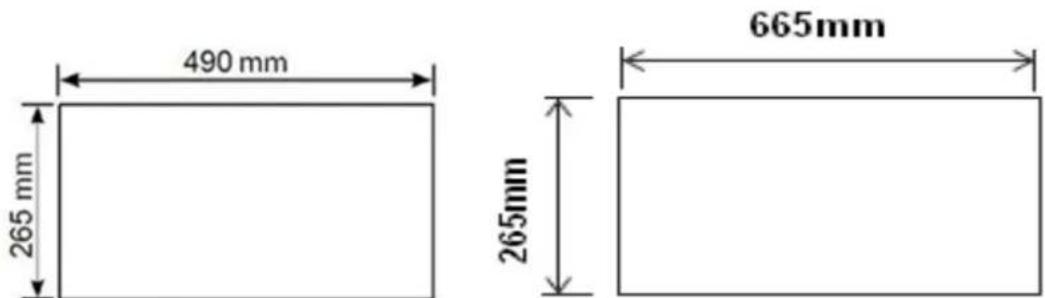
text_image
490 mm 265 mm 665mm 265mmNote: Make sure the hole edge should be at least 35mm from any cupboard edge.
Install the rangehood by following instructions as below:
- Remove the aluminum filter and remove the two front panel screws.
- Use a screwdriver to secure the screws to the cabinet.
- Replace the front panel with the two screws and replace the filter.

natural_image
Technical line drawing of a multi-section mechanical assembly with mounting holes and internal components (no text or symbols)Note: The expansion pipe or ducting kit are not included in this product.
WARNING:

text_image
Yellow triangular warning sign with black exclamation mark symbolFor safety reason, please use only the same size of fixing or mounting screws which are recommended in this instruction manual. Failure to install the screws or fixing device in accordance with these instructions may result in electrical hazards.
Controls


There are five buttons:

(Low),

(Mid),

(High),

(Lamp),

(Power).
-
After connecting to power, indicator light will on, all the output close and the hood will enter standby mode. The indicator light will be off automatically after reminding if no operation.
-
Power on: Press power button once, its indicator light will lit on, the hood works at low speed. Indicator light of low speed will be bright. Press power button again to close it, and its indicator light will be off. All the function operation of the hood will be closed, the hood enters standby mode, and run by circle. The speed buttons and lamp button can work separately and not controlled by the power button. When a certain function button is pressed, the hood operates at that function status. Press (Power) button under any status, the cooker hood will be switched off without any functions.
-
Press lamp button once; lights will be turn on. Indicator light of lamp button and power button will on. Press lamp button again to turn off the lights. Indicator light of lamp button and power button will be off. And recycle like this.
-
Press the High button once, motor runs on high speed, the indicator light of high button and power button will beam. Press high button again and the motor will stop. Indicator light of high button and power button will be off and run by circle.
-
Press the Mid button once, motor runs on middle speed, the indicator light of middle button and power button will beam. Press middle button again and the motor will stop. Indicator light of middle button and power button will be off and run by circle.
-
Press the low button once, motor runs on low speed, the indicator light of low button and power button will beam. Press low button again and the motor will stop. Indicator light of low button and power button will be off and run by circle.
-
Low speed, mid speed and high speed cannot work at the same time. When hood is on high speed, press low speed, it will turn to low speed at once; when it is in low speed, press middle speed, it will turn to middle speed immediately, and so on.
| Fault | Possible Cause | Solution |
| Light on, but motor does not work | Fan switch turned off | Select a fan switch position. |
| Fan switch failed | Contact service center. | |
| Motor failed | Contact service center. | |
| Light does not work; motor does not work | House fuses blown | Reset/Replace fuses. |
| Mains power cable is loose or disconnected | Refit mains power cable to power outlet.Switch power outlet on. | |
| Oil leakage | One way valve and the outlet are not tightly sealed | Take down the one-way valve and seal with sealant. |
| Leakage from the connection of chimney and cover | Take chimney down and seal. | |
| Lights not working | Broken or faulty bulbs | Replace bulbs as per this instruction. |
| Insufficient suction | The distance between the cooker hood and the gas top is too far | Refit the cooker hood to the correct distance. |
| The Cooker hood inclines | The fixing screw is not tight enough | Tighten the hanging screw and make it horizontal. |
NOTE:
Any electrical repairs to this appliance must conform to your local, state and federal laws. Please contact the service center if in any doubt before undertaking any of the above. Always disconnect the unit from the power source when opening the unit.
Caution:
- Before maintenance or cleaning is carried out, the cooker hood should be disconnected from the mains power supply. Ensure that the cooker hood is switched off at the wall socket and the plug removed.

natural_image
Abstract line drawing of a stylized figure with a cat-like head and arrow, no text or symbols present- External surfaces are susceptible to scratches and abrasions, so follow the cleaning instructions to ensure the best possible result is achieved without damage.
- Cleaning and maintenance should be carried out with the appliance cold especially when cleaning. Avoid leaving alkaline or acid substances (lemon juice, vinegar etc.) on the surfaces.
- The stainless steel must be cleaned regularly (e.g., Weekly) to ensure a long-life expectancy. Dry with a clean, soft cloth. A specialized stainless steel cleaning fluid may be used.
- Ensure that wiping is done along with the grain of the stainless steel to prevent any unsightly crisscross scratching patterns from appearing.
- The inlay control panel can be cleaned using warm soapy water. Ensure the cloth is clean and well wrung before cleaning. Use a dry soft cloth to remove any excess moisture left after cleaning.
- Using neutral detergents and avoid using harsh cleaning chemicals, strong household detergents or products containing abrasives, as this will affect the appearance of the appliance and potentially remove any printing of artwork on the control panel and will void manufactures warrantee.
GREASE MESH FILTERS
The mesh filters can be cleaned by hand. Soak them for about 3 minutes in water with a mild detergent and then brush it gently with a soft brush. Do not apply too much pressure to avoid any damage to it. (Leave to dry naturally out of direct sun light) Filters should be washed separately to crockery and kitchen utensils. It is advisable not to use rinse aid.
natural_image
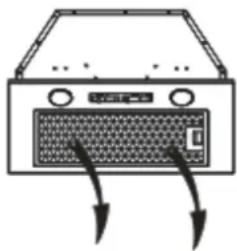
Diagram of a computer monitor front panel with arrows indicating signal or movement (no text or symbols)INSTALLING GREASE MESH FILTERS
To install filters for the following four steps:
- Angle the filter into the slots at the back of the hood.
- Push the button on the handle of the filter.
- Release the handle once the filter fits into a resting position.
- Repeat to install all filters.
BULB REPLACEMENT
Important:
• The bulb must be replaced by the manufacturer, its service agent, or similarly qualified persons.
- Always switch off the electricity supply before carrying out any operations on the appliance. When handling bulb, make sure it has completely cooled down before any direct contact with hands.
- When handling bulbs hold with a cloth or gloves to ensure perspiration does not meet the bulb as this can reduce the life of the bulb.
Note:
• Before changing the lights, make sure that the appliance is turned off and unplugged.
- Protect against danger when changing lights, such as wearing gloves.
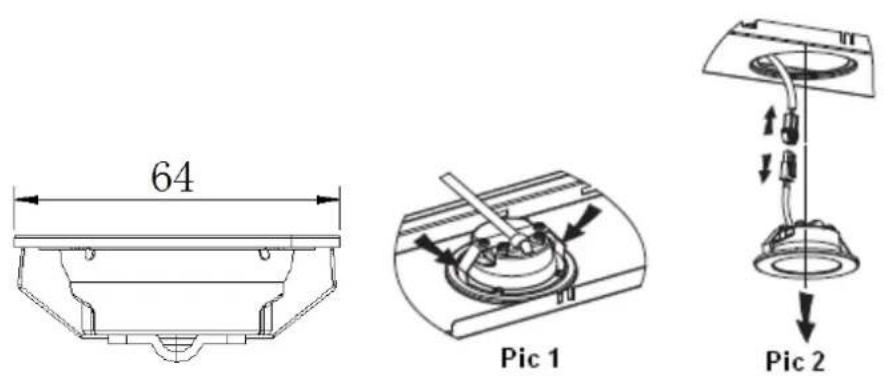
Changing the lights:
- Remove the grease filter.
- Use a tool or the hand to press the spring splinter of both sides of LED light to the inside, until the light is pressed out, see pic 1. Then slightly pull the light connecting wire out and dismantle the terminal of the light connecting wire. See pic 2.
- Apply the reverse procedure to install the light back.
ILCOS D code for this lamp is: DSR-1.5/65-S-64
LED modules -round lamp
Max wattage: 2×1.5 W
Voltage range: DC 12V
Dimensions:
Terms and Conditions
The following conditions apply in respect of the warranty given in this certificate:
- Monaco Corporation Limited ("Monaco") warrants the following Robinhood products against manufacturing defects and faulty materials, under normal use and subject to the exclusions in this certificate, for a period of:
Rangehood, Ovens, Cooktops, Dishwashers - 24 months from date of original purchase for domestic use.
Uniduct - 12 months from date of original purchase for domestic use.
Ironing centre – 12 months from date of original purchase for domestic use.
Laundry Tub - 5 years on stainless bowl, 24 months on Tap, Cabinet and other components from the date of original purchase for domestic use.
"Original purchase", when used in this certificate, means purchase by the customer directly from Monaco or one of its approved suppliers.
-
This warranty is limited to the repair or replacement, at our option, within the warranty period of any component part which we at our discretion determine to contain faulty materials or a manufacturing defect in breach of this warranty. This warranty is subject to terms and conditions set out in this certificate.
-
The warranty only applies within New Zealand.
-
The customer must produce the original invoice or other purchase documentation as proof of the original purchase date. Warranty exclusions
-
The warranty does not apply where, in Monaco's opinion:
The defect is caused by misuse, wear and tear, dirt, fire or accidental damage.
The product has been repaired or serviced by an unauthorised person.
The product was not installed in accordance with our instructions.
The product was purchased overseas or was not designed for use in New Zealand.
The product was not used, cleaned or cared for in accordance with our instructions.
The product was used outdoors.
- In addition, this warranty does not extend to damage or defects which in our opinion, directly or indirectly arise from or are due to:
Exposing the product to acidic or corrosive materials or chemicals such as dyes, solvents, denture cleaner or acetone;
Using inappropriate household cleaning products such as abrasive cream or powder cleansers, furniture polish, bleach, mentholated spirits, drain cleaners, sugar soap, metal pads and strongly alkaline or acidic cleaners;
Heat damage, including from washing the product at high temperatures;
Impact or mishandling the product, including the impact caused by objects scraped along, thrown or dropped on the product surface or excessive weight being placed on the product;
Structural or support changes in or affecting the building or the application where the product has been installed;
Failure to clean or maintain the product as recommended; or
any other causes specified in the product information as being excluded from this warranty.
-
Variations with the colour or gloss within the product or any ageing or fading of colour, shine or gloss level over time are not covered by this warranty. The warranty does not cover visual imperfections or blemishes in the surface and edges of the product that were not brought to your supplier's attention at the time you inspected the product.
-
Costs incurred on installation or removal of a product, or any reinstallation of a product, or any associated costs, are not covered by this warranty.
-
Monaco will not be liable for consequential or indirect loss or damage whatsoever and however arising out of or in connection with the supply, performance or removal of the product, including (but not limited to) loss of profit, loss of revenue, loss of contract, loss of goodwill or increased cost of workings, even if due to the negligence of Monaco or any of its approved suppliers, employees or agents.
-
Charcoal filters and light bulbs are not covered by this warranty
-
This warranty and the statements contained in this certificate or other documents given to you do not exclude, restrict or modify the application of any term implied into this warranty by statute, provided that (to the extent any statutory provision permits Monaco to limit its liability for a breach of an implied condition or warranty) Monaco's liability for such breach is limited to the payment of the cost of replacing the product, repairing the product or acquiring an equivalent product.
-
Subject to clause 5, our obligations under this warranty are limited to those set out in this certificate, and this warranty is expressly instead of all other warranties, express or implied, including any implied warranty of merchantability or fitness for a particular purpose and notwithstanding any course of dealing between the parties or custom and usage in trade to the contrary.
Terms and conditions are subject to change.
Warranty Certificate (Australia)
Terms and Conditions
If you are a consumer under the Australian Consumer Law, our goods come with guarantees that cannot be excluded under the Australian Consumer Law. You are entitled to a replacement or refund for a major failure and for compensation for any other reasonably foreseeable loss or damage. You are also entitled to have the goods repaired or replaced if the goods fail to be of acceptable quality and the failure does not amount to a major failure
- Shriro Australia Pty Limited ("Shriro") also warrants the following Robinhood products against manufacturing defects and faulty materials, under normal use and subject to the exclusions in this certificate, for a period of:
Rangehood, Ovens, Cooktops, Dishwashers - 24 months from date of original purchase for domestic use. Uniduct – 12 months from date of original purchase for domestic use.
Ironing centre – 12 months from date of original purchase for domestic use.
Laundry Tub - 5 years on stainless bowl, 24 months on Tap, Cabinet and other components from the date of original purchase for domestic use.
"Original purchase", when used in this certificate, means purchase by the customer directly from Shriro or one of its approved suppliers.
-
This warranty is limited to the repair or replacement, at our option, within the warranty period of any component part which we at our discretion determine to contain faulty materials or a manufacturing defect in breach of this warranty. This warranty is subject to terms and conditions set out in this certificate.
-
The warranty only applies within Australia.
-
For warranty service outside of capital city metropolitan area or 30 km from nearest authorised service agent you will be liable for reasonable travelling expenses and the cost of transport of the product or parts to and from the service agent
-
To make a claim under this warranty, you must produce the original invoice or other purchase documentation as proof of the original purchase date. You must send your claim to Shriro Australia Pty Limited, 104 Vanessa Street, Kingsgrove NSW 2208 within 7 days of any alleged defect or failure of the product first becoming apparent, you are responsible for the expense of making a claim under this warranty. This warranty is given by:
Shriro Australia Pty Ltd
ABN 28 002 386 129
Telephone: 1800 648 556
Facsimile: 1800 628 577
Email: customercare@shriro.com.au
www.robinhood.com.au
Attention Customer Services Manager
Warranty exclusions
- The warranty does not apply where, in Shriro's opinion:
The defect is caused by misuse, wear and tear, dirt, fire or accidental damage.
The product has been repaired or serviced by an unauthorised person.
The product was not installed in accordance with our instructions.
The product was purchased overseas or was not designed for use in Australia.
The product was not used, cleaned or cared for in accordance with our instructions.
The product was used outdoors.
-
All Robinhood Rangehoods are suitable for indoor use only and not suitable over BBQs or charcoal cookers designed for outdoor use.
-
In addition, this warranty does not extend to damage or defects which in our opinion, directly or indirectly arise from or are due to: exposing the product to acidic or corrosive materials or chemicals such as dyes, solvents, denture cleaner or acetone; using inappropriate household cleaning products such as abrasive cream or powder cleansers, furniture polish, bleach, mentholated spirits, drain cleaners, sugar soap, metal pads and strongly alkaline or acidic cleaners; heat damage, including from washing the product at high temperatures; impact or mishandling the product, including the impact caused by objects scraped along, thrown or dropped on the product surface or excessive weight being placed on the product; structural or support changes in or affecting the building or the application where the product has been installed; failure to clean or maintain the product as recommended; or any other causes specified in the product information as being excluded from this warranty.
-
Variations with the colour or gloss within the product or any ageing or fading of colour, shine or gloss level over time are not covered by this warranty. The warranty does not cover visual imperfections or blemishes in the surface and edges of the product that were not brought to your supplier's attention at the time you inspected the product.
-
We will not be responsible under this warranty for, nor pay the costs of, removing the existing product, or reinstalling the new product, or any associated costs or damages.
-
Charcoal filters and light bulbs are not covered by this warranty
The benefits given by this warranty are in addition to other rights and remedies of consumers under any law in relation to the goods which cannot be excluded.
This warranty certificate is not intended to create a contract between Shriro Australia Pty Limited and the purchaser
New Zealand
Monaco Corporation Ltd
Telephone: (09) 415 6000
Facsimile: (09) 415 7400
Email: customercare@monacocorp.co.nz
11 www.robinhood.co.nz
Australia
Shriro Australia Pty Ltd
ABN 28 002 386 129
Telephone:1800648556
Facsimile: 1800 628 577
Email: customercare@shriro.com.au