
AHP8000W - Tumble dryer Artusi - Free user manual and instructions
Find the device manual for free AHP8000W Artusi in PDF.


| Product Type | Tumble Dryer |
| Brand | Artusi |
| Model | AHP8000W |
| Capacity | 8 kg |
| Height | 845 - 855 mm |
| Width | 596 mm |
| Depth | 609 mm |
| Net Weight (plastic door) | 46.8 kg |
| Net Weight (glass door) | 48.8 kg |
| Voltage | 220-240 V ~ 50 Hz |
| Power Rating | 1000 W |
| Refrigerant | R290 (150 g) |
| Drying System | Heat Pump |
| Number of Programmes | 13 (Cotton, Synthetics, Delicate, Time, etc.) |
| Control Type | Electronic with Rotary Knob |
| Display | LED Indicators for warnings |
| Drum Light | Yes, LED |
| Child Lock | Yes |
| Delay Start | Up to 23 hours |
| Anti-Crease Function | 1 hour after programme end |
| Lint Filter | Double lint filter (inner and outer) |
| Water Tank | Removable, or optional drain hose |
| Heat Exchanger Cleaning | Every 30 cycles or monthly |
| Humidity Sensor | Auto-drying, clean 4 times a year |
| Installation Options | Freestanding or under counter; stackable on washing machine |
| Warranty | 24 months |
Frequently Asked Questions - AHP8000W Artusi
User questions about AHP8000W Artusi
0 question about this device. Answer the ones you know or ask your own.
Ask a new question about this device
Download the instructions for your Tumble dryer in PDF format for free! Find your manual AHP8000W - Artusi and take your electronic device back in hand. On this page are published all the documents necessary for the use of your device. AHP8000W by Artusi.
USER MANUAL AHP8000W Artusi
APPLIANCES
FOR LIVING
Congratulations, you are now the proud owner of an ARTUSI cooking appliance. Thank you for purchasing ARTUSI and welcome to the ARTUSI Family.
This instruction manual has been specially created to inform you of the full range of features your ARTUSI appliance has to offer and serves as an introduction to getting the very best out of your ARTUSI appliance.
We present detailed information on each of the features your ARTUSI appliance consists of. Once you have read this section you will be able to choose the most appropriate settings for your appliance when cooking different types of food.
We ask you to read the instructions in this booklet very carefully as this will allow you to get the best results from using your appliance. KEEP THE DOCUMENTATION OF THIS PRODUCT FOR FUTURE REFERENCE.
TO REGISTER YOUR PRODUCT WITH ARTUSI, PLEASE FILL OUT THE WARRANTY CARD AT THE END OF THIS BOOKLET AND POST IT TO: REPLY PAID 83617
LEICHHARDT NSW 2040
Dear Artusi Customer, please read this user manual carefully before using the product and, keep it permanently at your disposal.
Note: This user manual is prepared for more than one model. Some of the features specified in this Manual may not be available on your appliance.
All our appliances are only for domestic use, not for commercial use. Products marked with (*) are optional.
"THIS APPLIANCE SHALL BE INSTALLED IN ACCORDANCE WITH THE REGULA TIONS FORCE AND ONLY USED IN A WELL VENTILATED SPACE. READ THE INSTRUCTIONS BEFORE INSTALLING OR USING THIS APPLIANCE"
"Conforms with the WEEE Regulations."
Thank you for choosing this dryer.
This User Manual contains important safety information and instructions on the operation and maintenance of your dryer.
Please take the time to read this User Manual before using your dryer and keep this book for future reference.
| Icon Caption Description | ||
 | WARNING Risk of serious injury or death | |
 | RISK OF ELECTRIC SHOCK Dangerous voltage | |
 | FIRE Risk of fire | |
 | ATTENTION Risk of injury or material damage | |
 | IMPORTANT/NOTE Information on correct operation of the system | |
 | Read the instructions. | |
 | Hot surface | |
CONTENTS
1. SAFETY INSTRUCTIONS .... 5
1.1. Electrical Safety 5
1.2. Children's Safety 6
1.3. Dryer Safety....7
1.4. Correct Use 8
1.5. Installing On Top Of a Washing Machine.... 10
2. INSTALLATION 11
2.1. Connection to Water Outlet (with optional drain hose) 11
2.1.1. Connecting the Water Discharge Hose 11
2.2. Adjusting the Feet 11
2.3. Electrical Connection 11
2.4.Under Counter Installation 11
3. OVERVIEW 12
4. PREPARING THE LAUNDRY 13
4.1. Sorting the Laundry to be Dried.... 13
4.2.Preparing the Laundry to be Dried 14
4.3. Load Capacity 14
5. USING THE DRYER 15
5.1. Control Panel 15
5.1.1. Programme Selection Knob.... 15
5.1.2. Electronic Indicator and Additional Functions 15
5.2. Programme Selection and Consumption Table 16
5.2.1.Auxiliary Functions.... 17
5.2.2. Starting the Programme 18
5.2.3. Programme Progress 19
5.3.Drum Light Information 19
6. CLEANING AND CARE 21
6.1. Cleaning the Lint Filters 21
6.2. Emptying the Water Tank 21
6.3. Cleaning the Heat Exchanger.... 22
6.4. Cleaning the Humidity Sensor 22
6.5. Cleaning the Inner Surface of the Loading Door 23
7. TECHNICAL SPECIFICATIONS ...... 24
8. TROUBLESHOOTING 25
9. AUTOMATIC FAULT WARNINGS AND WHAT TO DO 27
10. ENVIRONMENTAL PROTECTION AND PACKAGING INFORMATION ..... 28
10.1. Packaging Information 28
10.2. Energy Efficiency 28
PRIMARY CONSIDERATIONS
- This dryer can be used by children aged from 8 years and above and persons with reduced physical, sensory or mental capabilities or lack of experience and knowledge if they have been given supervision or instruction concerning use of the dryer in a safe way and understand the hazards involved. Children must not play with the dryer. Cleaning and user maintenance must not be made by children without supervision.
- This dryer is intended only for household and indoor use. The warranty will be void in case of commercial use.
- Use this dryer only for laundry with a label that indicates it is suitable for drying.
- The manufacturer will not accept responsibility for damages resulting from incorrect use or transport.
- Do not allow floor coverings to obstruct the ventilation openings.
• Installation and repair of the dryer should only be made by an authorised repair agent. The manufacturer cannot be held responsible for damages resulting from un-authorised repairs.
⚠ WARNING: Never spray or pour water onto the dryer to wash it! There is risk of electric shock!
- Leave at least 3 cm of space between the side and rear walls of the dryer and above if you plan on placing your dryer under a worktop.
- Assembly / disassembly for under-counter installation if necessary must be done by an authorised service agent.
- Before installation, check the dryer for visible damage. Never install or operate a damaged dryer.
- Keep pets away from the dryer.
- Fabric softeners or similar dryer should be used in
accordance with the manufacturers instructions.
- Remove all objects from pockets such as lighters and matches.
- The dryer must not be installed behind a lockable door, a sliding door or a door with a hinge on the opposite side to that of the dryer, if it prevents the door from being fully opened.
⚠ WARNING: In the dryer enclosure or in the built-in structure, keep ventilation openings clear of obstruction.
- Before contacting the local Authorised Service Provider for the installation of the dryer, check the information in the user manual to make sure that the electrical installation and water outlet is suitable. If they are not, call a qualified electrician and a plumber to have the necessary adjustments made.
- It is the customer's responsibility to prepare the dryer's installation place, as well as the electricity and waste water installation. Before installation, check the dryer for damage. If damaged, do not have it installed. Damaged dryer may endanger your health.
• Install the dryer on a stable and flat surface. - Run the dryer in a dust-free environment where the air ventilation is good.
- The clearance between the dryer and the floor should not be reduced with objects such as carpets, wood or tape.
- Do not block the ventilation grills found on the plinth of the dryer.
- The dryer must not be installed behind a lockable door, a sliding door or a door with a hinge on the
opposite side of the dryer, in such a way that blocks the full opening of the dryer door.
- Once the dryer has been installed, the connections must remain stable. When installing the dryer, make sure that the rear surface is not leaning on anything (e.g. tap, socket).
- The operating temperature of the dryer is +5°C to +35°C. If operated out of this temperature range, the performance of the dryer will be affected negatively and the dryer will be damaged.
- Be careful when carrying the dryer since it is heavy. Always wear safety gloves.
• Always install the dryer against a wall. - The rear surface of the dryer should be placed against the wall.
- When the dryer is placed on a stable surface, use a level to check if it is fully level/stable. If not, adjust the feet until it becomes steady. Repeat this process every time you relocate the dryer.
- Do not place the dryer onto the power cable.
Disposing the Old Dryer
natural_image
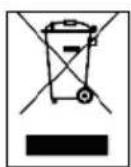
Simple line drawing of a trash bin with no text or symbolsThis dryer complies with EU WEEE Directive (2012/19/EU). This dryer bears a classification symbol for waste electrical and electronic equipment (WEEE).
This symbol, which is found on the dryer or information label, indicates that this dryer must not be disposed together with other household waste at the end of its service life. To prevent the potential harms of uncontrolled waste disposal on the environment and human health, please keep this dryer separate from other types of waste, and to prevent sustainable reuse of material resources, make sure that it is recycled responsibly. Contact your dealer or local authorities to get information on how and where you can take the dryer for environmentally-safe recycling. This dryer cannot be mixed with other commercial wastes for recycling.
1. SAFETY INSTRUCTIONS
This section contains safety instructions that will help protect you from risk of personal injury or property damage. Failure to follow these instructions will void any warranty.
1.1. Electrical Safety
- The dryer must not be supplied through an external switching device, such as a timer, or connected to a circuit that is regularly switched on and off by a utility.
- Do not touch the power plug with wet hands. Always pull the plug to unplug the dryer, otherwise, there will be risk of an electric shock.
- Connect the dryer to a grounded socket with fuse protection. The earth connection must be installed by a qualified electrician. Our company cannot be held responsible for damages/losses resulting from using the dryer without an earth connection as required by local regulations.
- The voltage and the allowable fuse protection are indicated on the type plate.(For the type plate, please see Overview)
- Voltage and frequency values indicated on the type plate must be equal to the mains voltage and frequency value in your house.
- Unplug the dryer when it is not used for an extended period, and before installation, maintenance, cleaning and repair, otherwise, the dryer may get damaged.
- The plug socket must be freely accessible at all times after installation.
A damaged power cord/plug can cause fire or give you an electric shock. When damaged it must be replaced, this should only be done by qualified personnel.
⚠️ To avoid the risk or fire or electric shock, do not use extension cords, multi sockets or adapters to connect the dryer to mains power.
1.2. Children's Safety
- This dryer is not intended for use by people (including children) with reduced physical, sensory or mental capabilities, or lack of experience and knowledge, unless they have been given supervision or instruction concerning use of the dryer by a person responsible for their safety.
- This dryer can be used by children aged from 8 years and above, and persons with reduced physical, sensory or mental capabilities or lack of experience and knowledge if they have been given supervision or instruction concerning use of the dryer in a safe way and understand the hazards involved. Children must not play with the dryer. Cleaning and user maintenance must not be made by children without supervision.
- Do not leave children unattended near the dryer.
• Children might lock themselves in the dryer resulting in risk of death. - Do not allow children to touch the glass door during operation. The surface becomes extremely hot and may cause skin damage.
- Keep packaging material away from children.
- Poisoning and irritation may occur if detergent and cleaning materials are consumed or come into contact with the skin and eyes.
- Keep cleaning materials out of the reach of children Electrical dryer are dangerous for children.
- Keep children away from the dryer while it is running.
• To prevent children from interrupting the dryer cycle, you can use the child lock to avoid any changes in
the running programme.
- Do not allow children to sit/climb on or climb inside the dryer.
1.3. Dryer Safety

Due to risk of fire, the following laundry items and dryer should NEVER be dried in the dryer:
- Do not dry unwashed items in the dryer.
- Items that have been soiled with substances such as cooking oil, acetone, alcohol, petrol, kerosene, spot removers, turpentine, waxes and wax removers should be washed in hot water with an extra amount of detergent before being dried in the dryer.
- Cleaning cloths and mats that have residues of flammable cleaning agents or acetone, gas, patrol, stain remover, turpentine, candle, wax, wax remover or chemicals.
- Laundry that has residues of hair sprays, nail polish remover and similar substances.
- Laundry on which industrial chemicals have been used for cleaning (such as chemical cleaning).
- Laundry that has any kind of foam, sponge, rubber or rubber-like parts or accessories. These include latex foam sponge, shower caps, waterproof fabrics, fitted clothes, and foam pillows.
- Items with filling and damaged (parts or jackets). Foam protruding from these items might catch fire during the drying process.
- Operating the dryer in environments that contain flour or coal dust may cause explosion.

ATTENTION: Underwear that contains metal inforcements should not be put in the dryer. The er may be damaged if metal reinforcements come se and break off during drying.

FIRE:R290
Risk of fire and damage!
This dryer contains environmental friendly but flammable R290 gas. Keep open flame and fire sources away from the dryer.
1.4. Correct Use
⚠️ ATTENTION: Never stop a dryer before the end of the drying cycle unless all items are quickly removed and spread out so that the heat is dissipated.
⚠️ ATTENTION: Make sure that pets do not enter the dryer. Check the inside of the dryer before using it.
⚠️ ATTENTION: Superheating of clothes inside the dryer can occur if you cancel the programme or in the event of a power failure whilst the dryer is running. This concentration of heat can cause self-combustion so always activate the Refresh programme to cool down or quickly remove all laundry from the dryer in order to hang them up and dissipate the heat.
- Use the dryer only for household drying and to dry fabrics with a label that indicates they are suitable for drying. All other uses are out of the scope of intended use and are prohibited.
- The warranty will be void in case of any commercial use.
- This dryer is designed to be used inside domestic residences only, and should be placed on a straight and stable surface.
- Do not lean against or sit on the door of the dryer. The dryer may tip over.
- To maintain a temperature that will not harm the laundry (e.g. to prevent the laundry from catching fire), a cooling process starts after the heating process. After this, the programme ends. At the end of the programme, always remove the laundry promptly.
- Oil-affected items can ignite spontaneously, especially when exposed to heat sources such as in a dryer. The items become warm, causing an oxidation reaction in oil. Oxidations creates heat. If the heat cannot escape the items can become hot enough to catch fire. Piling, stacking or storing oil-affected items can prevent heat from escaping and so create a fire hazard.
- If it is unavoidable that fabrics that contain vegetable or cooking oil or have been contaminated by hair care products be placed in a dryer they should first be washed in hot water with extradetergent - this will reduce, but not eliminate, the hazard
⚠️ ATTENTION: Never use the dryer without a lint filter or with a damaged lint filter.
- Lint filters must be cleaned after each use as indicated in Cleaning the Lint Filter.
- Lint filters must be dried after wet cleaning. Wet filters might cause malfunction during the drying process.
- Lint accumulation must not to be allowed around the dryer (not applicable for dryers intended to be vented to the exterior of the building)
IMPORTANT: The clearance between the dryer and the floor should not be reduced with objects such as carpets, wood or panel, otherwise, sufficient air intake cannot be ensured for the dryer.
- Do not install the dryer in rooms where there is risk of freezing. Freezing temperatures negatively affect the dryer performance. Condensed water that freezes in the pump and hose may cause damage.
1.5. Installing On Top Of a Washing Machine
⚠️ ATTENTION: A washing machine cannot be placed on the dryer. Pay attention to the warnings below when installing the dryer on a washing machine.
⚠️ ATTENTION: The dryer can only be placed on washing machines that have a same capacity and above.
- To use the dryer on the washing machine, a fixing part must be used between the two dryer. The fixing part must be attached by an Authorised Service Provider. - When the dryer is installed on top of the washing machine, the total combined weight of these products may reach approximately 150 kilograms (when loaded). Ensure that the appliances are placed on a solid floor that has a load bearing capacity!
| Appropriate Installation Table for Washing Machine and Dryer | |||||
| Dryer (Depth) | Washing Machine | ||||
| 37-42 cm 42 | 45 cm 46-49 cm | 50-56 cm 57-63 cm | |||
| 52,5 cm X | √ | √ | √ | √ | |
| 56 cm XX | √ | √ | √ | ||
| 61 cm XXX | √ | √ | |||
| 64 cm XXXX | √ | ||||
(For the depth information, please see 7. Technical Specifications)
In order to put the dryer onto the washing machine, a special stacking kit is required as an optional extra. Please contact customer service to acquire. The assembly instruction will be served together with the stacking kit.
CE Declaration of conformity
We declare that our dryer meet the applicable European Directives, Decisions and Regulations and the requirements listed in the standards referenced.
2. INSTALLATION
2.1. Connection to Water Outlet (with optional drain hose)
In dryer with a heat pump unit, water accumulates in the water tank during the drying process. You must empty the accumulated water after each drying process. Instead of periodically emptying the water tank, you can also use the water drain hose provided with the dryer to directly drain the water outside.
2.1.1. Connecting the Water Discharge Hose
- Pull and take out the end of the hose at the back of the dryer. Do not use any tools to take out the hose.
- Fit one end of the water discharge hose, which is provided with the dryer, to the slot from which you have removed the hose.
- Fix the other end of the water discharge hose directly to the water outlet or sink.
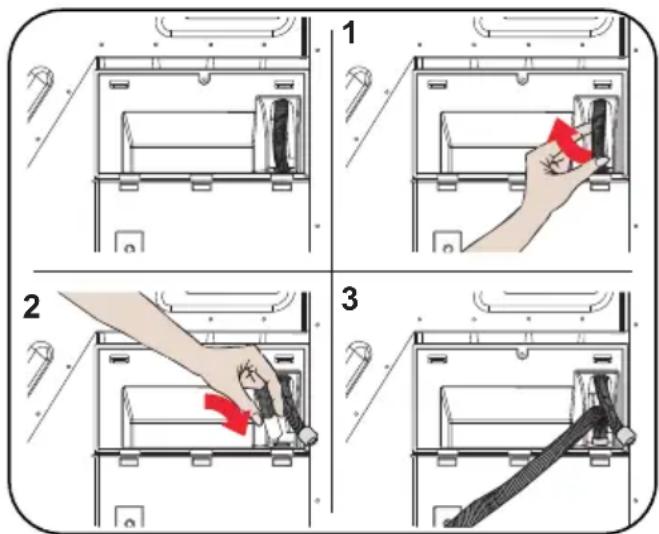
ATTENTION: The hose must be connected in a manner that it cannot be displaced. If the hose comes out during water discharge, there might be flooding in your house.
IMPORTANT: The water discharge house must be installed at a height of 80 cm maximum.
IMPORTANT: The water discharge hose must not be bent between the outlet and the dryer, folded or stepped over.
2.2. Adjusting the Feet
- For the dryer to work with less noise and vibration, it must be stable and balanced on its feet. Adjust the feed to ensure that the dryer is balanced.
- Rotate the feet to the right and to the left until the dryer is even and stable.
IMPORTANT: Never remove the adjustable feet.
2.3. Electrical Connection
⚠️ ATTENTION: There is risk of fire and electric shock.
- Your dryer is set to 220-240 V and 50 Hz.
- The mains cable of the dryer is equipped with a special plug. This plug must be connected to an earthed socket protected by a fuse of 10 Amperes as indicated on the type plate. The fuse current rating of the power line where the outlet is connected must also be 10 amperes. Consult a qualified electrician if you do not have such an outlet or fuse.
- Our company cannot be held responsible for damages resulting from usage without earthing.
IMPORTANT: Operating your dryer at low voltage values will shorten the service life and decrease the performance of your dryer.
2.4. Under Counter Installation
- Leave at least 3 cm of space between the side and rear walls of the dryer and the underside of the worktop when installing your dryer under a counter.
- Assembly / disassembly under the counter if necessary must be done by authorized service.
3. OVERVIEW
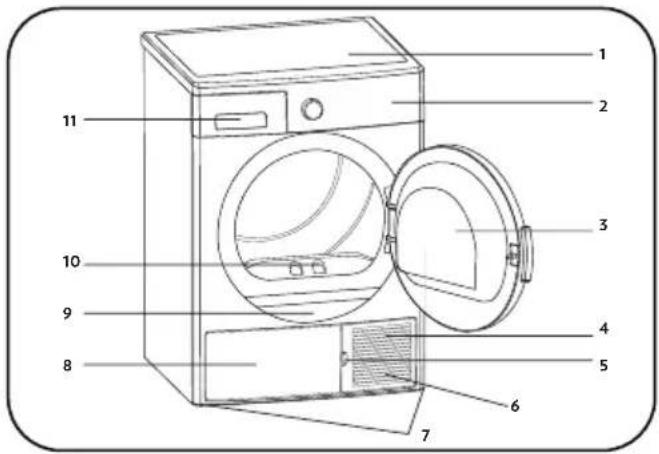
- Upper tray
- Control panel
- Loading door
- Plinth
- Plinth opening slot
- Ventilation grills
- Adjustable feet
- Plinth cover
- Type plate
- Lint filter
- Drawer Cover
4. PREPARING THE LAUNDRY
4.1. Sorting the Laundry to be Dried
Follow the instructions on the labels of the laundry to be dried. Only dry items that have a statement/symbol that indicates "they can be dried in a dryer".
- Do not operate the dryer with load amounts and laundry types other than those given in 4.3. Load Capacity.
 Suitable for drying in a dryer Suitable for drying in a dryer |  Does not need ironing Does not need ironing |  Sensitive/Delicate drying Sensitive/Delicate drying | 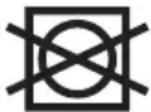 Not suitable for drying in a dryer Not suitable for drying in a dryer |
 No drying No drying |  Do not dry-clean Do not dry-clean | 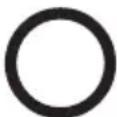 At any temperature At any temperature |  At high temperatures At high temperatures |
 At medium temperatures At medium temperatures |  At low temperatures Heatless At low temperatures Heatless |  Hang to dry Hang to dry |  |
 Spread to dry Hang wet to dry Spread in shadow to dry Suitable for dry cleaning Spread to dry Hang wet to dry Spread in shadow to dry Suitable for dry cleaning | 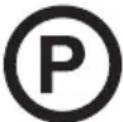 | ||
Do not dry thin, multi-layer or thick-layer fabrics together as they dry at different levels. For this reason, dry clothes together that have the same structure and fabric type. This way, you can get an even drying result. If you think that the laundry is still wet, you can select a time programme for additional drying.
Please dry your big (like duvets) and small sizes of laundries separately in order to avoid damp laundries.
IMPORTANT: Delicate fabrics, embroided fabrics, woolen/silk fabrics, clothes made of delicate and expensive fabrics, airtight clothes and tulle curtains are not suitable for drying in the dryer.
4.2. Preparing the Laundry to be Dried

Risk of explosion and fire!
Remove all objects from pockets such as lighters and matches.

ATTENTION: The drum of the dryer and fabrics may get damaged.
• The clothes may have become entangled during the washing process. Separate them from each other before placing them in the dryer.
- Remove all objects in the pockets of the clothes and apply the following:
- Tie fabric belts, apron laces etc. to each other or use a laundry bag.
- Lock the zips, clasps and fasteners, do up the buttons of covers.
• To get the best drying result, sort the laundry according to the textile type and drying programme.
- Remove clips and similar metal parts from the clothes.
- Woven goods such as t-shirts and knit clothes generally shrink in the first drying. Use a protective programme.
- Do not over-dry synthetics. This will cause creases.
- When washing the laundry to be dried, adjust the amount of softener according to the data from the manufacturer of the washing machine.
4.3. Load Capacity
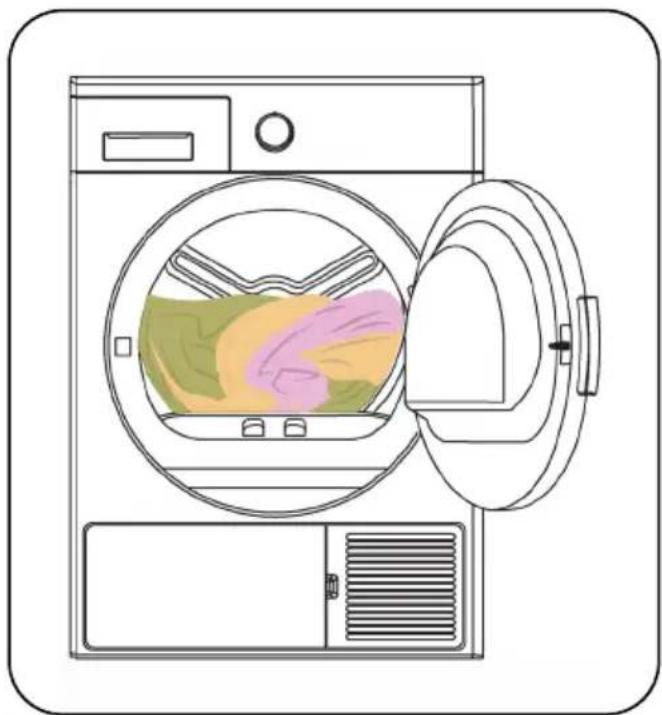
Follow the instructions in the "Programme selection and consumption table". (See: 5.2 Programme selection and consumption table). Do not load the dryer with more laundry than the capacity values specified in the table.
natural_image
Line drawing of a washing machine with an open door and internal air vent (no text or symbols)
IMPORTANT: It is not recommended to load the dryer with more laundry than the amount shown in the figure. When overloaded, the drying performance of the dryer will decrease and the dryer and laundry might be damaged.
| Laundry Dry load weight (gr) | |
| Bedsheet (double) 725 | |
| Pillowcase 240 | |
| Bath Towel 700 | |
| Hand Towel 225 | |
| Shirt 190 | |
| Cotton Shirt 200 | |
| Jean 650 | |
| Fabric - Gabardine Trousers 400 | |
| T-shirt 120 | |
5. USING THE DRYER
5.1. Control Panel
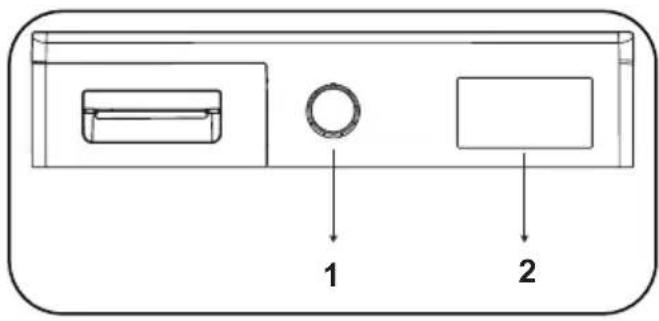
- Programme Selection Knob
- Electronic indicator and additional functions
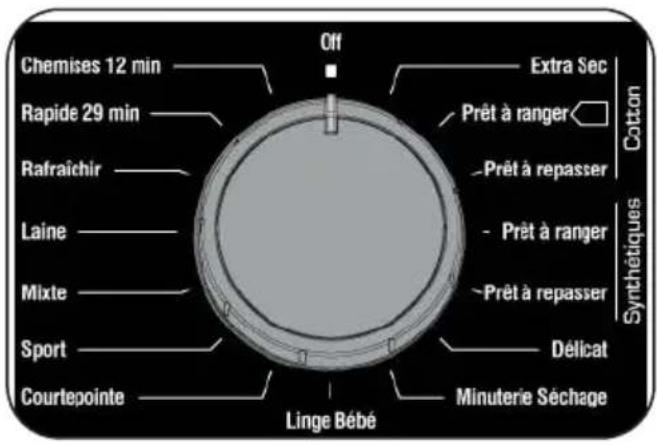
5.1.1. Programme Selection Knob
Use the programme selection knob to select the desired drying programme
5.1.2. Electronic Indicator and Additional Functions
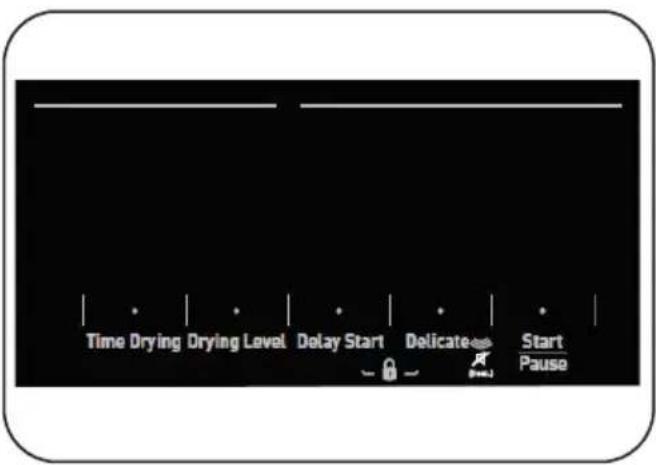
Display symbols:
| Water tank warning indicator |  |
| Lint filter cleaning warning indicator |  |
| Heat exchanger cleaning warning indicator |  |
5.2. Programme Selection and Consumption Table
Press the Start/Pause button to start the programme. The Start/Pause LED that indicates that the programme has started and the remaining the of the program is seen on the display.
| Programme Load (kg) | Washing machine spin speed | Approximate amount of remaining humidity | Duration (minutes) | |
| Cotton Extra Dry 8 1000 60% 179 | ||||
| Cotton Cupboard Dry 8 1000 60% 174 | ||||
| Cotton Iron Dry 8 1000 60% 148 | ||||
| Synthetics Cupboard Dry | 4 800 40% 74 | |||
| Synthetics Iron Dry 4 800 40% 64 | ||||
| Delicate 2 600 50% 55 | ||||
| Time drying - - | - | - | ||
| Baby Care | 3 1000 60% 78 | |||
| Duvet | 2,5 | 800 60% 140 | ||
| Sport | 4 800 40% 103 | |||
| Mix | 4 | 1000 | 60% | 112 |
| Wool Refresh | - | - | - | 5 |
| Refresh | - | - | - | 10 |
| Express 34' | 1 1200 50% 34 | |||
| Shirts 20' | 0.5 | 1200 50% 20 | ||
| Energy consumption values | |||
| Programme | Load (kg) | Energy Consumption Value (kWh/year) | Energy Rating Star |
| Cotton Cupboard Dry Drying Level 3 | 8 | 149 | 7 |
*Energy labelling standard programme (AS/NZS 2442) All the filters must be cleaned before test series.
All values in the table were determined in accordance with standard laboratory conditions. Consumption values may vary from the values in the table depending on the fabric type, spin speed, environment conditions and voltage values.
5.2.1. Auxiliary Functions
The table that summarises the options that can be selected in programmes is given below.
| Option Description | |
| Drying Level | The humidity level obtained after drying can be increased by 3 levels. This way, level of required dryness can be selected. The levels that can be selected other than the standard setting: 1, 2, 3. After selection, the LED of the relevant drying level will turn on. |
| Delicate Delicate fabrics are dried for a longer time at a low temperature | |
| Delay Start | You can delay the start time of the programme by selecting the 1-hour to 23-hour option. You can activate the desired delay time by pressing the Start/Pause button. When the time is up, the selected programme will start automatically. During the delay time, options compatible with the programme can be activated/deactivated. Long pressing on Delayed Start button changes delay time continuously. |
| Buzzer Cancel | The dryer gives an audible warning when programme selection knob is turned, buttons are pressed and at the end of programme. To cancel the warnings, press and hold the "Anti-Crease Option" button for 3 seconds. When you press the button, you will hear an audible warning that the option has been cancelled. |
| Time Drying | When knob is positioned to Time Drying programme, option can be selected by pressing Time Drying option button and program starts by pressing Start/Pause button. Long pressing on time dying button changes time continuously. |
| Child Lock | There is a child lock option to avoid changes in the programme flow when keys are pressed during the programme. To activate child lock feature user should press "Delay Start" and "Delicate" buttons simultaneously for 3 sec. When the child lock activated, all keys will be deactivated. Child lock is not automatically deactivated at the end of the program. To deactivate the child lock at end of the programme, set the programme selection knob to "Off" position. Then set programme selection knob to first position. Child lock is still active. To deactivate the child lock , user should press "Delay Start" and "Delicate" buttons simultaneously for 3 sec. When activating/deactivating the child lock, "CL" will visualize on display for 2 sec and then becomes off; and an audible warning will be heard. Warning; when the product is running or the child lock is active, if you turn the programme selection knob, you will hear an audible warning and "CL" will visualize on display for 2 sec and then becomes off. If you turn the programme selection knob, you will hear an audible warning. Even if you set the programme knob to another programme, the previous programme will continue running. To select a new programme, you need to deactivate the child lock and then set the programme selection knob. |
5.2.2. Starting the Programme
The Start/Pause LED will flash during programme selection. Press the Start/Pause button to start the programme. The Start/Pause LED that indicates that the programme has started and the drying LED will come on.
| Programme Description | |
| Cotton Extra Dry | This programme dries thick and multi-layer fabrics, such as cotton towels, bedsheets, pillowcases, bathrobes, at a high temperature to allow you to place them in a closet. |
| Cotton Cupboard Dry | This programme dries cotton pyjamas, underwear, tablecloths etc. to allow you to place them in a closet. |
| Cotton Iron Dry | This programme dries cotton laundry to prepare it for ironing. Laundry removed from the machine will be damp. |
| Synthetics Cupboard Dry | This programme dries synthetics, such as shirts, t-shirts, blouses, at a lower temperature compared to the cottons programme to allow you to place them in a closet. |
| Synthetics Iron Dry | This programme dries synthetics, such as shirts, t-shirts, blouses, at a lower temperature compared to the cottons programme to prepare them for ironing. Laundry removed from the machine will be damp. |
| Delicate | This programme dries thin clothes like shirts, blouses and silk garments at a low temperature to make them ready to wear. |
| Time Drying | To reach the required drying level at a low temperature, you can use the time programmes of 20 min. to 200 min. Regardless of the drying level, the programme stops at the desired time. |
| Baby Care | This programme dries delicate infant clothes at a low temperature to make them ready to wear. |
| Duvet This programme is used | to dry duvet. |
| Sport | Sport program is used for synthetic sport laundries like shorts, t-shirts at low temperature. |
| Mix | This programme dries cotton-synthetic mixed garments that do not discolour to make them ready to wear. |
| Wool Refresh | Wool refresh helps wool textiles to remove excess water after washing by applying low temperature and gentle movements of drum. |
| Refresh | This programme provides ventilation for 10 minutes without applying heat to help freshen up your garments. |
| Express 34' | 1 kg of synthetics shirts spun at high speed in the washing machine are dried in 34 minutes. |
| Shirts 20' 2 to 3 shirts are ready for to be ironed in 20 minutes | |
IMPORTANT: Do not open the loading door while the programme is running. If you have to open the door, do not keep it open for a long time.
5.2.3. Programme Progress
During the Programme
If you open the door when the programme is running, the dryer will switch to standby mode. Once the door has been closed, press the Start/Pause key to resume the programme.
Do not open the loading door when the programme is running. If you have to open the door, do not keep it open for a long time.
Programme End
Once the programme is over, the warning LEDs for Start/Pause, water tank level, filter cleaning and heat exchanger cleaning will turn on. Additionally, an audible warning will be given at the end of the programme. You can remove the laundry to make the machine ready for a new load.
IMPORTANT: Clean the lint filter after every programme. Empty the water tank after every programme.
IMPORTANT: If you do not remove the laundry after the programme has ended, the 1-hour Anti Crease phase will automatically be activated. This programme rotates the drum at regular intervals to prevent creases.
5.3. Drum Light Information
• This dryer includes LED Drum Light.
- The light works automatically when you open the door. And closes itself after a while automatically.
- It is not an adjustable option.
- Please do not try to replace or modify the LED Light.
| PROGRAMMES | OPTIONS | |||||
| Delay Start | Buzzer Cancel | Child Lock Delicate | Time Drying | Drying Level | ||
| Cotton Extra Dry X | ✓ | ✓ | ✓ | ✓ | ✓ | |
| Cotton Cupboard Dry | ✓ | ✓ | ✓ | ✓ | X | ✓ |
| Cotton Iron Dry X | ✓ | ✓ | ✓ | ✓ | ✓ | |
| Synthetics Cupboard Dry | ✓ | ✓ | ✓ | ✓ | X | ✓ |
| Synthetics Iron Dry | ✓ | ✓ | ✓ | ✓ | X | ✓ |
| Delicate X X | ✓ | ✓ | ✓ | ✓ | ||
| Time drying X X | ✓ | ✓ | ✓ | ✓ | ||
| Baby Care X | ✓ | ✓ | ✓ | ✓ | ✓ | |
| Duvet X X | ✓ | ✓ | ✓ | ✓ | ||
| Sport X | ✓ | ✓ | ✓ | ✓ | ✓ | |
| Mix X | ✓ | ✓ | ✓ | ✓ | ✓ | |
| Wool Refres X X X | ✓ | ✓ | ✓ | |||
| Refresh | ✓ | ✓ | ✓ | XXX | ||
| Express 34' X X X | ✓ | ✓ | ✓ | |||
| Shirts 20' X X X | ✓ | ✓ | ✓ | |||
| X Not selectable | ||||||
| ✓ | Selectable | |||||
6. CLEANING AND CARE
IMPORTANT: Do not use industrial chemicals to clean your dryer. Do not use a dryer that has been cleaned with industrial chemicals.
6.1. Cleaning the Lint Filters
IMPORTANT: DO NOT FORGET TO CLEAN THE LINT FILTERS AFTER EACH USE.
To clean the lint lters:
- Close the lters and t the hooks
- Place inner liter inside of outer liter
- Re t the Lint lter
After the dryer has been used for a certain period of time, if you encounter a layer that will cause obstruction on the surface, wash the with warm water to clean the layer. Dry the thoroughly before reinstalling it again.
6.2. Emptying the Water Tank
1
2
- Open the loading door.
- Pull up the lint lters to remove it.
- Open the outer lter
- Clean the outer liter by your hands or using a soft cloth.
- Open the inner lter
-
Clean the inner liter by your hands or using a soft cloth
-
Pull the drawer cover and carefully take out the tank.
-
Empty the water in the tank.
-
If there is lint accumulated on the discharge cap in the tank, clean it with water.
-
Refit the water tank.
IMPORTANT: Never remove the water tank when the programme is running. The water condensed in the water tank is not suitable for human consumption.
IMPORTANT: DO NOT FORGET TO EMPTY THE WATER TANK AFTER EACH USE.
6.3. Cleaning the Heat Exchanger
IMPORTANT: Clean the heat exchanger when you see the warning "Heat Exchanger cleaning".
IMPORTANT: EVEN IF THE "HEAT EXCHANGER CLEANING WARNING LED" IS NOT ON: CLEAN THE HEAT EXCHANGER AFTER EVERY 30 DRYING PROCESSES OR ONCE A MONTH.
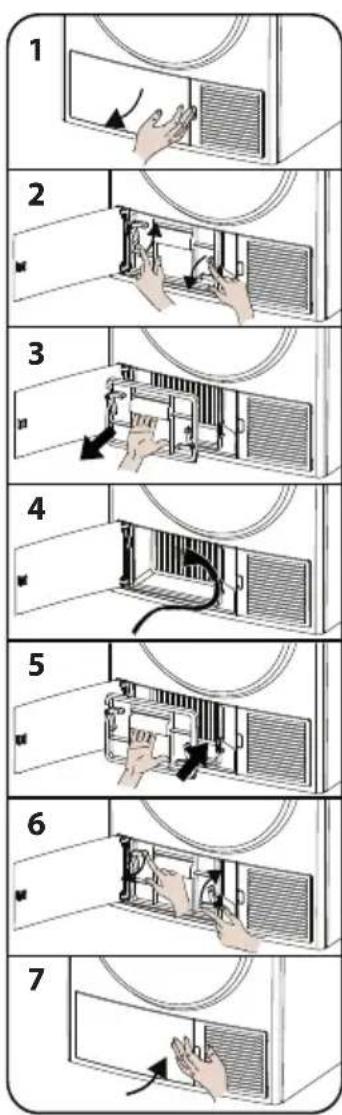
flowchart
graph TD
    A["1: Hand placement on air conditioner unit"] --> B["2: Valve insertion"]
    B --> C["3: Valve insertion"]
    C --> D["4: Valve insertion"]
    D --> E["5: Valve insertion"]
    E --> F["6: Valve insertion"]
    F --> G["7: Air conditioning unit with hand placement"]
If the drying process is completed, open the loading door and wait for it to cool down.
- Open the kick plate cover as shown.
- Unlock the exchanger cover by turning in the direction shown with arrows.
- Take out the exchanger cover as shown.
- Clean the front surface of the exchanger as shown.
- Fit the exchanger cover as shown.
- Lock the exchanger cover by turning in the direction shown with arrows.
- Close the kick plate cover as shown.
WARNING: DO NOT CLEAN WITH BARE HANDS SINCE THE EXCHANGER FINS ARE SHARP. THEY MAY HURT YOUR HANDS
6.4. Cleaning the Humidity Sensor
natural_image
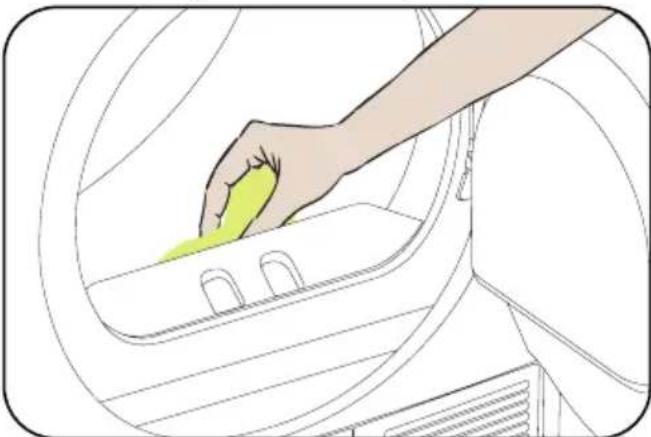
Illustration of a hand placing a yellow substance into a car interior (no text or symbols)Inside the machine, there are humidity sensors that detect whether the laundry is dry or not.
To clean the sensors:
- Open the loading door of the dryer.
- If the dryer is still hot due to the drying process, wait for it to cool down.
- Using a soft cloth soaked in vinegar, wipe the metal surfaces of the sensor and dry them.
IMPORTANT: CLEAN THE METAL SURFACES OF THE SENSOR 4 TIMES A YEAR.
IMPORTANT: Do not use metal tools to clean the metal surfaces of the sensor.
WARNING: Due to the risk or fire and explosion, do not use solution agents, cleaning agents or similar dryer when cleaning the sensors.
6.5. Cleaning the Inner Surface of the Loading Door
IMPORTANT: DO NOT FORGET TO CLEAN THE INNER SURFACE OF THE LOADING DOOR AFTER EACH DRYING PROCESS.
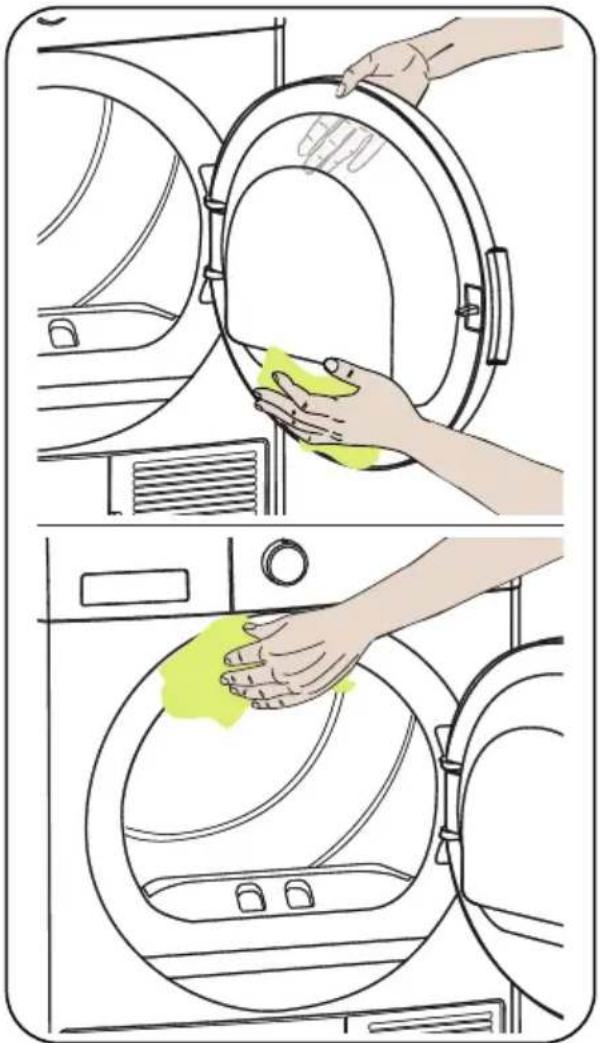
Open the loading door of the dryer and clean all of the inner surfaces and the gasket with a soft, damp cloth.
natural_image
Illustration showing hands cleaning a washing machine with a cloth, no text or symbols present7. TECHNICAL SPECIFICATIONS
| Brand ARTUSI | |
| Model name AHPD8000W | |
| Height Min: 845 mm / Max: 855 mm* | |
| Width 596 mm | |
| Depth 609 mm | |
| Capacity (max.) 8 kg** | |
| Net weight (with plastic door) 46,8 kg | |
| Net weight (with glass door) 48,8 kg | |
| Voltage | 220-240 V |
| Power | 1000 W |
*Min. height: Height with the adjustable feet not used. Max. height: Height with the adjustable feet extended to the maximum.
**Dry laundry weight before washing.
IMPORTANT: To improve the quality of the dryer, technical specifications are subject to change without prior notice.
IMPORTANT: The values declared have been obtained in a laboratory environment according to the relevant standards. These values may change depending on the environmental conditions and use of the dryer.
ATTENTION:
- Due to safety reasons, legislation forces a room of at least 1 m^3 per 8 g refrigerant for such equipment. For 150 g propane, the minimum allowed room size would be 18.75 m^3 .
- Coolant : Risk of fire/risk of poisoning/risk of material damage and damage to the dryer. The dryer contains refrigerant which, although it is environmentally friendly, is flammable R290. Failure to dispose of it properly may result in a fire or poisoning. Dispose of the dryer properly and do not damage the pipes in the refrigerant circuit.
• Type of refrigerant : R290
• Quantity of gas : 150 g
• ODP (Ozone Depletion Potential) : 0
• GWP (Global Warning Potential) : 3
3. Risk of explosion or fire. Remove any cigarette lighters and matches from pockets.
4. Do not place the dryer near open fires and ignition sources.
8. TROUBLESHOOTING
Your dryer is fitted with systems that continuously perform checks during the drying process to take the necessary measures and warn you in case of any malfunction.
⚠ WARNING: If the problem persists even if you have applied the steps in this section, please contact the your dealer or an Authorised Service Provider. Never try to repair a nonfunctional dryer.
| PROBLEM REASON SOLUTION | ||
| The drying process takes a long time. | The surface of the lint filter might be clogged. | Wash the filter with lukewarm water. |
| The heat exchanger might be clogged. | Clean the heat exchanger | |
| The ventilation grills in front of the machine might be closed. | Open the doors/windows to prevent the room temperature from rising too much. | |
| There might be a layer of limescale on the humidity sensor. | Clean the humidity sensor. | |
| The dryer might be overloaded with laundry. | Do not overload the dryer. | |
| The laundry might be insufficiently spun. | Select a higher spin speed on your washing machine. | |
| Laundry comes out damp at the end of the drying process. | ⚠ The laundry that comes out hot at the end of the drying process generally feels more humid. | |
| The programme used might not be suitable for the type of laundry. | Check the care labels on the laundry items, select a suitable programme for the type of laundry and additionally, use the time programmes. | |
| The surface of the lint filter might be clogged. | Wash the filter with lukewarm water. | |
| The heat exchanger might be clogged. | Clean the heat exchanger | |
| The dryer might be overloaded with laundry. | Do not overload the dryer. | |
| The laundry might be insufficiently spun. | Select a higher spin speed on your washing machine. | |
| The dryer cannot be opened or the programme cannot be started. The dryer does not get activated when adjusted. | The dryer might not be plugged in. Make sure that the plug is fitted in the socket. | |
| The loading door might be open. Make sure that the loading door is properly closed. | ||
| You might not have set a programme or pressed the Start/Pause key. | Make sure that the programme has been set and the dryer is not in the Standby (Pause) mode. | |
| Child lock might be active. Deactivate the child lock. | ||
| The programme has been interrupted for no reason. | The loading door might not be closed properly. | Make sure that the loading door is properly closed. |
| There might have been a power failure. | Press the Start/Pause key to start the programme. | |
| The water tank might be full. Empty the water tank. | ||
| Clothes have shrunk, felted or deteriorated. | The programme used might not be suitable for the type of laundry. | Check the care labels on the laundry items, select a suitable programme for the type of laundry. |
| Water leaking from the loading door. | There might be lint accumulated on the inner surfaces of the loading door and on the surfaces of the gasket of the loading door. | Clean the inner surfaces of the loading door and the surfaces of the gasket of the loading door. |
| The loading door opens on its own. | The loading door might not be closed properly. | Push the loading door until you hear the closing sound. |
| The water tank warning symbol is on/flashing. | The water tank might be full. Empty the water tank. | |
| The water discharge hose might be bent. | If the dryer is connected directly to the water outlet, check the water discharge hose. | |
| The filter cleaning warning symbol is on. | The lint filter might be unclean. Clean the filter. | |
| The filter seat might be clogged by lint. | Clean the filter seat. | |
| There might be a layer that causes obstruction on the surface of the lint filter. | Wash the filter with lukewarm water. | |
| The heat exchanger cleaning warning symbol is on. | The heat exchanger might be unclean. | Clean the heat exchanger. |
9. AUTOMATIC FAULT WARNINGS AND WHAT TO DO
Your dryer is equipped with a built-in fault detection system, indicated by a combination of flashing operation lights. The most common failure codes are shown below.
| ERROR CODE SOLUTION | |
| E00 Contact the nearest authorised service agent. | |
| E03 / [5x55] | Empty the water tank, if problem does not solved, contact the nearest authorised service agent. |
| E04 Contact the nearest authorised service agent. | |
| E05 Contact the nearest authorised service agent. | |
| E06 Contact the nearest authorised service agent. | |
| E07 Contact the nearest authorised service agent. | |
| E08 | There may be voltage fluctuation in mains.Wait until voltage is appropriate for working range. |
10. ENVIRONMENTAL PROTECTION AND PACKAGING INFORMATION
10.1. Packaging Information
The packaging of this dryer is made of recyclable materials. Do not dispose of the packaging, waste together with household or other waste. Instead, take it to a packaging collection point defined by your local authority.
10.2. Energy Efficiency
- You should operate the dryer to full capacity, but make sure that it is not overloaded.
- When the laundry is being washed, the spin speed should be at the highest level possible. This will shorten the drying time and reduce energy consumption.
• Make sure that the same kinds of laundry are dried together. - Please follow the recommendations in the user manual for programme selection.
- For air circulation, leave an appropriate clearance on the front and back sides of the dryer. Do not cover the grills on the front side of the dryer.
- Unless necessary, do not open the door of the dryer when drying. If you have to open it, do not keep it open for a long time.
- Do not add new (wet) laundry during the drying process.
- Hairs and lint that detach from the laundry and merge in the air are collected by the "Lint Filters". Please make sure that the filters are cleaned before and after each use.
- For models with a heat pump, make sure that the heat exchanger is cleaned at least once a month or after each 30 uses.
- During the drying process, the environment where the dryer is installed must be well ventilated.
Worldwide Appliances Pty Limited
A.B.N. 45868077422
Distributed by Eurolinx pty Ltd
Office:
48-50 Moore Street, Leichhardt N.S.W 2040 Post:
Locked Bag 3000, Annandale, N.S.W 2038
P: 1300 694 583
WARRANTY REGISTRATION
Your ongoing satisfaction with your artusi product is important to us. We ask that you complete the enclosed Warranty Registration Card and return it to us so that we have a record of the artusi product purchased by you.
PRIVACY
Worldwide Appliances respects your privacy and is committed to handling your personal information in accordance with the National Privacy Principles and the Privacy Act 1988 (Cth). A copy of the Worldwide Appliances Privacy Policy is available at www.artusi.com.au. Worldwide Appliances will not disclose any personal information set out in the Warranty Registration Card (“Personal Information”) without your consent unless required by:
-
law;
-
any Worldwide Appliances related company;
-
any service provider which provide services to artusi or assist artusi in providing services (including repair and warranty services) to customers. Our purpose in collecting the Personal Information is
to keep a record of the artusi product purchased by you, in order to provide a better warranty service to you in the unlikely event that there is a problem with your artusi product. Worldwide Appliances may contact you at any one or more of the address, email address or telephone numbers set out in the Warranty Registration Card. Please contact artusi on 1300 694 583 should you not wish to be contacted by Worldwide Appliances.
WARRANTY
1. Warranty
Worldwide Appliances warrants that each artusi product will remain, for a period of either 12 months or 24 months of warranty. All Warranties are valid from the original date of purchase, And warranty claims must be accompanied by the proof of purchase.
24 months warranty products:
All Built-in Appliances – Limited to Ovens, Gas, Induction and Electric Cooktops, and All Rangehoods. Freestanding Cookers - Gas and Electric Models (900mm Width).
Dishwashers - Freestanding, Fully Integrated, Semi Integrated and built-in. All Wine coolers. All Dryers. Freestanding Cookers - Gas and Electric Models in 50cm, 54cm and 60cm Widths
Portable Appliances* – Benchtop Models and Portable Gas Models
2. What is not Covered by the Warranty.
The Warranty does not apply if an artusi product is defective by a factor other than a defect arising in the manufacture of the artusi product, including but not limited to:
(a) damage through misuse (including failure to maintain, service or use with proper care), neglect, accident or ordinary wear and tear (including deterioration of parts and accessories and glass breakage);
(b) use for purpose for which the artusi product was not sold or designed;
(c) use or installation which is not in accordance with any specified instructions for use or installation;
(d) use or operation after a defect has occurred or been discovered;
(e) damage through freight, transportation or handling in transit (other than when Worldwide Appliances is responsible);
(f) damage through exposure to chemicals, dusts, residues, excessive voltage, heat, atmospheric conditions or other forces or environmental factors outside the control or Worldwide Appliances;
(g) repair, modification or tampering by the purchaser or any person other than Worldwide Appliances, an employee of Worldwide Appliances or an authorised artusi service contractor ^* ;
(h) use of parts, components or accessories which have not been supplied or specifically approved by artusi.
(i) damage to surface coatings caused by cleaning or maintenance using products not recommended in the artusi product handbook provided to the purchaser upon purchase of the artusi product;
(j) damage to the base of an electric oven due to items having been placed on the base of the oven cavity or covering the base, such as aluminium foil (this impedes the transfer of heat from the element to the oven cavity and can result in irreparable damage); or
(k) damages, dents or other cosmetic imperfections not affecting the performance of the artusi in respect of an artusi product purchased as a “factory second” or from display
The Warranty does not extend to light globes used in artusi products.
3. Domestic Use
Each artusi product is made for domestic use. This Warranty may not extend to artusi products used for commercial purposes.
4. Time for Claim under the Warranty
You must make any claim under this Warranty within twenty eight (28) days after the occurrence of an event which gives rise to a claim pursuant to the Warranty, by booking a service call on the telephone number below.
5. Proof of Purchase
Customers must retain proof of purchase in order to be eligible to make a warranty claim in respect of an artusi product.
6. Claiming under the Warranty
Customers will bear the cost of claiming under this Warranty unless Worldwide Appliances determines the expenses are reasonable, in which case the customer must claim those expenses by providing written evidence of each expense to Worldwide Appliances at the address on the Warranty Registration Card.
7. Statutory Rights
(a) These terms and conditions do not affect your statutory rights.
(b) The limitations on the Warranty set out in this document do not exclude or limit the application of the consumer guarantees set out in the Act or any other equivalent or corresponding legislation in the relevant jurisdiction where to do so would:
(i) contravene the law of the relevant jurisdiction; or
(ii) cause any part of the Warranty to be void.
(c) Worldwide Appliances excludes indirect or consequential loss of any kind (including, without limitation, loss of use of the artusi product) and (other than expressly provided for in these terms and conditions) subject to all terms, conditions and warranties implied by custom, the general law, the Act or other statute.
(d) The liability of Worldwide Appliances to you
for a breach of any express or non-excludable implied term, condition or warranty is limited at the option of Worldwide Appliances to:
(i) replacing or repairing the defective part of the artusi product;
(ii) paying the cost of replacing or repairing the defective part of the artusi product;
(iii) replacing the artusi product; or
(iv) paying the cost of replacing the artusi product.
(e) Our goods come with guarantees that cannot be excluded under the Australian Consumer Law. You are entitled to a replacement or refund for a major failure and for compensation for any other reasonably foreseeable loss or damage.
You are also entitled to have the goods repaired or replaced if the goods fail to be of acceptable quality and the failure does not amount to a major failure.
8. Defects
Any part of an artusi product deemed to be defective and replaced by Worldwide Appliances is the property of Worldwide Appliances.
Worldwide Appliances reserves the right to inspect and test artusi products in order to determine the extent of any defect and the validity of a claim under the Warranty.
All warranty service calls must be booked via the customer care department. The team can be contacted on 1 300 85 64 11 option 1 or customercare@eurolinx.com.au
01082016
DON'T FORGET TO REGISTER YOUR WARRANTY ONLINE NOW AT www.eurolinx.support

TO REGISTER YOUR WARRANTY

52396782-230525-01

ARTUSI
THE ART OF COOKING
DISCLAIMER
Worldwide Appliancees PTY LTD, trading as ARTUSI, is continually seeking ways to improve the design specifications, aesthetics and production techniques of its products. As a result alterations to our products and designs take place continually. Whilst every effort is made to produce information and literature that is up to date, this brochure should not be regarded as an infallible guide to the current specifications, nor does it constitute an offer for the sale of any particular product. Product dimensions indicated in our literature is indicative only. Actual product only should be used to define dimension cutouts. Distributors, and retailers are not agents of ARTUSI and are not authorised to bind ARTUSI by any express or implied undertaking or representation.
ARTUSIOFFICES ARE OPEN DAILY FROM 9AM-5PM AND SATURDAYS 10AM-4PM
NSW & ACT (HEAD OFFICE)
48-50 MOORE STREET
LEICHHARDT
FO285694699
VIC. TAS & SA
1211 TOORAK ROAD
CAMBERWELL
FO398092155
QLD
1/42 CAVENDISH ROAD
COOPAROO
F0733970850
WA&NT
UNIT 10/55 HOWE STREET
OSBORNE PARK
F0892019188
NZ
PO BOX 11.160
SOCKBURN CHRISTCHURCH
FO33445906
- APPLIANCES
- FOR LIVING
- Thank you for choosing this dryer.
- CONTENTS
- SAFETY INSTRUCTIONS .... 5
- INSTALLATION 11
- OVERVIEW 12
- PREPARING THE LAUNDRY 13
- USING THE DRYER 15
- CLEANING AND CARE 21
- TECHNICAL SPECIFICATIONS ...... 24
- TROUBLESHOOTING 25
- AUTOMATIC FAULT WARNINGS AND WHAT TO DO 27
- ENVIRONMENTAL PROTECTION AND PACKAGING INFORMATION ..... 28
- PRIMARY CONSIDERATIONS
- Disposing the Old Dryer
- SAFETY INSTRUCTIONS
- Electrical Safety
- Children's Safety
- Dryer Safety
- Due to risk of fire, the following laundry items and dryer should NEVER be dried in the dryer:
- FIRE:R290
- Risk of fire and damage!
- Correct Use
- Installing On Top Of a Washing Machine
- CE Declaration of conformity
- INSTALLATION
- Connection to Water Outlet (with optional drain hose)
- Connecting the Water Discharge Hose
- Adjusting the Feet
- Electrical Connection
- Under Counter Installation
- OVERVIEW
- PREPARING THE LAUNDRY
- Sorting the Laundry to be Dried
- Preparing the Laundry to be Dried
- Risk of explosion and fire!
- Load Capacity
- USING THE DRYER
- Control Panel
- Programme Selection Knob
- Electronic Indicator and Additional Functions
- Display symbols:
- Programme Selection and Consumption Table
- Auxiliary Functions
- Starting the Programme
- Programme Progress
- During the Programme
- Programme End
- Drum Light Information
- CLEANING AND CARE
- Cleaning the Lint Filters
- Emptying the Water Tank
- Cleaning the Heat Exchanger
- Cleaning the Humidity Sensor
- Cleaning the Inner Surface of the Loading Door
- TECHNICAL SPECIFICATIONS
- ATTENTION:
- TROUBLESHOOTING
- AUTOMATIC FAULT WARNINGS AND WHAT TO DO
- ENVIRONMENTAL PROTECTION AND PACKAGING INFORMATION
- Packaging Information
- Energy Efficiency
- WARRANTY REGISTRATION
- PRIVACY
- WARRANTY
- Warranty
- months warranty products:
- What is not Covered by the Warranty.
- Domestic Use
- Time for Claim under the Warranty
- Proof of Purchase
- Claiming under the Warranty
- Statutory Rights
- Defects
- DON'T FORGET TO REGISTER YOUR WARRANTY ONLINE NOW AT www.eurolinx.support
- ARTUSI
- THE ART OF COOKING
- DISCLAIMER
Brand : Artusi
Model : AHP8000W
Category : Tumble dryer