
SR-D1 - Radio SONY - Free user manual and instructions
Find the device manual for free SR-D1 SONY in PDF.


| Product Type | Memory Drive Unit (SRMemory card drive) |
| Model | SR-D1 |
| Brand | Sony |
| Dimensions (W x H x D) | 154 x 49 x 227 mm (6.1 x 1.9 x 8.9 in) |
| Weight | 1.5 kg (3 lb 4.9 oz) |
| Power Supply | 12V DC via AC adapter (included) |
| Power Consumption | 30 W (maximum) |
| Interfaces | USB 3.0 (USB 2.0 compatible) and eSATA |
| Supported Media | SRMemory cards |
| Data Transfer Protocols | FGBRAW and SSITP (high-speed) |
| Operating Temperature | 5°C to 40°C (41°F to 104°F) |
| Storage Temperature | -20°C to +60°C (-4°F to +140°F) |
| Indicator Lights | POWER (green/red blinking), STATUS (green/orange/red/purple), USB (blue/green/red), eSATA (green/red), SRMemory (blue/green/red) |
| Safety Features | Overcurrent protection; warning labels for fire/shock; compliant with FCC Class A, Canadian ICES-003 |
| Cleaning Instructions | Use soft dry cloth; avoid benzine, alcohol, or thinners |
| Repair Policy | Refer servicing to qualified personnel only; no user-serviceable parts |
| Supplied Accessories | AC adapter (1), USB cable (1), rubber feet (4), operation manual (JP/EN/CN) |
| Required Software | SRMemory Driver, SRMemory Drive Utility, SR Viewer, F6SRAW Viewer (download from Sony Professional Products site) |
| Compatible Operating Systems | Windows and Macintosh (specific versions not listed) |
| Class (EMC) | Class A digital device; not for residential use in Europe |
| Warranty Disclaimer | Sony not liable for loss of profits or damages; always verify operation before use |
Frequently Asked Questions - SR-D1 SONY
User questions about SR-D1 SONY
0 question about this device. Answer the ones you know or ask your own.
Ask a new question about this device
Download the instructions for your Radio in PDF format for free! Find your manual SR-D1 - SONY and take your electronic device back in hand. On this page are published all the documents necessary for the use of your device. SR-D1 by SONY.
USER MANUAL SR-D1 SONY
Before operating the unit, please read this manual thoroughly and retain it for future reference.
MEMORY DRIVE UNIT
Operation Manual
SR-D1
© 2012 Sony Corporation Printed in Japan

WARNING
To reduce the risk of fire or electric shock, do not expose this apparatus to rain or moisture.
To avoid electrical shock, do not open the cabinet. Refer servicing to qualified personnel only.
WARNING
When installing the unit, incorporate a readily accessible disconnect device in the fixed wiring, or connect the power plug to an easily accessible socket-outlet near the unit. If a fault should occur during operation of the unit, operate the disconnect device to switch the power supply off, or disconnect the power plug.
WARNING: THIS WARNING IS APPLICABLE FOR USA ONLY. If used in USA, use the UL LISTED power cord specified below. DO NOT USE ANY OTHER POWER CORD.
Plug Cap Parallel blade
(NEMA 1-15P Configuration)
Cord Type NISPT-2 or SPT-2, two 16 or 18 AWG wires Length Minimum 1.5 m (4 ft 11 in), Less than 2.5 m (8 ft 3 in) Rating Minimum 7A, 125V
Using this unit at a voltage other than 120V may require the use of a different line cord or attachment plug, or both. To reduce the risk of fire or electric shock, refer servicing to qualified service personnel.
WARNING: THIS WARNING IS APPLICABLE FOR OTHER COUNTRIES. 1. Use the approved Power Cord (2-core mains lead) / Appliance Connector / Plug that conforms to the safety regulations of each country if applicable. 2. Use the Power Cord (2-core mains lead) / Appliance Connector / Plug conforming to the proper ratings (Voltage, Ampere).
If you have questions on the use of the above Power Cord / Appliance Connector / Plug, please consult a qualified service personnel.
IMPORTANT
The nameplate is located on the bottom.
For the customers in the U.S.A.
This equipment has been tested and found to comply with the limits for a Class A digital device, pursuant to Part 15 of the FCC Rules. These limits are designed to provide reasonable protection against harmful interference when the equipment is operated in a commercial environment. This equipment generates, uses, and can radiate radio frequency energy and, if not installed and used in accordance with the instruction manual, may cause harmful interference to radio communications. Operation of this equipment in a residential area is likely to cause harmful interference in which case the user will be required to correct the interference at his own expense.
You are cautioned that any changes or modifications not expressly approved in this manual could void your authority to operate this equipment.
All interface cables used to connect peripherals must be shielded in order to comply with the limits for a digital device pursuant to Subpart B of Part 15 of FCC Rules.
This device complies with Part 15 of the FCC Rules. Operation is subject to the following two conditions: (1) this device may not cause harmful interference, and (2) this device must accept any interference received, including interference that may cause undesired operation.
For the customers in Canada
This Class A digital apparatus complies with Canadian ICES-003.
For the customers in Europe, Australia and New Zealand
WARNING
This is a Class A product. In a domestic environment, this product may cause radio interference in which case the user may be required to take adequate measures.
For the customers in Europe
The manufacturer of this product is Sony Corporation, 1-7-1 Konan, Minato-ku, Tokyo, 108-0075 Japan.
The Authorized Representative for EMC and product safety is Sony Deutschland GmbH, Hedelfinger Strasse 61, 70327 Stuttgart, Germany. For any service or guarantee matters please refer to the addresses given in separate service or guarantee documents.
This apparatus shall not be used in the residential area.
AVERTISSEMENT
• As the unit may fall over when placed on its side, place the unit flat on a stable surface.
- The SRMemory indicators light green when an SRMemory card is being accessed. Never perform the following when the SRMemory indicators are lit green. Doing so may damage data stored on the computer or on the SRMemory card.
Disconnect the USB cable, eSATA cable, or AC adapter cable. – Turn off the power to the computer. –
- When disconnecting the USB cable or eSATA cable, hold the connector
- If the unit becomes dirty, clean it using a soft cloth. Never use benzine, alcohol or thinner because these solvents will deform the unit and cause it to malfunction.
• For details on recommended I/F cards, contact your local Sony representative.
Notes on the AC adapter
- Connect the AC adapter to any handy wall outlet. If trouble occurs when using the unit, disconnect the plug from the wall outlet.
- Do not use the AC adapter in narrow spaces, such as between a wall and furniture.

A-1

A-2
Rear
B

C
natural_image
Isometric line drawing of a rectangular electronic component with four corner pins (no text or symbols)Overview
The SR-D1 Memory Drive Unit is a SRMemory card drive capable of high-speed transfer of F65RAW and SStP data. The unit can be connected to a computer via USB or eSATA interface.
Parts Identification

A-1 Front
① POWER indicator
Light or blinks based on the operating status of the unit.
Lit green: The unit is turned on.
Blinking red: The power supply voltage may be incorrect.
If the indicator blinks red, stop operation and contact your local Sony
representative.
② STATUS indicator
Displays the status of the unit.
Lit green: Operating normally
Lit orange: A warning has occurred.
Blinking red: An error has occurred
Blinking purple: Firmware update in progress. For details, refer to "Updating the
Firmware of the Drive in the SRMemory Drive Utility Help.
If a warning of error occurs, follow the instruction. SBMemory Drive Utility to resolve the problem
Shin memory Drive Quality to resolve the problem.
③ USB indicator
Displays the status of connection to the computer via USB.
Off: Not connected via USB.
Lit blue: Connected via USB 3.0.
Lit green: Connected via USB 2.0.
Blinking red: An error has occurred. Check that the cable is properly connected
and that the cable is not damaged.
4 eSATA indicator
Displays the status of connection to the computer via eSATA.
Off: Not connected via eSATA.
Lit green: Connected via eSATA
Blinking red: An error has occurred. Check that the cable is properly connected and that the cable is not damaged.
⑤ SRMemory slot
Insert the SRMemory card here.
6 Manual eject hole
For details, see "Ejecting an SRMemory Card without a Power Supply."
⑦ UNLOCK button
Unlocks the SRMemory slot when the SRMemory indicator is lit blue.
Press this button to unlock the slot before removing an SRMemory card.
8 SRMemory indicators
Display the status of the SRMemory card inserted in the slot.
Off: The SRMemory card is logically detached from the unit.
Lit blue: The SRMemory card is connected to the unit and available for use.
Lit green: Files on the SRMemory card are being accessed.
Blinking red: An error has occurred. The file system or data on the SRMemory
card may be damaged. Follow the instructions in the message
displayed by SRMemory Drive Utility, and eject or salvage the card or resolve the problem as indicated.
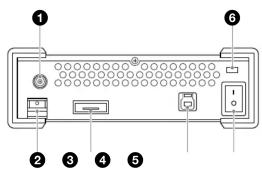
A-2 Rear
① DC IN connector
Connect the supplied AC adapter here, and plug the adapter into a wall outlet.
② DC cable clamp
Use this to secure the cable.
③ eSATA connector
Connect an eSATA cable here.
4 USB connector
Connect the USB cable here.
⑤ Power switch
Turns the unit on or off.
⑥ Anti-theft key hole
Connect a commercially available anti-theft key here.
Connecting the Unit to a Computer

- Connect the AC adapter A to the power cord B
2 Connect the unit to the computer.
When using the USB cable
2-1 Insert the supplied USB cable securely into the USB connector on the
unit
2-2 Connect the USB cable to the USB connector on the computer.
When using an eSATA cable
2-1 Insert the eSATA cable securely into the eSATA connector on the unit.
2-2 Connect the eSATA cable to the eSATA connector on the computer.
3 Confirm that the operating system on the computer has started up, and then turn on the unit.
CAUTION
When you connect the USB cable of the unit to peripheral device, use the
supplied cable to prevent malfunction due to radiation noise.
Note
Use either the USB cable or an eSATA cable to connect the unit to a computer.
Do not use both cables at the same time.

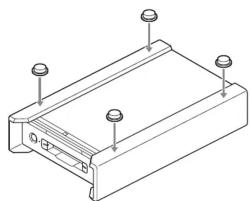
Attaching the Rubber Feet

Depending on the installation environment, the unit may slide when an
SRMemory card is being inserted, causing difficulty during insertion. In such
cases, attach the supplied rubber feet in the locations illustrated.
Inserting an SRMemory Card
Inserting
1 Fully insert the SRMemory card straight into the slot.
2 Check that the SRMemory indicators light blue.
Note
If there is a large number of files stored on the SRMemory card, it may take the computer a few minutes to recognize the card.
Ejecting
1 Press the UNLOCK button.
2 Check that the SRMemory indicators change from blinking blue to off.
3 Remove the SRMemory card.
Ejecting an SRMemory Card without a Power Supply
Note
If you press the UNLOCK button before turning the power off, the SRMemory card can be removed normally.
If you do not press the UNLOCK button before turning the power off, the
SRMemory card will remain locked and cannot be removed normally. In such
cases, turn the unit on and press the UNLOCK button to unlock the card. The
SKmemory ca
If an SRMemory card is locked and you cannot turn on the unit or the UNLOCK button does not function, remove the SRMemory card as follows.
1 Check that the SRMemory card is fully inserted.
2 Insert a long, thin object such as a straightened paper clip (1 mm or less in diameter) into the manual eject hole, and remove the SRMemory card while gently pressing the inserted object.
Specifications
Memory Drive Unit
Power Requirements 12 V DC
Power Consumption 30 W (maximum)
Operating Temperature 5 °C to 40 °C (41 °F to 104 °F)
Storage Temperature -20^ to +60^ (-4^ to +140^)
Mass 1.5 kg (3 lb 4.9 oz.)
Dimensions (W × H × D) = 134 × 49 × 227 mm (6% × 1-5% × 9 inches)
(excluding protrusion) Hi-Speed USB (USB2.0 compliant) / SuperSpeed USB
(USB3.0 compliant)
eSATA 1.0 / eSATA2.0
Supplied Accessories
AC adapter (1) (part number: 1-468-626-6X)
USB cable (1) (part number: 1-839-351-1X)
Rubber feet (4)
Operationman Japanese (1)
Japanese (1) English (1)
Chinese (1)
1) The values for dimensions are approximate.
Note
Always verify that the unit is operating properly before use. SONY WILL NOT BE LIABLE FOR DAMAGES OF ANY KIND INCLUDING, BUT NOT LIMITED TO, COMPENSATION OR REIMBURSEMENT ON ACCOUNT OF THE LOSS OF PRESENT OR PROSPECTIVE PROFITS DUE TO FAILURE OF THIS UNIT, EITHER DURING THE WARRANTY PERIOD OR AFTER EXPIRATION OF THE WARRANTY, OR FOR ANY OTHER REASON WHATSOEVER.
Notes on Software
The following applications are available for use with the SB-D1.
Download the following software from the Sony Professional Products site ^1 for use with this unit.
| Software | Supported OS | Description |
| SRMemory Driver Software | Windows/Macintosh | Software driver that allows the computer to recognize the SR-D1 |
| SRMemory Drive Utility | Windows/Macintosh | Utility software that allows you to manage the SR-D1 software version and other operations.NoteThe utility software is installed automatically when you install the SRMemory Driver Software. |
| SR Viewer Software | Windows/Macintosh | Application software that enables playback of MXF SSTP (Simple Studio Profile) files. |
| F65RAW Viewer Software | Windows/Macintosh | Application software that enables playback of F65RAW files. |
1) Sony Professional Products site
• USA
• Canada
- Latin America
• Europe, Middle East and Africa
• Japan
- Asia Pacific
• Korea
China
http://pro.sony.com
http://www.sonybiz.
http://sonypro-latin.com
http://www.pro.sony.eu
http://www.sonybsc.com
http://pro.sony-asia.com
http://bp.sony.co.kr
http://pro.sony.com.cn
System requirements
For details on the functions of the above recommended software and their
system requirements, refer to the following file and Help.
SRMemory Drive Software:
ReadmeFirst (available on the download page of the software)
SRMemory Drive Utility:
Help (refer to the "Features" section or "Recommended Operating
Environment ^4 within that section)
Other software:
Readme (available on the download page of each respective software)
- MEMORY DRIVE UNIT
- SR-D1
- WARNING
- To reduce the risk of fire or electric shock, do not expose this apparatus to rain or moisture.
- To avoid electrical shock, do not open the cabinet. Refer servicing to qualified personnel only.
- IMPORTANT
- For the customers in Canada
- For the customers in Europe, Australia and New Zealand
- For the customers in Europe
- AVERTISSEMENT
- Notes on the AC adapter
- Overview
- Parts Identification
- A-1 Front
- ① POWER indicator
- ② STATUS indicator
- ③ USB indicator
- eSATA indicator
- ⑤ SRMemory slot
- Manual eject hole
- ⑦ UNLOCK button
- SRMemory indicators
- A-2 Rear
- ① DC IN connector
- ② DC cable clamp
- ③ eSATA connector
- USB connector
- ⑤ Power switch
- ⑥ Anti-theft key hole
- Connecting the Unit to a Computer
- CAUTION
- Note
- Attaching the Rubber Feet
- Inserting an SRMemory Card
- Inserting
- Ejecting
- Ejecting an SRMemory Card without a Power Supply
- Specifications
- Notes on Software
- System requirements
Brand : SONY
Model : SR-D1
Category : Radio