165B03 - Wall light Varaluz - Free user manual and instructions
Find the device manual for free 165B03 Varaluz in PDF.


| Product Type | LED Pendant Light |
| Model Number | 165B03 |
| Brand | Varaluz |
| Dimensions (Overall) | 12 x 12 x 18 inches |
| Weight | 4.5 lbs |
| Power Source | Hardwired (120V AC) |
| Light Source | Integrated LED, 15W |
| Color Temperature | 3000K (Warm White) |
| Lumens | 900 lm |
| CRI | >90 |
| Dimmable | Yes, with compatible dimmer |
| Material | Steel and glass |
| Finish | Matte Black |
| Installation Type | Ceiling mounted (hardwired) |
| Certifications | UL listed |
| Warranty | 5 years limited |
| Cleaning Instructions | Wipe with a dry cloth, do not use abrasive cleaners |
| Safety Notes | Disconnect power before installation or maintenance |
| Spare Parts Availability | Contact Varaluz customer service |
Frequently Asked Questions - 165B03 Varaluz
User questions about 165B03 Varaluz
0 question about this device. Answer the ones you know or ask your own.
Ask a new question about this device
Download the instructions for your Wall light in PDF format for free! Find your manual 165B03 - Varaluz and take your electronic device back in hand. On this page are published all the documents necessary for the use of your device. 165B03 by Varaluz.
USER MANUAL 165B03 Varaluz
3-Light Wall Fixture
natural_image
Abstract arrangement of metallic circular elements with reflective surfaces, no text or symbols presentTo Begin/Para Comenzar

natural_image
Pure geometric diagram of interconnected circles and rectangles without any text, numbers, or symbolsIncluded Hardware
Partes incluidas

Mounting plate (1)
Placa de fijación (1)

Ground screw, green (1)
Tornillo a tierra, verde (1)

Wire nut (2)
Cono aislante para
empalmes (2)

Mounting screw (2)
Tornillo de montura (2)
Required
Necesario

Flathead screwdriver
Destornillador plano

Phillips screwdriver
Destornillador de estrella
Helpful
Útil

Wire strippers
Pelacables

Pliers
Alicate

Wire cutters Cortacables

Soft cloth
Tela de material suave

100-watt medium base B13 lightbulb (1)
Bombilla de base mediana tipo B13 de 100 vatios (1)

Electrical tape
Cinta aislante
▲ WARNING FOR YOUR PROTECTION AND SAFETY -
understand the information given in this manual before beginning the assembly and installation. Failure to do so could lead to electric shock, fire or other injuries which could be hazardous or even fatal.
- All electrical connections must be in agreement with local codes, ordinances or the national electric code (NEC). Contact your municipal building department to learn about your local codes, permits and/or inspections. WARNING: RISK OF FIRE - MOST DWELLINGS BUILT BEFORE 1985 HAVE SUPPLY WIRE RATED FOR 60°C. CONSULT A QUALIFIED ELECTRICIAN BEFORE INSTALLATION.
- TURN OFF ELECTRICITY at main fuse box (or circuit breaker box) before beginning installation by switching circuit breaker off or removing fuse.
- DO NOT connect this fixture to an electrical system that does not provide a means for equipment grounding. Never use a fixture in a two-wire system that is not grounded. WARNING: INSTALLING A FIXTURE INTO AN ELECTRICAL SYSTEM NOT HAVING A PROPER GROUNDING MEANS COULD ALLOW ALL METAL PARTS OF THE FIXTURE TO CARRY ELECTRICAL CURRENT IF ANY OF THE FIXTURE WIRES, WIRE CONNECTIONS OR SPLICES BECOME BROKEN, CUT OR LOOSE DURING THE MOUNTING OR NORMAL OPERATION OF THE FIXTURE, UNDER THIS CONDITION, ANYONE COMING IN CONTACT WITH THE FIXTURE IS SUBJECT TO ELECTRICAL SHOCK, WHICH COULD CAUSE SERIOUS INJURY OR DEATH.
- If you are not sure your lighting system has a grounding means, DO NOT attempt to install this fixture. Contact a qualified, licensed electrician for information with regards to proper grounding methods as required by the local electrical code in your area.
- DO NOT connect the bare or green insulation fixture ground wire to the black (HOT) current carrying wire or white neutral house wire. WARNING: CONNECTION OF THE BARE OR GREEN FIXTURE GROUND WIRE TO THE BLACK OR WHITE HOUSE WIRES MAY ALLOW ALL METAL PARTS OF THE FIXTURE TO CARRY ELECTRICAL CURRENT. UNDER THIS CONDITION ANYONE COMING IN CONTACT WITH THE FIXTURE WILL RECEIVE ELECTRICAL SHOCK, WHICH COULD CAUSE SERIOUS INJURY OR DEATH.
- DO NOT suspend any fixture by the house wires. A fixture must always be mounted directly to an outlet box or to a mounting strap which is first attached to the outlet box. WARNING: WIRE CONNECTORS WILL NOT SUPPORT THE WEIGHT OF A FIXTURE. SUSPENDING A FIXTURE BY THE HOUSE WIRES AND WIRE CONNECTORS WILL RESULT IN THE FIXTURE FALLING, WITH THE POSSIBILITY OF PERSONAL INJURY AND THE DANGER OF ELECTRICAL SHOCK OR FIRE.
- All fixtures must be mounted to an outlet box that is supported by the building structure. DO NOT attempt to support the fixture by ceiling board alone. Ceiling board alone does not have the strength to support the weight of the fixture. The fixture may fall and cause personal injury.
- BE CAREFUL not to damage or cut the wire insulation (covering) during fixture installation. DO NOT permit wires to contact any surface having a sharp edge. To do so may damage or cut the wire insulation which could cause serious injury or death from electric shock.
- DO NOT use lamps (bulbs) having a greater wattage than the maximum value stated on the fixture. The use of a higher wattage lamp(s) than specified will increase temperatures and cause the risk of fire.
- If a dimmer control switch is used with this fixture, obtain professional advice to determine the correct type and electrical rating required.
Read the safety instructions on page 2 of this manual before installing this fixture.
Advertencia:
Shut off main power at the circuit breaker or fuse panel before removing old fixture.
Remove old fixture. Disconnect wiring.
natural_image
Pure mechanical diagram showing interconnected circles and shafts without any text, numbers, or symbols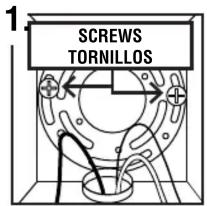
Detach mounting plate from fixture. Keep the ball nuts. Attach mounting plate to junction box using two mounting screws. Before tightening the screws, make sure that screws in mounting plate are lined up with the holes in back plate.
Strip 1/2" of insulation from wire ends. Twist stripped ends together with pliers black to black (power) and white to white (neutral). Snip ends. Attach copper wire to ground wire and attach to green ground screw.
Helpful hint:
If necessary attach copper ground wire to grounded junction box.
Consejo útil:
Attach wire nuts. Tape nuts and wire together.
Carefully tuck all the wires into the junction box and pass screws (from junction box) through back plate and secure fixture with the two ball nuts removed in step 1.
Install light bulbs. Use only medium base B13 bulbs of 100 watts or less.
Minor problems can often be fixed without an electrician. Before attempting any repair on this light fixture, turn off electricity at main fuse box (or circuit breaker box).
Problem Cause Solution Problema Causa Solución
| Bulbs won't light Bulb is burnt out. Replace light bulb. | |
| Power is off. Check if power supply is on. | |
| Bad wire connection. Check wiring. | |
| Bad switch. Test or replace switch. | |
| Fuse blows or circuit breaker trips when light is turned on. | Wires are crossed or power wire is contacting ground wire. Check wire connections. |
Cleaning and Bulb replacement
Shut off main power supply.
Clean fixture with a damp cloth. Do not use window cleaner to clean glass shades. Do not use abrasive cleaners.
Bulb replacement: Use medium base B13 bulbs labeled as 100 watts or less.
Brand : Varaluz
Model : 165B03
Category : Wall light