
PE520 - Fitness Equipment Hacienda - Free user manual and instructions
Find the device manual for free PE520 Hacienda in PDF.


| Product Type | Stationary Exercise Bike |
| Model | PE520 |
| Brand | Hacienda |
| Dimensions (L x W x H) | 100 cm x 50 cm x 120 cm |
| Weight | 35 kg |
| Max User Weight | 120 kg |
| Power Source | Self-powered (manual) |
| Resistance System | Magnetic |
| Resistance Levels | 8 |
| Display | LCD |
| Display Metrics | Time, Speed, Distance, Calories, Pulse |
| Heart Rate Monitor | Hand grip sensors |
| Pedals | Adjustable with toe cages |
| Seat Adjustment | Vertical and horizontal |
| Handlebar Adjustment | Vertical |
| Transport Wheels | Yes |
| Water Bottle Holder | Yes |
| Frame Material | Steel |
| Maintenance | Clean with damp cloth; lubricate chain monthly |
| Safety Features | Stabilizing feet, emergency brake |
| Spare Parts Availability | Contact Hacienda customer service |
Frequently Asked Questions - PE520 Hacienda
User questions about PE520 Hacienda
0 question about this device. Answer the ones you know or ask your own.
Ask a new question about this device
Download the instructions for your Fitness Equipment in PDF format for free! Find your manual PE520 - Hacienda and take your electronic device back in hand. On this page are published all the documents necessary for the use of your device. PE520 by Hacienda.
USER MANUAL PE520 Hacienda
PEDAL EXERCISER MINI TRAINER
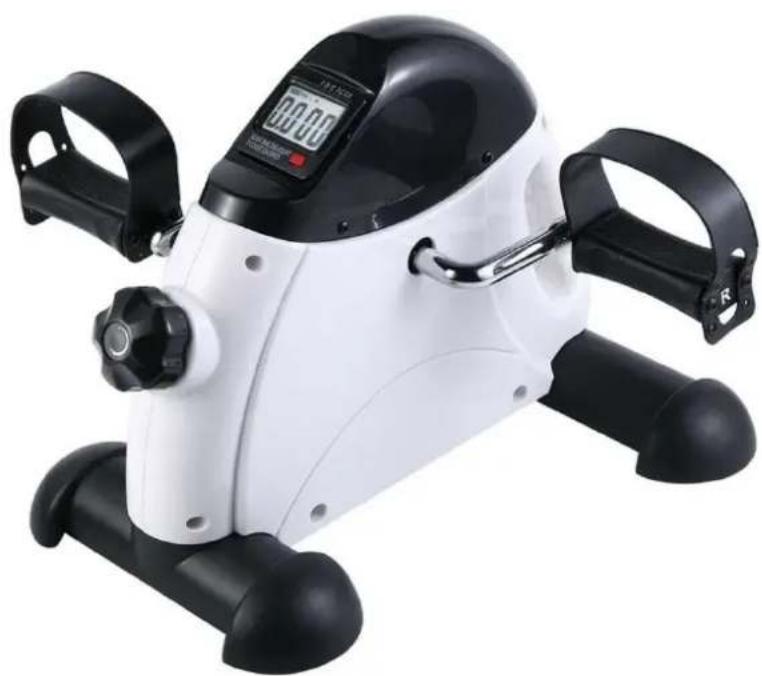
Model: PE520
Batch: PR4368
PLEASE READ AND RETAIN THESE INSTRUCTIONS FOR FUTURE REFERENCE.
THIS ITEM IS INTENDED FOR HOUSEHOLD USE ONLY.
ABOUT THE PRODUCT:
Sculpt, tone and strengthen your body core with our Hacienda gym set range.
Build up muscle and strength alongside with a special cardio boost with this Pedal Exerciser.
No time for the Gym? No problem. This exerciser is perfect for home and office use to put in front of the sofa or under the desk to work on legs. It can even be put onto a table to work on arms. Further than toning the arms and legs, pedalling can help improve blood circulation whilst sitting for long periods of time.
Install one AAA battery (not included) to take full advantage of the benefits of the LCD monitor which tracks progress on time, distance, count (cycling rotations), total count and calories.
This portable design includes a convenient transport handle on the backside of the exerciser. The adjustable tension knob allows for a wide range of exercise requirements. The non-slip pedal grips provide ease of use and safety.
With minimal assembly, you will happily be pedalling and exercising in no time with our at-home, in-office Pedal Exerciser.
SAFETY INSTRUCTIONS:
- Consult with a medical doctor to ensure that you are in proper physical condition before using the mini trainer.
- Use at your own risk.
- If you feel any pain or dizziness, stop immediately, rest and consult a medical doctor.
- Read all the instructions in this manual before construction and using the product. Follow all warnings and operating instructions prior to use. Keep this manual for the entire life of the product.
- It is important before using that Mini Trainer is properly assembled as instructed by the manual.
- Do not allow children on or around the machine. Keep children and pets away from the product all the times.
- Keep hands, feet and loose articles away from moving parts.
- The owner is responsible for ensuring that all users of this product are properly informed on how to use this product safely.
- Product is intended for domestic use only.
- Do not store this product in a damp place.
- Use this product indoors. Keep away from humidity and dust.
- When using product, place on a flat. Hard surface and in a space large enough to allow safe access and movement around the product.
- DO NOT wear loose or baggy since it may get caught in the machine. Take off all jewellery.
Important: The calculation of calories expended should be treated as just as estimation and should not be considered medically reliable. For more accurate calorie expenditure, it is recommended that you consult with your doctor or dietitian to better pinpoint your metabolic profile.
Consult with your physician before using product.
VERY IMPORTANT: To protect flooring, place a rug under Health and Mini Trainer. Wear athletic shoes to protect your feet while exercising.
BATTERY INSTALLATION/ REPLACEMENT:
- Remove the computer from the top of the main body.
- Insert or replace 1 x AAA battery (not included) in the compartment, matching the polarity indicators.
- Press the computer back onto the top of the main body.
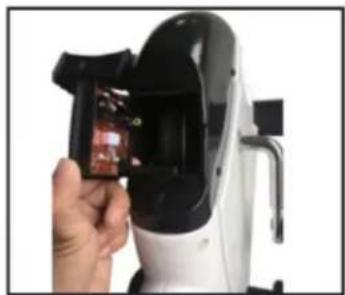

Note: when the computer is removed from the top of the main body, the wire connecting the computer to the main body may become disconnected.
Before pressing the computer back, ensure the wire is connected to the computer and the sensor bar.
CONSTRUCTION AND FEATURES:

-
Main body
-
Front stabiliser
-
Rear stabiliser
-
Left and right peddle
-
Knob screw and tools
-
Instruction manual
ASSEMBLY STEPS:
Ensure a rug is placed underneath the mini trainer to prevent damage to flooring.
- Flip the product over so that the knob faces yourself.
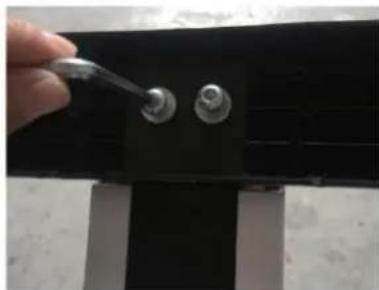
Take the smaller of the two stabilisers (3), slide then fasten onto the main body (1) using the hex key (5) and two of the washers provided.

-
Repeat with the larger front stabiliser (2).
-
The right pedal (4) is marked 'R' on the pedal axel.
Connect it to the right crank arm.
The right pedal is fastened by rotating clockwise.
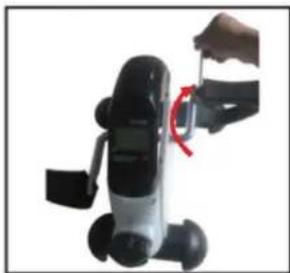
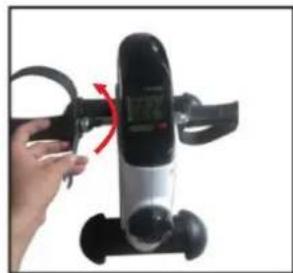
- The left pedal (4) is marked 'L' on the pedal axel.
Connect it to the left crank arm.
The left pedal is fastened by rotating counter-clockwise.
All nuts and bolts need to be secured tightly before using the mini trainer.
USING THE COMPUTER:
Parts identification:
T: Time
Displays how much time has elapsed since training session started.
D: Distance
Displays the distance covered in kilometres.
C: Count

Display shows TIME
Accumulates the number of movements made by cycling during training session.
T.C: Total count
Accumulates the number of movements made by cycling during multiple sessions.
This can be re-set by removing the battery.
CA: Calories
Estimates the total calories burnt since training session started.
SCAN: allows to scan through all the functions.
Press the red button to turn on the computer.
You can select the desired function by pressing the red button.
Data can be cleared by pressing and holding the red button down for 5 – 8 seconds.
Data will also be cleared if the battery is removed from the unit.
OPERATION:
There are two ways to use the mini trainer: for legs or arms.
The mini trainer will strengthen and tone your legs and arms as well as offer a great cardio work-out.
The mini trainer may also be used as part of a chair gym exercise routine.
For Leg work out:
Place the unit on a flat, hard surface and in a space large enough to allow safe access and movement around the product.
Sit down in a chair, so the mini trainer is in front of you.
The adjustment knob needs to face yourself.
Slide feet into the pedals.
Set the desired tension by using the adjustment knob. Then it clockwise to make it tight, turn it counter-clockwise to make it loose.
Press the red button on the computer to turn on the LCD control panel.
Cycle forward in a controlled motion.
This motion will engage your quadriceps (upper legs), hamstrings (lower legs), and lower abdominals.
For Arms:
Place the unit on your lap, on the floor or on a table in front of you.
The adjustment knob needs to face yourself.
Set the desired tension by using the adjustment knob. Then it clockwise to make it tight, turn it counter-clockwise to make it loose.
Press the red button on the computer to turn on the LCD control panel.
Place hands into the pedals.
Move arms forward in a controlled circular motion.
This motion will engage your triceps (lower arms) and forearms.
Once usage has been complete, the unit will turn off by itself after 15 minutes.
LENOXX
www.lenoxx.com.au

1300 666 848

LenoxxElectronics

LenoxxElectronics

@LenoxxAustralia

Dear Valued Customer,
Thank you for purchasing the PE520, Pedal Exerciser.
Your comments are important to us because they help us provide high quality, competitive and innovative products, just for you. If you are satisfied with your product, we kindly ask you to please take a moment to write a review on www.productreview.com.au and/or through the website where you have purchased your item.
If you have any questions concerning our products, please call our customer service department on 1300 666 848. Your feedback makes us better.
Thank you for choosing Hacienda by Lenoxx.
LENOXX
LENOXX ELECTRONICS AUSTRALIA PTY LTD
Importers & Wholesalers of Electronics & Toys
6 Oban Court Laverton North Vic 3026
ABN: 97 844 321 851
Customer Service: 1300-666-848
Email Address: Lenoxx@lenoxx.com.au
Web Site: www.lenoxx.com.au
WARRANTY CARD
WE WARRANT THIS PRODUCT TO BE FREE FROM DEFECTS IN MATERIAL AND WORKMANSHIP UNDER NORMAL USE FOR A PERIOD OF 12 MONTHS AFTER DELIVERY TO THE ULTIMATE USER AND WE WILL REPAIR AT NO CHARGE OR REPLACE IT AT OUR OPTION SHOULD IT BECOME DEFECTIVE UNDER THIS WARRANTY PROVIDING YOU SUBMIT PROOF OF PURCHASE (ORIGINAL SALES RECEIPT) WHEN MAKING A REQUEST UNDER THIS WARRANTY. THIS WARRANTY DOES NOT APPLY TO ANY PRODUCT, WHICH HAS BEEN SUBJECT TO MISUSE NEGLECT OR ACCIDENT. THE WARRANTY DOES NOT COVER: HANDLES, BATTERIES, ELECTRICAL CORDS, ANTENNAS, MICROPHONES, BROKEN CABINETS OR ANY OTHER ACCESSORIES USED IN CONNECTION WITH THE PRODUCT. UNDER NO CIRCUMSTANCES WILL LENOXX ELECTRONICS (AUSTRALIA) PTY LTD BE LIABLE FOR ANY INCIDENTAL OR CONSEQUENTIAL DAMAGE.
IMPORTANT MESSAGE: BEFORE SENDING YOUR UNIT TO LENOXX FOR REPAIR YOU MUST SUPPLY PROOF OF PURCHASE (Original Sales Receipt) TO VALIDATE YOUR WARRANTY.
THIS WARRANTY IS IN ADDITION TO OTHER RIGHTS AND REMEDIES OF THE CONSUMER UNDER A LAW IN RELATION TO THE GOODS OR SERVICES TO WHICH THE WARRANTY RELATES.
"Our goods come with guarantees that cannot be excluded under the Australian Consumer Law. You are entitled to a replacement or refund for a major failure and for compensation for any other reasonably foreseeable loss or damage. You are also entitled to have the goods repaired or replaced if the goods fail to be of acceptable quality and the failure does not amount to a major failure".
For warranty registration please visit our website www.lenoxx.com.au
Service Direct Line (Australia only): 1300 - 666 - 848
MODEL NO: PE520
BATCH NO: PR4368
Brand : Hacienda
Model : PE520
Category : Fitness Equipment