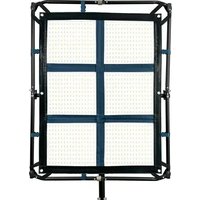
LiteCloth Mega-6FC - Lighting Intellytech - Free user manual and instructions
Find the device manual for free LiteCloth Mega-6FC Intellytech in PDF.


| Product Type | LED Video Light Panel |
| Brand | Intellytech |
| Model | LiteCloth Mega-6FC |
| Panel Dimensions | Approx. 6 x 4 ft (1.8 x 1.2 m) |
| Weight | 2.5 kg (5.5 lbs) |
| Power Supply | AC adapter 100-240V or V-lock battery (not included) |
| Power Consumption | 60W typical |
| Brightness Adjustment | 0-100% dimmable |
| Color Temperature | 3200K-5600K (bi-color) |
| CRI (Color Rendering Index) | >95 |
| Control Method | On-panel buttons and LCD; optional RF remote |
| DMX Support | Yes (built-in DMX receiver) |
| Mounting | Compatible with light stands, clamps, or direct frame mounting |
| Material | Flexible LiteCloth fabric |
| Included Accessories | Mounting bar, carry case, power cable |
| Ingress Protection | IP20 (indoor use only) |
| Cleaning Instructions | Wipe gently with a soft, dry cloth |
| Safety Notes | Use on stable surface; avoid water exposure |
| Spare Parts Availability | Contact Intellytech customer service |
Frequently Asked Questions - LiteCloth Mega-6FC Intellytech
User questions about LiteCloth Mega-6FC Intellytech
0 question about this device. Answer the ones you know or ask your own.
Ask a new question about this device
Download the instructions for your Lighting in PDF format for free! Find your manual LiteCloth Mega-6FC - Intellytech and take your electronic device back in hand. On this page are published all the documents necessary for the use of your device. LiteCloth Mega-6FC by Intellytech.
USER MANUAL LiteCloth Mega-6FC Intellytech
Storing your Mega-LC in a cold or location?
For optimal power distribution, allow your Mega-LC 3.0 to warm up for 5 minutes using the following settings:
1: Set the bi-color LED's to 5600k
2: Set the output to 10%
*This isn't required but will help in evenly distributing power through the LED's. We recommend this if the light is being stored in a cold grip truck or if it has recently shipped.
E) Attention

- Please read this manual before using this product and follow the instructions
- Should be used with the appropriate voltage labeled on product. Make sure the power button is set to off before pressing the power button. Please remove the power connection if the light is not in-use. Don't pull the power cable directly. Please grip the power plug and pull it out from the socket.
- Make sure your hand is dry when inserting and unplugging the power plug. Don't touch the metal part directly.
- Keep the environment dry and ventilated when using the product. Do not leave or use the product in a humid or dusty environment. And keep it away from fire or extreme heat.
- Clean this product only with a soft and dry cloth.
- Do NOT apply extreme pressure and do not drop the product.
- Improper installation may damage the light, and there can be high voltage inside the unit. Please Do NOT open or repair the unit yourself. If there is any defect, please contact Intellytech directly.
- Only use the specific Li-ion camcorder batteries according to the model of the battery holder on the rear panel. Do not install 24V batteries.
- Please do not look at the LEDs directly or touch them. Please turn off the light if it is unattended.
- Please make sure the product cools down and put it back in the case after being used. Don't store the product in a humid environment, and avoid direct sunshine. Avoid freezing temperatures.
Need Help? Contact us now using Live Chat at www.intellytechusa.com. We usually respond within 10 seconds during business hours and can help with any questions.
Email: customerservice@intellytechusa.com

INTELLYTECH
LiteCloth 3.0
natural_image
Structural frame with black structural elements and grid pattern (no text or symbols)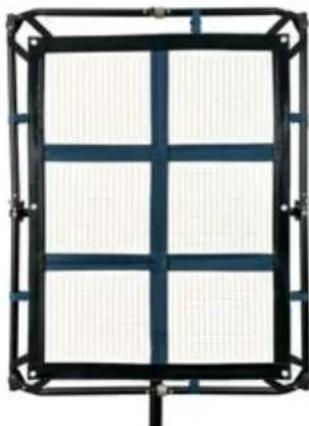
natural_image
Pure electrical circuit lines without any symbolsMEGA-8FC / 6FC
Instruction Manual
RoHS


Connecting Mega LED Mat to Frame
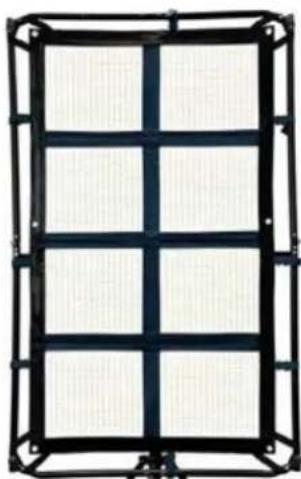
1: Unfold Folding Frame, and tighten silver collar(s) to lock in place. (Make sure bar it is totally straight before tightening silver collar).
natural_image
Close-up of a hand holding a metallic tool or tool, no visible text or symbols2: Attach LED Mat to Frame by adding buckles and straps.


3: Add CL-40L anywhere on center bar of the Folding Frame.
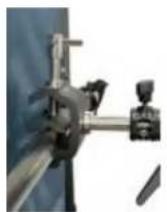

natural_image
Exterior view of a blue rectangular panel with metal frame and vertical support structure (no text or symbols)Connecting 5" Softbox to LED Mat
1: Unfold Softbox, and lineup Velcro between the LED Mat and Softbox.
** User Tip: Lean light and frame vertically against a wall and then add softbox.


**Softbox Straps: These are optional and not required. Attach these to reduce sag on your softbox.
**Optional lightweight modifiers shown below (Using these will reduce the weight by 2-3 pounds compared to using the included 5" deep softbox)

natural_image
Exterior view of a modern building with a black and white facade (no signage or text visible)Pancake Lantern W/ Skirt
Pop-Up Diffuser
DMX Instructions:
- Press the "MENU" key to enter the menu interface, rotate the "COLOR/SET" key to select DMX setup (DMX SET), and press the "SELECT" key to enter the DMX setup mode interface.
**Wireless DMX settings only apply to CRMX Models. If your unit wasn't ordered with CRMX, please ignore the Wireless DMX settings and only used Wired DMX.
- Wired DMX mode (Wired): Press the "SELECT" key to select DMX mode (DMX MODE), and rotate the "COLOR/SET" key. When "Wired" is displayed below DMX MODE, the wired DMX mode is enabled.
When using wired DMX (Wired), the DMX512 console must be set to the same channel as the control box. RGBWW DMX (Wired & WI DMX) utility table:
DMX Chart / Utility Table:
| CH1 (MODE) CH2 (D1) | CH3 {D2} CH4 | (D3) | Notes | |
| MODE: 205 to 255 | DIM | CCT GM | CCT_MODE | |
| MODE: 154 to 204 | RED | GREEN BLUE | RGB_MODE | |
| MODE: 103 to 153 | HUE | SAT INT | HSI_MODE | |
| MODE: 51 to 102 | GEL_DIM | GEL_L GEL_R | GEL_MODE | |
| MODE: 1 to 50 | FX_DIM | FX_DATA FX_SPEED | FX_MODE | |
| MODE:0(Not allowed) | NOT NOT | NOT | ||
| 0 | 0 | 0 | 0 | BLACKOUT |
CH1: 1--255 CH2: 0--255 CH3: 0--255 CH4: 0--255

GEL SET

② L GEL
② R GEL
③ Dimming
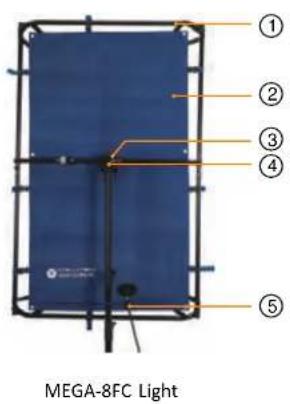
| 1. Folding frame | 8. Function switch/adjustment knob | 15. Battery holder |
| 2. Lighting panel | 9. LCD Display | 16. Power switch |
| 3. CL-40L C-clip | 10. Menu button | 17. DC 48V input |
| 4. CLD-16 | 11. Select button | 18. Power socket |
| 5. Signal Cabel | 12. Fan on/off button | 19. DC output |
| 6. Dimming knob | 13. Blackout button | 20. DMX input |
| 7. Handle | 14. Firmware | 21. DMX output |
Operating Instructions
一、LED lighting operation

Menu interface
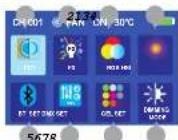
① CCT
② FX
③ RGB
④ HSI
⑤ BT_SET
⑥ DMX SET
⑦ GEL SET
⑧ DIMMING MODE
- Before plugging in the power cord, please make sure that the power switch is in the off position (press the power switch to turn on the power, press it again to reset and turn off the power).
- After connecting the power supply, press the power switch and the menu interface will be displayed on the screen.

CCT

① Color Temperature Display & Value
② Output Display & Value
③ Green / Magenta Display & Value
- Press the "MENU" button to enter the menu interface, then rotate the "COLOR/SET" button to select the color temperature mode (CCT), and press the "SELECT" button to enter the color temperature mode interface.
- Adjust the color temperature: Press the "SELECT" button to select the color temperature display, then rotate the "COLOR/SET" button to change the parameters. The color temperature adjustment range is 3000K-9999K.
- Adjust the brightness: Rotate the "DIMMING" button to change the parameters. The brightness adjustment range is 0%-100%.
- Adjust the G/M color correction: Press the "SELECT" button to select the G/M color correction, then rotate the "COLOR/SET" button to change the parameters. The G/M value adjustment range is 1.00M-0.100G.

FX
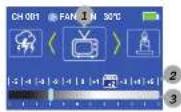
① Special Effect Icons
② Speed
③ Value Dimming
- Press the "MENU" button to enter the menu interface, then rotate the "COLOR/SET" button to select the scene mode (FX), and press the "SELECT" button to enter the scene mode interface.
- Switch scene mode: Press the "SELECT" button to select the scene mode & icon, then rotate the "COLOR/SET" button to switch the scene mode (there are a total of twenty scene modes, as shown in the figure below).
- Adjust the speed: Press the "SELECT" button to select the speed & value, then rotate the "COLOR/SET" button to change the frequency of the light effect. The speed adjustment range is -5-0-+5.
- Adjust the brightness: Rotate the "DIMMING" button to change the brightness of the light effect. The brightness adjustment range is 0%-100%.


Lightning1
Lightning2

Screen

Candle

Flash light

Strobe

High and low beam bulb

Alarm Heartbeat


Ambulance

HSI demo (slow)

HSI demo (fast)

Red flash

Green flash

Blue flash

PARTY 1

PARTY 2

RGB Strobe

RGB
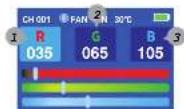
① Red
② Green
③ Blue
- Press the "MENU" button to enter the menu interface, rotate the "COLOR/SET" button to select the RGB mode (RGB), and press the "SELECT" button to enter the RGB mode interface.
- Adjust RGB: Press the "SELECT" button to select the color (R, G, B) that needs to be adjusted, and rotate the "COLOR/SET" button to change the parameter. The R, G, and B adjustment range is 0-255.

HSI

① Hue 360
② Saturation
③ Brightness display & luminance Value
- Press the "MENU" button to enter the menu interface, rotate the "COLOR/SET" button to select the HSI mode, and press the "SELECT" button to enter the HSI mode interface.
- Adjust the hue: Press the "SELECT" button to select "H (360 hue)", rotate the "COLOR/SET" button to change the parameter, and the hue value will jump to 000 if it exceeds 360. The hue adjustment range is 0-360.
- Adjust the saturation: Press the "SELECT" button to select "S (saturation)", rotate the "COLOR/SET" button to change the parameter, and the saturation adjustment range is 0-100.
- Adjust the brightness: Rotate the "DIMMING" button to change the parameter, and the brightness adjustment range is 0%-100%.

BT\_SET (Pairing Device to Bluetooth for LiteSync+ App
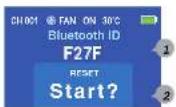
① Bluetooth ID number
② Bluetooth Reset ? / OK
- Press the "MENU" button to enter the menu interface, rotate the "COLOR/SET" button to select Bluetooth settings (BT_SET), and press the "SELECT" button to enter the Bluetooth settings interface.
- Bluetooth ID name: Each lamp has a unique Bluetooth ID name, for example, ID: F27F. When connecting to the LiteSync+ app, please select the Bluetooth ID name displayed on the screen.
- Bluetooth reset: Rotate the "COLOR/SET" button, and "OK" will be displayed below RESET, indicating that the Bluetooth connection between the lamp and the app has been successfully reset.
TIP: When pairing device, set Reset feature to "OK" WHILE your device is searching. Don't do this before or after.

DMX SET

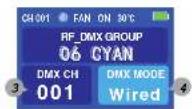
① Channel
② Wireless DMX Grouping
③ Wireless DMX
④ Wired_DMX
A) Temperature Notice:
Storing your Mega in a cold location?
For optimal power distribution, allow your Mega-LC to warm up for 5 minutes using the following settings:
1: Set the bi-color LED's to 5600k
2: Set the output to 10%
*This isn't required but will help in evenly distributing power through the LED's. We recommend this if the light is being stored in a cool or hot grip truck or if it has recently shipped.
B) Panel Diagram
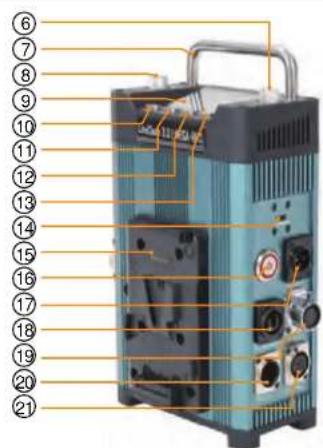
MEGA-8FC Control Box
- Press the "MENU" button to enter the menu interface, rotate the "COLOR/SET" knob to select the gel mode (GEL SET), and press the "SELECT" button to enter the gel mode interface.
- LEE gel: Press the "SELECT" button to select LEE gel, and rotate the "COLOR/SET" knob to choose the desired gel number. There are 20 types of LEE gels.
- ROSCO gel: Press the "SELECT" button to select ROSCO gel, and rotate the "COLOR/SET" knob to choose the desired gel number. There are 20 types of ROSCO gels.
- Adjust brightness: Rotate the "DIMMING" knob to adjust the brightness of the light effect. The brightness adjustment range is 0%-100%.

DIMMING MODE
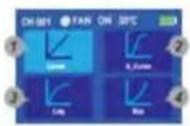
① Linear
② S Curves
③ Logarithmic
④ Exponential
- Press the "MENU" button to enter the menu interface, rotate the "COLOR/SET" knob to select the dimming mode (DIMMING MODE), and press the "SELECT" button to enter the dimming mode interface.
- Choose the corresponding dimming curve to match desired cue and / or dimming speed.

INTELLIGENT FAN / BLACKOUT
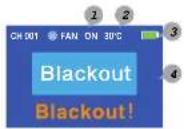
② Fan display
② Temperature display
③ Power display
4 Black out display
1. Intelligent Fan:
Press the "FAN" button to set the fan, which has two modes: ON - Automatic mode, OFF - Forced Off.
ON - Automatic mode: The fan will automatically turn off when the temperature is below 40°C, and fully turn on when the temperature is above 70°C. When the temperature is between 40°C and 70°C, the fan speed will adjust automatically according to the internal temperature.
OFF - Forced Off: The fan can remain off as long as the temperature doesn't meet or exceed 70°C. The fan will turn on when the temperature is above 70°C, and turn off when the temperature is ≤70°C.
2. Press the "BLACKOUT" button to enter the blackout mode interface. At this time, all functions of the fixture are suspended. Press the "BLACKOUT" button again to exit the blackout mode.
- E) Attention
- Instruction Manual
- Connecting Mega LED Mat to Frame
- Connecting 5" Softbox to LED Mat
- DMX Instructions:
- GEL SET
- Operating Instructions
- 一、LED lighting operation
- Menu interface
- CCT
- FX
- RGB
- HSI
- BT\_SET (Pairing Device to Bluetooth for LiteSync+ App
- DMX SET
- A) Temperature Notice:
- Storing your Mega in a cold location?
- DIMMING MODE
- INTELLIGENT FAN / BLACKOUT
- Intelligent Fan:
Brand : Intellytech
Model : LiteCloth Mega-6FC
Category : Lighting