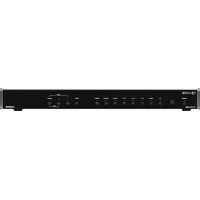
1T-VS-668 - Video switch TV One - Free user manual and instructions
Find the device manual for free 1T-VS-668 TV One in PDF.


| Product Type | Video Scaler/Converter |
| Model | 1T-VS-668 |
| Brand | TV One |
| Dimensions (W x D x H) | 220 mm x 160 mm x 45 mm |
| Weight | 1.2 kg |
| Power Supply | 12V DC, 2A |
| Power Consumption | 8 W |
| Input Video Formats | Composite, S-Video, Component, VGA, HDMI |
| Output Video Formats | HDMI, VGA, Composite |
| Maximum Resolution | 1920x1080 @ 60Hz |
| Supported Scaling Modes | Fill, Fit, Stretch, Aspect Ratio Preserve |
| On-Screen Display (OSD) | Yes, with menu navigation |
| Remote Control | Infrared remote included |
| Mounting | Desktop or rack-mountable (bracket optional) |
| Operating Temperature | 0°C to 40°C |
| Storage Temperature | -20°C to 60°C |
| Safety Certifications | CE, FCC, RoHS |
| Spare Parts Availability | Power adapter, remote control, cables (sold separately) |
| Repairability | User-serviceable: fuse replacement; advanced repairs by authorized service center |
| Maintenance | Keep vents clean, wipe with dry cloth, avoid moisture |
| Warranty | 1 year limited warranty |
Frequently Asked Questions - 1T-VS-668 TV One
User questions about 1T-VS-668 TV One
0 question about this device. Answer the ones you know or ask your own.
Ask a new question about this device
Download the instructions for your Video switch in PDF format for free! Find your manual 1T-VS-668 - TV One and take your electronic device back in hand. On this page are published all the documents necessary for the use of your device. 1T-VS-668 by TV One.
USER MANUAL 1T-VS-668 TV One
tvONE

Instruction Manual
1T-VS-668
Universal Presentation Switcher/Scaler
Table of Contents
1.0 Introduction 2
2.0 Specifications 3
3.0 Checking Package Contents 4
4.0 Connecting The Hardware 5
5.0 Operating The Unit 7
6.0 Troubleshooting 15
7.0 Limited Warranty 16
8.0 Regulatory Compliance 17
9.0 Contacts 17
1.0 INTRODUCTION
The 1T-VS-668 Video Scaler is a commercial switcher/scaler with versatile format conversion and multiple duplicated output capability. Fully scalable video inputs include HDMI, DVI (via DVI-to-HDMI adapter), Analog RGB via HD-15 connectors, Analog YPbPr or 480i/576i YUV Component via three RCA connectors, and Composite Video. It handles I/O Resolutions up to 1080p and WUXGA. Both digital and analog audio processing are supported and audio delays of up to 150ms can be introduced to ensure lip sync. Eight analog stereo and inputs can be selected for embedding into the HDMI outputs. Separate coaxial digital and stereo audio outputs are also provided.
Our professional video conversion products have been serving the industry for over twenty years. tvONE offers a full line of high quality Seamless Switchers, Video Scalers, Up/Down/Cross Converters, Analog-Digital Converters (SD/HD-SDI, HDMI, DVI), Format Converters, Standards Converters, TBC/Frame Synchronizers, Matrix Routing Switchers, Signal Distribution Amplifiers and Cat.5 Transmission Systems.
1.1 Liability Statement
Every effort has been made to ensure that this product is free of errors. tvONE cannot be held liable for the use of this hardware or any direct or indirect consequential damages arising from its use. It is the responsibility of the user of the hardware to check that it is suitable for his/her requirements and that it is installed correctly. All rights reserved. No parts of this manual may be reproduced or transmitted by any form or means electronic or mechanical, including photocopying, recording or by any information storage or retrieval system without the written consent of the publisher.
tvONE reserves the right to revise any of its hardware and software following its policy to modify and/or improve its products where necessary or desirable. This statement does not affect the legal rights of the user in any way.
All third party trademarks and copyrights are recognised. The tvONE logo and CORIO logo are the registered trademarks of tvONE. All other trademarks are the property of their respective holders.
1.2 Features
The 1T-VS-668 has many features that enable it to perform in a superior manner. Among those features you will find:
• HDMI Max Res: WUXGA and 1080p
• HDMI, RGB, YPbPr, YUV, CV In
- No output sync loss during switching
- Cross Conversion of Analog & Digital Audio
• Audio Delay for Lip Sync Correction
- HDCP Compliant
• 3D Motion Adaptive De-Interlacing
- Noise Reduction, 3D Comb Filter
• 3:2 Pull-Down, 2:2 Pull-Down Recovery
- Web GUI Control Interface
• Infrared Remote Control
- Locking DC Power Supply
- Rack Mount Kit
2.0 SPECIFICATIONS:
| Video Inputs | |
| HDMI (DVI Compatible)Analog RGBHVAnalog Component (YPbPr/YUV)Composite Video | 3x via HDMI Connector3x via HD-15 Connector1x via 3x RCA Connectors1x NTSC or PAL via RCA Connector |
| Audio Inputs | |
| Analog Audio (Stereo) | 2x via RCA (R/L), 6x via 3.5mm mini |
| Video Output | |
| HDMI Video (v1.2)Analog RGBHV/YPbPr | 2x via HDMI Connector1x via HD-15 Connector |
| Audio Outputs | |
| Embedded into HDMIAnalog StereoDigital Audio (S/PDIF)Audio Delay Adjustment | Digital per HDMI Spec1x via 3.5mm mini1x via RCA Coax ConnectorOff, 40ms, 110ms, 150ms |
| Control Methods | |
| Local Control | Front Panel via 13x Buttons |
| Remote Control | IR, RS-232 via DB-9 Connector and LAN |
| Scaling Engine | |
| De-InterlacePull-DownHDMI ComplianceMaximum I/O Resolution | 3D Motion Adaptive with Noise Reduction3:2 + 2:2 Recoveryv1.2 with HDCPWUXGA@60Hz and 1080p |
| Warranty | |
| Limited Warranty | 3 Years Parts and Labor |
| Mechanical | |
| Size (H-W-D)Weight (Net) | 47x432x183mm (1.85"x 17"x 7.2")2.14 kg (4.72 lbs) |
| Environmental | |
| Operating TemperatureOperating Humidity | 0° to +40°C (+32° to +104°F)20% to 90%, Non-condensing |
| Storage TemperatureStorage Humidity | -20° to +60°C (-4° to +140°F)10% to 85%, Non-condensing |
| Power Requirement | |
| External Power SupplyPower Consumption | 5VDC@3A11w |
| Regulatory Approvals | |
| Switcher/Scaler Unit | FCC, CE, RoHS |
| Power Supply | UL, CUL, CE, PSE, GS, RoHS |
| Accessories Included | |
| 1x AC Power Adapter | US, UK and Euro Type |
| 1x Rack Ear Set1x HD15 to YUV adapter cable1x IR Remote Control1x IR Extender1x Operations Manual | |
2.1 Supported Input and Output Formats and Resolutions
The 1T-VS-668 accepts HDMI (DVI compatible), HD15 (RGBHV), Analog Component, and Composite inputs via separate connectors and can output all resolutions over the included HDMI (DVI compatible) and HD15 outputs. The resolutions and formats processed for these inputs and outputs are as follows:
| Resolution | V. Rate/Hz | Scan | Format | Valid Connector | |
| 480i | 720x480 | 60 (NTSC) | Interlaced | Composite, YUV | HD-15,HDMI,YUV,CV |
| 576i | 720x576 | 50 (PAL) | Interlaced | Composite, YUV | HD-15,HDMI,YUV,CV |
| 480p | 720x480 | 60 | Progressive | YPbPr/RGBHV | HD-15,HDMI,YUV |
| 576p | 720x576 | 50 | Progressive | YPbPr/RGBHV | HD-15,HDMI,YUV |
| 720p | 1280x720 | 50,60 | Progressive | YPbPr/RGBHV | HD-15,HDMI,YUV |
| 1080i | 1920x1080 | 50,60 | Interlaced | YPbPr/RGBHV | HD-15,HDMI,YUV |
| 1080p | 1920x1080 | 50,60 | Progressive | YPbPr/RGBHV | HD-15,HDMI,YUV |
| VGA | 640x480 | 60 | Progressive | RGBHV | HD-15,HDMI |
| SVGA | 800x600 | 60 | Progressive | RGBHV | HD-15,HDMI |
| XGA | 1024x768 | 60 | Progressive | RGBHV | HD-15,HDMI |
| WXGA | 1280x768 | 60 | Progressive | RGBHV | HD-15,HDMI |
| WXGA | 1280x800 | 60 | Progressive | RGBHV | HD-15,HDMI |
| SXGA | 1280x1024 | 60 | Progressive | RGBHV | HD-15,HDMI |
| 1360x768 | 60 | Progressive | RGBHV | HD-15,HDMI | |
| SXGA+ | 1400x1050 | 60 | Progressive | RGBHV | HD-15,HDMI |
| 1440x900 | 60 | Progressive | RGBHV | HD-15,HDMI | |
| UXGA | 1600x1200 | 60 | Progressive | RGBHV | HD-15,HDMI |
| WSXGA | 1680x1050 | 60 | Progressive | RGBHV | HD-15,HDMI |
| WUXGA | 1920x1200 | 60 | Progressive | RGBHV | HD-15,HDMI |
3.0 PACKAGE CONTENTS
Before attempting to use this unit, please check the packaging and make certain the following items are contained in the shipping carton:
• 1x 1T-VS-668 Scaler
• 1x Locking Power Supply
- 1x Rack Ear Set
• 1x HD15 to 3-RCA adapter cable
• 1x IR Remote Control
- 1x IR Extender
• 1x Operations Manual
NOTE: Please retain the original packing material should the need ever arise to return the unit. If you find any items are missing, contact your reseller or tvONE immediately. Have the Model Number, Serial Number and Invoice available for reference when you call.
4.0 CONNECTING THE HARDWARE
Referring to the drawings below, connect the proper cables and then connect the AC power adaptor.
Rear Panel Connectors: The rear panel has the connectors required to interface the 1T-VS-668 to the External Inputs, Outputs and Power Supply. The numbers above and below the drawing relate to the connector directly above or below the number. Refer to the corresponding number and functional description below.

1 IR IN: Connect the supplied IR extender to receive the IR signal from the included IR remote. Ensure that the remote is within the direct line-of-sight of the IR extender.
2 SERVICE: Reserved for manufacturer use only.
3 RS-232: Connect to a PC/Laptop or RS-232 control system to use RS-232 commands to control the device (See Section 6.5 for details on RS-232 commands).
4 OUTPUT
a) HDMI 1/2: Connect to an HDMI display or AV Receiver for video and/or audio output.
b) PC/HD: Connect to a monitor/display for video output. For HD (component) output, use the included D-Sub 15pin to 3 RCA adaptor cable for resolutions from 480i-1080p.
NOTE: All three outputs will display the same selected signal at the chosen resolution. When the selected HDMI input source signal has HDCP content the VGA/Component output will not display any image.
c) COAX: Connect to an amplifier or active speakers for audio output in digital format.
NOTE: When the input audio source signal is in bitstream format and the AUDIO SOURCE setting is set to AUTO in the OSD menu, the coaxial output will bypass the input audio signal including compatible surround sound formats.
d) AUDIO: Connect to an amplifier or active speakers for audio output in stereo format.
5 INPUT
a) HDMI 1/2/3: Connect to HDMI sources such as Blu-ray/DVD player for both video and audio signal conversion.
b) PC 1/2/3: Connect to a PC/Laptop source for video signal input with a D-Sub 15pin cable.
c) 3.5mm Mini-jacks: Connect to source's L/R output with 3.5mm mini-jack for audio signal conversion.
NOTE: For HDMI signals you can select in the OSD Menu whether you require audio from the HDMI (AUTO) or from the analog audio input (EXT).
d) YPbPr + L/R: Connect to source equipment such as a DVD player for both video and audio signal conversion.
e) CV + L/R: Connect to a composite video source such as a video/DVD player for both video and audio signal conversion.
6 CONTROL: This port is the link for Telnet or Web GUI controls, connect to an active Ethernet link with an RJ45 terminated cable
7 POWER: Switch this power toggle to turn on and activate the device or turn off to shut it down.
8 DC 5V: Connect the power adaptor included in the package.
Connect the furnished AC Adaptor to the 1T-VS-668. (Use only the furnished adaptor to avoid the possibility of equipment damage due to over-voltage or under-current from generic AC Adapters). Next, connect the appropriate cables to the Input(s) and Output(s) and turn on the destination and source devices.
Plug the AC Adapter into the AC wall outlet flip the rear power switch to the ON position and if necessary press the 'POWER' button on the front of the unit. Verify that the LED above the button lights green which indicates that power has been applied to the 1T-VS-668.
NOTE: To realize maximum quality and performance, use only the highest quality cables with the 1T-VS-668. Low quality cables will cause degradation of the signal quality and limit the distance between both the source and destination devices and the 1T-VS-668.
The 1T-VS-668 can be operated from either the front panel controls or via the included Infrared Remote Control. Since Infrared is the control method used most often by the majority of users, please take the time to familiarize yourself with the location and function of the various control buttons on the Controller.
Front Panel Controls: The front panel has controls to manually control the 1T-VS-668 Universal Presentation Switcher/Scaler.

1 POWER Button and LED: Press this button to switch the device on or to set it to standby mode. Once the device is connected to an active power supply and the Power Switch on the back panel is turned on, the LED will illuminate and the device will switch on automatically.
2 IR Receiver Window: Receives only the IR signal from the remote control included in the package.
3 INPUT Buttons and LEDs: Press these buttons to switch directly to the required source. An LED will illuminate to indicate the selected input source.
4 MENU: Press this button to enter the On-screen Display (OSD) menu.
5 Plus/Minus (− / +) Buttons: Press these buttons to navigate down and up in the OSD menu.
6 ENTER: Press this button to confirm the selection in the OSD menu.
NOTE: Press this button simultaneously with the "+" (plus) button to instantly switch the output to XGA resolution or with the "-" (minus) button to instantly switch the output to 720p resolution.
5.2 Remote Control Operation
1 POWER: Press this button to switch the device on or to set it to standby mode.
2 HDMI1/2/3, PC1/2/3, CV and COMP: Direct source selection keys. Press one of these keys to switch to the required source.
3 MENU: Press this button to enter the OSD
4 EXIT: Press this button to exit the menu or the current selection in the OSD menu.
5 OK & ▲▼ ◀▶ : Press OK to confirm the selection or press the arrow buttons to navigate the OSD menu. When the OSD menu is not active, use the LEFT/RIGHT (◀▶) to control the volume level.
6 AUTO ADJUST: Press this button when the image being outputted does not correctly fit the display's screen. The device will auto adjust the image to fill the screen.
7 RESET: Press this button to reset the device back to the default settings.
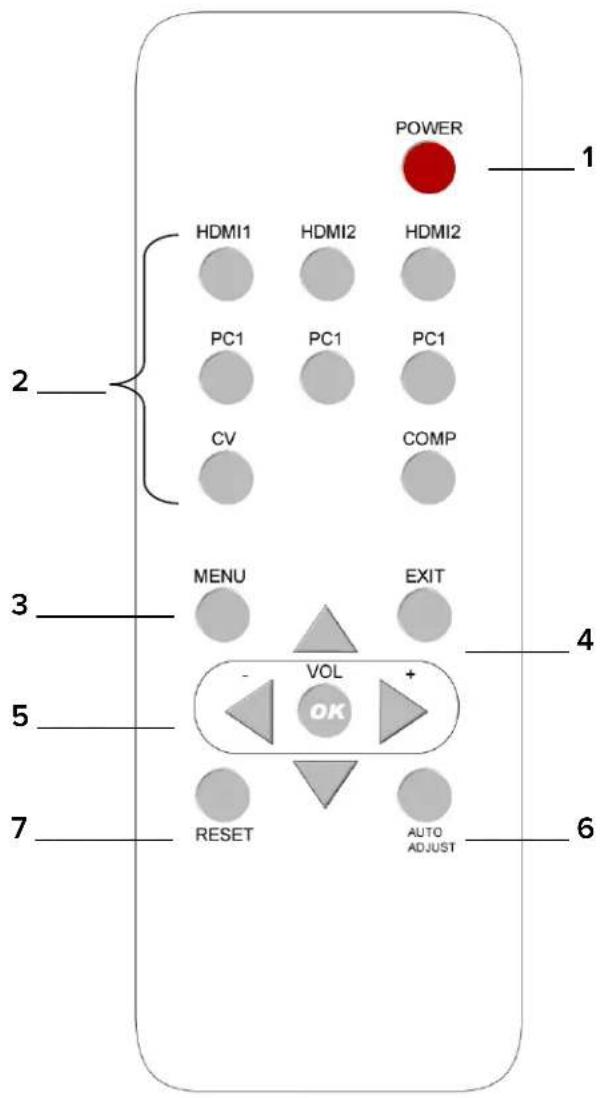
* For resolutions not accessible from the Remote, Use the OSD or Web GUI control options.
5.3 Using the On Screen Display Menus
Regardless of whether you operate the 1T-VS-668 from the front panel or using the Remote Controller, you will need to become familiar with the OSD (On Screen Display) menu structure if you wish to take full advantage of the capability of the product.
5.4 Menu Navigation
If you are using the front panel control method, you can select the desired function by pressing the “MENU” button to bring up the On Screen Display and then pressing the “+”, “-” and “ENTER” buttons to navigate to the desired function. Once at the desired function, press the “ENTER” button to make the selection and then press the “+” and “-” buttons to make the actual adjustment. Once you’ve made the adjustment, press the “ENTER” button one last time to save your adjustment. Escape from the OSD menu modes is accomplished by pressing the “MENU” button repeatedly until the OSD turns off.
From the IR remote controller, press the menu key to activate the OSD, use the arrow buttons to navigate to the selection you want and then use the arrow buttons and the "OK" button to make your adjustment or selection. Press the "Exit" button to escape from the OSD mode.
| Main Menu2 | Sub Menu | 3rd Menu | 4th Menu |
| DISPLAY | OUTPUT | 640×480 60 | |
| 800×600 60 | |||
| 1024×768 60 | |||
| 1280×768 60 | |||
| 1360×768 60 | |||
| 1280×720 60 | |||
| 1280×800 60 | |||
| 1280×1024 60 | |||
| 1440×900 60 | |||
| 1400×1050 60 | |||
| 1680×1050 60 | |||
| 1600×1200 60 | |||
| 1920×1080 60 | |||
| 1920×1200 60 | |||
| 1280×720P 60* | |||
| 1920×1080I 60 | |||
| 1920×1080P 60 | |||
| 720×576P 50 | |||
| 1280×720P 50 | |||
| 1920×1080I 50 | |||
| 1920×1080P 50 | |||
| SIZE | OVER SCAN | ||
| FULL | |||
| FOLLOW INPUT* | |||
| PAN SCAN | |||
| DISPLAY (cont.) | SIZE (cont.) | LETTERBOX | |
| UNDER 2 | |||
| UNDER 1 | |||
| MODE INFO | OFF | ||
| INFO* | |||
| ON | |||
| INPUT HDCP (HDMI mode only) | OFF | ||
| ON* | |||
| PC (PC mode only) | AUTO SETUP | ||
| H_POSITION | |||
| V_POSITION | |||
| PHASE | |||
| CLOCK | |||
| WXGA/XGA | XGA* | ||
| WXGA | |||
| RESET | |||
| COLOR | CONTRAST | 0-60 [30] | |
| BRIGHTNESS | 0-60 [30] | ||
| COLOR | R 0-1023 [512] | ||
| G 0-1023 [512] | |||
| B 0-1023 [512] | |||
| R OFFSET 0-1023 [512] | |||
| G OFFSET 0-1023 [512] | |||
| B OFFSET 0-1023 [512] | |||
| HUE | 0-60 [30] | ||
| SATURATION | 0-60 [30] | ||
| SHARPNESS | 0-30 [3] | ||
| NR. | OFF* | ||
| LOW | |||
| MIDDLE | |||
| HIGH | |||
| AUDIO | VOLUME | 0-100 [100] | |
| DELAY | OFF* | ||
| 40ms | |||
| 110ms | |||
| 150ms | |||
| SOUND | ON* | ||
| MUTE | |||
| SOURCE (HDMI mode only) | AUTO* | ||
| EXT. | |||
| SETUP | FACTORY RESET1 | ||
| KEY LOCK | OFF* | ||
| ON | |||
| POWER SAVE | OFF* | ||
| ON | |||
| SETUP (cont.) | IP MODE | DHCP* | |
| STATIC | |||
| SET STATIC IP | IP ADDRESS | 0.0.0.0.-255.255.255.255[192.168.0.1] | |
| SUBNET MASK | 0.0.0.0.-255.255.255.255[255.255.255.0] | ||
| DEF. GATEWAY | 0.0.0.0.-255.255.255.255[192.168.0.254] | ||
| FREERUN COLOR | BLACK | ||
| BLUE* | |||
| INFORMATION | INPUT | ||
| OUTPUT | |||
| REVISION | |||
| IP ADDRESS |
Notes:
-
The FACTORY RESET option in the OSD menu will only reset part of settings. For a complete reset of the system, please use the reset button on the remote control.
-
Items in BOLD with an asterisk (*) are the factory default settings. Items in brackets [ ] are the default values for those settings.
5.5 RS-232 Protocol
The connection between 1T-VS-668 and controller with RS-232 modem cable.
| 1T-VS-668 | |
| PIN | Assignment |
| 1 | NC |
| 2 | Tx |
| 3 | Rx |
| 4 | NC |
| 5 | GND |
| 6 | NC |
| 7 | NC |
| 8 | NC |
| 9 | NC |
| Remote Control | |
| PIN | Assignment |
| 1 | NC |
| 2 | Rx |
| 3 | Tx |
| 4 | NC |
| 5 | GND |
| 6 | NC |
| 7 | NC |
| 8 | NC |
| 9 | NC |
RS-232
Transmission Format:
Baud Rate: 19200bps
Data Bit: 8 bits
Parity: None
Stop Bit: 1bit
Flow Control: None
| Command2 | Description | ||
| S POWER x (x= 0 or 1) | 0=OFF | 1=ON | |
| R POWER | Reports the numeric value for POWER setting (as above) | ||
| S SOURCE x (x= 1 - 8) | 1=HDMI 12=HDMI 23=HDMI 34=YPbPr | 5=VIDEO6=PC 17=PC 28=PC 3 | |
| R SOURCE | Reports the numerical value for SOURCE setting (as above) | ||
| S OUTPUT x (x= 0 - 21)*1 | 0=640×4801=800×6002=1024×7683=1280×7684=1360×7685=1280×7206=1280×8007=1280×10248=1440×9009=1400×105010=1680×1050 | 11=1600×120012=1920×108013=1920×120014=480p@6015=720p@6016=1080i@6017=1080p@6018=576p@5019=720p@5020=1080i@5021=1080p@50 | |
| R OUTPUT | Reports the numerical value for OUTPUT setting (as above) | ||
| S SIZE x (x= 0 - 6) | 0=OVERSCAN1=FULL2=FOLLOW INPUT3=PAN SCAN | 4=LETTERBOX5=UNDER 26=UNDER 1 | |
| R SIZE | Reports the numerical value for SIZE setting (as above) | ||
| S INPUT HDCP x (x= 0 or 1) | 0=ON | 1=OFF (For use with Apple computers) | |
| R INPUT HDCP | Reports the numerical value for INPUT HDCP setting (as above) | ||
| S CONTRAST x (x= 0 - 60) | Sets the numerical value for CONTRAST setting (0-60) | ||
| R CONTRAST | Reports the numerical value for CONTRAST setting | ||
| S BRIGHTNESS x (x= 0 - 60) | Sets the numerical value for the BRIGHTNESS setting (0-60) | ||
| R BRIGHTNESS | Reports the numerical value for the BRIGHTNESS setting | ||
| S HUE x (x= 0 - 60) | Sets the numerical value for the HUE setting (0-60) | ||
| R HUE | Reports the numerical value for the HUE setting | ||
| S SATURATION x (x= 0 - 60) | Sets the numerical value for the SATURATION setting (0-60) | ||
| R SATURATION | Reports the numerical value for the SATURATION setting | ||
| S SHARPNESS x (x= 0 - 30) | Sets the numerical value for the SHARPNESS setting (0-30) | ||
| R SHARPNESS | Reports the numerical value for SHARPNESS setting | ||
| S NR x (x= 0 - 3) | 0=OFF1=LOW | 2=MIDDLE3=HIGH | |
| R NR | Reports the numerical value for the NOISE REDUCTION setting (as above) | ||
| S VOLUME x (x= 0 - 100) | Sets the numerical value for VOLUME setting (0-100) | ||
| R VOLUME | Reports the numerical value for VOLUME setting | ||
| S AUDIO DELAY x (x= 0 - 3) | 0=OFF1=40ms | 2=110ms3=150ms | |
| R AUDIO DELAY | Reports the numeric value for the AUDIO DELAY setting (as above) | ||
| S AUDIO MUTE x (x= 0 or 1) | 0=ON | 1=MUTE | |
| R AUDIO MUTE | Reports the numeric value for the AUDIO MUTE setting (as above) | ||
| S HDMI AUDIO x (x= 0 or 1) | 0=AUTO | 1=EXT | |
| R HDMI AUDIO | Reports the numeric value for HDMI AUDIO setting (as above) | ||
| S KEY LOCK x (x= 0 or 1) | 0=ENABLE | 1=DISABLE | |
| R KEY LOCK | Reports the numeric value for KEY LOCK setting (as above) | ||
| S FREERUNCOLOR x (x= 0 or 1) | 0=BLACK | 1=BLUE | |
| R FREERUNCOLOR | Reports the numerical value for the free run color setting (as above) | ||
| S RESET 1 | Resets the unit to factory defaults | ||
| PORT x (x= 0 - 8) | 0=LAST MEMORY1=HDMI 12=HDMI 23=HDMI 34=YPbPr | 5=VIDEO6=PC 17=PC 28=PC 3 | Sets the defaultinput port at power-on |
| ST | Checks the FIRMWARE version and SOURCE information:VERSION: 0.00-x.xxSOURCE: HDMI - PC3PORT ON: LAST - PC3 | ||
| VOL +VOL - | Raises the volume level (VOLUME IS SET)Lowers the volume level (VOLUME IS SET) | ||
| QUIT | Exit. (Telnet Only) | ||
Notes:
1. Resolution settings 0-13 are RGB encoded. Resolution settings 14-21 are YUV encoded.
2. RS-232 commands will be not executed unless followed with a carriage return (CR) command and for some systems a Line feed (LF) command. Commands are case-insensitive.
5.6 Telnet Control
Before attempting to use the Telnet control, ensure that both the 1T-VS-668 (via the LAN port) and the PC/Laptop or control system being used are connected to the same active network.
You may now start your Telnet client of choice and connect directly to the unit's IP address. If you wish to use the Telnet software that is built into Windows XP, Vista and 7 please follow these instructions:
- Go to the "Start" menu and click on "Run".
-
After the "Run" command windows opens type "cmd" then press "Enter". This will open the Windows command line interface (CLI).
-
Once in the Windows CLI type "telnet" followed by the IP address of the unit you wish to control. This will connect to the unit and you will see the "Telnet Command Service" prompt.
-
You may now begin sending commands directly to the unit. To receive a listing of all available commands please type “?”.
Notes:
- The current IP address of the unit can be obtained from the OSD menu under Information.
- Telnet commands will be not executed unless followed with a carriage return (CR) command and for some systems a Line feed (LF) command. Commands are case-insensitive.
5.7 Web GUI Control
On a PC/Laptop that is connected to same active network as the Scaler, open a web browser and input the unit's IP address on the web address entry bar. The browser will bring up the 1T-VS-668's Web GUI control page (see below for reference). All functions of the unit are controllable from this single screen.
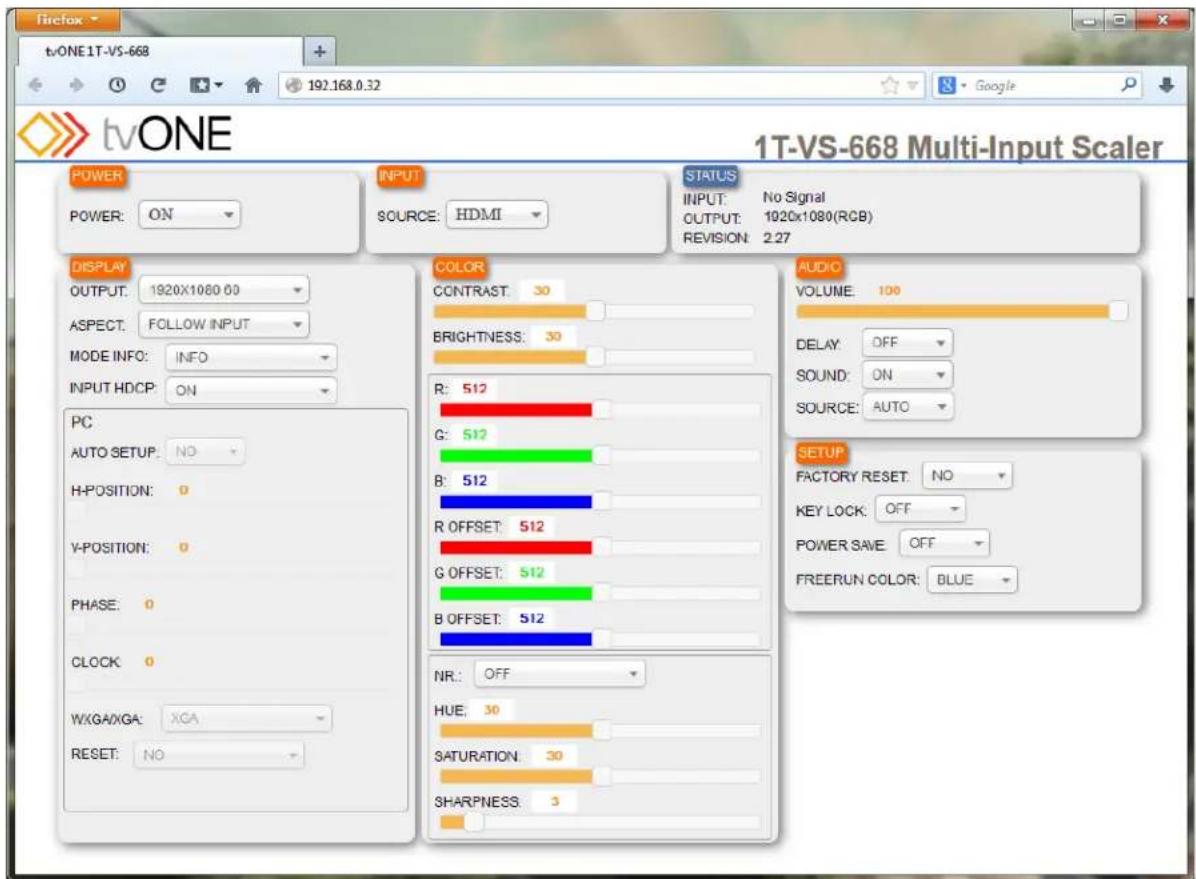
NOTE: The current IP address of the unit can be obtained from the OSD menu under Information.
6.0 TROUBLESHOOTING
If the 1T-VS-668 Scaler does not appear to be functioning, be certain that the source and all other devices connected to the unit are functioning correctly by connecting each device currently connected to the 1T-VS-668's outputs directly to the source using a short length of cable. (In other words, bypass the 1T-VS-668 to insure that the problem is not with the source or destination devices.) If the signal is present under those conditions, make certain that the power is present to the 1T-VS-668. If it is, check all cables for damage. Cables should be undamaged, as short as possible and should be premium quality.
Note: It is strongly recommended that you use premium cables in order to achieve maximum distance cable runs and the best performance possible.
As a final step before contacting technical support, use the IR remote and press the RESET button which will return the unit to the default settings. After trying the above suggestions should the problem still persist, contact your dealer for additional suggestions before contacting tvONE. Should the dealer's technical personnel be unable to assist you, contact tvONE via our support website: http://tvone.crmdesk.com. Create a technical support request on the site and our support team will respond within a short period of time.
7.0 LIMITED WARRANTY
tvONE warrants the original purchaser that the equipment it manufactures or sells will be free from defects in materials and workmanship for a fixed term from the date of purchase. The warranty term for specific product lines is defined below.
- tvONE branded products based on tvONE's CORIO technology are warranted for a period of five years from the date of purchase. This includes products with the model number prefix of C2, 1T-C2, CX, A2 or S2.
- tvONE products, other than those based on tvONE's CORIO technology mentioned above, are warranted for a period of three years from the date of purchase. This includes products with the model number prefix of 1T, with the exception of 1T-C2.
- LCD Monitors are warranted for a period of three years from the date of purchase, with the exception of the LCD panels integrated into the monitors that are supplied by third parties. LCD panels are limited to the term and conditions of the warranty offered by the respective LCD panel manufacturer. Such specific LCD panel warranties are available upon request to tvONE.
Should a product, in tvONE's opinion, prove defective within this warranty period, tvONE, at its option, will repair or replace this product without charge. Any defective parts replaced become the property of tvONE. This warranty does not apply to those products which have been damaged due to accident, unauthorized alterations, improper repair, modifications, inadequate maintenance and care, or use in any manner for which the product was not originally intended.
If repairs are necessary under this warranty policy, the original purchaser must obtain a Return Authorization Number from tvONE and return the product to a location designated by tvONE, freight prepaid. After repairs are complete, the product will be returned, freight prepaid.
LIMITATIONS - All products sold are “as is” and the above Limited Warranty is in lieu of all other warranties for this product, expressed or implied, and is strictly limited to the stated number of years from the date of purchase. tvONE assumes no liability to distributors, resellers or end-users or any third parties for any loss of use, revenue or profit.
tvONE makes no other representation of warranty as to fitness for the purpose or merchantability or otherwise in respect of any of the products sold. The liability of tvONE with respect to any defective products will be limited to the repair or replacement of such products. In no event shall tvONE be responsible or liable for any damage arising from the use of such defective products whether such damages be direct, indirect, consequential or otherwise, and whether such damages are incurred by the reseller, end-user or any third party.
8.0 REGULATORY COMPLIANCE
The 1T-VS-668 Universal Presentation Switcher/Scaler has been tested for compliance with the appropriate FCC and CE rules and regulations. The power adaptor/supply has been tested for compliance with appropriate UL, CUL, CE, PSE, GS Rules, regulations and/or guidelines. This product and power adapter is RoHS compliant.
9.0 CONTACT INFORMATION
Should you have questions or require assistance with this product in areas not covered by this manual, please contact tvONE at the appropriate location shown below.
tvONE USA
2791 Circleport Drive
Erlanger, KY 41018
USA
Tel 859-282-7303
Fax 859-282-8225
sales@tvone.com
www.tvone.com
tvONE Europe
Continental Approach
Westwood Industrial Estate
Margate, Kent CT9 4JG, UK
Tel +44 (0)1843 873311
Fax +44 (0)1843 873312
sales.europe@tvone.com
tvONE Latin America
6991 NW 82 Avenue #8
Miami, FL 33166
USA
Tel 305-396-6275
Fax 305-418-9306
sales.latinoamerica@tvone.com
tvONE Mercosur
Av Diaz Velez 3965 PB
Capital Federal (1200)
Buenos Aires, Argentina
Tel +54 11 5917-2525
Fax +54 11 4032-0281
sales.mercosur@tvone.com
tvONE Asia
16F-4, No.75, Sec. 1
Xintai 5th Rd, Xizhi Dist
New Taipei City 22101
Taiwan R.O.C.
Tel +886 2 2698-2296
Fax +886 2 2698-2297
sales.asia@tvone.com
tvONE China
Rm. 1007 Golden Peach Building
No.1900 Shangcheng Road
Pudong, Shanghai
China 200120
Tel +86 21 5830-2960
Fax +86 21 5851-7949
sales.china@tvone.com

- TVONE
- INSTRUCTION MANUAL
- TABLE OF CONTENTS
- 1.0 INTRODUCTION
- 1.1 LIABILITY STATEMENT
- 1.2 FEATURES
- 2.1 SUPPORTED INPUT AND OUTPUT FORMATS AND RESOLUTIONS
- 3.0 PACKAGE CONTENTS
- 4.0 CONNECTING THE HARDWARE
- 4 OUTPUT
- 5 INPUT
- 5.2 REMOTE CONTROL OPERATION
- 5.3 USING THE ON SCREEN DISPLAY MENUS
- 5.4 MENU NAVIGATION
- 5.5 RS-232 PROTOCOL
- RS-232
- TRANSMISSION FORMAT
- 5.6 TELNET CONTROL
- NOTES
- 5.7 WEB GUI CONTROL
- 6.0 TROUBLESHOOTING
- 7.0 LIMITED WARRANTY
- 8.0 REGULATORY COMPLIANCE
- 9.0 CONTACT INFORMATION
- TVONE USA
- TVONE EUROPE
- TVONE LATIN AMERICA
- TVONE MERCOSUR
- TVONE ASIA
- TVONE CHINA
Brand : TV One
Model : 1T-VS-668
Category : Video switch