MicroMain 45 - Pregnant Barefoot Sound - Free user manual and instructions
Find the device manual for free MicroMain 45 Barefoot Sound in PDF.


| Product Type | Active 3-way studio monitor |
| Drivers | Dual 10" woofers, 4" midrange, 1" tweeter |
| Amplification | Built-in: LF 500W, MF 250W, HF 100W (Class AB) |
| Frequency Response | 30 Hz – 40 kHz (±3 dB) |
| Crossover Frequencies | 280 Hz (LF/MF), 3.6 kHz (MF/HF) |
| Maximum SPL | 123 dB (peak, @ 1 m) |
| Input Connectors | Balanced XLR and 1/4" TRS |
| Input Impedance | 10 kΩ balanced, 20 kΩ unbalanced |
| Power Requirements | 100–240 V AC, 50/60 Hz |
| Power Consumption | 1500 W (max), <0.5 W standby |
| Dimensions (H x W x D) | 787 x 482 x 711 mm (31" x 19" x 28") |
| Weight | 68 kg (150 lbs) each |
| Enclosure Type | Sealed, internally braced MDF with constrained-layer damping |
| Standby Mode | Auto-standby after 30 min inactivity |
| Protection | Thermal, over-current, DC offset, and subsonic filter |
| Included Accessories | Power cable, grille, foam pads |
| Cleaning | Wipe with a dry soft cloth; do not use solvents |
Frequently Asked Questions - MicroMain 45 Barefoot Sound
User questions about MicroMain 45 Barefoot Sound
0 question about this device. Answer the ones you know or ask your own.
Ask a new question about this device
Download the instructions for your Pregnant in PDF format for free! Find your manual MicroMain 45 - Barefoot Sound and take your electronic device back in hand. On this page are published all the documents necessary for the use of your device. MicroMain 45 by Barefoot Sound.
USER MANUAL MicroMain 45 Barefoot Sound
MICROMAIN45
Manual
Contents Section start page
Description 1.0 01
Warnings! (please read carefully) 2.0 02
Inputs and Controls 3.0 03
Startup 4.0 03
Signal Flow Diagram 5.0 04
Protection 6.0 05
Positioning 7.0 05
Equalization 8.0 09
Maintenance 9.0 10
Frequency Response 10.0 11
Specifications 11.0 13
Drawings 12.0 14
Warranty 13.0 16
1.0 Description
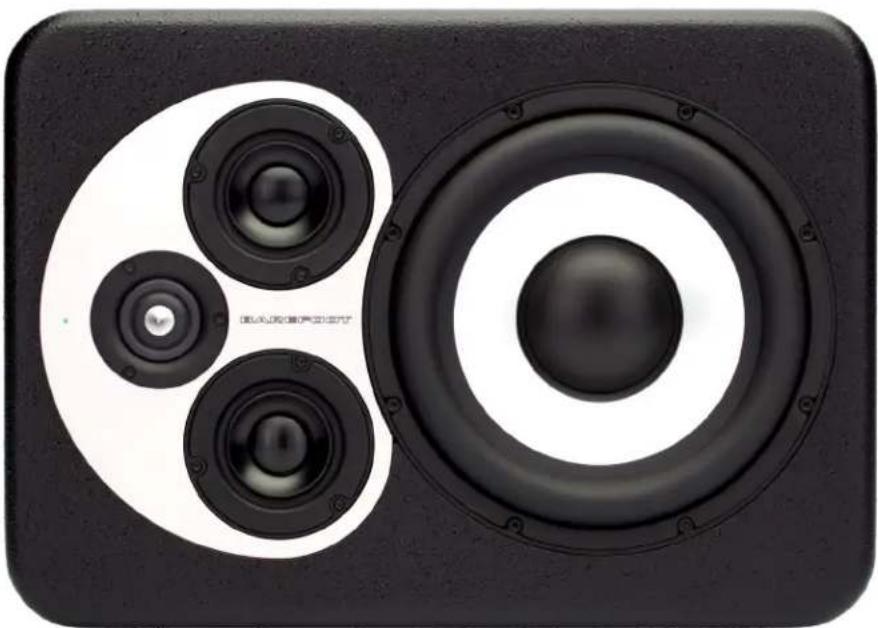
The MicroMain45 is a 3-way active loudspeaker capable of nearfield, and mid-field operation. The four drive units are all housed in sealed enclosures. The DSP controlled three-way power amplifier module can deliver 350 Watts continuously.
natural_image
Black speaker with three circular speakers and a central hub, no visible text or symbols2.0Warnings!
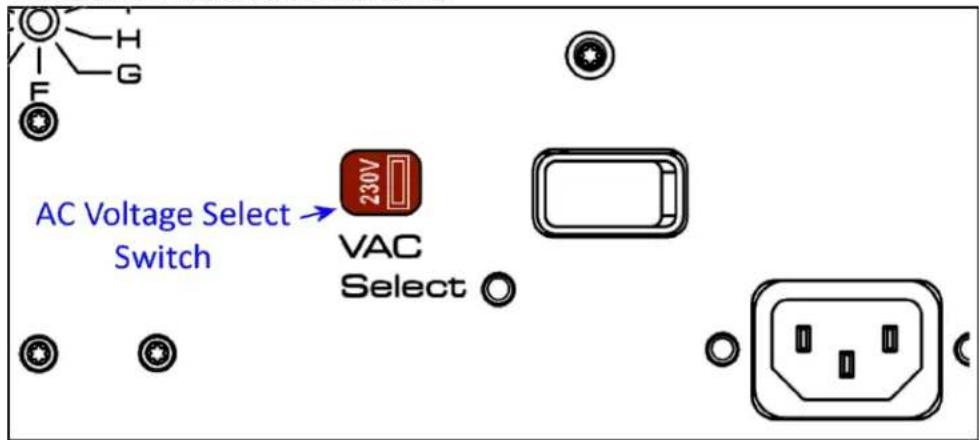
The Mains Voltage Select switch (VAC Select) on the rear panel must be in the 230V position for AC power line voltages over 132 VAC. Connecting the power cord to AC power line voltages over 132 VAC while the VAC Select switch is in the 115V position will damage the amplifier. Such damage is NOT covered under warranty.
Rear panel VAC Select switch location
Please read and follow the safety information below:
- Do not remove the rear amplifier panel. There is a risk of electric shock. No user serviceable parts are inside. Please refer service issues to a qualified technician.
- Do not operate this device with an ungrounded mains power cable or a mains connection that is ungrounded. This may result in personal injury.
- Do not place open flames such as lighted candles on or near this device.
- Do not expose this device to water, rain or high humidity. Do not place objects filled with liquids, such as vases, on or near this device.
- This speaker requires adequate airflow to maintain proper cooling. Do not obstruct airflow around the speaker. Do not run the speaker upside down (mains power connector on top).
- Do not operate this device in ambient temperatures above 30^ C ( 85^ F). Over-temperature may cause device failure.
Caution! This speaker is capable of producing sound pressure levels in excess of 85dB which may cause permanent hearing damage. Always verify that input signal levels are attenuated before powering on the speaker.
3.0 Input and Controls
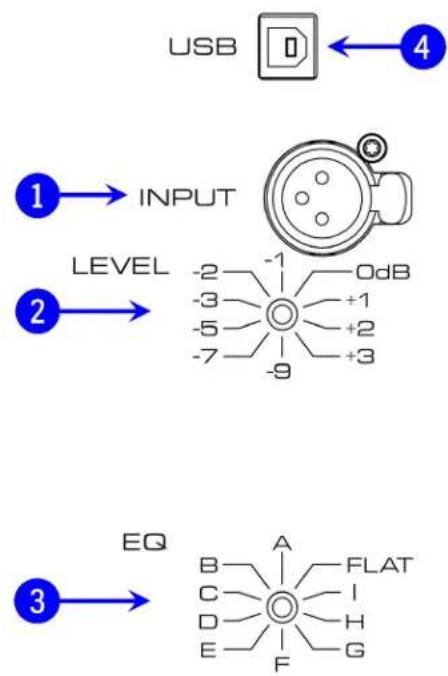
- [INPUT] XLR connector is designed to receive analog balanced line level audio signal from sources such as preamplifiers, sound cards, monitor controllers and mixing consoles. Pin 1 is tied to chassis ground. Pins 2 & 3 are fully floating differential inputs. Pin 3 must be referenced to ground for single ended input signals. The analog signal is converted to 24bit/192kHz digital audio via a precision, ultra-high-fidelity analog to digital converter section inside the MicroMain45.
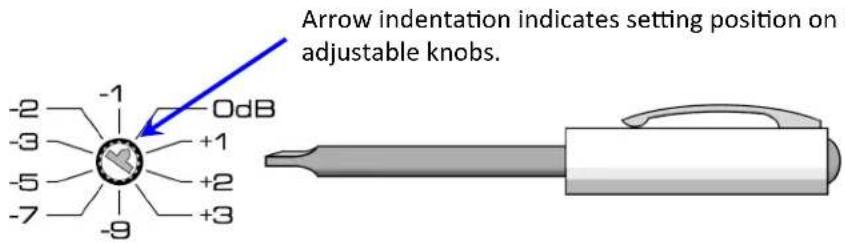
- [LEVEL] Ten position rotary switch adjusts the input level in precise increments from +3dB to -9dB. The level steps are as follows: +3, +2, +1, 0, -1, -2, -3, -5, -7, -9dB The +3dB setting matches the input sensitivity of the first generation Barefoot MicroMain27 and MicroMain35.
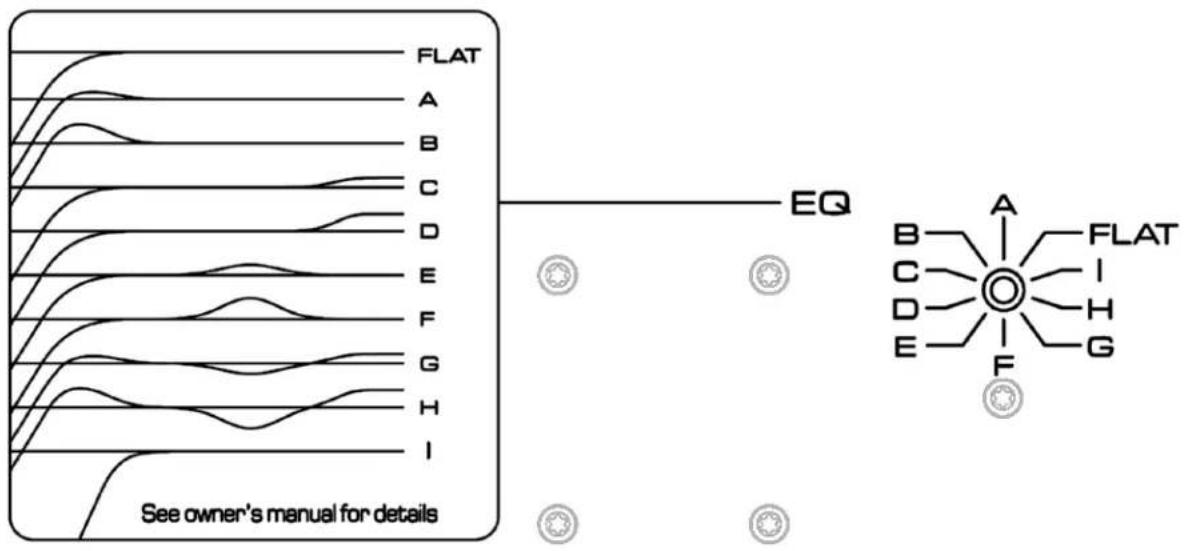
- [EQ] Ten position rotary switch adjusts the equalization balance of the speaker. See section 8 for details.
- [USB] The universal serial bus connector is for factory adjustments and calibrations. This connector is NOT an audio input.
4.0 Startup
- Verify that the AC Voltage select switch on the rear panel is in the correct position for the AC voltage in your facility (see warnings on pervious page for details) then plug in grounded mains power cable.
- Set Level control to nominal desired input sensitivity.
- Set EQ control to FLAT position.
- Ensure that the audio source signal is fully attenuated.
- Power on the speaker with the rocker switch located on the rear panel above the mains connector. The LED indicator on the front of the speaker will illuminate Red for a couple of seconds then turn Aqua.
- Turn up the audio signal and enjoy!
5.0 Signal Flow Diagram
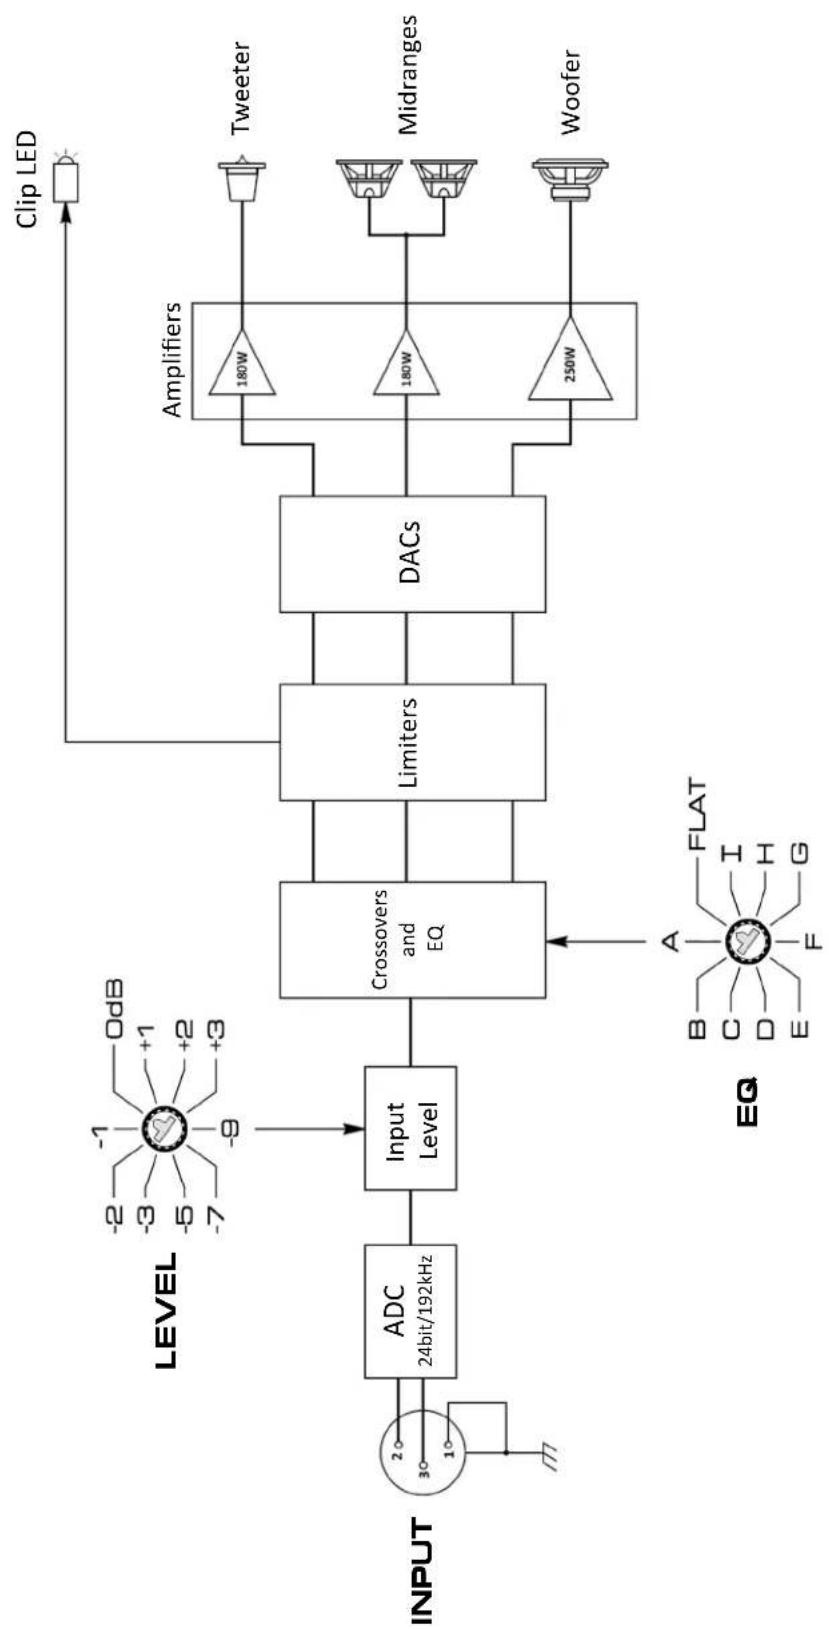
flowchart
graph LR
    INPUT["INPUT"] --> ADC["ADC 24bit/192kHz"]
    ADC --> InputLevel["Input Level"]
    InputLevel --> Crosovers["Crossovers and EQ"]
    Crosovers --> Limiters["Limiters"]
    Limiters --> DACs["DACs"]
    DACs --> Amplifiers["Amplifiers 180W, 180W, 250W"]
    Amplifiers --> Tweeter["Tweeter"]
    Amplifiers --> Midranges["Midranges"]
    Amplifiers --> Woofer["Woofer"]
    DACs --> ClipLED["Clip LED"]
    Level --> OdB["OdB"]
    Level --> -1["-1"]
    Level --> -3["-3"]
    Level --> -5["-5"]
    Level --> -7["-7"]
    Level --> -9["-9"]
    Level --> +1["+1"]
    Level --> +2["+2"]
    Level --> +3["+3"]
    EQ["EQ"] --> A["A FLAT"]
    EQ --> B["B C I H E F G"]
6.0 Protection Features
6.1 Limiters
Peak Limiter
The Woofer, Midrange and Tweeter channels have individual Peak Limiters designed to protect each driver from high amplitude, short duration audio input signal spikes that might cause damage due to over excursion of the voice coil. These limiters are implemented digitally within the DSP in such a manner that they have zero effect on the audio signal below their thresholds. The front LED indicator light will flash RED when a Peak Limiter on any of the driver channels is triggered. The duration of such events is only a fraction of a second. Therefore, the LED flash may appear pink or orange as the eye naturally blends the normally aqua-blue color of the LED with the red.
RMS Limiter
The Woofer, Midrange and Tweeter channels have individual RMS Limiters designed to protect each driver from long duration, high amplitude audio input signals that might cause thermal damage due to the voice coil. These limiters are implemented digitally within the DSP in such a manner that they have zero effect on the audio signal below their thresholds. The front LED indicator light will flash RED when a RMS Limiter on any of the driver channels is triggered.
Caution: Signals large enough to trigger any of the limiters can generate very high sound pressure levels that may result in permanent hearing damage.
6.2 Over Current
In the event of a large audio input signal that might damage the amplifiers or power supply due to current overload, the power supply is designed to enter into Over Current protect mode. This state typically results from a large, broadband input signal burst that flat lines the limiters on all three channels simultaneously. While the fault persists the amplifier power rails shut down, the speaker goes quiet, and the front panel LED turns red. Once the audio input signal is turned down the speaker should reboot within a few seconds. If the speaker fails to reboot or the LED light goes out completely, disconnect the audio input cable and power cycle the speaker. Verify the signal level is attenuated before reconnecting audio input cable.
Caution: Signals that cause Over Current protection to trigger can generate very high sound pressure levels that may result in permanent hearing damage.
7.0 Positioning
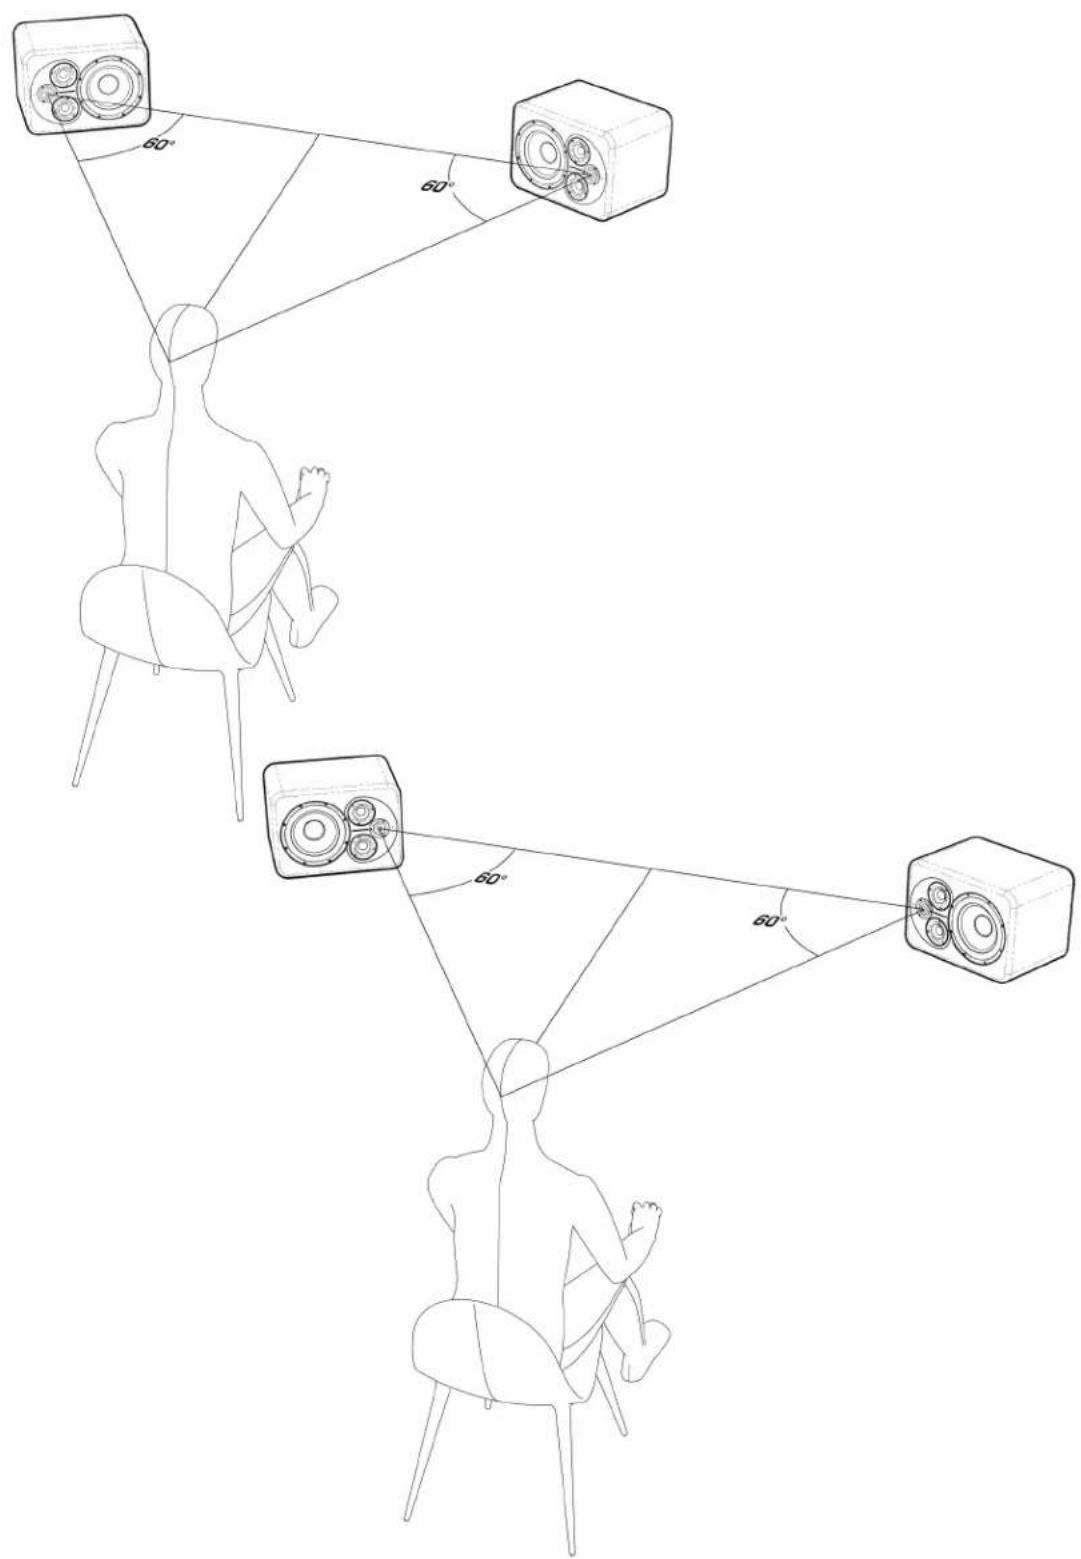
The acoustic center of the MicroMain45 is located at the center of the tweeter. The MM45 is designed to work equally well as a nearfield or mid-field monitor. The minimum recommended listening distance is 1 meter (39.4"). While speaker positioning can often be dependent on the nature of the room, a good starting point is to create an equilateral triangle between the two speakers and the listening position. The speakers should be angled inward so the tweeter axes aim towards the listener's ears, crossing a few inches behind the head.
The speakers should be positioned symmetrically with both tweeters oriented to either the outside or inside. Both orientations are acceptable, however, we recommend starting with the tweeters oriented to the outside. You may need to experiment to determine which arrangement is optimal in you room.
Since every room has its unique characteristics, the optimal listening distances, speaker height and distances from walls are also a matter for experimentation.
Example: Symmetrical stereo arrangements.
7.1 Widening the Stereo Field
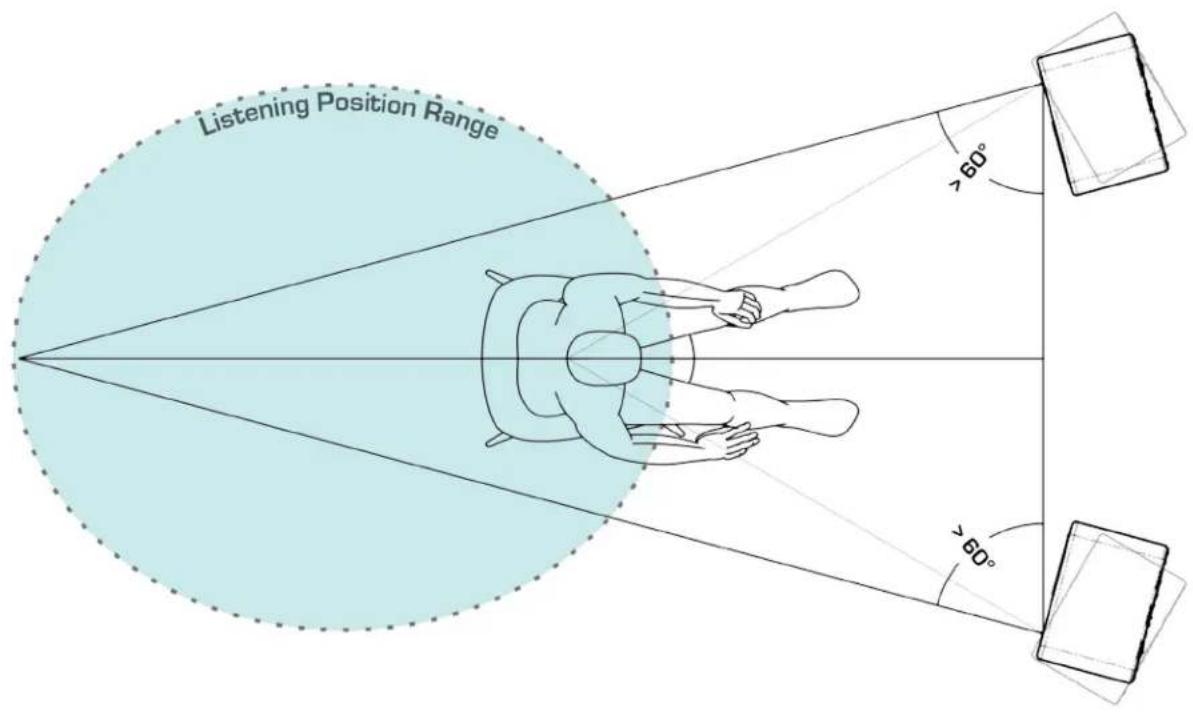
We generally recommend angling the speaker axes in towards the listening position to create an equilateral triangle as described above. This yields the most accurate high frequency response and the sharpest stereo image at the center listening position. In some cases, however, the listener might change positions frequently. Or there might be multiple listeners. In such situations it may be desirable to have a wider and less focus stereo field which provides better coverage over a range of listening positons. This can be achieved by aiming the speaker axes more forward such that the axes cross further behind the center listing position. The figure below illustrates the general principle and is not meant to be an exact measure of speaker angles or optimal listening positions.
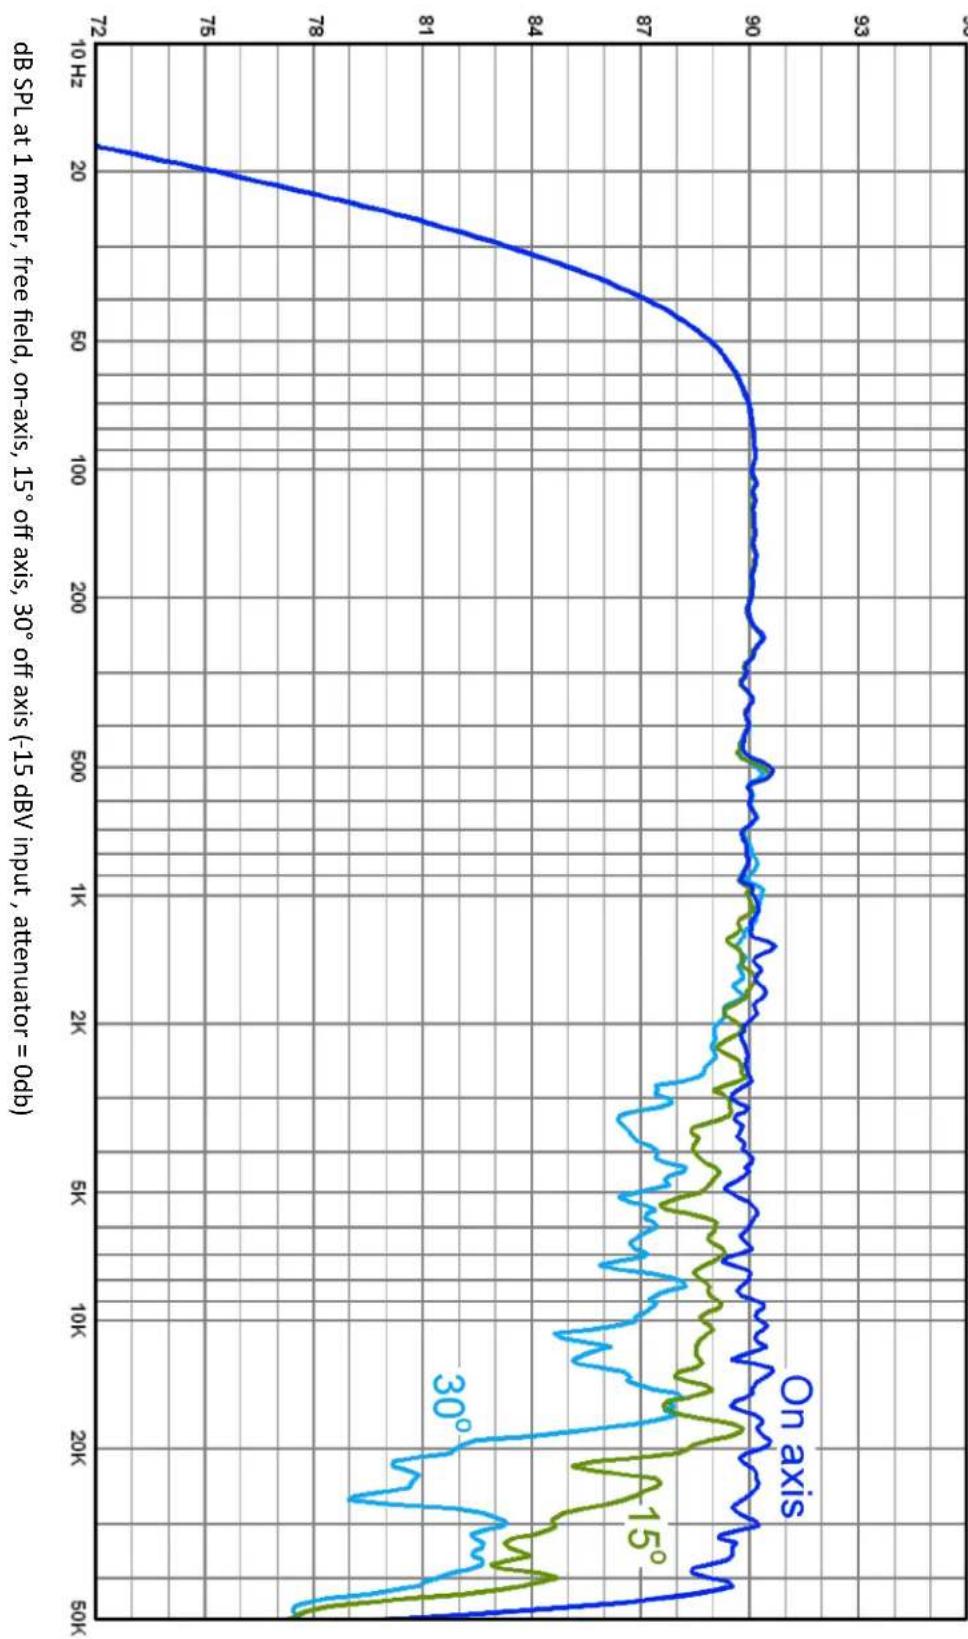
Since the MicroMain45 has such wide off-axis dispersion, the angle relative to the listener can be changed by up to 10 degrees with less than 1 dB variance in the frequency response across the audible spectrum. Angling the speakers forward in this manner will somewhat defocus the center stereo image while providing generally better imaging over a range of listing positions. For some users this may be an acceptable compromise.
7.2 Vertical Orientation
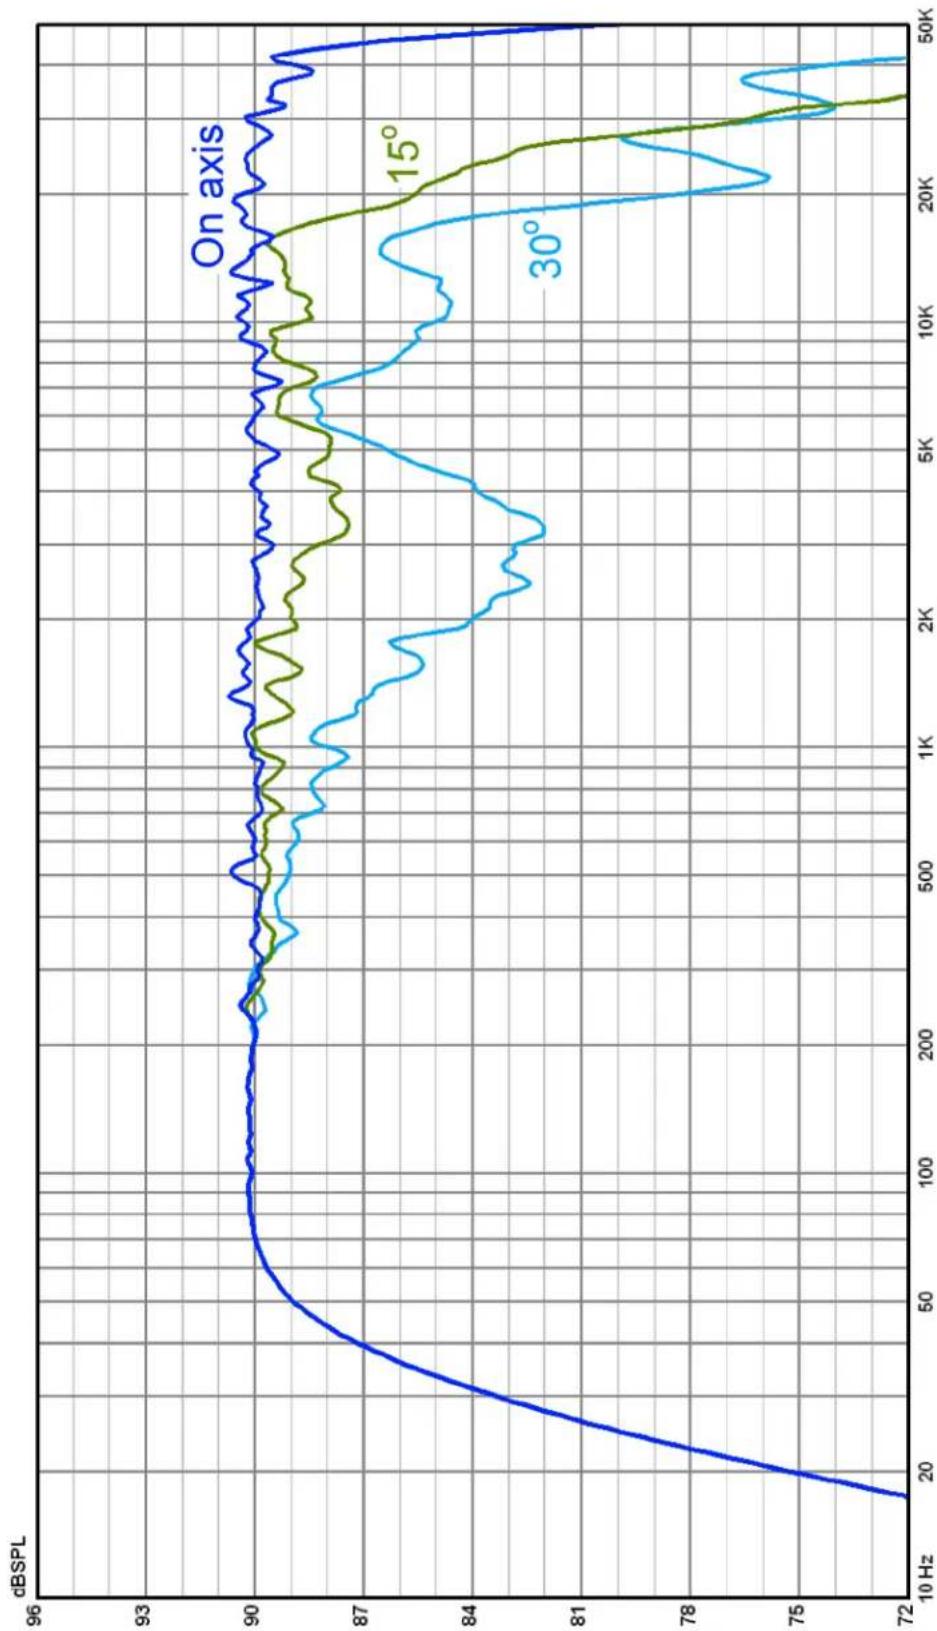
For center channel applications it might be desirable to stand the MicroMain45 in the vertical orientation. This orientation is acceptable, however, it does sacrifice horizontal dispersion. Section 13 shows off-axis frequency response graphs in the horizontal (13.1) and vertical (13.2) planes for the MM45 mounted in the normal horizontal orientation. One can see the horizontal off-axis response is smoother than the vertical off-axis response. Standing the MM45 vertically, therefore, makes the frequency response less smooth compared to the normal orientation when the listener moves from side to side. Nonetheless, the response is still quite good out to 15 degrees off-axis and provides a reasonably large sweet spot.
All the same positioning principles that are described here in Section 7 apply to the vertical speaker orientation as well.
natural_image
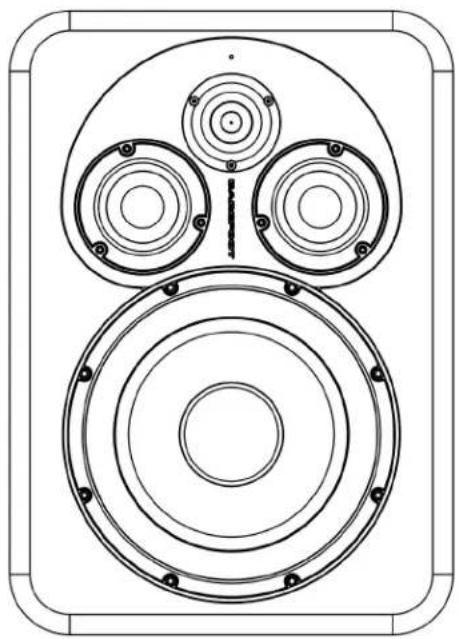
Technical line drawing of a speaker with three concentric rings and mounting holes (no text or symbols)7.3 Cooling Concerns
While the Hypex amplifier modules that drive the MicroMain45 are a very efficient, the speaker still generates a significant amount of heat that must be dissipated. This heat is transmitted to the air via convection from the rear amplifier plate. In order to ensure proper airflow, a minimum of 3" (76mm) clearance should be maintained between the speaker and any large obstructions like walls. An ambient room temperature below 30°C (85°F) should be maintained. Over-temperature may cause the speaker to overheat and shut down.
![[76mm] 3.0in](/content/2026/05/1062833/images/b46201ea9d66c217a67445f5594ffbaa31be6c49a8c1e0988a1d3a3a4ac8b1e0.jpg)
8.0 Equalization
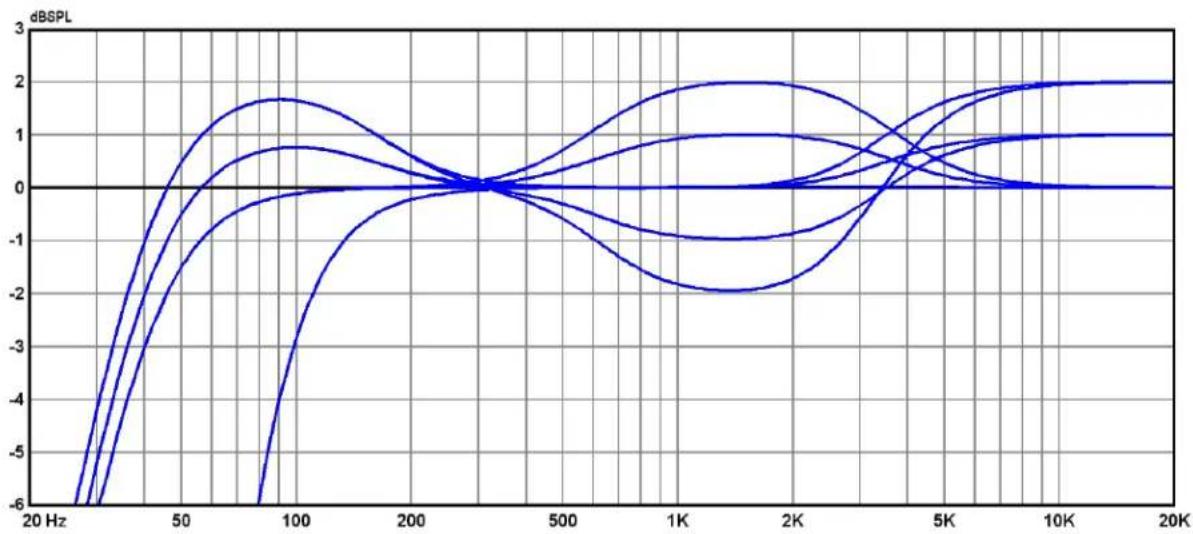
While the FLAT setting is recommended, the MicroMain45 offers eight additional EQ contours as well as a high-pass filter for integration with a subwoofer. In order to maintain as pure of a signal path as possible, the midrange and high frequency contours are implemented with simple level adjustments to the midrange and tweeter channels. The low frequency contour is a 2nd order low shelf filter with its inflection point at 160Hz . The high pass filter is a 4th order Linkwitz-Riley type with its -6dB point at 80Hz . All filters are completely bypassed in the FLAT setting. The equalization contours are selected via the 10 position rotary switch labeled EQ on the rear speaker panel.
flowchart
graph TD
    A["FLAT"] --> B["EQ"]
    C["A"] --> B
    D["B"] --> B
    E["C"] --> B
    F["D"] --> B
    G["E"] --> B
    H["F"] --> B
    I["G"] --> B
    J["H"] --> B
    K["I"] --> B
    L["See owner's manual for details"]
    style A fill:#f9f,stroke:#333
    style C fill:#f9f,stroke:#333
    style D fill:#f9f,stroke:#333
    style E fill:#f9f,stroke:#333
    style F fill:#f9f,stroke:#333
    style G fill:#f9f,stroke:#333
    style H fill:#f9f,stroke:#333
    style I fill:#f9f,stroke:#333
    style L fill:#ccf,stroke:#333
8.1 EQ Switch Position - Contour Settings
| EQ Position | Tweeter Level | Midrange Level | 160 Hz Low Shelf |
| FLAT | 0 dB 0 dB 0 dB (bypass) | ||
| A | 0 dB 0 dB +1 dB | ||
| B | 0 dB 0 dB +2 dB | ||
| C | +1 dB 0 dB 0 dB | ||
| D | +2 dB 0 dB 0 dB | ||
| E | 0 dB +1 dB 0 dB | ||
| F | 0 dB +2 dB 0 dB | ||
| G | +1 dB -1 dB +1 dB | ||
| H | +2 dB -2 dB +2 dB | ||
| I | 4th order Linkwitz-Riley high pass with -6 dB point at 80Hz. Passband EQ is FLAT | ||
8.2 Detailed look at EQ contour family of curves.
line
| Frequency | Series 1 | Series 2 | Series 3 | Series 4 | Series 5 | Series 6 | Series 7 | Series 8 | | --------- | -------- | -------- | -------- | -------- | -------- | -------- | -------- | -------- | | 20 Hz | -6.0 | -6.0 | -6.0 | -6.0 | -6.0 | -6.0 | -6.0 | -6.0 | | 50 Hz | -2.0 | -1.5 | -1.0 | -0.5 | 0.0 | 0.5 | 1.0 | 1.5 | | 100 Hz | 1.5 | 1.0 | 0.5 | 0.0 | 0.5 | 1.0 | 1.5 | 2.0 | | 200 Hz | 0.0 | 0.0 | 0.0 | 0.0 | 0.0 | 0.0 | 0.0 | 0.0 | | 500 Hz | -1.0 | -0.5 | -0.2 | 0.0 | 0.5 | 1.0 | 1.5 | 2.0 | | 1K | -2.0 | -1.5 | -1.0 | -0.5 | 0.0 | 0.5 | 1.0 | 1.5 | | 2K | -1.5 | -1.0 | -0.5 | 0.0 | 0.5 | 1.0 | 1.5 | 2.0 | | 5K | -0.5 | -0.2 | 0.0 | 0.5 | 1.0 | 1.5 | 2.0 | 2.5 | | 10K | 0.5 | 1.0 | 1.5 | 2.0 | 2.5 | 3.0 | 3.5 | 4.0 | | 20K | 1.5 | 2.0 | 2.5 | 3.0 | 3.5 | 4.0 | 4.5 | 5.0 |9.0 Maintenance
Exterior surfaces of this product may be cleaned using a non-abrasive lint-free cloth lightly damped with water. Disconnect the mains power cable when cleaning to avoid risk of electric shock. Do not use alcohol-based cleaners.
Driver active surfaces such as diaphragms and surrounds may be cleaned using dry soft bristle brushes. Driver diaphragms are very delicate and easily damaged. So, proceed with great care. Clean new sable artist brushes or cosmetic brushes work well for this task. Gently brush dust away from the surface starting at the center of the driver diaphragm and moving radially outward. Avoid applying inward pressure to the driver diaphragm.
Repairs, maintenance, or other servicing of this product when its interior compartment is exposed should only be performed under specific advice from Barefoot Sound by a qualified technician or by the Barefoot Service Center. There are no user-serviceable parts inside this product.
line
| Time (GHz) | On axis | 15° off axis | 30° off axis | |------------|---------|--------------|--------------| | 10 | 80 | 80 | 80 | | 20 | 60 | 60 | 60 | | 50 | 60 | 60 | 60 | | 100 | 60 | 60 | 60 | | 200 | 60 | 60 | 60 | | 500 | 60 | 60 | 60 | | 1000 | 60 | 60 | 60 | | 2000 | 60 | 60 | 60 | | 5000 | 60 | 60 | 60 | | 10000 | 60 | 60 | 60 | | 20000 | 60 | 60 | 60 | | 50000 | 60 | 60 | 60 | | 100000 | 60 | 60 | 60 | | 200000 | 60 | 60 | 60 | | 500000 | 60 | 60 | 60 | | 1000000 | 60 | 60 | 60 | | 2000000 | 60 | 60 | 60 | | 5000000 | 60 | 60 | 60 | | 1000001 | 60 | 60 | 60 | | 200001 | 60 | 60 | 60 | | 50001 | 60 | 60 | 60 | | 10001 | 60 | 60 | 60 | | 2001 | 60 | 60 | 60 | | 501 | 65 | 65 | 65 | | 101 | 75 | 75 | 75 | | 211 | 95 | 95 | 95 | | | | | | | | | | | | | | | | | | | | | | | | | | | | | | | | | | | | | | | | | | | | | | | | | | | | | | | | | | | | |DBSPL
10.1 SPL in the Horizontal Plane
10.0 Frequency Response
10.2 SPL in the Vertical Plane
line
| Frequency | On axis | 15° | 30° | | --------- | ------- | ----- | ----- | | 10 Hz | 72.0 | - | - | | 20 | 80.0 | - | - | | 50 | 89.5 | - | - | | 100 | 90.0 | - | - | | 200 | 90.0 | - | - | | 500 | 90.0 | 89.5 | 89.0 | | 1K | 90.0 | 89.5 | 88.5 | | 2K | 90.0 | 89.0 | 84.0 | | 5K | 90.0 | 88.5 | 86.0 | | 10K | 90.0 | 89.0 | 84.5 | | 20K | 90.0 | 87.0 | 76.0 | | 50K | 89.5 | 75.0 | 75.5 |dB SPL at 1 meter, free field, on-axis, 15° off axis, 30° off axis (-15 dBV input, attenuator = 0db)
11.0 Specifications
| Analog Input XLR female, Pin 1 | ground, Pin 2 positive, Pin 3 negativeInput Impedance = 20k OhmsInput Sensitivity (1m) = 90 dB @ -15 dBV (pass band) |
| Analog to Digital Conversion | Word Length: 24 bitSample Rate: 192 kHzOversampling = 128xSignal/Noise ≥ 125 dB |
| Frequency Response | 40 Hz - 45 kHz (+/- 3 dB), 53 Hz - 40 kHz (+/- 1 dB) |
| Bass Response -3 dB @ 40 Hz | Q = 0.707Slope = 12 dB/octave |
| Cabinet 14 liters total internal volume | Sealed Woofer and Midrange enclosuresMachined aluminum baffle plateLong fiber wool acoustic damping throughout |
| Crossover Frequencies 600 / 3600 Hz | |
| Tweeter 1" ring radiator with Advanced neodymium motorRear waveguide chamberAmplifier: 180W Hypex | |
| Midranges | 2 x 2.5" aluminum cone with Advanced neodymium motor+/- 2 mm linear excursionAmplifier: 180W Hypex |
| Woofer 8" aluminum cone with low distortion motor+/- 13 mm linear excursionAmplifier: 250W Hypex | |
| Power Mains Voltage Input: 115 or 230 VAC selectableIdle Power Consumption = 18WMaximum Power Consumption = 400 W | |
| Weight Speaker: 37.5 lbs each (17 kg)Shipping: 47 lbs each (21 kg) | |
| Dimensions HxWxD | Cabinet: 11.0 x 15.5 x 10.5 inches (279 x 394 x 267 mm)Overall: 11.0 x 15.5 x 11.4 inches (279 x 394 x 290 mm) |
12.0 Drawings
12.1 Cabinet dimensions [mm] inches
![[393.70] 15.50 [279.40] 11.00 [70.49] 2.78 [290.39] 11.43 [139.70] 5.50](/content/2026/05/1062833/images/dda1438d5fb8c7cd3f13c65977a87f7da242aef550398052e065bbc77760e242.jpg)
![MICROMAIN45 BARCEOOT SOUND Digital Privacy Object USA USB NVIDIA® CE OK NOT OPEN INJUREO ACCESS NO USER SENSORS FOR MS OSCE WARNING SHOOCHADO VAC Select [63.50] [2.50] [182.56] [58.74] [196.85] [7.19]](/content/2026/05/1062833/images/b4e6c00388591c29856d2f883a96dc1d52f2888ff09cde304621d8929ab287f0.jpg)
12.2 Rear Amplifier Panel Layout [mm] inches
13.0 Warranty
This product is under limited warranty as described in the following conditions. The warranty period commences on the date of purchase from the authorized dealer. Barefoot Sound reserves the right to request your original purchase receipt as proof of the date of purchase. The warranty follows the product and is transferable to any subsequent owner(s) as long as a copy of the original purchase receipt from the authorized dealer can be provided.
Electronic components and cabinetry of the product are warranted for a period of three (3) years against manufacturing defect, covering parts and labor for necessary repairs.
Moving speaker components are warranted for a period of one (1) year against manufacturing defect.
The manufacturer's warranties are limited to physical defects in the materials, parts and workmanship used in making the product. Misuse, incorrect installation, connection or handling, repairs or modifications performed by unauthorized persons, abnormal conditions, deliberate abuse, damage due to accidents such as power surges, water, fire, or any other are excluded from any warranty claims. In addition, faulty or unsuitable ancillary equipment, accessories, or options are fitted at owner's risk.
Barefoot Sound warrants all service repairs and replacements for 180 days from the date of return to the customer/owner. This warranty specifically excludes unrelated additional defects or failures. Otherwise the same general provisions of the limited product warranties apply.
13.1 Technical Support and Service
For warranty service and assistance, contact the original authorized dealer/distributor to arrange for return and/or repair of the product. Barefoot Sound will strive to satisfy all service requests in the fastest manner possible. Under the warranty, Barefoot Sound will repair, or at its discretion, replace the product at no charge, provided it is returned (postage paid) to an authorized Barefoot Sound service center. Any shipping or duties incurred are the customer's responsibility. Products should be returned suitably packaged to protect from shipping damage, or in their original packaging. Barefoot Sound shall be the sole and final authority to determine the validity of all warranty issues. All non-warranty repairs for current products will be charged according to the service repair pricing schedule. Repair prices will either be based on a flat fee for repair or replacement, or will be estimated depending on the repair deemed necessary.
Barefoot Sound LLC
http://barefootsound.com
2014
- MICROMAIN45
- Manual
- Description
- 2.0Warnings!
- Please read and follow the safety information below:
- Input and Controls
- Startup
- Protection Features
- Limiters
- Peak Limiter
- RMS Limiter
- Over Current
- Positioning
- Widening the Stereo Field
- Vertical Orientation
- Cooling Concerns
- Equalization
- EQ Switch Position - Contour Settings
- Maintenance
- Warranty
- Technical Support and Service
Brand : Barefoot Sound
Model : MicroMain 45
Category : Pregnant