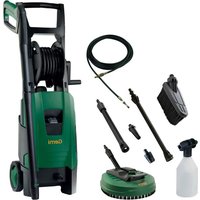
Classic 125.3 - Pressure washer Gerni - Free user manual and instructions
Find the device manual for free Classic 125.3 Gerni in PDF.


| Product Type | High Pressure Washer |
| Brand | Gerni |
| Model | Classic 125.3 |
| Dimensions (L x W x H) | 40 cm x 30 cm x 85 cm |
| Weight | 10.5 kg |
| Power Supply | 230 V / 50 Hz |
| Power Consumption | 1500 W |
| Maximum Pressure | 125 bar |
| Rated Pressure | 100 bar |
| Water Flow Rate | 6 L/min |
| Max Water Inlet Temperature | 40 °C |
| Hose Length | 8 m |
| Power Cord Length | 5 m |
| Nozzles Included | Adjustable, Rotary, Foam |
| Detergent Tank Capacity | 0.5 L |
| Sound Level | 75 dB(A) |
| Vibration Level | 2.5 m/s² |
| Protection Class | IPX5 |
| Safety Features | Auto-stop, Thermal cut-out, Locking trigger |
| Maintenance | Clean nozzle, check oil level, store frost-free |
| Spare Parts Availability | Nozzles, hoses, seals, brushes |
| Repairability Index | 7/10 |
| Country of Origin | Denmark |
| Warranty | 2 years |
Frequently Asked Questions - Classic 125.3 Gerni
User questions about Classic 125.3 Gerni
0 question about this device. Answer the ones you know or ask your own.
Ask a new question about this device
Download the instructions for your Pressure washer in PDF format for free! Find your manual Classic 125.3 - Gerni and take your electronic device back in hand. On this page are published all the documents necessary for the use of your device. Classic 125.3 by Gerni.
USER MANUAL Classic 125.3 Gerni
natural_image
Warning symbol: black exclamation mark inside a triangle (no text or numbers)
User Guide
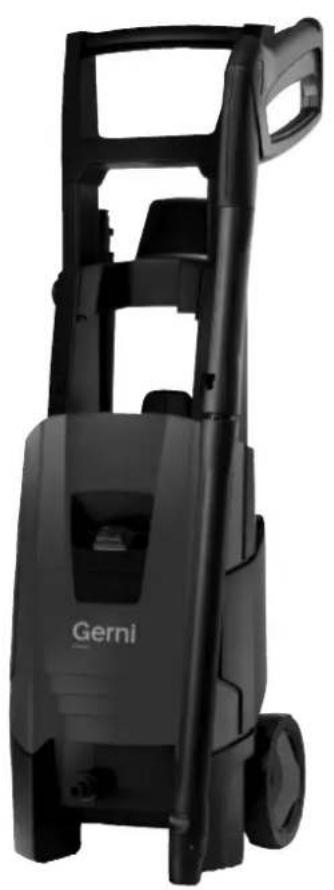
natural_image
Black Gerni water heater with visible wheels and handle (no text or symbols on body)
natural_image
Black Gerni water heater with adjustable handle and wheels (no visible text or symbols)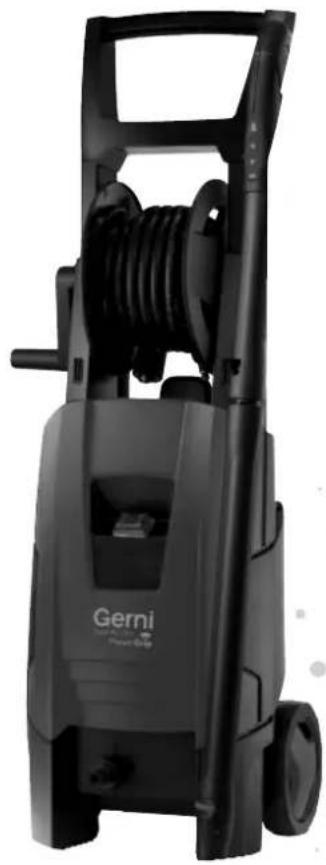
natural_image
Black Gerni power cord water heater with coiled spring (no visible text or symbols)Contents
1 Introduction 4
1.1 Symbols used to mark instruction....4
2 Safety precautions and working techniques ....4
3 Before you start using your high pressure washer .... 10
3.1 Mounting of trolley handle, hose hook and hose reel 10
3.2 Mounting of quick coupling ....10
3.3 Mounting of Battery (Cell battery – CR 2032) – Only for models with Wireless regulation .... 10
4 Operating your high pressure washer .... 11
4.1 Connection of high pressure hose ....11
4.2 Mounting of spray lance and Click&Clean nozzles ....11
4.3 Water Connection ....11
4.4 Starting the high pressure washer 12
4.5 Pressure regulation on the TORNADO® PR- nozzle....12
4.6 Stationary use ....12
4.7 Pairing the machine (Models with wireless regulation) ....13
4.8 Using wireless regulation (Models with wireless regulation) ....13
5 Fields of application and working methods 13
5.1 General....13
5.2 Typical fi elds of application .....14
6 After using the pressure washer 15
6.1 Stopping the high pressure washer ....15
7 Maintenance 15
8 Troubleshooting 16
9 Accessories and detergents 17
10 Warranty Conditions 17
11 Main technical Data 18
12 Declaration of Conformity 19
1 Introduction
1.1 Symbols used to mark instruction

All pictograms attached to the high pressure washer and its components are shown and explained in this manual.

Safety instructions marked with this symbol must be observed to prevent personal injury or serious damage to property.
Caution where there is a risk of damaging the machine or its individual components.

This symbol indicates tips and instructions to simplify work and to ensure a safe operation of the high pressure washer.
2 Safety precautions and working techniques

Before starting up your machine for the first time, this instruction manual must be read through carefully. Save the instructions for later use.

WARNING!
- Inhalation of aerosols can be hazardous to health. Where applicable use a device in order to avoid or reduce aerosols production, e.g., a shield covering the nozzle. For protection against aerosols use a respiratory mask of class FFP 2 or higher.
- The high water pressure generated by the machine and the power connection are particular sources of danger.
- Machines shall not be used by children or untrained personnel. Children should be supervised to ensure that they do not play with the machine.
- Do not use the machine within range of persons unless they wear protective clothing.
- Before starting up your machine please check it carefully for any defects. If you find any, do not start up your machine, contact your Gerni distributor. The insulation of the electric cable should be faultless and without any cracks. If the electric cable is damaged, an authorized Gerni di tributor should replace it.
- Always unplug the power plug before cleaning or maintenance and when replacing parts or converting the machine to another function.
- Observe the national safety regulations issued, for example, by the employers liability insurance association, social security institutions, occupational safety and health authorities or other organizations.
Accessories and spare parts

- To ensure the machine safety only use original spare parts from Gerni or approved by Gerni.
- High pressure hoses, fi ttings and couplings are important for the safety of the machine. Only use hoses, fi ttings and couplings recommended by Gerni.
Physical, sensory or mental conditions
- This machine is not intended for use by persons (including children) with reduced physical, sensory or mental capabilities or lack of experience and knowledge. If the machine is used by people with reduced physical, sensory or mental capabilities or lack of experience and knowledge they shall have been given supervision or instruction concerning use of the machine in a safe way and understand the hazards involved.

Applications
This machine has been developed for domestic use such as:
- Car, motorbike, boat, caravan, trailer, patio/drive/fl agstones, woodwork, brickwork, barbecue, garden furniture, lawn mower.
Any other use is considered as improper use. Gerni accepts no liability for any damage resulting from such use. The risk for such use is borne solely by the user.
Proper use also includes proper operation, servicing and repairs as specified in this instruction.
Clothing and equipment
Always take action to protect yourself when operating the machine.
- Wear shoes with non-slip soles.
- Wear goggles, ear protection and protective clothes
during operation.
Transporting the high pressure washer

- When transporting the machine in or on a vehicle, it must be secured, e.g. with straps, so that it cannot slip or tip over.
- Gerni recommends that the machine is positioned horizontally on the backside, when transported in or on a vehicle.

Detergents
- This machine has been designed for use with cleaning agents supplied or recommended by Gerni. The use of other cleaning agents or chemicals may adversely affect the function of the machine.

Before starting the work
Inspecting the machine
- Do not use the machine if a supply cord or important parts of the machine are damaged, e.g., safety device, high pressure hose, and spray handle and spray attachments.
- The trigger of the spray handle must move easily and automatically return to its starting position when released.
- Always keep high pressure hose and spray attachment in good condition (clean, moving easily) and correctly assembled.
Electrical connection

WARNING!
Minimize the risk for electrical shock:
- Voltage and frequency of the machine (see rating plate) must match the voltage of and frequency of the mains supply.
- Only connect the machine to electrical installation made by a certified electrician and comply with IEC 60364-1.
- It is recommended that the electrical supply to the
machine should include a residual current device that will interrupt the supply if the leakage current to earth exceeds 30 mA for 30 ms.
- Inadequate extension cables can be dangerous. If an extension cable is used, it shall be suitable for outdoor use, and the connection has to be kept dry and off the ground.
- Gerni recommends use of an extension cable drum when cable extension is needed which keeps the socket at least 60 mm above the ground.
- If the electric cable is damaged, it must be replaced by an authorized Gerni distributor or similar qualified person in order to avoid a hazard.

Water connection
- This high pressure washer is only allowed to be connected with the drinking water mains, when an appropriate backflow preventer has been installed, Type BA according to EN 60335-2-79.
- The backflow preventer can be ordered under number 106411177.
- As soon as drinking water has fl own through the back-flow preventer, it is no longer regarded as drinking water.
- Operation by suction (e.g. a rainwater vessel) is carried out without a backflow preventer – see “Connecting to a pressureless water supply”. The machine can be connected to water mains with a max. inlet-pressure of 1 MPa/10 bars and max. 40°C.
Safety devices
Locking device on spray handle:
- The spray handle features a locking device. When the pawl is activated, the spray handle cannot be operated.
Thermal sensor:
- A thermal sensor protects the motor against overloading. The machine will restart after a few minutes when the thermal sensor has cooled.
Pressure safety device:
- An integrated hydraulic safety valve protects the system from excessive pressure.
During work

WARNING!
- It is not allowed to clean asbestos-containing surfaces with high pressure.
- Risk of explosion – Do not spray fl ammable liquids.
- Never draw in fluids containing solvents (e.g., gasoline, heating oil, paint thinner or acetone) These substances damage the materials used in the machine. Their spray is highly combustible, explosive and poisonous.
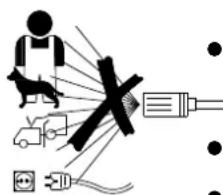
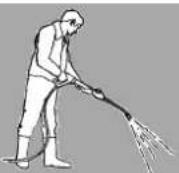
- Never direct the water jet at yourself, other persons, = not even to clean clothing or footwear - risk of injury.
- Never direct the water jet at pets or other animals.
- Never direct the water jet at live electrical equipment or the machine itself - danger of short-circuiting.
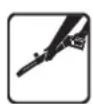
- The spray lance is affected by a kickback force less than 20N and a sudden torque when activating the trigger of the spray handle during operation.
- This high pressure washer machine must not be operated at temperatures below 0°C.
- Never start up a frozen machine. Frost damages are not covered by the guarantee!
- Always ensure fi rm and safe footing.
- The machine shall be operated in an upright position.
- If the machine is left or not used for 5 minutes, it must be switched off on the start/stop switch "O" (1).
After fi nishing the work

WARNING!
- Always switch off the machine and unplug the power plug from the socket after work and when leaving the machine unattended.
- Disconnect water inlet hose between machine and water supply.
- Always empty pump, hose and accessories of water after use of the machine and prior to storing.
Maintenance and repairs

WARNING!
• Always disconnect the electrical plug from the socket prior to maintenance, cleaning and repair.
- Any repair should always be made in Gerni authorized workshop with original Gerni spare parts.
- Do not attempt any maintenance not described in the instructions.
- If the machine refuses to start, stops, pulsates, pressure fluctuates, motor busses, fuse blows or no water comes out, check the trouble shooting diagram in these instructions. In case other problems occur, please contact your local Gerni distributor.
Recycling the high pressure washer
Make the old machine unusable immediately.
- Unplug the machine.
- Cut the electric cable.
- The battery must be removed from the appliance before it is scrapped; the battery is to be disposed of safely.
Do not discard electrical appliances with household waste. As specified in WEEE Directive 2012/19/EC on old electrical and electronic appliances, used electrical goods must be collected separately and recycled ecologically. Contact your local authorities or your nearest dealer for further information.
3 Before you start using your high pressure washer

See the pictorial quick reference guide – unpacking.
Illustration shows the operation elements and how to prepare your machine for use.
Operation elements
1 Start/stop switch
2 Water inlet (with fi Iter)
3 High pressure connection
4 High pressure hose
5 Electric cable
6 Click & Clean spray lance
7 Spray gun with lock (7a)
8 Click & Clean Tornado ^® PR nozzle
9 Click & Clean Powerspeed ^® nozzle
10 Click & Clean foam sprayer
11 Nozzle cleaning tool
12 Trolley Handle
13 Hose reel (not standard)
14 Hose hook / cable hook
15 Model tag
16 Warning sign
17 Quick coupling
3.1 Mounting of trolley handle, hose hook and hose reel
Mounting of trolley handle and hose hook (standard modelsl)
A1 Mount the trolley handle (12) on the machine. Mount the hose hook (14) on the handle.
Mounting of trolley handle and hose reel (models with hose reel)
A2 Mount the trolley handle (12) on the machine. Mount the hose reel (13) on the handle.
3.2 Mounting of quick coupling
A3 When mounting the quick coupling for the first time, check that the factory fitted filter is positioned in the water inlet pipe.
IMPORTANT!

The inlet filter must always be fitted in the water inlet pipe to filter out sand, limestone and other impurities as these will damage the pump valves. The filter is factory fitted. If the filter is removed this will invalidate the guarantee.
3.3 Mounting of Battery (Cell battery - CR 2032) - Only for models with Wireless regulation
A4 Unscrew (1) the lid (2) to access the battery compartment in the wireless spray handle. Gently push the battery (3) into the battery holder (4), + sign facing upwards as illustrated.
Mount the lid (1) to the battery compartment (2). Make sure that the lid gasket (3) is still placed properly in the groove at the spray handle.
A5 When the battery is mounted correctly, the orange LED (1) will flash for two minutes or until the spray handle has been paired with the machine. If pairing is not executed within 2 min., the spray handle enters into stand-by mode (battery saving) -> for pairing see section 4.7.
- If in standby mode and no pairing is in place, then the pairing process can be revitalized by pressing the up/down keys to activate the spray handle. Orange LED will then flash until pairing is completed or resuming standby mode.
When the battery runs out and you insert a new battery, the old battery must be disposed of safely.
4 Operating your high pressure washer
B

See the pictorial quick reference guide – operating your high pressure washer.
4.1 Connection of high pressure hose
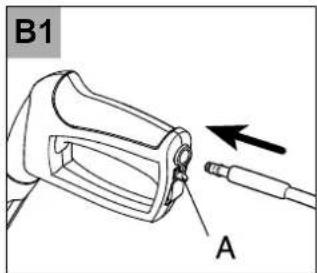
B1 Attach the high pressure hose (4) to the spray handle (7). Detach the high pressure hose by pressing the pawl (A). B2 Mount the high pressure hose on the outlet (3).
4.2 Mounting of spray lance and Click&Clean nozzles
B3 Push the spray lance (6) into the spray handle (7), twist and release.

NOTE!
The spray lance has a built-in low pressure nozzle that can be used for fl ushing away dirt.
B4 When attaching the nozzles (8, 9), press the nozzles into the spray lance.

IMPORTANT!
When attaching the click & Clean nozzles, the pawl on the side of the spray lance should come out again. The nozzle should stay in position when pulling it. B5 Push the foam sprayer (10) into the spray lance (6).

NOTE!
The foam sprayer features a swivel lock, which must be positioned in the hole in the Click & Clean spray lance. Press the pawl to detach the Click & clean nozzles and the foam sprayer.

IMPORTANT!
Before starting the cleaning job, check that the machine is in an upright position and placed on an even surface. Do not place the machine in long grass!
4.3 Water Connection

IMPORTANT!
Connecting to pressurized water supply
The inlet water max. pressure is 1 MPa/10 bar and the max. temperature is 40^ C – see rating plate. An ordinary 12 " garden hose of min. 10 m and max. 25 m will be suitable.
B6 Check that the filter is fitted in the water inlet pipe and that it is not clogged up.
B7 Connect the water hose to the water supply by means of the quick connector. Turn on the water.

Connection to the drinking water mains according to national and local regulations.

Let the water run through the water hose before connecting it to the machine to prevent sand and dirt from penetrating the machine.
B8 Turn off the water and connect the water hose by means of the quick coupling to the water inlet of the machine.

Connecting to pressure less water supply
The machine can also operate in suction mode, meaning that you can connect the machine to e.g. rainwater vessels, rivers, lakes and cisterns etc. When taking in water from non drinking water mains the backflow preventer is not needed.
When connecting the machine to operate from pressure less water supplies – always use additional fi ltering to secure that impurities are not sucked in. Hose length should be max. 3 meter and of minimum 12 ".

To meet these requirements, Gerni recommends that you use the original Gerni suction hose kit.
The Machine is designed for suction up to 0.5 meter above water surface.
- Position the machine at max. 0.5 meter above the water surface. Detach the high pressure hose from the outlet.
- Ensure that the inlet filter is in position and attach the suction hose kit, secure tight connection to the inlet.
- Turn on the machine, turning the start/stop switch (1) to position "I".
- Wait until a steady jet exits the outlet.
- Switch off the machine and attach high pressure hose (4), spray handle, lance and nozzle.
- Start the machine again and activate the spray handle.
4.4 Starting the high pressure washer

IMPORTANT!
Connecting to mains power supply
The voltage and frequency of the machine (see model tag (15)) must match the voltage and frequency of the power supply.
Connecting the high pressure washer to a supply system, the max allowed impedance is = 0,29+j0,18Ω (Zmax). Consult with the supply authority that the equipment is connected only to a supply of that impedance or less.

B9 Insert the power plug into power supply socket.
B10 Turn on the water.
B11 Release the trigger lock (7a). Remember to unplug, turn off the high pressure washer and lock the trigger, when leaving the high pressure washer unattended
B12 Activate the trigger of the spray handle and let the water run until all air has escaped from the water hose.
B13 Turn on the machine, pressing the start/stop switch to position "I".
B14 Activate the trigger of the spray handle. When releasing the trigger of the spray handle, the machine automatically stops. The machine will start again when you reactivate the trigger of the spray handle.
4.5 Pressure regulation on the TORNADO® PR- nozzle
B15 The pressure can be regulated on the TORNADO® PR nozzle.
4.6 Stationary use
B16 If mounting a special wall hook (not standard), the pressure washer can be used as a stationary solution meaning that it can be operated while hanging on the wall.
Only mount the wall hook on a sturdy wall. Adjust the length of the screws and size of rawlplugs to the type of wall.
B17 On the wall hook Multi Brush (a) foam sprayer (b), Click & Clean brush (c) and Click & Clean nozzles (d) can be stored.
The bearing capacity of the wall hook is max. 30 kg.
4.7 Pairing the machine (Models with wireless regulation)
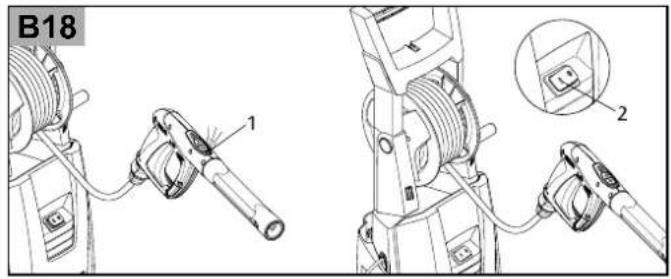
B18 Before using the machine with wireless regulation, the spray handle must be electrically paired to the machine. When the battery has been mounted - ref. section 3.4, and the spray handle is in pairing mode (orange LED is flashing (1) then turn on (2) the machine. The orange LED is now turned off and the spray handle is operational.
4.8 Using wireless regulation (Models with wireless regulation)
B19 The water pressure and use of energy is regulated by clicking the arrows (1) on the spray handle. The power can be regulated stepwise by pushing and releasing each button. It can also be regulated continuously by pushing and holding down each button. If so, the power will be increased/ decreased until max/ min is reached. The green LED illustrating the power level (2) is only lighting when pressing the up/down keys (1).
- Other wireless units (eg. microwave ovens, baby monitors, neighbours' wireless devices) that operate in the 2.4 GHz band can have a reduced effect on the wireless range between spray handle and machine.
5 Fields of application and working methods
5.1 General
Effi cient high presure cleaning is achieved by following a few guidelines, combined with your own personal experience of specific cleaning tasks. Accessories and detergents, when correctly chosen, can increase the efficiency of your pressure washer. Here is some basic information about cleaning.
5.1.1 Detergent and foam
Foam or detergent should be applied onto dry surfaces so that the chemical product is in direct contact with the dirt. Detergents are applied from bottom to top, for example on a car bodywork, in order to avoid "super clean" areas, where the detergent collects in higher concentration and streams downwards. Let the detergent work for several minutes before rinsing but never let it dry on the surface being cleaned. Note: It is important that the detergents do not dry up. Otherwise the surface that has to be cleaned can be da maged.
5.1.2 Mechanical effect
In order to break down tough layers of dirt, additional mechanical effect may be required. Special wash brushes offer this supplementary effect that cuts through dirt (especially by car washing).
5.2 Typical fi elds of application
Below you will find a description of a lot of cleaning tasks which can be solved by a pressure washer from Gerni in association with accessories and detergents.
| Task Accessories ‘Click & Clean’ | Cleaning method | |
| Car | Car nozzle, auto brush, underchassis nozzle, Foam sprayer, Car Combi Cleaner | 1. Apply Car Combi Cleaner with the foam sprayer. Always start from the bottom and work upwards. Let Car Combi Cleaner act for at least 5 min.2. Wash the car with the car nozzle, which has been optimized for quick and gentle cleaning of enamelled surfaces (the jet is wider and not so sharp). Start at the front of the car and work backwards to avoid water from penetrating by the door mouldings.3. Use the brush for removal of traffic film which is not removed by the nozzle. If the car is very dirty, apply Car Combi Cleaner again.4. Attach the undercarriage nozzle and clean undercarriage and wheel arches.5. Remove water from the surface of the car with the scraper on the car brush.Make surethat all grains of sand etc. have been removed before using the scraper. Wipe with a wash leather where the scraper cannot reach. |
| Rims, aluminium | Multi Brush with Rim brush head, auto nozzle, foam sprayer, Car Combi Cleaner | Apply Car Combi Cleaner with the foam sprayer or the Multibrush with detergent tank. Let it act for approx. 5 min.. Wash with rim brush head.Be careful!The high pressure jet may damage the tyres. |
| Flagstones, concrete floors and other hard surfaces | Powerspeed® nozzle, Stone & Wood Cleaner, Patio Cleaner | Wash towards outlets or the like. On surfaces with foulings you may start by applying Stone & Wood Cleaner with the foam sprayer. Wash before the soap dries. Another more effective and quicker method is to use the Patio Cleaner. Thus you will also avoid splashes. |
| Garden furniture, wood | Multi Brush with Garden brush head (with or without detergent tank) Stone & Wood CleanerFoam sprayer | Apply Stone & Wood Cleaner with foam sprayer or Multi Brush with Garden brush head and wash before the soap dries.NOTE:Use the Multi Brush with Garden brush head to clean off the dirt. |
| Brickwork, Wood work | Powerspeed® nozzle, Stone & Wood Cleaner, Patio Cleaner | Same method as for flagstones, butbe careful- bad joints and wood may be damaged by high pressure. You may choose only to use the Tornado® nozzle. Adjust the distance (pressure) to the quality of the joints and the wood. Patio Cleaner can also be used on vertical surfaces. |
| Gutter | Underchassis spray lance | Wash the gutter with the nozzle. Always wash towards downpipes.Bewarenot to spray under the roofi ng. |
| Cleaning of drain pipes, outlets, down pipes etc. | Tube cleaner | Push the tube cleaner approx. 12 m (to mark) into a tube or drain and activate the trigger of the spray handle. The nozzle opening turning backwards will pull the cleaner through the tube. The nozzle will break down the „plug“ and fl ush the dirt backwards. |
| Rust, paint | Water/sandblasting equipment | Mount the water/sand blasting equipment and rust and paint is effi ciently and quickly removed. Beware not to damage the surface to be sandblasted. |
| Greenhouse | Tornado® PR nozzle brush, Stone & Wood Cleaner | Wash with high pressure and maybe a brush. You may use Stone & Wood Cleaner to remove moss and algae. |
| Garden tools, lawn mover | Tornado® PR nozzle, Power-speed® nozzle, multiangle adaptor, Metal Cleaner | Rinse the worst dirt off with the nozzle. Apply Metal Cleaner with the foam sprayer and let it act for approx. 5 min. Wash with the nozzle. You may use the multiangle adaptor for hard to get at areas to avoid splashing. |
6 After using the pressure washer
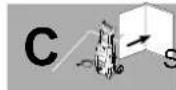
See the pictorial quick reference guide – storing the high pressure washer.

The high pressure washer should be stored in a frost free room! Should the machine by a mistake be frozen, it will be necessary to check it for damages.
6.1 Stopping the high pressure washer

C1 Shut off the water supply and activate the trigger of the spray handle and let the machine run until no more water runs out of the nozzle. This will wash out water hose, high pressure hose, spray lance and nozzles.
C2 Stop the machine, pressing the start/stop switch to position "0".
C3 Unplug the machine from the power supply socket.
IMPORTANT!
To avoid accidents, the electric cable and the high pressure hose should always be wound up carefully.
C4 Wind up the electric cable on the dedicated cable hook (14).
C5 The high pressure washer comes in two models: A) with hook for storage of high pressure hose (14) - B) with a hose reel (13).
C6 Rinse the spray lance, nozzles and the foam sprayer after use.
C7 Place spray handle, lance, nozzles, foam sprayer in the holders on the high pressure washer. The nozzle cleaning tool and a Click & Clean brush can also be stored on the product.
7 Maintenance

See the pictorial quick reference guide - maintenance.

To ensure a long and problem free working life of the high pressure washer, please take the following advices:
- Wash out water hose, high pressure hose, spray lance and accessory before mounting
- Clean the connectors of dust and sand
- Rinse the detergent bottle and the detergent nozzle
- Clean the nozzle
- Keep the water inlet fi Iter clean and unclogged
Cleaning of the water inlet fi Iter
D1 Clean the water inlet filter regularly once a month or more frequently according to use. Carefully loosen the filter with a screwdriver and clean it. Check that it is intact before remounting it.
Cleaning of nozzle
A clogging up in the nozzle causes a pump pressure which is too high, why cleaning is required immediately.

IMPORTANT!
The nozzle cleaning tool (11) should only be used when the nozzle is detached and the machine is stopped!
D2 Stop the machine and disconnect the nozzle. Clean the nozzle.
D3 Flush the nozzle backwards with water.
Cleaning of machine vents
D4 The machine should be kept clean so as to let cooling air pass freely through the machine vents.
Greasing of O-rings
D5 To ensure an easy connection and that O-rings do not dry up the couplings should be greased regularly.
8 Troubleshooting
To avoid unnecessary disappointments, you should check the following before contacting the Gerni service organization.
| Symptom Cause | Recommended action | |
| Machine refuses to start | Machine not plugged in Defective socketFuse has blownDefective extension cable | Plug in machineTry another socket.Replace fuse. Switch off other machines.Try without the extension cable. |
| Fluctuating pressure | Pump sucking airValves dirty, worn out or stuckPump seals worn out | Check that hoses and connections are air-tight.Clean and replace or refer to local Gerni-distributor.Clean and replace or refer to local Gerni-distributor. |
| Machine stops | Fuse has blownIncorrect mains voltageThermal sensor activatedNozzle partially blocked | Replace fuse. Switch off other machines.Check that the mains voltage corresponds to specifi cation on the model tag.Leave the washer for 5 minutes to cool down.Clean the nozzle (see section 7) |
| Fuse blows | Fuse too small Change to an installation higher than the amp. consumption of the machine.You may try without the extension cable. | |
| Machine pulsating | Air in inlet hose/pumpInadequate supply of mains waterNozzle partially blockedWater fi Iter blockedHose kinked | Allow machine to run with open trigger until regular working pressure resumes.Check that the water supply corresponds to specifi cations required (see model tag)NB! Avoid using long, thin hoses (min. 1/2")Clean the nozzle (see section 7)Clean the fi Iter (see section 7)Straighten out hose. |
| Machine often starts and stops by itself | Pump/spray handle is leaking | Contact your nearest Gerni Service Centre. |
| Machine starts, but no water comes out | Pump/hoses or accessory frozenNo water supplyWater fi Iter blockedNozzle blocked | Wait for pump/hoses or accessory to thaw.Connect inlet water.Clean the fi Iter (see section 7)Clean the nozzle (see section 7) |
| The orange LED is not fl ashing while ready for pairing | The spray handle is in stand-by modeBattery mounted incorrectly or no power on battery | Press the up/down keys to activate the spray handle. The orange LED will then fl ash and pairing can be made within 2 min.Dismount the lid and make sure that the battery is mounted correctly or replace the battery |
| The orange LED will light uninterrupted for 3 Sec and repeated when pressing up/ down button | Low battery Replace the battery | |
| The green LED is not lightning when press-ing the up/down keys | There is no communication between spray handle and machine | Point the spray handle towards the machine or move closer to the machine |
In case problems other than the above occur, please phone 1300 733 171 or check our website www.gerni.com.au for your nearest service agent.
9 Accessories and detergents
Only use original accessories and detergents. For further information, see www.gerni.com.au
10 Warranty Conditions
Our goods come with guarantees that cannot be excluded under the Australian Consumer Law. You are entitled to a replacement or refund for a major failure and for compensation for any other reasonably foreseeable loss or damage. You are also entitled to have the goods repaired or replaced if the goods fail to be of acceptable quality and the failure does not amount to a major failure.
Gerni high pressure washers for domestic use are warranted for 2 years from the date of purchase by:
AUSTRALIA:
Nilfi sk Pty LTd
Unit 1/13 Bessemer Street
Blacktown NSW 2148
Phone: 1300 556 710
E-mail: Warranty.au@nilfi sk.com
NEW ZEALAND:
Accent Tools Ltd
232 Bush Rd
Albany
Auckland 0632
Phone: 09 968 2610
E-mail: sales@accent-tools.co.nz
Equipment defects covered by this warranty will be repaired or replaced by one of the service centres of the Gerni organisation. Find your local service agent here:
http://www.gerni.com.au/.
If your high pressure washer or acces so ries are handed in for repair, it must be followed by a description/specification of the fault, and the original purchase receipt, or a copy, must be enclosed.
Packing and postage/carriage is not covered by the warranty.
The benefit is under this warranty are in addition to your national law of sale.
Guarantee repairs are made on the following con dit ions:
- that defects are attributable to flaws or defects in materials or workmanship. (wear and tear as well as misuse are not covered by the gu a ran tee).
- that the directions of this instruction manual have been thoroughly observed.
● that repair has not been carried out or attempted by other than Gerni-trained service staff.
● that only original accessories have been applied. - that the product has not been exposed to abuse such as knocks, bumps or frost.
● that only water without any impurities has been used. - that the high pressure washer has not been used for rental nor used commercially in any other way.
Repairs not covered by the guarantee conditions will be invoiced. (i.e. malfunctions due to Causes men ti o ned in section Trouble Shooting of the instruction manual).
Please phone 1300 733 171 (Australia) or 09 9682610 (NZ) for service or warranty assistance only after checking possible causes in the trouble shooting chart on page 16.
11 Main technical Data
| Type | Classic 125.3 | Classic 130.3Classic PG 130.3 | |
| Electric specifications | |||
| Rated voltage V 230-240 230-240 | |||
| Rated frequency Hz 50 50 | |||
| Rated power consumption kW 1.7 1.8 | |||
| Current A 7.5 7.8 | |||
| Protection class | Class I/Class II | Class II | Class II |
| Protection degree | IP xx | IPX5 | IPX5 |
| Hydraulic specifications | |||
| Rated pressure | MPa/bar | 10.0/100 | 10.5/105 |
| Max. pressure | MPa/bar | 12.5/125 | 13.0/130 |
| Rated water flow | l/min/l/h | 5.8/350 | 5.8/350 |
| Max. water flow | l/min/l/h | 8.7/520 | 8.7/520 |
| Max. water inlet pressure | Mpa/bar | 1/10 | 1/10 |
| Max. water inlet temperature | °C | 40 40 | |
| Max. water inlet temp. suction mode | °C | 20 20 | |
| Weight | kg | 9.0 | 9.3 (Classic 130.3)10.1 (Classic PG 130.3) |
| Hand-arm vibration according to ISO 5349-1:Standard nozzle | m/s ^2 | < 2.5 ±1 < 2.5 ±1 | |
| Sound pressure level LpA in accordance with ISO 3744 | dB(A) | 77.2 ±2 | 77.2 ±2 |
| Guaranteed sound power level LWA in accordance with 2000/14/EC | dB(A) | 92 92 | |
We reserve the right to make alterations.
12 Declaration of Conformity
We,
Nilfi sk A/S
Kornmarksvej 1
2605 Broendby
DENMARK
Hereby solely declare that the product:
| Product Description Type | ||
| HPW - ConsumerHPW - Consumer w/wireless remote* | 230-240 V 1~, 50/60 Hz– IPX5 | Gerni Classic 125.3 / Classic 130.3 / Classic PG 130.3 and accessory variants of above-mentioned types |
Is in compliance with the following standards:
| Id and Version Title | |
| EN 60335-1:2012+A11:2014 Household | Ind and similar electrical appliances - Safety - Part 1: General requirements |
| EN 60335-2-79:2012 Household and | similar electrical appliances - Safety - Part 2-79: Particular requirements for high pressure cleaners and steam cleaners |
| EN 55014-1:2006+A1:2009+A2:2011 | Electromagnetic compatibility - Requirements for household appliances, electric tools and similar apparatus - Part 1: Emission |
| EN 55014-2:1997+A1:2001+A2:2008 | Electromagnetic compatibility - Requirements for household appliances, electric tools and similar apparatus - Part 2: Immunity - Product family standard |
| EN 61000-3-11:2000 Electromagnetic | compatibility (EMC) - Part 3-11: Limits - Limitation of voltage changes, voltage fluctuations and flicker in public low-voltage supply systems, for equipment with rated current ≤ 75 A per phase and subject to conditional connection |
| EN 50581:2012 Technical documentation for the assessment of electrical and electronic products with respect to the restriction of hazardous substances | |
| *EN 300 440-2 V1.4.1 | ERM; Short range devices; Radio equipment to be used in the 1 GHz to 40 GHz frequency range; Part 2: Harmonized EN covering the essential requirements of article 3.2 of the R&TTE Directive |
| *EN 301 489-1 V1.9.2 | EMC standard for radio equipment and services; Part 1: Common technical requirements |
| *EN 301 489-3 V1.6.1 | EMC standard for radio equipment and services; Part 3: Specific conditions for Short-Range Devices (SRD) operating on frequencies between 9 kHz and 246 GHz |
Following the provisions of:
Machinery Directive 2006/42/EC
EMC Directive 2004/108/EC → April 20, 2016 → 2014/30/EC
RoHS Directive 2011/65/EC
Noise Emission Directive 2000/14/EC – Conformity assessment procedure according to Annex V.
Compliance to harmonic current emissions is documented in the TCF.
Measured noise level: 77 dB(A); Guaranteed noise level: 92 dB(A)
* R&TTE Directive 1999/5/EC
| Hadsund | 27-11-2015 | Anton SørensenGM – Technical Operations | ### |
| Place | Date | Name, Title | Signature |


natural_image
Mechanical assembly diagram showing a bracket with adjustment parts (no text or labels)

natural_image
Technical line drawing of a mechanical assembly with gears and housing (no text or symbols)

B




natural_image
Technical diagram of a mechanical assembly with labeled components (no text or symbols present)
natural_image
Diagram of a water spray system with pipe, valve, and hose (no text or labels)
natural_image
Diagram of a faucet with a valve and bucket, showing a right-hand rule (no text or symbols)
natural_image
Technical diagram of a mechanical assembly with a coiled cable and connector (no text or symbols)


natural_image
Technical line drawing of a mechanical component with no visible text or symbols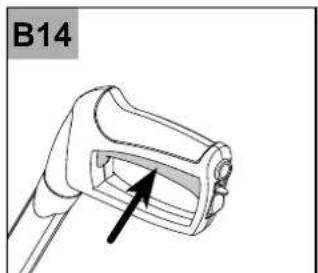
natural_image
Technical line drawing of a mechanical component with an arrow indicating direction (no text or symbols)

natural_image
Technical line drawing of a mechanical clamp or bracket assembly (no text or symbols)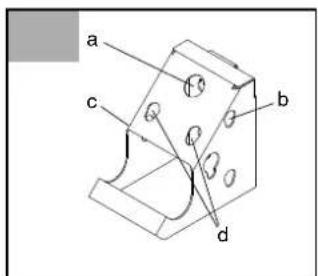

C

natural_image
Diagram of a mechanical device with a directional arrow indicating motion, no text or symbols present

natural_image
Diagram of a handheld device with an arrow pointing to the internal structure (no text or symbols)
natural_image
Technical line drawing of a door or vent with an arrow pointing to a small component (no text or symbols present)

natural_image
Technical line drawing of a mechanical device with hoses and components (no text or symbols)
natural_image
Diagram of a car interior with hoses and connectors, labeled C5 (no text or symbols on the diagram itself)
natural_image
Technical line drawing of a mechanical device with hoses and shafts (no text or symbols)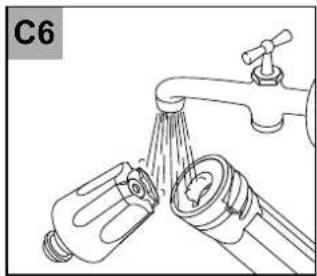
natural_image
Line drawing of a faucet with a showerhead spraying water, no text or symbols present
natural_image
Technical line drawing of a mechanical device with no visible text or symbols
natural_image
Technical line drawing of a mechanical device with hoses and components (no text or symbols)D


natural_image
Line drawing of a screwdriver with a connector, labeled D2 (no text or symbols on the diagram itself)
natural_image
Line drawing of a faucet with a spray bottle and hose, no text or symbols present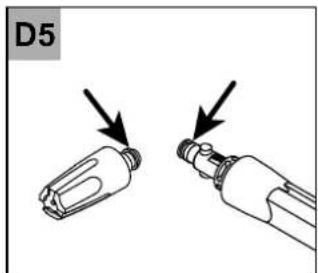
natural_image
Diagram showing two mechanical components with arrows pointing to them, labeled D5 (no text or symbols on the components themselves)AUSTRALIA:
Nilfi sk Pty Ltd
Unit 1/13 Bessemer Street
Blacktown NSW 2148
Phone: 1300 556 710
E-mail: Info.au@nilfi sk.com
NEW ZEALAND:
Accent Tools Ltd
232 Bush Rd
Albany
Auckland 0632
Phone: 09 968 2610
E-mail: sales@accent-tools.co.nz
- Contents
- Introduction 4
- Safety precautions and working techniques ....4
- Before you start using your high pressure washer .... 10
- Operating your high pressure washer .... 11
- Fields of application and working methods 13
- After using the pressure washer 15
- Maintenance 15
- Troubleshooting 16
- Accessories and detergents 17
- Warranty Conditions 17
- Main technical Data 18
- Declaration of Conformity 19
- Introduction
- Symbols used to mark instruction
- Safety precautions and working techniques
- WARNING!
- Accessories and spare parts
- Physical, sensory or mental conditions
- Applications
- Clothing and equipment
- Transporting the high pressure washer
- Detergents
- Before starting the work
- Inspecting the machine
- Electrical connection
- Water connection
- Safety devices
- Locking device on spray handle:
- Thermal sensor:
- Pressure safety device:
- During work
- After fi nishing the work
- Maintenance and repairs
- Recycling the high pressure washer
- Before you start using your high pressure washer
- Operation elements
- Mounting of trolley handle, hose hook and hose reel
- Mounting of trolley handle and hose hook (standard modelsl)
- Mounting of trolley handle and hose reel (models with hose reel)
- Mounting of quick coupling
- IMPORTANT!
- Mounting of Battery (Cell battery - CR 2032) - Only for models with Wireless regulation
- Operating your high pressure washer
- B
- Connection of high pressure hose
- Mounting of spray lance and Click&Clean nozzles
- NOTE!
- Water Connection
- Connecting to pressurized water supply
- Connecting to pressure less water supply
- Starting the high pressure washer
- Connecting to mains power supply
- Pressure regulation on the TORNADO® PR- nozzle
- Stationary use
- Pairing the machine (Models with wireless regulation)
- Using wireless regulation (Models with wireless regulation)
- Fields of application and working methods
- General
- Detergent and foam
- Mechanical effect
- Typical fi elds of application
- After using the pressure washer
- Stopping the high pressure washer
- Maintenance
- Cleaning of the water inlet fi Iter
- Cleaning of nozzle
- Cleaning of machine vents
- Greasing of O-rings
- Troubleshooting
- Accessories and detergents
- Warranty Conditions
- AUSTRALIA:
- NEW ZEALAND:
- Main technical Data
- Declaration of Conformity
Brand : Gerni
Model : Classic 125.3
Category : Pressure washer