
AM360R - Household Fan OMEGA - Free user manual and instructions
Find the device manual for free AM360R OMEGA in PDF.


| Product Type | Domestic Fan |
| Brand | Omega |
| Model | AM360R |
| Dimensions (HxWxD) | Approx. 36 x 12 x 12 inches (stand type) |
| Weight | Approx. 7.5 lbs (3.4 kg) |
| Power Supply | 120V / 60Hz |
| Power Consumption | 55 Watts |
| Speed Settings | 3 (Low, Medium, High) |
| Oscillation | Yes, 90° horizontal |
| Timer | Yes, up to 2 hours |
| Remote Control | Yes, included |
| Tilt Adjustment | Yes, manual up/down |
| Blade Diameter | 16 inches (40 cm) |
| Noise Level | Approx. 50 dB (max speed) |
| Safety Features | Overheat protection, stable base with anti-skid pads |
| Maintenance | Clean with damp cloth; dust filter washable |
| Spare Parts Availability | Blades, grille, motor available from service centers |
| Repairability Index | 7.5/10 (replaceable parts) |
| Warranty | 1 year limited |
| Certifications | ETL, CE |
Frequently Asked Questions - AM360R OMEGA
User questions about AM360R OMEGA
0 question about this device. Answer the ones you know or ask your own.
Ask a new question about this device
Download the instructions for your Household Fan in PDF format for free! Find your manual AM360R - OMEGA and take your electronic device back in hand. On this page are published all the documents necessary for the use of your device. AM360R by OMEGA.
USER MANUAL AM360R OMEGA
OPERATION, MAINTENANCE AND SAFETY INSTRUCTIONS
FOR OMEGA ALTISE MISTING FAN

natural_image
Exterior view of a modern air conditioner unit with visible fan blades and control panel (no text or symbols)MODELS INCLUDE:
AM360R
omega altise
IMPORTANT SAFETY INSTRUCTIONS
IMPORTANT: Read the safety precautions of this booklet carefully before attempting to assemble, install, operate or maintain the product described. Protect yourself and others by observing all safety information. Failure to comply with instructions could result in personal injury and/or property damage. If you are unsure about anything regarding your appliance or these instructions, please contact Omega Altise on 1300 795 572 in Australia or (09) 415 6000 in New Zealand before operating your appliance.
1. Read all instructions carefully before using the misting fan.
2. Use this misting fan only as described in this manual. Any other use not recommended by the manufacturer may cause fire, electrical shock, or injury to persons. Do not modify this appliance. Do not try to repair this appliance – there are no user serviceable parts within.
3. Remove the packaging and ensure that the appliance is undamaged (keep packing box for later storage). Take care to remove all packaging inside the guards & around the mist outlet. In case of doubt do not use the appliance and contact Omega Altise Service. Do not let children play with any parts of the packaging.
4. This appliance is not intended for use by persons (including children) with reduced physical, sensory or mental capabilities, or lack of experience or knowledge, unless they have been given supervision or instruction concerning the use of the appliance by a person responsible for their safety. Children should be supervised to ensure that they do not play with the appliance. Extreme caution is necessary when the misting fan is used by or near children or individuals with decreased mental and physical capacity and whenever the misting fan is left operating unattended.
5. Before you use the appliance, check if the voltage marked on the rating label corresponds to the mains in your home. The appliance must be connected to a grounded power supply.
6. Do not use this appliance with a programmer, timer or any other device that switches the appliance on automatically, since a fire risk exists if the appliance is covered or positioned incorrectly.
7. Do not pull the power cord to disconnect with the power source. Always grasp the plug to pull it out. Do not remove the plug from the power source with wet hands or if water has spilt on the ground where you are standing.
8. Do not run power cords under rugs or other combustible materials. Do not place power cords in areas where they can be a tripping hazard.
9. Do not insert any objects into the appliance as it may cause an electric shock or fire or damage to the appliance. Do not block or tamper with the appliance in any manner while it is in operation. To prevent a possible fire, do not cover the appliance in any manner. Do not place on soft surfaces, like a bed, where openings may become blocked.
10. Do not leave the appliance unattended. Always unplug the appliance when not in use. Take care that it is not obstructed when oscillating.
WARNING: The Function Switch should not be used as the sole means of disconnecting power. Always unplug the power cord before servicing or moving the appliance.
- Keep materials such as hair, net curtains, tablecloths & clothes away from the openings of the misting fan, as material may be sucked into the appliance causing injury, damage to property or the appliance.
- The appliance has hot and arcing or sparking parts inside. It must NOT be used in potentially dangerous locations such as flammable, explosive, chemical-laden, corrosive, salty or wet atmospheres. This appliance is intended for general indoor domestic use ONLY.
- This appliance is not intended for use in wet or damp locations. Never locate it where it may fall into a bathtub or other water container.
- Do not use the misting fan outdoors. Do not use close to windows or in direct sunlight.
- Always place the appliance on flat, stable surfaces before use. Always place the appliance vertically on its base
- The water depth sensor will turn the misting function off if it detects the water in the tank has run out. Do not fill with any other liquid than water, or water over 40^ C.
WARNING: To avoid danger of electric shock, unplug from outlet when not in use and before cleaning or refilling the water reservoir. If the supply cord is damaged, it must be replaced by the manufacturer, its Service Agent or similarly qualified persons in order to avoid a hazard. In order to avoid overheating, do not cover the appliance. Do not use the appliance in the immediate surrounding of a bath, shower or swimming pool.
GENERAL MISTING FAN PARTS
- LED Display
- Control Buttons
- Control Panel
- Air Guide wheel
- Misting Plate
- Front Cover
- Water Level Indicator
- Panel Bracket
- Back cover
- Back guard
- Water tank
- Drain cover
- Power Cord
- Castors

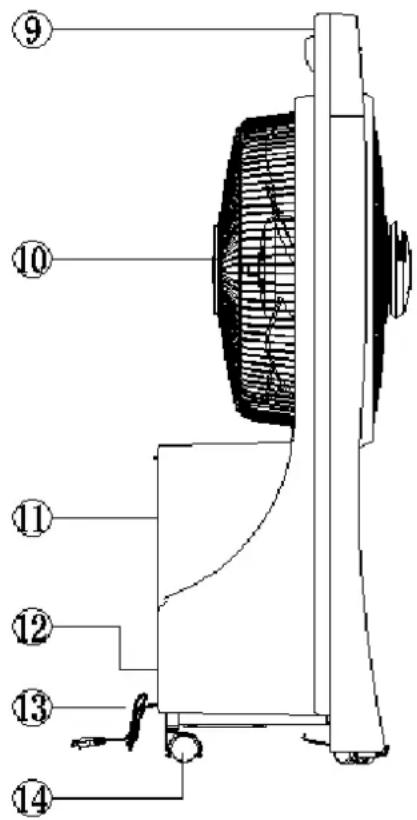
TECHNICAL DATA
Model: AM360R.
Voltage: 220-240V 50Hz.
Power Ratings: 90W (Misting - 32W).
Size: 400*290*800mm.
Weight: 6.5kg.
Maximum water usage: 130mL/hr.
Water tank capacity: 2.5L.
GETTING STARTED
- Carefully remove the appliance from the plastic bag and the carton, and unwind the cord to its full length.
- Place the appliance onto a stable, flat and dry surface.
- Fill the water tank with cool water.
- Plug the cord set into a 230-240V\~A.C. 50Hz earthed electrical outlet. Turn the power on at the electrical outlet.
CONTROLS
FUNCTION BUTTONS:

CONTROL PANEL ON FRONT OF BODY

REMOTE CONTROL
There are 6 function buttons on the control panel at the front of the main body and on the remote control. Make sure the power has been connected (indicator 6 will light up to indicate this) and the water tank has been filled.
1) Off button (9): This button turns the fan off when pressed. The Fan Function icon will turn off.
2) On/Speed button (10): When connected to the power supply, the "Power on" indicator (6) will light up. Press the On/Speed button to start the fan on slow speed. The digital display (1) will show the low speed as "1". The Fan Function icon (2) will also light up. Press the button a second time for medium speed (shown as "2") and a third time for high speed (displayed as "3"). Pressing once more will cycle the speed back to low.
3) Mist button: This button turns the mist function on and off. Press the button (11) once to start the misting function (with or without the fan working) and the mist will start to come out of the misting plate. The Misting Function icon (8) will also light up. Press the button another time and the mist will stop (Misting Function icon (8) will turn off). Note that the amount of mist may start off a little low, which is normal.
4) Ioniser button: This button turns the loniser on and off. Press the loniser button (12) once to turn the function on (the loniser function button (4) will light up). Press a second time to turn the function off.
5) Rotate button: This button turns the rotation of the front venting on and off. With the fan running, press the Rotate button (13) once to start the venting rotating (the Rotation icon (3) will light up), and again to turn it off.
6) Timer: This button is used to set up the timer for the fan and mist functions (the loniser function is not affected by the timer). First start the fan and/or mist function. Press the Timer button (14) once. The first digital display (1) will change to "H" and the Timer display (5) will show the current timer period (1). The Timer button can be pressed again to increase the timer period for up to 9 hours (in 1 hour increments). Pressing once more after the timer has reached 9 hours will reset the timer to zero. Once set, the misting will fan can be left to run, with the timer counting down & stopping the function(s) at the end of the set time. The appliance can still be turned off with the Off button.
With the power cord plugged in, the power switched on, and the water tank full, the misting fan is now ready for operation.
a) To use the fan, press the On/Speed button (starts at low speed). Press again to cycle through the speeds. To turn the fan off, press the Off button.
b) To start the fan vent rotating, press the Rotate button once...press a second time to turn it off. The direction of the venting can be adjusted in the same way, or by hand.
c) The misting function can be turned on & off using the Mist button. This forces water droplets through the mist cover, to increase the humidity of the air. This can be used with the fan running to spread the moisture faster, or with the fan off. Make sure that the water tank is full (this can be seen through the water level indicator at the front of the main body). Note that it takes a little while for the full force of the misting function to start up – a lower amount of mist at start-up is normal.
d) The Ioniser function can be turned on & off with the Ioniser button. This function creates negatively charged ions which float through the air, attracting airborne particles & acting as an air purifier.
e) A timer for the fan and/or mist function can be set by pressing the timer button (each press of the button increases the time by an hour up to 9 hours. One more press resets the timer to 0 (continuous)). The display shows the remaining time when the timer is active. The timer function does not affect the other functions.
FILLING THE WATER TANK
Always fill the water tank fully before using the mist function. After use, empty (and clean if necessary) the water tank. Remove the appliance from the power source. Take the tank out of the rear mounting, unscrew the plug and fill with cool (or cold) water. Screw the cap securely back onto the tank and fit the tank back into its position at the rear of the misting fan. Make sure the plug is placed correctly in its mounting, otherwise the water will not flow. Dry any spilled water (and hands) and reconnect the appliance to the power. The level of the water can be seen through the small water level indicator at the front of the appliance.
CLEANING & MAINTENANCE
WARNING: ALWAYS UNPLUG THE CORD BEFORE MOVING OR SERVICING, DO NOT IMMERSE APPLIANCE IN WATER!
The fan should be cleaned periodically (at least once a month depending on the build-up of dust). After unplugging the appliance, clean the venting, rear guard and fan blades with a damp, soft cloth and then allow to dry.
Clean the body of the misting fan with a soft damp cloth. Always make sure that the appliance is completely dry before connecting back to the mains supply.
CAUTION: Do not use gasoline, benzene, thinner, harsh cleaners, etc. as they will damage the fan. NEVER use ALCOHOL OR SOLVENTS.
At least once a week, wash out the tank with clean water. Allow to dry before refilling. Put a few drops of sewing machine oil between the bearing and motor shaft.
Do not disassemble the fan in any other manner.
STORAGE: Store the misting fan with these instructions, in a cool, dry place.
TROUBLESHOOTING
| Fault | Possible Cause | Solution |
| Fan does not work when plugged in. | Main power off, fuses blown | Check power is on at meter. |
| Motor failed to start Select a higher fan speed. | ||
| Power rating too low Increase power to correct rating. | ||
| Fan shaft not turning Knock motor cover to see if it loosens. | ||
| PCB or motor capacitor not working | Contact Omega Altise Service. | |
| Excessive shaking | Rear guard loose Tighten rear guard nut. | |
| Blade fastening screw is loose | Tighten blade fastening screw. | |
| Blade damaged Contact Omega Altise Service. | ||
| Atomiser working but no mist coming out | No water in tank | Add water to water tank. |
| Water has alkaline solution in it | Clean tank twice & re-try. | |
| Water tank is damaged & leaking internally | Replace tank & dry other parts. | |
| Mist guide tubes are blocked or incorrectly fitted | Clean out tubes with water & fit correctly. | |
| Indicator lights on, fan works, no mist. | No water in tank | Add water to water tank. |
| Mist function not selected Select mist function. | ||
| The mist smells | New unit – plastic smell will go away | Open the tank & leave dry for 12 hours. |
| Water tank dirty or water dirty | Change water, clean tank. | |
| Other | Burning smell coming from motor | Turn off fan, remove from power & contact Omega Altise Service. |
| Insulation damaged Remove from power & contact Omega Altise Service. | ||
| Motor seems to overheat Stop fan for 15 minutes & re-start. | ||
| Guards damaged Contact Omega Altise Service, do not use until replaced. |
It is important that you retain these instructions, proof of purchase as well as other important documents about this product for future reference.
Due to continual product development, Omega Altise reserves the right to alter specifications or appearances without notice.
Dispose of packaging responsibly – recycle where facilities are available.
omega altise
A division of Shriro Australia Pty Ltd
104 Vanessa St Kingsgrove NSW 2208
In Australia: 1300 795 572
In New Zealand: (09) 415 6000
www.omegaaltise.com
IM Ref: AM360R 26/2014/05
omega
altise
- OPERATION, MAINTENANCE AND SAFETY INSTRUCTIONS
- IMPORTANT SAFETY INSTRUCTIONS
- GENERAL MISTING FAN PARTS
- TECHNICAL DATA
- GETTING STARTED
- CONTROLS
- FILLING THE WATER TANK
- CLEANING & MAINTENANCE
- WARNING: ALWAYS UNPLUG THE CORD BEFORE MOVING OR SERVICING, DO NOT IMMERSE APPLIANCE IN WATER!
- TROUBLESHOOTING
- omega altise
Brand : OMEGA
Model : AM360R
Category : Household Fan