
X6530sc - Thermal camera FLIR - Free user manual and instructions
Find the device manual for free X6530sc FLIR in PDF.


| Product Type | Cooled Thermal Camera |
| Brand | FLIR |
| Model | X6530sc |
| Detector Type | InSb (Indium Antimonide) |
| Resolution | 640 x 512 pixels |
| Spectral Range | 3 – 5 µm |
| Frame Rate | Up to 30 Hz (full frame) |
| Thermal Sensitivity (NETD) | < 25 mK |
| Dimensions (Camera Body) | Approx. 320 x 140 x 140 mm |
| Weight | Approx. 5.2 kg (without lens) |
| Power Supply | 24 V DC (external power supply included) |
| Operating Temperature | -20°C to +55°C |
| Storage Temperature | -40°C to +70°C |
| Main Functions | High-speed thermal imaging, image recording (RAW), digital zoom, NUC correction |
| Lens Mount | FLIR bayonet mount (compatible with various lenses) |
| Output Interface | Camera Link, GigE Vision, analog video |
| Maintenance | Annual calibration recommended; clean lens with optical cloth |
| Safety | Use only approved power supply; avoid exposing to moisture |
| Spare Parts & Repairability | Contact FLIR Service for genuine parts; camera is field-serviceable |
| General Information | Designed for scientific and industrial R&D applications |
Frequently Asked Questions - X6530sc FLIR
User questions about X6530sc FLIR
0 question about this device. Answer the ones you know or ask your own.
Ask a new question about this device
Download the instructions for your Thermal camera in PDF format for free! Find your manual X6530sc - FLIR and take your electronic device back in hand. On this page are published all the documents necessary for the use of your device. X6530sc by FLIR.
USER MANUAL X6530sc FLIR
User's manual FLIR X6530sc series
natural_image
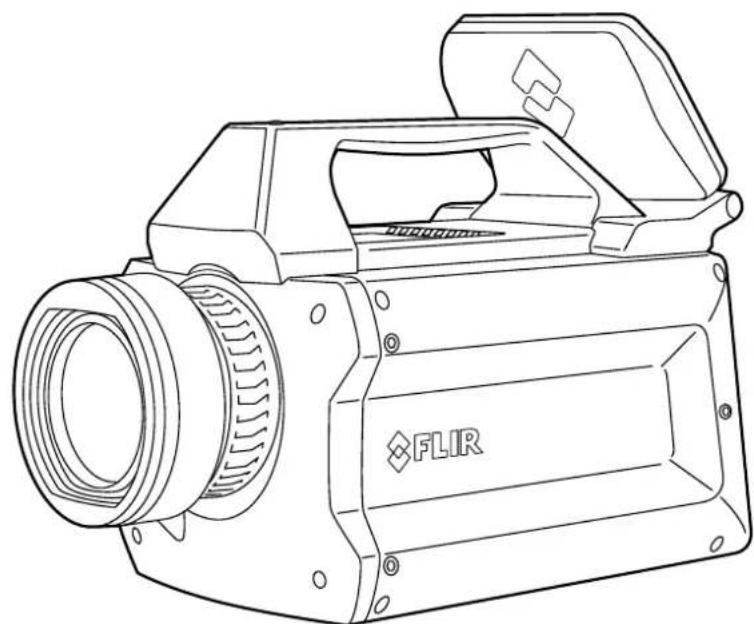
Line drawing of a FLIR digital camera with lens and external casing (no text or symbols beyond branding)User's manual FLIR X6530sc series
Table of contents
1 Disclaimers ....1
1.1 Legal disclaimer ....1
1.2 Usage statistics ....1
1.3 Changes to registry ....1
1.4 U.S. Government Regulations....2
1.5 Copyright ......2
1.6 Quality assurance ....2
1.7 Patents....2
1.8 Third-party licenses....2
1.8.1 GNU Lesser General Public License (LGPL) 2
1.8.2 Fonts (Source Han Sans).....2
1.8.3 Fonts (DejaVu) 3
2 Safety information ....4
3 Notice to user ....5
3.1 User-to-user forums ....5
3.2 Calibration....5
3.3 Accuracy ....5
3.4 Disposal of electronic waste 5
3.5 Training 5
3.6 Documentation updates ....5
3.7 Important note about this manual....5
3.8 Note about authoritative versions....6
4 Customer help ....7
4.1 General 7
4.2 Submitting a question ....7
4.3 Downloads 7
5 Introduction....9
5.1 Camera system components....9
5.2 System overview ......9
5.2.1 View from the front—bayonet mount.... 10
5.2.2 View from the front—M80 mount.... 10
5.2.3 View from the rear 11
5.2.4 Back panel 12
5.3 Key features 13
6 Installing the camera 15
6.1 Mounting the camera.... 15
6.2 Powering the camera 15
6.2.1 Power supply.... 15
6.2.2 Power button.... 16
6.2.3 Camera boot-up and cooling down.... 16
6.3 Adjusting the field of view 16
6.3.1 LCD screen.... 16
6.3.2 Lens.... 18
6.4 Setting the camera parameters 21
6.4.1 Connection to the computer.... 21
6.4.2 Connection to FLIR ResearchIR Max.... 21
6.4.3 Image size adjustment.... 22
6.4.4 Measurement configuration 23
6.4.5 Temperature range adjustment.... 24
6.4.6 Frame frequency.... 25
6.4.7 Synchronizing the camera to an external signal.... 25
6.4.8 Advanced camera controls 26
6.4.9 Extended camera information 27
7 Operation 29
7.1 Filter wheel.... 29
7.1.1 Removing an optical filter holder.... 29
7.1.2 Installing an optical filter holder.... 29
7.1.3 Filter holder identification 30
7.1.4 Creating a custom filter holder.... 30
7.1.5 Installing two filters in the filter holder.... 31
7.1.6 Adding a custom filter parameter into the camera 32
7.1.7 Filter definition file description 33
7.2 Camera configuration file management.... 34
7.2.1 CNUC file management.... 34
7.3 Camera Wi-Fi application 34
7.3.1 General.... 34
7.3.2 Procedure 34
7.3.3 Camera web page description.... 35
7.4 Infrared remote.... 35
7.4.1 General.... 35
7.4.2 Procedure 35
8 Radiometric measurement 36
8.1 Non-uniformity correction (NUC) 36
8.1.1 General.... 36
8.1.2 CNUC.... 36
8.1.3 Two-point correction process 36
8.1.4 One-point correction (offset correction) 37
8.2 Temperature calibration.... 37
8.2.1 Hypercal 37
8.2.2 Auto-exposure.... 37
8.3 Bad pixel replacement 38
8.3.1 General.... 38
8.4 Camera file management.... 38
8.4.1 Procedure 38
8.5 Frame rate and integration modes 38
8.5.1 General.... 38
8.5.2 The ITR process 39
8.5.3 The IWR process 39
8.5.4 Procedure 40
8.6 Dynamic range extension—superframing 40
8.7 Camera synchronization.... 41
8.7.1 Sync In 42
8.7.2 Sync Out 43
8.8 Trigger In.... 44
8.8.1 General.... 44
8.8.2 Characteristics 44
8.8.3 LED description 45
8.9 Lock-in 45
8.9.1 General.... 45
8.9.2 Characteristics 45
8.10 IRIG-B 46
9 Interfaces 47
9.1 Wi-Fi connection.... 47
9.1.1 General.... 47
9.1.2 Procedure 47
9.2 USB connection 48
9.2.1 General.... 48
9.2.2 USB driver installation 49
9.2.3 Configuration of the network interface.... 53
9.2.4 Accessing the camera files with Windows Explorer 55
10 Mechanical drawings 57
11 Technical data.... 60
11.1 Note about technical data 60
11.2 Note about authoritative versions.... 60
11.3 FLIR X6530sc 61
11.4 FLIR X6530sc M80 64
12 Maintenance and service.... 67
12.1 Cleaning the camera 67
12.1.1 Camera housing, cables, and other items 67
12.1.2 Infrared lens.... 67
12.2 Cooler maintenance 68
12.2.1 General.... 68
12.2.2 Signs to watch for.... 68
13 Quality 69
13.1 Quality assurance 69
13.2 For the US market.... 69
13.3 For the Canadian market 69
13.4 For the whole world 69
14 About FLIR Systems 70
14.1 More than just an infrared camera 71
14.2 Sharing our knowledge 71
14.3 Supporting our customers.... 72
15 Terms, laws, and definitions.... 73
16 Thermographic measurement techniques 75
16.1 Introduction 75
16.2 Emissivity.... 75
16.2.1 Finding the emissivity of a sample.... 75
16.3 Reflected apparent temperature.... 79
16.4 Distance 79
16.5 Relative humidity 79
16.6 Other parameters.... 79
17 About calibration.... 80
17.1 Introduction 80
17.2 Definition—what is calibration? 80
17.3 Camera calibration at FLIR Systems 80
17.4 The differences between a calibration performed by a user and that performed directly at FLIR Systems.... 81
17.5 Calibration, verification and adjustment.... 81
17.6 Non-uniformity correction.... 82
17.7 Thermal image adjustment (thermal tuning) 82
18 History of infrared technology.... 83
19 Theory of thermography.... 86
19.1 Introduction 86
19.2 The electromagnetic spectrum.... 86
19.3 Blackbody radiation.... 86
19.3.1 Planck's law 87
19.3.2 Wien's displacement law 88
19.3.3 Stefan-Boltzmann's law 89
19.3.4 Non-blackbody emitters.... 90
19.4 Infrared semi-transparent materials.... 92
Table of contents
20 The measurement formula.... 93
21 Emissivity tables 97
21.1 References.... 97
21.2 Tables 97
1.1 Legal disclaimer
All products manufactured by FLIR Systems are warranted against defective materials and workmanship for a period of one (1) year from the delivery date of the original purchase, provided such products have been under normal storage, use and service, and in accordance with FLIR Systems instruction.
Uncooled handheld infrared cameras manufactured by FLIR Systems are warranted against defective materials and workmanship for a period of two (2) years from the delivery date of the original purchase, provided such products have been under normal storage, use and service, and in accordance with FLIR Systems instruction, and provided that the camera has been registered within 60 days of original purchase.
Detectors for uncooled handheld infrared cameras manufactured by FLIR Systems are warranted against defective materials and workmanship for a period of ten (10) years from the delivery date of the original purchase, provided such products have been under normal storage, use and service, and in accordance with FLIR Systems instruction, and provided that the camera has been registered within 60 days of original purchase.
Products which are not manufactured by FLIR Systems but included in systems delivered by FLIR Systems to the original purchaser, carry the warranty, if any, of the particular supplier only. FLIR Systems has no responsibility whatsoever for such products.
The warranty extends only to the original purchaser and is not transferable. It is not applicable to any product which has been subjected to misuse, neglect, accident or abnormal conditions of operation. Expendable parts are excluded from the warranty.
In the case of a defect in a product covered by this warranty the product must not be further used in order to prevent additional damage. The purchaser shall promptly report any defect to FLIR Systems or this warranty will not apply.
FLIR Systems will, at its option, repair or replace any such defective product free of charge if, upon inspection, it proves to be defective in material or workmanship and provided that it is returned to FLIR Systems within the said one-year period.
FLIR Systems has no other obligation or liability for defects than those set forth above.
No other warranty is expressed or implied. FLIR Systems specifically disclaims the implied warranties of merchantability and fitness for a particular purpose.
FLIR Systems shall not be liable for any direct, indirect, special, incidental or consequential loss or damage, whether based on contract, tort or any other legal theory.
This warranty shall be governed by Swedish law.
Any dispute, controversy or claim arising out of or in connection with this warranty, shall be finally settled by arbitration in accordance with the Rules of the Arbitration Institute of the Stockholm Chamber of Commerce. The place of arbitration shall be Stockholm. The language to be used in the arbitral proceedings shall be English.
1.2 Usage statistics
FLIR Systems reserves the right to gather anonymous usage statistics to help maintain and improve the quality of our software and services.
1.3 Changes to registry
The registry entry HKEY_LOCAL_MACHINE\SYSTEM\CurrentControlSet\Control\Lsa \LmCompatibilityLevel will be automatically changed to level 2 if the FLIR Camera Monitor service detects a FLIR camera connected to the computer with a USB cable. The modification will only be executed if the camera device implements a remote network service that supports network logons.
1.4 U.S. Government Regulations
This product may be subject to U.S. Export Regulations. Please send any inquiries to exportquestions@flir.com.
1.5 Copyright
© 2016, FLIR Systems, Inc. All rights reserved worldwide. No parts of the software including source code may be reproduced, transmitted, transcribed or translated into any language or computer language in any form or by any means, electronic, magnetic, optical, manual or otherwise, without the prior written permission of FLIR Systems.
The documentation must not, in whole or part, be copied, photocopied, reproduced, translated or transmitted to any electronic medium or machine readable form without prior consent, in writing, from FLIR Systems.
Names and marks appearing on the products herein are either registered trademarks or trademarks of FLIR Systems and/or its subsidiaries. All other trademarks, trade names or company names referenced herein are used for identification only and are the property of their respective owners.
1.6 Quality assurance
The Quality Management System under which these products are developed and manufactured has been certified in accordance with the ISO 9001 standard.
FLIR Systems is committed to a policy of continuous development; therefore we reserve the right to make changes and improvements on any of the products without prior notice.
1.7 Patents
000439161; 000653423; 000726344; 000859020; 001707738; 001707746; 001707787; 001776519; 001954074; 002021543; 002021543-0002; 002058180; 002249953; 002531178; 002816785; 002816793; 011200326; 014347553; 057692; 061609; 07002405; 100414275; 101796816; 101796817; 101796818; 102334141; 1062100; 11063060001; 11517895; 1226865; 12300216; 12300224; 1285345; 1299699; 1325808; 1336775; 1391114; 1402918; 1404291; 1411581; 1415075; 1421497; 1458284; 1678485; 1732314; 17399650; 1880950; 1886650; 2007301511414; 2007303395047; 2008301285812; 2009301900619; 20100060357; 2010301761271; 2010301761303; 2010301761572; 2010305959313; 2011304423549; 2012304717443; 2012306207318; 2013302676195; 2015202354035; 2015304259171; 204465713; 204967995; 2106017; 2107799; 2115696; 2172004; 2315433; 2381417; 2794760001; 3006596; 3006597; 303330211; 4358936; 483782; 484155; 4889913; 4937897; 4995790001; 5177595; 540838; 579475; 584755; 599392; 60122153; 6020040116815; 602006006500.0; 6020080347796; 6020110003453; 615113; 615116; 664580; 664581; 665004; 665440; 67023029; 6707044; 677298; 68657; 69036179; 70022216; 70028915; 70028923; 70057990; 7034300; 710424; 7110035; 7154093; 7157705; 718801; 723605; 7237946; 7312822; 7332716; 7336823; 734803; 7544944; 7606484; 7634157; 7667198; 7809258; 7826736; 8018649; 8153971; 8212210; 8289372; 8340414; 8354639; 8384783; 8520970; 8565547; 8595689; 8599262; 8654239; 8680468; 8803093; 8823803; 8853631; 8933403; 9171361; 9191583; 9279728; 9280812; 9338352; 9423940; 9471970; 9595087; D549758.
1.8 Third-party licenses
1.8.1 GNU Lesser General Public License (LGPL)
http://www.gnu.org/licenses/lgpl-2.1.en.html
(Retrieved May 27, 2015)
1.8.2 Fonts (Source Han Sans)
https://github.com/adobe-fonts/source-han-sans/blob/master/LICENSE.txt
(Retrieved May 27, 2015)
1.8.3 Fonts (DejaVu)
http://dejavu-fonts.org/wiki/License
(Retrieved May 27, 2015)
2
Safety information
For best results and user safety, the following warnings and precautions should be followed when handling and operating the camera.
- Do not open the camera body for any reason. Disassembly of the camera (including removal of the cover) can cause permanent damage and will void the warranty.
- Great care should be exercised with your camera optics. Refer to section 12.1.2 Infrared lens, page 67 for lens cleaning.
- Operating the camera outside of the specified input voltage range or the specified operating temperature range can cause permanent damage.
- Do not image extremely high-intensity radiation sources, e.g., the sun, lasers, or arc welders.
- The camera is a precision optical instrument and should not be exposed to excessive shock and/or vibration.
- The camera contains static-sensitive electronics and should be handled appropriately.
- Do not put any item on the external cooling intake, to maintain the cooling of the camera.
3.1 User-to-user forums
Exchange ideas, problems, and infrared solutions with fellow thermographers around the world in our user-to-user forums. To go to the forums, visit:
http://forum.infraredtraining.com/
3.2 Calibration
We recommend that you send in the camera for calibration once a year. Contact your local sales office for instructions on where to send the camera.
3.3 Accuracy
For very accurate results, we recommend that you wait 5 minutes after you have started the camera before measuring a temperature.
3.4 Disposal of electronic waste
As with most electronic products, this equipment must be disposed of in an environmentally friendly way, and in accordance with existing regulations for electronic waste.
Please contact your FLIR Systems representative for more details.
3.5 Training
To read about infrared training, visit:
- http://www.infraredtraining.com
- http://www.irtraining.com
- http://www.irtraining.eu
3.6 Documentation updates
Our manuals are updated several times per year, and we also issue product-critical notifications of changes on a regular basis.
To access the latest manuals, translations of manuals, and notifications, go to the Download tab at:
http://support.flir.com
It only takes a few minutes to register online. In the download area you will also find the latest releases of manuals for our other products, as well as manuals for our historical and obsolete products.
3.7 Important note about this manual
FLIR Systems issues generic manuals that cover several cameras within a model line.
This means that this manual may contain descriptions and explanations that do not apply to your particular camera model.
3.8 Note about authoritative versions
The authoritative version of this publication is English. In the event of divergences due to translation errors, the English text has precedence.
Any late changes are first implemented in English.
4.1 General
For customer help, visit:
http://support.flir.com
4.2 Submitting a question
To submit a question to the customer help team, you must be a registered user. It only takes a few minutes to register online. If you only want to search the knowledgebase for existing questions and answers, you do not need to be a registered user.
When you want to submit a question, make sure that you have the following information to hand:
• The camera model
• The camera serial number
- The communication protocol, or method, between the camera and your device (for example, SD card reader, HDMI, Ethernet, USB, or FireWire)
• Device type (PC/Mac/iPhone/iPad/Android device, etc.)
- Version of any programs from FLIR Systems
• Full name, publication number, and revision number of the manual
4.3 Downloads
On the customer help site you can also download the following, when applicable for the product:
- Firmware updates for your infrared camera.
- Program updates for your PC/Mac software.
• Freeware and evaluation versions of PC/Mac software. - User documentation for current, obsolete, and historical products.
- Mechanical drawings (in *.dxf and *.pdf format).
- Cad data models (in *.stp format).
- Application stories.
- Technical datasheets.
- Product catalogs.
5.1 Camera system components
The FLIR X6530sc infrared camera and its accessories are delivered in a transport case that typically contains the items below.
- FLIR X6530sc camera with removable LCD touchscreen.
-
Portfolio that includes important information on the camera:
-
Packing list.
- Factory acceptance report.
- Calibration curves (if applicable).
- Camera files on a CD-ROM.
- Optical cleaning tissue.
- A set of user instructions.
- Filter-holding tool.
-
Micro SD card with an SD adapter.
-
Camera power supply.
-
Camera cables:
-
Power supply.
- Gigabit Ethernet (GigE) with locks.
- 50 Ω coaxial cable for sync (yellow colored).
- 50 Ω coaxial cable for triggering (orange colored).
- 50 Ω coaxial cable for lock-in (green colored).
- 75 Ω coaxial cable for general purposes (blue colored).
- LCD extender cable (with right-angle USB connectors).
• LCD connector protective cap.
There may also be additional items that you have ordered such as software or CDs.
5.2 System overview
The FLIR X6530sc infrared camera system has been developed by FLIR to meet the needs of the research community. The camera makes use of an advanced 640 × 512 readout circuit (ROIC), mated to a mercury cadmium telluride (MCT) detector to cover the 1.5–5.5 m mid-wave infrared band.
The FLIR X6530sc is a stand-alone imaging camera that interfaces to host PCs using standard interfaces, including GigE and Camera Link Base.
The FLIR X6530sc series is available in two versions: with a bayonet lens mount and with an M80 lens mount.
5.2.1 View from the front—bayonet mount
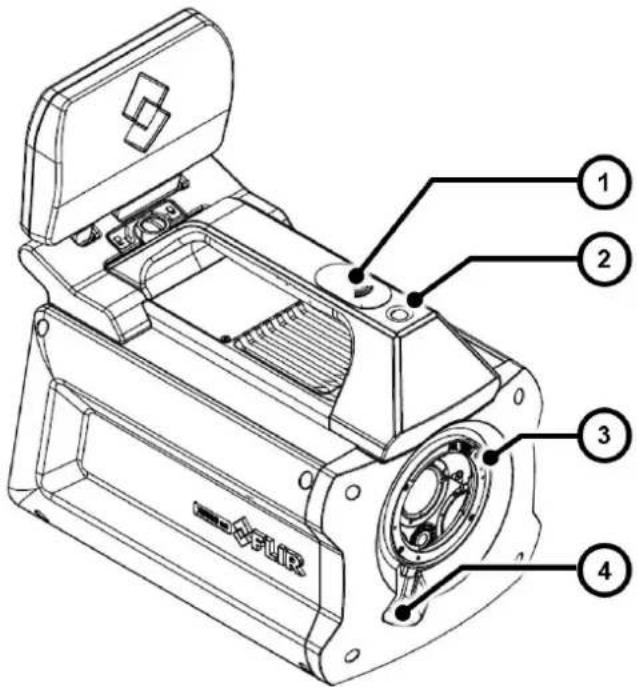
Figure 5.1 View from the front—bayonet mount.
- Wi-Fi antenna.
- Global status LED.
- Lens bayonet interface.
- Lens release latch.
5.2.2 View from the front—M80 mount
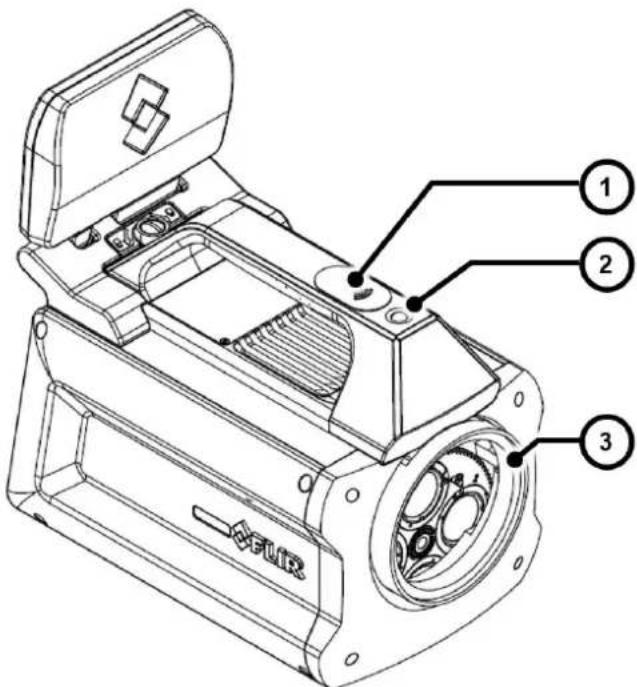
Figure 5.2 View from the front—M80 mount.
- Wi-Fi antenna.
- Global status LED.
- Lens M80 interface.
5.2.3 View from the rear
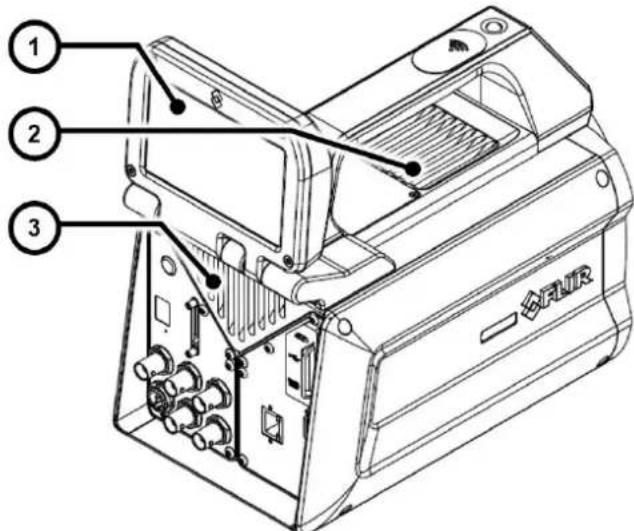
Figure 5.3 View from the rear.
- Removable touch screen LCD.
- External cooling intake.
- External cooling exhaust.
5.2.4 Back panel
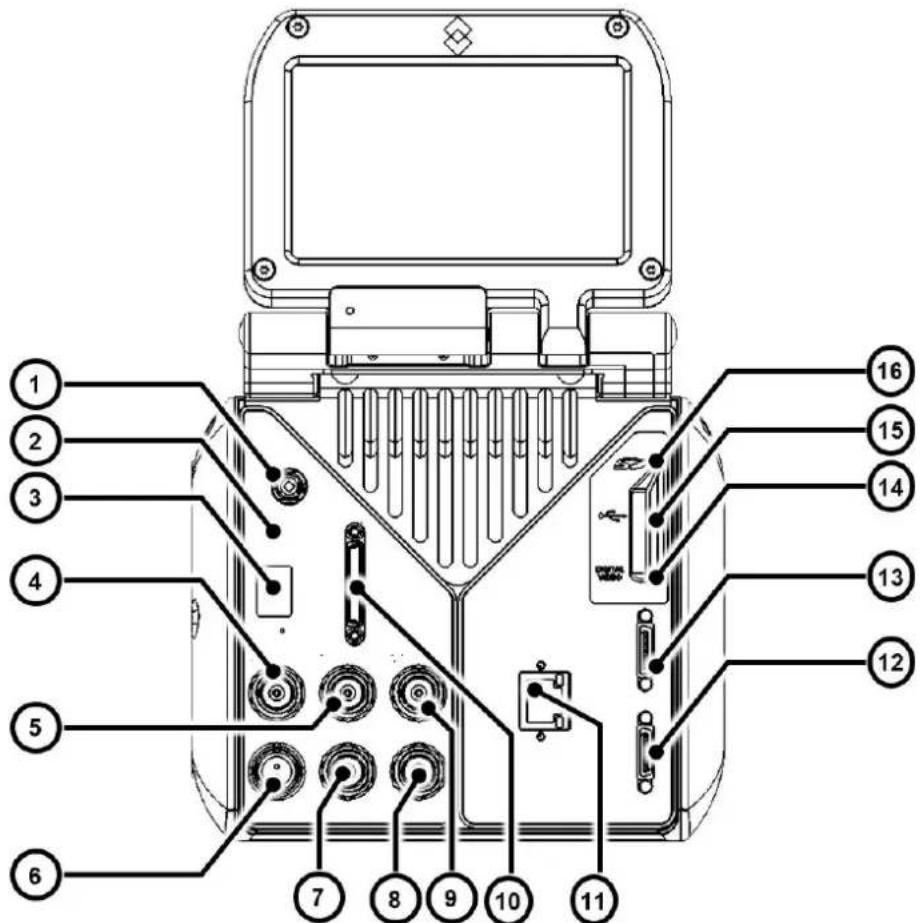
Figure 5.4 Camera back panel description.
- Power button.
- Status LED.
- Infrared remote sensor.
- Sync In.
- Sync Out.
- Power
- Lock-in In.
- General-purpose IO.
- Trigger In.
- Auxiliary port.
- GigE Vision.
- Camera Link Base.
- Camera Link Medium.
- Digital video interface.
- USB
- Micro SD card.
5.3 Key features
- Fast frame rate
The FLIR X6530sc series has an adjustable frame rate. Windowing allows a subset of the total image to be selectively read out with a user-adjustable window size. The sub-sample windows can be arbitrarily chosen and are easily defined.
• 14-bit image data
The FLIR X6530sc camera streams out 14-bit thermal images.
- Outstanding measurement accuracy
The high accuracy of ±1^ or ±1% produces sensitive thermal images. The FLIR X6530sc detects temperature differences smaller than 25 mK (18 mK typical).
- CNUC calibration
CNUC is a proprietary calibration process that provides beautiful imagery and measurement stability. CNUC allows for flexible integration time adjustments without the need to perform non-uniformity corrections. CNUC calibration also produces accurate measurement stability regardless of exposure of the camera to ambient temperature variations.
- Hypercal
Hypercal ensures the best measurement range with the highest sensitivity. Simply set the desired lower and upper temperature limits, and the camera will automatically adjust to the appropriate integration (exposure) time.
- Auto-exposure
The camera automatically adjusts its temperature range to best fit the thermal scene.
- Presets
Up to eight presets and their associated parameters, e.g., integration time, frame rate, window size, and window location, are available for instant selection with a single command. These presets can be used in Dynamic Range Extension (DRX) mode (also called “superframing”), which allows the acquisition of thermal data from up to four user-defined temperature ranges simultaneously, then merges those streams into a single real-time data stream that spans all four temperature ranges, effectively extending dynamic range from 14 bit to 16 bit.
- Multiple triggering modes and synchronizing interfaces
The FLIR X6530sc camera provides different interfaces to support maximum flexibility for synchronizing the camera to external events, as well as synchronizing external events to the camera:
- Sync In (TTL).
- Sync Out.
- Trigger In.
- Multiple video outputs
The FLIR X6530sc camera features multiple independent and simultaneous video:
- Digital 14-bit video—Camera Link Base.
- Digital 14-bit video—GigE.
- Digital video—DVI format 1080p30 digital output.
- The FLIR X6530sc camera has an advanced high-performance optical design.
Lenses are available with either a professional bayonet mount with a lock or an M80 mount. Lenses with a bayonet mount feature lens recognition and automatic measurement adjustments. A temperature probe is also integrated into lenses with a bayonet mount, for improved measurement accuracy and drift compensation.
• Ultrasonic smart lenses (USLs)
FLIR lenses with a bayonet mount are equipped with the latest motorization technology, using ultrasonic motors that provide fast response and precise positioning.
- Motorized filter wheel
The FLIR X6530sc camera has a four-slot motorized filter wheel with automatic filter recognition and measurement parameter adjustment. The removable filter holders contain an integrated temperature probe for improved measurement accuracy.
- Removable touch screen LCD
The detachable touch screen LCD provides you with on-site thermal image feedback. The LCD screen also provides camera information, adjustment controls, and ResearchIR Max acquisition control. The LCD touch screen can be removed from the FLIR X6530sc camera when the camera needs to be installed in a hard to reach location. Simply position the camera and control it at a distance.
• Wi-Fi
The camera includes a Wi-Fi interface, which enables it to be controlled by a smart phone (iPhone) or a tablet (iPad).
• Video color palettes
The FLIR X6530sc camera supports a selection of standard and user-defined color palettes (or grayscale) for DVI video.
- Configuration management
Save your camera configuration to the SD card (e.g., when loaning your camera to your colleague). To use a configuration saved on an SD card, simply insert the SD card.
- Global-status LED
Located on the top of the camera, the global-status LED provides instant system status, including the ResearchIR Max status (a green light indicates fully acquired). The back panel LEDs instantly inform you about the camera status.
Installing the camera
6.1 Mounting the camera
The camera can be operated installed either on a workbench or mounted on a tripod or custom mount. A standard photo mount ( 14 -20 UNC) or 3 × M5 mounting holes on the camera base as well as 3 × M5 mounting holes on the left side of the camera are provided.
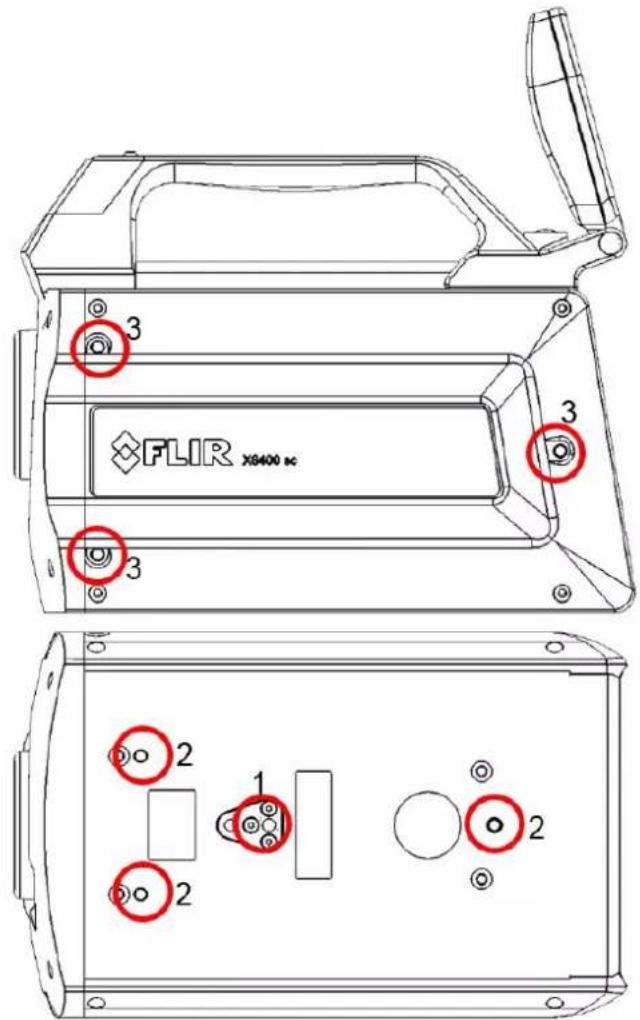
- ¼-20 UNC mount.
- Camera base M5 mounting holes.
- Camera left side M5 mounting holes.
6.2 Powering the camera
6.2.1 Power supply
The camera is powered through the red power connector (6 in Figure 5.4 Camera back panel description., page 12) on the back panel. When the 24 V DC power supply provided with the camera (PN X1159) is connected, the power button (1 in Figure 5.4 Camera back panel description., page 12) blinks slowly, indicating that the camera is receiving power.
Refer to section 11 Technical data, page 60 for the power supply technical data.
6.2.2 Power button
The power button (1 in Figure 5.4 Camera back panel description., page 12) is located behind the touch screen LCD. Open the touch screen LCD to its maximum extension to access the button.
Note Keep the LCD screen opened or detach it when the camera is being operated to prevent the external cooling vent from being blocked.
A short press on the power button starts the camera.
To turn off the camera:
- A short press on the power button starts the camera shutdown procedure. The camera is switched off a few seconds later.
- A long press on the power button forces the camera to turn off immediately, bypassing the shutdown procedure.
6.2.3 Camera boot-up and cooling down
When the camera is turned on, its Stirling cooler starts first. Stirling coolers produce noise. A high volume of noise is normal for advanced cooled thermal cameras.
The camera requires up to 7 minutes to reach the detector temperature of 80 K. In parallel, the camera performs a built-in test of its components and initializes the internal software and interfaces.
The camera is ready to use when all the status LEDs on the back panel are green (2 in Figure 5.4 Camera back panel description., page 12).
6.3 Adjusting the field of view
Once the camera is installed and operating, its field of view is adjusted to suit the thermal scene being imaged. This adjustment is done by selecting a suitable lens for the desired field of view, and then fine tuning the camera position to the scene.
Use of the LCD screen is helpful during this procedure.
6.3.1 LCD screen
The FLIR X6530sc includes a detachable touch screen LCD that provides instant thermal image feedback. The LCD screen also provides camera information, adjustment controls, and ResearchIR Max acquisition control.
In the LCD screen examples below, the camera measurement configuration and temperature range have been adapted to the thermal scene. If the camera is not correctly set up for the scene, the image can become saturated.
The temperature range of the camera can be automatically adjusted using the auto-exposure button on the touch screen. For more information, see section 8.2.2 Auto-exposure, page 37.
If the thermal scene does not match the configuration measurement (i.e., the spectral filter on the filter wheel), it is necessary to select the correct configuration measurement in ResearchIR Max. For more information, see section 6.4.4 Measurement configuration, page 23.
![Avg 27.2 °C FLIR 35.1 22.4 ① ② ③ ④ AF [•] AE ⑤ ⑥ ⑦ ⑧ ⑨ ⑩](/content/2026/05/1062173/images/493b5c37318020c4e64f0d55495f28dd19a4bd2f740c32d515cedb78cc859414.jpg)
Figure 6.1 LCD touch screen.
- Image statistics.
- Add spot tool: center, cold, or hot.
- Camera information.
- Measurement configuration.
- Adjust the near focus (not available for all lenses).
- Autofocus (not available for all lenses).
- Adjust the far focus (not available for all lenses).
- Start acquisition in ResearchIR Max.
- Auto-exposure.
- Change the color palette.
6.3.1.1 Detaching the touch screen LCD
The LCD screen can be detached from the camera and used remotely when the camera is mounted in a hard to reach location.
Note
- The camera can still be operated without the LCD screen connected.
- The LCD screen can be detached and attached while the camera is in operation.
6.3.1.2 Procedure
Follow the procedure below to install and detach the LCD screen from the camera:
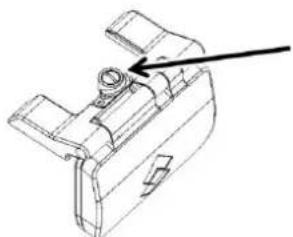
- Remove the LCD screw using a flat screwdriver or a coin.
natural_image
Technical line drawing of a mechanical component with an arrow pointing to a detail (no text or symbols present)-
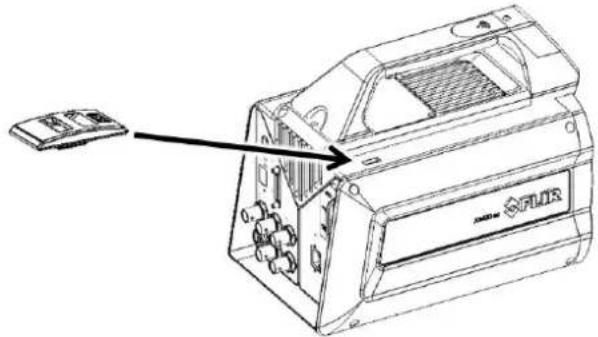
Gently lift up the screen to disconnect it from the camera, being careful of the USB connector.
-
Place the provided protective cap on the camera, to avoid dust or water entering the camera.
natural_image
Line drawing of a device with an arrow pointing to a component, no text or symbols present6.3.1.3 General
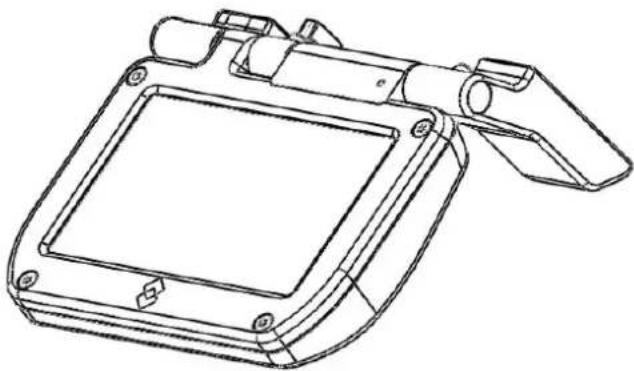
When detached, the LCD screen can be connected to the camera using the provided right-angled USB extender cable. An additional USB cable can be added to extend the length. The efficiency of operating the camera in this way is highly dependent on the quality of the additional USB cable and the environment in which the camera is being used.
The screen has been designed for ease of use on a workbench, as shown in the figure below.
natural_image
Line drawing of a device casing with handle and mounting bracket (no text or symbols)The screen automatically detects its orientation, and flips the interface accordingly. The orientation can be locked in the ResearchIR Max camera user interface (see section 6.4.8 Advanced camera controls, page 26).
6.3.2 Lens
A large range of lenses is available for the FLIR X6530sc. Lenses are available with either a professional bayonet mount with a lock or an M80 mount. Lenses with a bayonet mount are identified through the bayonet connector. A temperature probe is also integrated into lenses with a bayonet mount. This probe is used by the camera to compensate for thermal drifts.
Note FLIR is continuously extending its range of available optics. Contact your FLIR sales representative for more information on newly available optics.
6.3.2.1 Installing an infrared lens
Note
- The detector is a very sensitive sensor. It must not be directed toward strong visible light, e.g., sunlight.
- Do not touch the lens surface when you install the lens. If this happens, clean the lens according to the instructions in section 12.1.2 Infrared lens, page 67.
- Do not touch the filter surface when you install the lens. If this happens, clean the filter according to the instructions in section 12.1.2 Infrared lens, page 67.
6.3.2.1.1 Procedure—bayonet mount
Follow the procedure below to install an infrared lens with a bayonet mount:
- If present, remove the installed lens or the protection in front of the detector/filter wheel.
- Align the red index mark on the lens with the red index mark on the bayonet ring.
- Carefully push the infrared lens into the bayonet ring.
- Rotate the infrared lens 30° clockwise (looking at the front of the lens).
- The camera automatically identifies the lens and selects the measurement configuration corresponding to the lens, if loaded into the camera memory. For more information, see section 6.4.4 Measurement configuration, page 23.
6.3.2.1.2 Procedure—M80 mount
Follow the procedure below to install an infrared lens with an M80 mount:
- If present, remove the installed lens or the protection in front of the detector/filter wheel.
- Carefully push the infrared lens into position.
- Rotate the infrared lens clockwise (looking at the front of the lens) until it stops.
- You must manually select the measurement configuration using the FLIR ResearchIR Max software. For more information, see section 6.4.4 Measurement configuration, page 23.
6.3.2.2 Removing an infrared lens
Note
- The detector is a very sensitive sensor. It must not be directed toward strong light, e.g., sunlight.
- Do not touch the lens surface when you install the lens. If this happens, clean the lens according to the instructions in section 12.1.2 Infrared lens, page 67.
- Lenses can be heavy, so take care not to be surprised by their weight. Some lenses weight several hundred grams.
- When you have removed the infrared lens, put the lens caps on the lens to protect it from dust and fingerprints.
6.3.2.2.1 Procedure—bayonet mount
Follow the procedure below to remove an infrared lens with a bayonet mount:
- Pull forward the release button for the infrared lens (4 in Figure 5.1 View from the front—bayonet mount., page 10).
- Rotate the infrared lens 30^ counterclockwise (looking at the front of the lens).
- Carefully pull out the infrared lens from the bayonet mount.
- Install the protective cap or a new optic on the camera, to avoid visible light striking the detector.
6.3.2.2.2 Procedure—M80 mount
Follow the procedure below to remove an infrared lens with an M80 mount:
- Rotate the infrared lens counterclockwise (looking at the front of the lens).
-
Carefully pull out the infrared lens.
-
Install the protective cap or a new optic on the camera to avoid visible light striking the detector.
6.3.2.3 Lens identification
FLIR X6530sc lenses with a bayonet mount have a unique identifier. The camera reads the lens identifier and automatically selects the measurement configuration corresponding to the lens, if loaded into the camera memory. For more information, see section 6.4.4 Measurement configuration, page 23.
The lens connected to the camera is displayed in ResearchIR Max and on the LCD screen.
6.3.2.4 Adjusting the camera focus
Note Do not touch the lens surface when you adjust the camera focus. If this happens, clean the lens according to the instructions in section 12.1.2 Infrared lens, page 67.
Camera focus can be done manually by rotating the focus ring on the lens:
- For far focus, rotate the focus ring counterclockwise (looking at the front of the lens).
- For near focus, rotate the focus ring clockwise (looking at the front of the lens).
For some lenses, you can also adjust the camera focus by doing the following:
- Using the focus control buttons on the LCD screen (see Figure 6.1 LCD touch screen., page 17).
- Using the focus control buttons in ResearchIR Max.
6.3.2.5 Autofocus
The FLIR X6530sc features powerful and fast autofocus using the USL technology in lenses with a bayonet mount.
Note Autofocus is not available in lenses with an M80 mount and not in all lenses with a bayonet mount.
Autofocus can be started by:
- Using the autofocus button on the LCD screen (see Figure 6.1 LCD touch screen., page 17).
- Using the autofocus button in ResearchIR Max.
- Using the infrared remote controller (see section 7.4 Infrared remote, page 35).
6.3.2.6 Using an extension ring
Note
- The detector is a very sensitive sensor. It must not be directed toward strong visible light, e.g., sunlight.
- Do not touch the lens surface when you install the lens. If this happens, clean the lens according to the instructions in section 12.1.2 Infrared lens, page 67.
- Using extension rings requires a good understanding of their radiometric effects and the resulting measurement errors. The Infrared Training Center (ITC) offers courses and training. For more information on any training you require, contact your FLIR sales representative or ITC at www.infraredtraining.com.
Extension rings can be added between the camera and the infrared lens in order to change the minimum focus distance and thus the field of view of the camera. It is possible to use more than one extension ring at the same time.
Refer to the specification sheet for your infrared lens for available extension ring sizes and other data.
Depending on the extension ring, automatic lens identification may not function. This means you must manually select the measurement configuration using the FLIR ResearchIR Max software.
6.4 Setting the camera parameters
6.4.1 Connection to the computer
The camera can be connected to a computer using either Camera Link or GigE. Although it is possible to use both interfaces in parallel, only one of these should be used to send commands to the camera. The second computer should be used only to retrieve images.
6.4.1.1 Connection through the Camera Link interface
Camera Link is a standard data interface for high-end visible and infrared cameras. The FLIR X6530sc uses a Camera Link Base interface in a single-tap, 16-bit configuration. In terms of ports, the A and B ports are used, with bit A0 being the LSB of the data transferred, and bit B7 being the MSB. The header row uses the entire 16-bit value while the pixel data has a 14-bit range, with the upper MSBs masked to 0.

The camera is connected to the computer using one camera link cable (refer to section 11 Technical data, page 60 for cable reference and Camera Link information). Connect the cable to connector 12 in Figure 5.4 Camera back panel description., page 12.
The Camera Link mode is selected using the ResearchIR Max camera control panel interface (refer to section 6.4.8 Advanced camera controls, page 26). It should always be set to Base for the FLIR X6530sc.
Note
- Various connector notations can be found for Camera Link medium frame grabbers (0&1, 1&2, A&B). Make sure to connect camera connector 1 to the first port of the frame grabber.
- ResearchIR Max software supports a variety of frame grabbers. Contact your FLIR sales representative for more information on compatibility.
6.4.1.2 Connection through the GigE interface
The FLIR X6530sc features a GigE connection. The GigE interface can be used for image acquisition and/or camera control. The GigE interface is GigE Vision compliant.
GigE is available when the camera is in Base mode only. Refer to section 6.4.8 Advanced camera controls, page 26 for mode selection.
Note
- Use only the high-quality Ethernet cable provided with the camera or a CAT 6 equivalent cable.
- The GigE driver installation procedure must be followed exactly. Contact your FLIR local support if required.
6.4.2 Connection to FLIR ResearchIR Max
Note Refer to section 6.4.1 Connection to the computer, page 21 to make sure that the camera is correctly connected to the computer.
6.4.2.1 General
The FLIR X6530sc interfaces with the FLIR ResearchIR Max software. FLIR ResearchIR Max is a powerful image acquisition and analysis tool. Refer to the ResearchIR Max user manual for operating instructions. FLIR X6530sc specific camera control is described in this document.
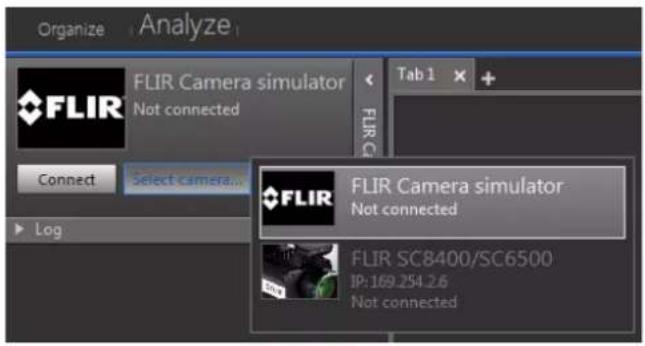
6.4.2.2 Procedure
Follow the procedure below to select and connect the camera:
- Click the Select camera button.
- Select the FLIR X6530sc camera.
The camera's IP address is displayed when connected using GigE.
The Camera Link port is displayed when connected using Camera Link.
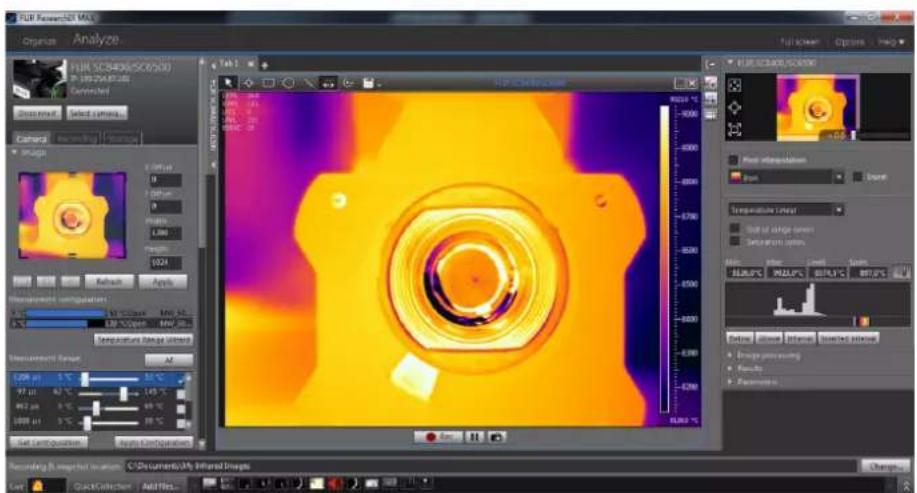
- Click the Connect button to activate the camera connection.
Once connected, the camera control interface is populated with the camera parameters, and the live image is displayed on the current tab.
6.4.3 Image size adjustment
6.4.3.1 General
The FLIR X6530sc can be set up to use only part of the detector. This allows the camera can be operated at higher frame rates. The selection is done through the upper part of the camera control panel.
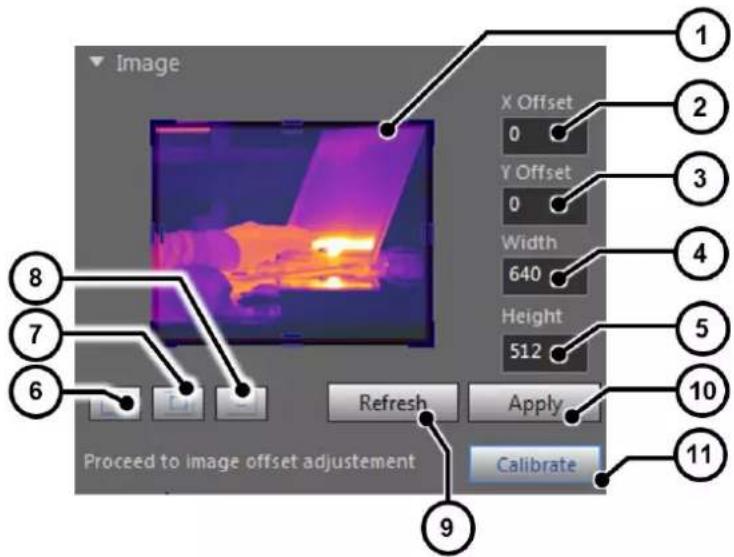
Figure 6.2 Image size adjustment
- Preview window. The window size can be selected by dragging the handles. The entire box can be dragged to set the location.
- The X offset can be manually set in this field.
- The Y offset can be manually set in this field.
- The window width can be manually set in this field.
- The window height can be manually set in this field.
- Set the window size to full detector size (640 × 512).
- Set the window size to half detector size (320 × 256 centered).
- Set the window size to quarter detector size (160 × 128 centered).
- Refresh the preview window with the last acquired image from the camera.
- Apply the settings to the camera.
- If needed, calibrate the image against a homogeneous reference target (also called "1 point NUC").
6.4.4 Measurement configuration
6.4.4.1 General
A measurement configuration is a combination of optical setup (lens and spectral filter), integration mode setting, and Camera Link setting.
The measurement configurations available in the camera are displayed in the FLIR ResearchIR Max interface. Each configuration is described with minimum and maximum calibrated temperatures, the lens and filter type, the integration mode (ITR or IWR), and the Camera Link setting (Base/Medium).
For lenses with automatic identification (see section 6.3.2.3 Lens identification, page 20), the camera automatically selects the measurement configuration corresponding to the lens.
You can also select the measurement configuration manually. Take care to select the measurement configuration corresponding to the lens, filter, integration mode setting (ITR or IWR), and the Camera Link setting (Base or Medium) in use. The configuration is selected by clicking on it. It is then highlighted in light gray. Once selected, the camera is automatically set to this configuration.
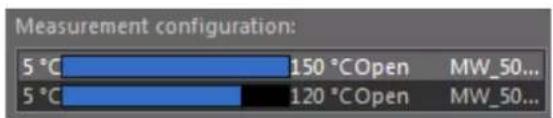
It is possible to deactivate the configuration filter by unchecking the check box shown below.
Show measurement configuration matching current camera settings
When unchecked, all configurations available in the camera are listed. It is then possible to select a configuration that does not match the current optical and detector setup. This is useful for advanced users when, for instance, using an infrared lens for which no calibration files are available: in this example, the camera will provide temperature data even if the calibration does not apply to the lens.
Note
- Only one measurement configuration is valid at a time.
- Make sure you select a configuration that matches the temperature of the scene to be measured. If not, your measurements will be incorrect because they will be outside the limits of the calibration.
6.4.5 Temperature range adjustment
6.4.5.1 General
The temperature range is defined by the minimum and maximum temperatures that can be measured for a given integration time.
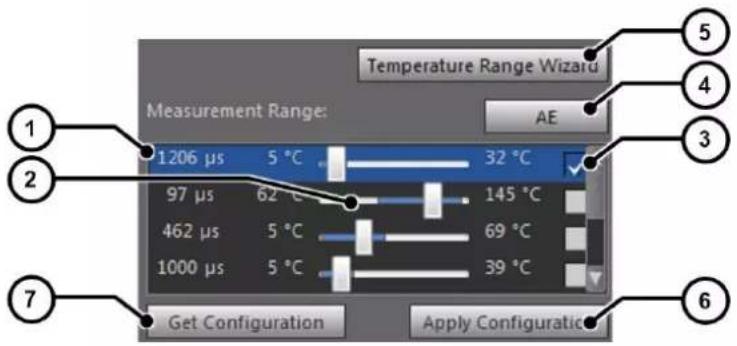
- Integration time for the range. Double click on the integration time to manually enter a value. The range is indicated in red and will be applied to the camera after clicking on the Apply Configuration button.
- Drag the range slider to adjust the integration time. The corresponding lower and upper temperatures of the range are displayed. The range is indicated in red and will be applied to the camera after clicking on the Apply Configuration button.
- Activate the range by checking the box. If more than one range is activated, the camera enters superframing mode, selecting each range in turn. Refer to section 8.6 Dynamic range extension—superframing, page 40 for more information on superframing.
- The FLIR X6530sc features an automatic exposure control that automatically selects the best integration time for the current thermal scene. Refer to section 8.2.2 Auto-exposure, page 37 for more information on auto-exposure.
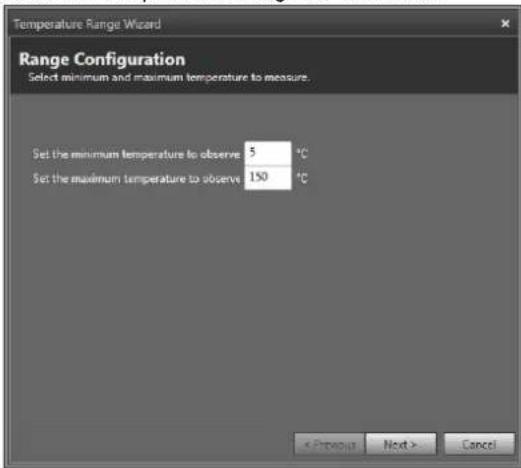
- The temperature range wizard automates the selection of integration times and superframing.
5.1. Select the temperature range to measure.
5.2. The wizard automatically calculates the best integration times to cover the desired temperature range.
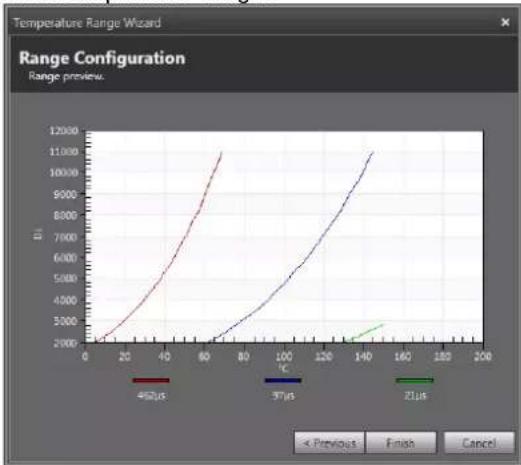
line
| Temperature Range Wizard | Value | | ------------------------ | ----- | | 45us | 2000 | | 37us | 3000 | | 37us | 11000 |Click on the Finish button to set up the camera accordingly.
- Apply the temperature range configuration to the camera.
- Read the actual camera configuration.
6.4.6 Frame frequency
6.4.6.1 General
The frame rate is the number of images taken by the camera per second. Achievable frame rates are based on the camera settings, the camera overhead, and the integration settings.

6.4.7 Synchronizing the camera to an external signal
6.4.7.1 General
Note Refer to section 8.7 Camera synchronization, page 41 for detailed information on synchronization.
The camera can be synchronized to an external signal. This is useful in, for example, brake disk testing. A signal from the testing machine will synchronize the camera to the disk speed.
Synchronization parameters are set through the ResearchIR Max user interface:
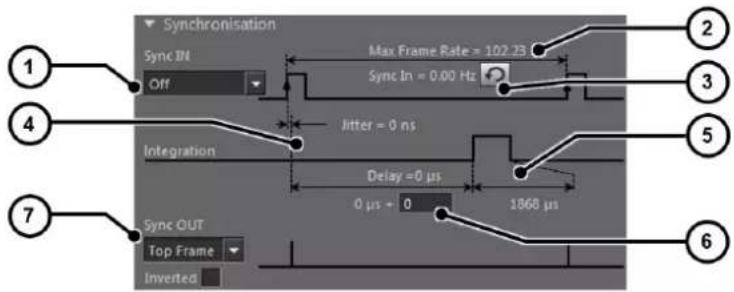
- Activate/deactivate external synchronization. Select the active edge and input impedance.
- Based on the camera configuration (e.g., the window size, integration time, or integration mode), the maximum allowable Sync In frequency is displayed.
- The actual Sync In signal frequency is measured by the camera and displayed here. If the Sync In frequency is higher than the maximum allowable frame rate, a warning message is displayed. In this case, the input signal is under-sampled.
- The jitter on the Sync In signal, which is typically one pixel clock, is displayed here.
- The integration time length is displayed here. The integration time is defined in the measurement range panel.
- A delay between the Sync In signal and the start of integration time can be defined here.
- Several camera signals can be routed to the Sync Out connector. The polarity of these signals is also defined here.
6.4.8 Advanced camera controls
6.4.8.1 General
This section describes the Advanced Camera Controls.
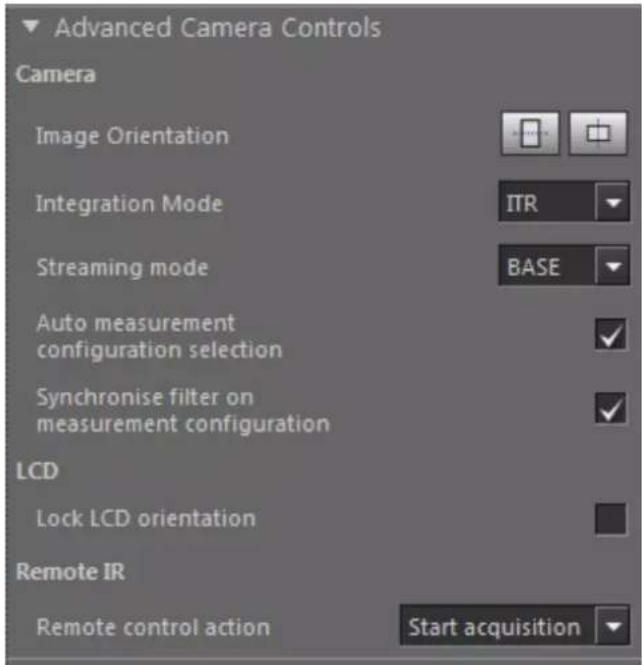
| Image Orientation Select the orientation of the image at the detector level. This impacts digital radiometric outputs as well as video outputs. | |
| Integration Mode | Select between integrate then read (ITR) and integrate while read (IWR). (IWR mode is not available in all camera models.)Refer to section 8.5 Frame rate and integration modes, page 38 for more information about these modes.The integration mode impacts the available measurement ranges, depending on the calibration configuration of the camera. |
| Streaming Mode Select Base or Medium. For more information, see section 6.4.1.1 Connection through the Camera Link interface, page 21.The streaming mode should always be set to Base for the FLIR X6530sc. | |
| Auto measurement configuration selection When this option is checked, the camera automatically searches the measurement configuration corresponding to the exact optical path (filter + lens) and detector configuration.If no measurement configuration is available in the camera, selecting this option will have no effectFor lenses with the M80 mount (no automatic lens identification), this setting has no effect. | |
| Synchronize filter on measurement configuration | When this option is checked (default), the filter corresponding to the selected measurement configuration is automatically placed by the filter wheel in front of the detector.Deactivating this option should be reserved for advanced setups where the user requires a different spectral filter for a measurement configuration. |
| Lock LCD orientation Freeze the LCD screen automatic orientation. | |
| Remote control action | Select the action associated with the infrared remote controller. Refer to section 7.4 Infrared remote, page 35 for more information on the infrared remote. |
6.4.9 Extended camera information
6.4.9.1 General
Extended camera information can be found in the Extended information section in the ResearchIR Max camera tab.
| Extended information | |
| Temperature Probes | |
| FPA Temperature | 82.24 °K |
| Lens Temperature | 25 |
| Camera Temperature #1 | 28.25 °C |
| Camera Temperature #2 | 28.88 °C |
| Miscellaneous | |
| Software version: | 0.3 |
| Serial number: | 210193 |
| Camera Name | unknown |
| FPGA1 | 0.0.5.142 |
| FPGA2 | 0.0.4.36 |
| Digitizer | 0.0.0.0 |
| Motors | 0.0.4.30 |
| Image Statistics | |
| Minimum | 0 |
| Maximum | 14496 |
| Average | 8088 |
| Standard Deviation | 588 |
| Temperature Probes The camera is equipped with various temperature probes that are used for improving measurement accuracy or for camera diagnostics.Click the refresh button to update the temperature values. |
| Miscellaneous This section lists the firmware version information,the model, and the serial number of the camera |
| Image Statistics The image statistics as measured by the cameraare shown here.Click the refresh button to update the statistics values. |
7.1 Filter wheel
The FLIR X6530sc includes a four-slot filter wheel. Each slot can hold a 1 in. (2.5 cm) diameter filter with a thickness of up to 2.5 mm. An identification system has been implemented so that the camera recognizes the inserted slot and automatically adjusts the measurement configuration.
7.1.1 Removing an optical filter holder
Note
- This operation is undertaken close to the detector window. Take extreme care not to touch or scratch the detector window. Contact FLIR service if you require assistance with this operation.
- The detector is a very sensitive sensor. It must not be directed toward strong light, e.g., sunlight. It is better to remove filters with the camera turned on, as the detector, when cooled, is less sensitive to visible light.
- A filter holder tool is provided with the camera.
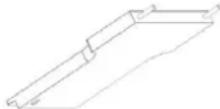
- Do not touch the filter surface when you install the filter. If this happens, clean the filter according to the manufacturer's instructions.
Follow the procedure below to remove a filter holder from the camera filter wheel:
- Select the measurement configuration range corresponding to the filter to be used. This places the filter in front of the detector, allowing access to it.
- If there is no measurement configuration range corresponding to the filter, switch off the camera and manually rotate the wheel to place the filter to be removed in front of the detector.
- Gently insert the two pins of the filter holder tool into the corresponding holes.
- Rotate the filter holder counterclockwise to release the holder from the wheel.
- Gently remove the holder from the camera, and store it in its case.
7.1.2 Installing an optical filter holder
Note
- This operation is undertaken close to the detector window. Take extreme care not to touch or scratch the detector window. Contact FLIR service if you require assistance with this operation.
- The detector is a very sensitive sensor. It must not be directed toward strong light, e.g., sunlight. It is best to remove filters with the camera turned on, as the detector, when cooled, is less sensitive to visible light.
- A filter holder tool is provided with the camera.
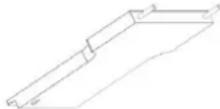
- Do not touch the filter surface when you install the filter. If this happens, clean the filter according to the manufacturer's instructions.
Follow the procedure below to install a filter holder in the camera filter wheel:
- Select the measurement configuration range using the filter to be used. The corresponding filter slot is placed in front of the detector allowing access to it.
-
If there is no measurement configuration range corresponding to the filter, switch off the camera and manually rotate the wheel to place the appropriate filter slot in front of the detector.
-
Gently insert the two pins of the filter holder tool into the corresponding holes of the holder to install.
- Insert the filter holder, making sure that the two slots in the holder are in line with the two springs on the filter wheel.
- Rotate the filter holder clockwise until the springs are correctly maintaining the holder.
7.1.3 Filter holder identification
Each filter holder is identified by a combination of magnets glued onto the filter holder. FLIR provides standard filter configurations with corresponding identification numbers (IDs). At start-up, the camera scans the filter wheel and identifies the inserted holders. If equipped with a lens with a bayonet mount, the camera also adjusts the measurement configuration in accordance with the identified filter holders.
The IDs 40 to 58 are reserved for customer-defined holders.
7.1.4 Creating a custom filter holder
Note
- Filters are fragile. Handle them with great care.
- Do not touch the filter surface when you install the filter. If this happens, clean the filter according to the manufacturer's instructions.
- Wear gloves or finger tips to handle the filter.
7.1.4.1 General
You can configure a filter holder to use your own spectral filter. You need an empty holder (P/N SC8_SC6_FILT_HOLD—contact your FLIR representative for more information on blank filter holders).
7.1.4.2 Procedure
Follow the procedure below to assemble a filter within a filter holder:
- Select a holder ID within the range 40 to 58. This will be used by the camera to identify your filter.
- Convert this number to binary. For example, 40 is 101000.
- The magnets provided with the empty holder are glued to the holder in accordance with the binary code. For every "1" in the binary code, a magnet is glued in the appropriate hole in the holder (see the figure below), with the north pole of the magnet facing into the hole. For example, for binary code 101000, you need to place a magnet at positions 8 and 32.
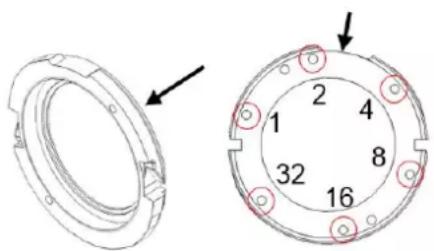
| Binary code | 1 | 0 | 1 | 0 | 0 | 0 |
| Magnet requirement | Yes | No | Yes | No | No | No |
| Magnet position/value | 32 | 16 | 8 | 4 | 2 | 1 |
The use of Loctite Hysol 3430 A&B glue is recommended.
Note The Microsoft Windows calculator in programmer mode provides an easy way to convert decimal numbers into binary code.
- Place your filter in the holder. Take care to ensure correct filter orientation, to avoid errors in the radiometric measurement. Contact your filter provider for this information.
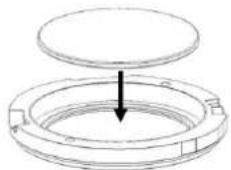
natural_image
Diagram of a mechanical component with a circular top and concentric rings, showing an arrow pointing to a specific ring (no text or symbols present)- Gently insert the threaded filter ring, and tighten it using the filter tool. Take great care not to damage the filter with the tool.
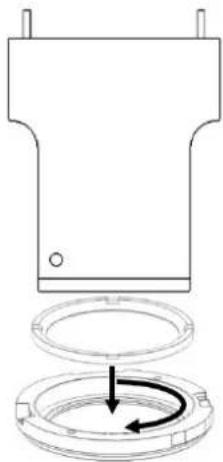
natural_image
Technical diagram showing a mechanical component with a rotating ring and a curved arrow indicating rotation (no text or symbols)7.1.5 Installing two filters in the filter holder
You can install two filters in the filter holder.
Note
• The total thickness of the two filters must not exceed 2 mm.
- The order in which you install the filters will not affect their performance. However, to avoid narcissus effects, it is recommended that the filters are installed with the least reflective side downwards in the filter holder (i.e., toward the detector).
- Filters are fragile. Handle them with the great care.
- Do not touch the filter surface when you install the filters. If this happens, clean the filter according to the manufacturer's instructions.
- Wear gloves or finger tips to handle the filters
- A set of filter holder equipment (filter holder, centering ring, filter spacer, threaded filter ring, and magnets) and a filter holder tool are provided with the camera.
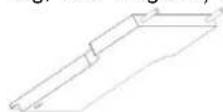
Follow the procedure below to install two filters in the filter holder.
- Create a custom filter ID, as described in section 7.1.4 Creating a custom filter holder, page 30.
- Place the first filter in the holder.
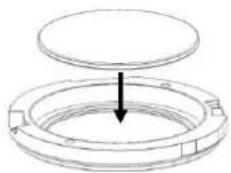
natural_image
Diagram of a mechanical component with a circular top and ring base, showing a downward arrow indicating a process or assembly (no text or symbols present)- Place the centering ring into the holder.
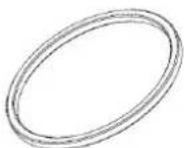
-
Clean the visible filter surface.
-
Place the filter spacer on top of the first filter.
-
Place the second filter into the holder. Make sure it seats correctly on top of the filter spacer and is centered with the centering ring.
-
Gently insert the threaded filter ring and tighten it using the filter tool. Take great care not to damage the filter with the tool.
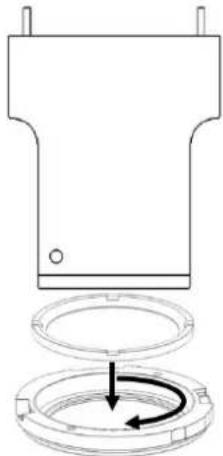
natural_image
Technical diagram showing a mechanical component with a rotating circular component and a downward arrow indicating rotation (no text or symbols present)7.1.6 Adding a custom filter parameter into the camera
7.1.6.1 General
Up to two filters can be mounted in a slot. A slot is defined in the camera's slot.ini file, and a filter's definition is stored in a text file in the camera.
Slot.ini file is a text file containing the holder identification and the corresponding filter numbers.
[Holder XXX]
F1 = FYYYY
F2 = FZZZZ
Where XXX is the unique identifier of the slot, and YYYYand ZZZZ are filter numbers referring to the existing FYYYY.txt and FZZZZ.txt files, respectively.
For instance, for a holder defined by ID 42 in which the filter F3221 is mounted, the following should be added to the slot.ini file:
[Holder 42]
F1 = F3221
F2 = F9999
For a holder defined by ID 45 in which the filters F3221 and F1518 are mounted, the following should be added to the slot.ini file:
[Holder 45]
F1 = F3221
F2 = F1518
Note
- Refer to section 9.2 USB connection, page 48 to access the camera files through the USB connection.
- Refer to section 7.1.7 Filter definition file description, page 33 for the description of the filter definition.
7.1.6.2 Procedure
- Connect your camera to your computer using the USB port.
- Edit the file Slot.ini file located in the location FlashFS/filters/.
- Save and close the file Slot.ini.
- If the filter definition files for the added holder are not present in FlashFS/filters/, they have to be created.
- Repeat steps 2 to 4 for all filters and holders to be added.
- Reboot the camera (a short press on the power button) to apply the modification.
7.1.7 Filter definition file description
7.1.7.1 General
Filter definition files contain identification and spectral information for the corresponding filters. This information is used by the camera and ResearchIR Max to adjust measurement configurations.
Filter definition files must contain all the sections described below. The values in each section must not be longer than the specified number of characters. It may be easier to copy an existing filter file and modify it.
| #reference max 20 char[reference]F1201 | The filter reference. This reference is used in the Slot.ini file and must start with the capital letter “F.” |
| #name max 20 char[name]NA_4094_4388_60% | The user-friendly name that is displayed in the searchIR Max user interface. FLIR uses the following naming convention, but it can be freely modified.XX_YYYY_ZZZZ_WW%XX: type of filter (NA, narrow; LP, low pass; high pass; BP, band pass)YYYY: cut-in (in nm)ZZZZ: cut-off (in nm)WW: average transmission |
| #application max 20 char(application]Blue CQ filter | Application in which the filter is used. This name is displayed on the camera’s LCD screen. |
| #band max 10 char[band]MW | BB: broadband midwave (1.5–5 μm)MW: midwave (3–5 μm)If unknown, enter “N/A.” |
| #material max 20 char[material]Silicon | Filter substrateIf unknown, enter “N/A.” |
| #type max 20 char[type]Narrow | Type of filter (narrow, band pass, high pass, low pass)If unknown, enter “N/A”. |
| #peak in μm[peak]4.22 | Peak transmissionIf unknown, enter “0.” |
| #cuton in nm[cuton]4094 | Filter cut-in (in nm)If unknown, enter “0.” |
| #cutoff in nm[cutoff]4388 | Filter cut-off (in nm)If unknown, enter “0.” |
| #transmission in %[transmission]60 | Average filter transmission (in %)If unknown, enter “0.” |
| #tolerance in %[tolerance]0.3 | Filter spectral toleranceIf unknown, enter “0.” |
| #[thickness] in mm[thickness]0.5 | Filter substrate thicknessIf unknown, enter “0”. |
| #spectral response max 160 char[spectral response]1:0;3,94:0,01;3,95:0,02;3,96:0,07;4,04:0,04;4,06:0,01;4,08:0;6:0 | Spectral response curve definitionThe wavelength and corresponding transmission (the maximum is 1) are separated by a colon.Pairs of values are separated by a semicolon.If unknown, enter “N/A.” |
7.2 Camera configuration file management
7.2.1 CNUC file management
7.2.1.1 General
Note
- CNUC files are related to the measurement configurations available for the camera. Refer to section 6.4.4 Measurement configuration, page 23.
- Accessing camera files exposes the camera system files. Do not erase or modify files other than the configuration files.
CNUC files are accessible by an FTP connection to the camera. Refer to section 9.2 USB connection, page 48 to connect to camera files.
7.2.1.2 Procedure
- Connect your camera to your computer through the USB port.
- You can add or delete camera calibration files directly in the directory FlashFS/nuc/.
- Reboot the camera to apply the modification
7.3 Camera Wi-Fi application
7.3.1 General
Note Refer to section 9.1 Wi-Fi connection, page 47 to set up a Wi-Fi connection to the camera.
A web application is available when using Wi-Fi to connect to the camera. This application allows image recording to be started and stopped in ResearchIR Max.
7.3.2 Procedure
- Connect your device (smartphone or computer) to your camera.
- On a web browser, go to http://169.254.242.23.
- Control the ResearchIR Max recording from the web page.
7.3.3 Camera web page description
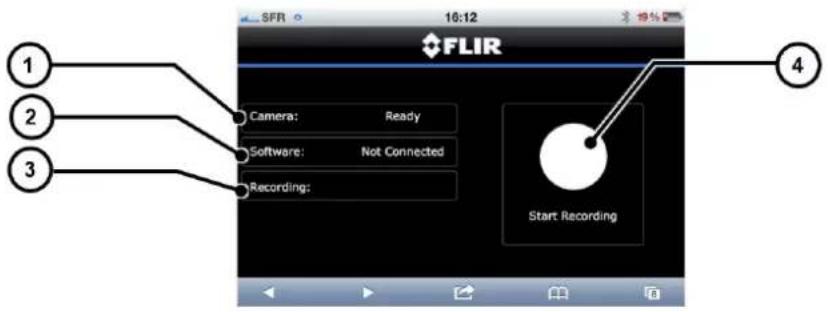
- Indicates camera status:
- Ready: The camera is running properly and providing infrared images. - Not Ready: The camera is not providing infrared images. Check the camera status LEDs for detailed information.
- Indicates ResearchIR Max connection status:
- Connected: ResearchIR Max is connected to the camera and ready to acquire an image sequence. - Not Connected: No sequence acquisition is possible. Check ResearchIR Max status on the computer.
- Indicates the current sequence recording status:
- Blank: Recording is not in progress in ResearchIR Max. - Recording: ResearchIR Max is currently recording an image sequence.
- Press the start/stop acquisition button to start or stop the image sequence acquisition in ResearchIR Max.
7.4 Infrared remote
7.4.1 General
The FLIR X6530sc can be controlled with the provided infrared remote or any XLR camera remote control using the Nikon protocol.
The actions available are as follows:
- Start acquisition in ResearchIR Max.
- Trigger 1 point NUC calibration.
- Trigger auto-exposure.
- Trigger autofocus (not available for all lenses).
7.4.2 Procedure
Follow the procedure below to select the infrared remote action:
- Connect the camera to ResearchIR Max.
- In the camera tab, under Advanced Camera Control, select the infrared remote action.

Radiometric measurement
8.1 Non-uniformity correction (NUC)
8.1.1 General
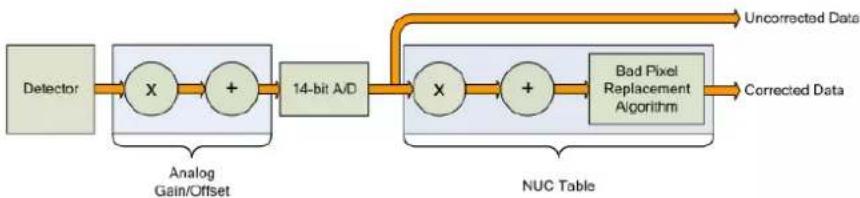
NUC refers to the process by which the camera electronics correct for the differences in the pixel-to-pixel response of each individual pixel in the detector array. The camera can create (or allow for the user to load) a NUC table that consists of a unique gain and off coefficients and a bad pixel indicator for each pixel. The table is then applied in the digital processing pipeline as shown in Figure 8.1. The result is corrected data, where each pixel responds consistently across the detector input range, creating a uniform image.
flowchart
graph LR
    A["Detector"] --> B["X"]
    B --> C["+"]
    C --> D["14-bit A/D"]
    D --> E["X"]
    E --> F["+"]
    F --> G["Bad Pixel Replacement Algorithm"]
    G --> H["Corrected Data"]
    I["Uncorrected Data"] --> G
    J["Analog Gain/Offset"] --> B
    K["NUC Table"] --> E
Figure 8.1 Digital process showing the application of NUC tables.
To create the NUC table, the camera images either one or two uniform temperature sources. The source is an external source provided by the user. The source should be uniform and large enough to overfill the camera's field of view. By analyzing the pixel data from these constant sources, the non-uniformity of the pixels can be determined and corrected. There are two types of processes that are used to create the NUC table: one point and two point.
8.1.2 CNUC
8.1.2.1 General
CNUC is a proprietary calibration process. A camera calibrated with CNUC allows for flexible integration time adjustments without the need to perform NUCs. Additionally, the CNUC calibration produces accurate measurement stability regardless of the camera's exposure to ambient temperature variations.
A CNUC correction is valid for a specific optical configuration comprising a lens and spectral filters combination. CNUC corrections are generated by FLIR service offices where advanced calibration benches are available. Contact your FLIR representative for CNUC correction on new spectral filters or infrared lenses.
The CNUC process generates a gain and offset map based on the camera's internal parameters and environmental probes.
8.1.3 Two-point correction process
8.1.3.1 General
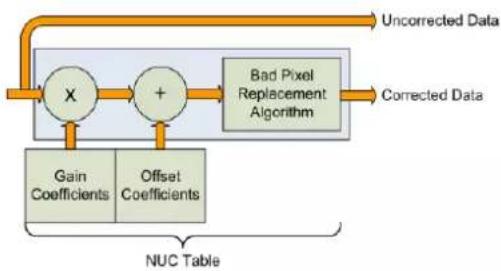
The two-point correction process builds a NUC table that contains individually computed gain and offset coefficients for each pixel, as shown in Figure 8.2. Two uniform sources are required for this correction: one source at the low end of the usable detector input range, and a second source at the upper end.
flowchart
graph TD
    A["Uncorrected Data"] --> B["X"]
    B --> C["+"]
    C --> D["Bad Pixel Replacement Algorithm"]
    D --> E["Corrected Data"]
    F["Gain Coefficients"] --> B
    G["Offset Coefficients"] --> C
    H["NUC Table"] --> F
    H --> G
Figure 8.2 Two-point correction.
8.1.4 One-point correction (offset correction)
8.1.4.1 General
The NUC correction is strongly dependent on the optical path in front of the detector, and on the detector setup itself. Often, any change in the camera or detector settings will require a new NUC. However, this change is mainly in the offset response of the image while the gain component stays constant. An offset update simply computes a new offset coefficient using the existing gain coefficient and corrects the image non-uniformity. An offset update requires only one uniform source, usually set at a temperature on the lower edge of the operational range.
One-point correction is done when clicking the calibrate button in the ResearchIR Max camera tab (11 in Figure 6.2 Image size adjustment, page 23).
8.2 Temperature calibration
8.2.1 Hypercal
8.2.1.1 General
Hypercal is a proprietary temperature measurement process that complements CNUC. With Hypercal, for any integration time selected, the camera produces accurate measurement within ±1^ or ±1% over the configured measurement range. Therefore, it makes the selection of the optimal measurement range for a given thermal scene an easy task.
Note ±1°C or ±1% accuracy is standard for the FLIR X6530sc, unless explicitly specified otherwise. Typically, calibration on custom spectral filters or custom optical configurations have higher-accuracy tolerances.
8.2.2 Auto-exposure
8.2.2.1 General
Because the dynamic range of a natural thermal scene can be larger than the range of the camera, some images taken by the camera may be saturated. When an image is in the bottom part of the dynamic range, the sensitivity is affected; therefore, the integration time has to be increased. Conversely, when an image is in the higher part of the dynamic range and saturated, the integration time has to be decreased.
When activated, the camera will search for the highest integration time for which the image dynamic range is contained in the upper part of the linearity domain of the detector.
Auto-exposure can be started from ResearchIR Max (see section 6.4.5 Temperature range adjustment, page 24) or from the LCD screen (see Figure 6.1 LCD touch screen., page 17).
Note
- The auto-exposure process looks for the best integration time for the actual thermal scene. It may be the case that this preferred integration time is not achievable because it is limited by the camera's frame rate. In this case, the auto-exposure process is stopped, and the preferred integration is not applied.
The auto-exposure process is not designed to handle multiple integration times.
8.3 Bad pixel replacement
8.3.1 General
Once an NUC has been carried out, bad pixels can be detected and replaced. This is done by replacing the bad pixels by the median value of the eight neighboring pixels.
There are three kinds of bad pixels:
- Bad pixels relative to the gain of the non-uniformity correction. In this case the system will consider a pixel as bad if the gain coefficient from the NUC is lower or higher than the predefined percentage. For instance, if the threshold is 25%, the system will determine a pixel as bad if the gain is <0.75 but >1.25.
- Bad pixels relative to the offset of the NUC. In this case the system will consider a pixel as a bad if the offset coefficient from the NUC table is lower or higher than the pre-defined threshold. For instance, if the threshold is 30% and if the range of digitization is 16 384 digital levels (DL), the system will determine a pixel as bad if the offset is <4915 DL but >4915 DL.
- Bad pixels relative to its level of root-mean-square (RMS) noise. In this case the system will consider a pixel as bad if the RMS noise is lower or higher than the predefined threshold. For instance, if the threshold is 3.5 and the mean and standard deviation of the noise image are, respectively, 5.0 and 1.0, the system will determine a pixel as bad if the RMS noise is >8.5. With the absolute threshold, the system considers a pixel as bad if its value is higher than this threshold.
8.4 Camera file management
8.4.1 Procedure
- Connect your camera to a computer using the USB port.
- You can add or delete camera calibration files directly in the directory FlashFS/nuc/.
- Reboot the camera to apply the modification
Note
If you are using Microsoft Windows 7:
- The camera must be connected to the computer using USB.
- The USB drivers must be correctly installed.
8.5 Frame rate and integration modes
8.5.1 General
The frame rate is the number of images taken by the camera per second. The integration time is the “exposure time”—the period of time for which the camera views the scene. Achievable frame rates are based on the camera settings, the camera overhead, and the integration settings. A brief review of the processes that occur during a frame is needed to understand how to determine maximum achievable frame rates.
There are two basic integration modes: integrate then read (ITR) and integrate while read (IWR). ITR is the most basic behavior of the camera and shows the process most clearly.
Note
- An NUC update is recommended any time an adjustment is made to either the frame rate or the integration time, regardless of the integration mode.
- The IWR mode is not available in all camera models.
8.5.2 The ITR process
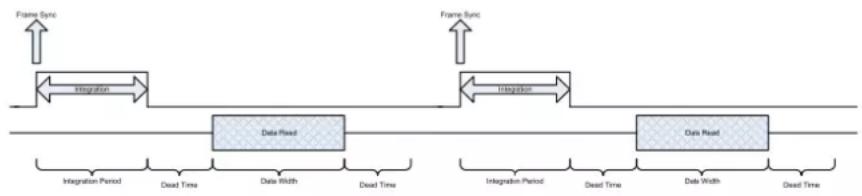
As seen in Figure 8.3, the frame generation process begins with a frame synchronization (Frame Sync). The camera then integrates the set amount of time, goes through a fixed dead time, transmits data, goes through a second fixed dead time, and then is ready to start the process over again. The figure shows that the camera first completes the integration process and then reads the data out, hence the term “integrate then read.”
flowchart
graph LR
    A["Frame Sync"] --> B["Integration"]
    B --> C["Data Read"]
    C --> D["Integration Period"]
    D --> E["Dead Time"]
    E --> F["Data Width"]
    F --> G["Dead Time"]
    G --> H["Data Read"]
    H --> I["Integration Period"]
    I --> J["Dead Time"]
    J --> K["Data Width"]
    K --> L["Dead Time"]
    L --> M["Data Read"]
    M --> N["Integration Period"]
    N --> O["Dead Time"]
    O --> P["Data Width"]
    P --> Q["Dead Time"]
    Q --> R["Data Read"]
    R --> S["Integration Period"]
    S --> T["Dead Time"]
    T --> U["Data Width"]
    U --> V["Dead Time"]
    V --> W["Data Read"]
    W --> X["Integration Period"]
    X --> Y["Dead Time"]
    Y --> Z["Data Width"]
    Z --> AA["Dead Time"]
    AA --> AB["Data Read"]
    AB --> AC["Integration Period"]
    AC --> AD["Dead Time"]
    AD --> AE["Data Width"]
    AE --> AF["Dead Time"]
    AF --> AG["Data Read"]
    AG --> AH["Integration Period"]
    AH --> AI["Dead Time"]
    AI --> AJ["Data Width"]
    AJ --> AK["Dead Time"]
    AK --> AL["Data Read"]
    AL --> AM["Integration Period"]
    AM --> AN["Dead Time"]
    AN --> AO["Data Width"]
    AO --> AP["Dead Time"]
    AP --> AQ["Data Read"]
    AQ --> AR["Integration Period"]
    AR --> AS["Dead Time"]
    AS --> AT["Data Width"]
    AT --> AU["Dead Time"]
    AU --> AV["Data Read"]
Figure 8.3 The ITR frame generation process.
All timings for the frame generation process are based on a 50 MHz clock, yielding a resolution of 160 ns. The minimum integration time for the FLIR X6530sc is two clock cycles or 320 ns.
Table 8.1 gives the method for computing the maximum frame rate for the ITR process.
Table 8.1 ITR maximum frame rate calculations
| Data width [8 + number of columns + number of columns × number of rows)]/50 M |
| Dead time 246.32 μs |
| Integration time User defined; [320 ns ≤ integration time ≤ 11 minutes] |
| Frame rate 1/[integration time + data width + dead time] |
Table 8.2 shows the ITR calculations for a typical frame setting of 640 × 512 with an integration period of 2.0 ms.
Table 8.2 ITR maximum frame rate calculations, 640 × 512, 2.0 ms integration time
| Data width | 8 + 640 + 640 × 512 /50 M = 0.006566 |
| Dead time 246.32 μs | |
| Integration time 0.002 | |
| Frame rate 1 / [0.006566 + 0.00024632 + 0.002] = 1/[0.0088129] = 113.47 | |
8.5.3 The IWR process
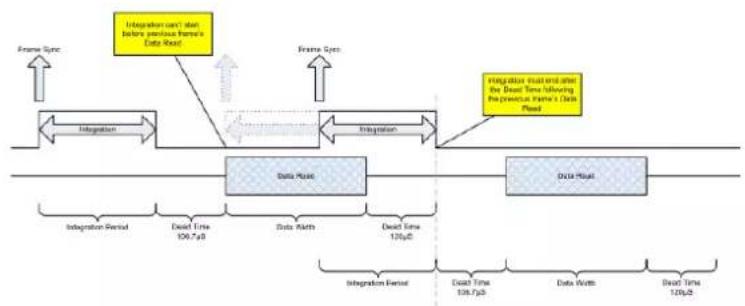
The integration and the data readout periods can be thought of as two separate processes. However, they are linked by certain timing requirements. This means that the camera can integrate for a period, then starts the data readout for that integration period, and during that readout starts the integration period for the next frame. This process is thus termed “integrate while read,” and can greatly speed up frame rates, as seen in Figure 8.4. The drawback to this process is that it injects a fixed pattern noise into the data which can be removed by performing an NUC on the data.
flowchart
graph TD
    A["Frame Sync"] --> B["Integration"]
    B --> C["Data Packet"]
    C --> D["Integration"]
    D --> E["Data Mail"]
    E --> F["Integration Mail and after the Dead Time following Reproductive System's Data Packet"]
    F --> G["Integration Packet"]
    G --> H["Dead Time 106.7pB"]
    G --> I["Data Widths"]
    G --> J["Dead Time 139pB"]
    H --> K["Integration Packet"]
    I --> L["Dead Time 106.7pB"]
    J --> M["Data Widths"]
    K --> N["Integration Packet"]
    L --> O["Dead Time 139pB"]
Figure 8.4 The IWR frame generation process.
The integration period cannot end before the previous frame data is read. The integration period cannot begin until after the previous frame's data read starts. Therefore, the calculation used to compute the maximum IWR frame rate depends on the integration and data read period. These calculations are shown in Table 8.1.
Table 8.1 IWR maximum frame rate calculations
| Data width [4 + number of columns + number of columns × number of rows)]/50 M |
| Dead time 249.28 μs |
| Integration time User defined; [320 ns ≤ integration time ≤ 11 minutes] |
| Frame rateIntegration time < data width + dead time : 1/[data width + dead time]Integration time > data width + dead time : 1/[Integration time + dead time] |
Table 8.2 shows the IWR calculations for a typical frame setting of 640 × 512 with an integration period of 2.0 ms.
Table 8.2 IWR maximum frame rate calculations, 640 × 512, 2.0 ms integration time
| Data width [4 + 640 + 640 × 512]/50 M = 0.00 | 656648 |
| Dead time 249.28 μs | |
| Integration time 0.002 | |
| Frame rate Integration time < data width + dead time:1/[0.00656648 + 0.00024928] = 1/[0.00681576] = 146.72 | |
8.5.4 Procedure
Note The IWR mode is not available in all camera models.
Follow the procedure below to select the camera integration mode (ITR or IWR):
- Connect the camera to ResearchIR Max
- In the camera tab, under Advanced Camera Control, select the integration mode.

8.6 Dynamic range extension—superframing
The main purpose of superframing is to capture a large dynamic range event with various integration times. Consider a rocket launch as an example. During the launch, a short integration time would be needed to monitor the plume of the rocket. However, such a short integration time would not yield adequate images across the the rocket body. If the integration time was increased to yield adequate images across the rocket body and its
plume, the plume would saturate the detector. Superframing cycles through up to eight different integration periods. Below is a timing graph explaining the link between the recorded frame and the integration time in superframing mode.
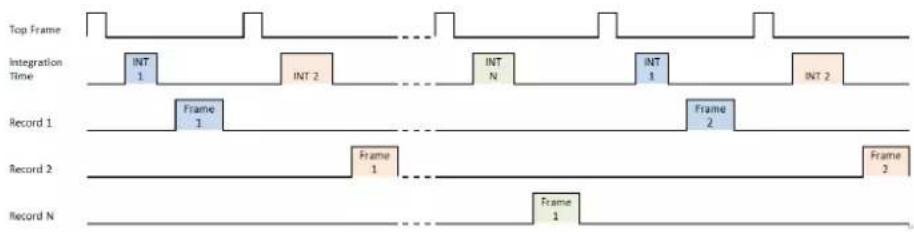
Refer to section 6.4.5 Temperature range adjustment, page 24 to set up superframing.
8.7 Camera synchronization
The FLIR X6530sc can be synchronized to an external signal. The synchronization applies to the timing of an individual frame. The camera features a Sync In connector (4 in Figure 5.4 Camera back panel description., page 12) and a Sync Out connector (5 in Figure 5.4 Camera back panel description., page 12).
The FLIR X6530sc makes use of frame synchronizations to control the generation of image data. The generation of a frame consists of two phases: integration and data readout. Depending on the timing between these two events, you have two basic integration modes: ITR and IWR. In ITR mode, integration and data readout occur sequentially. The complete frame time is the combined total of the integration time plus the readout time. In IWR mode, the integration phase of the current frame occurs during the readout phase of the previous frame. In other words, the ITR and IWR refer to whether or not the camera will overlap the data readout and integration periods. In ITR mode, the data is not overlapped, which means lower frame rates, but this process provides a less noisy image. IWR mode can achieve much faster frame rates, but with a slight increase in noise.
On frame synchronization, the camera immediately integrates, followed by data read out.
Note
- When using an external frame synchronization and preset sequencing, or superframing, the external frame synchronization should be set to comply with the ITR frame rate limits. If the external synchronization rate is too fast, the camera will ignore synchronizations that occur before the camera is ready.
- If the frame rate is too low, the image quality may deteriorate. Contact your FLIR representative if you have questions about low frame rates for your specific camera model.
- Synchronization is different from triggering. The latter is described in section 8.8 Trigger In, page 44.
- The IWR mode is not available in all camera models.

flowchart
graph LR
    A["Frame Sync"] --> B["Proset 0 Integration"]
    B --> C["Proset 1 Integration"]
    C --> D["Proset 2 Integration"]
    D --> E["Proset 3 Integration"]
    E --> F["Proset 3 Data"]
    style A fill:#f9f,stroke:#333
    style B fill:#ccf,stroke:#333
    style C fill:#cfc,stroke:#333
    style D fill:#fcc,stroke:#333
    style E fill:#cff,stroke:#333
    style F fill:#ffc,stroke:#333
Figure 8.5 Frame synchronization—ITR mode.
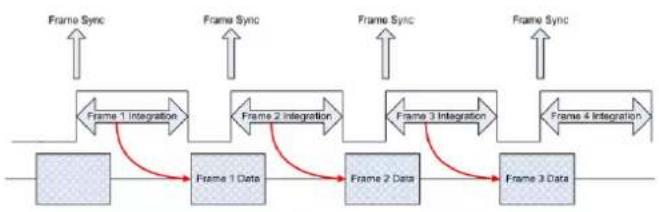
flowchart
graph LR
    A["Frame Sync"] --> B["Frame 1 Integration"]
    B --> C["Frame 2 Integration"]
    C --> D["Frame 3 Integration"]
    D --> E["Frame 4 Integration"]
    E --> F["Frame 3 Data"]
    F --> G["Frame 2 Data"]
    G --> H["Frame 1 Data"]
    H --> I["Frame 1 Integration"]
    I --> J["Frame Sync"]
    style A fill:#f9f,stroke:#333
    style J fill:#f9f,stroke:#333
Figure 8.6 Frame synchronization—IWR mode.
8.7.1 Sync In
8.7.1.1 General
The Sync In signal is supplied to the camera by connector 4 in Figure 5.4 Camera back panel description., page 12. The minimum pulse width is 300 ns.
The Sync In setup is described in section 6.4.7 Synchronizing the camera to an external signal, page 25.
8.7.1.2 Characteristics
| Name Value | |
| Amplitude | Rising-edge TTL, 0/+5 V |
| High-state minimum voltage >3.5 V | |
| Low-state maximum voltage <0.5 V | |
| Polarity User selectable | |
| Maximum frequency | Maximum frame rate of the camera for a given tector configuration# |
| Minimum pulse width 300 ns | |
| Impedance User selectable. 50 Ω/10 MΩ | |
| Protection | Voltage peaks (500 V/<1 ns)Overvoltage (15 V)Reversed polarity |
| Connector type Coaxial BNC jack |
- Some cameras also have a minimum frequency (unspecified). Contact your FLIR representative for more information.
- Example: If the detector is working at 100 in full frame, then the maximum frequency will be 100.
8.7.1.3 Chronogram
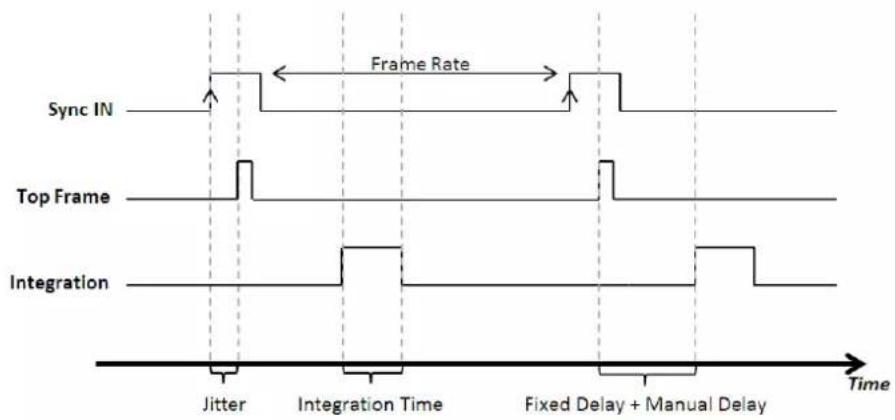
| Name Value Notes | ||
| Jitter 20 ns | 1 pixel clock (50 M) | |
| Fixed delay 690 ns Propagation | through the back | panel card + propagation from the FPGA to the detector |
| Manual delay | - | Set by the user |
| Integration Time | - | Set by the user |
8.7.1.4 LED description
| LED status Description | |
| Off No signal detected. Check the connection and signal levels. | |
| Green Signal detected and the signal voltage is correct but the signal is continuous. | |
| Orange Signal detected but the signal voltage is incorrect. | |
| Blinking green Signal detected. | LED is blinking at the signal frequency. Signal voltage is correct. |
| Blinking orange | Signal detected. LED is blinking at the signal frequency. Signal voltage is incorrect. |
8.7.2 Sync Out
8.7.2.1 General
The Sync Out signal is synchronous with the Sync In or the frame rate (if Sync In is not selected). It can be used to synchronize other events with the camera. It is a TTL signal.
The Sync Out setup is described in section 6.4.7 Synchronizing the camera to an external signal, page 25.
8.7.2.2 Characteristics
| Name Value | |
| Amplitude | TTL signal 0/+5 V |
| Max frequency Maximum frame rate of the camera for a given detector configuration | |
| Impedance | High impedance |
| Minimum pulse width | 300 ns |
| Protection | Voltage peaks (500 V/<1 ns)Overvoltage (15 V)Reversed polarity |
| Connector | Coaxial BNC jack |
- Example: If the detector is working at 100 in full frame, then the maximum frequency will be 100.
8.7.2.3 LED description
| LED status Description | |
| Off No signal. | |
| Blinking Green Signal ready to use. | LED is blinking at the signal frequency. |
| Green Signal not usable. | Signal voltage is 5 V continuous. |
8.8 Trigger In
8.8.1 General
Trigger In is used to tag images in the camera so that they are recorded by the software. The status of the Trigger In signal at the start of integration is added to the frame header sent to the recording software.
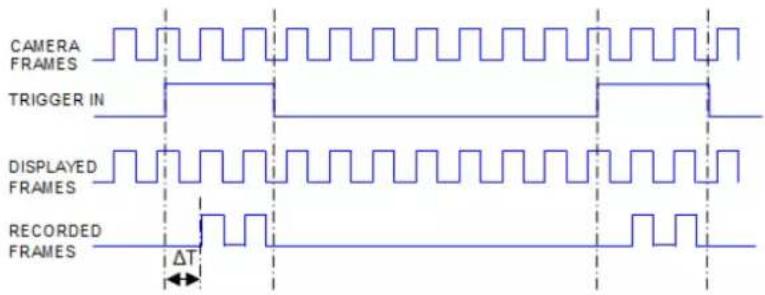
T is a jitter of one frame period maximum. The Trigger In signal must be at least one frame period long. All frames are sent to the computer. ResearchIR Max will start or stop acquisition based on the Trigger In signal. This is configured in the start and stop conditions on the ResearchIR Max recording tab (left panel).
When to use this configuration
- To capture a fugitive event. The camera will acquire images, but the software only records the frame of interest.
- When a precise start for the recording time is required.
- When only a few frames are needed to be recorded
When NOT to use this configuration
- When it is needed to trigger each acquisition. In that situation, it is preferable to use the Sync In input.
8.8.2 Characteristics
| Name Value | |
| Amplitude | Rising edge TTL, 0/+5 V |
| High-state minimum voltage | >3.5 V |
| Low-state maximum voltage | <0.5 V |
| Minimum pulse width | One frame period |
| Impedance | User selectable. 50 Ω/10 MΩ |
| Protection Voltage peaks (500 V/<1 ns) | Overvoltage (15 V)Reversed polarity |
| Connector type Coaxial BNC jack |
8.8.3 LED description
| LED status Description | |
| Off No signal detected. Check the connection and signal levels. | |
| Green Signal detected and the signal voltage is correct but the signal is continuous. | |
| range | Signal detected. Signal voltage is incorrect. |
| Blinking green | Signal detected. LED is blinking at the signal frequency. Signal voltage is correct. |
| Blinkingorange | Signal detected. LED is blinking at the signal frequency. Signal voltage is Incorrect. |
8.9 Lock-in
8.9.1 General
The lock-in technique is commonly used in thermography to improve the sensitivity of the camera and to extract from the thermal signal the thermal effects corresponding to an external excitation in the object under evaluation.
The FLIR X6530sc features a lock-in signal input BNC connector on the back panel of the camera (7 in Figure 5.4 Camera back panel description., page 12).
The value of the signal is digitalized during the integration of the infrared image and embedded within it. It is then recorded by ResearchIR Max and stored in the sequence file image headers. Files recorded with ResearchIR Max can subsequently be exploited with FLIR Thesa software. Contact your FLIR representative for further information.
Note When conducting lock-in experiments it is highly recommended to place a large non-polarized capacitor (e.g., 1 F 100 V or 1 F 63 V) in series with the input.
8.9.2 Characteristics
| Name Value | |
| Amplitude 150 mV < V | lock-in < 10 V |
| Frequency 10 mHz < F | lockin< 6 kHz |
| Maximum signal offset sweep rate Half-amplitude per period | |
| Impedance High Z | |
| Protection Peak voltage 500 V | Clamping voltage 150 VRated voltage 24 VElectrostatic discharge (ESD) contact 8 kVESD air 15 kV |
| Connector type Coaxial BNC jack | |
8.10 IRIG-B
The FLIR X6530sc features an IRIG-B input BNC connector (colored blue) on the back panel of the camera (8 in Figure 5.4 Camera back panel description., page 12).
The value of the signal is digitalized during the integration of the infrared image and embedded within it. It is then recorded by ResearchIR Max and stored in the sequence file image headers.
The supported IRIG-B formats are IRIG-B12x. The signal should be 3:1, 3 Vpp maximum at 50 Ω or 6 Vpp for high impedance input.
9.1 Wi-Fi connection
9.1.1 General
It is possible to connect to the FLIR X6530sc using the camera's integrated Wi-Fi and a peer-to-peer (ad hoc) WLAN network. This connection allows control of image acquisition in ResearchIR Max from the camera (same functions as on the LCD screen).
9.1.2 Procedure
Follow the procedure below to set up the peer-to-peer WLAN network:
- Connect the camera.
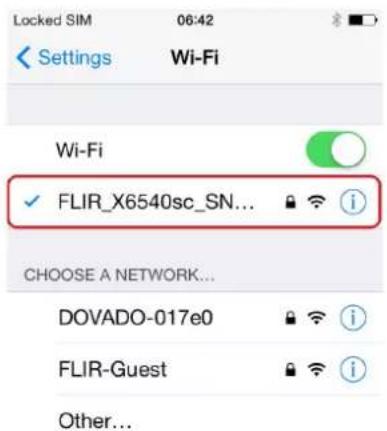
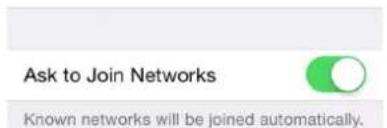
- Enter the password: 1234567890.
- Configure the advanced parameters.
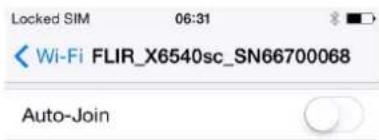
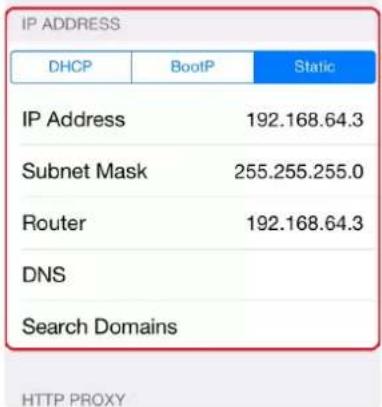
4. Connect to http://192.168.64.1/
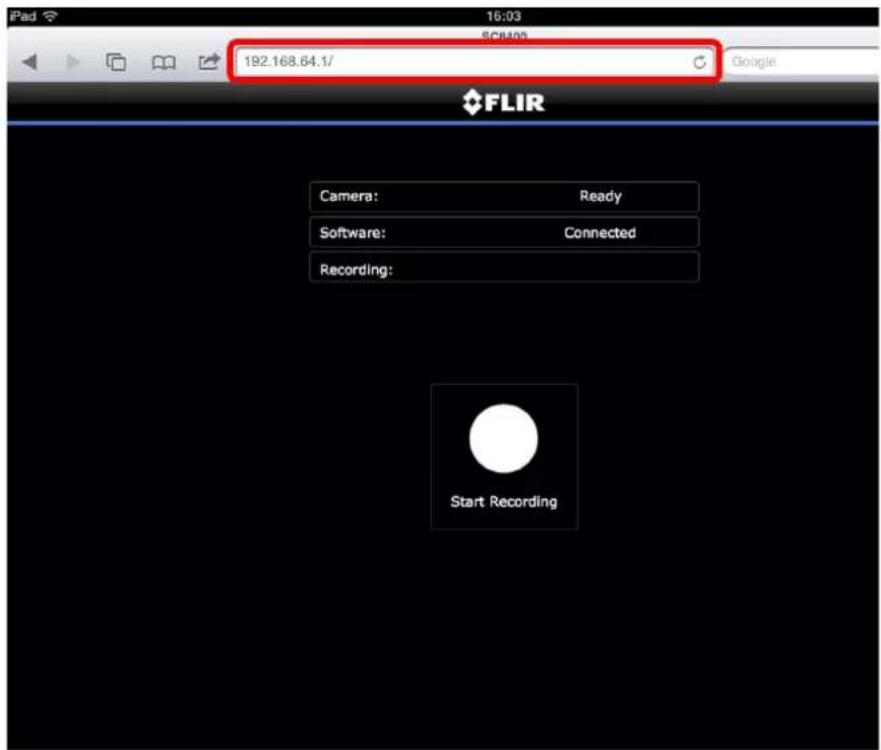
9.2 USB connection
9.2.1 General
The camera features a USB connector that is used to access to the camera's internal file system. Once connected, the connection allows:
- Access to the camera memory, to upload configuration and CNUC files.
- Access to the camera registry with the Res.NETutility (provided on request, see section 4 Customer help, page 7).
The USB connection requires a FLIR USB driver on the camera and also on the computer. Depending on the camera, there are two scenarios:
1. The camera has a newer FLIR USB driver
When the FLIR ResearchIR Max software is installed on the computer, a valid FLIR USB driver is automatically installed on the computer. When this FLIR USB driver is installed, FLIR Camera Network Device is listed under Network adaptors in Windows Device Manager. No manual installation of a USB driver is required, but you need to configure the network interface (see section 9.2.3 Configuration of the network interface, page 53).
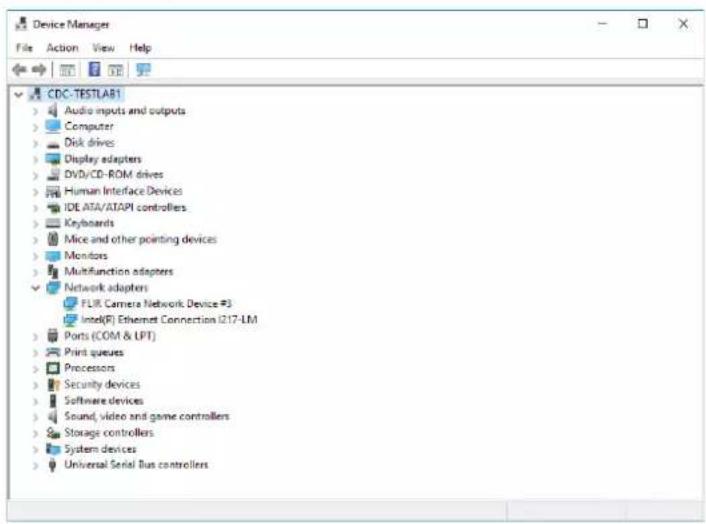
2. The camera has a legacy FLIR USB driver
Installation of the driver FLIR X8400sc - X6500sc - USB.inf is required on the computer. For more information, see section 9.2.2 USB driver installation, page 49. After installing the driver, you need to configure the network interface (see section 9.2.3 Configuration of the network interface, page 53).
Note
-
The connection type to the camera is RDNIS over a USB connection.
• The following operating systems are supported: -
Microsoft Windows 7 32 and 64 bit
• Microsoft Windows Vista 32 and 64 bit - Microsoft Windows XP SP2
9.2.2 USB driver installation
This section applies to cameras with the legacy FLIR USB driver. Installation of the driver FLIR X8400sc - X6500sc - USB.inf is required on the computer. Contact your FLIR service centre or visit http://support.flir.com to download the driver.
9.2.2.1 First time installation
9.2.2.1.1 General
When the camera is connected to the computer by a USB cable for the first time, Windows detects the camera and prompts you to select the driver.
9.2.2.1.2 Procedure
Follow the procedure below to install the USB driver:
- Connect the camera to the computer using the USB cable.
-
At the Windows prompt, select the FLIR X8400sc - X6500sc - USB.inf file.
-
Allow installation of the driver, despite it not being Microsoft trusted software.
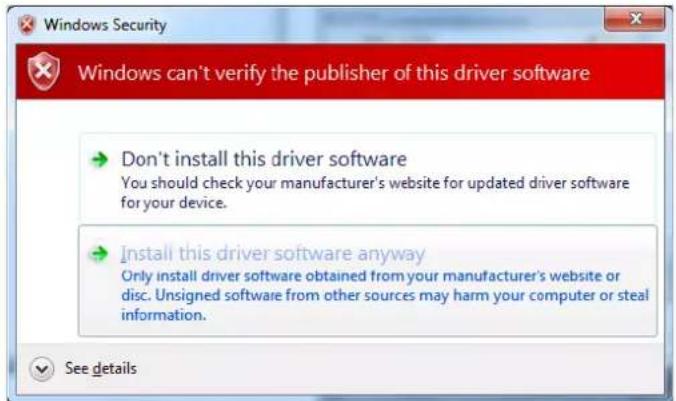
- Configure the network interface by following the procedure in section 9.2.3 Configuration of the network interface, page 53.
9.2.2.2 Replacing an existing driver
9.2.2.2.1 General
When the USB driver has already been installed, follow the procedure below to update the driver.
9.2.2.2.2 Procedure
- Disable the Ethernet connection between the camera and the computer.
- Connect the camera to the computer with the USB cable.
- Open Control Panel > Device Manager.
- Under Network adapters, find the device named FLIR Platinum USB.
- Right-click and select Update Driver Software.
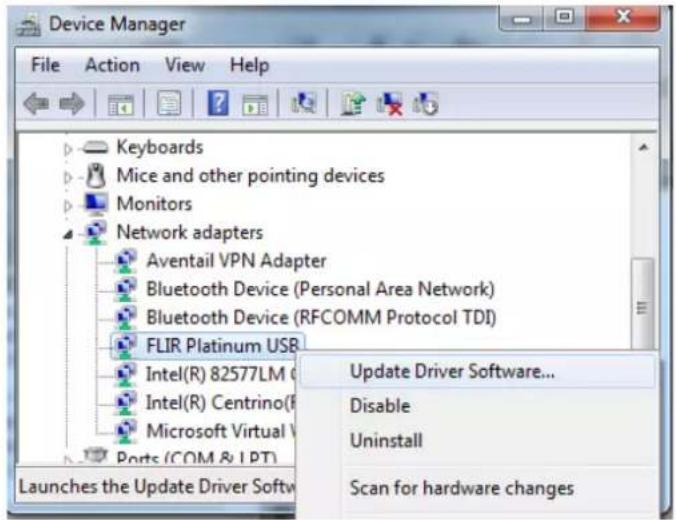
- Select Browse my computer for driver software.
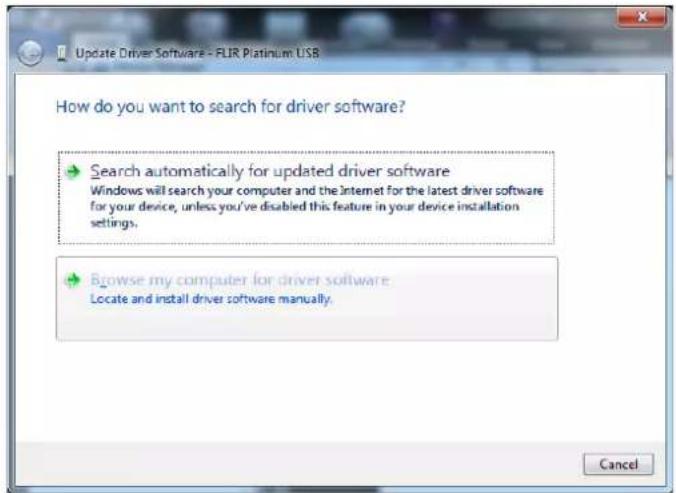
- Select Let me pick from a list of device on my computer.
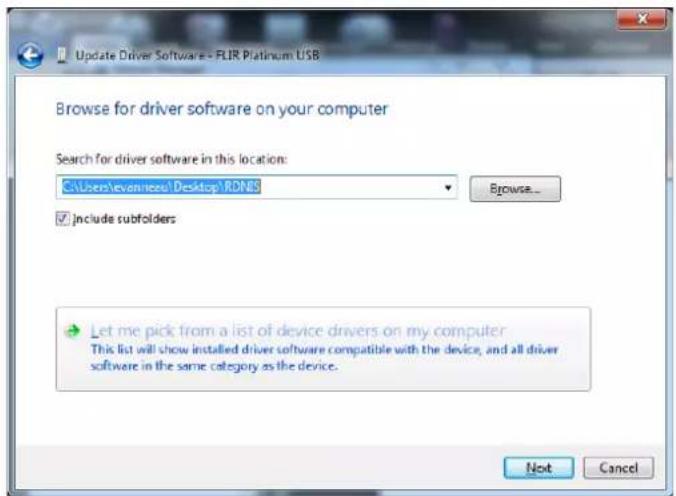
- Click the Have Disk... button.
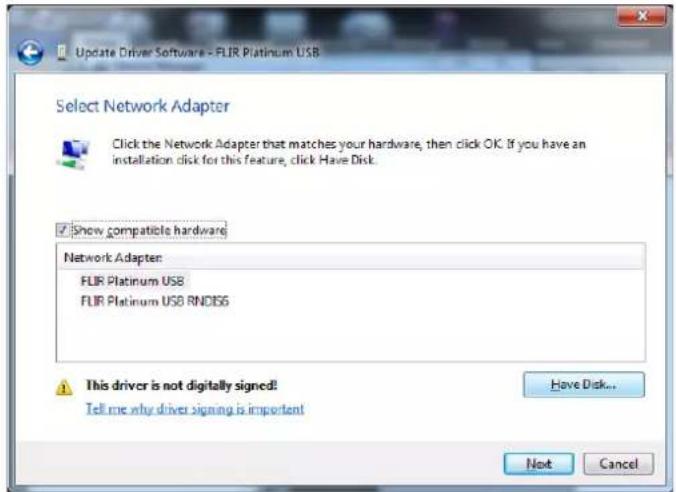
- Browse and select the file FLIR X8400sc - X6500sc - USB.inf file.
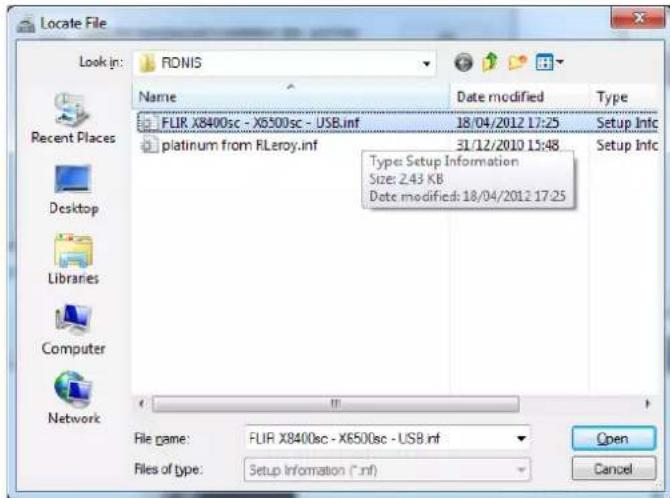
- Select Driver X8400sc - X6500sc - USB, and click the Next button.
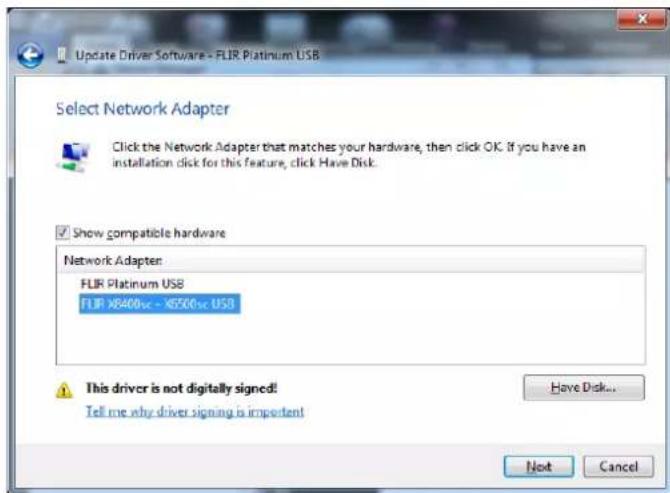
- Click Install this driver software anyway. The driver is now installing. If the installation does not progress correctly, try unplugging the USB cable from the computer.
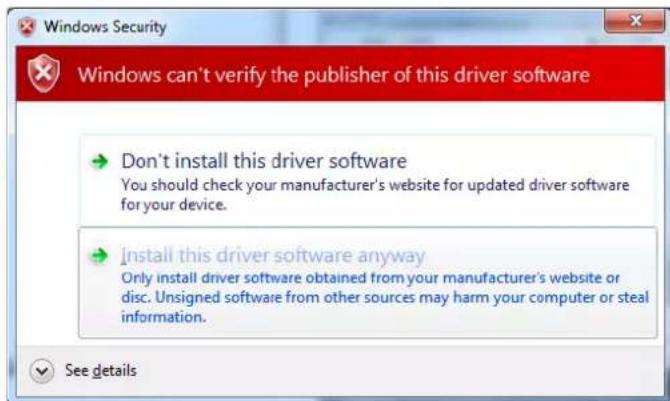
-
Restart the computer.
-
Device Manager now shows the new device FLIR X8400sc - X6500sc.
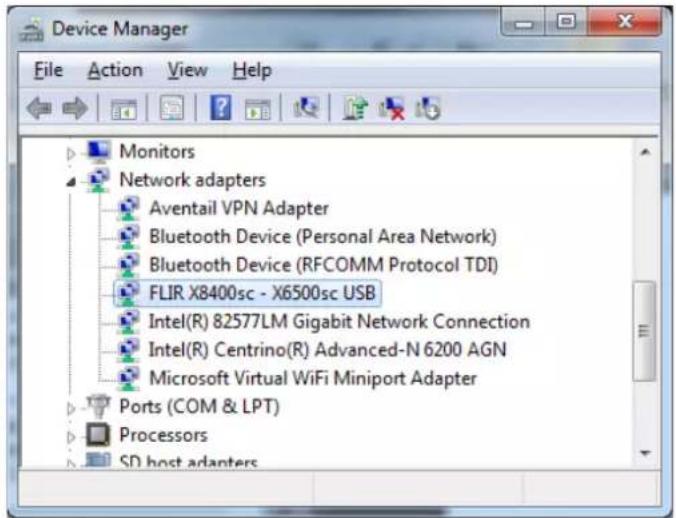
- Configure the network interface by following the procedure in section 9.2.3 Configuration of the network interface, page 53.
9.2.3 Configuration of the network interface
9.2.3.1 Procedure
- Go to Network Connections: open the Control Panel, click Network and Internet, click View network status and tasks, and click Change adapter settings.
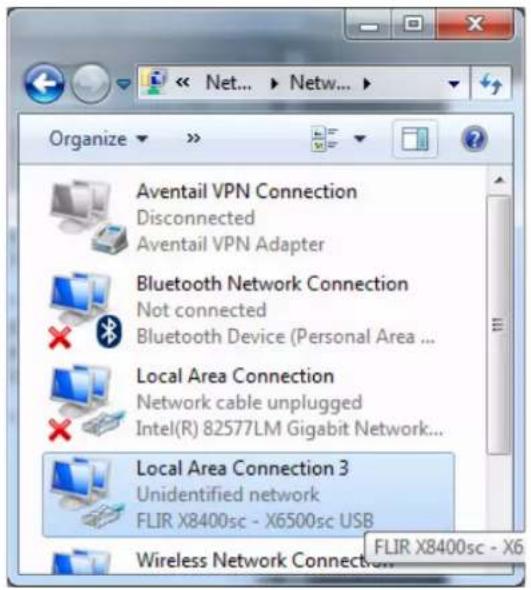
- Right-click on the FLIR X8400sc - X6500sc connection and click Properties, then select Internet Protocol V4 and click the Properties button.
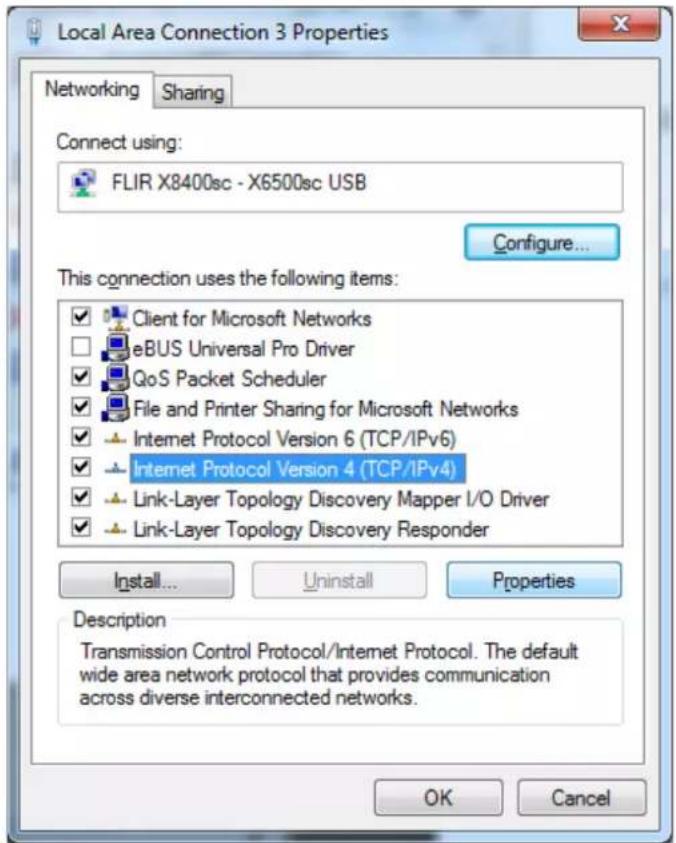
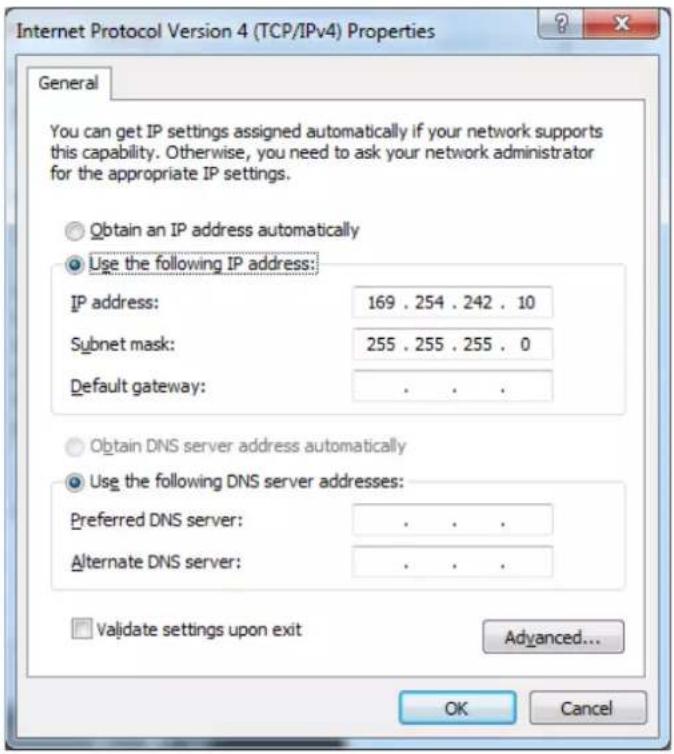
- Set the IP address to 169.254.242.10 and the subnet mask to 255.255.255.0.
Click the OK button.
-
The camera can now be accessed:
-
Use Windows Explorer to access camera files such as CNUC, lens, and filter ID descriptors.
- Use ResNet to access the camera registry. ResNet is an internal tool. Contact your FLIR service department for more information.
9.2.4 Accessing the camera files with Windows Explorer
9.2.4.1 General
Note
- The camera must be connected to the computer using the USB cable.
- The USB drivers must be correctly installed.
When the camera is connected to the computer with the USB cable (the Ethernet connection to the camera must be disabled), type the address of the camera in Window Explorer. The address can be in the form of:
• The camera's IP address: 169.254.242.23.
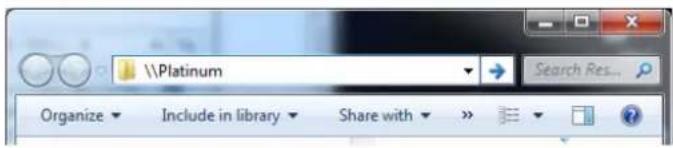
• The camera's SMB name: Platinum.

9.2.4.2 Procedure
The Windows 7 default configuration needs to be modified to allow correct display of the camera files in Windows Explorer:
- Open the Local Security Policy control panel. It can be easily found by typing "Local" in the Windows Start Menu search field.
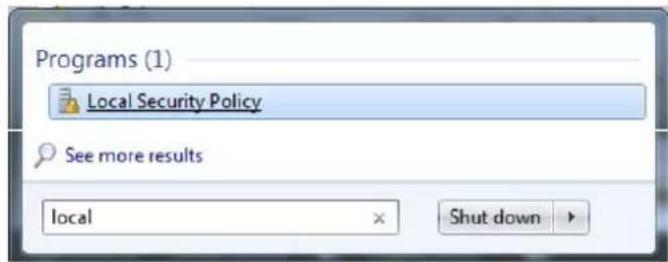
- Set the LAN Manager authentication level to "Send LM & NTLM responses."
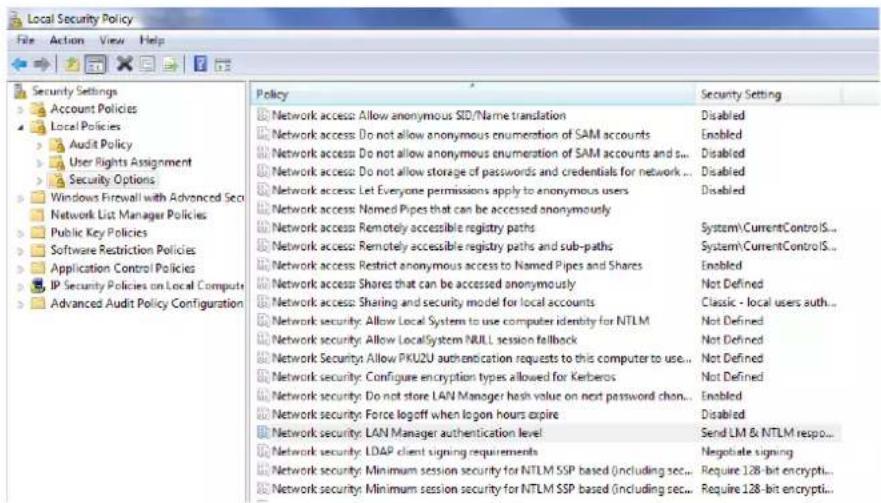
10
Mechanical drawings
[See next page]
X6/X8xxx sc with bayonet mount
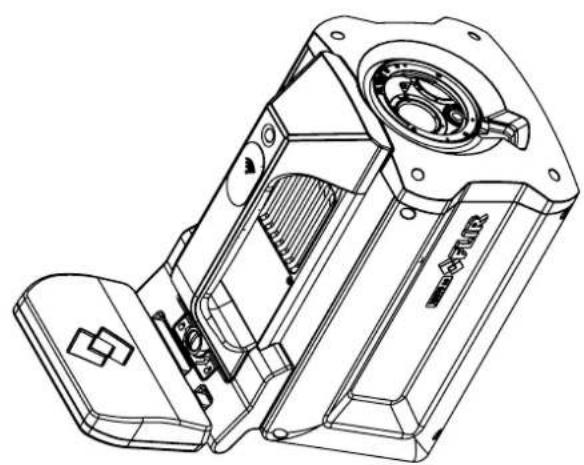
natural_image
Technical line drawing of a mechanical device with internal components and mounting bracket (no text or symbols)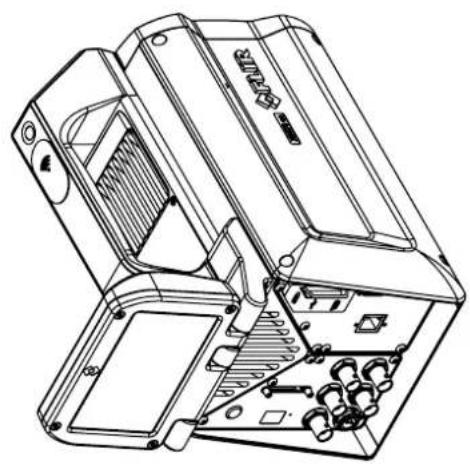
natural_image
Technical line drawing of an industrial machine with internal components and mounting holes (no text or symbols)![[3,15in] 80mm [2,95in] 75mm [5,91in] 150mm](/content/2026/05/1062173/images/ab7c4e279bfc098a60f87600567643ccfea8719f27c67c525a9300a93da7ecd7.jpg)
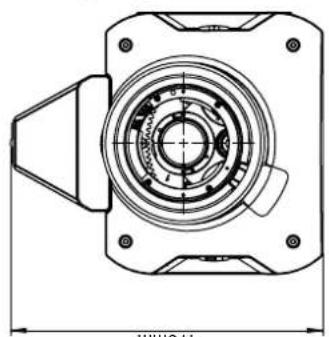
natural_image
Technical line drawing of a mechanical component with concentric rings and mounting holes (no text or symbols)With display removed
![Optical mour surface [2,82in] 72mm [1,61in] 41mm [0,75in] 19mm [0,43in] 11mm [1,22in] 31mm [2,01in] 51mm [0,96in] 24mm [1,53in] 39mm [2,09in] 53mm [0,96in] 24,5mm [2,08in] 52,75mm Modified](/content/2026/05/1062173/images/f84facf7a09295c4e5b1911f20aa25fe0b4ad272ede56f4c4d2eee7a3add25ae.jpg)
![1/4-20 UNC ↓ 6mm [0,24in] [2,84in] 72,1mm M5 x 0.8 ↓ 10 [0,4in] (3X) [1,06in] 27mm [1,06in] 27mm [0,98in] 24,8mm [0,87in] 22,1mm [5,43in] 138mm](/content/2026/05/1062173/images/b41cd16a1eb5cf128ce94ff2e592f27dc65dcf567376052055c4dd86f8696a74.jpg)
![[9,3in] 236mm [4,71in] 120mm [0,35in] 8,86mm X FPA ng [3,15in] 80mm FLIR [3,33] 85 [0,87in] 22,2mm [1,16in] 29,5mm [7,01in] 178mm M5 x 0.8 ↓ 10 [0,4in] (3X)](/content/2026/05/1062173/images/f21f1f7205afcb8230a913d215d10418e4dba5e00b8ab64902e4189a76ae8e47.jpg)
| Model name | X | Weight |
| X6520sc | 41.28 mm [1,625 in] | 4800 g ± 5 % |
| X6530sc | 41.28 mm [1,625 in] | 4800 g ± 5 % |
| X6540sc | 41.28 mm [1,625 in] | 4800 g ± 5 % |
| X6550sc | 41.28 mm [1,625 in] | 4800 g ± 5 % |
| X6580sc | 41.28 mm [1,625 in] | 4800 g ± 5 % |
| X8400sc | 47.90 mm [1,886 in] | 5100 g ± 5 % |
| Modified2017-02-07 | CheckFRGU | Drawn byR&D Instruments | FLIR | ||
| DenominationX6/X8xxx - Basic dimension | SizeA3 | ||||
| Scale1:3 | |||||
| Drawing No.T130229 | |||||
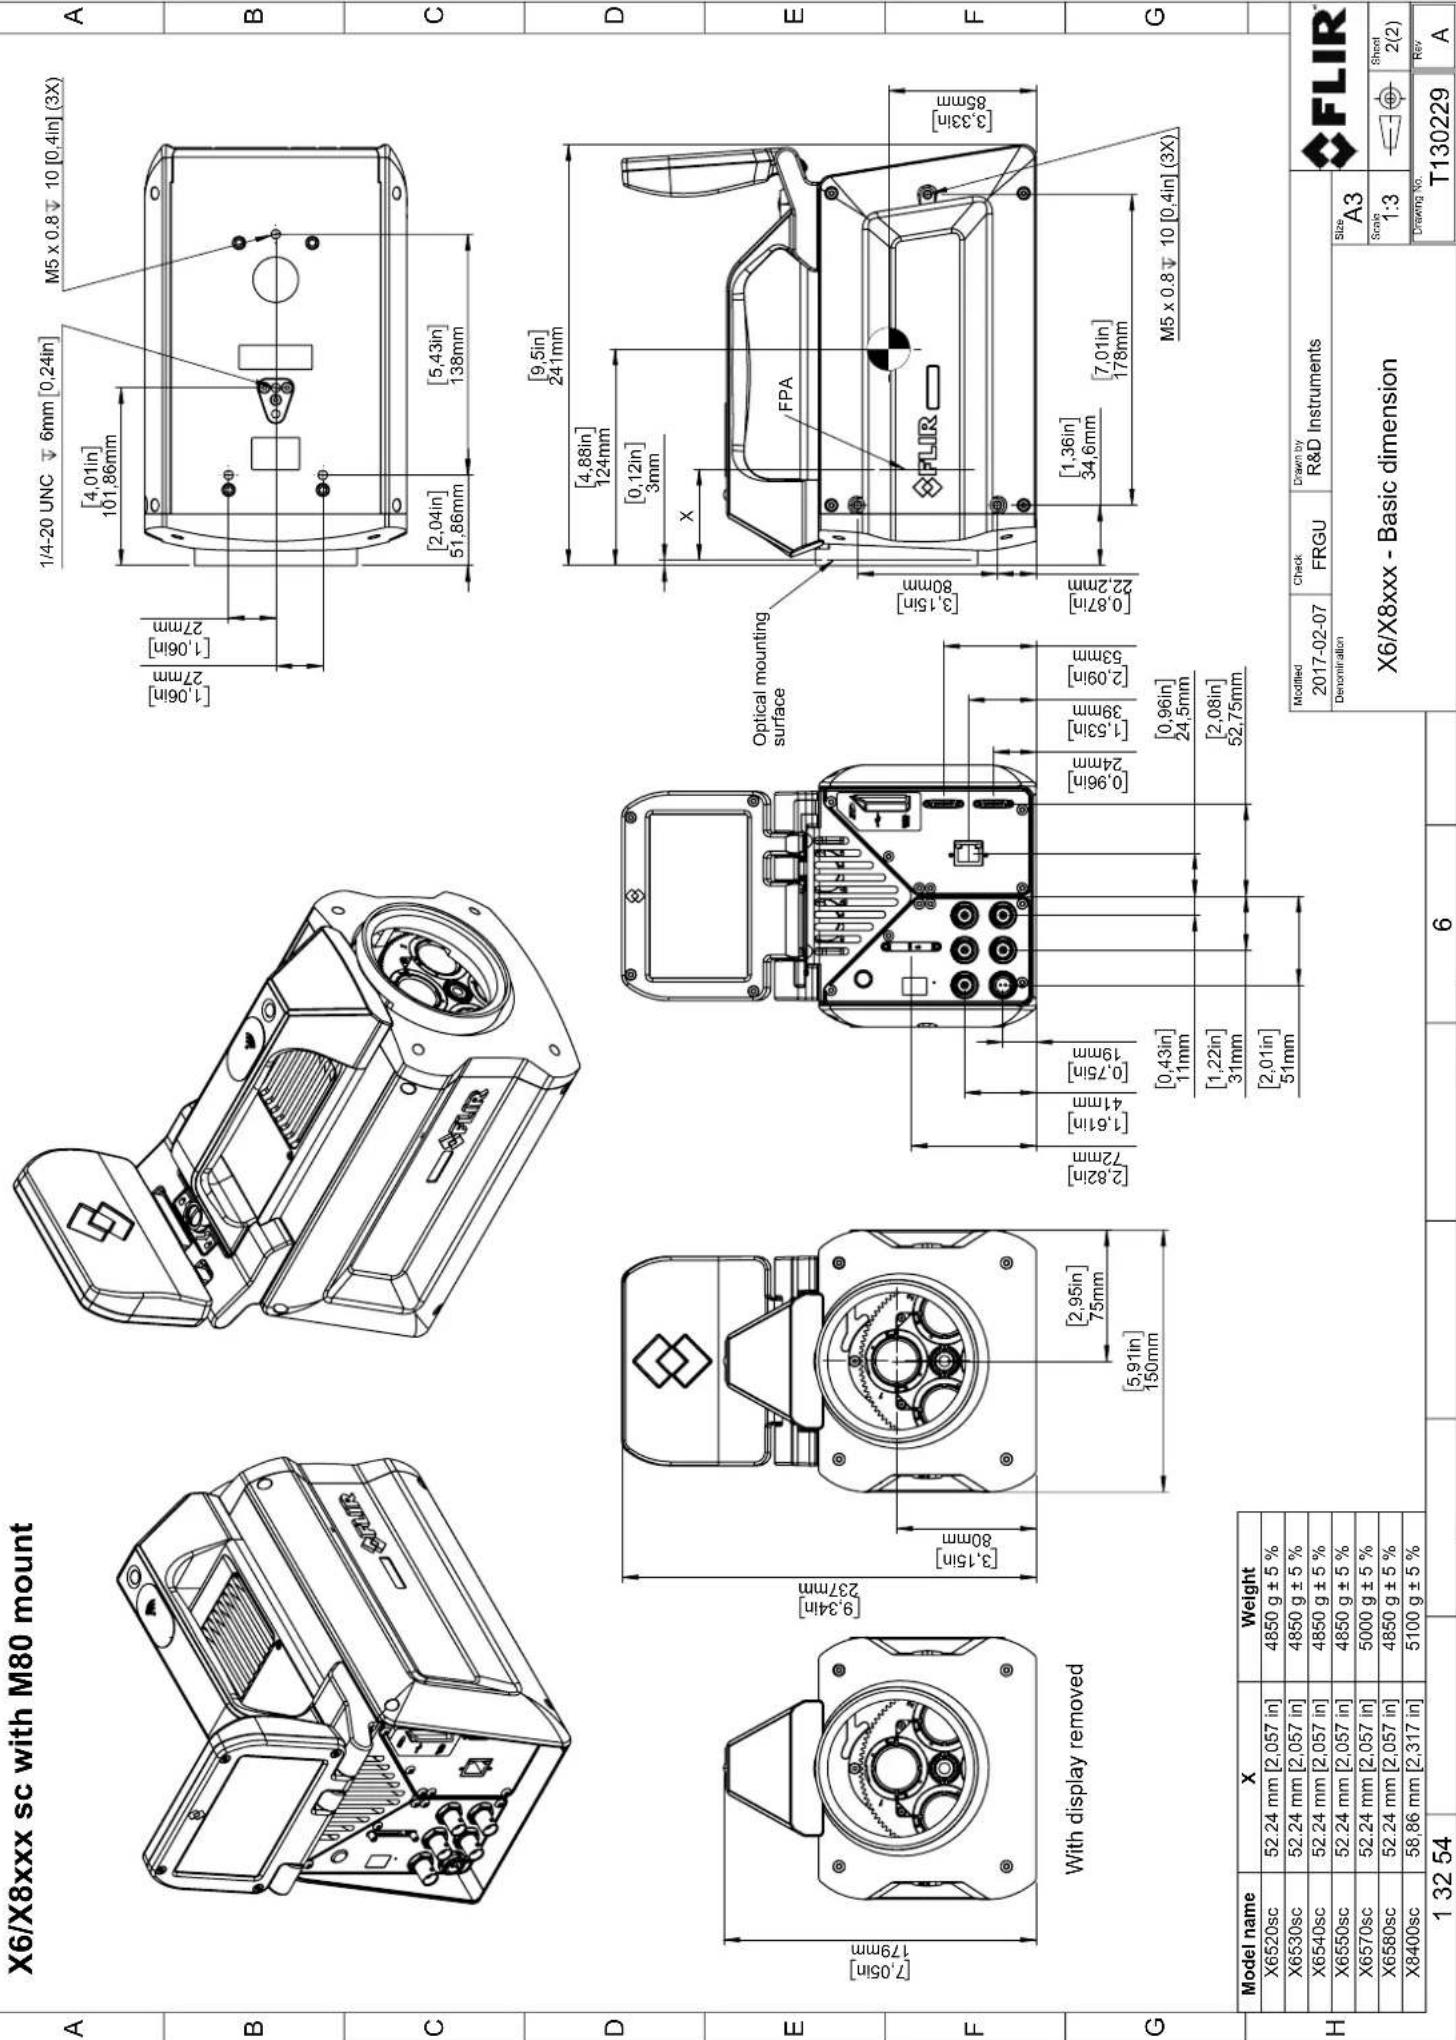
| Model name | X | Weight |
| X6520sc | 52.24 mm [2,057 in] | 4850 g ± 5 % |
| X6530sc | 52.24 mm [2,057 in] | 4850 g ± 5 % |
| X6540sc | 52.24 mm [2,057 in] | 4850 g ± 5 % |
| X6550sc | 52.24 mm [2,057 in] | 4850 g ± 5 % |
| X6570sc | 52.24 mm [2,057 in] | 5000 g ± 5 % |
| X6580sc | 52.24 mm [2,057 in] | 4850 g ± 5 % |
| X8400sc | 58.86 mm [2,317 in] | 5100 g ± 5 % |
11
Technical data
11.1 Note about technical data
FLIR Systems reserves the right to change specifications at any time without prior notice. Please check http://support.flir.com for latest changes.
11.2 Note about authoritative versions
The authoritative version of this publication is English. In the event of divergences due to translation errors, the English text has precedence.
Any late changes are first implemented in English.
11.3 FLIR X6530sc
P/N: 66601-0101
Rev.: 42029
| Detector/Image | |
| Detector type Focal plane array (FPA) | |
| Sensor material MCT | |
| IR resolution 640 × 512 | |
| Detector pitch 15 μm | |
| f-number f/3 | |
| Optical interface USL bayonet | |
| Lens identification Automatic | |
| Windowing | 320 × 256/160 × 128 |
| Arbitrary size windowing (down to) | 132 × 8 |
| Arbitrary size windowing (steps) Horizontal: ≥132, steps of 4 pixels Vertical: ≥8, steps of 1 pixel | |
| Maximum image frequency (full frame) | 146 Hz |
| Maximum image frequency | 3690 Hz |
| Maximum frame rate | 146 Hz @ 640 × 512/IWR 528 Hz @ 320 × 256/IWR 1510 Hz @ 160 × 128/IWR 3699 Hz @ 132 × 8/IWR |
| Integration time range | 80 ns-20 000 μs |
| Integration time step | 80 ns |
| Integration time mode | IWR/ITR |
| Digital output | GigE/Camlink base |
| Cooler type | Closed-cycle (rotary) Stirling cooler |
| Cooling temperature | 80 K |
| Operability | >99% |
| Physical data | |
| Size (L × W × H) | 233 mm × 150 mm × 178 mm (9.17" × 5.91" × 7.01") (without LCD) 233 mm × 150 mm × 178 mm (9.17" × 5.91" × 8.71") (with LCD) |
| Weight without lens | 4.350 kg (9.590 lb.) without LCD 4.800 kg (10.580 lb.) with LCD |
| Tripod mounting | UNC 1⁄4"-20 |
| Power system | |
| Power supply | 24 V DC |
| Power consumption (cooldown/stab) | 48 W/35 W |
| Environmental data | |
| Operating temperature range | -20°C/+50°C (-4°F/122°F) (-4°F/122°F) |
| Bump | Operational 15G, IEC 68-2-29 |
| Vibration | Operational 2G, IEC 68-2-26 |
| Encapsulation | IP 54 (IEC 60529) |
| Radiometry/measurement | |
| Spectral range | 1.5–5.5 μm |
| Thermal sensitivity/NETD <25 mK (18 mK typical) | |
| CNUCTM/HypercalTM | Yes |
| CLUT/extended linear response | No |
| Temperature measurement accuracy | ±1°C (1.8°F) or ±1% |
| Maximum temperature without filter 150°C (302°F) (302°F) | |
| Well capacity (e-) 6.36 Me- (ITR) 4.99 Me- (IWR) | |
| Filter wheel 4 slots for 1" filter up to 2.5 mm thick | |
| Filter holding | Screw-in holder |
| Timings and signals | |
| SYNC IN TTL, singled ended, BNC >300 ns pulse width | |
| SYNC IN jitter | 20 ns |
| SYNC IN active edge | Falling or rising edge |
| Delay between SYNC IN and integration | |
| Delay between SYNC IN and top frame | |
| Analog signals 1 × (0/+10 V), BNC | |
| TRIGGER IN TTL, singled ended, BNC >300 ns pulse width | |
| Video output DVI 1080p30 | |
| Waveform generator Sinus/triangle/square TTL 0-5 V Frequency:0.001 Hz to 250 kHz | |
| Ethernet | |
| GigE Vision | Yes |
| Camera link | |
| Connector type | 1 × Mini MDR26 |
| Tap number | 1 (A/B) |
| Bit depth 16 bpp | |
| Radio | |
| Wi-Fi | Standard: 802.11 b/g |
| Frequency range: 2412–2462 MHz | |
| Maximum output power: 15 dBm | |
| Antenna | Internal |
| Shipping information | |
| Packaging, type | |
| Packaging, weight | |
| Packaging, size | |
| EAN-13 | 7332558008072 |
| UPC-12 | 845188008420 |
| Country of origin | Sweden |
| Lenses | |
| Available optic 1 | L1009 MW 25 2.0 640 × 512 |
| Available optic 2 | L1008 MW 50 2.0 640 × 512 |
| Available optic 3 | L1019 MW 100 2.0 640 × 512 |
| Lenses | |
| Available optic 4 L1118 MW 200 2,0 640 x 512 | |
| Available optic 5 L1114 MW Close up x3 | |
| Available optic 6 L1209 MW Close up x5 | |
| Available optic 7 L1202 MW Close up x1 wd 30cm | |
| Available optic 8 | |
| Available optic 9 | |
| Available optic 10 | |
| Available optic 11 | |
| Available optic 12 | |
| Available optic 13 | |
Supplies & accessories:
• T199057; Lens BB 200mm F/3 Bayonet (L1208)
• T199084; Lens BB 100mm F/3 Bayonet (L1207)
• T199082; Lens BB 50mm F/3 Bayonet (L1206)
• T199080; Lens BB 27mm F/3 Bayonet (L1205)
• T198970; Lens MW 1x f/3.0 WD30
• T128379ACC; FLIR Platinum SDK
11.4 FLIR X6530sc M80
P/N: 66602-0202
Rev.: 42030
| Detector/Image | |
| Detector type Focal plane array (FPA) | |
| Sensor material MCT | |
| IR resolution 640 × 512 | |
| Detector pitch 15 μm | |
| f-number f/3 | |
| Optical interface M80 thread | |
| Lens identification N/A | |
| Windowing 320 × 256/160 × 128 | |
| Arbitrary size windowing (down to) | 132 × 8 |
| Arbitrary size windowing (steps) | Horizontal: ≥132, steps of 4 pixels Vertical: ≥8, steps of 1 pixel |
| Maximum image frequency (full frame) | 146 Hz |
| Maximum image frequency | 3690 Hz |
| Maximum frame rate | 146 Hz @ 640 × 512 IWR528 Hz @ 320 × 256 IWR1510 Hz @ 160 × 128 IWR3699 Hz @ 132 × 8 IWR |
| Integration time range | 80 ns-20 000 μs |
| Integration time step | 80 ns |
| Integration time mode | IWR/ITR |
| Digital output | GigE/Camlink base |
| Cooler type | Closed-cycle (rotary) Stirling cooler |
| Cooling temperature | 80 K |
| Operability | >99% |
| Physical data | |
| Size (L × W × H) | 233 mm × 150 mm × 178 mm (9.17" × 5.91" × 7.01") (without LCD)233 mm × 150 mm × 178 mm (9.17" × 5.91" × 8.71") (with LCD) |
| Weight without lens | 4.350 kg (9.590 lb.) without LCD 4.800 kg (10.580 lb.) with LCD |
| Tripod mounting | UNC 1⁄4"-20 |
| Power system | |
| Power supply 24 V DC | |
| Power consumption (cooldown/stab) | 48 W/35 W |
| Environmental data | |
| Operating temperature range | -20°C/+50°C (-4°F/122°F) (-4°F/122°F) |
| Bump | Operational 15G, IEC 68-2-29 |
| Environmental data | |
| Vibration Operational 2G, IEC 68-2-26 | |
| Encapsulation IP 54 (IEC 60529) | |
| Radiometry/measurement | |
| Spectral range | 1.5–5.5 μm |
| Thermal sensitivity/NETD <25 mK (18 mK typical) | |
| CNUCTM/HypercalTM | Yes |
| CLUT/extended linear response | No |
| Temperature measurement accuracy | ±1°C (1.8°F) or ±1% |
| Maximum temperature without filter 150°C (302°F) | |
| Well capacity (e-) 6.36 Me- (ITR) 4.99 Me- (IWR) | |
| Filter wheel 4 slots for 1" filter up to 2.5 mm thick | |
| Filter holding | Screw-in holder |
| Timings and signals | |
| SYNC IN TTL, singled ended, BNC >300 ns pulse width | |
| SYNC IN jitter | 20 ns |
| SYNC IN active edge | Falling or rising edge |
| Delay between SYNC IN and integration | |
| Delay between SYNC IN and top frame | |
| Analog signals 1 × (0/+10 V), BNC | |
| TRIGGER IN TTL, singled ended, BNC >300 ns pulse width | |
| Video output DVI 1080p30 | |
| Waveform generator | Sinus/triangle/square TTL 0–5 V Frequency: 0.001 Hz to 250 kHz |
| Ethernet | |
| GigE Vision | Yes |
| Camera link | |
| Connector type | 1 × Mini MDR26 |
| Tap number | 1 (A/B) |
| Bit depth 16 bpp | |
| Radio | |
| Wi-Fi | 802.11g |
| Frequency range: 2412–2462 MHz | |
| Maximum output power: 15 dBm | |
| Antenna | Internal |
| Shipping information | |
| Packaging, type | |
| Packaging, weight | |
| Packaging, size | |
| EAN-13 | 7332558008089 |
| UPC-12 | 845188008437 |
| Country of origin | Sweden |
| Lenses | |
| Available optic 1 | L0315 12 mm f/2 |
| Available optic 2 L0116 25 mm f/2 | |
| Available optic 3 | L0106 50 mm f/2 |
| Available optic 4 L0118 100 mm f/2 | |
| Available optic 5 | L0804 200 mm f/2 |
| Available optic 6 L0120 Close up x1 f/2 | |
| Available optic 7 L0120E Close up x3 f/2 | |
| Available optic 8 L0905 Close up x1 wd 30cm | |
| Available optic 9 L0709T 27 mm BB f/3 | |
| Available optic 10 | L0608T 50 mm BB f/3 |
| Available optic 11 L0604T 100 mm BB f/3 | |
| Available optic 12 | L0701 200 mm BB f/3 |
| Available optic 13 | |
Supplies & accessories:
• T198970; Lens MW 1x f/3.0 WD30
• T128379ACC; FLIR Platinum SDK
12.1 Cleaning the camera
12.1.1 Camera housing, cables, and other items
12.1.1.1 Liquids
Use one of these liquids:
- Warm water
• A weak detergent solution
12.1.1.2 Equipment
A soft cloth
12.1.1.3 Procedure
Follow this procedure:
- Soak the cloth in the liquid.
- Twist the cloth to remove excess liquid.
- Clean the part with the cloth.

CAUTION
Do not apply solvents or similar liquids to the camera, the cables, or other items. This can cause damage.
12.1.2 Infrared lens
12.1.2.1 Liquids
Use one of these liquids:
- A commercial lens cleaning liquid with more than 30% isopropyl alcohol.
• 96% ethyl alcohol ( CH_3OH ).
12.1.2.2 Equipment
Cotton wool

CAUTION
If you use a lens cleaning cloth it must be dry. Do not use a lens cleaning cloth with the liquids that are given in section 12.1.2.1 above. These liquids can cause material on the lens cleaning cloth to become loose. This material can have an unwanted effect on the surface of the lens.
12.1.2.3 Procedure
Follow this procedure:
- Soak the cotton wool in the liquid.
- Twist the cotton wool to remove excess liquid.
- Clean the lens one time only and discard the cotton wool.

WARNING
Make sure that you read all applicable MSDS (Material Safety Data Sheets) and warning labels on containers before you use a liquid: the liquids can be dangerous.

CAUTION
- Be careful when you clean the infrared lens. The lens has a delicate anti-reflective coating.
- Do not clean the infrared lens too vigorously. This can damage the anti-reflective coating.
12.2 Cooler maintenance
12.2.1 General
The microcooler is designed to provide maintenance-free operation for many thousands of hours. The microcooler contains pressurized helium gas.
After several thousand hours of operation the gas pressure decreases, and cooler service is required to restore cooler performance. The cooler also contains micro ball bearings, which may exhibit wear by becoming louder.
12.2.2 Signs to watch for
The FLIR Systems microcooler is equipped with a closed-loop speed regulator, which adjusts the cooler motor speed to regulate the detector temperature.
Typically, the cooler runs at maximum speed for 7–10 minutes (depending on model), and then slows to about 40% of maximum speed. As the gas pressure degrades, the motor continues at maximum speed for longer and longer periods to attain operating temperature
Eventually, as the helium pressure decreases, the motor will lose the ability to achieve and/or maintain operating temperature. When this occurs, the camera must be returned to FLIR Systems Customer Service Department for service.
13.1 Quality assurance
The quality management system under which this product is developed and manufactured has been certified in accordance with the ISO 9001 standard. FLIR Systems is committed to a policy of continuous development; therefore, we reserve the right to make changes and improvements to the product described in this manual without prior notice.
13.2 For the US market
Important instructions and notices for the user
Modification of this device without the express authorization of FLIR Systems Advanced Thermal Solutions may void the user's authority under FCC rules to operate this device.
Note This equipment generates, uses, and can radiate radio-frequency energy, and if not installed and used in accordance with the instructions it may cause harmful interference to radio communications. It has been tested and found to comply with the limits for a Class A computing device pursuant to Subpart J of Part 15 of FCC Rules, which are designed to provide reasonable protection against such interference when operated in a commercial environment. Operation of this equipment in a residential area is likely to cause interference, in which case the user at their own expense will be required to take whatever measures may be required to correct the interference.
13.3 For the Canadian market
Industry Canada Notice
This Class A digital apparatus complies with Canadian standard ICES-003.
Proper disposal of electrical and electronic equipment (EEE)
The European Union (EU) has enacted Waste Electrical and Electronic Equipment Directive 2002/96/EC (WEEE), which aims to prevent EEE waste from arising; to encourage reuse, recycling, and recovery of EEE waste; and to promote environmental responsibility.
In accordance with these regulations, all EEE products labeled with the “crossed out wheeled bin” either on the product itself or in the product literature must not be disposed of in regular rubbish bins, mixed with regular household or other commercial waste, or by other regular municipal waste collection means. Instead, and in order to prevent possible harm to the environment or human health, all EEE products (including any cables that came with the product) should be responsibly discarded or recycled.
To identify a responsible disposal method where you live, contact your local waste collection or recycling service, your original place of purchase or product supplier, or the responsible government authority in your area. Business users should contact their supplier or refer to their purchase contract.
About FLIR Systems
FLIR Systems was established in 1978 to pioneer the development of high-performance infrared imaging systems, and is the world leader in the design, manufacture, and marketing of thermal imaging systems for a wide variety of commercial, industrial, and government applications. Today, FLIR Systems embraces five major companies with outstanding achievements in infrared technology since 1958—the Swedish AGEMA Infrared Systems (formerly AGA Infrared Systems), the three United States companies Indigo Systems, FSI, and Inframetrics, and the French company Cedip.
Since 2007, FLIR Systems has acquired several companies with world-leading expertise in sensor technologies:
• Extech Instruments (2007)
• Ifara Tecnologías (2008)
• Salvador Imaging (2009)
• OmniTech Partners (2009)
• Directed Perception (2009)
• Raymarine (2010)
• ICx Technologies (2010)
• TackTick Marine Digital Instruments (2011)
• Aerius Photonics (2011)
- Lorex Technology (2012)
- Traficon (2012)
• MARSS (2013)
• DigitalOptics micro-optics business (2013)
• DVTEL (2015)
- Point Grey Research (2016)
• Prox Dynamics (2016)

Figure 14.1 Patent documents from the early 1960s
FLIR Systems has three manufacturing plants in the United States (Portland, OR, Boston, MA, Santa Barbara, CA) and one in Sweden (Stockholm). Since 2007 there is also a manufacturing plant in Tallinn, Estonia. Direct sales offices in Belgium, Brazil, China, France, Germany, Great Britain, Hong Kong, Italy, Japan, Korea, Sweden, and the USA—together with a worldwide network of agents and distributors—support our international customer base.
FLIR Systems is at the forefront of innovation in the infrared camera industry. We anticipate market demand by constantly improving our existing cameras and developing new ones. The company has set milestones in product design and development such as the introduction of the first battery-operated portable camera for industrial inspections, and the first uncooled infrared camera, to mention just two innovations.
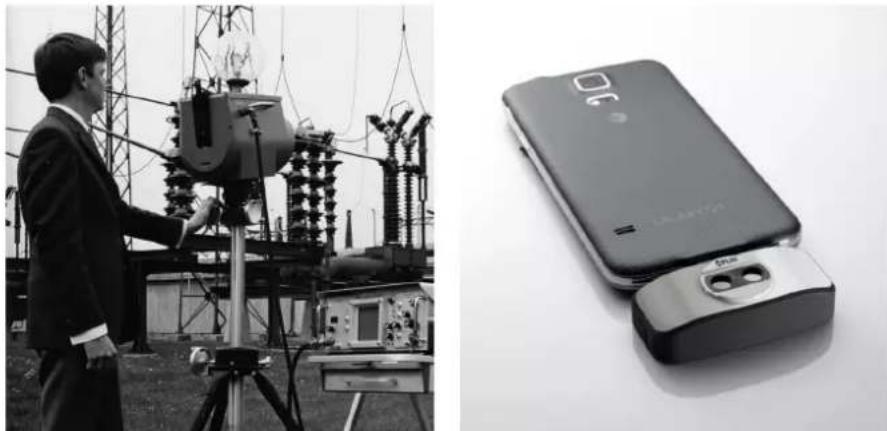
natural_image
Black-and-white photo showing a man operating an electrical substation with equipment, alongside a smartphone displaying the same device (no visible text or symbols)Figure 14.2 1969: Thermovision Model 661. The Figure 14.3 2015: FLIR One, an accessory to camera weighed approximately 25 kg (55 lb.), thePhone and Android mobile phones. Weight: 90 g oscilloscope 20 kg (44 lb.), and the tripod 15 kg (3.2 oz.). (33 lb.). The operator also needed a 220 VAC generator set, and a 10 L (2.6 US gallon) jar with liquid nitrogen. To the left of the oscilloscope the Polaroid attachment (6 kg (13 lb.)) can be seen.
FLIR Systems manufactures all vital mechanical and electronic components of the camera systems itself. From detector design and manufacturing, to lenses and system electronics, to final testing and calibration, all production steps are carried out and supervised by our own engineers. The in-depth expertise of these infrared specialists ensures the accuracy and reliability of all vital components that are assembled into your infrared camera.
14.1 More than just an infrared camera
At FLIR Systems we recognize that our job is to go beyond just producing the best infrared camera systems. We are committed to enabling all users of our infrared camera systems to work more productively by providing them with the most powerful camera-software combination. Especially tailored software for predictive maintenance, R & D, and process monitoring is developed in-house. Most software is available in a wide variety of languages.
We support all our infrared cameras with a wide variety of accessories to adapt your equipment to the most demanding infrared applications.
14.2 Sharing our knowledge
Although our cameras are designed to be very user-friendly, there is a lot more to thermography than just knowing how to handle a camera. Therefore, FLIR Systems has founded the Infrared Training Center (ITC), a separate business unit, that provides certified training courses. Attending one of the ITC courses will give you a truly hands-on learning experience.
The staff of the ITC are also there to provide you with any application support you may need in putting infrared theory into practice.
14.3 Supporting our customers
FLIR Systems operates a worldwide service network to keep your camera running at all times. If you discover a problem with your camera, local service centers have all the equipment and expertise to solve it within the shortest possible time. Therefore, there is no need to send your camera to the other side of the world or to talk to someone who does not speak your language.
Terms, laws, and definitions
| Term Definition | |
| Absorption and emission | The capacity or ability of an object to absorb incident radi- ated energy is always the same as the capacity to emit its own energy as radiation |
| Apparent temperature uncompensated | reading from an infrared instrument, con- taining all radiation incident on the instrument, regardless of its sources |
| Color palette assigns different colors to | indicate specific levels of apparent temperature. Palettes can provide high or low contrast, de- pending on the colors used in them |
| Conduction direct transfer of thermal | energy from molecule to molecule, caused by collisions between the molecules |
| Convection heat transfer mode where | a fluid is brought into motion, ei-ther by gravity or another force, thereby transferring heat from one place to another |
| Diagnostics examination of symptoms | and syndromes to determine the nature of faults or failures |
| Direction of heat transfer | Heat will spontaneously flow from hotter to colder, thereby transferring thermal energy from one place to another |
| Emissivity ratio of the power radiated | by real bodies to the power that is radiated by a blackbody at the same temperature and at the same wavelength |
| Energy conservation | The sum of the total energy contents in a closed system is constant |
| Exitant radiation radiation that leaves | the surface of an object, regardless of its original sources |
| Heat thermal energy that is transferred | between two objects (sys- tems) due to their difference in temperature |
| Heat transfer rate ^9 | The heat transfer rate under steady state conditions is di- rectly proportional to the thermal conductivity of the object, the cross-sectional area of the object through which the heat flows, and the temperature difference between the two ends of the object. It is inversely proportional to the length, or thickness, of the object |
| Incident radiation | radiation that strikes an object from its surroundings |
| IR thermography | process of acquisition and analysis of thermal information from non-contact thermal imaging devices |
| Isotherm | replaces certain colors in the scale with a contrasting color. It marks an interval of equal apparent temperature |
| Qualitative thermography | thermography that relies on the analysis of thermal patterns to reveal the existence of and to locate the position of anomalies ^13 |
| Quantitative thermography | thermography that uses temperature measurement to deter- mine the seriousness of an anomaly, in order to establish re- pair priorities ^3 |
- Kirchhoff's law of thermal radiation.
- Based on ISO 18434-1:2008 (en).
- Based on ISO 13372:2004 (en).
- 2nd law of thermodynamics.
- This is a consequence of the 2nd law of thermodynamics, the law itself is more complicated.
- Based on ISO 16714-3:2016 (en).
- 1st law of thermodynamics.
- Fourier's law.
- This is the one-dimensional form of Fourier's law, valid for steady-state conditions.
- Based on ISO 18434-1:2008 (en)
- Based on ISO 10878-2013 (en).
| Term Definition | |
| Radiative heat transfer Heat transfer by the emission and absorption of thermal radiation | |
| Reflected apparent temperature apparent temperature of the environment that is reflected by the target into the IR camera | |
| Spatial resolution ability of an IR camera to resolve small objects or details | |
| Temperature measure of the average kinetic energy of the molecules and atoms that make up the substance | |
| Thermal energy total kinetic energy of the molecules that make up the object15 | |
| Thermal gradient gradual change in temperature over distance 14 | |
| Thermal tuning process of putting the colors of the image on the object of analysis, in order to maximize contrast | |
Thermographic measurement techniques
16.1 Introduction
An infrared camera measures and images the emitted infrared radiation from an object. The fact that radiation is a function of object surface temperature makes it possible for the camera to calculate and display this temperature.
However, the radiation measured by the camera does not only depend on the temperature of the object but is also a function of the emissivity. Radiation also originates from the surroundings and is reflected in the object. The radiation from the object and the reflected radiation will also be influenced by the absorption of the atmosphere.
To measure temperature accurately, it is therefore necessary to compensate for the effects of a number of different radiation sources. This is done on-line automatically by the camera. The following object parameters must, however, be supplied for the camera:
• The emissivity of the object
• The reflected apparent temperature
- The distance between the object and the camera
• The relative humidity
• Temperature of the atmosphere
16.2 Emissivity
The most important object parameter to set correctly is the emissivity which, in short, is a measure of how much radiation is emitted from the object, compared to that from a perfect blackbody of the same temperature.
Normally, object materials and surface treatments exhibit emissivity ranging from approximately 0.1 to 0.95. A highly polished (mirror) surface falls below 0.1, while an oxidized or painted surface has a higher emissivity. Oil-based paint, regardless of color in the visible spectrum, has an emissivity over 0.9 in the infrared. Human skin exhibits an emissivity 0.97 to 0.98.
Non-oxidized metals represent an extreme case of perfect opacity and high reflexivity, which does not vary greatly with wavelength. Consequently, the emissivity of metals is low – only increasing with temperature. For non-metals, emissivity tends to be high, and decreases with temperature.
16.2.1 Finding the emissivity of a sample
16.2.1.1 Step 1: Determining reflected apparent temperature
Use one of the following two methods to determine reflected apparent temperature:
16.2.1.1.1 Method 1: Direct method
Follow this procedure:
- Look for possible reflection sources, considering that the incident angle = reflection angle (a = b).
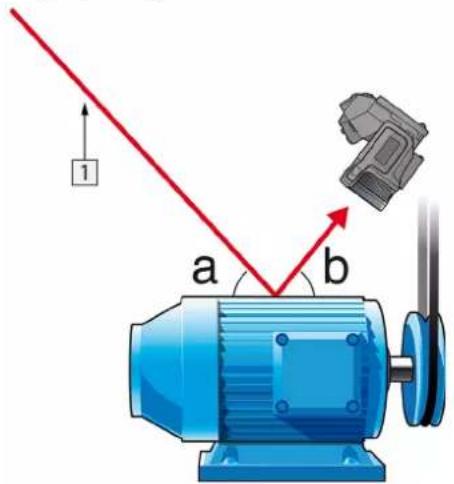
Figure 16.1 1 = Reflection source
- If the reflection source is a spot source, modify the source by obstructing it using a piece if cardboard.
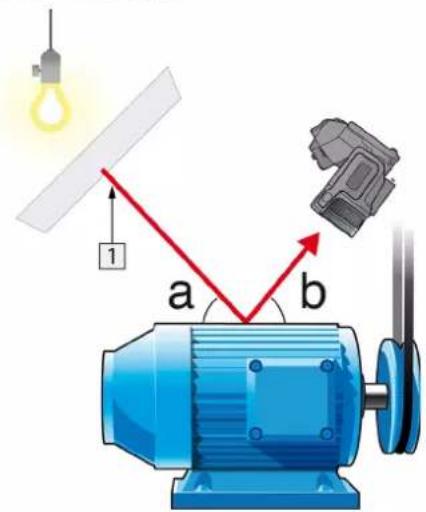
Figure 16.2 1 = Reflection source
-
Measure the radiation intensity (= apparent temperature) from the reflection source using the following settings:
-
Emissivity: 1.0
- D_obj : 0
You can measure the radiation intensity using one of the following two methods:
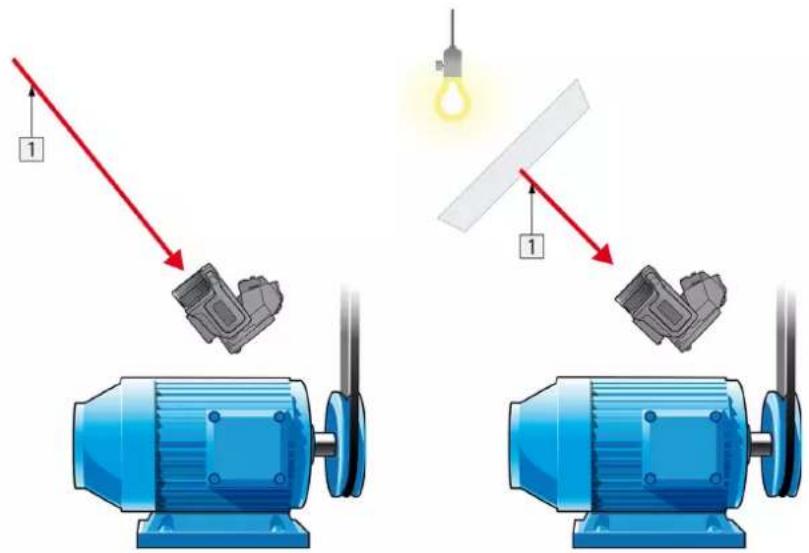
Figure 16.3 1 = Reflection source
Figure 16.4 1 = Reflection source
You can not use a thermocouple to measure reflected apparent temperature, because a thermocouple measures temperature, but apparent temperature is radiation intensity.
16.2.1.1.2 Method 2: Reflector method
Follow this procedure:
- Crumble up a large piece of aluminum foil.
- Uncrumble the aluminum foil and attach it to a piece of cardboard of the same size.
- Put the piece of cardboard in front of the object you want to measure. Make sure that the side with aluminum foil points to the camera.
-
Set the emissivity to 1.0.
-
Measure the apparent temperature of the aluminum foil and write it down. The foil is considered a perfect reflector, so its apparent temperature equals the reflected apparent temperature from the surroundings.
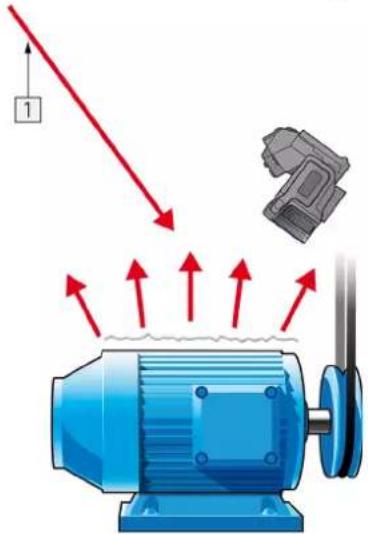
natural_image
Illustration of an electric motor with red arrows indicating airflow or heat transfer, next to a mechanical component (no text or symbols)Figure 16.5 Measuring the apparent temperature of the aluminum foil.
16.2.1.2 Step 2: Determining the emissivity
Follow this procedure:
- Select a place to put the sample.
- Determine and set reflected apparent temperature according to the previous procedure.
- Put a piece of electrical tape with known high emissivity on the sample.
- Heat the sample at least 20 K above room temperature. Heating must be reasonably even.
- Focus and auto-adjust the camera, and freeze the image.
- Adjust Level and Span for best image brightness and contrast.
- Set emissivity to that of the tape (usually 0.97).
-
Measure the temperature of the tape using one of the following measurement functions:
-
Isotherm (helps you to determine both the temperature and how evenly you have heated the sample)
- Spot (simpler)
-
Box Avg (good for surfaces with varying emissivity).
-
Write down the temperature.
-
Move your measurement function to the sample surface.
-
Change the emissivity setting until you read the same temperature as your previous measurement.
-
Write down the emissivity.
Note
- Avoid forced convection
- Look for a thermally stable surrounding that will not generate spot reflections
- Use high quality tape that you know is not transparent, and has a high emissivity you are certain of
- This method assumes that the temperature of your tape and the sample surface are the same. If they are not, your emissivity measurement will be wrong.
16.3 Reflected apparent temperature
This parameter is used to compensate for the radiation reflected in the object. If the emissivity is low and the object temperature relatively far from that of the reflected it will be important to set and compensate for the reflected apparent temperature correctly.
16.4 Distance
The distance is the distance between the object and the front lens of the camera. This parameter is used to compensate for the following two facts:
- That radiation from the target is absorbed by the atmosphere between the object and the camera.
- That radiation from the atmosphere itself is detected by the camera.
16.5 Relative humidity
The camera can also compensate for the fact that the transmittance is also dependent on the relative humidity of the atmosphere. To do this set the relative humidity to the correct value. For short distances and normal humidity the relative humidity can normally be left at a default value of 50%.
16.6 Other parameters
In addition, some cameras and analysis programs from FLIR Systems allow you to compensate for the following parameters:
- Atmospheric temperature – i.e. the temperature of the atmosphere between the camera and the target
- External optics temperature – i.e. the temperature of any external lenses or windows used in front of the camera
- External optics transmittance – i.e. the transmission of any external lenses or windows used in front of the camera
17.1 Introduction
Calibration of a thermal camera is a prerequisite for temperature measurement. The calibration provides the relationship between the input signal and the physical quantity that the user wants to measure. However, despite its widespread and frequent use, the term "calibration" is often misunderstood and misused. Local and national differences as well as translation-related issues create additional confusion.
Unclear terminology can lead to difficulties in communication and erroneous translations, and subsequently to incorrect measurements due to misunderstandings and, in the worst case, even to lawsuits.
17.2 Definition—what is calibration?
The International Bureau of Weights and Measures defines calibration ^7 in the following way:
an operation that, under specified conditions, in a first step, establishes a relation between the quantity values with measurement uncertainties provided by measurement standards and corresponding indications with associated measurement uncertainties and, in a second step, uses this information to establish a relation for obtaining a measurement result from an indication.
The calibration itself may be expressed in different formats: this can be a statement, calibration function, calibration diagram, calibration curve, or calibration table.
Often, the first step alone in the above definition is perceived and referred to as being "calibration." However, this is not (always) sufficient.
Considering the calibration procedure of a thermal camera, the first step establishes the relation between emitted radiation (the quantity value) and the electrical output signal (the indication). This first step of the calibration procedure consists of obtaining a homogeneous (or uniform) response when the camera is placed in front of an extended source of radiation.
As we know the temperature of the reference source emitting the radiation, in the second step the obtained output signal (the indication) can be related to the reference source's temperature (measurement result). The second step includes drift measurement and compensation.
To be correct, calibration of a thermal camera is, strictly, not expressed through temperature. Thermal cameras are sensitive to infrared radiation: therefore, at first you obtain a radiance correspondence, then a relationship between radiance and temperature. For bolometer cameras used by non-R&D customers, radiance is not expressed: only the temperature is provided.
17.3 Camera calibration at FLIR Systems
Without calibration, an infrared camera would not be able to measure either radiance or temperature. At FLIR Systems, the calibration of uncooled microbolometer cameras with a measurement capability is carried out during both production and service. Cooled cameras with photon detectors are often calibrated by the user with special software. With this type of software, in theory, common handheld uncooled thermal cameras could be calibrated by the user too. However, as this software is not suitable for reporting
purposes, most users do not have it. Non-measuring devices that are used for imaging only do not need temperature calibration. Sometimes this is also reflected in camera terminology when talking about infrared or thermal imaging cameras compared with thermography cameras, where the latter are the measuring devices.
The calibration information, no matter if the calibration is done by FLIR Systems or the user, is stored in calibration curves, which are expressed by mathematical functions. As radiation intensity changes with both temperature and the distance between the object and the camera, different curves are generated for different temperature ranges and exchangeable lenses.
17.4 The differences between a calibration performed by a user and that performed directly at FLIR Systems
First, the reference sources that FLIR Systems uses are themselves calibrated and traceable. This means, at each FLIR Systems site performing calibration, that the sources are controlled by an independent national authority. The camera calibration certificate is confirmation of this. It is proof that not only has the calibration been performed by FLIR Systems but that it has also been carried out using calibrated references. Some users own or have access to accredited reference sources, but they are very few in number.
Second, there is a technical difference. When performing a user calibration, the result is often (but not always) not drift compensated. This means that the values do not take into account a possible change in the camera's output when the camera's internal temperature varies. This yields a larger uncertainty. Drift compensation uses data obtained in climate-controlled chambers. All FLIR Systems cameras are drift compensated when they are first delivered to the customer and when they are recalibrated by FLIR Systems service departments.
17.5 Calibration, verification and adjustment
A common misconception is to confuse calibration with verification or adjustment. Indeed, calibration is a prerequisite for verification, which provides confirmation that specified requirements are met. Verification provides objective evidence that a given item fulfills specified requirements. To obtain the verification, defined temperatures (emitted radiation) of calibrated and traceable reference sources are measured. The measurement results, including the deviation, are noted in a table. The verification certificate states that these measurement results meet specified requirements. Sometimes, companies or organizations offer and market this verification certificate as a “calibration certificate.”
Proper verification—and by extension calibration and/or recalibration—can only be achieved when a validated protocol is respected. The process is more than placing the camera in front of blackbodies and checking if the camera output (as temperature, for instance) corresponds to the original calibration table. It is often forgotten that a camera is not sensitive to temperature but to radiation. Furthermore, a camera is an imaging system, not just a single sensor. Consequently, if the optical configuration allowing the camera to “collect” radiance is poor or misaligned, then the “verification” (or calibration or recalibration) is worthless.
For instance, one has to ensure that the distance between the blackbody and the camera as well as the diameter of the blackbody cavity are chosen so as to reduce stray radiatio and the size-of-source effect.
To summarize: a validated protocol must comply with the physical laws for radiance, and not only those for temperature.
Calibration is also a prerequisite for adjustment, which is the set of operations carried out on a measuring system such that the system provides prescribed indications corresponding to given values of quantities to be measured, typically obtained from measurement standards. Simplified, adjustment is a manipulation that results in instruments that measure correctly within their specifications. In everyday language, the term “calibration” is widely used instead of “adjustment” for measuring devices.
17.6 Non-uniformity correction
When the thermal camera displays "Calibrating..." it is adjusting for the deviation in response of each individual detector element (pixel). In thermography, this is called a "non-uniformity correction" (NUC). It is an offset update, and the gain remains unchanged.
The European standard EN 16714-3, Non-destructive Testing—Thermographic Testing—Part 3: Terms and Definitions, defines an NUC as “Image correction carried out by the camera software to compensate for different sensitivities of detector elements and other optical and geometrical disturbances.”
During the NUC (the offset update), a shutter (internal flag) is placed in the optical path, and all the detector elements are exposed to the same amount of radiation originating from the shutter. Therefore, in an ideal situation, they should all give the same output signal. However, each individual element has its own response, so the output is not uniform. This deviation from the ideal result is calculated and used to mathematically perform an image correction, which is essentially a correction of the displayed radiation signal. Some cameras do not have an internal flag. In this case, the offset update must be performed manually using special software and an external uniform source of radiation.
An NUC is performed, for example, at start-up, when changing a measurement range, or when the environment temperature changes. Some cameras also allow the user to trigger it manually. This is useful when you have to perform a critical measurement with as little image disturbance as possible.
17.7 Thermal image adjustment (thermal tuning)
Some people use the term “image calibration” when adjusting the thermal contrast and brightness in the image to enhance specific details. During this operation, the temperature interval is set in such a way that all available colors are used to show only (or main the temperatures in the region of interest. The correct term for this manipulation is “thermal image adjustment” or “thermal tuning”, or, in some languages, “thermal image optimization.” You must be in manual mode to undertake this, otherwise the camera will set the lower and upper limits of the displayed temperature interval automatically to the coldest and hottest temperatures in the scene.
History of infrared technology
Before the year 1800, the existence of the infrared portion of the electromagnetic spectrum wasn't even suspected. The original significance of the infrared spectrum, or simply 'the infrared' as it is often called, as a form of heat radiation is perhaps less obvious today than it was at the time of its discovery by Herschel in 1800.
natural_image
Portrait of a man in historical attire with a crescent moon visible in the background (no text or symbols)Figure 18.1 Sir William Herschel (1738–1822)
The discovery was made accidentally during the search for a new optical material. Sir William Herschel – Royal Astronomer to King George III of England, and already famous for his discovery of the planet Uranus – was searching for an optical filter material to reduce the brightness of the sun's image in telescopes during solar observations. While testing different samples of colored glass which gave similar reductions in brightness he was intrigued to find that some of the samples passed very little of the sun's heat, while others passed so much heat that he risked eye damage after only a few seconds' observation.
Herschel was soon convinced of the necessity of setting up a systematic experiment, with the objective of finding a single material that would give the desired reduction in brightness as well as the maximum reduction in heat. He began the experiment by actually repeating Newton's prism experiment, but looking for the heating effect rather than the visual distribution of intensity in the spectrum. He first blackened the bulb of a sensitive mercury-in-glass thermometer with ink, and with this as his radiation detector he proceeded to test the heating effect of the various colors of the spectrum formed on the top of a table by passing sunlight through a glass prism. Other thermometers, placed outside the sun's rays, served as controls.
As the blackened thermometer was moved slowly along the colors of the spectrum, the temperature readings showed a steady increase from the violet end to the red end. This was not entirely unexpected, since the Italian researcher, Landriani, in a similar experiment in 1777 had observed much the same effect. It was Herschel, however, who was the first to recognize that there must be a point where the heating effect reaches a maximum, and that measurements confined to the visible portion of the spectrum failed to locate this point.
natural_image
Portrait engraving of a man in 18th-century attire (no text or symbols visible)Figure 18.2 Marsilio Landriani (1746–1815)
Moving the thermometer into the dark region beyond the red end of the spectrum, Herschel confirmed that the heating continued to increase. The maximum point, when he found it, lay well beyond the red end – in what is known today as the ‘infrared wavelengths’.
When Herschel revealed his discovery, he referred to this new portion of the electromagnetic spectrum as the 'thermometrical spectrum'. The radiation itself he sometimes referred to as 'dark heat', or simply 'the invisible rays'. Ironically, and contrary to popular opinion, it wasn't Herschel who originated the term 'infrared'. The word only began to appear in print around 75 years later, and it is still unclear who should receive credit as the originator.
Herschel's use of glass in the prism of his original experiment led to some early controversies with his contemporaries about the actual existence of the infrared wavelengths. Different investigators, in attempting to confirm his work, used various types of glass indiscriminately, having different transparencies in the infrared. Through his later experiments, Herschel was aware of the limited transparency of glass to the newly-discovered thermal radiation, and he was forced to conclude that optics for the infrared would probably be doomed to the use of reflective elements exclusively (i.e. plane and curved mirrors). Fortunately, this proved to be true only until 1830, when the Italian investigator, Melloni, made his great discovery that naturally occurring rock salt (NaCl) – which was available in large enough natural crystals to be made into lenses and prisms – is remarkably transparent to the infrared. The result was that rock salt became the principal infrared optical material, and remained so for the next hundred years, until the art of synthetic crystal growing was mastered in the 1930's.
natural_image
Portrait of a man in 19th-century attire seated at a scientific apparatus (no visible text or symbols)Figure 18.3 Macedonio Melloni (1798–1854)
Thermometers, as radiation detectors, remained unchallenged until 1829, the year Nobili invented the thermocouple. (Herschel's own thermometer could be read to 0.2 °C (0.036 °F), and later models were able to be read to 0.05 °C (0.09 °F)). Then a breakthrough occurred; Melloni connected a number of thermocouples in series to form the first thermopile. The new device was at least 40 times as sensitive as the best thermometer of the day for detecting heat radiation – capable of detecting the heat from a person standing three meters away.
The first so-called 'heat-picture' became possible in 1840, the result of work by Sir John Herschel, son of the discoverer of the infrared and a famous astronomer in his own right. Based upon the differential evaporation of a thin film of oil when exposed to a heat pattern focused upon it, the thermal image could be seen by reflected light where the interference effects of the oil film made the image visible to the eye. Sir John also managed to obtain a primitive record of the thermal image on paper, which he called a 'thermograph'.
natural_image
Portrait of a bearded man in formal attire, seated with hands clasped (no visible text or symbols)Figure 18.4 Samuel P. Langley (1834–1906)
The improvement of infrared-detector sensitivity progressed slowly. Another major breakthrough, made by Langley in 1880, was the invention of the bolometer. This consisted of a thin blackened strip of platinum connected in one arm of a Wheatstone bridge circuit upon which the infrared radiation was focused and to which a sensitive galvanometer responded. This instrument is said to have been able to detect the heat from a cow at a distance of 400 meters.
An English scientist, Sir James Dewar, first introduced the use of liquefied gases as cooling agents (such as liquid nitrogen with a temperature of -196^ ( -320.8^ )) in low temperature research. In 1892 he invented a unique vacuum insulating container in which it is possible to store liquefied gases for entire days. The common ‘thermos bottle’, used for storing hot and cold drinks, is based upon his invention.
Between the years 1900 and 1920, the inventors of the world ‘discovered’ the infrared. Many patents were issued for devices to detect personnel, artillery, aircraft, ships – and even icebergs. The first operating systems, in the modern sense, began to be developed during the 1914–18 war, when both sides had research programs devoted to the military exploitation of the infrared. These programs included experimental systems for enemy intrusion/detection, remote temperature sensing, secure communications, and ‘flying torpedo’ guidance. An infrared search system tested during this period was able to detect an approaching airplane at a distance of 1.5 km (0.94 miles), or a person more than 300 meters (984 ft.) away.
The most sensitive systems up to this time were all based upon variations of the bolometer idea, but the period between the two wars saw the development of two revolutionary new infrared detectors: the image converter and the photon detector. At first, the image converter received the greatest attention by the military, because it enabled an observer for the first time in history to literally 'see in the dark'. However, the sensitivity of the image converter was limited to the near infrared wavelengths, and the most interesting military targets (i.e. enemy soldiers) had to be illuminated by infrared search beams. Since this involved the risk of giving away the observer's position to a similarly-equipped enemy observer, it is understandable that military interest in the image converter eventually faded.
The tactical military disadvantages of so-called 'active' (i.e. search beam-equipped) thermal imaging systems provided impetus following the 1939–45 war for extensive secret military infrared-research programs into the possibilities of developing 'passive' (no search beam) systems around the extremely sensitive photon detector. During this period, military secrecy regulations completely prevented disclosure of the status of infrared-imaging technology. This secrecy only began to be lifted in the middle of the 1950's, and from that time adequate thermal-imaging devices finally began to be available to civilian science and industry.
Theory of thermography
19.1 Introduction
The subjects of infrared radiation and the related technique of thermography are still new to many who will use an infrared camera. In this section the theory behind thermography will be given.
19.2 The electromagnetic spectrum
The electromagnetic spectrum is divided arbitrarily into a number of wavelength regions, called bands, distinguished by the methods used to produce and detect the radiation. There is no fundamental difference between radiation in the different bands of the electromagnetic spectrum. They are all governed by the same laws and the only differences are those due to differences in wavelength.
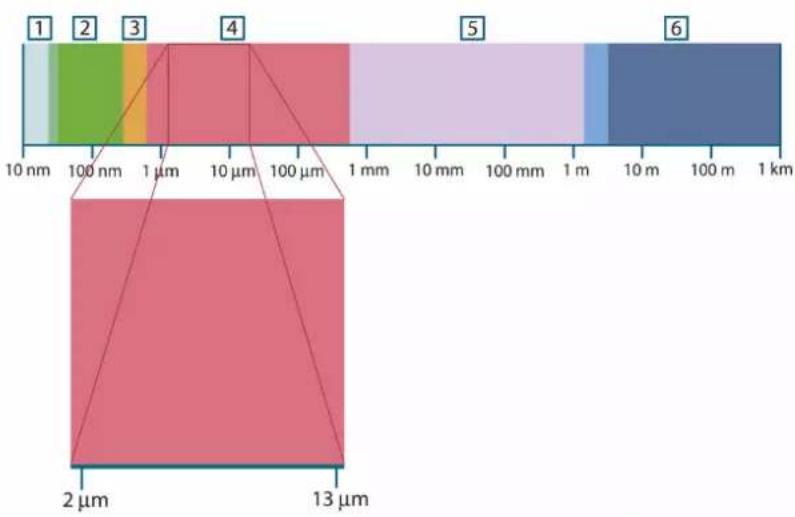
bar
| Dimension | Value | | --------- | ----- | | 1 | 1 | | 2 | 2 | | 3 | 3 | | 4 | 4 | | 5 | 5 | | 6 | 6 |Figure 19.1 The electromagnetic spectrum. 1: X-ray; 2: UV; 3: Visible; 4: IR; 5: Microwaves; 6: Radiowaves.
Thermography makes use of the infrared spectral band. At the short-wavelength end the boundary lies at the limit of visual perception, in the deep red. At the long-wavelength end it merges with the microwave radio wavelengths, in the millimeter range.
The infrared band is often further subdivided into four smaller bands, the boundaries of which are also arbitrarily chosen. They include: the near infrared (0.75–3 m), the middle infrared (3–6 m), the far infrared (6–15 m) and the extreme infrared (15–100 m).
Although the wavelengths are given in m (micrometers), other units are often still used to measure wavelength in this spectral region, e.g. nanometer (nm) and Ångström (Å).
The relationships between the different wavelength measurements is:
$$ 1 0 0 0 0 \mathrm {\AA} = 1 0 0 0 \mathrm{nm} = 1 \mu = 1 \mu \mathrm{m} $$
19.3 Blackbody radiation
A blackbody is defined as an object which absorbs all radiation that impinges on it at any wavelength. The apparent misnomer black relating to an object emitting radiation is explained by Kirchhoff's Law (after Gustav Robert Kirchhoff, 1824–1887), which states that a body capable of absorbing all radiation at any wavelength is equally capable in the emission of radiation.
natural_image
Portrait of a bearded man in formal 19th-century attire (no text or symbols visible)Figure 19.2 Gustav Robert Kirchhoff (1824–1887)
The construction of a blackbody source is, in principle, very simple. The radiation characteristics of an aperture in an isotherm cavity made of an opaque absorbing material represents almost exactly the properties of a blackbody. A practical application of the principle to the construction of a perfect absorber of radiation consists of a box that is light tight except for an aperture in one of the sides. Any radiation which then enters the hole is scattered and absorbed by repeated reflections so only an infinitesimal fraction can possibly escape. The blackness which is obtained at the aperture is nearly equal to a blackbody and almost perfect for all wavelengths.
By providing such an isothermal cavity with a suitable heater it becomes what is termed a cavity radiator. An isothermal cavity heated to a uniform temperature generates black-body radiation, the characteristics of which are determined solely by the temperature of the cavity. Such cavity radiators are commonly used as sources of radiation in temperature reference standards in the laboratory for calibrating thermographic instruments, such as a FLIR Systems camera for example.
If the temperature of blackbody radiation increases to more than 525°C (977°F), the source begins to be visible so that it appears to the eye no longer black. This is the incident red heat temperature of the radiator, which then becomes orange or yellow as the temperature increases further. In fact, the definition of the so-called color temperature of an object is the temperature to which a blackbody would have to be heated to have the same appearance.
Now consider three expressions that describe the radiation emitted from a blackbody.
19.3.1 Planck's law
natural_image
Portrait of a man in formal 19th-century attire (no visible text or symbols)Figure 19.3 Max Planck (1858–1947)
Max Planck (1858–1947) was able to describe the spectral distribution of the radiation from a blackbody by means of the following formula:
$$ W _ {\lambda b} = \frac {2 \pi h c ^ {2}}{\lambda^ {5} \left(e ^ {h c / \lambda k T} - 1\right)} \times 1 0 ^ {- 6} [ W a t t / m ^ {2}, \mu m ] $$
where:
| W_ b | Blackbody spectral radiant emittance at wavelength . |
| c | Velocity of light = 3 × ^8 m/s |
| h Planck's constant = 6.6 × 10 | -34 Joule sec. |
| k | Boltzmann's constant = 1.4 × -40 Joule/K. |
| T Absolute temperature (K) of a blackbody. | |
| Wavelength ( m). | |
Note The factor 10^-6 is used since spectral emittance in the curves is expressed in Watt/m ^2 , m.
Planck's formula, when plotted graphically for various temperatures, produces a family of curves. Following any particular Planck curve, the spectral emittance is zero at = 0 , then increases rapidly to a maximum at a wavelength and after passing it approaches zero again at very long wavelengths. The higher the temperature, the shorter the wavelength at which maximum occurs.
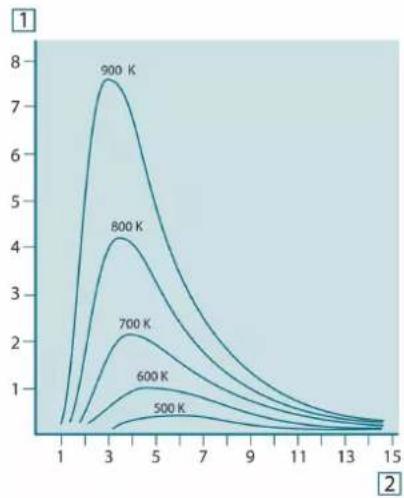
line
| Temperature | Peak Value | | ----------- | ---------- | | 900 K | 7.5 | | 800 K | 4.2 | | 700 K | 2.1 | | 600 K | 1.2 | | 500 K | 0.8 |Figure 19.4 Blackbody spectral radiant emittance according to Planck's law, plotted for various absolute temperatures. 1: Spectral radiant emittance (W/cm 10^3( m) ); 2: Wavelength ( m )
19.3.2 Wien's displacement law
By differentiating Planck's formula with respect to , and finding the maximum, we have:
$$ \lambda_ {\max} = \frac {2 8 9 8}{T} [ \mu m ] $$
This is Wien's formula (after Wilhelm Wien, 1864–1928), which expresses mathematically the common observation that colors vary from red to orange or yellow as the temperature of a thermal radiator increases. The wavelength of the color is the same as the wavelength calculated for max. A good approximation of the value of for a given blackbody temperature is obtained by applying the rule-of-thumb 3 000/T μm. Thus, a very hot star such as Sirius (11 000 K), emitting bluish-white light, radiates with the peak of spectral radiant emittance occurring within the invisible ultraviolet spectrum, at wavelength 0.27 μm.
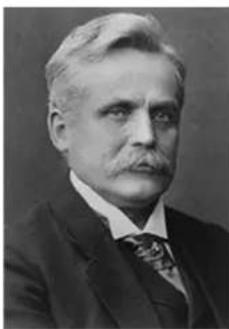
natural_image
Portrait of a man in formal attire with mustache (no visible text or symbols)Figure 19.5 Wilhelm Wien (1864–1928)
The sun (approx. 6 000 K) emits yellow light, peaking at about 0.5 m in the middle of the visible light spectrum.
At room temperature (300 K) the peak of radiant emittance lies at 9.7 μm, in the far infrared, while at the temperature of liquid nitrogen (77 K) the maximum of the almost insignificant amount of radiant emittance occurs at 38 μm, in the extreme infrared wavelengths.
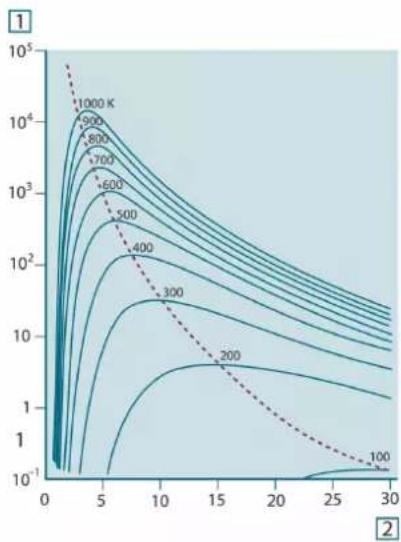
line
| Temperature (K) | X Value | Y Value | | --------------- | ------- | ------- | | 1000 | 5 | 10000 | | 900 | 5 | 8000 | | 800 | 5 | 7000 | | 700 | 5 | 6000 | | 600 | 5 | 500 | | 500 | 5 | 400 | | 400 | 5 | 300 | | 300 | 5 | 200 | | 200 | 5 | 10 | | 10 | 5 | 5 | | 5 | 5 | 2 | | 2 | 5 | 1 | | 1 | 15 | 1 | | 1 | 30 | 1 |Figure 19.6 Planckian curves plotted on semi-log scales from 100 K to 1000 K. The dotted line represents the locus of maximum radiant emittance at each temperature as described by Wien's displacement law. 1: Spectral radiant emittance (W/cπ(μm)); 2: Wavelength (μm).
19.3.3 Stefan-Boltzmann's law
By integrating Planck's formula from = 0 to = , we obtain the total radiant emittance (W_b) of a blackbody:
$$ W _ {b} = \sigma T ^ {4} [ \mathrm{Watt/m} ^ {2} ] $$
This is the Stefan-Boltzmann formula (after Josef Stefan, 1835–1893, and Ludwig Boltzmann, 1844–1906), which states that the total emissive power of a blackbody is proportional to the fourth power of its absolute temperature. Graphically, it is presented in the area below the Planck curve for a particular temperature. It can be shown that the radian emittance in the interval = 0 to t_max is only 25% of the total, which represents about the amount of the sun's radiation which lies inside the visible light spectrum.
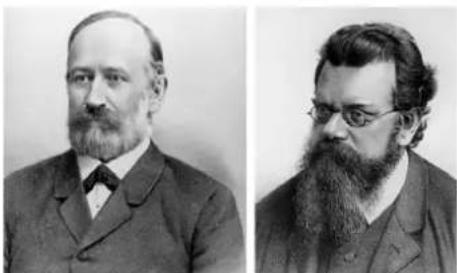
natural_image
Black-and-white portrait of two men in formal 19th-century attire, one with a beard and the other with glasses (no text or symbols visible)Figure 19.7 Josef Stefan (1835–1893), and Ludwig Boltzmann (1844–1906)
Using the Stefan-Boltzmann formula to calculate the power radiated by the human body, at a temperature of 300 K and an external surface area of approximately 1 kW. This power loss could not be sustained if it were not for the compensating absorption of radiation from surrounding surfaces, at room temperatures which do not vary too drastically from the temperature of the body – or, of course, the addition of clothing.
19.3.4 Non-blackbody emitters
So far, only blackbody radiators and blackbody radiation have been discussed. However, real objects almost never comply with these laws over an extended wavelength region – although they may approach the blackbody behavior in certain spectral intervals. For example, a certain type of white paint may appear perfectly white in the visible light spectrum, but becomes distinctly gray at about 2 µm, and beyond 3 µm it is almost black.
There are three processes which can occur that prevent a real object from acting like a blackbody: a fraction of the incident radiation may be absorbed, a fraction may be reflected, and a fraction may be transmitted. Since all of these factors are more or less wavelength dependent, the subscript is used to imply the spectral dependence of their definitions. Thus:
- The spectral absorptance = the ratio of the spectral radiant power absorbed by an object to that incident upon it.
- The spectral reflectance = the ratio of the spectral radiant power reflected by an object to that incident upon it.
- The spectral transmittance I = the ratio of the spectral radiant power transmitted through an object to that incident upon it.
The sum of these three factors must always add up to the whole at any wavelength, so we have the relation:
$$ \alpha_ {\lambda} + \rho_ {\lambda} + \tau_ {\lambda} = 1 $$
For opaque materials = 0 and the relation simplifies to:
$$ \varepsilon_ {\lambda} + \rho_ {\lambda} = 1 $$
Another factor, called the emissivity, is required to describe the fraction of the radiant emittance of a blackbody produced by an object at a specific temperature. Thus, we have the definition:
The spectral emissivity _λ is the ratio of the spectral radiant power from an object to that from a blackbody at the same temperature and wavelength.
Expressed mathematically, this can be written as the ratio of the spectral emittance of the object to that of a blackbody as follows:
$$ \varepsilon_ {\lambda} = \frac {W _ {\lambda o}}{W _ {\lambda b}} $$
Generally speaking, there are three types of radiation source, distinguished by the ways in which the spectral emittance of each varies with wavelength.
• A blackbody, for which ==1
- A graybody, for which = = constant less than 1
- A selective radiator, for which varies with wavelength
According to Kirchhoff's law, for any material the spectral emissivity and spectral absorptance of a body are equal at any specified temperature and wavelength. That is:
$$ \varepsilon_ {\lambda} = \alpha_ {\lambda} $$
From this we obtain, for an opaque material (since _ = 1 ):
$$ \varepsilon_ {\lambda} + \rho_ {\lambda} = 1 $$
For highly polished materials, approaches zero, so that for a perfectly reflecting material (i.e. a perfect mirror) we have:
$$ \rho_ {\lambda} = 1 $$
For a graybody radiator, the Stefan-Boltzmann formula becomes:
$$ W = \varepsilon \sigma T ^ {4} [ \mathrm{Watt} / \mathrm{m} ^ {2} ] $$
This states that the total emissive power of a graybody is the same as a blackbody at the same temperature reduced in proportion to the value of from the graybody.
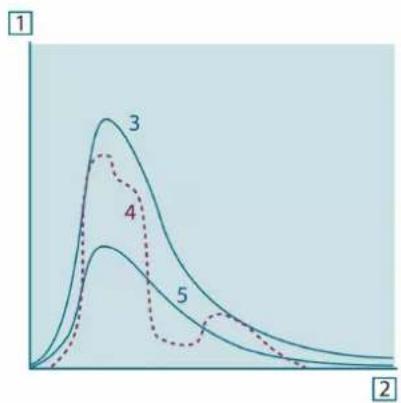
line
| Curve | Peak Position | Value | |-------|---------------|-------| | 3 | First Peak | ~1.0 | | 4 | Second Peak | ~0.8 | | 5 | Third Peak | ~0.6 |Figure 19.8 Spectral radiant emittance of three types of radiators. 1: Spectral radiant emittance; 2: Wavelength; 3: Blackbody; 4: Selective radiator; 5: Graybody.
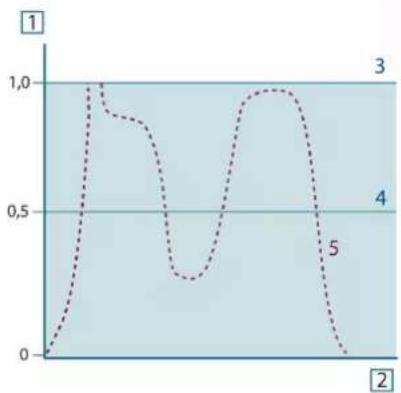
line
| x | y | | ---- | ----- | | 0 | 0.0 | | 1 | 1.0 | | 2 | 0.5 | | 3 | 1.0 | | 4 | 0.5 | | 5 | 0.0 |Figure 19.9 Spectral emissivity of three types of radiators. 1: Spectral emissivity; 2: Wavelength; 3: Blackbody; 4: Graybody; 5: Selective radiator.
19.4 Infrared semi-transparent materials
Consider now a non-metallic, semi-transparent body – let us say, in the form of a thick flat plate of plastic material. When the plate is heated, radiation generated within its volume must work its way toward the surfaces through the material in which it is partially absorbed. Moreover, when it arrives at the surface, some of it is reflected back into the interior. The back-reflected radiation is again partially absorbed, but some of it arrives at the other surface, through which most of it escapes; part of it is reflected back again. Although the progressive reflections become weaker and weaker they must all be added up when the total emittance of the plate is sought. When the resulting geometrical series is summed, the effective emissivity of a semi-transparent plate is obtained as:
$$ \varepsilon_ {\lambda} = \frac {(1 - \rho_ {\lambda}) (1 - \tau_ {\lambda})}{1 - \rho_ {\lambda} \tau_ {\lambda}} $$
When the plate becomes opaque this formula is reduced to the single formula:
$$ \varepsilon_ {\lambda} = 1 - \rho_ {\lambda} $$
This last relation is a particularly convenient one, because it is often easier to measure reflectance than to measure emissivity directly.
The measurement formula
As already mentioned, when viewing an object, the camera receives radiation not only from the object itself. It also collects radiation from the surroundings reflected via the object surface. Both these radiation contributions become attenuated to some extent by the atmosphere in the measurement path. To this comes a third radiation contribution from the atmosphere itself.
This description of the measurement situation, as illustrated in the figure below, is so far a fairly true description of the real conditions. What has been neglected could for instance be sun light scattering in the atmosphere or stray radiation from intense radiation sources outside the field of view. Such disturbances are difficult to quantify, however, in most cases they are fortunately small enough to be neglected. In case they are not negligible, the measurement configuration is likely to be such that the risk for disturbance is obvious, at least to a trained operator. It is then his responsibility to modify the measurement situation to avoid the disturbance e.g. by changing the viewing direction, shielding off intense radiation sources etc.
Accepting the description above, we can use the figure below to derive a formula for the calculation of the object temperature from the calibrated camera output.
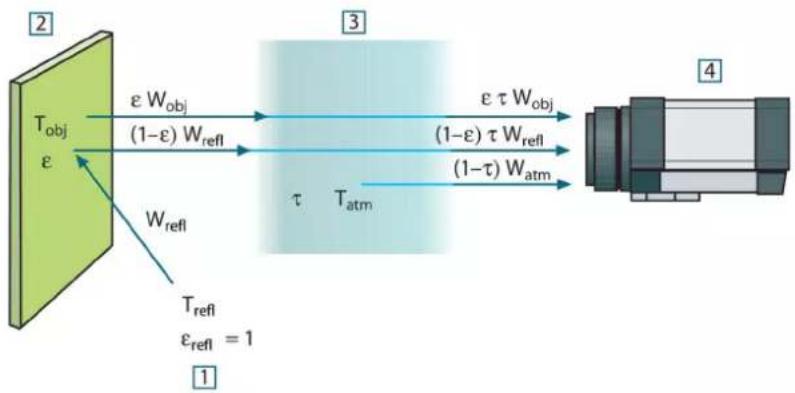
flowchart
graph LR
    A["Device"] -->|ε W_obj (1-ε) W_refi| B["Thermal Energy Transfer"]
    B -->|ε τ W_obj (1-ε) τ W_refi (1-τ) W_atm| C["Output Unit"]
    D["T_refi ε_refi = 1"] --> E["Thermal Energy Transfer"]
    style A fill:#99ccff,stroke:#333
    style B fill:#99ccff,stroke:#333
    style C fill:#99ccff,stroke:#333
    style D fill:#99ccff,stroke:#333
    style E fill:#ccc,stroke:#333
Figure 20.1 A schematic representation of the general thermographic measurement situation.1: Surroundings; 2: Object; 3: Atmosphere; 4: Camera
Assume that the received radiation power W from a blackbody source of temperature T_source on short distance generates a camera output signal, U that is proportional to the power input (power linear camera). We can then write (Equation 1):
$$ U _ {\text { source }} = C W (T _ {\text { source }}) $$
or, with simplified notation:
$$ U _ {\text { source }} = C W _ {\text { source }} $$
where C is a constant.
Should the source be a graybody with emittance , the received radiation would consequently be W_source .
We are now ready to write the three collected radiation power terms:
-
Emission from the object = εT _W where ε is the emittance of the object and τ is the transmittance of the atmosphere. The object temperature is T
-
Reflected emission from ambient sources = (1 - ) where (1 - ) is the reflectance of the object. The ambient sources have the temperature T. It has been assumed that the temperature is the same for all emitting surfaces within the halfsphere seen from a point on the object surface. This is of course sometimes a simplification of the true situation. It is, however, a necessary simplification in order to derive a workable formula, and can - at least theoretically - be given a value that represents an efficient temperature of a complex surrounding.
Note also that we have assumed that the emittance for the surroundings = 1. This is correct in accordance with Kirchhoff's law: All radiation impinging on the surrounding surfaces will eventually be absorbed by the same surfaces. Thus the emittance = 1. (Note though that the latest discussion requires the complete sphere around the object to be considered.)
- Emission from the atmosphere = (1 - )eff / W where (1 - ) is the emittance of the atmosphere. The temperature of the atmosphere is m .T
The total received radiation power can now be written (Equation 2):
$$ W _ {t o t} = \varepsilon \tau W _ {o b j} + (1 - \varepsilon) \tau W _ {r e f l} + (1 - \tau) W _ {a t m} $$
We multiply each term by the constant C of Equation 1 and replace the CW products by the corresponding U according to the same equation, and get (Equation 3):
$$ U _ {t o t} - \varepsilon \tau U _ {o b j} + (1 - \varepsilon) \tau U _ {r e f l} + (1 - \tau) U _ {a t m} $$
Solve Equation 3 for _j (Equation 4):
$$ U _ {o b j} = \frac {1}{\varepsilon \tau} U _ {t o t} - \frac {1 - \varepsilon}{\varepsilon} U _ {r e f l} - \frac {1 - \tau}{\varepsilon \tau} U _ {a t m} $$
This is the general measurement formula used in all the FLIR Systems thermographic equipment. The voltages of the formula are:
Table 20.1 Voltages
| U_obj | Calculated camera output voltage for a blackbody of temperature T_obj i.e. a voltage that can be directly converted into true requested object temperature. |
| U_tot | Measured camera output voltage for the actual case. |
| U_refl | Theoretical camera output voltage for a blackbody of temperature T_refl according to the calibration. |
| U_atm | Theoretical camera output voltage for a blackbody of temperature T_atm according to the calibration. |
The operator has to supply a number of parameter values for the calculation:
• the object emittance ε,
• the relative humidity,
• T_atm
- object distance (D_obj)
- the (effective) temperature of the object surroundings, or the reflected ambient temperature T_eff , and
• the temperature of the atmosphere _atm
This task could sometimes be a heavy burden for the operator since there are normally no easy ways to find accurate values of emittance and atmospheric transmittance for the actual case. The two temperatures are normally less of a problem provided the surroundings do not contain large and intense radiation sources.
A natural question in this connection is: How important is it to know the right values of these parameters? It could though be of interest to get a feeling for this problem already here by looking into some different measurement cases and compare the relative
magnitudes of the three radiation terms. This will give indications about when it is important to use correct values of which parameters.
The figures below illustrates the relative magnitudes of the three radiation contributions for three different object temperatures, two emittances, and two spectral ranges: SW and LW. Remaining parameters have the following fixed values:
• τ = 0.88
- T_refl = +20^ (+68^)
- T_atm = +20^ (+68^)
It is obvious that measurement of low object temperatures are more critical than measuring high temperatures since the 'disturbing' radiation sources are relatively much stronger in the first case. Should also the object emittance be low, the situation would be still more difficult.
We have finally to answer a question about the importance of being allowed to use the calibration curve above the highest calibration point, what we call extrapolation. Imagine that we in a certain case measure ±4.5 volts. The highest calibration point for the camera was in the order of 4.1 volts, a value unknown to the operator. Thus, even if the object happened to be a blackbody, i.e. ± U_tot , we are actually performing extrapolation of the calibration curve when converting 4.5 volts into temperature.
Let us now assume that the object is not black, it has an emittance of 0.75, and the tramittance is 0.92. We also assume that the two second terms of Equation 4 amount to 0.5 volts together. Computation of by means of Equation 4 then results in U4.5 / 0.75 / 0.92 - 0.5 = 6.0. This is a rather extreme extrapolation, particularly when considering that the video amplifier might limit the output to 5 volts! Note, though, that the application of the calibration curve is a theoretical procedure where no electronic or other limitations exist. We trust that if there had been no signal limitations in the camera, and if it had been calibrated far beyond 5 volts, the resulting curve would have been very much the same as our real curve extrapolated beyond 4.1 volts, provided the calibration algorithm is based on radiation physics, like the FLIR Systems algorithm. Of course there must be a limit to such extrapolations.
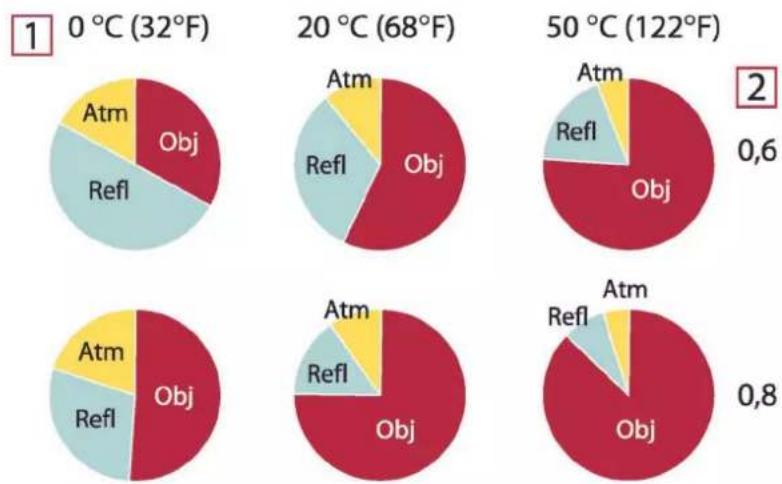
Figure 20.2 Relative magnitudes of radiation sources under varying measurement conditions (SW camera). 1: Object temperature; 2: Emittance; Obj: Object radiation; Refl: Reflected radiation; Atm: atmosphere radiation. Fixed parameters: = 0.88 ; = 20^ (+68°F); _atm = 20^ (+68°F).
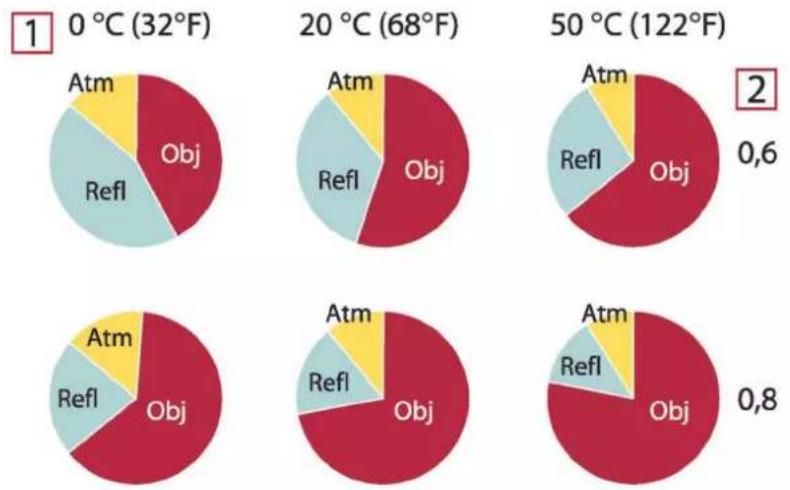
Figure 20.3 Relative magnitudes of radiation sources under varying measurement conditions (LW camera). 1: Object temperature; 2: Emittance; Obj: Object radiation; Refl: Reflected radiation; Atm: atmosphere radiation. Fixed parameters: = 0.88J = 20^ (+68°F); _m = 20^ (+68°F).
This section presents a compilation of emissivity data from the infrared literature and measurements made by FLIR Systems.
21.1 References
- Mikaël A. Bramson: Infrared Radiation, A Handbook for Applications, Plenum press, N.Y.
- William L. Wolfe, George J. Zissis: The Infrared Handbook, Office of Naval Research, Department of Navy, Washington, D.C.
- Madding, R. P.: Thermographic Instruments and systems. Madison, Wisconsin: University of Wisconsin – Extension, Department of Engineering and Applied Science.
- William L. Wolfe: Handbook of Military Infrared Technology, Office of Naval Research, Department of Navy, Washington, D.C.
- Jones, Smith, Probert: External thermography of buildings..., Proc. of the Society of Photo-Optical Instrumentation Engineers, vol.110, Industrial and Civil Applications of Infrared Technology, June 1977 London.
- Paljak, Pettersson: Thermography of Buildings, Swedish Building Research Institute, Stockholm 1972.
- Vlcek, J: Determination of emissivity with imaging radiometers and some emissivities at = 5 m . Photogrammetric Engineering and Remote Sensing.
- Kern: Evaluation of infrared emission of clouds and ground as measured by weather satellites, Defence Documentation Center, AD 617 417.
- Öhman, Claes: Emittansmätningar med AGEMA E-Box. Teknisk rapport, AGEMA 1999. (Emittance measurements using AGEMA E-Box. Technical report, AGEMA 1999.)
- Matteï, S., Tang-Kwor, E: Emissivity measurements for Nextel Velvet coating 811-21 between -36^ AND 82^ .
- Lohrengel & Todtenhaupt (1996)
- ITC Technical publication 32.
- ITC Technical publication 29.
- Schuster, Norbert and Kolobrodov, Valentin G. Infrarotthermographie. Berlin: Wiley-VCH, 2000.
Note The emissivity values in the table below are recorded using a shortwave (SW) camera. The values should be regarded as recommendations only and used with caution.
21.2 Tables
Table 21.1 T: Total spectrum; SW: 2–5 μm; LW: 8–14 μm, LLW: 6.5–20 μm; 1: Material; 2: Specification; 3: Temperature in °C; 4: Spectrum; 5: Emissivity: 6: Reference
| 1 2 3 4 5 6 | |||||
| 3M type 35 | Vinyl electrical tape (several colors) | < 80 | LW | ≈ 0.96 | 13 |
| 3M type 88 | Black vinyl electrical tape | < 105 | LW | ≈ 0.96 | 13 |
| 3M type 88 | Black vinyl electrical tape | < 105 | MW | < 0.96 | 13 |
| 3M type Super 33 + | Black vinyl electrical tape | < 80 | LW | ≈ 0.96 | 13 |
| Aluminum | anodized sheet | 100 | T | 0.55 | 2 |
| Aluminum | anodized, black, dull | 70 | SW | 0.67 | 9 |
| Aluminum | anodized, black, dull | 70 | LW | 0.95 | 9 |
| Aluminum anodized, light gray, dull | 70 | SW | 0.61 9 | ||
| Aluminum anodized, light gray, dull | 70 LW 0.97 9 | ||||
| Aluminum as received, plate 100 T 0.09 4 | |||||
| Aluminum as received, sheet | 100 T 0.09 2 | ||||
| Aluminum cast, blast cleaned | 70 | SW | 0.47 9 | ||
| Aluminum cast, blast cleaned | 70 LW 0.46 9 | ||||
| Aluminum dipped in HNO _3 , plate | 100 T 0.05 4 | ||||
| Aluminum foil | 27 10 μm 0.04 | 3 | |||
| Aluminum foil | 27 3 μm 0.09 | 3 | |||
| Aluminum | oxidized, strongly | 50-500 | T | 0.2-0.3 | 1 |
| Aluminum polished | 50-100 | T 0.04-0.06 1 | |||
| Aluminum polished | plate 100 T 0.05 4 | ||||
| Aluminum polished, sheet | 100 T 0.05 2 | ||||
| Aluminum rough surface | 20-50 | T 0.06-0.07 1 | |||
| Aluminum roughened | 27 10 μm 0.18 3 | ||||
| Aluminum roughened | 27 3 μm 0.28 3 | ||||
| Aluminum sheet, 4 | samples differently scratched | 70 | SW | 0.05-0.08 9 | |
| Aluminum sheet, 4 | samples differently scratched | 70 LW 0.03-0.06 9 | |||
| Aluminum | vacuum deposited | 20 T 0.04 2 | |||
| Aluminum weathered, heavily | 17 | SW | 0.83-0.94 5 | ||
| Aluminum bronze | 20 T 0.60 1 | ||||
| Aluminum hydroxide | powder | T 0.28 1 | |||
| Aluminum oxide | activated, powder | T 0.46 1 | |||
| Aluminum oxide | pure, powder (alumina) | T 0.16 1 | |||
| Asbestos | board | 20 T 0.96 1 | |||
| Asbestos | fabric | T 0.78 1 | |||
| Asbestos | floor tile | 35 | SW | 0.94 7 | |
| Asbestos | paper | 40-400 | T 0.93-0.95 1 | ||
| Asbestos | powder | T 0.40-0.60 1 | |||
| Asbestos | slate | 20 T 0.96 1 | |||
| Asphalt paving | 4 LLW 0.967 | 8 | |||
| Brass | dull, tarnished | 20-350 | T 0.22 1 | ||
| Brass | oxidized | 100 T 0.61 2 | |||
| Brass | oxidized | 70 | SW | 0.04-0.09 9 | |
| Brass oxidized 70 | LW 0.03-0.07 9 | ||||
| Brass oxidized at | 600°C | 200-600 T 0.59-0 | 61 1 | ||
| Brass polished | 200 | T 0.03 | 1 | ||
| Brass polished, highly | 100 | T 0.03 | 2 | ||
| Brass rubbed with | 80-grit emery | 20 T 0.20 | 2 | ||
| Brass sheet, rolled | 20 T 0.06 | 1 | |||
| Brass sheet, worked with emery | 20 T 0.2 | 1 | |||
| Brick | alumina | 17 | SW | 0.68 | 5 |
| Brick | common 17 | SW | 0.86-0.81 5 | ||
| Brick | Dinas silica, glazed, rough | 1100 | T 0.85 | 1 | |
| Brick | Dinas silica, refractory | 1000 | T 0.66 | 1 | |
| Brick | Dinas silica, un-glazed, rough | 1000 | T 0.80 | 1 | |
| Brick | firebrick | 17 | SW | 0.68 | 5 |
| Brick | fireclay | 1000 | T 0.75 | 1 | |
| Brick | fireclay | 1200 | T 0.59 | 1 | |
| Brick | fireclay | 20 T 0.85 | 1 | ||
| Brick | masonry 35 | SW | 0.94 | 7 | |
| Brick | masonry, plastered | 20 T 0.94 | 1 | ||
| Brick | red, common | 20 T 0.93 | 2 | ||
| Brick | red, rough | 20 T 0.88-0.93 1 | |||
| Brick | refractory, corundum | 1000 | T 0.46 | 1 | |
| Brick | refractory, magnesite | 1000-1300 | T 0.38 | 1 | |
| Brick | refractory, strongly radiating | 500-1000 T 0.8-0 | 9 | 1 | |
| Brick | refractory, weakly radiating | 500-1000 T 0.65- | 0.75 1 | ||
| Brick | silica, 95% SiQ | 1230 | T 0.66 | 1 | |
| Brick | sillimanite, 33% SiO_2 , 64% AlO_3 | 1500 | T 0.29 | 1 | |
| Brick | waterproof | 17 | SW | 0.87 | 5 |
| Bronze | phosphor bronze | 70 | SW | 0.08 | 9 |
| Bronze | phosphor bronze | 70 LW 0.06 | 9 | ||
| Bronze | polished | 50 T 0.1 | 1 | ||
| Bronze | porous, rough 50- | 150 T 0 | 55 | 1 | |
| Bronze | powder | T 0.76-0.80 1 | |||
| Carbon | candle soot | 20 T 0.95 | 2 | ||
| Carbon | charcoal powder | T 0.96 | 1 | ||
| Carbon | graphite powder | T 0.97 | 1 | ||
| Carbon graphite, filed surface | 20 T 0.98 2 | ||||
| Carbon | lampblack 20-400 | T 0.95-0.97 1 | |||
| Chipboard untreated | 20 SW | 0.90 6 | |||
| Chromium | polished | 50 T 0.10 1 | |||
| Chromium | polished | 500-1000 T 0.28-0.38 1 | |||
| Clay | fired | 70 T 0.91 1 | |||
| Cloth | black | 20 T 0.98 1 | |||
| Concrete | 20 T 0.92 2 | ||||
| Concrete | dry | 36 SW | 0.95 7 | ||
| Concrete | rough | 17 | SW | 0.97 5 | |
| Concrete | walkway | 5 | LLW | 0.974 | 8 |
| Copper commercial, burnished | 20 T 0.07 1 | ||||
| Copper | electrolytic, carefully polished | 80 T 0.018 | 1 | ||
| Copper electrolytic, polished | -34 | T 0.006 | 4 | ||
| Copper | molten | 1100-1300 | T 0.13-0.15 1 | ||
| Copper | oxidized | 50 T 0.6-0.7 1 | |||
| Copper | oxidized to blackness | T 0.88 1 | |||
| Copper oxidized, black | 27 T 0.78 | 4 | |||
| Copper oxidized, heavily | 20 T 0.78 | 2 | |||
| Copper polished | 50-100 T | 0.02 | 1 | ||
| Copper polished | 100 | T 0.03 2 | |||
| Copper polished, commercial | 27 T 0.03 4 | ||||
| Copper | polished, mechanical | 22 T 0.015 | 4 | ||
| Copper pure, carefully prepared surface | 22 T 0.008 | 4 | |||
| Copper | scraped | 27 T 0.07 4 | |||
| Copper dioxide | powder | T 0.84 1 | |||
| Copper oxide | red, powder | T 0.70 1 | |||
| Ebonite | T 0.89 1 | ||||
| Emery | coarse | 80 T 0.85 1 | |||
| Enamel | 20 T 0.9 | 1 | |||
| Enamel | lacquer 20 T 0.85-0.95 1 | ||||
| Fiber board | hard, untreated | 20 | SW | 0.85 6 | |
| Fiber board | masonite | 70 | SW | 0.75 9 | |
| Fiber board | masonite | 70 LW 0.88 | 9 | ||
| Fiber board | particle board | 70 | SW | 0.77 9 | |
| Fiber board | particle board | 70 | LW | 0.89 | 9 |
| Fiber board | porous, untreated | 20 | SW | 0.85 6 | |
| Glass pane (float glass) | non-coated 20 LW | 0.97 14 | |||
| Gold | polished 130 T 0.018 | 1 | |||
| Gold | polished, carefully | 200-600 | T 0.02-0.03 | 1 | |
| Gold | polished, highly | 100 T 0.02 2 | |||
| Granite | polished 20 LLW | 0.849 | 8 | ||
| Granite | rough | 21 LLW 0.879 | 8 | ||
| Granite | rough, 4 different samples | 70 | SW | 0.95-0.97 | 9 |
| Granite | rough, 4 different samples | 70 LW 0.77-0.87 | 9 | ||
| Gypsum | 20 T 0.8-0.9 | 1 | |||
| Ice: See Water | |||||
| Iron and steel | cold rolled | 70 | SW | 0.20 9 | |
| Iron and steel | cold rolled | 70 LW 0.09 9 | |||
| Iron and steel | covered with red rust | 20 T 0.61-0.85 | 1 | ||
| Iron and steel | electrolytic | 100 T 0.05 4 | |||
| Iron and steel | electrolytic | 22 T 0.05 4 | |||
| Iron and steel | electrolytic | 260 T 0.07 4 | |||
| Iron and steel | electrolytic, carefully polished | 175-225 | T 0.05-0.06 | 1 | |
| Iron and steel | freshly worked with emery | 20 T 0.24 1 | |||
| Iron and steel | ground sheet | 950-1100 | T | 0.55-0.61 | 1 |
| Iron and steel | heavily rusted sheet | 20 T 0.69 2 | |||
| Iron and steel | hot rolled | 130 T 0.60 1 | |||
| Iron and steel | hot rolled | 20 T 0.77 1 | |||
| Iron and steel | oxidized | 100 T 0.74 4 | |||
| Iron and steel | oxidized | 100 T 0.74 1 | |||
| Iron and steel | oxidized | 1227 | T 0.89 | 4 | |
| Iron and steel | oxidized | 125-525 | T | 0.78-0.82 | 1 |
| Iron and steel | oxidized | 200 T 0.79 2 | |||
| Iron and steel | oxidized | 200-600 | T | 0.80 | 1 |
| Iron and steel | oxidized strongly | 50 T 0.88 1 | |||
| Iron and steel | oxidized strongly | 500 T 0.98 1 | |||
| Iron and steel | polished 100 T 0.07 2 | ||||
| Iron and steel | polished | 400-1000 | T | 0.14-0.38 | 1 |
| Iron and steel | polished sheet | 750-1050 | T | 0.52-0.56 | 1 |
| Iron and steel | rolled sheet | 50 T 0.56 1 | |||
| Iron and steel | rolled, freshly | 20 T 0.24 1 | |||
| Iron and steel | rough, plane surface | 50 T 0.95-0.98 | 1 | ||
| Iron and steel | rusted red, sheet | 22 T 0.69 4 | |||
| Iron and steel | rusted, heavily | 17 | SW | 0.96 5 | |
| Iron and steel rusty, red 20 T 0.69 1 | |||||
| Iron and steel shiny oxide layer, sheet, | 20 T 0.82 1 | ||||
| Iron and steel shiny, etched 150 | T 0.16 1 | ||||
| Iron and steel wrought, carefully polished | 40-250 | T 0.28 1 | |||
| Iron galvanized | heavily oxidized | 70 | SW | 0.64 9 | |
| Iron galvanized | heavily oxidized | 70 | LW | 0.85 | 9 |
| Iron galvanized | sheet | 92 T 0.07 4 | |||
| Iron galvanized | sheet, burnished | 30 T 0.23 1 | |||
| Iron galvanized | sheet, oxidized | 20 T 0.28 1 | |||
| Iron tinned | sheet | 24 T 0.064 | 4 | ||
| Iron, cast | casting | 50 T 0.81 1 | |||
| Iron, cast | ingots | 1000 | T 0.95 1 | ||
| Iron, cast | liquid | 1300 | T 0.28 1 | ||
| Iron, cast | machined | 800-1000 | T | 0.60-0.70 | 1 |
| Iron, cast | oxidized | 100 | T 0.64 2 | ||
| Iron, cast | oxidized | 260 | T 0.66 4 | ||
| Iron, cast | oxidized | 38 T 0.63 4 | |||
| Iron, cast | oxidized | 538 | T 0.76 4 | ||
| Iron, cast | oxidized at 600°C | 200-600 | T 0.64-0.78 | 1 | |
| Iron, cast | polished | 200 | T 0.21 1 | ||
| Iron, cast | polished | 38 T 0.21 4 | |||
| Iron, cast | polished | 40 T 0.21 2 | |||
| Iron, cast | unworked | 900-1100 | T | 0.87-0.95 | 1 |
| Krylon Ultra-flat black 1602 | Flat black | Room temperature up to 175 | LW | ≈ 0.96 | 12 |
| Krylon Ultra-flat black 1602 | Flat black | Room temperature up to 175 | MW | ≈ 0.97 | 12 |
| Lacquer | 3 colors sprayed on Aluminum | 70 | SW | 0.50-0.53 | 9 |
| Lacquer | 3 colors sprayed on Aluminum | 70 LW 0.92-0.94 | 9 | ||
| Lacquer | Aluminum on rough surface | 20 T 0.4 | 1 | ||
| Lacquer | bakelite | 80 T 0.83 1 | |||
| Lacquer | black, dull | 40-100 | T | 0.96-0.98 | 1 |
| Lacquer | black, matte | 100 | T 0.97 2 | ||
| Lacquer | black, shiny, sprayed on iron | 20 T 0.87 1 | |||
| Lacquer | heat-resistant | 100 | T 0.92 1 | ||
| Lacquer | white | 100 | T 0.92 2 | ||
| Lacquer | white | 40-100 | T | 0.8-0.95 | 1 |
| Lead | oxidized at 200°C | 200 | T 0.63 1 | ||
| Lead | oxidized, gray | 20 T 0.28 1 | |||
| Lead oxidized, gray | 22 T 0.28 4 | ||||
| Lead shiny 250 T | 0.08 1 | ||||
| Lead unoxidized, polished | polished | 100 T 0.05 4 | |||
| Lead red | 100 T 0.93 4 | ||||
| Lead red, powder | 100 T 0.93 1 | ||||
| Leather | tanned | T 0.75-0.80 | 1 | ||
| Lime | T 0.3-0.4 | 1 | |||
| Magnesium | 22 T 0.07 4 | ||||
| Magnesium | 260 T 0.13 4 | ||||
| Magnesium | 538 T 0.18 4 | ||||
| Magnesium | polished | 20 T 0.07 2 | |||
| Magnesium powder | T 0.86 1 | ||||
| Molybdenum | 1500-2200 | T 0.19-0.26 | 1 | ||
| Molybdenum | 600-1000 | T 0.08-0.13 | 1 | ||
| Molybdenum | filament | 700-2500 | T 0.1-0.3 | 1 | |
| Mortar | 17 | SW | 0.87 5 | ||
| Mortar | dry | 36 | SW | 0.94 7 | |
| Nextel Velvet 811-21 Black | Flat black | -60-150 | LW > 0.97 | 10 | and 11 |
| Nichrome | rolled | 700 T 0.25 1 | |||
| Nichrome | sandblasted | 700 T 0.70 1 | |||
| Nichrome | wire, clean | 50 T 0.65 1 | |||
| Nichrome | wire, clean | 500-1000 | T | 0.71-0.79 | 1 |
| Nichrome | wire, oxidized | 50-500 | T | 0.95-0.98 | 1 |
| Nickel | bright matte 122 T | 0.041 | 4 | ||
| Nickel | commercially pure, polished | 100 T 0.045 | 1 | ||
| Nickel | commercially pure, polished | 200-400 | T 0.07-0.09 | 1 | |
| Nickel | electrolytic | 22 T 0.04 4 | |||
| Nickel | electrolytic | 260 T 0.07 4 | |||
| Nickel | electrolytic | 38 T 0.06 4 | |||
| Nickel | electrolytic | 538 T 0.10 4 | |||
| Nickel | electroplated on iron, polished | 22 T 0.045 | 4 | ||
| Nickel | electroplated on iron, unpolished | 20 T 0.11-0.40 | 1 | ||
| Nickel | electroplated on iron, unpolished | 22 T 0.11 4 | |||
| Nickel | electroplated, polished | 20 T 0.05 2 | |||
| Nickel | oxidized | 1227 T 0.85 4 | |||
| Nickel | oxidized | 200 T 0.37 2 | |||
| Nickel | oxidized | 227 T 0.37 4 | |||
| Nickel | oxidized at 600°C | 200-600 T 0.37-0 | 48 1 | ||
| Nickel polished 122 T 0.045 4 | |||||
| Nickel wire | 200-1000 T | 0.1-0.2 | 1 | ||
| Nickel oxide | 1000-1250 | T 0.75-0.86 1 | |||
| Nickel oxide | 500-650 T 0.52-0.59 1 | ||||
| Oil, lubricating | 0.025 mm film | 20 | T 0.27 | 2 | |
| Oil, lubricating | 0.050 mm film | 20 | T 0.46 | 2 | |
| Oil, lubricating | 0.125 mm film | 20 | T 0.72 | 2 | |
| Oil, lubricating | film on Ni base: Ni base only | 20 | T 0.05 | 2 | |
| Oil, lubricating | thick coating | 20 | T | 0.82 | 2 |
| Paint | 8 different colors and qualities | 70 | SW | 0.88-0.96 9 | |
| Paint | 8 different colors and qualities | 70 | LW | 0.92-0.94 9 | |
| Paint | Aluminum, various ages | 50-100 | T 0.27-0.67 1 | ||
| Paint | cadmium yellow | T 0.28-0.33 1 | |||
| Paint | chrome green | T 0.65-0.70 1 | |||
| Paint | cobalt blue | T 0.7-0.8 | 1 | ||
| Paint | oil | 17 | SW | 0.87 | 5 |
| Paint | oil based, average of 16 colors | 100 T 0.94 | 2 | ||
| Paint | oil, black flat | 20 | SW | 0.94 | 6 |
| Paint | oil, black gloss | 20 | SW | 0.92 | 6 |
| Paint | oil, gray flat | 20 | SW | 0.97 | 6 |
| Paint | oil, gray gloss | 20 | SW | 0.96 | 6 |
| Paint | oil, various colors | 100 T 0.92-0.96 1 | |||
| Paint | plastic, black | 20 | SW | 0.95 | 6 |
| Paint | plastic, white | 20 | SW | 0.84 | 6 |
| Paper | 4 different colors | 70 | SW | 0.68-0.74 9 | |
| Paper | 4 different colors | 70 | LW | 0.92-0.94 9 | |
| Paper | black | T 0.90 | 1 | ||
| Paper | black, dull | T 0.94 | 1 | ||
| Paper | black, dull 70 | SW | 0.86 | 9 | |
| Paper | black, dull | 70 | LW | 0.89 | 9 |
| Paper | blue, dark | T 0.84 | 1 | ||
| Paper | coated with black lacquer | T 0.93 | 1 | ||
| Paper | green | T 0.85 | 1 | ||
| Paper | red | T 0.76 | 1 | ||
| Paper | white | 20 | T | 0.7-0.9 | 1 |
| Paper | white bond | 20 | T | 0.93 | 2 |
| Paper | white, 3 different glosses | 70 | SW | 0.76-0.78 9 | |
| Paper white, 3 different glosses | 70 LW 0.88-0.90 9 | ||||
| Paper yellow T 0.72 1 | |||||
| Plaster | 17 | SW | 0.86 5 | ||
| Plaster | plasterboard, untreated | 20 | SW | 0.90 6 | |
| Plaster | rough coat | 20 T 0.91 2 | |||
| Plastic | glass fibre laminate (printed circ. board) | 70 | SW | 0.94 9 | |
| Plastic | glass fibre laminate (printed circ. board) | 70 LW 0.91 9 | |||
| Plastic | polyurethane isolation board | 70 LW 0.55 9 | |||
| Plastic | polyurethane isolation board | 70 | SW | 0.29 9 | |
| Plastic | PVC, plastic floor, dull, structured | 70 | SW | 0.94 9 | |
| Plastic | PVC, plastic floor, dull, structured | 70 LW 0.93 9 | |||
| Platinum | 100 | T 0.05 4 | |||
| Platinum | 1000-1500 | T 0.14-0.18 1 | |||
| Platinum | 1094 | T 0.18 4 | |||
| Platinum | 17 T 0.016 | 4 | |||
| Platinum | 22 T 0.03 4 | ||||
| Platinum | 260 | T 0.06 4 | |||
| Platinum | 538 | T 0.10 4 | |||
| Platinum | pure, polished | 200-600 | T | 0.05-0.10 | 1 |
| Platinum | ribbon | 900-1100 T 0.12-0.17 1 | |||
| Platinum | wire | 1400 | T 0.18 1 | ||
| Platinum | wire | 500-1000 T 0.10-0.16 1 | |||
| Platinum | wire | 50-200 | T 0.06-0.07 1 | ||
| Porcelain | glazed | 20 T 0.92 1 | |||
| Porcelain | white, shiny | T 0.70-0.75 1 | |||
| Rubber | hard | 20 T 0.95 1 | |||
| Rubber | soft, gray, rough | 20 T 0.95 1 | |||
| Sand | T 0.60 1 | ||||
| Sand | 20 T 0.90 2 | ||||
| Sandstone | polished | 19 LLW 0.909 | 8 | ||
| Sandstone | rough | 19 | LLW | 0.935 | 8 |
| Silver | polished | 100 | T 0.03 2 | ||
| Silver | pure, polished | 200-600 | T 0.02-0.03 1 | ||
| Skin human | 32 T 0.98 2 | ||||
| Slag | boiler | 0-100 | T 0.97-0.93 1 | ||
| Slag | boiler | 1400-1800 | T 0.69-0.67 1 | ||
| Slag | boiler | 200-500 | T 0.89-0.78 1 | ||
| Slag | boiler 600-1200 T | 0.76-0.70 1 | |||
| Snow: See Water | |||||
| Soil | dry 20 T 0.92 2 | ||||
| Soil saturated with water | water | 20 T 0.95 2 | |||
| Stainless steel | alloy, 8% Ni, 18% Cr | 500 T 0.35 1 | |||
| Stainless steel | rolled 700 T 0.45 | 1 | |||
| Stainless steel | sandblasted | 700 T 0.70 1 | |||
| Stainless steel | sheet, polished | 70 | SW | 0.18 9 | |
| Stainless steel | sheet, polished | 70 | LW | 0.14 | 9 |
| Stainless steel | sheet, untreated, somewhat scratched | 70 | SW | 0.30 9 | |
| Stainless steel | sheet, untreated, somewhat scratched | 70 LW 0.28 | 9 | ||
| Stainless steel | type 18-8, buffed | 20 T 0.16 2 | |||
| Stainless steel | type 18-8, oxidized at 800°C | 60 T 0.85 2 | |||
| Stucco | rough, lime | 10-90 | T 0.91 | 1 | |
| Styrofoam | insulation | 37 | SW | 0.60 7 | |
| Tar | T 0.79-0.84 1 | ||||
| Tar | paper | 20 T 0.91-0.93 1 | |||
| Tile | glazed | 17 | SW | 0.94 5 | |
| Tin burnished 20-50 T 0 | 04-0.06 1 | ||||
| Tin tin-plated sheet iron | 100 T 0.07 2 | ||||
| Titanium | oxidized at 540°C | 1000 | T 0.60 | 1 | |
| Titanium | oxidized at 540°C | 200 T 0.40 1 | |||
| Titanium | oxidized at 540°C | 500 T 0.50 1 | |||
| Titanium | polished | 1000 | T 0.36 | 1 | |
| Titanium | polished | 200 T 0.15 1 | |||
| Titanium | polished | 500 T 0.20 1 | |||
| Tungsten | 1500-2200 | T 0.24-0.31 1 | |||
| Tungsten | 200 T 0.05 1 | ||||
| Tungsten | 600-1000 T 0.1-0.16 | 16 | 1 | ||
| Tungsten | filament | 3300 | T 0.39 | 1 | |
| Varnish | flat | 20 | SW | 0.93 6 | |
| Varnish | on oak parquet floor | 70 | SW | 0.90 9 | |
| Varnish | on oak parquet floor | 70 LW 0.90-0.93 9 | |||
| Wallpaper | slight pattern, light gray | 20 | SW | 0.85 6 | |
| Wallpaper | slight pattern, red | 20 | SW | 0.90 6 | |
| Water | distilled | 20 T 0.96 2 | |||
| Water frost crystals | -10 T 0.98 2 | ||||
| Water ice, covered | with heavy frost | 0 T 0.98 1 | |||
| Water ice, smooth | 0 T 0.97 1 | ||||
| Water ice, smooth | -10 T 0.96 2 | ||||
| Water layer >0.1 mm thick | 0-100 T 0.95-0.98 | 1 | |||
| Water | snow | T 0.8 | 1 | ||
| Water | snow | -10 T 0.85 2 | |||
| Wood | 17 | SW | 0.98 5 | ||
| Wood | 19 | LLW | 0.962 | 8 | |
| Wood ground | T 0.5-0.7 | 1 | |||
| Wood pine, 4 different samples | 70 | SW | 0.67-0.75 | 9 | |
| Wood pine, 4 different samples | 70 | LW | 0.81-0.89 | 9 | |
| Wood planed | 20 | T 0.8-0.9 | 1 | ||
| Wood planed oak | 20 | T 0.90 2 | |||
| Wood planed oak | 70 | SW | 0.77 9 | ||
| Wood planed oak | 70 | LW | 0.88 9 | ||
| Wood plywood, smooth, dry | 36 | SW | 0.82 7 | ||
| Wood plywood, untreated | 20 | SW | 0.83 6 | ||
| Wood white, damp | 20 | T 0.7-0.8 | 1 | ||
| Zinc | oxidized at 400°C | 400 | T 0.11 1 | ||
| Zinc oxidized surface | 1000-1200 | T 0.50-0.60 | 1 | ||
| Zinc polished | 200-300 | T 0.04-0.05 | |||
| Zinc sheet | 50 | T 0.20 1 | |||
A note on the technical production of this publication
This publication was produced using XML — the eXtensible Markup Language. For more information about XML, please visit http://www.w3.org/XML/
A note on the typeface used in this publication
This publication was typeset using Linotype Helvetica™ World. Helvetica™ was designed by Max Miedinger (1910–1980)
LOEF (List Of Effective Files)
T501242.xml; en-US; AA; 43064; 2017-06-07
T505864.xml; en-US; 26038; 2015-05-27
T506076.xml; en-US; 42787; 2017-05-22
T505469.xml; en-US; 39689; 2017-01-25
T505013.xml; en-US; 39689; 2017-01-25
T506071.xml; en-US; 43030; 2017-06-07
T506072.xml; en-US; 43030; 2017-06-07
T506074.xml; en-US; 42938; 2017-05-30
T506077.xml; en-US; 42896; 2017-05-29
T506078.xml; en-US; 42938; 2017-05-30
T506083.xml; en-US; 40135; 2017-02-09
T506079.xml; en-US; 40065; 2017-02-07
T506080.xml; en-US; 42787; 2017-05-22
T505007.xml; en-US; 42810; 2017-05-23
T506125.xml; en-US; 40753; 2017-03-02
T505000.xml; en-US; 39687; 2017-01-25
T506051.xml; en-US; 40460; 2017-02-20
T505005.xml; en-US; 42810; 2017-05-23
T505001.xml; en-US; 41563; 2017-03-23
T505006.xml; en-US; 41563; 2017-03-23
T505002.xml; en-US; 39512; 2017-01-18
Website
http://www.flir.com
Customer support
http://support.flir.com
Copyright
© 2017, FLIR Systems, Inc. All rights reserved worldwide.
Disclaimer
Specifications subject to change without further notice. Models and accessories subject to regional market considerations. License procedures may apply. Products described herein may be subject to US Export Regulations. Please refer to exportquestions@flir.com with any questions.
- User's manual FLIR X6530sc series
- Table of contents
- Disclaimers ....1
- Safety information ....4
- Notice to user ....5
- Customer help ....7
- Introduction....9
- Installing the camera 15
- Operation 29
- Radiometric measurement 36
- Interfaces 47
- Mechanical drawings 57
- Technical data.... 60
- Maintenance and service.... 67
- Quality 69
- About FLIR Systems 70
- Terms, laws, and definitions.... 73
- Thermographic measurement techniques 75
- About calibration.... 80
- History of infrared technology.... 83
- Theory of thermography.... 86
- The measurement formula.... 93
- Emissivity tables 97
- Legal disclaimer
- Usage statistics
- Changes to registry
- U.S. Government Regulations
- Copyright
- Quality assurance
- Patents
- Third-party licenses
- GNU Lesser General Public License (LGPL)
- Fonts (Source Han Sans)
- Fonts (DejaVu)
- 2
- Safety information
- User-to-user forums
- Calibration
- Accuracy
- Disposal of electronic waste
- Training
- Documentation updates
- Important note about this manual
- Note about authoritative versions
- General
- Submitting a question
- Downloads
- Camera system components
- System overview
- View from the front—bayonet mount
- View from the front—M80 mount
- View from the rear
- Back panel
- Key features
- - Fast frame rate
- • 14-bit image data
- - Outstanding measurement accuracy
- - CNUC calibration
- - Hypercal
- - Auto-exposure
- - Presets
- - Multiple triggering modes and synchronizing interfaces
- - Multiple video outputs
- • Ultrasonic smart lenses (USLs)
- - Motorized filter wheel
- - Removable touch screen LCD
- • Wi-Fi
- • Video color palettes
- - Configuration management
- - Global-status LED
- Installing the camera
- Mounting the camera
- Powering the camera
- Power supply
- Power button
- Camera boot-up and cooling down
- Adjusting the field of view
- LCD screen
- Detaching the touch screen LCD
- Note
- Procedure
- General
- Lens
- Installing an infrared lens
- Procedure—bayonet mount
- Procedure—M80 mount
- Removing an infrared lens
- Procedure—bayonet mount
- Procedure—M80 mount
- Lens identification
- Adjusting the camera focus
- Autofocus
- Using an extension ring
- Setting the camera parameters
- Connection to the computer
- Connection through the Camera Link interface
- Connection through the GigE interface
- Connection to FLIR ResearchIR Max
- General
- Procedure
- Image size adjustment
- General
- Measurement configuration
- General
- Show measurement configuration matching current camera settings
- Temperature range adjustment
- General
- Frame frequency
- General
- Synchronizing the camera to an external signal
- General
- Advanced camera controls
- General
- Extended camera information
- General
- Filter wheel
- Removing an optical filter holder
- Installing an optical filter holder
- Filter holder identification
- Creating a custom filter holder
- General
- Procedure
- Installing two filters in the filter holder
- Adding a custom filter parameter into the camera
- General
- Procedure
- Filter definition file description
- General
- Camera configuration file management
- CNUC file management
- General
- Procedure
- Camera Wi-Fi application
- General
- Procedure
- Camera web page description
- Infrared remote
- General
- Procedure
- Radiometric measurement
- Non-uniformity correction (NUC)
- General
- CNUC
- General
- Two-point correction process
- General
- One-point correction (offset correction)
- General
- Temperature calibration
- Hypercal
- General
- Auto-exposure
- General
- Bad pixel replacement
- General
- Camera file management
- Procedure
- Frame rate and integration modes
- General
- The ITR process
- The IWR process
- Procedure
- Dynamic range extension—superframing
- Camera synchronization
- Sync In
- General
- Sync Out
- General
- Trigger In
- General
- When to use this configuration
- When NOT to use this configuration
- LED description
- Lock-in
- General
- Characteristics
- IRIG-B
- Wi-Fi connection
- General
- Procedure
- Connect to http://192.168.64.1/
- USB connection
- General
- The camera has a newer FLIR USB driver
- The camera has a legacy FLIR USB driver
- USB driver installation
- First time installation
- General
- Procedure
- Replacing an existing driver
- General
- Procedure
- Configuration of the network interface
- Procedure
- Accessing the camera files with Windows Explorer
- General
- Procedure
- 10
- Mechanical drawings
- 11
- Technical data
- Note about technical data
- Note about authoritative versions
- FLIR X6530sc
- Supplies & accessories:
- FLIR X6530sc M80
- Cleaning the camera
- Camera housing, cables, and other items
- Liquids
- Equipment
- Procedure
- CAUTION
- Infrared lens
- Liquids
- Equipment
- Procedure
- WARNING
- Cooler maintenance
- General
- Signs to watch for
- Quality assurance
- For the US market
- For the Canadian market
- About FLIR Systems
- More than just an infrared camera
- Sharing our knowledge
- Supporting our customers
- Terms, laws, and definitions
- Thermographic measurement techniques
- Introduction
- Emissivity
- Finding the emissivity of a sample
- Step 1: Determining reflected apparent temperature
- Method 1: Direct method
- Method 2: Reflector method
- Step 2: Determining the emissivity
- Reflected apparent temperature
- Distance
- Relative humidity
- Other parameters
- Introduction
- Definition—what is calibration?
- Camera calibration at FLIR Systems
- The differences between a calibration performed by a user and that performed directly at FLIR Systems
- Calibration, verification and adjustment
- Non-uniformity correction
- Thermal image adjustment (thermal tuning)
- History of infrared technology
- Theory of thermography
- Introduction
- The electromagnetic spectrum
- Blackbody radiation
- Planck's law
- Wien's displacement law
- Stefan-Boltzmann's law
- Non-blackbody emitters
- Infrared semi-transparent materials
- The measurement formula
- References
- Tables
- A note on the technical production of this publication
- A note on the typeface used in this publication
- LOEF (List Of Effective Files)
- Website
- Customer support
- Copyright
- Disclaimer
Brand : FLIR
Model : X6530sc
Category : Thermal camera