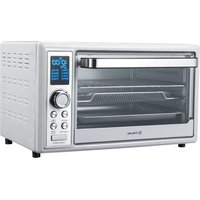
AFD23L - Oven Stirling - Free user manual and instructions
Find the device manual for free AFD23L Stirling in PDF.


| Product Type | Built-in Electric Oven |
| Brand | Stirling |
| Model | AFD23L |
| Dimensions (H x W x D) | 595 x 595 x 520 mm |
| Weight | 28 kg |
| Power Supply | 220-240 V, 50/60 Hz |
| Energy Rating | A+ |
| Oven Capacity | 65 L |
| Oven Functions | Convection, Grill, Bottom Heat, Defrost, Fan Forced, Pizza Mode |
| Cleaning Type | Catalytic Liners (Easy Clean) |
| Safety Features | Child Lock, Auto Shut-Off, Cool Touch Door, Overheat Protection |
| Display Type | Digital LED Timer |
| Door Type | Triple Glazed, Drop-Down |
| Interior Light | Yes, Halogen |
| Accessories Included | 1 Baking Tray, 1 Wire Shelf, 1 Grill Rack |
| Spare Parts Availability | Heating Elements, Thermostats, Door Gaskets, Control Boards |
| Repairability Index | 8.2 / 10 |
| Certifications | CE, RoHS |
Frequently Asked Questions - AFD23L Stirling
User questions about AFD23L Stirling
0 question about this device. Answer the ones you know or ask your own.
Ask a new question about this device
Download the instructions for your Oven in PDF format for free! Find your manual AFD23L - Stirling and take your electronic device back in hand. On this page are published all the documents necessary for the use of your device. AFD23L by Stirling.
USER MANUAL AFD23L Stirling
natural_image
Abstract black and white spiral pattern enclosed in a circle (no text or symbols)STIRLING®

24 L Air Fryer Oven
Model Number AFD24L
INSTRUCTION MANUAL
Welcome
Congratulations on choosing to buy a STIRLING® product.
All products brought to you by STIRLING ^® are manufactured to the highest standards of performance and safety and, as part of our philosophy of customer service and satisfaction, are backed by our comprehensive 3 Year Warranty.
We hope you will enjoy using your purchase for many years to come.
Contents
02 Welcome
04 Warranty Details
05 General Safety Instructions
09 Product Overview
12 Getting Started
16 Instructions
28 FAQs and Troubleshooting Guide
30 Other Useful Information
35 Repair and Refurbished Goods or Parts Notice


natural_image
Abstract black-and-white spiral pattern enclosed in a circle (no text or symbols)STIRLING®
24 L Air Fryer Oven
Warranty Details
REGISTER YOUR PURCHASE AT www.aldi.com.au/en/about-aldi/product-registration/ TO KEEP UP-TO-DATE WITH IMPORTANT PRODUCT INFORMATION
The product is guaranteed to be free from defects in workmanship and parts for a period of 36 months from the date of purchase. Defects that occur within this warranty period, under normal use and care, will be repaired, replaced or refunded at our discretion. The benefits conferred by this warranty are in addition to all rights and remedies in respect of the product that the consumer has under the Competition and Consumer Act 2010 and similar state and territory laws.
Our goods come with guarantees that cannot be excluded under the Australian Consumer Law. You are entitled to a replacement or refund for a major failure and to compensation for any other reasonably foreseeable loss or damage. You are also entitled to have the goods repaired or replaced if the goods fail to be of acceptable quality and the failure does not amount to a major failure.
3
YEAR WARRANTY
General Safety Instructions
IMPORTANT SAFETY INSTRUCTIONS READ CAREFULLY AND KEEP FOR FUTURE REFERENCE
Read this manual thoroughly before first use, even if you are familiar with this type of product. The safety precautions enclosed herein reduce the risk of fire, electric shock and injury when correctly adhered to. Keep the manual in a safe place for future reference, along with the completed warranty card, purchase receipt and carton. If applicable, pass these instructions on to the next owner of the appliance.
Always follow basic safety precautions and accident prevention measures when using an electrical appliance, including the following:
Electrical safety and cord handling
- Voltage: Make sure your outlet voltage and circuit frequency correspond to the voltage stated on the appliance rating label. If it does not match, contact our after sales support centre and do not use the appliance.
- Electrical circuit: Operate the unit on a separate electrical circuit. If the circuit is overloaded with other appliances, this appliance may not work properly.
- Connection: Insert the plug firmly into the mains wall socket. The socket must be properly earthed and within easy reach so the plug can easily be removed.
- No timer: Do not use with a programmer, timer, wireless plug adapter or outlet that allows control remotely, or connect to a circuit that is regularly switched on and off by your energy provider.
- WARNING: Do not immerse! To protect against electric shock, do not immerse the cord, plug or the appliance itself in water or other liquid. If it falls into water, immediately unplug it from the electrical outlet. Do not touch it or reach into the water. Dry the appliance and have it checked by qualified service personnel.
- Protect from moisture: Do not expose the electrical connections to water. Do not use the appliance, or touch the plug, with wet or damp hands, on a damp floor, or when the appliance itself is wet. Do not use it near an open window as rain may cause electric shock.
- Short power cord: A short power supply cord is provided to reduce the risks resulting from becoming entangled in or tripping over a longer cord. If you must use an extension cord, exercise due care and ensure that its marked electrical rating is at least as great as that of the appliance. Arrange the longer cord so that it will not drape over the benchtop or tabletop, where it can be tripped over unintentionally or pulled on by children.
- Protect the power cord: Do not kink, squash or strain the power cord and protect it from sharp edges and heat. Do not let the cord touch hot surfaces. Do not place anything on top of the cord. Never pull the cord to lift up, carry or unplug the appliance.
General Safety Instructions (Cont.)
- Damaged cord: Check the power cord regularly for visible damage. If it is damaged, do not use the appliance. A damaged cord must be replaced by the manufacturer, its authorised service centres or similarly qualified personnel in order to avoid any hazards.
- WARNING: Do not use when damaged! Do not pick up or operate an appliance with a damaged cord or plug, or after it malfunctions or has been dropped or damaged in any manner. Contact our after sales support centre for advice.
- Disconnect the appliance from the power supply when it is not in use, before cleaning and before putting on or taking off parts. Turn off all controls, then switch off the power at the outlet and remove the plug. Grip the plug when disconnecting, do not pull the cord. Allow the appliance to cool before cleaning it or putting on/taking off parts.
- After use: Unplug the appliance and wait until it has cooled completely before putting on or taking off parts, and before cleaning, maintenance or moving it.
- RCD: Unless your home is already fitted with a residual current device (safety switch), we recommend installing an RCD with a rated residual operating current not exceeding 30 mA to provide additional safety protection when using electrical appliances. See your electrician for professional advice.
- Winding the cord: If winding the power cord, avoid tight bends as this could damage the cord.
Usage conditions and restrictions
- Domestic use only: This appliance is intended for private domestic use only. It is not suitable for commercial, industrial or trade use.
- No outdoor use: Do not use the appliance outdoors or in areas of high humidity.
- Intended use: Do not use the appliance for anything other than its intended use, and only use it as described in this manual.
- Usage restrictions: This appliance is not intended for use by persons (including children) with reduced physical, sensory or mental capabilities, or lack of experience and knowledge, unless they have been given supervision or instruction concerning the use of the appliance by a person responsible for their safety.
- Children: Keep children away from the appliance when it is being used. Supervise children to ensure they do not play with the appliance. Close supervision is necessary when any appliance is used by or near children.
- Work environment: To ensure efficient operation and avoid overturning, always place the appliance on a level and stable, heat and flameproof work surface. Do not use it on an inclined plane or unstable surface. Ensure there is sufficient free space (approximately 15 cm) above and around all sides for air circulation.
General Safety Instructions (Cont.) General Saf
- Protect from heat: Do not place the appliance on or near a hot gas or electric stove/cooktop, oven or heater.
- Appliance garage: Do not operate the air fryer oven in a pantry, appliance garage or under a wall cabinet or shelving. If storing it in an appliance garage, always unplug the unit from the electrical outlet. Not doing so could create a risk of fire, especially if the appliance touches the walls of the garage or the door touches the unit as it closes.
- Accessories: Do not use any accessories that are not supplied with this unit. Doing so may expose you to danger and void your warranty.
- Crumb tray: Do not operate the oven without the crumb tray in place. Do not cover the crumb tray or any part of the oven with metal foil as this will cause overheating of the oven. Empty the crumb tray after each use.
- Oven door: This appliance has a tempered, safety glass door. The glass is stronger than ordinary glass and more resistant to breakage. Tempered glass can break, but the pieces will not have sharp edges. Avoid scratching the door surface or nicking edges. If the door has a scratch or nick, please contact our after sales support centre before using the oven. Do not use the oven if the glass door is damaged as the glass may shatter during use. Do not rest cooking utensils or baking dishes on the glass door.
- Containers: Exercise extreme caution when using containers constructed of materials other than metal or ovenproof glass in the oven.
- Cleaning: Do not place the appliance in water or other liquids. Clean the housing only with a sponge/cloth moistened in warm, soapy water. Do not use a steel wool pad as pieces may break off and touch electrical parts, causing an electric shock hazard. Do not use harsh, abrasive cleaners. See pages 30–31 for detailed cleaning instructions.
- WARNING: Electric shock hazard! Do not attempt to dislodge food when the appliance is plugged into an electrical outlet.
- Storage: Do not store any materials other than the supplied ovenproof accessories in the appliance. Never place paper, cardboard, plastic or similar products in the oven.
- Repair: The appliance has no user-serviceable parts contained inside. Do not attempt to repair, disassemble or modify it.
- Misuse: Improper use or installation may cause injury and/or damage. We accept no responsibility for any eventual damage or injury caused by misuse of the product or noncompliance with the instructions.
General Safety Instructions (Cont.)
WARNING: FIRE HAZARD!
- Do not use near flammable materials such as curtains, drapes, paper, wall coverings, tea towels or clothing.
- Do not cover the appliance, or store anything on top of it, to avoid overheating.
- Do not leave unattended when plugged in. Always unplug the appliance after use and when you are leaving the room.
- Do not place oversize foods, metal foil packages and utensils in the air fryer oven as they may cause a risk of fire or electric shock.

WARNING: HOT SURFACES! RISK OF BURNS!
Take proper precautions to prevent the risk of burns, fires or other injury to persons or damage to property.
- Do not touch hot surfaces! This appliance generates heat during use. The temperature of the oven door and other accessible surfaces may be very high when the appliance is operating, and parts of the appliance can retain heat for some time after turning off. Always use handles, knobs and oven mitts or pot holders when the oven is operating. Allow metal parts to cool before cleaning.
- Do not touch hot food! Always use tongs and oven mitts or pot holders when removing food.
- Do not move the appliance during cooking! Exercise extreme caution when removing hot food, oil or other liquids from the appliance. Always protect your hands with non-slip oven mitts or similar.
- Beware of hot steam! Hot steam is released during air fryer operation. Keep your hands and face at a safe distance from the vent. Hot steam may also escape when you open the door of the appliance. Take proper precautions to protect yourself from burns.
- Prevent damage! Keep the power cord away from hot parts of the oven.
NOTE: Some benchtop and table surfaces are not designed to withstand the prolonged heat generated by certain appliances. Do not set the heated air fryer oven on a finished wood table. We recommend placing a hot pad or trivet under your air fryer oven to prevent possible damage to the surface.
Product Overview
Scope of delivery

Air fryer oven
1 Control panel (see page 11)
2 Air-frying basket
3 Baking/drip tray
4 Oven rack
5 Glass viewing window
6 Oven door
7 Door handle
8 Removable crumb tray
Documentation (not shown)
Instruction manual
Recipe Booklet
Quick start guide
Warranty certificate
NOTE: Due to continued product improvement, images and illustrations in this manual may vary slightly from the product purchased. All images in this manual are for reference purposes only. Parts are not necessarily pictured to scale.
Product Overview (Cont.)
Accessories
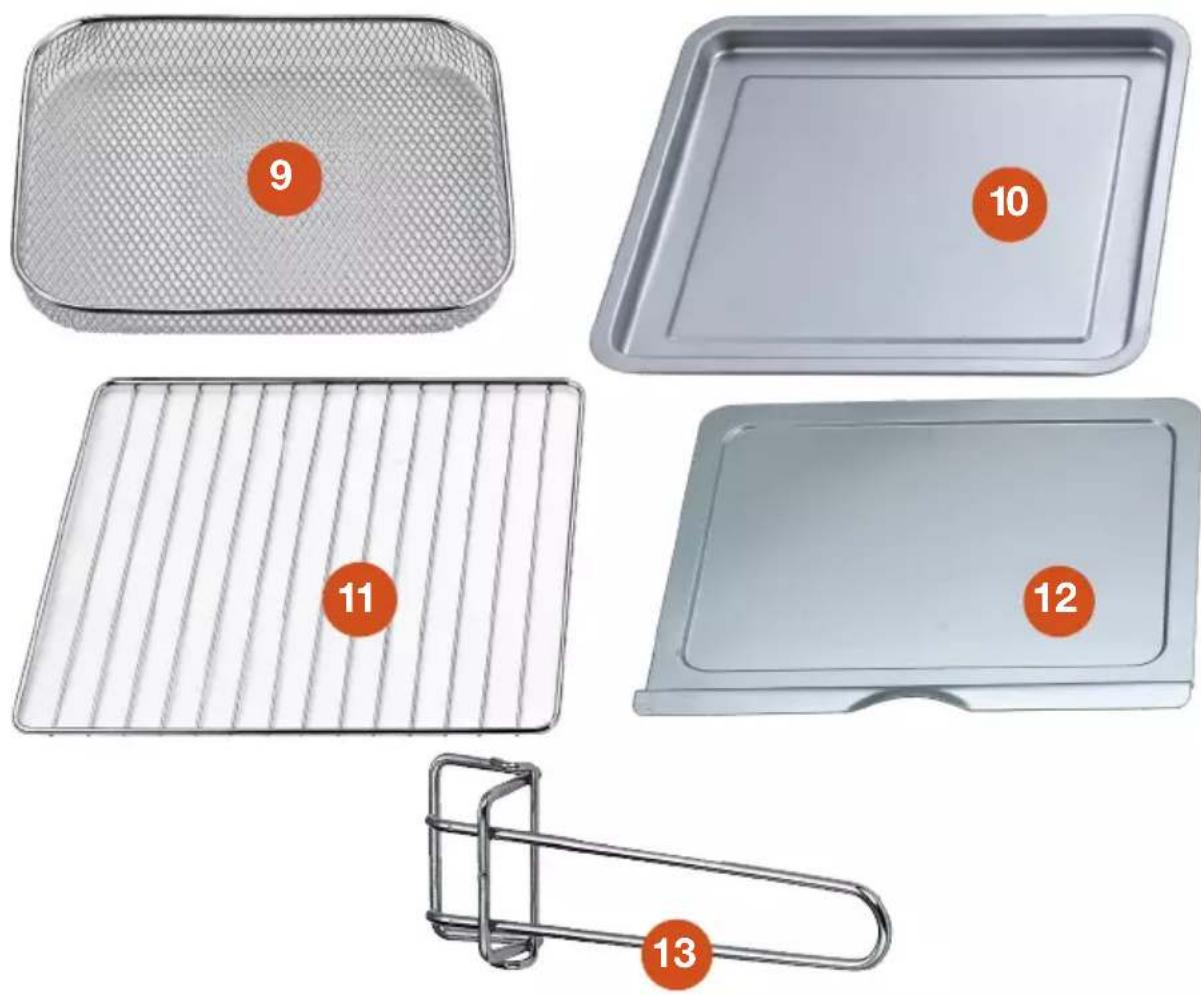
9 Air-frying basket: When air-frying, use this basket to optimise your cooking results. Position the basket in (on top of) the baking/drip tray to catch drips.
10 Baking/drip tray: The baking/drip tray can be used alone when baking or roasting, with the air-frying basket when air-frying, or when grilling or toasting to catch drips or crumbs.
11 Oven rack: The oven wire rack is designed to hold the baking/drip tray (or other baking dish), or use it for toasting or grilling.
12 Crumb tray: Always position the crumb tray on the bottom of the oven cavity. It is removable for easy cleaning. Do not use the oven without the crumb tray in place.
13 Tongs: Use the supplied tongs for handling the hot oven accessories.
NOTE: All accessories are to be washed by hand.
Product Overview (Cont.)
Control panel
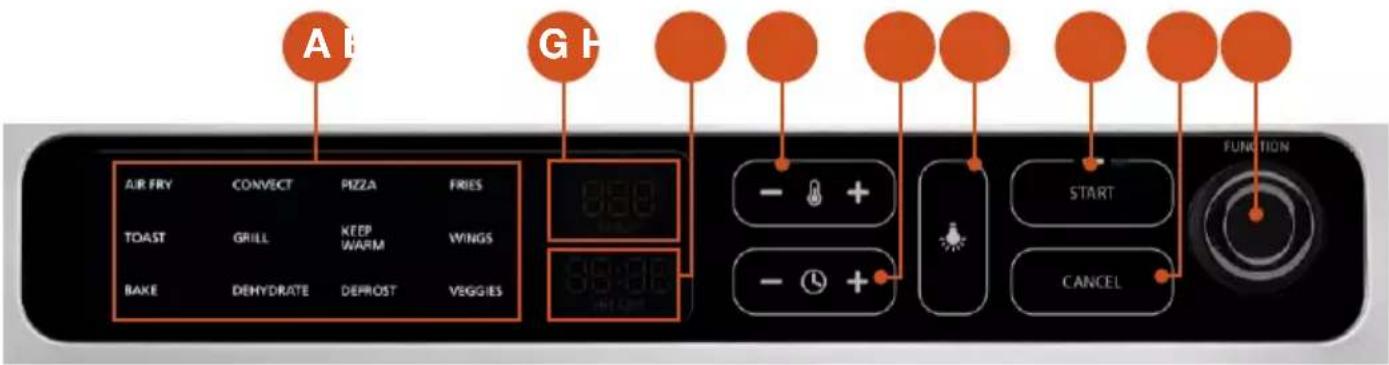
A Program indicators
These indicators light up when the respective program is selected.
B Temperature display
Shows the set temperature in degrees Celsius or Fahrenheit
C Time display
Shows the time remaining in hours and minutes
D Temperature button
Press the [-] or [+] button to adjust the cooking temperature.
E Timer button
Press the [-] or [+] button to adjust the cooking time.
F Interior light
Press this button to turn on the interior light.
G START button
Press this button to start a function once it is selected.
H CANCEL button
Press this button to cancel a setting.
I FUNCTION dial
Rotate this dial to select a function: Air Fry, Convection Bake, Pizza, Fries, Toast, Grill, Keep Warm, Wings, Bake, Dehydrate, Defrost, Veggies. The respective function icon will illuminate on the LED display when selected.
Getting Started
Before first use
Unpacking
CAUTION: The appliance has sharp edges which can cause injury if handled inappropriately. Unpack and use the appliance with due care.
This product has been packaged to protect it against transportation damage. Unpack the appliance and keep the original packaging carton in a safe place. It will help prevent any damage if the product needs to be transported in the future, and you can use it to store the appliance when it is not in use. In the event that the packaging materials are to be disposed of, please recycle them where possible.
Make sure to remove any stickers from the surface of the oven and all documentation from inside the oven.
Safe packaging disposal
Plastic wrapping can be a suffocation hazard for babies and young children, so ensure all packaging materials are out of their reach and disposed of safely. Before you discard any packaging, ensure you have unpacked all the parts listed previously. Contact our after sales support centre if anything is missing.
Check the contents
Unwind the power cord to its full length and inspect all parts of the appliance for visual damage. Do not use it if anything appears to be damaged or not working properly. In case of damage, please contact our after sales support centre.
Documentation
Make sure you have read and understood all instructions and warnings in this manual. Refer to the Product Overview, pages 9–11, to familiarise yourself with the product and identify all parts. Pay particular attention to the safety instructions.
Cleaning
Make sure the power cord is unplugged. Before first use, clean all parts of the appliance that come into contact with food, as described in the "Cleaning and care" section on pages 30–31. Dry thoroughly.
CAUTION: Do not immerse the air fryer oven in water or other liquid.
Your air fryer oven is now ready for connection to your power supply.
Getting Started (Cont.)
First connection
Place the appliance on a flat, level and dry surface which should also be heat-resistant and non-flammable. Make sure:
- the rear oven wall is placed against a wall
- there is a 15 cm clear space at the back and sides of the appliance — you may have to move it away from the wall or from any objects on the benchtop
- there are no objects stored on top of the air fryer oven — its exterior walls get very hot when in use. Keep children away when using the appliance.
Connect the air fryer oven to your power supply and heat the empty appliance at maximum temperature on the Pizza setting for 20 minutes. This will eliminate any odours from within the appliance and also burn off any excess lubricants that may have been used in the manufacturing process.
During this first heating process, the appliance may give off a slight odour or smoke. This is due to the elements and components being new and is no cause for concern. It is not harmful and will disappear quickly. Ensure good ventilation. Then switch off and unplug the appliance and allow it to cool to room temperature.
Opening the oven door

natural_image
Illustration of a hand inserting a tray into a drawer with a striped pattern (no text or symbols)Step 1: Grab the centre of the handle from below with your fingertips.

natural_image
Illustration of a hand using a tool to cut or install a rectangular object, labeled 'Fig. 2' (no text on diagram itself)Step 2: Pull down the oven door carefully.
CAUTION:
This appliance generates heat during use. Do not touch hot surfaces.
Always use the handle according to the instructions on the left.
Removing food
Always open the door fully and remove food carefully with an oven mitt.
Display
When the oven is connected to your power supply, the display will switch off and go into standby mode two minutes after the end of a cooking cycle, or after two minutes of inactivity.
Getting Started (Cont.)
Changing the temperature display
The temperature can be displayed in degrees Celsius or Fahrenheit. You can change the display when the oven is in sleep or idle mode: simultaneously hold the [CANCEL] and [TEMP + ] buttons for 2 seconds to change the display.
Heating elements
The top and bottom heating elements will cycle ON and OFF to maintain the desired temperature. You may not see the heating elements glowing.
Positioning the oven rack
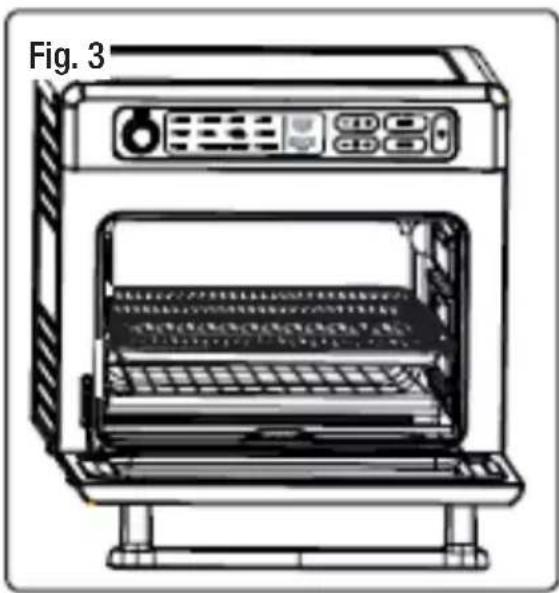
The air fryer oven has three support guides at the sides of the oven cavity to accommodate a number of cooking functions (Fig. 3). The best position for the oven rack or baking tray will depend on the size of the food to be cooked, the cooking function and the desired browning level. For example:
natural_image
Line drawing of a kitchen appliance with a side panel and front view (no text or symbols)- For air-frying, position the air-frying basket in the baking/drip tray.
- For baking or roasting, position the baking/drip tray in the bottom or middle guides, depending on the size of your food.
- For toasting, position the oven rack in the middle guide so your toast won't catch fire.
- Place a baking dish on the oven rack and choose an appropriate support guide when baking or grilling.
- Do not place food directly on the bottom of the oven cavity.
Before removing a rack from the oven, always allow the oven to cool. Grip the rack and pull it out carefully to prevent food slipping down the rack when you pull it out.
Preparing the appliance for use
Place the clean and dry appliance on a flat, level and dry surface which should also be heat-resistant and non-flammable. Ensure there is sufficient free space (15cm) above and around all sides of the air fryer oven for air circulation.
Unwind the power cord. Check and ensure that the crumb tray is in place and that there is nothing in or on top of the oven. Plug power cord into an appropriate wall socket and switch on the power to the outlet.
Getting Started (Cont.)
Function settings
| Table 1: Air fryer oven functions | |||
| Function | Heating element(s) (power) | Default temp. (temp. range) (°C) | Default time (time range) (min) |
| Air Fry All four top elements + high turbo fan (1700 W) | 200 (120–230) 25 (1–60) | ||
| Toast Top + bottom (1400 W) Level 4 (Levels 1–7) | |||
| Bake Top + bottom (1400 W) 175 (120–230) 25 (1–90) | |||
| Convection Top + bottom + low turbo fan (1400 W) | 160 (120–230) 30 (1–90) | ||
| Grill Top (700 W) 230 (120-230) 30 (1–90) | |||
| Dehydrate Top + bottom + low turbo fan (1400 W) | 40 8h (5min–12h) | ||
| Pizza Top + bottom (1400 W) 200 (175–230) 20 (1–90) | |||
| Keep Warm Top + bottom (1400 W) 95 (n/a) | 20 (1–90) | ||
| Defrost | Top + bottom (1400 W) 65 (n/a) | 15 (1–90) | |
| Fries | All four top elements + high turbo fan (1700 W) | 230 (120–230) 15 (1–60) | |
| Wings | All four top elements + high turbo fan (1700 W) | 200 (175–230) 25 (1–60) | |
| Veggies | All four top elements + high turbo fan (1700 W) | 200 (120–230) 20 (1–60) | |
IMPORTANT!
- Never operate the oven without the crumb tray in place.
• Always close the door when using any oven function.
• Always ensure that no food is touching the heating elements. - CAUTION: HOT! Take utmost care when using the oven on any setting. Accessible surfaces of the appliance can get very hot during use. Do not touch hot surfaces! Use handles and knobs. Always use tongs and oven mitts or pot holders when removing food.
Instructions
Air fry
Air-frying helps you cook a variety of foods to crispy perfection but without large amounts of oil — a healthier alternative to deep-frying. A fan circulates hot air around the food at high speed, cooking the food and producing a crispy, browned layer with only a small fraction of the oil used for shallow or deep-frying.
The supplied air-frying basket is designed for use with the Air Fry function. Always place the basket in the baking tray to catch drips.
Operation
- Make sure the crumb tray is in place on the bottom of the oven cavity.
- Arrange food in the air-frying basket and place the basket on the baking tray.
- Insert the baking tray into the middle rack position. Close the oven door.
- Set the function to Air Fry.
- If you want to adjust the default cooking time or default temperature:
- use the temp. [-] or [ + ] button to adjust to the desired temperature
- use the timer [-] or [ + ] button to adjust to the desired time.
- Press the [START] button to begin cooking. The time will start counting down. All four top heating elements will cycle on and off to maintain the desired temperature while the turbo fan on high helps distribute the heat evenly.
- When the working cycle is complete, the unit will stop and emit a few beeps. Open the door completely and carefully take out the basket.
NOTE: Toss food evenly in oil, if desired, before placing it in the air-frying basket.
CAUTION: HOT! Cooked food, the air-frying basket, baking tray and door can all be very hot: handle with care! To check or remove the food, always use an oven mitt or pot holder when touching a hot accessory or hot food. Do not leave the oven unattended.
IMPORTANT!
When air-frying, always place the air-frying basket on the baking tray to catch drips. We strongly recommend that you DO NOT use aluminum foil for covering the accessories. If the basket or rack is covered, the foil prevents any fat from dripping into the baking/drip tray. Grease will therefore accumulate on the foil surface and may catch fire. If you choose to cover the baking/drip tray with foil, be sure to cut the foil neatly so it fits into the pan and does not touch the oven wall or heating elements.
Instructions (Cont.)
| Table 2: Air fry cooking chart | ||||
| Food | Weight (g) | Temper- ature (°C) | Time (min) | Oil? * |
| Potatoes | ||||
| Hand-cut potato chips 450 200 20 | Yes | |||
| Hand-cut sweet potato chips 450 | 200 20 Yes | |||
| Frozen hash browns 600 200 15 No | ||||
| Frozen chips (thick cut) 700 230 20 | -25 No | |||
| Frozen chips (thin cut) 450 230 10 | -15 No | |||
| Meat / poultry / fish | ||||
| Chicken wings 750 200 25 No | ||||
| Steak | 225 230 | 8-10 | No | |
| Pork chops | 225 200 | 20 No | ||
| Hamburger patties | 100 200 | 20-25 No | ||
| Crumbed chicken breast | 450 175 | 10 No | ||
| Crumbed fish | 450 200 | 10 No | ||
| Bacon | 225 200 | 5-7 | No | |
| Snacks | ||||
| Frozen chicken nuggets | 450 200 | 10-15 No | ||
| Frozen mozzarella sticks | 450 | 200 | 8-10 | No |
| Frozen onion rings | 280 200 | 10 No | ||
| Fresh mixed vegetables | 700 200 | 20 Yes | ||
NOTE:
* Air-frying does not require oil, but a light spray or brush with oil can enhance browning and crispness. Use an oil sprayer to keep it extra light, or pour a little oil into a bowl, add food and toss.
- The oven does not need to be preheated for air-frying.
- Cooking times are estimates and may vary based on the type of food and preparation. Smaller quantities of food may require less time. For best results when using the air fryer oven, check the food periodically during cooking.
- It is normal for some steam and/or condensation to escape from the door, especially when cooking frozen foods.
Air-frying tips
- Which food? Many foods that are traditionally fried can be air-fried using only a fraction of the oil required for other frying methods. Air-fried foods will taste lighter and less greasy than deep-fried foods.
- Toss in oil or not? Not all foods will benefit from being tossed in oil prior to being air-fried. Frozen foods and foods with a high fat content such as chicken wings or bacon do not require oil. To achieve crispy and browned results on foods such as hand-cut fries or vegetables, evenly coat food with about one tablespoon of oil.
- Which oil? You can use most oils for air-frying. Olive oil will give you a richer flavour. Vegetable, canola or grapeseed oil has a lighter, milder flavour. For a crispy, golden result, brush a small amount of oil evenly on the food to be air-fried, or use an olive oil or non-stick cooking spray.
- Crumbed or battered? You can use a variety of coatings to add flavour and texture to the food you are air-frying, for example, breadcrumbs (seasoned or plain), panko breadcrumbs, cornflakes, potato chip crumbs, quinoa or various types of flour. Press the dry coating firmly onto the (battered and/or seasoned) food pieces to ensure good adhesion during air-frying.
- Flip or shake it? Most foods do not need to be flipped during cooking, but larger items, like chicken fillets, should be flipped halfway during cooking to ensure quick, even cooking and browning. When air-frying large quantities of food that crowd the basket, toss the food halfway through the cooking cycle to ensure even cooking and browning.
- Which temperature? Use higher temperatures for foods that cook quickly, like bacon and thinly sliced vegetable crisps, and lower temperatures for foods that take longer to cook, like crumbed chicken pieces.
- Which size? Food pieces cook more evenly if they are cut to the same size.
- Condensation? Most foods release water when they are being cooked. If the door of the oven has condensation droplets during cooking, wait until the appliance has stopped operating, then wipe the droplets off the door. When cooking large quantities for an extended period of time, condensation may build up, which could leave some moisture on your benchtop.
Please refer to Table 2, page 17, for time and temperature suggestions for air-frying various types of food.
Instructions (Cont.)
Toast
You can use the air fryer oven for toasting various types of bread and similar products. When toasting, you do not set a time and temperature but a browning level, as different types of bread require different levels of browning. Lighter breads and waffles require a lighter browning level; darker breads, crumpets and English muffins require a darker setting.
Operation
- Make sure the crumb tray is in place on the bottom of the oven cavity.
- Place the food to be toasted on the oven rack. Slide the rack into the middle rack position and close the door.
- Set the function to Toast. Two heating elements at the top and bottom will start working once you have set the timer. They will cycle on and off to maintain the temperature at the set level for toasting.
- Use the temperature or timer [-] or [+] buttons to set the desired browning level from (1-7).
- Press the [START] button to begin cooking. The time will start counting down. To cancel the operation, press the [CANCEL] button.
- When the working cycle is complete, the unit will stop and emit a few beeps. Open the door completely and remove the food immediately, otherwise the heat remaining in the oven will continue to toast and dry out your toast.
CAUTION: HOT! Cooked food, the oven rack and oven door can be very hot, handle with care. To check or remove the food, always use an oven mitt or pot holder when touching a hot accessory or hot food. Do not leave the oven unattended.
Toasting tips
- Make sure that the crumb tray is properly in its place on the bottom of the oven cavity.
- Always position your bread product(s) in the middle of the rack for even toasting. For example, if toasting four items, place two at the front and two at the back. If toasting six items, place three at the front and three at the back. Ensure no food is touching the heating elements.
Instructions (Cont.)
Bake
The Bake program is recommended for baking a variety of foods you would normally bake in a conventional oven (with top and bottom heat), such as cakes, muffins, small roasts, poultry and vegetables.
Operation
- Make sure the crumb tray is in place on the bottom of the oven cavity.
- Arrange the food to be baked/roasted on the baking tray, then slide the tray in the appropriate support guide at the sides of the oven. Alternatively, place your food in a baking dish and place it on the oven rack inserted in the appropriate rack position.
- Set the function to Bake. Two heating elements at the top and bottom will start working once you have set the timer. They will cycle on and off to maintain the temperature at the set level for baking.
- If you want to adjust the default baking time or default temperature:
- use the temp. [-] or [ + ] button to adjust to the desired temperature
- use the timer [-] or [ + ] button to adjust to the desired time.
- Press the [ START ] button to begin baking. The time will start counting down.
- When the working cycle is complete, the unit will stop and emit a few beeps.
Open the door completely and carefully take the baked food out of the oven.
CAUTION: HOT! Cooked food, oven utensils and the oven door can be very hot, handle with care. To check or remove the food, always use an oven mitt or pot holder when touching a hot accessory or hot food. Do not leave the oven unattended.
Baking tips
- Is it cooked? To check whether a cake is fully cooked, insert a clean skewer into the middle of the dough and remove it. If the skewer is clean, the cake is cooked, if dough sticks to the skewer, return the cake to the oven for a little longer.
- Preheating: If you want to preheat the oven when baking, choose the required setting (e.g. bake or convection bake), set the desired baking temperature and then set the timer to approximately 15 minutes for preheating. At the end of the set preheating time, place your baking dish on the oven rack in the appropriate rack position and enter the time for the cooking cycle.
CAUTION: Take great care to avoid burns as the oven interior will be very hot.
Instructions (Cont.)
Convection bake (convect)
The Convection Bake (Convect) program is recommended for baking and roasting a variety of foods that you would normally bake in a fan-forced oven. On the Convect setting, both the top and bottom heating elements are on and a fan gently circulates the hot air in the oven chamber for better and faster cooking results.
Convection baking generally reduces the traditional baking time (by up to 30%), but it varies depending on the type of food. We suggest that you start with a reduced cooking time and then add more time if needed.
Operation
- Make sure the crumb tray is in place on the bottom of the oven cavity.
- Arrange the food to be baked/roasted on the baking tray, then slide the tray in the appropriate support guides at the sides of the oven. Alternatively, place your food in a baking dish and place it on the oven rack inserted in the appropriate rack position.
- Set the function to Convect. Once you have set the timer, two heating elements at the top and bottom will start working together with the fan to distribute the heat. The heating elements will cycle on and off to maintain the temperature at the set level for baking.
- If you want to adjust the default baking time or default temperature:
- use the temp. [- ] or [ + ] button to adjust to the desired temperature
- use the timer [- ] or [ + ] button to adjust to the desired time.
- Press the [START] button to begin baking. The time will start counting down.
- When the working cycle is complete, the unit will stop and emit a few beeps. Open the door completely and carefully take the baked food out of the oven.
CAUTION: HOT! Cooked food, oven utensils and the oven door can be very hot, handle with care. To check or remove the food, always use an oven mitt or pot holder when touching a hot accessory or hot food. Do not leave the oven unattended.
Instructions (Cont.)
Grill
The Grill program is recommended for cooking smaller, thinner pieces of food, such as bacon, steaks, chops, sausages, fish fillets or vegetables. It is also suitable for top-browning casseroles, open-faced sandwiches, gratin dishes or desserts.
Operation
- Make sure the crumb tray is in place on the bottom of the oven cavity.
- Arrange the food to be grilled on the oven wire rack or baking tray. Slide the rack/tray into the top or middle support guides of the oven (and the baking tray underneath, if grilling on the wire rack). Close the door.
- Set the function to Grill. Two heating elements at the top will start working once you have set the timer. They will cycle on and off to maintain the temperature at the set level for grilling.
- If you want to adjust the default time or default temperature:
- use the temp. [-] or [+] button to adjust to the desired temperature
- use the timer [-] or [+] button to adjust to the desired time.
- Turn the food over about halfway through the grilling cycle.
- Press the [START] button to begin grilling. The time will start counting down.
- When the working cycle is complete, the unit will stop and emit a few beeps. Open the door completely and carefully take the food out of the oven.
CAUTION: HOT! Cooked food, oven utensils and the oven door can be very hot, handle with care. To check or remove the food, always use an oven mitt or pot holder when touching a hot accessory or hot food. Do not leave the oven unattended.
Grilling tips
- Never use glass oven dishes for grilling.
- Be sure to keep an eye on your food – items can get dark or burn quickly while grilling.
Instructions (Cont.)
Keep warm
Use this setting for warming up leftovers or keeping cooked food warm. The temperature is fixed and cannot be adjusted.
Operation
- Make sure the crumb tray is in place on the bottom of the oven cavity.
- Place the food you want to keep warm (in an ovenproof container) on the oven wire rack, in the air-frying basket or on the baking tray. Slide the rack/tray into an appropriate rack position and close the door.
- Set the function to Keep Warm.
- If you want to adjust the default warm-keeping time:
- use the timer [-] or [+] button to adjust to the desired warm-keeping time.
- Press the [START] button to begin the warm-keeping cycle. The time will start counting down. Two heating elements at the top and bottom will cycle on and off to maintain the temperature for warm-keeping.
- When the working cycle is complete, the unit will stop and emit a few beeps. Open the door completely and carefully take the food out of the oven.
CAUTION: HOT! Cooked food, oven utensils and the oven door can be very hot, handle with care. To check or remove the food, always use an oven mitt or pot holder when touching a hot accessory or hot food. Do not leave the oven unattended.
Defrost
Use this setting for defrosting frozen foods. The temperature is fixed and cannot be adjusted.
Operation
- Make sure the crumb tray is in place on the bottom of the oven cavity.
- Arrange the food on the oven wire rack, in the air-frying basket or on the baking tray. Slide the rack/tray into an appropriate rack position and close the door.
- Set the function to Defrost.
- If you want to adjust the default defrosting time:
- use the timer [-] or [+] button to adjust to the desired defrosting time.
- Press the [START] button to begin defrosting. The time will start counting down. Two heating elements at the top and bottom will cycle on and off to maintain the temperature for defrosting.
- When the working cycle is complete, the unit will stop and emit a few beeps. Open the door completely and carefully take the food out of the oven.
Instructions (Cont.)
Dehydrate
This function combines low and stable heat to dry out foods without cooking. Dehydrating fruit, vegetables or meat improves the shelf life of the dried produce while maintaining the flavour. The temperature is fixed and cannot be adjusted.
Operation
- Cut the food to be dehydrated into slices or even pieces.
- Make sure the crumb tray is in place on the bottom of the oven cavity.
- Arrange the food slices/pieces in the air-frying basket. Position the basket on top of the baking tray and slide it in the middle support guide of the oven. Close the door.
- Set the function to Dehydrate.
- If you want to adjust the default time or default temperature:
- use the temp. [- ] or [ + ] button to adjust to the desired temperature
- use the timer [- ] or [ + ] button to adjust to the desired time for dehydrating the food (up to a maximum of 12 hours).
- Press the [START] button to begin. The time will start counting down. Two heating elements at the top and bottom will start working together with the fan to distribute the heat. The heating elements will cycle on and off to maintain the temperature at the set level for dehydrating.
- When the working cycle is complete, the unit will stop and emit a few beeps. Open the door completely and carefully take the food out of the oven.
CAUTION: HOT! Cooked food, oven utensils and the oven door can be very hot, handle with care. To check or remove the food, always use an oven mitt or pot holder when touching a hot accessory or hot food. Do not leave the oven unattended.
Instructions (Cont.)
Fries
This function is specially designed for air-frying chips (fries).
Operation
- Make sure the crumb tray is in place on the bottom of the oven cavity.
- Arrange the frozen chips in a single layer in the air-frying basket. Position the basket on top of the baking tray and slide it in the middle support guide of the oven. Close the door.
- Set the function to Fries.
- If you want to adjust the default time or default temperature:
- use the temp. [-] or [+] button to adjust to the desired temperature
- use the timer [-] or [+] button to adjust to the desired time.
- Press the [START] button to begin cooking. The time will start counting down. All four top heating elements will cycle on and off to maintain the desired temperature while the turbo fan on high helps distribute the heat evenly.
- When the working cycle is complete, the unit will stop and emit a few beeps. Open the door completely and carefully take the food out of the oven.
Pizza
This program is recommended for cooking pizza. It will melt and brown cheese and toppings while crisping up the pizza crust.
Operation
- Make sure the crumb tray is in place on the bottom of the oven cavity.
- Place the pizza on the oven rack, then slide the rack into the middle support guide of the oven. Close the door.
- Set the function to Pizza.
- If you want to adjust the default time or default temperature:
- use the temp. [-] or [+] button to adjust to the desired temperature
- use the timer [-] or [+] button to adjust to the desired time.
- Press the [START] button to begin cooking. The time will start counting down. Two top and bottom heating elements will cycle on and off to maintain the desired temperature.
- When the working cycle is complete, the unit will stop and emit a few beeps. Open the door completely and carefully take the pizza out of the oven.
CAUTION: HOT! Cooked food, oven utensils and the oven door can be very hot, handle with care. To check or remove the food, always use an oven mitt or pot holder when touching a hot accessory or hot food. Do not leave the oven unattended.
Instructions (Cont.)
Wings
This function is specially designed for air-frying chicken wings.
Operation
- Prepare chicken wings with your favourite marinade or spice rub.
- Make sure the crumb tray is in place on the bottom of the oven cavity.
- Arrange the prepared wings in a single layer in the air-frying basket. Position the basket on top of the baking tray and slide it in the middle support guide of the oven. Close the door.
- Set the function to Wings.
- If you want to adjust the default time or default temperature:
- use the temp. [-] or [+] button to adjust to the desired temperature
- use the timer [-] or [+] button to adjust to the desired time.
- Press the [START] button to begin cooking. The time will start counting down. All four top heating elements will cycle on and off to maintain the desired temperature while the turbo fan on high helps distribute the heat evenly.
- When the working cycle is complete, the unit will stop and emit a few beeps. Open the door completely and carefully take out the basket.
CAUTION: HOT! Cooked food, oven utensils and the oven door can be very hot, handle with care. To check or remove the food, always use an oven mitt or pot holder when touching a hot accessory or hot food. Do not leave the oven unattended.
Instructions (Cont.)
Veggies
This function is specially designed for air-frying vegetables, for example, Tempura-style.
Operation
- Prepare vegetables for air-frying.
- Make sure the crumb tray is in place on the bottom of the oven cavity.
- Arrange the vegetables in a single layer in the air-frying basket. Position the basket on top of the baking tray and slide it in the middle support guide of the oven. Close the door.
- Set the function to Veggies.
- If you want to adjust the default time or default temperature:
- use the temp. [-] or [+] button to adjust to the desired temperature
- use the timer [-] or [+] button to adjust to the desired time.
- Press the [START] button to begin cooking. The time will start counting down. All four top heating elements will cycle on and off to maintain the desired temperature while the turbo fan on high helps distribute the heat evenly.
- When the working cycle is complete, the unit will stop and emit a few beeps. Open the door completely and carefully take out the basket.
CAUTION: HOT! Cooked food, oven utensils and the oven door can be very hot, handle with care. To check or remove the food, always use an oven mitt or pot holder when touching a hot accessory or hot food. Do not leave the oven unattended.
FAQs and Troubleshooting Guide
If your air fryer oven fails to operate, or you experience any other problems with the appliance, check in Table 3 below for solutions to common problems. If none of the solutions offered helps you solve the problem, please contact our after sales support centre for advice or to arrange a service.
| Table 3: Troubleshooting guide | |
| Problem Potential cause and solution | |
| The air fryer oven is not turning on. | ·Check and ensure that you have selected a function and set a time and temperature.·Check and ensure that the power cord is plugged in, the power is turned on and that the outlet is working (check the appliance at a different outlet). |
| Smoke is coming from the appliance when I switch it on. | ·If you are using the appliance for the first time, this is normal and no cause for concern; it should subside soon. Ensure good ventilation.·If you have used the air fryer oven before, unplug the appliance and let it cool. Check and ensure that the interior surfaces and all accessories inside the oven are clean and free of food residues.·If you cleaned the appliance properly and it continues to emit smoke, stop using the appliance and contact our after sales support centre.·If you are air-frying greasy food, oil will drip into the tray where it may produce white smoke. This will not affect the appliance or the end result. |
| Only one heating element is heating up. | ·Which heating element(s) heat up depends on the function setting. Please refer to the instructions for each function to ascertain which element(s) should be on. If fewer elements are on than are indicated, please contact our after sales support centre for advice. |
| The heating elements do not stay on. | ·The heating elements cycle on and off to maintain the set (predetermined) cooking temperature. |
FAQs and Troubleshooting Guide (Cont.)
| Table 3: Troubleshooting guide | |
| Problem Potential cause and solution | |
| There are noises during operation. | Check and ensure that the accessories (rack, basket or tray) are securely inserted in the support guides at the sides of the oven. If the air fryer function is in use, make sure the air-frying basket has all feet on the baking tray.Check and ensure that you have no unused accessories on top of the air fryer oven.The unit has not yet passed its break-in period (of approximately three cooking cycles). Noises are typical during this time. They do not impact cooking performance and should stop after approximately three cooking cycles. If the noises persist, please contact our after sales support centre. But please note that the unit will always produce noise when in operation, especially in convection and air-frying mode. |
| Food is undercooked. | You may have overfilled the basket. Put smaller batches of food in the basket, which are fried more evenly.Check and ensure that the temperature is set correctly. |
| Food is overcooked. | You may have to adjust (lower) the set cooking time and/or temperature. As the air fryer oven is smaller than your standard oven, it generally heats up faster than a traditional oven and cooks in shorter periods of time. |
| Food is fried unevenly. | Try tossing/shaking the basket with food halfway through the cooking time, but be careful not to burn yourself. The metal parts are very hot during use. |
| Home-made chips are fried unevenly. | You may not have used the right potato type. Use fresh potatoes that will remain firm during frying. Also ensure to rinse and dry the cut potato sticks properly before cooking. |
| The batter is coming off when air-frying. | Make sure your batter is not too wet. Add a dry layer and pat it firmly onto the (battered) food pieces to ensure it will remain on the food during air-frying. |
Other Useful Information
Cleaning and care
WARNING!
- Before cleaning or storing the appliance, always unplug the oven from the electrical outlet and allow it to cool completely.
- Never immerse the appliance, cord or plug in water or any other liquid.
- Never use solvents, cleaning powders, wire brushes, steel wool pads or any other harsh abrasive cleaners, as such materials will damage the finish.
Exterior surfaces
Wipe the appliance housing clean with a damp cloth and a mild detergent. Apply the cleansing agent to the cloth, not directly onto the oven. Dry thoroughly.
Interior surfaces
To keep your air fryer oven in good working order, make sure to remove all food residues and grease splatters from interior surfaces on a regular basis. Regular cleaning will also reduce the fire hazard risk.
- Unplug the air fryer oven from the power supply. Allow the appliance to cool.
- Remove all accessories (crumb tray, oven rack, baking/drip tray, air-frying basket) from the oven cavity.
Interior walls and oven door
- Use a damp cloth and mild detergent solution on a sponge to clean the interior walls and door of the air fryer oven. Repeat with a dry, clean cloth.
- Never use harsh abrasives, corrosive products or as these could damage the oven surface. Never use steel wool pads or other abrasive cleaning products. Abrasive cleaners, scrubbing brushes and chemical cleaners will damage the coating on this unit. Pieces can break off the and touch electrical parts involving a risk of electrical shock.
- If scrubbing is necessary, use a nonabrasive nylon or polyester mesh pad.
Crumb tray
- To remove crumbs and drippings from the bottom of the oven, slide out the crumb tray and discard any crumbs. Wipe the tray clean and replace in the oven.
- To remove baked-on grease, soak the tray in hot, sudsy water or use nonabrasive cleaners. Never operate the oven without the crumb tray in place!
Other Useful Information (Cont.)
Accessories
- The accessories (oven rack, baking/drip tray, air-frying basket, tongs) should be hand-washed in hot, sudsy water.
- If scrubbing is necessary, use a nylon scouring pad or nylon brush. Rinse and dry the accessories thoroughly after washing.
Storage
- When the appliance is not in use, disconnect it from the power supply.
- Storing the appliance and accessories safely in the original packaging will protect it from dust.
- Store the appliance in a dry location, out of reach of children.
- Do not store any materials other than the supplied ovenproof accessories in the appliance. Never place paper, cardboard, plastic or similar products in the oven.
- Do not place any heavy items on top of appliance during storage as this may result in damage of appliance.
Service, repair and spare parts
- This appliance requires little maintenance. It contains no user serviceable parts. Servicing is necessary if the air fryer oven has been damaged, or if it has been exposed to rain or moisture, or if it does not work correctly, or has been dropped. In such a case, please contact our after sales support centre to arrange for examination or repair of the product. Never attempt to open the housing or repair the appliance yourself.
- To purchase a part, please contact our after sales support centre on 1300 112 534 or via tempo.org/support. Our after sales support centre stocks the following spare parts for the appliance:
Air-frying basket Baking/drip tray Crumb tray Oven wire rack Tongs
Other Useful Information (Cont.)
Technical specifications
| Power 1700 W | |
| Voltage 220–240 V~ | |
| Frequency 50–60 Hz | |
| Capacity 24 L | |
| Temperature setting range * 120–230°C (Dehydrate: 40°C) | |
| Time setting range * 1–90 minutes (Dehydrate: 5 minutes to 12 hours) | |
| Dimensions (approx.) 400 (W) x 410 (D) x 370 (H) mm | |
| Weight (approx.) 9.37 kg | |
* The individual time and temperature setting ranges vary depending on the program.
Compliance
This appliance has been fully tested and meets all requirements as set out by standards AS/NZS 60335.1 and AS/NZS 60335.2.9 for electrical safety.

The RCM Mark (Regulatory Compliance Mark) indicates that the product complies with the relevant guidelines of the ACMA as well as corresponding government requirements for the safety of electrical devices.
Responsible disposal


Packaging materials are recyclable. Please dispose of them responsibly for recycling.
At the end of its working life, do not throw this appliance out with your household waste. Electrical and electronic products contain substances that can have a detrimental effect on the environment and human health if disposed of inappropriately. Observe any local regulations regarding the disposal of electrical consumer goods and dispose of it appropriately for recycling.
Contact your local authorities for advice on recycling facilities in your area. Or find recycling scheme services listed on Planet Ark's website at www.recyclingnearyou.com.au, or call Planet Ark on 1300 733 712.
This page has been left blank intentionally.
This page has been left blank intentionally.


natural_image
Abstract black-and-white spiral pattern enclosed in a circle (no text or symbols)STIRLING®
24 L Air Fryer Oven
Repair and Refurbished Goods or Parts Notice
Unfortunately, from time to time, faulty products are manufactured which need to be returned to the supplier for repair.
Please be aware that if your product is capable of retaining user-generated data (such as files stored on a computer hard drive, telephone numbers stored on a mobile telephone, songs stored on a portable media player, games saved on a games console or files stored on a USB memory stick) during the process of repair, some or all of your stored data may be lost. We recommend you save this data elsewhere prior to sending the product for repair.
You should also be aware that rather than repairing goods, we may replace them with refurbished goods of the same type or use refurbished parts in the repair process.
Please be assured though, refurbished parts or replacements are only used where they meet ALDI's stringent quality specifications.
If at any time you feel your repair is being handled unsatisfactorily, you may escalate your complaint. Please telephone us on 1300 112 534 or write to us at:
Tempo (Aust) Pty Ltd (ABN 70 106 100 252)
PO BOX 132, Frenchs Forest NSW 1640, Australia
Web Support: tempo.org/support
Tempo Help Desk: 1300 112 534 (Aust)
(Operating Hours: Mon–Sat 09:00 am to 06:00 pm AEST)
3
YEAR WARRANTY

natural_image
Icon showing a person reading a document with an exclamation mark, symbolizing information review or warning (no text present)Please read the manual
It will help you get the best out of your product.
Still have questions?
Call after sales support
1300 112 534
Or visit www.tempo.org
Warranty returns
Should you for any reason need to return this product for a warranty claim, make sure to include all accessories with the product.
Product does not work?
If you encounter problems with this product, or if it fails to perform to your expectations, make sure to contact our After Sales Support Centre on 1300 112 534 for advice.
For an electronic copy of this manual, please contact our after sales support centre.
Instruction Manual Revision Index
Version No Issue Date Description
V1.0 29 December 2020 Original (2021) release
V2.0 20 October 2021 2022 release
V2.1 18 November 2021 Minor update, page 6

- STIRLING®
- Welcome
- Contents
- L Air Fryer Oven
- Warranty Details
- General Safety Instructions
- IMPORTANT SAFETY INSTRUCTIONS READ CAREFULLY AND KEEP FOR FUTURE REFERENCE
- Always follow basic safety precautions and accident prevention measures when using an electrical appliance, including the following:
- Electrical safety and cord handling
- General Safety Instructions (Cont.)
- Usage conditions and restrictions
- General Safety Instructions (Cont.) General Saf
- WARNING: FIRE HAZARD!
- WARNING: HOT SURFACES! RISK OF BURNS!
- Product Overview
- Air fryer oven
- Documentation (not shown)
- Product Overview (Cont.)
- Accessories
- Control panel
- Getting Started
- Before first use
- Unpacking
- Safe packaging disposal
- Check the contents
- Documentation
- Cleaning
- Getting Started (Cont.)
- First connection
- Opening the oven door
- CAUTION:
- Removing food
- Display
- Changing the temperature display
- Heating elements
- Positioning the oven rack
- Preparing the appliance for use
- IMPORTANT!
- Instructions
- Air fry
- Operation
- Instructions (Cont.)
- NOTE:
- Air-frying tips
- Toast
- Toasting tips
- Bake
- Baking tips
- Convection bake (convect)
- Grill
- Grilling tips
- Keep warm
- Defrost
- Dehydrate
- Fries
- Pizza
- Wings
- Veggies
- FAQs and Troubleshooting Guide
- FAQs and Troubleshooting Guide (Cont.)
- Other Useful Information
- Cleaning and care
- WARNING!
- Exterior surfaces
- Interior surfaces
- Interior walls and oven door
- Crumb tray
- Other Useful Information (Cont.)
- Storage
- Service, repair and spare parts
- Compliance
- Responsible disposal
- Repair and Refurbished Goods or Parts Notice
- Please read the manual
- Still have questions?
- Warranty returns
- Product does not work?
- Instruction Manual Revision Index
Brand : Stirling
Model : AFD23L
Category : Oven