
SATMAR32 - Satellite antenna MAJESTIC - Free user manual and instructions
Find the device manual for free SATMAR32 MAJESTIC in PDF.


| Brand | Majestic |
| Model | SATMAR32 |
| Product Type | Satellite Antenna |
| Diameter | 32 cm |
| Polarization | Linear (H/V) or Circular |
| Frequency Range | Ku-band (10.7 – 12.75 GHz) |
| Gain | Approx. 35 dBi |
| Noise Temperature | 20 K typical |
| Weight | 2.5 kg |
| Dimensions | 320 mm diameter x 350 mm depth |
| Power Supply | 5V DC via coaxial cable from receiver |
| Mounting Type | Wall mount or tripod (optional) |
| Storage Temperature | -40°C to +70°C |
| Operating Temperature | -30°C to +50°C |
| Waterproof Rating | IP65 |
| Main Functions | Receive satellite TV signals for FTA and encrypted channels |
| Maintenance | Clean with soft dry cloth; avoid abrasive chemicals |
| Safety Precautions | Disconnect during storms; avoid pointing near sun; secure mounting |
| Spare Parts | LNB, mounting bracket, coaxial cable available through authorized dealers |
| Repairability | Replaceable LNB; antenna body non-repairable |
| Warranty | 2 years (subject to terms) |
Frequently Asked Questions - SATMAR32 MAJESTIC
User questions about SATMAR32 MAJESTIC
0 question about this device. Answer the ones you know or ask your own.
Ask a new question about this device
Download the instructions for your Satellite antenna in PDF format for free! Find your manual SATMAR32 - MAJESTIC and take your electronic device back in hand. On this page are published all the documents necessary for the use of your device. SATMAR32 by MAJESTIC.
USER MANUAL SATMAR32 MAJESTIC
Marine Satellite Antenna for TV
SATMAR32D HD Digital


natural_image
Exterior view of a satellite dish antenna mounted on a white base against a blue background (no text or symbols visible)Installation & User Manual
This manual contains important product information on the use and maintenance of your SATMAR32D marine satellite system. Please refer this manual for installation, operation, maintenance and contact information. Prior to contacting the manufacturer or dealer, have this manual and serial number available for reference.
ELECTRICAL HAZARD WARNING
THE COAXIAL CABLE THAT CONNECTS THE OUTDOOR ANTENNA CARRIES ELECTRICAL CURRENT. EXERCISE EXTREME CAUTION WHEN HANDLING THIS CABLE. DO NOT CUT, BREAK OR SPLICE THIS LINE. DO NOT INSEERT OR CONNECT ANY DEVICES SUCH AS SPLITTERS OR ANY OTHER DEVICE FOR ANY REASON. THIS LINE IS NOT COMPATIBLE WITH ANY OTHER EQUIPMENT. DAMAGE WILL OCCUR TO ANY DEVICE OTHER THAN THE SATMAR32D OUTDOOR ANTENNA IF CONNECTED TO THE ANTENNA PORT.
Table of Contents
1 Introduction
1.1 SATMAR32D System Overview
1.2 System Compatibility
1.3 Direct Broadcast Satellite Overview
1.4 Line of Sight (LOS) Interruption
1.5 System Components
2 Installation
2.1 Unpacking the SATMAR32D
2.2 Antenna Installation
3 Operation
3.1 Operating the SATMAR32D
3.2 The Satellite Acquisition with the SATMAR32D
system
4 Troubleshooting
4.1 Causes and Remedies for Operational Issues
5 Maintenance
1 Introduction
The SATMAR32D satellite system is the innovative and a technologically advanced satellite antenna system for marine applications. The SATMAR32D has a unique combination of state-of-the-art components with the most sophisticated satellite acquisition and tracking programs to provide the following features:
■ Fast satellite acquisition
■ Compatible with any Satellite Receiver
■ Compatible with all Direct Broadcast Satellites (DBS)
■ Built-in Digital Broadcast Receiver (DVB)
■ HD Receiver Capable of High Definition receiving
1.1 SATMAR32D System Overview
A complete satellite TV system, illustrated in Figure 1-1, includes the SATMAR32D antenna connected to a control box (IDU), a satellite TV receiver, and a television set.
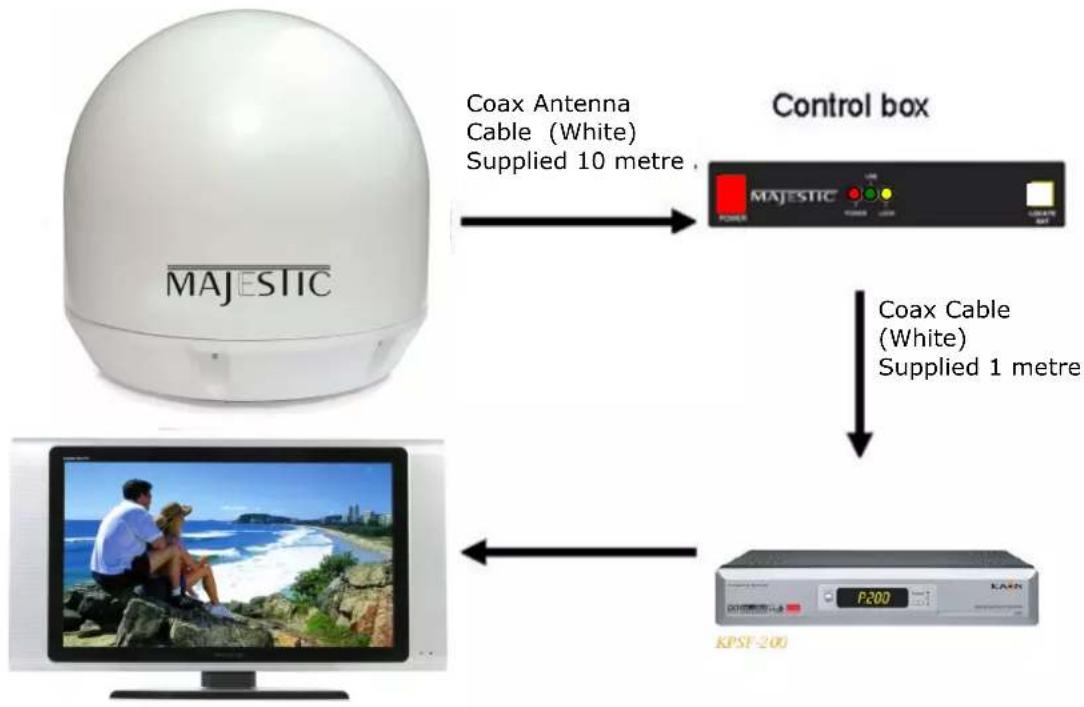
flowchart
graph TD
    A["MAJESTIC"] -->|Coax Antenna Cable (White) Supplied 10 metre| B["Control box"]
    B -->|Coax Cable (White) Supplied 1 metre| C["RSST-200"]
    C --> D["TV monitor with people on beach"]
Figure 1-1
1.2 System Compatibility
The SATMAR32D satellite antenna is fully compatible with Digital Video Broadcasting (DVB) satellites, as well as OPTUS D1 satellite.
At present, there is one Direct Broadcast Satellite position over New Zealand.
1.3 Direct Broadcast Satellite Overview
Direct Broadcast Service (DBS) satellites broadcast audio, video and data information from satellites located 22,000 miles in space. A receiving station, such as the SATMAR32D, should include a dish and satellite receiver to receive the signals and process them for use by the consumer audio and video equipment. The system requires a clear view of the satellite in the sky to maximize the signal reception.

natural_image
Illustration of a cruise ship with radar dish and satellite communication system in coastal setting (no text or symbols)Figure 1-2
SATMAR45
1.4 Line of Sight (LOS) Interruption
The SATMAR32D needs a clear line of sight (LOS), view to the satellite for uninterrupted reception. Objects such as tall buildings, bridges, tunnels and trees that block this view will cause a loss of signal. The signal will be quickly restored once the antenna has a clear line of sight again.
Heavy rain, cloud, snow or ice may also interfere with the signal reception quality. If the satellite signal is lost due to blockage or severe weather condition, services from the receiver will be lost (picture will freeze frame and may disappear). When the satellite signal strength is again high enough, then the receiver will resume providing desired programming services.
1.5 System Components
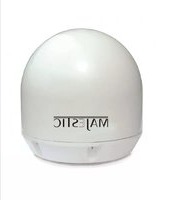
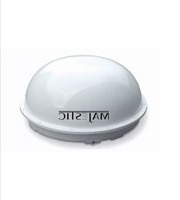
The standard SATMAR32D antenna system consists of the Outdoor Unit (ODU, dome antenna), the Indoor Unit (IDU), which includes the Power Supply.
SATMAR32D Outdoor Unit (ODU):
The Outdoor Unit houses the electronics, dish, LNB within a radome.

Figure 1-3
SATMAR32D Indoor Unit (IDU):
The IDU supplies power and commands to the SATMAR32D. This device allows for selection of the satellite from which you wish to receive a signal.
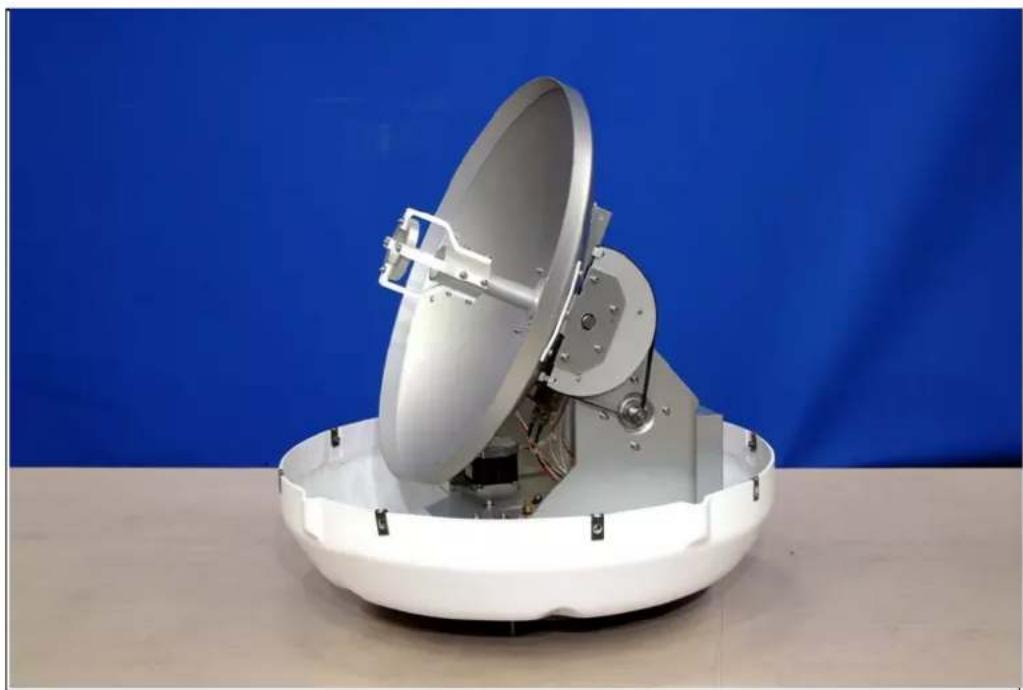
natural_image
Exterior view of a white satellite dish antenna module with metallic components, set against a blue backdrop (no text or symbols visible)Figure 1-4
SATMAR32D Indoor Unit (IDU):
The IDU supplies power and commands to the SATMAR32D. This device allows for selection of the satellite from which you wish to receive a signal.

Figure 1-5
2 Installation
This section offers a general explanation of how properly to install the SATMAR32D antenna. Installation of the SATMAR32D must be accomplished by or under the supervision of an authorized dealer for the Limited Warranty to be valid and in force. The steps in the installation and setup process are as follows:
- Preparing for the installation
- Select location
■ Mount the antenna (ODU) on top of the vessel
- Equipment and cable installation
■ Install the Indoor Unit (IDU), Power Supply near the Satellite Receiver (Decoder) and TV
■ Connect the cables
2.1 Unpacking the SATMAR32D
The following items are included in the packaging of the SATMAR45:
| Item Description Quantity | ||
| 1 Outdoor Antenna Assembly (ODU) 1 each | ||
| 2 Indoor Unit (IDU)- Control box 1 each | ||
| 3 Power Cable 1 each | ||
| 4 Coax Cable (10m) 1 each | ||
| 5 Coax Cable (1m) 1 each | ||
| 6 | Installation & User Manual | 1 set |
Be sure to verify the complete shipment of your system before beginning the installation.
2.1.1 Preparing the SATMAR45 Antenna for Installation
- Upon opening the shipping container remove the items listed in the table on the previous page.
2.1.2 Installation Tools and Materials
The SATMAR45 system is designed for simple installation and setup. However, the following list of equipment or items should be available during installation of the SATMAR45:
■ Electric drill and drill bits (Define the size?) eg. 5mm & 2mm
■ Philips and flat tip screwdrivers (Define the size?) eg.#2 & #0
- Socket wrench
■ Silicon sealant
■ Fastener suitable for specific application
2.2 Antenna Installation
2.2.1 Select Location
Perform a through site inspection for the antenna to be mounted. There are several factors to consider when choosing the location for the SATMAR32D antenna.
- The antenna must have a clear view of the sky and horizon at all the direction to avoid blockage of the satellite signal.
- Keep the antenna clear of any obstructions above decks. The antenna requires a 10 to 80 degree look angle to receive satellite signals.
- To minimize tracking errors, place the antenna unit as close as possible to the intersection of the vessel's fore-and aft centerline and midships
- Using two people, place the antenna onto the vessel platform. Do not try to
install the antenna by yourself.
■ The mounting surface should be flat and strong enough to support the complete assembly.
■ Make sure that the mounting surface is rigid.
2.2.2 Equipment and cable installation
This offers a general explanation of how to install the Indoor Unit and satellite receiver properly to the inside of vessel connecting with coax cable.
- The RF cable is routed from the antenna to the IDU inside the vessel.
- Once decide where to place the IDU and satellite receiver, and make sure that both units are placed in a dry and protected area.
- The IDU and satellite receiver should be placed away from any heat source and in an area with proper ventilation.
-
Ensure that there are at least 3cm of space around both units for ventilation and connection of cables. Do not stack the units on top of each other.
-
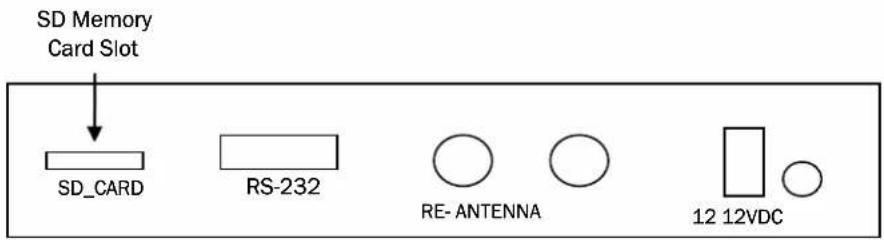
The following describes the basic wiring configurations for the SATMAR32D antenna system.
■ Connect the RF cable to the SATMAR32D port (antenna) on the back of the IDU
■ Connect one end of the supplied coax cable to the receiver port on the back of the IDU
■ Connect the other end of the coax cable to the satellite receiver in the LNB INPUT
Figure 2-1
2.2.3 Initial power-up and system checkout
Once all of the system cables have been connected, and when the Power Supply is connected to the IDU then the antenna will have power applied and it should be ready to checkout the system.
Explanation of words in LCD
- INIT : It shows condition of initializing the antenna.
- INIT-SCH : It shows condition of initial search mode.
- SAT-MOVE: It shows condition of moving to another satellite.
- S:xxx : It shows intensity of signal.
- ID:xxx : It shows ID of acquired satellite.
● GYRO-CAL : It shows condition of calibrating the Gyro Sensor.
Upon Turn on:
The Antenna is being Initialised
Gyro Sensor is being Calibrated
The antenna is searching the selected satellite. At first time, it can have longer time to find satellite. Once it can find satellite, next time it will have shorter time because it remember the elevation angle of satellite.
It shows ID and intensity of signal. The antenna is tracking the satellite.
Power can be turned off by pressing the POWER button as shown in
Figure 2-2

flowchart
graph TD
    A["ON OFF POWER"] --> B["MAJESTIC"]
    B --> C["SATELLITE"]
    C --> D["SLEEP"]
    B --> E["Zoom in"]
    E --> F["Figure 2-2"]
    F --> G["It shows user selected"]
    F --> H["It shows satellite ID"]
    F --> I["It shows current opera-"]
    F --> J["It shows intensity of signal"]
3 Operation
3.1 Operating the SATMAR32D
The SATMAR32D system is easy to use. Under normal conditions, operation of the SATMAR32D requires no intervention from the user. Antenna unit initialization and satellite acquisition is completely automatic.
3.2 The Satellite Acquisition with the SATMAR32D system
3.2.1 Power on
■ Turn on the power to the TV and satellite receiver
■ Turn on the receiver using the POWER switch
Under normal conditions, the SATMAR32D will acquire the correct satellite and produce television programming in less than 1 minute.
To minimize the time it takes the antenna system acquiring the satellite, do not change the channel during the startup process.
3.2.2 Changing Channels
If you have followed the installation instructions, your system should be set to the satellite of your choice and the system should have downloaded the appropriate channel guides. When the SATMAR32D system and satellite receiver is properly configured, it is easy to change the channel using the remote control that normally comes with the receiver unit.
4 Troubleshooting
4.1 Causes and Remedies for Operational Issues
There are a number of common issues that can affect the signal quality and/or the operation of the SATMAR32D antenna system. The following sections address these issues and potential solutions.
4.1.1 System Not Power-On
■ Verify that the Indoor Unit (IDU) and receiver are powered on
■ Check the blown fuses
■ Verify vessel battery has been connected properly
4.1.2 Improper Wiring
■ Check the system is properly wired
■ Verify that the IDU, ODU, and receiver units are properly connected
■ Check the antenna unit cable connections with proper RF connectors
4.1.3 Incorrect Satellite or LNB Configuration
■ Check the satellite trying to acquire
■ Select receiver menu, set the correct LNB frequency setting
■ Check the LNB skew angle
4.1.4 Search Failure
■ Move the vessel to clear location from obstruction
■ Check the satellite coverage area
Satellite signals can be blocked by trees and buildings, overpasses, underpasses or obstructive equipments on the vessel.
SATMAR45
4.1.5 Snow, Rain or Dew pooling on Dome
■ Check the satellite trying to acquire
■ Select receiver menu, set the correct LNB frequency setting
■ Check the LNB skew angle
4.1.6 Satellite Receiver
■ Check the satellite trying to acquire
■ Select receiver menu, set the correct LNB frequency setting
■ Check the LNB skew angle
5 Maintenance
The SATMAR32D Satellite System has been designed to be maintenance and trouble free. For optimum signal strength, keep the dome clean from dirt, bugs, and other debris. Periodic washing and cleaning of the dome with mild soap and water is recommended.
If you have any comments or questions, please contact the Majestic Service Department.
Firmware UpgraFIRMWARE UPGRADE
Firmware Upgrade
If antenna cannot search the selected satellite or move incorrectly, you need to change
- Prepare the SD memory card.
- Before you use the SD memory card, you should format it to "FAT16 (Default)"

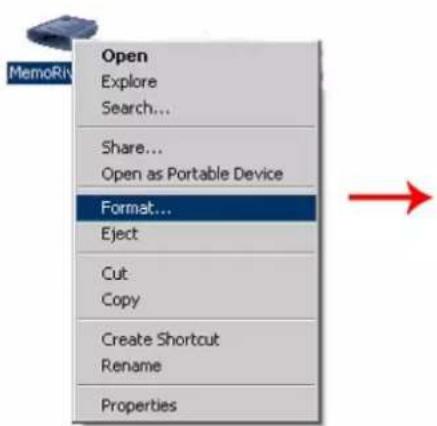
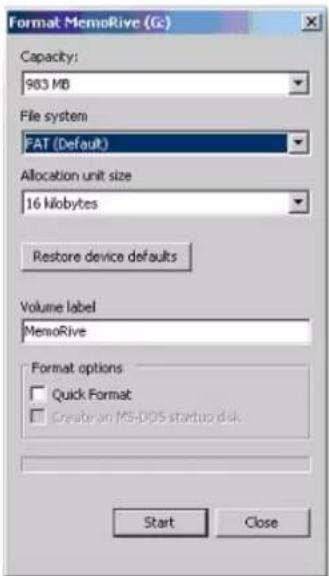
- After formatting your SD card, copy the new software file from the www.majestic-global.com website.
- Turn off the IDU.
- Put your SD memory card into the SD slot of back side of the IDU.

Figure C-3 The back of the IDU
- Turn on the IDU. You can see the message "WRITING SOFTWARE" in LCD Display.
WRITING SOFTWARE
Figure C-4 Writing software
- If you see the message "FINISH TO WRITE", IDU is finishing the software upgrade. You have to wait until the IDU is restarted.
FINISH TO WRITE
- Turn off the IDU. Take your SD memory card away from the IDU.
- Turn on the IDU.
Appendix A - System Specification
| Frequency Band Ku Band | |
| Operating Frequency 12.25GHz | ~ 12.75GHz |
| LNB Local Frequency 11.3GHz | |
| Dish Diameter 32cm | |
| Radome Diameter 35cm | |
| Radome Height 36cm | |
| Antenna Weight 6kg | |
| Antenna Gain 27dB | |
| Polarization Type V/H | |
| Stabilization Type 2-Axis DC Motor | |
| Elevation Range 5° ~ 90° | |
| Tracking Rate <50°/sec | |
| Azimuth Range | Unlimited |
| Temp Range | -22°C ~ 70°C |
| Humidity | 95%@40°C |
| Power | 12VDC@3A(Max) |
| Target Satellite | Optus D1 |
Appendix B - Glossary
Azimuth: The horizontal angle of observer's bearing measured clockwise from a reference direction. It is circular rotation around the vehicle hereby.
Elevation: Angle in degrees measured from the ground level.
Signal Strength: Intensity of electronic signal received from the satellite transmission.


Limited Product Warranty
Majestic warrants the SATMAR32D product purchased against defects in materials for a period of ONE (1) years and against labour costs for a period of ONE (1) year from the date of original retail purchase by the original purchase. It is the customer's responsibility to verify the date of purchase returning the warranty card included with the product to Majestic within 30 days of purchase, or by providing a dated sales receipt for the Majestic product under warranty with the warranty claim. If this date cannot be verified, the warranty period will begin 30 days after the date of manufacture of the original product purchased.
If you discover a defect, Majestic will, at its option, replace or repair the product at no charge to you, provided you return it during the warranty period. This is a return to base warranty. Please attach your name, address, telephone number, a description of the problem and a copy of sales receipt as proof of date of original retail purchase, to each product returned to warranty service. Alternatively, you may bring the product to an Authorized Majestic dealer/distributor for repair. If the product was installed by an Authorized Majestic dealer/distributor, Majestic will cover the dealer's/distributor's labour charges for warranty repairs, provided that the dealer/distributor contacts Majestic for pre-approval of the charges.
This Limited Warranty does not apply if the product has been damaged by accident, abuse, misuse or misapplication or has been modified without the written permission of Majestic; if the unit has not been installed by an authorized installer; if any Majestic serial number has been removed or defaced; or if any factory-sealed part of the system has been opened without authorization.
THE EXPRESS WARRANTIES SET FORTH ABOVE ARE THE ONLY WARRANTIES GIVEN BY MAJESTIC WITH RESPECT TO ANY PRODUCT FURNISHED HEREUNDER; MAJESTIC MAKES NO OTHER WARRANTIES, EXPRESSED, IMPLIED OR ARISING BY CUSTOM OR TRADE USAGE, AND SPECIFICALLY DISCLAIMS ANY WARRANTY OF MERCHANTABILITY OR OF FITTNESS FOR A PARTICULAR PURPOSE, SAID EXPRESS WARRANTIES SHALL NOT BE ENLARGED OR OTHERWISE AFFACTED BY TECHNICAL OR OTHER ADVICE OR SERVICE PROVIDED BY MAJESTIC
Notes

- Marine Satellite Antenna for TV
- SATMAR32D HD Digital
- ELECTRICAL HAZARD WARNING
- Table of Contents
- Introduction
- Installation
- Operation
- Troubleshooting
- Maintenance
- SATMAR32D System Overview
- System Compatibility
- Direct Broadcast Satellite Overview
- SATMAR45
- Line of Sight (LOS) Interruption
- System Components
- SATMAR32D Outdoor Unit (ODU):
- SATMAR32D Indoor Unit (IDU):
- Unpacking the SATMAR32D
- Preparing the SATMAR45 Antenna for Installation
- Installation Tools and Materials
- Antenna Installation
- Select Location
- Equipment and cable installation
- Initial power-up and system checkout
- Explanation of words in LCD
- Upon Turn on:
- Operating the SATMAR32D
- The Satellite Acquisition with the SATMAR32D system
- Power on
- Changing Channels
- Causes and Remedies for Operational Issues
- System Not Power-On
- Improper Wiring
- Incorrect Satellite or LNB Configuration
- Search Failure
- Snow, Rain or Dew pooling on Dome
- Satellite Receiver
- Firmware UpgraFIRMWARE UPGRADE
- Firmware Upgrade
- Figure C-4 Writing software
- Appendix B - Glossary
- Limited Product Warranty
- Notes
Brand : MAJESTIC
Model : SATMAR32
Category : Satellite antenna