
AT-VSP-800 - Camera Atlona - Free user manual and instructions
Find the device manual for free AT-VSP-800 Atlona in PDF.


| Product Type | Scheduling Touch Panel |
| Brand | Atlona |
| Model | AT-VSP-800 |
| Display Size | 8 inches |
| Native Resolution | 1280 × 800 |
| Touch Technology | Capacitive glass with gesture support |
| Edge Lighting | Bright LED for room status indication |
| Power Supply | Power over Ethernet (PoE, 802.3af) |
| Mounting Options | 1-gang US/UK/EU box; 2-gang US horizontal |
| Dimensions (approx.) | 208 × 136 × 35 mm (8.2 × 5.4 × 1.4 in) |
| Weight (approx.) | 0.5 kg (1.1 lb) |
| Primary Functions | Room scheduling, AV control, Velocity system integration |
| Gateway Requirement | Velocity Gateway (AT-VGW-HW-3/10/20) |
| Setup Method | Auto-upload from Velocity system via network |
| Network Interface | Ethernet (RJ45) |
| Operating System | Android (embedded) |
| Firmware Update | Over-the-air via settings menu |
| Default PIN | 554361 |
| Warranty | 2-year limited product warranty |
| Package Contents | Touch panel, mounting screws, metal 1-gang plate, installation guide, 2-gang US horizontal plate |
Frequently Asked Questions - AT-VSP-800 Atlona
User questions about AT-VSP-800 Atlona
0 question about this device. Answer the ones you know or ask your own.
Ask a new question about this device
Download the instructions for your Camera in PDF format for free! Find your manual AT-VSP-800 - Atlona and take your electronic device back in hand. On this page are published all the documents necessary for the use of your device. AT-VSP-800 by Atlona.
USER MANUAL AT-VSP-800 Atlona
Velocity System 8" Scheduling Touch Panel
AT-VSP-800-BL and AT-VSP-800-WH
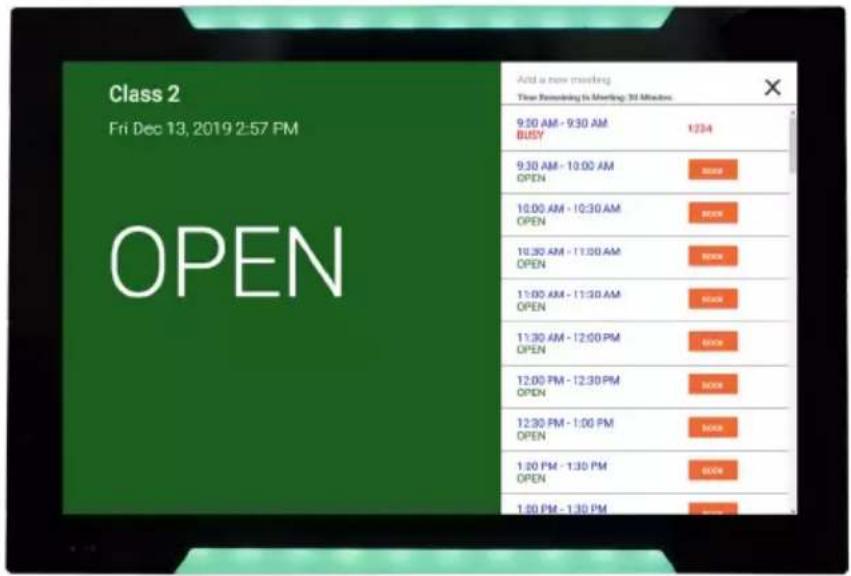
The Atlona AT-VSP-800 is a Velocity System 8" scheduling touch panel. It features contemporary, refined styling with 1280×800 native resolution, and a capacitive glass surface that supports touch and gesture interactions. Bright LED lighting on the edge of the bezel is ideal for providing a visual representation of room status in scheduling applications. This touch panel conveniently installs into a wall or furniture via a one-gang US, UK, or EU opening. The VSP-800 features Power over Ethernet (PoE), enabling a single network connection for data and power. Setting up the touch panel is effortless as room scheduling and AV control GUIs are automatically uploaded from the Velocity System hardware or software server gateway during system configuration.
Package Contents
1 x AT-VSP-800
4 x Mounting screws
1 x Metal 1-gang mounting plate
1 x Installation Guide
1 x Metal 2-gang US horizontal mounting plate
Operating Notes
- The Velocity 8" Scheduling Touch Panel (AT-VSP-800) must be on the same network as the Velocity Gateway (AT-VGW-HW-3/10/20) or it will be unable to sync for scheduling.
- The AT-VTP-800 is PoE capable, to power the unit, simply plug it into a 802.3af compatible network switch. If the network switch is not PoE capable, a PoE injector (purchased separately) can be used.

IMPORTANT: Velocity Gateway (AT-VGW-HW-3/10/20) must be set up before the AT-VSP-800 is fully functional.
Mounting Instructions
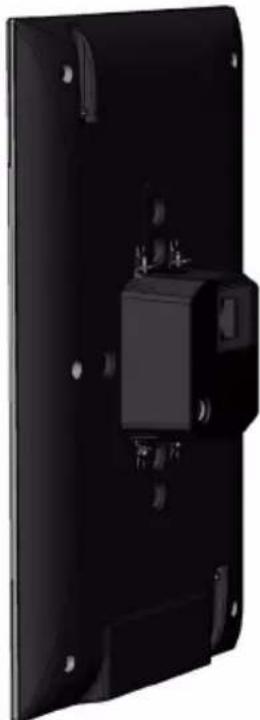
The AT-VSP-800 can be mounted to a 1 gang back plate.
1 Select the type of 1 gang back box to use and install into a wall.

NOTE: Install using the region's safety guidelines for electrical boxes.
2 Thread the Ethernet cable through the 1 gang box.
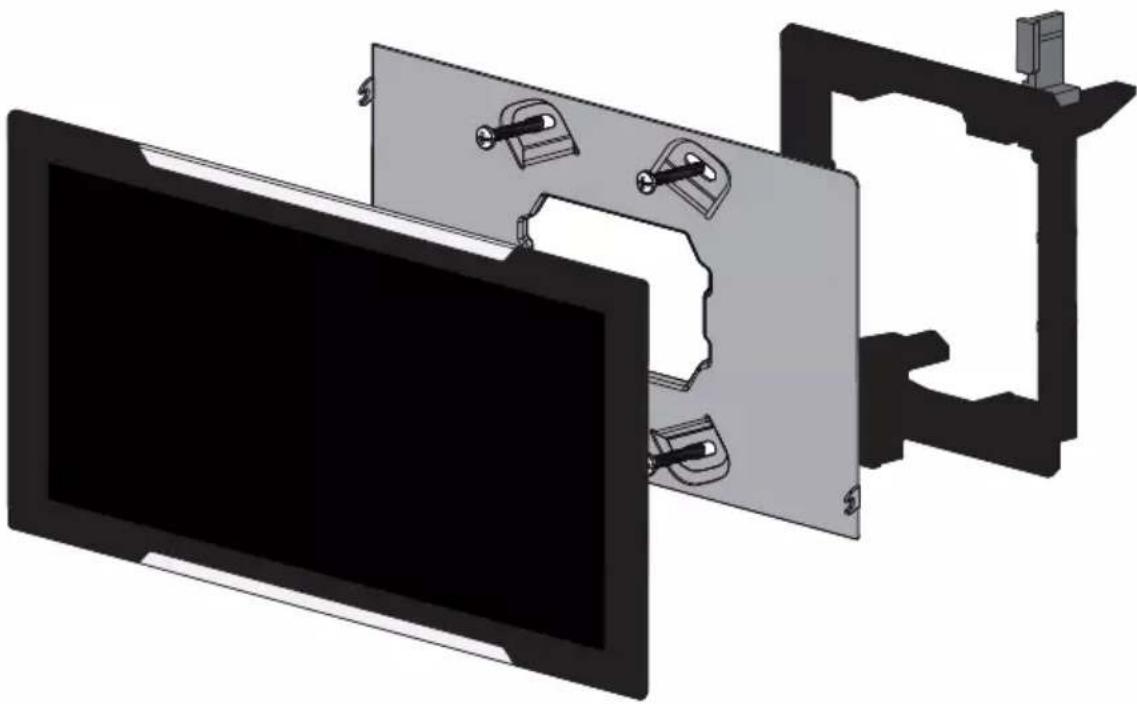
3 Install the included mounting plate into the 1 gang box.
a If using a UK back box, place the screws in the two inside mounting holes.
b If using a US back box, place the screws through the outside screw holes.
4 Loosen or remove the two screws located at the top and bottom of the unit.
5 Place the unit onto the metal back plate, the dual prongs inserting into the small opening on the back of the unit.
6 Tighten/attach the screws at the top and bottom of the touch pad.

NOTE: To avoid damage to the unit, do not overtighten the screws.

natural_image
Three-panel diagram showing a building interior with directional arrows indicating rotation or movement (no text or symbols)UK back box:
natural_image
Black electrical switch component with mounting holes and mounting brackets (no text or symbols visible)
natural_image
Pure electrical circuit lines without any symbols
natural_image
3D rendering of a mechanical component with internal cavity (no text or symbols)
NOTE: For horizontal installation, turn the unit and mounting plate on its side. The same back box can be used.
US back box:
1-gang Vertical installation

natural_image
Three black metal electrical switch components with mounting holes and mounting brackets (no text or symbols visible)2-gang Horizontal installation
To install the touch panel in landscape orientation in a wall the US 2-gang installation plate should be used. Use the 4 included screws to install the unit into the back box.
natural_image
3D diagram of a computer monitor with internal components and mounting bracket (no text or symbols)EU back box:

NOTE: For horizontal installation, turn the unit and mounting plate on its side. The same back box can be used.
Installation and Set Up

NOTE: Installation of the Velocity Touch Panel can only be done after the AT-VGW-HW-3/10/20 has been set up. View the AT-VGW-HW-3/10/20 Installation Guide and Velocity Manual for instructions.
1 Connect the Ethernet cable into the back of the unit.
a If the Ethernet cable is connected to a non PoE switch, use a PoE injector using 802.3at (purchased separately).
2 Secure the unit in either the wall or optional stand, as explained in the mounting instructions.
- The Velocity logo will display during the booting process and will go directly into setup. Press CONTINUE to start the setup process.

4 When the unit displays the IP information, press CONTINUE.
a If the touch panel does not display an IP, select the Set Static IP slider.
b Assign the unit a static IP. Ensure there are no other devices on the network with the same IP to avoid connection issues.


- The unit will load a new screen. Change the Device Alias (if needed) to help differentiate when there are multiple touch panels at a site.
- Press the SCAN FOR GATEWAYS button.

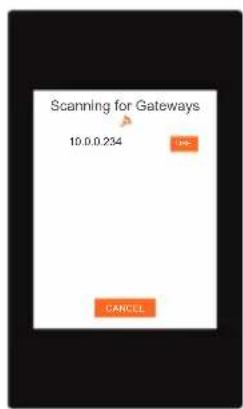
7 The touch panel will scan for new gateways. Once the correct gateway is found, press USE.

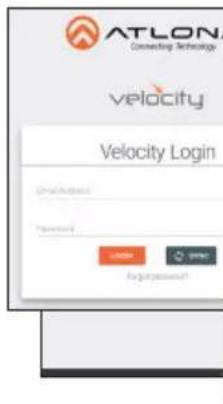

8 On a network computer, use a browser to log into Velocity.
9 A green message will appear at the top right corner of the screen. Select Buildings.


10 On the buildings screen, press the Synchronize button on the building the touch panel is located.
11 When the rooms page opens, press the Sync Scheduler button on the touch panel's room.
12 Press the SAVE & CONTINUE button on the touch panel.


Advanced Settings
Once the touch pad has been set up, the settings can be changed or reset only through the advanced settings.
1 To access the settings, swipe from the left side of the touch pad to the right.
2 Select Advanced Setup.
3 Type in the PIN. Default PIN is 554361.

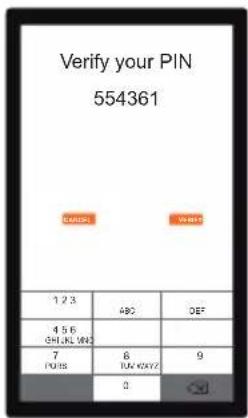
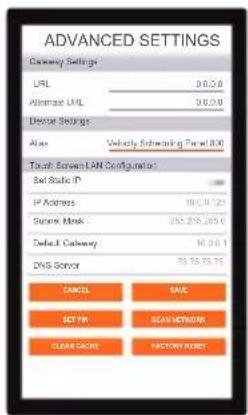
Within the advanced settings, all the touch pad settings can be changed or reset.
Gateway Settings -
a If the gateway IP is known, it can be typed into the URL field.
b If the gateway IP is unknown, press the Scan Network button to search for and add the gateway.


Device Settings - The touch pad can be renamed for easier syncing with Velocity. Type the name into the Alias field.
Touch Screen LAN Configuration - The current IP settings will display in these fields. To switch to a static IP, select the Set Static IP slider, fill in the IP information, and press Save.
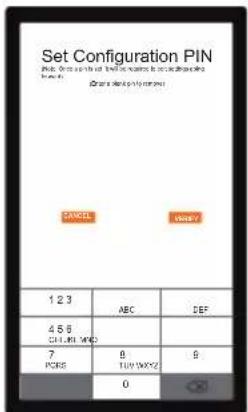
Set PIN - The default PIN of 554361 can be changed to a new pin by pressing the Set PIN button. Type the new PIN in and press Save PIN.
Clear Cache - Press the Clear Cache button to release the current cache of the VSP. Press the OK button to verify.
Factory Reset - Press the Factory Reset button to clear all the settings and start the touch pad set up again. Press the OK button to verify.
Firmware Updating
The touch panel can be updated from within its settings menu. To update, the panel must be connected to a network with internet access.
1 Swipe from the left side of the touch pad to the right to open the gateway settings menu.
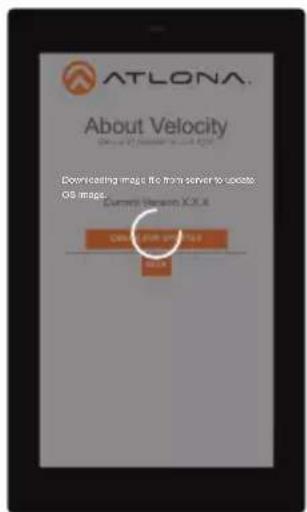
2 Select the ABOUT VELOCITY button. A new screen will take over.
3 Select the CHECK FOR UPDATES button. A pop up will appear if there is an update.
4 Press the YES on the touch screen for the unit to download and install the firmware.


When the installation starts, it will switch to an Android update screen. Once completed it will restart the touch panel. The splash screen will appear, before the loading screen takes over. The update is complete when it returns to the control screen. This process can take up to 5 minutes to complete.


Troubleshooting
Problem Cause Solution
| My touchpad won’t power on. | The touchpad is not connected to a PoE switch. | Connect the touchpad to a switch that supports 802.3at PoE.If a PoE switch is not available, use a PoE injector (sold separately) to power the unit. |
| My touchpad isn’t receiving an IP address. | The connected network is not DHCP enabled. | Swipe from the left corner to the right and press the refresh button. It can sometimes take up to 60 seconds to obtain an IP address.Set the touchpad to static IP by selecting theSet Static IPslider and providing IP, subnet, gateway, and DNS server information. |
Atlona, Inc. ("Atlona") Limited Product Warranty
Coverage
Atlona warrants its products will substantially perform to their published specifications and will be free from defects in materials and workmanship under normal use, conditions and service.
Under its Limited Product Warranty, Atlona, at its sole discretion, will either:
- repair or facilitate the repair of defective products within a reasonable period of time, restore products to their proper operating condition and return defective products free of any charge for necessary parts, labor and shipping.
OR
- replace and return, free of charge, any defective products with direct replacement or with similar products deemed by Atlona to perform substantially the same function as the original products.
OR
- refund the pro-rated value based on the remaining term of the warranty period, not to exceed MSRP, in cases where products are beyond repair and/or no direct or substantially similar replacement products exist.
Repair, replacement or refund of Atlona products is the purchaser's exclusive remedy and Atlona liability does not extend to any other damages, incidental, consequential or otherwise.
This Limited Product Warranty extends to the original end-user purchaser of Atlona products and is non-transferrable to any subsequent purchaser(s) or owner(s) of these products.
Atlona, Inc. ("Atlona") Limited Product Warranty Cont.
Coverage Periods
Atlona Limited Product Warranty Period begins on the date of purchase by the end-purchaser. The date contained on the end-purchaser 's sales or delivery receipt is the proof purchase date.
Limited Product Warranty Terms – New Products
- 10 years from proof of purchase date for hardware/electronics products purchased on or after June 1, 2013.
Exclusions:
- HDVS-CAM Series: PTZ motor is covered for 3 years; hardware, electronic circuit and optics are covered for 10 years
-
VTP and VSP Series: 2-year limited product warranty
-
3 years from proof of purchase date for hardware/electronics products purchased before June 1, 2013.
• Lifetime Limited Product Warranty for all cable products.
Limited Product Warranty Terms – Refurbished (B-Stock) Products and Discontinued Products
3 years from proof of purchase date for all Refurbished (B-Stock) and Discontinued hardware and electronic products purchased on or after June 1, 2013.
Remedy
Atlona recommends that end-purchasers contact their authorized Atlona dealer or reseller from whom they purchased their products. Atlona can also be contacted directly. Visit www.atlona.com for Atlona's contact information and hours of operation. Atlona requires that a dated sales or delivery receipt from an authorized dealer, reseller or end-purchaser is provided before Atlona extends its warranty services. Additionally, a return merchandise authorization (RMA) and/or case number, is required to be obtained from Atlona in advance of returns.
Atlona requires that products returned are properly packed, preferably in the original carton, for shipping. Cartons not bearing a return authorization or case number will be refused. Atlona, at its sole discretion, reserves the right to reject any products received without advanced authorization. Authorizations can be requested by calling 1-877-536-3976 (US toll free) or 1-408-962-0515 (US/international) or via Atlona's website at www.atlona.com.
Exclusions
This Limited Product Warranty excludes:
- Damage, deterioration or malfunction caused by any alteration, modification, improper use, neglect, improper packaging or shipping (such claims must be presented to the carrier), lightning, power surges, or other acts of nature.
- Damage, deterioration or malfunction resulting from the installation or removal of this product from any installation, any unauthorized tampering with this product, any repairs attempted by anyone unauthorized by Atlona to make such repairs, or any other cause which does not relate directly to a defect in materials and/or workmanship of this product.
- Equipment enclosures, cables, power supplies, batteries, LCD displays, and any accessories used in conjunction with the product(s).
- Products purchased from unauthorized distributors, dealers, resellers, auction websites and similar unauthorized channels of distribution.
Atlona, Inc. ("Atlona") Limited Product Warranty Cont.
Disclaimers
This Limited Product Warranty does not imply that the electronic components contained within Atlona's products will not become obsolete nor does it imply Atlona products or their electronic components will remain compatible with any other current product, technology or any future products or technologies in which Atlona's products may be used in conjunction with. Atlona, at its sole discretion, reserves the right not to extend its warranty offering in instances arising outside its normal course of business including, but not limited to, damage inflicted to its products from acts of god.
Limitation on Liability
The maximum liability of Atlona under this limited product warranty shall not exceed the original Atlona MSRP for its products. To the maximum extent permitted by law, Atlona is not responsible for the direct, special, incidental or consequential damages resulting from any breach of warranty or condition, or under any other legal theory. Some countries, districts or states do not allow the exclusion or limitation of relief, special, incidental, consequential or indirect damages, or the limitation of liability to specified amounts, so the above limitations or exclusions may not apply to you.
Exclusive Remedy
To the maximum extent permitted by law, this limited product warranty and the remedies set forth above are exclusive and in lieu of all other warranties, remedies and conditions, whether oral or written, express or implied. To the maximum extent permitted by law, Atlona specifically disclaims all implied warranties, including, without limitation, warranties of merchantability and fitness for a particular purpose. If Atlona cannot lawfully disclaim or exclude implied warranties under applicable law, then all implied warranties covering its products including warranties of merchantability and fitness for a particular purpose, shall provide to its products under applicable law. If any product to which this limited warranty applies is a “Consumer Product” under the Magnuson-Moss Warranty Act (15 U.S.C.A. §2301, ET SEQ.) or other applicable law, the foregoing disclaimer of implied warranties shall not apply, and all implied warranties on its products, including warranties of merchantability and fitness for the particular purpose, shall apply as provided under applicable law.
Other Conditions
Atlona's Limited Product Warranty offering gives legal rights, and other rights may apply and vary from country to country or state to state. This limited warranty is void if (i) the label bearing the serial number of products have been removed or defaced, (ii) products are not purchased from an authorized Atlona dealer or reseller. A comprehensive list of Atlona's authorized distributors, dealers and resellers can be found at www.atlona.com.
- Velocity System 8" Scheduling Touch Panel
- Package Contents
- Operating Notes
- Mounting Instructions
- US back box:
- 2-gang Horizontal installation
- Installation and Set Up
- Advanced Settings
- Firmware Updating
- Troubleshooting
- Atlona, Inc. ("Atlona") Limited Product Warranty
- Coverage
- OR
- Atlona, Inc. ("Atlona") Limited Product Warranty Cont.
- Coverage Periods
- Limited Product Warranty Terms – New Products
- Exclusions:
- Limited Product Warranty Terms – Refurbished (B-Stock) Products and Discontinued Products
- Remedy
- Exclusions
- Disclaimers
- Limitation on Liability
- Exclusive Remedy
- Other Conditions
Brand : Atlona
Model : AT-VSP-800
Category : Camera