KPAC2421-2 - Air-conditioner KwiKool - Free user manual and instructions
Find the device manual for free KPAC2421-2 KwiKool in PDF.


| Product Type | Portable Air Conditioner |
| Model | KPAC2421-2 |
| Brand | KwiKool |
| Cooling Capacity (BTU) | 14,000 BTU (ASHRAE) / 10,000 BTU (DOE) |
| Heating Function | No (Cooling only) |
| Coverage Area | Up to 450 sq ft |
| Power Supply | 115V / 60 Hz |
| Power Consumption (Cooling) | 1,350 W |
| Current | 11.7 A |
| Refrigerant | R-410A |
| Noise Level (Low/High) | 50 / 55 dB |
| Air Flow (Max) | 250 CFM |
| Dimensions (H x W x D) | 30.3 x 18.1 x 16.5 in |
| Weight | 75 lbs |
| Modes | Cool, Fan, Dehumidify |
| Fan Speeds | 3 (Low, Medium, High) |
| Thermostat Control | Digital with remote control |
| Timer | 24-hour programmable |
| Filter Type | Washable mesh filter |
| Drainage | Self-evaporating (Continuous drain optional) |
| Installation Kit Included | Yes (window kit, exhaust hose, brackets) |
| Warranty | 1 year limited |
| Certifications | ETL, Energy Star |
Frequently Asked Questions - KPAC2421-2 KwiKool
User questions about KPAC2421-2 KwiKool
0 question about this device. Answer the ones you know or ask your own.
Ask a new question about this device
Download the instructions for your Air-conditioner in PDF format for free! Find your manual KPAC2421-2 - KwiKool and take your electronic device back in hand. On this page are published all the documents necessary for the use of your device. KPAC2421-2 by KwiKool.
USER MANUAL KPAC2421-2 KwiKool
KPAC II
SEIRES
KwiKool KPAC II Series Operation Manual
Table of Contents
Section I / Unit Components - Page: 3
Section II / Assembly and Installation - Page: 4 - 5
Section III / Operational Safeguards - Page: 6
Section IV / System Operation - Page: 6 - 8
Section V / Built In Safeguards - Page: 8 - 9
Section VI / Application Requirements - Page: 9
Section VII / Maintenance - Page: 9
Section VIII / Utilizing Your KwiKool System - Page: 10
Section IX / Fault Codes - Page: 10
Section X / KPAC II Troubleshooting Guide - Page: 10-12
Before installing and using your KwiKool Portable Cooling System, read this manual carefully for instructions and proper usage and all safeguards.
This manual should be retained for future reference.
I / Unit Components
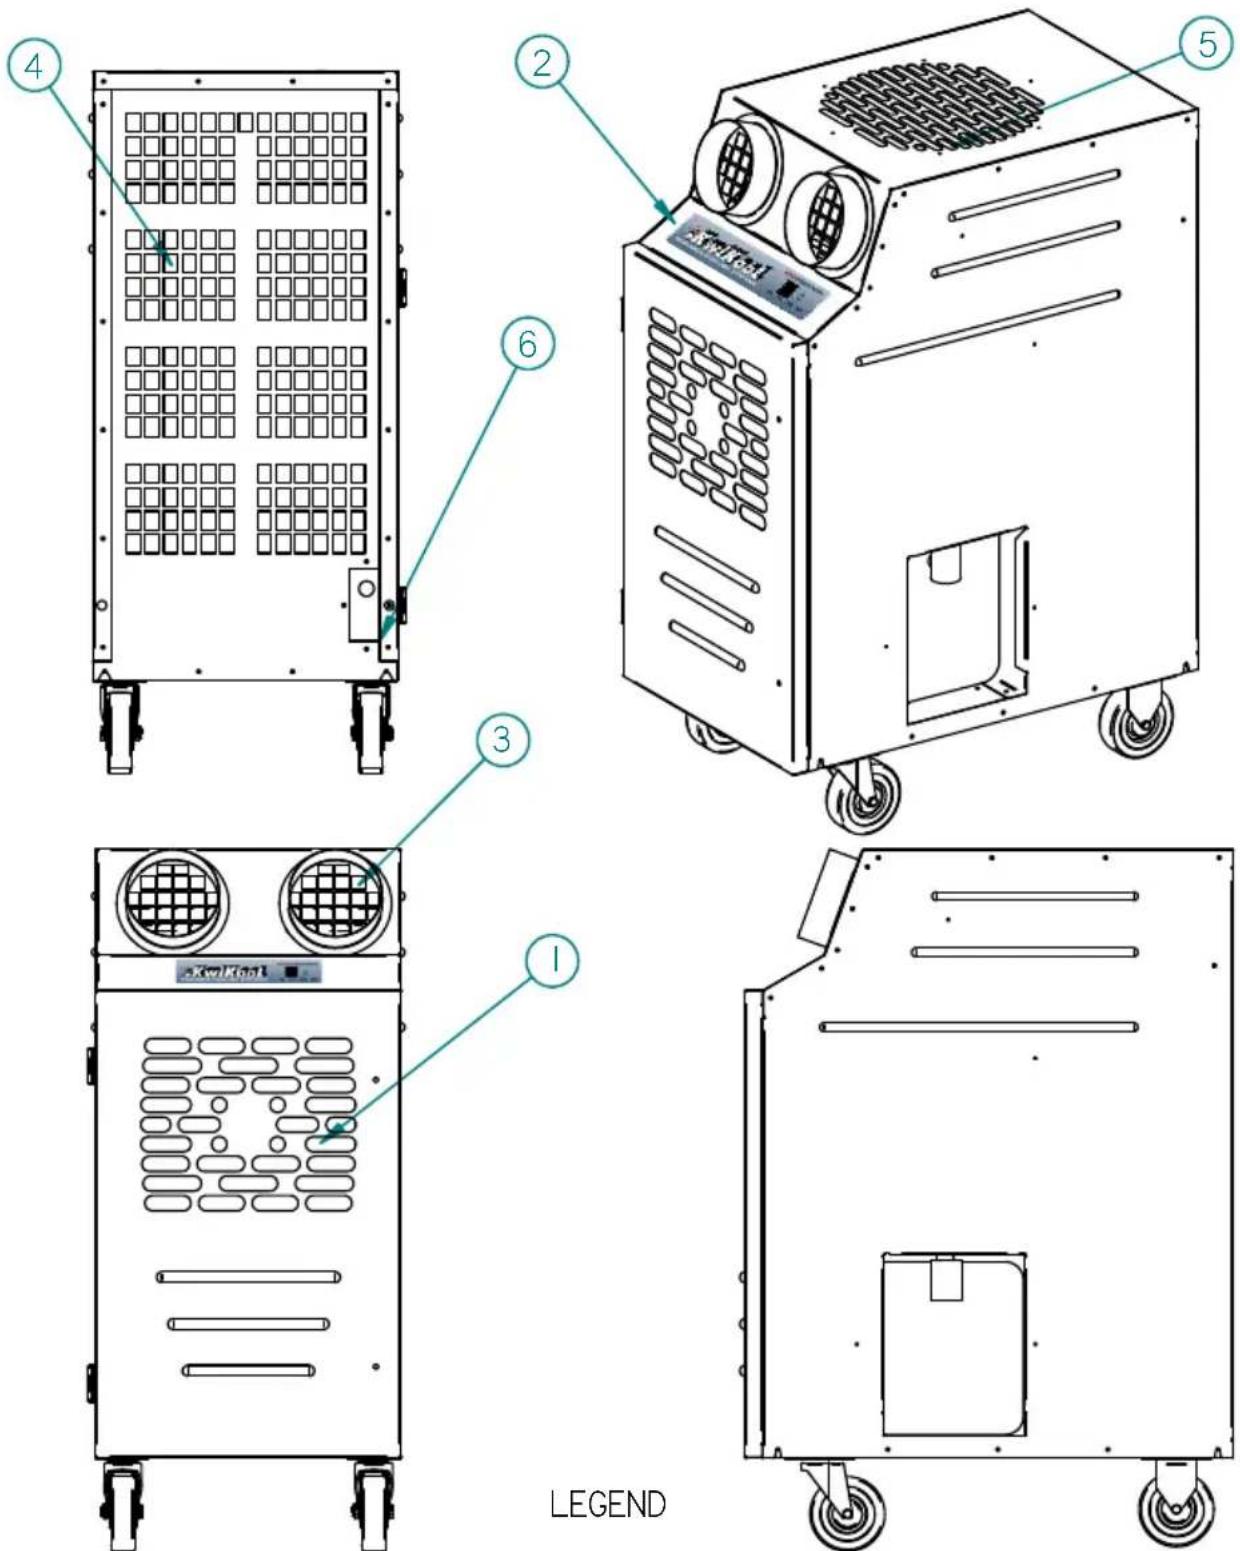
1 Cold Air Return 4 Condenser Air Inlet - 12"
2 Control Pad 5 Condenser Air Outlet
3 Cold Air Supply 6 Power Cord
II / Assembly and Installation
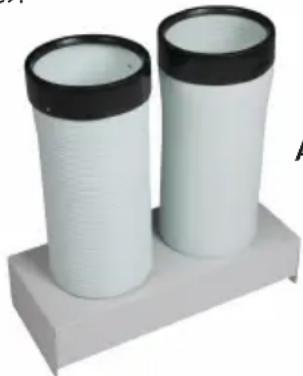
A. Air Chutes (standard equipped) - Install supply air flanges to the front of your KwiKool unit above the control panel. (See instructions in the air chute kit for specific procedures).
natural_image
Two white cylindrical containers with black lids placed on a gray base (no text or symbols visible)Air Chutes - Conditioned air supply, equipped.
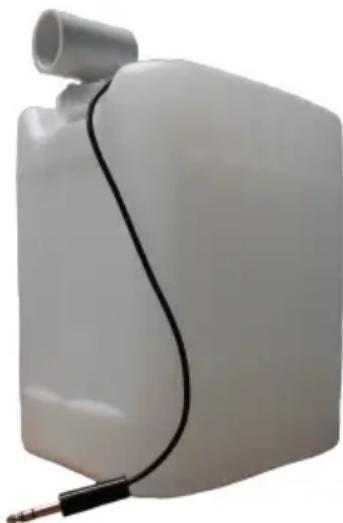
B. Condensate Tank - The system comes standard with an internal 3-gallon condensate tank. The internal condensate tank is equipped with a float switch that shuts your KwiKool down and alerts operators with an alarm and displays CF ("Condensate Full") when the condensate tank is full. This prevents accidental water overflow on the floor. To continue operation of your KPAC II the collection bottle must be removed, emptied and then re-installed. Turning the KPAC II to off will stop the audio alarm. Remove the float switch jack by pulling it straight back and then remove the condensate bottle by pushing the front of the bottle slightly downward and then pull the bottle out. Remove the cap threaded onto the bottle by turning it counterclockwise, then empty the collected water, return the cap back onto the bottle by turning clockwise taking care not to cross thread the cap upon installation, tighten the cap to the point where the angle connector on the condensate bottle lines up with the nipple extending out from the drain pan on your KPAC II and insert the bottle by pushing down slightly to clear the extended drain pan nipple. Be sure the drain pan nipple is inside of the angle connector and the cap is snug and not cross threaded to avoid water leakage. Install the float switch jack by pushing it straight in and confirm the pin is fully inserted or the alarm will not clear. Continue normal operation.
natural_image
White plastic container with black cable and plug, no visible text or symbolsCondensate Tank - 3-gal Condensate Tank with float assembly for automatic cutoff.
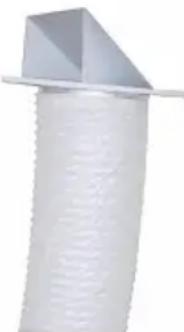
C. Ceiling Kit (Optional Accessory) - The ceiling kit is comprised of a flange with foam tape, fasteners, one (1) eight foot length of flexible duct, duct clamps, and one 24"X24" replacement ceiling tile.
Follow these installation steps:
- Align the holes of the flange to the holes located on the top of the unit. Attach to the top of the KwiKool unit using the factory supplied fasteners.
- Attach the duct to the flange on the replacement ceiling panel; secure the duct to the flange using the supplied clamps.
- Install the replacement ceiling panel in the ceiling grid with the duct attached, connect the open end of the duct to the flange on your KwiKool and secure with supplied clamps. The area where the discharge air is directed must be open to a space that is well vented or large enough to absorb the load without pressurizing and coming back into your conditioned space. Discharge make-up air will come from your conditioned space and create a negative pressure in the conditioned area. Your KwiKool must have fresh make-up air going to the condenser to operate.
- **For Ceiling Kit Users** - Single Duct Ceiling Kit - Can use this method when conditioning a space, adding supplemental conditioning, process conditioning and comfort conditioning. The unit is placed in the area you are conditioning, discharge air is moved from the space through the duct connected to the condenser discharge air flange, the duct is connected to the ceiling panel, the ceiling panel is typically used in drop ceilings, a 24" x 24" space is opened in the ceiling grid and the replacement panel with the duct attached to the flange is installed, the area where the discharge air is directed must be open to a space that is well vented or large enough to absorb the load without pressurizing and coming back into your conditioned space. Discharge make up air will come from your conditioned space and create a negative pressure in the conditioned area. Determine if your application can tolerate this condition, the negative pressure will pull in surrounding conditioned air and ambient air from unsealed areas which may include dust, moisture or other particles. Additionally, the ceiling kit replacement panel is not limited to ceiling use and may be placed or fastened to any vertical or horizontal surface providing the discharge and make up air is able to be directed to the space where it is mounted. For areas with a closed ceiling or no ceiling use the double flange ceiling kit method or extended duct method.
Visit www.KwiKool.com for more information and a complete set up guide.
natural_image
Close-up of a white cylindrical object with a triangular top and horizontal line, no visible text or symbols.Ceiling Kit - The CK-12S includes one 12" x 8" duct, 1 flange and fasteners to be mounted to the unit, clamps necessary for duct attachment and a ceiling panel.
D. Power Connection - Verify that the source power, phase and breaker size is compatible with your KwiKool serial plate information and that the electrical circuit is dedicated only for the use of your KwiKool Unit. If you aren't sure about your power, contact a licensed electrician. KwiKool systems are factory equipped with 8' of power cable sized to meet the power requirement of your system. Extension power cable is allowed but cannot exceed 25' and must be rated to operate your KwiKool. KwiKool units that come supplied with a factory installed plug require the exact receptacle to match the plug and exact circuit size and power. Cutting the power plug on your KwiKool unit will void its warranty.
III / Operational Safeguards
Read the following safeguards carefully before installing your KwiKool:
A. Do not operate or install your KwiKool unit in a potentially explosive, combustible, or corrosive gas atmosphere.
B. Keep your KwiKool system away from flammable materials and open flame.
C. To avoid electrical shock keep your KwiKool system away from direct contacts with water and any liquids and do not touch your system with wet hands.
D. To insure your KwiKool system is stable, the floor on which the system is to be place should be level, free of vibration and strong enough to support the weight of your KwiKool model.
E. Do not move the system while it is operating. Before moving the system, first turn system to OFF then unplug the system from the power source. Then unlock casters.
F. Do not tilt or overturn your unit, since this could damage the compressor.
G. Do not place objects on top of your unit.
H. Do not insert your hand or any other object into the cold air supply chutes.
I. Do not operate your KwiKool system with its service doors open.
J. If your KwiKool system makes abnormal noises or vibrations, call KwiKool at 1-800-594-5665.
IV / System Operation
A. Apply Electrical Power - Once power is engaged by plugging in your system and/or switching the breaker to the on position, your KwiKool display will come alive and show the current room temperature. The unit is set to OFF and the fan is set to the default position. A 2 minute time delay starts, indicated by a flashing F on the display. If you are not seeing anything on the display, refer to the Troubleshooting Guide section of this manual.
B. Control Panel - The control panel display shows the current operational status of the unit.
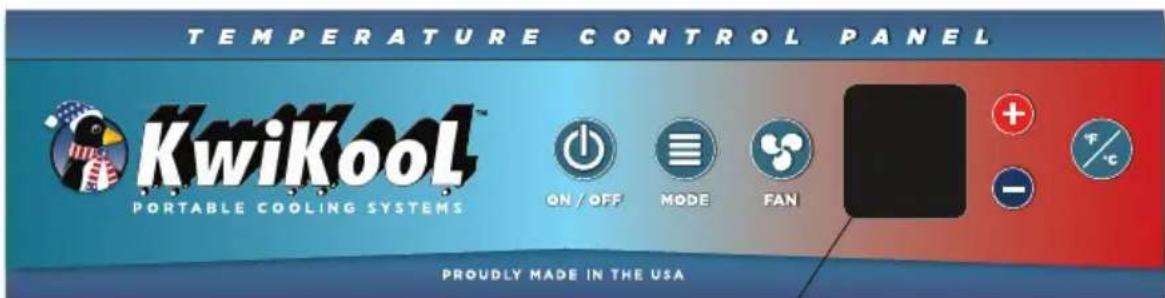
Shown in detail on next page.
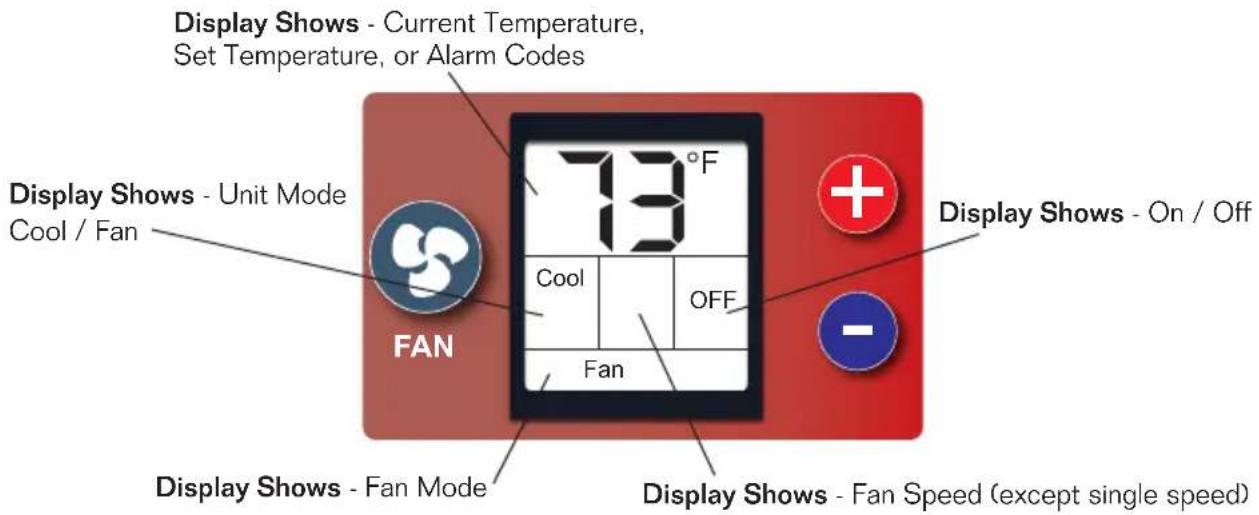
-
ON/OFF Button - Pressing this button on your control panel engages or shuts down your KwiKool system. All settings selected are stored in the microprocessor board even if the power is lost including the ON/OFF selection. Refer to the Troubleshooting Guide section of this manual if your KwiKool is alerting an alarm after selecting ON.
-
MODE Button - Depressing the MODE button selects your choice of operations. Cool, for cooling with compressor operation. "Cool" will flash when the compressor is running. "Cool" will not flash when the room temperature is equal to or lower than the set temperature or the system is timing out. Fan, for air circulation without compressor operation.
-
F/C - Selects the way that room temperature and set point are displayed on the control panel. Choices are Fahrenheit or Celsius. F is the factory default. This indicator will flash when the system is in “time out” to prevent compressor short cycling.
-
Fan - Pressing the fan button cycles the supply air fan between auto fan and fan on. When the system is in auto fan, the supply air fan only operates when the compressor is running. When the fan is set to on, the fan runs continuously as long as the unit is in the ON position. The fan speed window will be blank on these models.
-
Up (+) and Down (-) Arrow Buttons - Raises or lowers the desired set temperature. When changing the set point, pressing the + or - key, the word SET will appear on the display and the current set point flashes ON and OFF. The value of the set point is changed 1 degree each time the + or - is pressed. The adjusted set point flashes on and off 12 times after the last change and then returns to display the room temperature.
NOTES:
a. Lowering or raising the set point will not change the temperature of the supply air. For best results always adjust the set point to a temperature your KwiKool can cycle on and off at to avoid operational issues such as freezing or rapid discharge fan cycling, KwiKool systems are designed to maintain the set point when sized properly and constant operation without achieving the set point may shorten the expected operational life of your system.
b. The lowest set point temperature available for your KwiKool is 60 degrees F, and the highest setting is 95 degrees F. The control will not allow adjustments beyond these ranges.
C. System Operation -
-
Turn On Your KwiKool System - Pressing the ON/OFF button once on your control panel will put your unit in the ON position and "ON" will be displayed on the right side of your display as well as the previously chosen mode.
-
COOL - If the unit was previously set to the cooling mode (cool) then “cool” will be displayed. If the compressor is running, the "cool" on the display will be flashing. If your unit has been sitting for over 2 minutes, this should happen immediately upon turning the unit on, unless your set point is lower than the current room temperature. In this case your unit is ready to automatically turn on once the temperature rises above the set point. If the unit was recently turned off or the unit turned itself off because it reached the set point, the compressor will not turn on until the system waits for approximately 2 minutes. This prevents the compressor from being damaged do to a condition called short cycling. The indicator that the unit is in the “time out” condition is that the F (or C) in the display will be flashing. When the compressor starts, the F will stop flashing and the “COOL” will begin flashing.
Note that the condenser fan will not start immediately with the compressor. If the display flashes 99, this indicates ambient temperature of 99 degrees F or more. This is normal and will stop flashing when the ambient temperature falls below 99 degrees F.
- FAN - If the unit was previously set to the fan mode then "FAN" will be displayed and the fan will start to run.
V / Built in Safeguards
KwiKool is proud to provide its customers with high quality features and safety devices that are not found in most other brands.
A. Time Delay - Protects your KwiKool from potential damage by delaying the compressor from starting before the pressures in the mechanical system equalize. This always activates when your KwiKool cycles off, is turned off, power is lost and then restored on the operational mode is changed. Display flashes C or F if the time delay is activated.
B. High-Pressure Switch and Alarm - Protects your KPAC II unit from potential damage to the mechanical system by shutting down, sounding an audible alarm and displaying a fault code (AL) when the system pressure exceeds safe operating conditions. The high pressure switch is a manual reset switch located in the condenser inlet on the back of the system and labeled HP Reset; and must be reset after the switch is activated and the condition causing the trip is corrected.
C. Automatic Restart - In the event of a power loss your KwiKool Iceberg resumes operation when the power is restored. All operational functions are preserved in the memory of the Microprocessor Board including the ON/OFF selection.
D. Condensate Tank & High Level Alarm - All KPAC II models come standard with an internal condensate tank. The tank is equipped with an overflow safety cut-off. When the tank is full, the safety will automatically shut down your unit, sound an audible alarm and display a fault code (CF) this prevents accidental flooding of the conditioned space. To continue operation when bottle is filled, see section II:B.
E. Service Ports - Located in the filter access compartment in the front of your KwiKool below the control panel. This gives service personal a connection point for service gauges to monitor the operating pressures of your KPAC II refrigeration system.
VI / Application Requirements
A. Air Temperature Requirements - The environmental requirements of your KwiKool unit at the installation site are 60 to 110 degrees F for the condenser make-up air located on the back of the unit. If the unit is operated in an environment above 110 F the high pressure switch may trip, stopping the unit's compressor. You also may notice diminished performance. The High Pressure Switch type is a manual reset. The reset switch is located in the condenser make-up air inlet on the back of the system. Reset the unit by pressing the button labeled HP Reset. Standard air-cooled KwiKool models are not designed to operate at temperatures below 60 degrees F. Low-ambient temperature controls must be special ordered at an additional cost. Temperatures below 60 degrees F will cause freezing and or diminished performance and can void your warranty.
B. Capacity & Temperature Settings - Sizing of our units is based on matching capacity to a specific heat load while maintaining a 72 degree F temperature. In order to reach temperatures below 72 degrees F, the unit must have extra capacity.
C. Positioning of Unit - Do not place your KwiKool unit in direct sunlight, the unit should be positioned so that the output of the unit can be focused as close to the heat generating equipment as possible with the front grill fully exposed. Do not block the front of the unit, since this will cause a restriction in the airflow and can cause low performance and/or evaporator coil freezing. The KPAC II will take condenser make-up air from the area of placement and cannot be ducted, the inlet for the condenser make-up air is located in the rear of the unit and will not allow for the back of the unit to be placed flat against a wall or fixed object, not allowing at least 5 or 6 inches of space between the inlet and a wall or fixed object will cause decreased performance and or high pressure safety trip.
VII / Maintenance
A. Air Filters - Your KwiKool unit comes from the factory with filters installed on the evaporator inlet to prevent dust and debris from entering the system and circulating in the conditioned space, factory installed filters are a disposable type and must be periodically checked and replaced based on the air quality of your conditioned space. Failure to maintain the filters will cause restricted air flow and low overall unit performance. The air filter is located on the front of your KwiKool unit below the control, release the 2 slotted fasteners on the access door to open.
VIII / Utilizing your KwiKool System
In contrast to conventional air conditioners, which circulate air conditioning capacity evenly to an entire floor, KwiKool systems are designed for cooling an area with a high concentration of heat load, usually from electrical or computer equipment. Understanding the capabilities of your KwiKool can help you avoid problems. For example, if you add heat-generating equipment to the room after purchasing a KwiKool system, you may be short of the necessary cooling capacity. Your KwiKool system offers an effective affordable solution for many applications. It can also provide spot cooling for workers or process cooling within a large space without the use of condenser ducting, such as a warehouse factory, or production areas. If the system is used in this manner, the cold air supply must be within 5 feet of the person or equipment being cooled, since the hot ambient air will mix with the cool air very quickly. Your KwiKool system is specifically designed to adapt to today's high tech environments such as telecommunication or computer rooms and is equipped with the necessary controls to maintain those special environments. Call your nearest KwiKool Distributor or 1-800-594-5665 for help or for questions about other applications.
IX / Fault Codes
Your KwiKool Iceberg System incorporates a self-diagnostic system that sounds an audible alarm, stops your system and displays a fault code to indicate the nature of the problem on the display panel. See the troubleshooting guide later in this manual for further information.
CF = Condensate Tank Full
AL = High Pressure Switch Tripped
FP = Freeze Protection
X / KPAC II Troubleshooting Guide
| Fault Possible Cause Possible Solution | ||
| Unit displays CF, Audio alarm fails to clear on start up or while operating | Internal Condensate Tank is full, or condensate float switch jack is not installed or not positioned correctly. Water level switch is engaged. | Empty Internal Tank (see section II:B) Unplug tank plug and reinstall to assure good connections. System automatically resets when fault condition is corrected. |
| Audio alarm fails to clear on start up or while operating, unit displays FP. | Microprocessor has detected freezing on the evaporator coil if the system has a factory installed freeze sensor. (Special order) | Check for freezing on the evaporator coil and turn the system off to let it thaw out, call 1-800-KWIKOOL if your system is not equipped with a freeze sensor. Auto resets upon correction. |
| Unit Displays AL and Audio alarm is sounding during start up or while operating. | Microprocessor board has detected high pressure. The High Pressure switch is tripped. | High pressure is normally caused by reduced condenser air flow. Check for restriction in ducting. Check for condenser air system ventilation (see section V:B). Check condenser motors and/or blowers for proper operation. High pressure is a manual reset type. To reset, press the button labeled HP reset located in the condenser make-up air inlet on the back of your KwiKool (you should feel a click when resetting). |
| System is ON and display is showing ON but unit is not supplying conditioned air. | System is in time out (F or C is flashing), control is set above room temperature or control is adjusted out of operating parameters or not in the correct operational MODE. | Wait 2 minutes, review System Operations guide. |
| Power is supplied but control is blank | Low voltage circuit is not engaged | Check source power breaker and verify incoming power to connector. Call 1-800-KWIKOOL for assistance. |
| System trips breaker on start up | Incoming power is incorrect, breaker is undersized or faulty, and or power cable is too long and or undersized. | Verify the circuit and power cable is within the systems specifications, consult with your electrician or call 1-800-KWIKOOL for guidance. |
| Display shows 32 and unit will not turn on cooling. | No connection of temperature sensor to Microprocessor. Temperature Sensor malfunction. | Call 1-800-KWIKOOL for instructions. |
| Chatter or hum is heard from the control box while the system is operating. | Incoming source power is poor or low voltage component is faulty. | Check for proper incoming voltage; remove excess or undersized power cable. Call 1-800-KWIKOOL. |
| Supply air flow is limited, and or water is dripping from the front of the system | Supply or return air is blocked or restricted, and or the evaporator coil is freezing. | Verify that supply and return air are not blocked and duct work is installed to specification, remove or add duct as needed, check air filter for blockage. |
| Evaporator coil is freezing Low | or restricted air flow. Undersized capacity, unit constantly on, unable to achieve set point. Low return air temperature out of factory specifications. Evaporator door open, mechanical system malfunction. | Direct supply return air to area of highest heat load, check for blocked air flow from the supply air, replace air filters, adjust set point to allow the unit to cycle, add another KwiKool system or larger capacity model. Install service gauges to view pressures. Call 1-800-KWIKOOL |
| 99 Flashes on display Ambient | room temperature over 99 degrees F. | Unit is working properly. Lowering of room temperature will rectify the flashing. |
| 59 or lower temperature flashes on display | Ambient room temperature under 59 degrees F. | Limits of unit have been reached. Operating temperatures are 65 - 105 degrees F. |
- KwiKool KPAC II Series Operation Manual
- Table of Contents
- I / Unit Components
- II / Assembly and Installation
- Follow these installation steps:
- III / Operational Safeguards
- Read the following safeguards carefully before installing your KwiKool:
- IV / System Operation
- NOTES:
- System Operation -
- V / Built in Safeguards
- VI / Application Requirements
- VII / Maintenance
- VIII / Utilizing your KwiKool System
- IX / Fault Codes
Brand : KwiKool
Model : KPAC2421-2
Category : Air-conditioner