
SB360 - Camera HP - Free user manual and instructions
Find the device manual for free SB360 HP in PDF.


| Product Type | Digital Camera |
| Brand | HP |
| Model | SB360 |
| Megapixels | 12 MP |
| Optical Zoom | 3x |
| Digital Zoom | 4x |
| LCD Screen Size | 2.7 inches |
| Dimensions (W x H x D) | 95 x 56 x 22 mm |
| Weight (without battery) | 100 g |
| Weight (with battery) | 120 g |
| Power Source | 2x AA batteries (alkaline or rechargeable) |
| Memory Card Type | SD/SDHC (up to 32 GB) |
| Internal Memory | 32 MB |
| Image Resolution | Up to 4000 x 3000 pixels |
| Video Resolution | 640 x 480 (VGA) |
| Shutter Speed | 1/2000 to 8 seconds |
| ISO Sensitivity | Auto, 100, 200, 400, 800, 1600 |
| Flash Modes | Auto, Red-Eye Reduction, Forced Flash, Off |
| Scene Modes | Portrait, Landscape, Night, Sport, etc. |
| Interface | USB 2.0, AV output |
| Maintenance | Clean lens with soft, dry cloth. Avoid moisture. |
| Safety | Keep away from water and extreme temperatures. Do not disassemble. |
| Spare Parts / Repairability | Batteries, charger, USB cable available. Limited repair options. |
| General Info | Compact digital camera for everyday use. Built-in flash and self-timer. |
Frequently Asked Questions - SB360 HP
User questions about SB360 HP
0 question about this device. Answer the ones you know or ask your own.
Ask a new question about this device
Download the instructions for your Camera in PDF format for free! Find your manual SB360 - HP and take your electronic device back in hand. On this page are published all the documents necessary for the use of your device. SB360 by HP.
USER MANUAL SB360 HP
Federal Communications Commission (FCC) Compliance ...... iv
Declaration of Conformity....iv
Trademark Recognition ....iv
Safety and Handling Precautions ...... v
Camera Information......v
Battery Information ......v
Battery safety notice....v
Camera & battery recycle notice ...... vi
Camera on operating notice ...... vi
Using this Menu....vii
Photography Terms and Definitions...... vii
Package Contents....1
Camera Views....1
Front View ....1
Back View....2
Top View....2
Bottom View 2
Left View 2
Navigation Control ....3
Attaching the Wrist Strap....3
Inserting the Battery....3
Inserting an SD/SDHC Memory Card 4
Charging the Battery 5
Initial Settings....5
Setting the Language....5
Setting the Date & Time ....6
Modes....6
Shooting mode....6
Playback mode....6
Switching between Shooting mode and Playback Mode 6
Selecting the Shooting mode options ....6
LCD Monitor Layout and Icon Descriptions 7
Shooting mode Screen Layout....7
Playback Mode Screen Layout 8
Changing the LCD Monitor Display....12
Shooting Image 14
Taking Photos....14
Using the Stabilizer ....14
Setting the Zoom Control....15
Using Flash 15
Setting the Focus Mode....16
Using the Shooting Functions ....17
Shooting Mode....17
Resolution....17
Quality....17
EV Compensation 18
White Balance....18
ISO 19
Metering....19
Color Mode 19
Using the Record Menu 21
Setting the Scene Mode 21
Using Smile Capture Scene....24
Using Blink Detection Mode....26
Using Aperture Priority Mode....26
Using Manual Exposure Mode ....27
Setting the Self-Timer/Burst 28
Setting the AEB....29
Setting the AF Area 29
Setting the AF Lamp 29
Setting Sharpness....30
Setting Saturation....30
Setting Contrast ....30
Setting the Digital Zoom 31
Setting the Date Stamp....31
Setting Auto Review 32
Setting the Active Z-Lighting 32
Recording Movies....33
Setting the Movie Size....33
YouTube Mode 33
Recording Voices....34
Using the Viewing Functions 35
Viewing in Single Navigation 35
Viewing thumbnails....35
Zooming images 36
Playing Movies....36
To capture screenshot image from a movie clip ....37
Playing Voice Recording....37
Playing Voice Memo 38
Deleting an Image/Video/Audio ....38
Using the Delete Button....38
Playback Menu 39
Slide Show....39
Delete 40
Protect 40
Red Eye Correction....40
Voice Memo 41
Photo Edit....42
Z-Lighting 43
Rotate 43
Trim 43
Resize....44
Startup Image....45
DPOF....45
PictBridge 46
Using the Setup Menu ....46
Making Connections 47
Connecting the Camera to a PC 47
Connecting the Camera to a Printer 47
Troubleshooting 48
Specifications 49
Getting Help 51
Preface
Copyright
This manual contains proprietary information protected by copyright. All rights are reserved. No part of this manual may be reproduced by any mechanical, electronic or other means, in any form, without prior written permission of the manufacturer.
© Copyright 2009
Federal Communications Commission (FCC) Compliance
This equipment has been tested and found to comply with the limits for a Class B digital device, pursuant to Part 15 of the FCC Rules. These limits are designed to provide reasonable protection against harmful interference in a residential installation. This equipment generates, uses, and can radiate radio frequency energy and, if not installed and used in accordance with the instructions, may cause harmful interference to radio communications. However, there is no guarantee that interference will not occur in a particular installation. If this equipment does cause harmful interference to radio or television reception, which can be determined by turning the equipment off and on, the user is encouraged to try to correct the interference by one or more of the following measures:
Reorient or relocate the receiving antenna.
Increase the distance between the equipment and the receiver.
Connect the equipment to an outlet on a circuit different from that to which the receiver is connected.
Consult the dealer or an experienced radio/TV technician for help.
Warning: A shielded-type power cord is required in order to meet FCC emission limits and to prevent interference to radio and television reception. Use only shielded cable to connect I/O devices to this equipment. Any changes or modifications not expressly approved by the manufacturer may void your warranty and service agreement.
Declaration of Conformity
This device complies with Part 15 of the FCC rules. Operation is subject to the following conditions:
This device must accept any interference received, including interference that may cause • undesired operation.
Trademark Recognition
Windows 2000/XP/Vista/Windows 7 are registered trademarks of Microsoft Corporation in the United States and/or other countries. Windows is an abbreviated term referring to the Microsoft Windows Operation System. All other companies or product names are trademarks or registered trademarks of their respective companies.
Safety and Handling Precautions
Camera Information
Do not take apart or attempt to service the camera yourself.
Do not expose the camera to moisture, or extreme temperatures.
Allow the camera to warm up when moving from cold to warm temperatures.
Do not touch the camera lens.
Do not expose the lens to direct sunlight for extended periods.
Do not use abrasive chemicals, cleaning solvents or strong detergents the product. Wipe the product with a slightly damp soft cloth.
Battery Information
Turn off the camera before installing or removing the battery.
Use only the provided batteries or type of battery and charger that came with your camera. Using other types of battery or charger may damage the equipment and invalidate the warranty.
- When using Li-ion battery in this product, ensure that they are inserted correctly. Inserting the battery upside down can cause damage to the product and possibly cause an explosion. When the camera is used for an extended period of time, it is normal for the camera body • to feel warm.
Download all pictures and remove the battery from the camera if you are going to store the • camera for a long period of time.
The type of battery and the battery power level may cause the lens to not extend or retract • properly.
Battery safety notice
If the battery pack is mishandled, the battery pack can burst, cause a fire or even chemical burns. Observe the following cautions.
Do not disassemble.
Do not crush and do not expose the battery pack to any shock or force such as hammering, • dropping or stepping on it.
Do not short circuit and do not allow metal objects to come into contact with the battery • terminals.
- Do not expose to high temperature above 45° C ( 113° F) such as in direct sunlight or in a car parked in the sun.
- Do not incinerate or dispose of in fire.
- Do not handle damaged or leaking lithium ion batteries.
- Be sure to charge the battery pack using a device that can charge the batter pack.
- Keep the battery pack out of the reach of small children.
- Keep the battery pack dry.
- Dispose of used battery packs promptly as described in the instructions.
Replace the battery with the specified type only. Otherwise, fire or injury may result. Do not expose the batteries to excessive heat such as sunshine, fire or the like.
Lithium-ion Battery Warning
Caution: Danger of explosion if battery is incorrectly replaced. Replace only with the same or equivalent type recommended by the manufacturer. Dispose of used batteries according to the manufacturer's instructions.
Camera & battery recycle notice
In the European Union, do not discard this product and battery as unsorted municipal waste. Contact local authorities for recycling program information.
Camera on operating notice
On operating temperatures
Your camera is designed for use under the temperatures between 0° C and 40° C ( 32° F and 104° F). Shooting in extremely cold or hot places that exceed this range is not recommended.
Do not use/ store the camera in the following places
In an extremely hot, cold or humid place. In places such as in a car parked in the sun, the camera body may become deformed and this may cause a malfunction.
Under direct sunlight or near a heater. The camera body may become discolored or • deformed, and this may cause a malfunction.
In a location subject to rocking vibration•
Near strong magnetic place•
In sandy or dusty places. Be careful not to let sand or dust get into the camera. This may cause the camera to malfunction, and in some cases this malfunction cannot be repaired.
Using this Menu
Symbols used in this manual are explained below:
 | This indicates useful information when using your camera. |
 | This indicates warning message that should be read before using the function. |
Photography Terms and Definitions
| Terms Definitions | |
| auto exposure bracketing (AEB) | A simple technique professional photographers use to ensure they properly expose their pictures, especially in challenging lighting situations. When AEB is selected, the camera automatically takes three or more shots with a different exposure for each frame. |
| autofocus (AF) | Autofocus refers to a camera lens' ability to adjust its configuration in order to focus properly on a subject regardless of whether it is near or far from the camera. Autofocus lenses generally provide vastly superior image quality than do their fixed focus cousins since they do not have to rely on their depth of field. Also known as: "AF", "auto-focus" |
| album | An end-user created object that is used to logically group data objects according to some user-defined criteria. An album may or may not be a physical folder in a filesystem. |
| Analog to Digital Converter (A/D or ADC) | A circuit that converts an analog signal, having a continuously varying amplitude, to a digitally quantized representation using binary output signals. |
| aspect ratio cf. image aspect ratio, pixel aspect ratio. | |
| auto white balance (AWB) | With auto white balance, the camera attempts to determine the color temperature of the light and automatically adjust for that color temperature. Many people just leave the camera set to auto white balance all the time. |
| Charge Coupled Device (CCD) | A type of silicon integrated circuit used to convert light into an electronic signal. |
| compression cf. image compression, sound file compression | |
| connection | A transport-provided logical or physical persistent mechanism for transferring data between devices. |
| Digital Print Order Format (DPOF) | A standardized ASCII file created in a digital camera and stored on removable media along with the image files that indicate how many copies of which images should be printed. It also allows index prints, cropping, and text overlays to be specified. |
| Terms Definitions | |
| digital still camera (DSC) | A camera incorporating an image sensor which outputs a digital signal representing a still picture, or records a digital signal representing a still picture on a removable medium, such as a memory card or magnetic disk. |
| dynamic range cf. ISO DSC | dynamic range, colour gamut, luminance ratio |
| Exif/JPEG | A compressed file format for digital cameras in which the images are compressed using the baseline JPEG standard, described in ISO 12234-2, and metadata and thumbnail images are stored using TIFF tags within an application segment at the beginning of the JPEG file. |
| exposure index | A numerical value that is inversely proportional to the exposure provided to an image sensor to obtain an image. Images obtained from a camera using a range of exposure index values will normally provide a range of image quality levels. |
| file system | The software structure which specifies how the data are logically organized on a given storage medium. |
| folder | An optional sub-structure in a hierarchical storage area that can contain data objects. |
| ISO speed | A numerical value calculated from the exposure provided at the focal plane of an electronic camera to produce specified camera output signal characteristics using the methods described in the referenced standard. The ISO speed should correlate with the highest exposure index value that provides peak image quality for normal scenes. |
| JPEG | Joint Photographic Experts Group. An image compression method defined in ISO/IEC 10918-1. |
| memory card | A specific type of memory module with a physical form factor approximating that of a credit card in outline; approx. 85 mm x 55 mm. |
| PC | Personal Computer. Any personal computing device, which may employ various hardware architectures and operating systems. |
| protocol Defined mechanisms | for exchanging data between devices. |
| StorageID | A device-specific four byte unsigned integer (UINT32) that represents a unique storage area that may contain data objects. The most significant sixteen bits of a StorageID represents the PhysicalStorageID, while the least significant sixteen bits of a StorageID represents the LogicalStorageID. |
| USB | Universal serial bus, a digital interface for connecting up to 64 devices in a tiered-star topology. See http://www.usb.org. |
| white balance | The adjustment of electronic still picture color channel gains or image processing so that radiation with relative spectral power distribution equal to that of the scene illumination source is rendered as a visual neutral. |
Source: ISO/WE 12231 Photography-- Electronic still-picture cameras -- Terminology
Package Contents
Please check the contents of your camera package. It should contain:
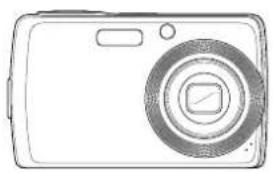


Digital camera Li-ion battery Battery charger
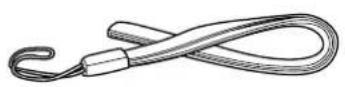
Wrist strap
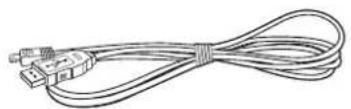
USB cable Power cord


CD-ROM Quick Start guide Warranty card
Camera Views
Front View
- Flash 2. Self-timer LED /AF Assist Lamp

Back View

Top View
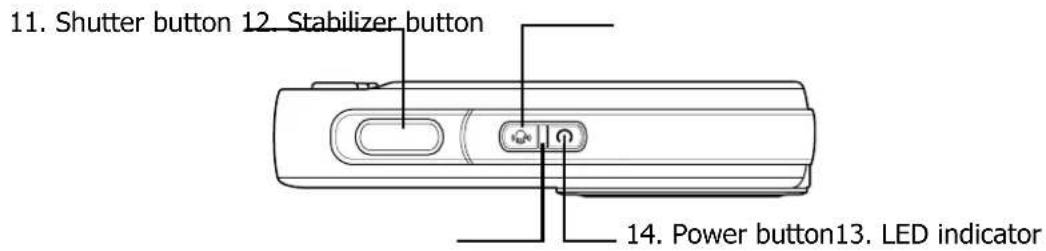
Bottom View

Left View

Navigation Control
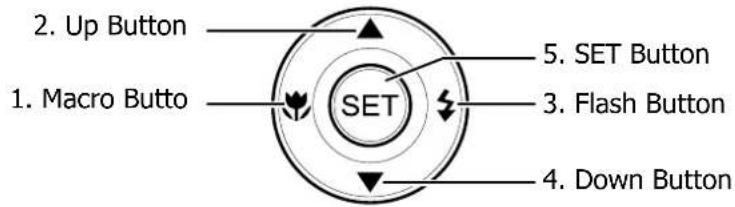
You can choose camera settings by pressing the 4-way control or the button.
Left/Macro:1.
Scrolls left in menus.
Activates Macro mode or Auto Focus mode.
Up:2.
Scrolls up in menus.
Right/Flash:3.
Scrolls right in menus.
Selects a flash mode.
Down:4.
Scrolls down in menus.
- : Confirms a chosen setting.
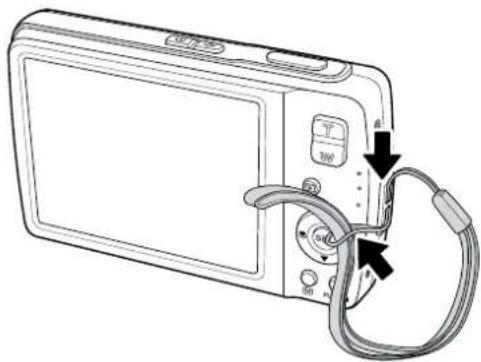
Attaching the Wrist Strap
Insert the short loop of the strap in the strap 1. eyelet.
Thread the larger loop of the strap though the 2. short loop and pull tight to attach the strap to the camera.
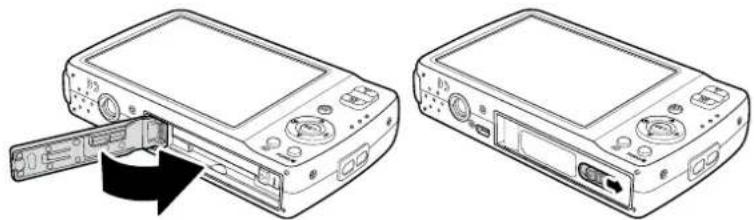
Inserting the Battery
Please read "Battery Information" on page v before inserting/removing batteries.
- Make sure the power is off before inserting the batteries.
- Open the battery compartment at the bottom of the camera.

Insert the battery into the compartment 3. with the terminal facing inside the camera and the battery indent next to the compartment door.

Close the battery compartment.4.
Inserting an SD/SDHC Memory Card
Open the battery compartment 1. at the bottom of the camera.

Insert the SD/SDHC card into the memory 2. card slot with the metallic part facing the front side of the camera.
Push the SD/SDHC card into the memory 3. slot until it clicks into place.

Close the battery compartment.4.
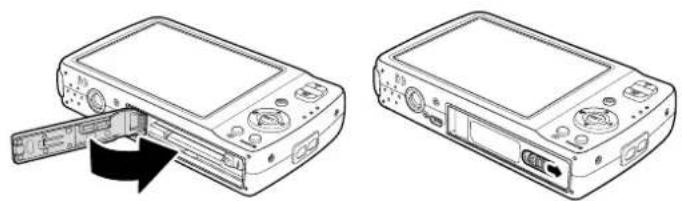
To remove the SD/SDHC card
Open the battery compartment.1.
Gently push the card until it pops out.2.
Pull out the card carefully.3.
Charging the Battery
The battery that comes along with your package is not charged. You need to charge the battery before using the camera.
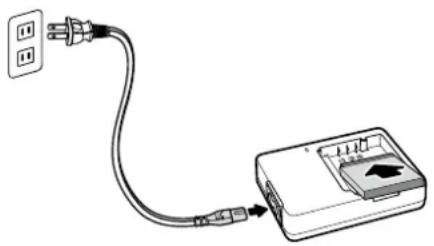
Insert the battery into the battery 1. charger as shown.
Connect the power cord to the battery 2. charger.
Plug the power cord to the main outlet.3.
The battery charging time is 2 hours.
The battery icon 📋 on the LCD monitor indicates the battery level.
Initial Settings
You will be prompted to set up the language and the date and time when the camera is turned on for the first time.
Setting the Language
Press ▲, ▼, or to move through the selection.
Select a language, then press SET to apply.2.
Setting the Date & Time
Press 🏠 or to move through the selection.
Press ▲ or ▼keys to change the value for the date and time.
Press SET to apply.3.
If necessary, press 4 to close the menu.

- Holding down the ▲ or ▼ changes the values continuously.
- If the batteries are removed for more than 48 hours, the Date & Time will have to be re-set.
Modes
Your camera has two modes:
Shooting mode
Set to Shooting mode to capture images and record videos and audio clips.
Shooting mode can be further set to mode options like auto, movie and scene selection • modes. See "Selecting the Shooting mode options" below.
Playback mode
Set your camera to Playback mode to view and edit captured images and playback videos • and audio clips. You can also attach voice memo to images in this mode.
When you turn on your camera using the Power button, you are automatically turned on to Shooting mode.
Switching between Shooting mode and Playback Mode
In Shooting mode, press the Play button to switch to Playback mode.
In Playback mode, press the Play button to switch back to Shooting mode.
Selecting the Shooting mode options
The mode options allow you to capture images with preset settings according to scene conditions.
Set the camera to Shooting mode.1.
Press 2 to launch Shooting mode Menu.
Select 3. Shooting Mode, then press to enter submenu.
- Select a mode.
- Press the SET button to apply selected mode.


Use the 4-way navigation control to move through the menu selections.
LCD Monitor Layout and Icon Descriptions
Shooting mode Screen Layout

| No. | Item | Description |
| 1 | Shooting mode | Indicates the current mode. |
| 2 | Flash | Indicates flash settings. |
| 3 | Self-Timer/Burst | Indicates Self-Timer/Burst settings. |
| 4 | Zoom indicator | Displays zoom. |
| 5 | Shots remaining | Indicates the remaining shots available. |
| 6 | Battery | Indicates battery level. |
| 7 | Storage media Indicates current | storage media in use. |
| 8 | Date stamp | Indicates date stamp is enabled. |
| 9 | Stabilizer | Indicates stabilizer function is enabled. |
| 10 | Saturation | Displays saturation settings. |
| 11 | Contrast | Displays contrast settings. |
| 12 | Histogram | Graphic display of ISO settings. |
| 13 | ISO | Displays ISO settings. |
| 14 | Focus area | Use to frame subject to capture. |
| No. Item Description | ||
| 15 Shake warning Indicates that the camera is shaking. | ||
| 16 Shutter speed Displays shutter speed settings. | ||
| 17 Aperture value Displays aperture settings. | ||
| 18 Exposure Displays exposure settings. | ||
| 19 AEB Displays AEB settings. | ||
| 20 Macro Indicates macro is enabled. | ||
| 21 Face tracking Indicates face tracking is enabled. | ||
| 22 White balance Displays white balance settings. | ||
| 23 Active Z-Lighting Indicates Z-lighting is enabled. | ||
| 24 Metering Displays metering settings. | ||
| 25 Sharpness Displays sharpness settings. | ||
| 26 Quality | Displays quality settings. | |
| 27 Resolution | Displays resolution settings. | |
| 28 AF lamp | Indicates AF lamp is enabled. | |
Playback Mode Screen Layout
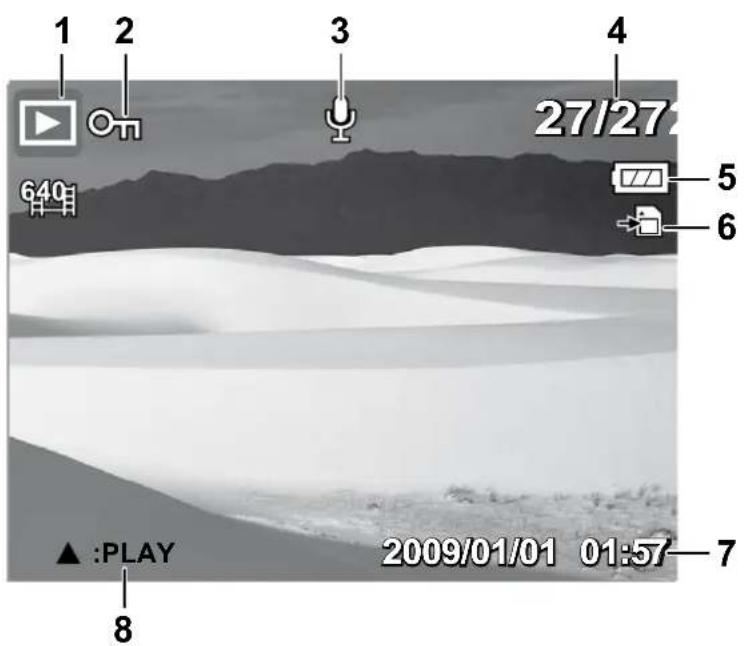
The Playback mode display varies depending on the type of image being viewed.
Playback mode display of still images:

| No. Item Description | ||
| 1 |  | Playback mode Indicates playback mode. |
| 2 |  | Protect Indicates file is protected. |
| 3 | [1X2T] | Voice memo Indicates voice memo is attached. |
| 4 | 27127 | File no. / Total no. |
| 5 |  | Battery Indicates battery level. |
| 6 |  | Storage media Indicates used storage memory. |
| 7 |  | Recording information Displays recording information of the file. |
| 8 | :PLAY | Button intro |
| 9 | [24X3] | DPOF Indicates the file is marked for printing. |
| 10 |  | Resolution Displays the resolution settings. |
Playback mode of videos:
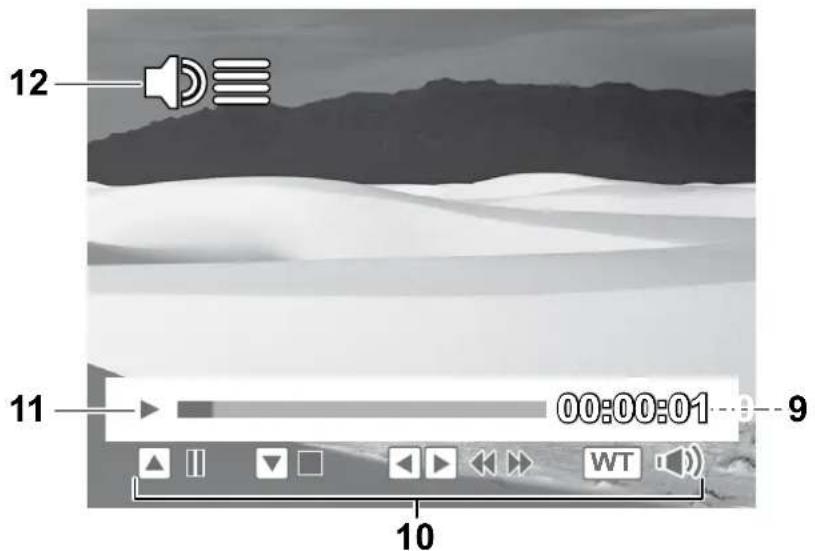
| No. Item Description | |||
| 1 |  | Playback mode Indicates playback mode. | |
| 2 |  | Protect Indicates file is protected. | |
| 3 | [2X07] | Voice memo Indicates voice memo is attached. | |
| 4 | 27127 | File no. / Total no. | Indicates the file number over the total number of files in the storage card. |
| 5 |  | Battery Indicates battery level. | |
| 6 |  | Storage media Indicates used storage memory. | |
| 7 | 2009/01/01 01:57 | Recording information Displays recording information of the file. | |
| 8 | ▲ :PLAY | Button intro | Indicates the button to press on the camera to play a movie or audio file. |
| 9 | 00:00:01 | Played time Indicates played time. | |
| 10 |    [ST75] [ST75] | Key indicator | Indicates the buttons to press on the camera to apply the functions. |
| 11 | ▶ | Playing status Displays playing status. | |
| 12 |  | Volume Indicates volume settings. | |
Playback mode of audio clips:

| No. Item Description | |||
| 1 |  | Playback mode Indicates playback mode. | |
| 2 |  | Protect Indicates file is protected. | |
| 3 |  | File no. / Total no. | Indicates the file number over the total number of files in the storage card. |
| 4 |  | Battery Indicates battery level. | |
| 5 |  | Storage media Indicates used storage memory. | |
| 6 | 2009/01/01 01:57 | Recording information Displays recording information of the file. | |
| 7 |  | Button intro | Indicates the button to press on the camera to play a movie or audio file. |
| 8 | 00:00:01 | Played time | Indicates played time. |
| No. Item Description | ||
9  | Key indicator | Indicates the buttons to press on the camera to apply the functions. |
| 10 ▶ | Playing status Displays playing status. | |
| 11 📋 | Volume Indicates volume settings. | |
Changing the LCD Monitor Display
The type of information displayed on the LCD screen can be changed using the SET button. In Shooting mode, the LCD display can be changed into any four of the following:
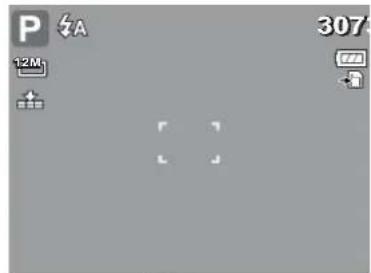
OSD on

Full OSD on
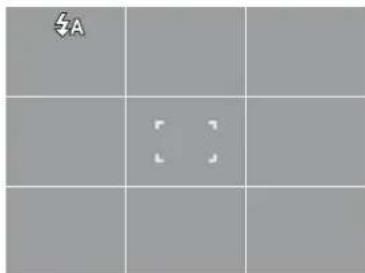
Guide lines on

OSD off

- The OSD information may vary depending on the Shooting mode type.
- The following icons, if enabled, are still displayed on the LCD even when OSD off or Guide lines on: AEB, Face tracking, AF lamp, Active Z-lighting, Self-Timer/Burst, and Macro.
- Use the "Guide lines" to properly set image for capture.
In Playback mode, the LCD display can be changed into any three of the following:
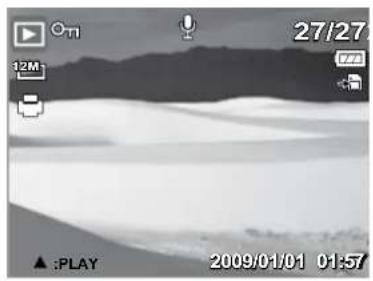
OSD on
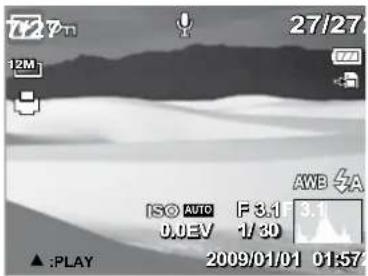
Full OSD on OSD off

LCD display cannot be changed in the following situations:
- Manual exposure mode
• Recording movie or audio clips - Playing movie or audio clips
- Playing slide show
Shooting Image
Taking Photos
Turn on the camera by pressing the 1. Power button.
Frame the shot using the focus bracket on the LCD 2. monitor. See illustration on the right.

Half press the 3. Shutter button. The camera automatically adjusts the focus and exposure. When the camera is ready to take the photo, the frame bracket turns green, the shutter speed and aperture value are displayed.
Fully press the 4. Shutter button to capture image.
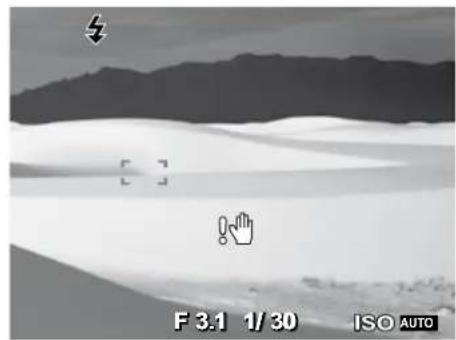
Using the Stabilizer
The Stabilizer function prevents blurred images caused by shaking.

To activate Stabilizer
- Press the Stabilizer button on top of your camera to enable/disable stabilizer. If Stabilizer is enabled, the stabilizer icon is displayed on the LCD monitor and the ISO setting is automatically set to Auto.

Setting the Zoom Control
Your camera features up to 3x optical zoom and up to 5x of digital zoom. Please refer to "Setting the Digital Zoom" on page 31 on how to setup digital zoom.
To adjusts the optical zoom:
Press the 1. Zoom buttons to zoom in or zoom out an image.
The zoom indicator appears on the LCD 2.
monitor. W□T

Press to zoom in.
Press to zoom out.
Zoom buttons
To adjusts the digital zoom:
Activate digital zoom.1.
Press the 2. T button to optically zoom in to the maximum until it stops.
Release the button.3.
Press the 4. T button again to switch to digital zoom automatically. Zooming continues.
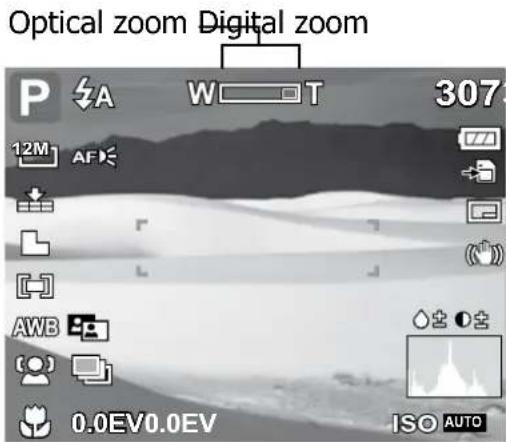
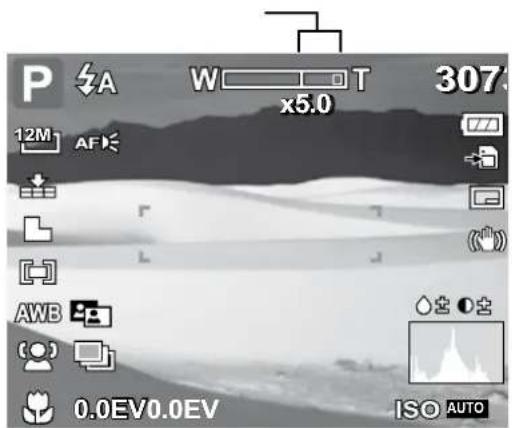

Digital zoom is not activated in recording movies.
Using Flash
When taking the picture in dim lighting condition, use the Flash to get correct exposure. This function cannot be activated in recording movies or continuous shooting.
To activate Flash:
- Press the Flash/Right button on your camera repeatedly until your desired flash mode is displayed on the LCD monitor.
Flash button

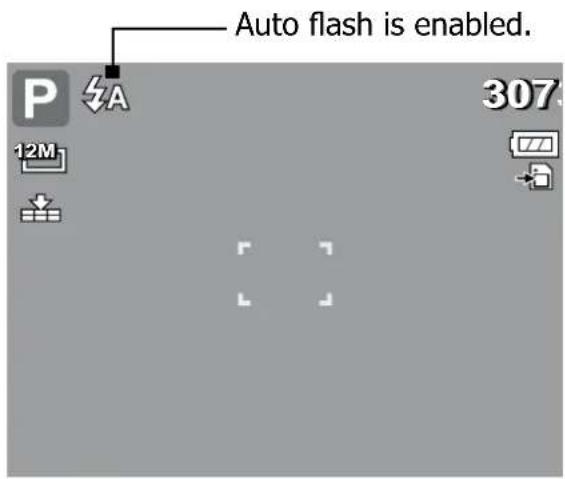
Your camera is equipped with five flash modes:
A Auto flash. The flash fires automatically whenever extra lighting is needed.
Red-eye reduction. The flash fires twice to reduce the red-eye effect.
Forced on. The flash fires whenever you press the shutter button regardless of lighting conditions.
SL Slow sync. The flash fires with a slow shutter speed.
Forced off. The flash is turned off.
Setting the Focus Mode
To set the Focus mode
Press the Macro button repeatedly until the desired focus mode icon is displayed on the • lower left corner of the LCD monitor.

Your camera supports the four focus modes: Normal. With normal focus, the focus range starts from 0.4m. There is no icon displayed on the screen.
Macro. This mode is designed for close-up photography. If Macro is enabled, you can capture the detail and sharpness of a very close image by fixed focus.
PF Pan Focus. The camera focuses on every object.
INF Infinity. The camera focuses on distant objects.

Using the Shooting Functions
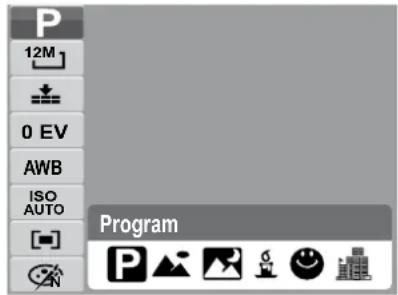
The hot key of "heart" (FUNC button) is used for a quick setup of the latest six shotting modes (My Mode) and to adjust capturing settings in Shooting Mode.

Press the FUNC button of your camera to launch My Mode Menu. Press the FUNC button again to close the menu.
The Menu options bar displays the • six latest used shooting modes.
The available options for each item • on the menu bar are shown in the Menu options.
Use the ⚡ or ↓ move through the menu selections then press the SET button to save and apply changes.

Shooting Mode
It shows the selected mode from Menu options bar.
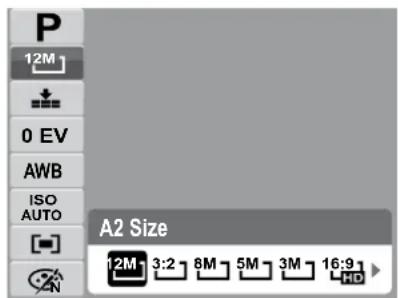
Resolution
The Resolution setting is used to set the resolution before you capture the image. The higher the resolution, the more memory space is required.
Quality
The quality setting lets you adjust the quality level of your photos before you capture them. However, the higher the quality, the more memory space is required in your memory card. The available settings for still images are as follows:


Super fine, ■ Fine, and Normal.
EV Compensation
In dim lighting condition, the auto exposure function of your camera may be misled into giving the wrong readings. The EV Compensation function allows you to adjust the exposure value and correctly expose your images. Available for still images only.
To adjust EV settings, press the 🎩 or ↓keys to increase/decrease the value. Press the SET button to save and apply changes.

The available settings are: 0EV, +0.3EV, +0.7EV, +1.0EV, +1.3EV, +1.7EV, +2.0EV, -0.3EV, -0.7EV, -1.0EV, -1.3EV, -1.7EV, -2.0EV.
White Balance
The White Balance setting allows you to adjust the image color temperature according to the ambient light condition when recording the still images and movies.

| Icon Item Description | ||
| AWB | Auto The camera automatically adjusts the white balance. | |
 | Daylight Ideally used for bright sunny conditions. | |
 | Cloudy Ideally used for cloudy conditions. | |
 | Tungsten | Ideally used for indoor photos with tungsten or halogen lighting without a flash. |
 | Fluorescent 1 | Ideally used for indoor photos with near blue fluorescent lighting conditions. |
 | Fluorescent 2 | Ideally used for indoor photos with near red fluorescent lighting conditions. |
 | Custom | Used when light source cannot be specified. Press the shutter button for the camera to automatically adjust the appropriate white balance setting according to the environment. |
ISO
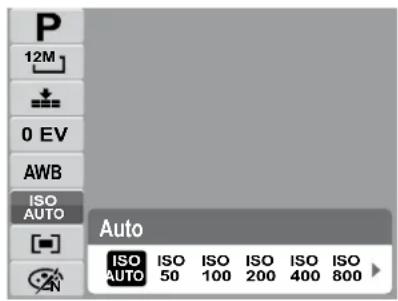
The ISO function lets you adjust the ISO sensitivity in recording still images depending on the lightning levels of your surroundings.
Use a higher ISO setting in dim conditions and a lower ISO • setting in brighter conditions.
Available settings are: Auto, 50, 100, 200, 400, 800, 1600, • and 3200.

- If the Stabilizer is enabled, ISO is automatically set to Auto and cannot be adjusted. To adjust ISO, disable Stabilizer first.
- ISO 3200 setting is not available when the resolution is set to more than 3M.
Metering
The Metering function lets you select the area of the subject or frame by which the camera measures light to record still images or movies.
![P 12M 0 EV AWB ISO AUTO Multi [®] [•]](/content/2026/05/1061010/images/978912e6c2df4eea95e03be853b65d3beb7e23003bab08887d7767313d9ed974.jpg)
| Icon Item Description | ||
 | Multi | The camera measures the exposure readings from multiple points in the subject area. |
 | Center | The camera measures the average light from the entire frame but gives more importance to the values near the center. |
 | Spot | The camera selects the exposure value based on the center of your picture. |
Color Mode
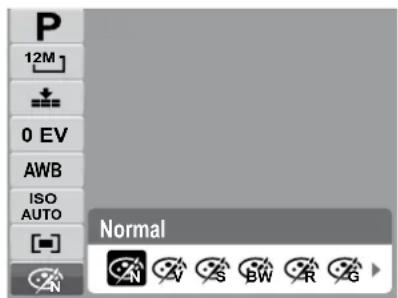
The Color Mode function lets you record still images or movies and apply different colors or tones for a more artistic effect.
| Icon Item Description | ||
 | Normal The camera records normally. | |
 | Vivid | The camera captures the image with more contrast and saturation emphasizing on the bold colors. |
 | Sepia Images are captured in sepia tones. | |
 | B&W Images are captured in black and white. | |
 | Vivid Red | Captured image becomes reddish. Ideally used to record images like flowers and cars to make them more vivid. |
 | Vivid Green | Captured image becomes greenish. Ideally used to record images like mountains and lawns to make them more vivid. |
 | Vivid Blue | Captured image becomes bluish. Ideally used to record images like the sky and the ocean, to make them look more vivid. |
Using the Record Menu

Menu
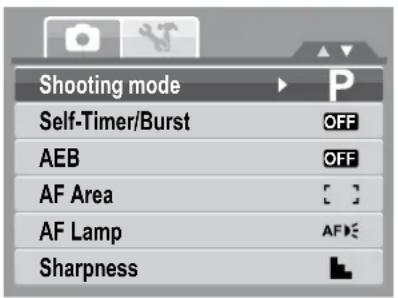
If you are in Shooting mode, you can access the Record menu simply by pressing the MENU button on your camera.
When the menu is displayed, use the 4-way navigation control and the SET button to move through menu selections and apply your desired settings. To close the menu anytime, press the menu button again.
To go to Record Menu:
Set the camera to Shooting mode.1.
Press 2 to launch the Record Menu.
Use the ▲ or ▼keys to move through the menu selections.
To select an item, press 4.
Change the submenu settings using the 4-way 5. navigation control.
Press the 6. SET button to save and apply settings.
| Shooting Mode | P |
| Self-Timer/Burst | OFF |
| AEB | OFF |
| AF Area | [ ] |
| AF Lamp | AF |
| Sharpness |
Setting the Scene Mode
Setting the Scene allows you to capture images with preset settings according to the scenes or environment.
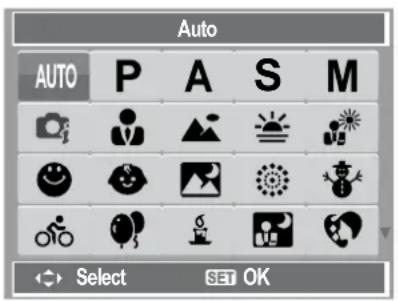
The table below shows the available scene mode settings.
| Icon Item Description | ||
| AUTO | Auto | The simplest way to shoot basic images. Settings are adjusted automatically. |
| [2406] | Program | The camera automatically adjusts suitable shooting settings like shutter speed and aperture values. |
| [08ZX] | Aperture Priority | This feature lets users to adjust the aperture value and the camera automatically selects the shutter speed to match the brightness. |
| [70C5] | Shutter Priority | This feature lets users to adjust the shutter speed and the camera automatically selects the aperture value to match the brightness. |
| [64T2] | Manual Exposure | This feature lets users to adjusts the shutter speed and aperture value to correctly expose your images. |
 | Intelligent Scene | The camera detects the shooting conditions and automatically switches to the appropriate scene mode. |
| [CCHZ] | Portrait | The camera blurs the background to focus on the subject. |
 | Landscape This feature is used to emphasize wide scenic views. | |
| [A2X0] | Sunset | This feature enhances the red hue for recording sunset images. |
| [CCHZ] | Backlight | This feature is used to capture the image of a backlight object by changing the metering. |
| [SECZ] | Smile Capture | This feature uses face tracking to auto detect faces to capture. When smiles are detected, it continuously captures the image. |
 | Kids | This feature is used to capture still images of moving kids. |
| [3ZSY] | Night Scene | This feature is used to capture images with night scenery background. |
| [14TD] | Fireworks | This feature slows shutter speed to capture fireworks explosions. |
| [0587] | Snow This feature is used for beach and snow scenes. | |
| [CA4H] | Sports | This feature captures still images in high speed motions. |
| [SKDZ] | Party | This feature is used for wedding or indoor party settings. |
| [5340] | Candlelight | This feature is used to capture warm candle light effects. |
 | NIGHT Portrait | This feature is used to capture portrait pictures with night or dark background. |
 | Soft Skin | This feature enhances skin tone thus facial skin appears smooth. |
 | Soft Flowing Water This feature | enhances smooth effects like water or silk. |
 | Food | This feature is used to capture food images. The increased saturation in this mode makes the captured image more enticing. |
 | Building This feature enhances the edges of captured images. | |
 | Text | This feature enhances the black and white contrast normally used when capturing text images. |
 | Auction | Pictures taken in Auction mode are automatically saved under a specific folder named “_AUCT”. |
 | Blink Detection | This feature detects if the subject blinked an eye when the image is captured and gives the user an option whether to save it or not. |
 | Movie This mode is used to record movie clips. | |
 | Voice REC This mode is used to record audio clips. | |
Using Smile Capture Scene
The Smile Capture mode uses smile tracking to automatically capture images. Pressing the shutter button will enable the camera to take 6 continuous shots whenever a smile is detected. This feature is most useful in capturing different angles and smiles of moving people. When capturing an image with more than one person, the camera detects the smile of the closest person on the center of the screen.
To activate Smile Capture
Select 😊 from the Scene Mode submenu.
Smile Capture Icon
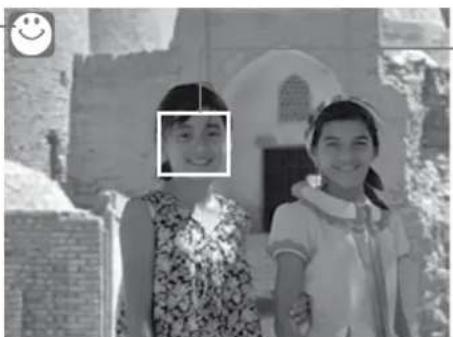
The camera displays a white frame when a face is detected.
Focus the camera on the subject to capture.2.
Press the shutter button to start smile detection. The smile capture icon blinks every 3. second and the white focus frame turns green to denote camera activity.
When a smile is detected, the camera will automatically take a shot of the image. It will 4. continuously take 6 shots whenever a smile is detected.
To stop shooting before the 6 shots are taken, press the shutter button again. The smile 5. capture icon stops blinking and the focus frame turns white.

When capturing an image with several faces, face tracking function may take up more time tracking faces for the first time.
Using Intelligent Scene Mode
With the Intelligent Scene Mode, the camera automatically detects the shooting conditions and switches to the appropriate scene and settings when aiming on a subject. This feature is most useful for novice users to capture great images even without basic knowledge of photography.

To activate Intelligent Scene
Select 1. from the Shooting Mode submenu.
Focus the camera on the subject to capture.2.
The camera detects the shooting conditions and switches to an appropriate scene mode.3.

Half press the shutter button to focus the subject. The frame turns green to indicate focus 4. is set.
Press the shutter button to take the shot.5.
The table below shows the modes supported by Intelligent scene:
| Icon | Intelligent Scene Modes | Description |
 | Portrait This mode is set when a face is detected. | |
 | Backlight | This mode is set when a face is detected with an EV setting greater than 2.5. |
 | Landscape | This mode is set when:There is no face detected.•The focus distance is more than 1.5 meters.•The EV setting is greater than 11 or 10.5.• |
 | Macro | This mode is set when:There is no face detected•The focus distance is within the macro range.•This mode can only be detected when you half press the shutter button. |
 | Night Scene | This mode is set when:There is no face detected.•The focus distance is more than 1.5 meters.•The EV setting is lower than 5 or 4.5.• |
Using Blink Detection Mode
The Blink Detection mode tracks faces and determines captured image that contain subjects with blinked eyes. This feature saves time in managing photos to be stored or deleted from the memory.
To activate Blink Detection
Select 🔺! from the Scene Mode submenu.
Blink Detection Icon
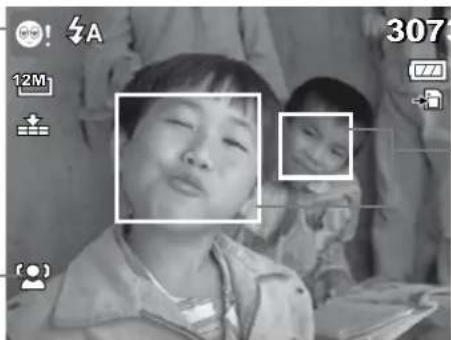
Detected faces are framed.
Face tracking is automatically enabled.
Half press the shutter button to focus the subject. The 2. frame turns green to indicate focus is set.
Press the shutter button to capture the image. The 3. image is automatically saved unless the camera detects that the subject blinked an eye. In this case, the screen on the right is displayed.
Select 4. Save Image to save or Cancel to disregard.

Using Aperture Priority Mode
To activate Aperture Priority
Select A from the Scene Mode submenu.
Aperture Priority Icon

Displays the aperture value.
Use the keys to increase or decrease the aperture.2.
Press the shutter button to capture the image.3.
To activate Aperture Priority
Select S from the Scene Mode submenu.
Shutter Priority Icon
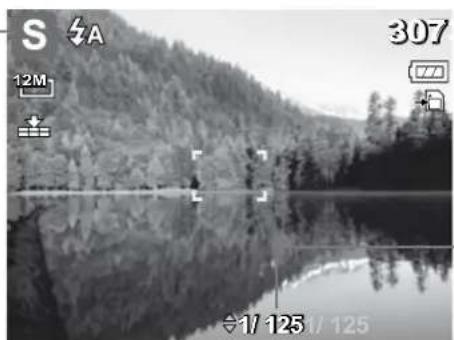
Displays the shutter speed value.
Use the ▲ or▼ keys to increase or decrease the shutter speed.
Press the shutter button to capture the image.3.
Using Manual Exposure Mode
To activate Manual Exposure
Select M from the Scene Mode submenu.
Manual Exposure Icon
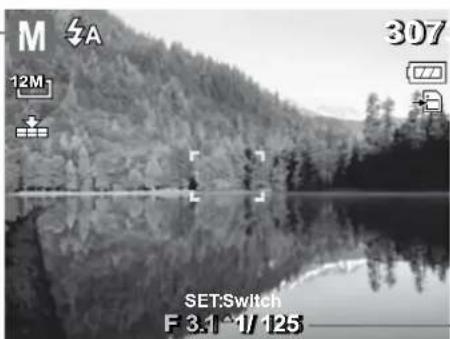
Displays the aperture and shutter speed values.
Use the ▲ or▼ keys to increase or decrease the aperture or shutter speed values.
Use the SET button to switch between aperture and shutter speed adjustment and vice 3.
versa.
Press the shutter button to capture the image.4.

When you half press the shutter button, the difference between the correct and selected exposure is displayed in red.
Setting the Self-Timer/Burst
Your camera features a Self-timer and Burst which can be set in the Self-Timer/Burst function in the Record Menu. The Self-timer allows you to take photos after a pre-defined delay. While burst lets you take consecutive shots. This function is only available in recording still images. The Self-Timer/Burst setting is automatically set to off when you turn off the camera.
![Shoot Mode Self-Timer/Burst OFF AEB OFF AF Area [ ] AF Lamp AF Sharpness](/content/2026/05/1061010/images/49b46364450ca23322cff2541f2a2a3e977eb57392da420b30c8b2db22386205.jpg)
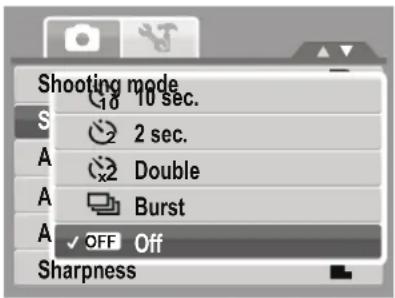
The table below shows the available Self-Timer/Burst settings.
| Icon Item Description | ||
 | 10 Sec Self-timer | Sets a 10-second delay to capture image after pressing the shutter button. |
 | 2 Sec Self-timer | Sets a 2-second delay to capture image after pressing the shutter button. |
 | Double Self-timer | Performs delay and capture twice:Performs a 10-second delay, then captures the • image.Performs another 2-second delay then captures the • image again. |
 | Burst | Performs continuous shooting when the shutter button is pressed. Stops shooting when the shutter button is released. |
| OFF | Off Captures an image without time delay. | |
Setting the AEB
AEB stands for Automatic Exposure Bracketing. This feature captures the same image with 3 different exposure settings.
The settings are recorded in the following order: standard • exposure, under exposure, and over exposure.
Available settings are: [On] and [Off].

Setting the AF Area
AF stands for Automatic Focus. This feature determines the area on which the camera focuses.
![Shooting Mode Self-Timer/Burst OFF AEB Face Tracking ✓ [ ] Wide A Center Sharpness](/content/2026/05/1061010/images/aa435dda1a6ba8a269ca82e0c952dec12de7e17ea753b8bee736b7a659c3e22a.jpg)
The table below shows the available AF area settings.
| Icon Item Description | ||
 | Face Tracking | The camera automatically detects the position of a face and sets the focus. |
 | Wide | The camera automatically selects focus area within the wide frame. |
 | Center The focus area is fixed | on the center. |
Setting the AF Lamp
The AF Lamp function allows you to record images even in low light conditions.
If AF Lamp is set to Auto, the AF lamp located in the front of the camera, emits an amber light by half pressing the shutter button allowing the camera to focus easily. Available settings are: [Auto] and [Off].

Setting Sharpness
This function allows you to enhance or soft finer details of your photos.
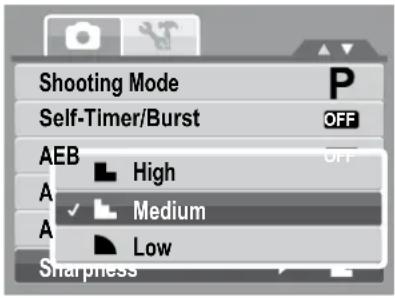
The table below shows the available Sharpness settings.
| Icon Item Description | ||
 | High Sharpens the image. | |
 | Medium Medium sharpness. | |
 | Low Softens the image. | |
Setting Saturation
The Saturation function lets you adjust the color saturation in your photos. Use a higher saturation setting for rich colors and a lower saturation setting for more natural tones.

The table below shows the available Saturation settings.
| Icon Item Description | ||
 | High Enhances saturation. | |
 | Normal Normal saturation is applied. | |
 | Low Reduces saturation. | |
Setting Contrast
This function allows you to adjust the contrast of your photos.
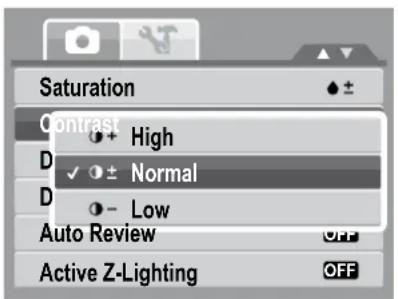
The table below shows the available Contrast settings.
| Icon Item Description | ||
| ➊+ | High Enhances the contrast. | |
| ➊± | Normal Normal contrast. | |
| ➊- | Low Reduces the contrast. | |
Setting the Digital Zoom
Your camera enlarges an image using the optical zoom first. When the zoom scale exceeds 3x, the camera uses digital zoom.
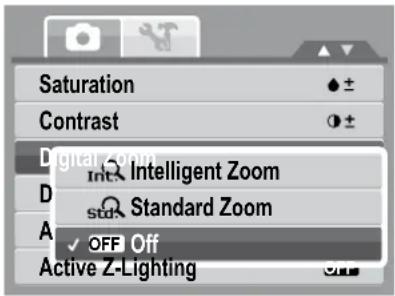
The table below shows the available Digital Zoom settings.
| Icon Item Description | ||
| Standard Zoom | Enlarges all image sizes up to a maximum of 5x, but the image quality deteriorates. | |
| Off Uses the optical zoom only. | ||

- Digital Zoom is not available in Smile Capture, Video, and Voice Recording modes.
- The maximum Intellect zoom scale varies depending on the image type and resolution.
Setting the Date Stamp
The Date Stamp function allows you to add the recorded date and time on your photos. Once date and time are stamped on a photo, they can no longer be edited or deleted. Limitations of Date Stamp functions are as follows:
Available for still images only.
May slow down AEB/ continuous shooting when Date Stamp is enabled in /AEB/ Burst • mode.
If Date Stamp is enabled, digital zoom is automatically turned off.
In vertical or rotated images, the date and time on your photos still appear horizontally.


Available settings are as follows:
- Date
- Date & Time
• CFFF
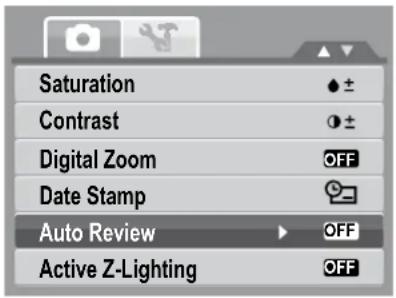
Setting Auto Review
The Auto Review function lets you view the captured image right after shooting it. If Auto review is On, the camera will display the captured image for 1 second on the LCD monitor.

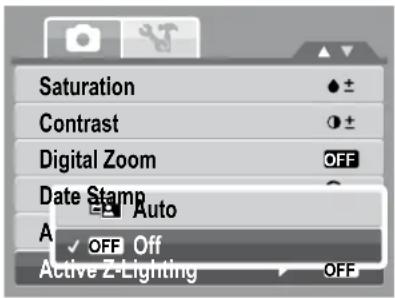
Setting the Active Z-Lighting
The Active Z-Lighting adjusts the metering and applies the required Z-lighting according to shooting conditions. This function is only available for still images.
Available settings are: [Auto] and [Off].
Recording Movies
You can record movies with the camera, the available recording time depends on the capacity of the memory card. Videos can be recorded until the maximum memory capacity has been reached.
From the Shooting mode menu, select 1. Video.
Focus your camera on the subject that you want to take.2.
Press the Shutter button to start recording.3.

Use the 4W control to zoom in and zoom out an image.
To pause recording, press the ▲ key.
To continue recording, press the ▲ key again.
To stop recording, press the Shutter button.7.
![Shooting Mode Self-Timer/Burst OFF AEB OFF AF Area [ ] AF Lamp OFF Sharpness](/content/2026/05/1061010/images/880bc2613b7e37faeb184dfa0ce39af06656d398bdbdcb9b3ee2416c9f642466.jpg)


When the maximum capacity for a single video has been reached, simple press the shutter button again to continue recording.
The camera will automatically stop recording when the memory capacity is full. Digital zoom is not available in movie recording.
Sound cannot be recorded while pressing the control.
Setting the Movie Size
The Movie Size function icon appears only in Video Mode. Use "FUNC" button to adjust the resolution and quality of movie clips.

YouTube Mode
The YouTube Mode allows you to record movies with predefined video settings for easy upload to the YouTube website.
YouTube supports two file upload standards:
Single File Uploader. The maximum movie file size is up to 100 MB.
- YouTube Uploader. The maximum movie file size is up to 1 GB.
Most uploaded movie length ranges within 5 minutes, although you can upload a maximum movie length of 10 minutes.
Recorded movies in the YouTube mode are stored following the DCF rule, however movies are saved in a specific folder named “_UTUBE”.
To record a YouTube movie, select from the Movie Size function.
Available recording time for a YouTube movie is up to 10 minutes.
Recording Voices
From the Shooting mode menu, select 🎨 Voice REC. The Voice Recording screen layout is displayed on the LCD monitor. Press the Shutter button to start recording.2. Press the Shutter button again to stop recording.3.

Using the Viewing Functions
View images, videos and audio clips through your camera's Playback mode.
Viewing in Single Navigation
The Single navigation mode displays the image one by one on the LCD monitor. To view images/videos/audio clips, follow the steps below.
Press the 1. Play button to set or turn on the camera to Playback mode.
The LCD monitor displays an image.2.
Still Image Movie Audio Clip


Use the 🔊 of keys to view next/previous image/video/audio.
To play a movie or audio clip, press the ▲ key.
Viewing thumbnails
Press the 1. W button to view 9-image thumbnails.
Use the navigation controls to move through the items.2.
Press the 3. SET button to select the image and view it normally.
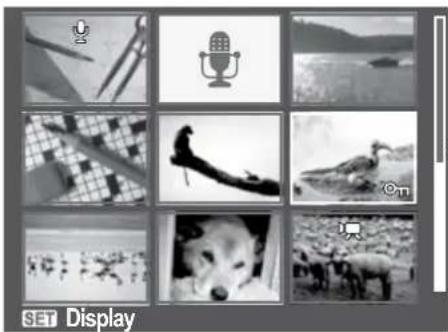
Scroll bar. If scroll bars appear, it indicates that the screen can be scrolled.
Thumbnail view
Thumbnail icons
When you view the thumbnails, some images may contain icons. These icons indicate the type of file or recording.
| Icon Item Description | ||
 | Voice Memo Indicates that a voice memo is attached to the image. | |
 | Movie | Indicates a recorded movie. The image displayed is the first frame of the movie clip. |
 | Locked File | Indicates that the image has been locked. Locked files cannot be edited or deleted. |
 | Voice Record Indicates a voice recording file. | |
 | File Error Indicates an error file. | |
Zooming images
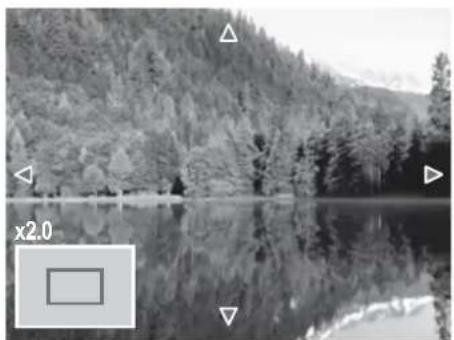
The zoom view function works with still images only.
- In normal view, press the T button repeatedly until the desired zoom view.
The 4 arrows on the LCD monitor indicate that the • image is zoomed in.
Press the • Play button to close zoom view.
Playing Movies

Set the camera to Playback mode.1.
Use the navigation controls to scroll through the saved 2. images. A movie clip has a movie icon displayed on screen. See picture on the left.
Press the ▲ key to play the movie.
-
During playback, press the 🎨 or ⚡ keys to fast forward or rewind the movie. The camera supports forward and rewind speed of up to 4x.
-
During playback, use the T to control volume. Press the T button to increase volume. Press the W button to decrease volume.

Press the ▲ key to pause playback. Press the ▲ key again to resume.
To forward or rewind the movie frame by frame, press the ▲ key to pause playback, then press 🔊 or ↓the keys.
Press the 8. key to stop the playback. The LCD monitor displays the movie frame image in Single navigation mode.
To capture screenshot image from a movie clip
During playback of movie, press the ▲ key to pause playback on your desired movie frame to capture.
Press the Shutter button to capture screenshot.2.
The camera will automatically stop playback. The LCD 3. monitor displays the captured image in Single navigation mode.


This feature does not function when the memory card is full or the folder cannot be created. The SHUTTER icon does not appear on the screen either.
Playing Voice Recording
Set the camera to Playback mode.1.
Use the navigation controls to scroll through the saved 2. images. When viewing a voice recording file, the LCD monitor displays the screen layout of Audio clips. See picture on the right.
Press the ▲ key to play the voice recording.
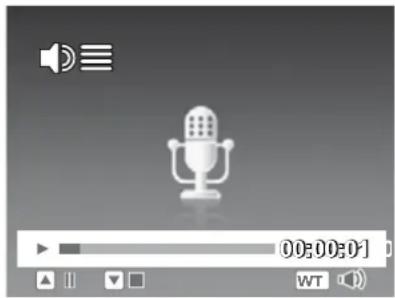
During playback, use the 4W to control volume. The volume icon appears on the screen. Press the T button to increase volume. Press the W button to decrease volume.
Press the ▲
key to pause playback ▲ Press the
key again to resume.
Press the 6 key to stop the playback. The LCD monitor displays the image in Single navigation mode.
Playing Voice Memo
Voice memo is separately recorded and attached to a captured image.

Deleting an Image/Video/Audio
Using the Delete Button
Use the Delete button on your camera to delete or mark an image/video/audio clip for deletion.
Set the camera to Playback mode.1.
View images/videos/audio clips in Single navigation mode.2.
Use the 🎨 or ↓keys to scroll the display.
When the desired image/video/audio clip is displayed on 4. the LCD monitor, press the Delete button.
A confirmation selection appears on screen.5.
-
Select Delete.
-
Press the SET button to delete.
-
The next image is displayed on the LCD monitor. To delete another file, use the 🎨 or ↩ to scroll through the images/videos/audio clips. Then, repeat steps 4 to 7.
-
To close the Delete function and go back to viewing in single navigation mode, select Cancel.

Locked files cannot be deleted at any time. When you try to delete a locked file, the camera displays "File Locked" message on the LCD monitor.


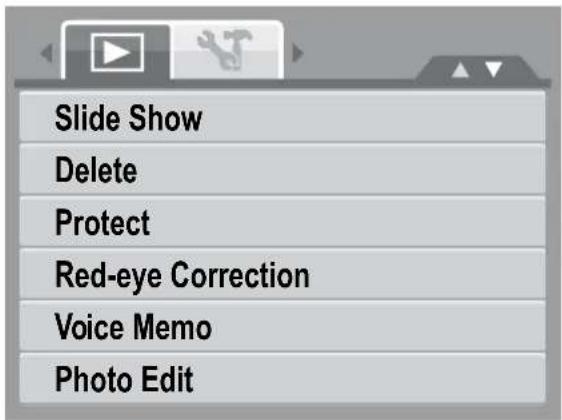
Playback Menu
To go to Playback Menu:
Set the camera to Playback mode.1.
Press 2 to launch the Playback Menu.
Use ▲▼keys to move through the menu selections.
To select a menu, press 4. or the SET button.
Change the submenu settings using the 4-way 5. navigation control.
Press the 6. SET button to save and apply settings.
Slide Show
To view slide show:
From the Playback menu, select 1. Slide Show. The Slide Show menu appears.
Set the Slide Show settings.2.
Select 3. Start, then press the SET button to start the Slide Show.
-
During Slide Show, press the SET button to pause Slide Show.
-
Use the ▲ or ▼ keys to move through the options. Select whether to Continue or Exit the Slide Show.
Press the 6. SET button to apply selected option.

To change Slide Show settings:
-
From the Slide Show menu, use the ▲ or ▼ keys to move through the selections.
-
Select Interval setting. Press the 🔊 or ↕ keys to adjust. Choose among the available interval settings: 1 sec, 3 sec, 5 sec, and 10 sec.
-
Select Transition setting. Press 🔊 or ↓ the keys to adjust. Choose among the available transition settings:
-
Horizontal
- Shrink
- Fade
- Vertical
-
Random
-
Select Repeat setting. Press the 🔊 or ↓ keys to adjust. Available settings are: Yes, No.
Delete
To delete a photo/video/audio clip:
From the Playback menu, select 1. Delete.
The Delete submenu is displayed on the LCD monitor. 2.
Select available settings:
Single.• Select one file to delete.
Voice Only.• Delete only the attached voice memo, the image is retained in the memory.
Multi.• Select multiple files to delete at the same time.
All.• Delete all files.

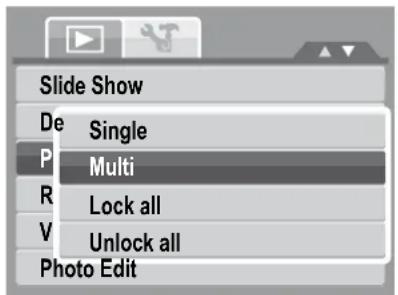
Protect
The Protect function lets you lock a photo or video to protect it from being modified or accidentally erased. A protected file has a lock icon when viewed on Playback mode.
To protect files:
From the Playback menu, select 1. Protect.
The Protect submenu is displayed on the LCD monitor. 2.
Select available settings:
Single.• Select one file to lock.
Multi. Select multiple files from the thumbnail view to lock.
- Lock All. Lock all files.
- Unlock All. Unlock all files.
Red Eye Correction
This function is only available for still images. Red eye correction can be applied to an image several times, but the quality may gradually deteriorate.
To activate Red Eye Correction:
- Set the camera to Playback mode.
- Press the 🎨 or ↓ keys to scroll and select an image.
- Press the MENU button to launch the Playback menu.
- Select Red Eye Correction.
- Select Start.
- Press the SET button to start correction.

Steps 5 and 6 Step 7
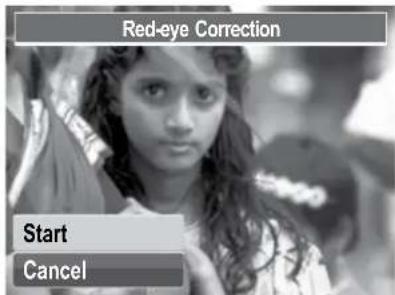

After completing Red eye correction, a menu selection appears. Select whether to:7.
Overwrite.• Save and replace the old file with the new one.
Save As.• Save the new file as a new one.
Cancel.• Cancel red eye correction.
Press the 8. SET button to save/cancel changes.
Voice Memo
To record voice memo:
Set the camera to Playback mode.1.
Press the 🔊 or ↕ keys to scroll and select an image to attach voice memo to.
Press the 3. MENU button to launch the Playback menu.
Select 4. Voice Memo.
- Select Start, then press the SET button to start recording.
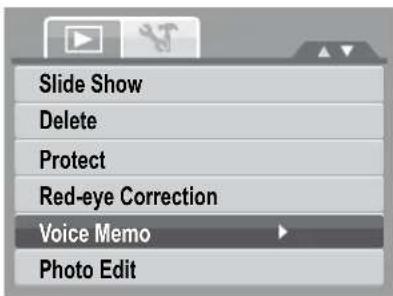

- Select Stop, then press the SET button to stop recording.
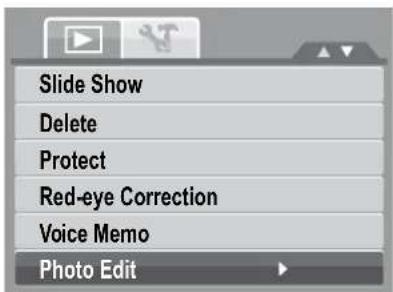
When you record voice memo to an image with an existing voice memo, the old recording is automatically changed to the new one.
Photo Edit
To activate Photo Edit:
Set the camera to Playback mode.1.
Press the 🔊 or ↓keys to scroll and select an image to edit.
Press the 3. MENU button to launch the Playback menu.
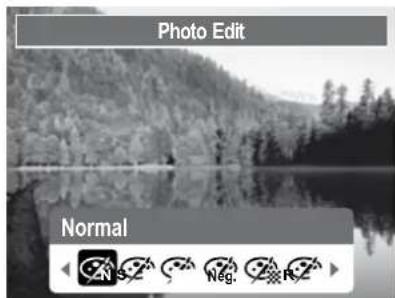
Select 4. Photo Edit. The Photo Edit submenu appears.
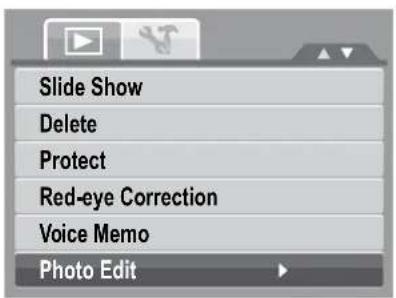
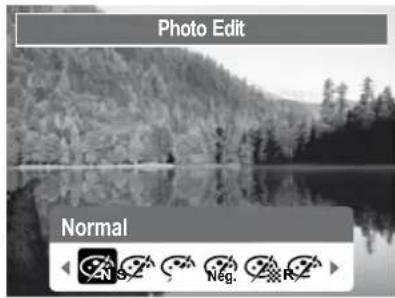
Press the 5 of keys to scroll and select an option. As you move through the selection, the preview on the LCD monitor changes synchronously. The succeeding table shows the available settings.
| Icon Item Description | ||
 | Normal No effect is added to the image. | |
 | Sepia Image is saved with a sepia tone. | |
 | B&W | Image is saved in black and white. |
 | Negative | Image appears to be the opposite of the original image. |
 | Mosaic | Image is saved with mosaic tiles. |
 | Vivid Red | Image is saved with reddish tint. |
 | Vivid Green | Image is saved with greenish tint. |
 | Vivid Blue | Image is saved with bluish tint. |
Press the 6. SET button to apply changes and save the new file.
Z-Lighting
The Z-Lighting function allows you to manually adjust the exposure to compensate for inadequate lighting conditions. This function is only applicable for still images.


Rotate
The Rotate function lets you change the orientation of a saved photo. Rotated images are saved as a new file.
Normal orientation of image. Image rotated at 90° clockwise.

Each time you press the SET button to rotate image, the image is rotated at 90° clockwise.
Trim
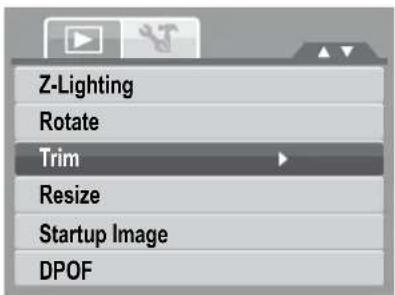
The Trim function allows you to trim an image to another image size.
To trim an image:
Set the camera to Playback mode.1.
Use the 🔊 or ↓ keys to scroll and select an image to trim.
Press the 3. MENU button to launch the Playback menu.
Select 4. Trim. The Trim screen layout is displayed on the LCD monitor.
Use the SW control to change size.
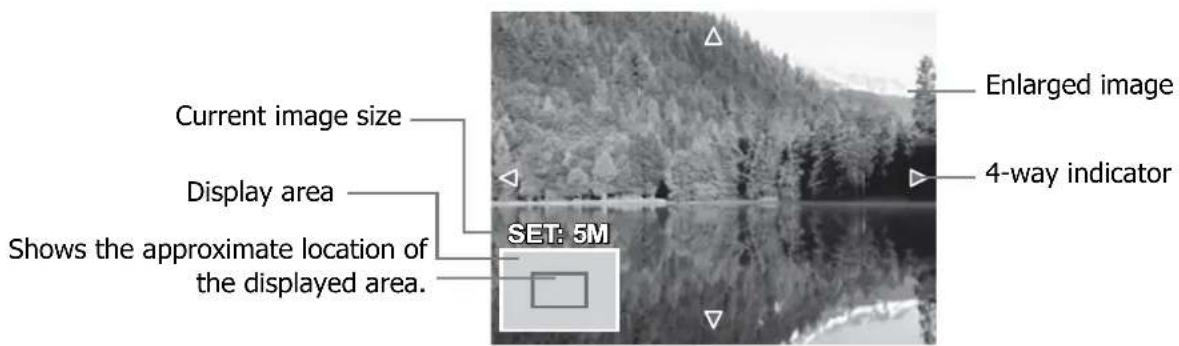
Use the navigation controls to move the image.6.
Press the 7. SET button to apply changes. A menu selection appears.
Select whether to:8.
Overwrite.• Save and replace the old file with the new one.
Save As.• Save the new file as a new one.
Cancel.• Cancel resize.
Press the 9. SET button to save/cancel changes.


Trim function is not available for photos with image size set to VGA.
Resize
The Resize function allows you to change the image resolution of large images to smaller ones.
- • Overwrite. Save and replace the old file with the new one.
Save As.• Save the new file as a new one.
Cancel.• Cancel resize.
Press the 2. SET button to save/cancel changes.
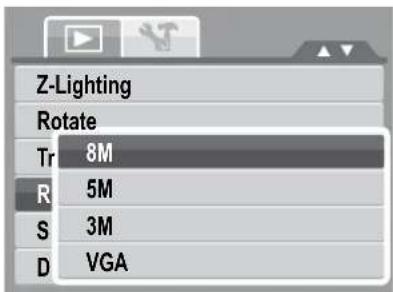
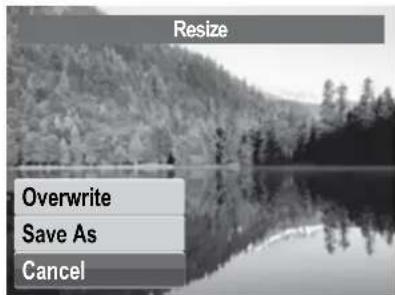

Resize function is not available for photos with image size set to VGA.
Startup Image
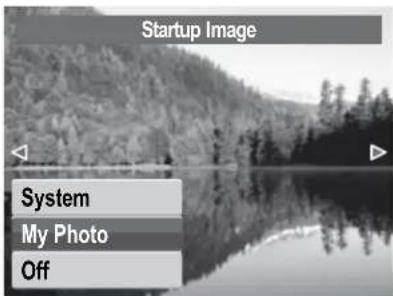
The Startup Image function allows you to setup a startup image when you turn on your camera.
DPOF
The Digital Print Order Format (DPOF) function allows you to mark image in your memory card for printing and allows you to specify the number of copies that you want to print at a later date. When all images to be printed are marked, take the memory card to a digital printing service, or use a DPOF compatible printer.

You can specify up to 99 copies for DPOF. If you specify 0 copies, the DPOF setting of that image is automatically disabled.
PictBridge
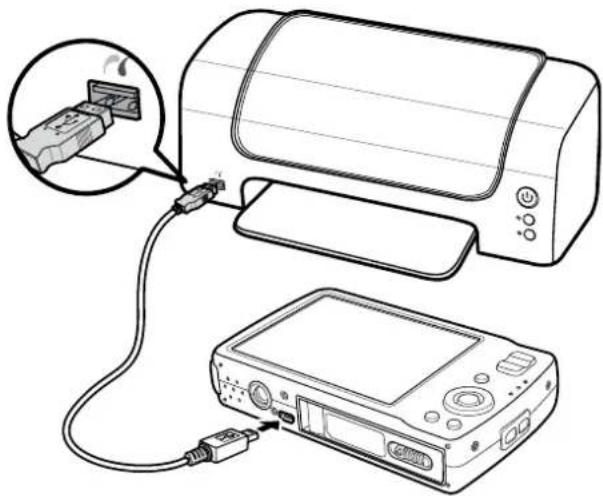
The PictBridge function allows you to print images captured by your camera without connecting the camera to a PC. Print images with a PictBridge compatible printer directly.
To activate PictBridge:
Connect your camera to a PictBridge compatible printer using the USB cable. See illustration below.
Using the Setup Menu
The Setup menu allows you to configure general camera settings.
To go to Setup Menu:
Press 📄 to launch the Record/ Playback Menu. Use the 🔊 or ↕ keys to change the menu tab to Setup ✉Menu.
Use the ▲ or ▼keys to move through the menu selections.
To select an item, press the 4. SET button or Change the submenu settings using the 4-way 5. navigation control.
Press the 6. SET button to save and apply settings.
| Sounds | |
| Power Save | 1min |
| Date & Time | |
| Language | |
| File Numbering | |
| TV Out | NTSC |
Making Connections Connecting the Camera to a PC
Connect the camera to a PC using the USB cable.1. Turn on the camera.2.
The PC detects the connection. The camera's 3. internal memory and memory card display as removable drives in the file manager. No image is displayed on the LCD monitor.


You can also use a card reader to access the memory card contents of your camera.
Connecting the Camera to a Printer
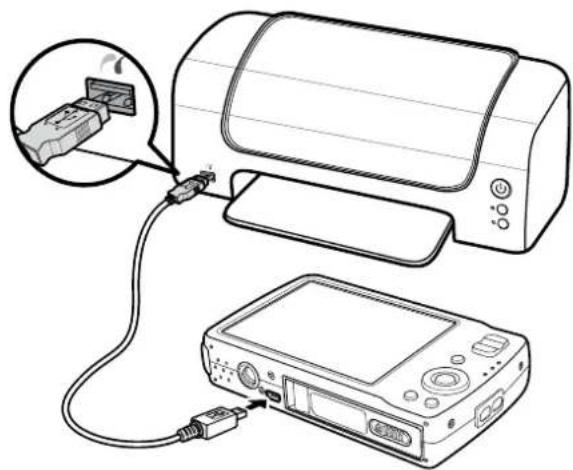
You can print your photos directly using a PictBridge compatible printer.
Turn on your camera.1.
Set PictBridge settings.2.
Connect the camera to the printer using the USB cable.3.
Troubleshooting
| Problem Cause and/or Action | |
| Camera does not turn on. The | batteries may be exhausted. Charge or replace the batteries. |
| Camera turns off automatically. | Press any button except the Power button to turn on the camera. |
| LCD turns blank. Press any button except the Power button to turn on the LCD. | |
| Empty battery icon is displayed on the LCD, then the camera turns off. | Batteries are exhausted, please replace or recharge. |
| LCD screen displays 'No image'. | The image file on the memory card. Image file format may not be supported. |
| LCD screen displays 'Not available for this file'. | Function is only available for specific file types. File format is not supported. |
| LCD screen displays 'Memory full'. | Memory card is full. Replace the memory card with a new one or delete unnecessary images. |
| LCD screen displays 'File locked' | This file is locked. Unlock the file. See "Protect" on page 39. |
| LCD screen displays 'Card locked'. | The memory card is protected. Remove the card and slide the write-protect switch to its unlock position. |
| LCD screen displays 'Format error'. | The memory card is protected. Remove the card and slide the write-protect switch to its unlock position. |
| LCD screen displays 'Copy error'. | The memory card is protected. Remove the card and slide the write-protect switch to its unlock position. The memory card is full. Replace card or delete unness-sary files. |
| No image displays on the TV screen. | Incorrect TV-out type was selected. Set the correct TV-out type to match your TV system. |
| The lens got stuck up. | Do not force the lens to go back. The type of the battery used may be incorrect or the battery power level is too low. Change the battery or charge the battery before using the camera. |
Specifications
| Sensor 12 Mega Pixels, Type: 1/2.3 | |
| Lens | Focal Length: f = 6.3 - 18.9 mm,3X optical zoom, 5x digital zoom |
| LCD Monitor 3.0" color LCD | |
| Focusing Range | Normal: 0.4m - InfinityMacro Wide: 10cm - 60cmTele: 40 - 60cm |
| Aperture F = 3.1 - 5.6 | |
| Shutter | Type: Mechanical and Electronic ShutterSpeed:Auto: 1 - 1/2,000 sec.Manual: 15 - 1/2,000 sec.Night: 15 - 1/2,000 sec.Fireworks: 8 sec. |
| File Format | Still Image: EXIF 2.2 compatible format (JPEG compression)Video: AVI (MJPEG)Audio: WAV |
| Resolution (Still image) | 12M (4000 X 3000), 3:2 (4000 X 2672), 8M (3264 X 2448),5M (2592 X 1944), 3M (2048 X 1536), HD (1920 x 1080),VGA (640 X 480) |
| Resolution (Video) 16:9, 640 X 480, 320 X 240, YouTube | |
| Scene Mode | Auto, Program, Aperture Priority, Shutter Priority, ManualExposure, Intelligent Scene, Portrait, Landscape, Sunset,Backlight, Smile Detection, Kids, Night Scene, Fireworks, Snow,Sports, Party, Candlelight, Night Portrait, Soft Skin, Soft FlowingWater, Food, Building, Text, Auction, Blink Detection, Movie, VoiceRec |
| Sensitivity | Auto, 50, 100, 200, 400, 800, 1600, 3200 (available only for 3Mresolution or lower) |
| White Balance | Auto, Daylight, Cloudy, Tungsten, Fluorescent_H, Fluorescent_L,Custom |
| Exposure Control -2EV to + | 2EV (1/3EV steps) |
| Metering Multi, Spot, Center-weighted | |
| Self-Timer 10 sec., 2 sec., Double | |
| Flash | Auto, Auto/Red-eye Reduction, Slow Sync/Red-eye Reduction,Forced On, Forced Off |
| Effect (Preview) Normal, Vivid, Sepia, Black & White, Red, Green, Blue | |
| Effect (Playback) Normal, Sepia, Black & White, Negative, Mosaic, Red, Green, Blue | |
| Storage | Internal memory: 32MB flash memoryReal size for mass storage: about 9 MBExternal memory: SD (up to 4GB), SDHC card (up to 16GB guaranteed) |
| OSD Language | English, Spanish, German, French, Italian, Portuguese, Dutch, Czech, Hungarian, Polish, Turkish, Russian, Swedish, Greek, Romanian, Arabic, Thai, Japanese, Korean, Simplified Chinese, Traditional Chinese, Brazil Portuguese, Croatian, Finnish, Danish, Norwegian, Malay, Indonesia, Slovene, Bulgarian, Slovak |
| Interface USB / AV OUT | |
| TV system NTSC, PAL | |
| Battery Lithium Ion Battery | |
| Operating Temperature 0°C - 40°C | |
| Operating Humidity 0% - 90% | |
| Microphone Built-in | |
| Speaker Built-in | |
| Dimensions | Max. 97.5 X 57.7 X 18.9 mmNormal 95.5 X 56.7 X 17.6 mm |
| Weight 130g | |
Getting Help
Should you have a technical support question or your HP Digital Camera require service within the warranty period, please contact the original point of purchase or an authorized HP reseller in your country. If service is not available at those locations, please contact an HP Branded Product warranty agent from the support contact list provided below. A service agent will work with you to troubleshoot your issue and if necessary, issue a Return Material Authorization (RMA) number in order to replace your HP Branded Product. For warranty claims, you will be required to provide a copy of your original dated sales receipt as proof of purchase and the issued RMA number. You will be responsible for shipping charges when shipping the product to the service center. The service agent will provide you with an address and you will also be responsible for any shipping charges to the warranty service center. Once your product is received by this service center, a replacement unit will be shipped back to you typically within 5 business days.
| Email Support: | |
| Language Email Address | |
| Dutch hollands@hpodd.com | |
| Chinese | simp.chinese@hpodd.com |
| trad.chinese@hpodd.com | |
| English english@hpodd.com | |
| Français français@hpodd.com | |
| Deutsch deutsch@hpodd.com | |
| Italiano italiano@hpodd.com | |
| Japanese nippon@hpodd.com | |
| Korean korean@hpodd.com | |
| Portuguese portugues@hpodd.com | |
| Espanol espanol@hpodd.com | |
| Svenska svensk@hpodd.com | |
| Contact/phone Support: | ||
| Country Language Number | ||
| Europe Region (EMEA) | ||
| België Dutch and German | + 32 2700 1724 | |
| FRANCE | French + 33 171230454 | |
| DEUTSCHLAND | German + 49 6950073896 | |
| IRELAND | English | + 353 1850882016 |
| ITALIA Italian + 39 269682 | 189 | |
| NETHERLANDS | Dutch | + 31 202015093 |
| ESPAÑA | Spanish + 34 914533458 | |
| SWITZERLAND | German/French/Italian | + 41 18009686 |
| UK | English | + 44 2073652400 |
| North America | ||
| United States | English | 1.866.694.7633 |
| Canada | English and French | 1.866.694.7633 |
- SAFETY AND HANDLING PRECAUTIONS ...... V
- USING THIS MENU....VII
- PACKAGE CONTENTS....1
- CAMERA VIEWS....1
- NAVIGATION CONTROL ....3
- ATTACHING THE WRIST STRAP....3
- INSERTING THE BATTERY....3
- INSERTING AN SD/SDHC MEMORY CARD 4
- CHARGING THE BATTERY 5
- INITIAL SETTINGS....5
- MODES....6
- LCD MONITOR LAYOUT AND ICON DESCRIPTIONS 7
- SHOOTING IMAGE 14
- TAKING PHOTOS....14
- USING THE STABILIZER ....14
- SETTING THE ZOOM CONTROL....15
- USING FLASH 15
- SETTING THE FOCUS MODE....16
- USING THE SHOOTING FUNCTIONS ....17
- USING THE RECORD MENU 21
- RECORDING MOVIES....33
- RECORDING VOICES....34
- USING THE VIEWING FUNCTIONS 35
- VIEWING IN SINGLE NAVIGATION 35
- VIEWING THUMBNAILS....35
- ZOOMING IMAGES 36
- PLAYING MOVIES....36
- PLAYING VOICE RECORDING....37
- PLAYING VOICE MEMO 38
- DELETING AN IMAGE/VIDEO/AUDIO ....38
- PLAYBACK MENU 39
- USING THE SETUP MENU ....46
- MAKING CONNECTIONS 47
- CONNECTING THE CAMERA TO A PC 47
- CONNECTING THE CAMERA TO A PRINTER 47
- TROUBLESHOOTING 48
- SPECIFICATIONS 49
- GETTING HELP 51
- PREFACE
- COPYRIGHT
- FEDERAL COMMUNICATIONS COMMISSION (FCC) COMPLIANCE
- DECLARATION OF CONFORMITY
- TRADEMARK RECOGNITION
- SAFETY AND HANDLING PRECAUTIONS
- CAMERA INFORMATION
- BATTERY INFORMATION
- BATTERY SAFETY NOTICE
- LITHIUM-ION BATTERY WARNING
- CAMERA & BATTERY RECYCLE NOTICE
- CAMERA ON OPERATING NOTICE
- ON OPERATING TEMPERATURES
- DO NOT USE/ STORE THE CAMERA IN THE FOLLOWING PLACES
- USING THIS MENU
- PACKAGE CONTENTS
- CAMERA VIEWS
- FRONT VIEW
- BACK VIEW
- TOP VIEW
- BOTTOM VIEW
- LEFT VIEW
- NAVIGATION CONTROL
- LEFT/MACRO:1
- RIGHT/FLASH:3
- ATTACHING THE WRIST STRAP
- INSERTING THE BATTERY
- INSERTING AN SD/SDHC MEMORY CARD
- CHARGING THE BATTERY
- INITIAL SETTINGS
- SETTING THE LANGUAGE
- SETTING THE DATE & TIME
- MODES
- SHOOTING MODE
- PLAYBACK MODE
- SWITCHING BETWEEN SHOOTING MODE AND PLAYBACK MODE
- SELECTING THE SHOOTING MODE OPTIONS
- LCD MONITOR LAYOUT AND ICON DESCRIPTIONS
- PLAYBACK MODE SCREEN LAYOUT
- CHANGING THE LCD MONITOR DISPLAY
- SHOOTING IMAGE
- TAKING PHOTOS
- USING THE STABILIZER
- TO ACTIVATE STABILIZER
- SETTING THE ZOOM CONTROL
- USING FLASH
- SETTING THE FOCUS MODE
- USING THE SHOOTING FUNCTIONS
- RESOLUTION
- QUALITY
- EV COMPENSATION
- WHITE BALANCE
- ISO
- METERING
- COLOR MODE
- USING THE RECORD MENU
- MENU
- SETTING THE SCENE MODE
- USING SMILE CAPTURE SCENE
- TO ACTIVATE SMILE CAPTURE
- USING INTELLIGENT SCENE MODE
- TO ACTIVATE INTELLIGENT SCENE
- USING BLINK DETECTION MODE
- USING APERTURE PRIORITY MODE
- USING MANUAL EXPOSURE MODE
- SETTING THE SELF-TIMER/BURST
- SETTING THE AEB
- SETTING THE AF AREA
- SETTING THE AF LAMP
- SETTING SHARPNESS
- SETTING SATURATION
- SETTING CONTRAST
- SETTING THE DIGITAL ZOOM
- SETTING THE DATE STAMP
- SETTING AUTO REVIEW
- SETTING THE ACTIVE Z-LIGHTING
- RECORDING MOVIES
- SETTING THE MOVIE SIZE
- YOUTUBE MODE
- RECORDING VOICES
- USING THE VIEWING FUNCTIONS
- VIEWING IN SINGLE NAVIGATION
- VIEWING THUMBNAILS
- THUMBNAIL ICONS
- ZOOMING IMAGES
- PLAYING MOVIES
- TO CAPTURE SCREENSHOT IMAGE FROM A MOVIE CLIP
- PLAYING VOICE RECORDING
- PLAYING VOICE MEMO
- DELETING AN IMAGE/VIDEO/AUDIO
- PLAYBACK MENU
- SLIDE SHOW
- TO CHANGE SLIDE SHOW SETTINGS
- DELETE
- PROTECT
- RED EYE CORRECTION
- VOICE MEMO
- TO RECORD VOICE MEMO
- PHOTO EDIT
- TO ACTIVATE PHOTO EDIT
- Z-LIGHTING
- ROTATE
- TRIM
- TO TRIM AN IMAGE
- RESIZE
- STARTUP IMAGE
- DPOF
- PICTBRIDGE
- USING THE SETUP MENU
- MAKING CONNECTIONS CONNECTING THE CAMERA TO A PC
- CONNECTING THE CAMERA TO A PRINTER
- TROUBLESHOOTING
- GETTING HELP
Brand : HP
Model : SB360
Category : Camera