
HIH20 - Heating Heller - Free user manual and instructions
Find the device manual for free HIH20 Heller in PDF.


| Product Type | Electric Heater |
| Brand | Heller |
| Model | HIH20 |
| Dimensions (L x W x H) | 40 x 30 x 20 cm |
| Weight | 2.5 kg |
| Power Supply | 220-240 V ~ 50/60 Hz |
| Power Consumption | 2000 W |
| Heating Element | Ceramic |
| Number of Power Settings | 2 (1000 W / 2000 W) |
| Thermostat Control | Adjustable thermostat |
| Safety Features | Overheat protection, tip-over switch |
| Ventilation | Fan-forced |
| Noise Level | < 45 dB |
| Coverage Area | Up to 25 m² |
| Housing Material | ABS Plastic |
| Color | White |
| Cleaning & Maintenance | Wipe with a damp cloth; avoid abrasive cleaners |
| Spare Parts Availability | Contact Heller customer service |
| Manual Languages | English (PDF available) |
Frequently Asked Questions - HIH20 Heller
User questions about HIH20 Heller
0 question about this device. Answer the ones you know or ask your own.
Ask a new question about this device
Download the instructions for your Heating in PDF format for free! Find your manual HIH20 - Heller and take your electronic device back in hand. On this page are published all the documents necessary for the use of your device. HIH20 by Heller.
USER MANUAL HIH20 Heller
natural_image
Technical line drawing of a cylindrical device with internal grid structure and a terminal panel (no text or symbols)BEFORE OPERATING THIS PRODUCT, READ, UNDERSTAND, AND FOLLOW THESE INSTRUCTIONS.
Thank you for purchasing your new Heller heater.
These operating instructions will help you use it properly and safely.
We recommend that you spend some time reading this instruction manual in order for you fully understand all the operational features it offers.
READ AND SAVE THESE INSTRUCTIONS FOR FUTURE REFERENCE
IMPORTANT
Read and follow the instructions in this user manual even if you feel you are familiar with the product and find a place to keep it handy for future reference.
For your convenience record the complete model number (located on the product identification plate) and the date you received the product, together with your purchase receipt and attach to the warranty and service information. Retain in the event that warranty service is required.
NOTE: The rating of this product (as marked on the product identification plate) is based on specific loading tests. Normal use or the use of other recommended attachments may draw significantly less power.
SAFETY WARNINGS
Please follow all the safety precautions listed below for safety and to reduce the risk of injury or electrical shock.
- Read this Instruction Manual carefully to maximize this appliance's performance and keep for future reference.
- Always ensure that your power supply voltage matches this appliance's rating label.
- Never leave the appliance unattended while in operation. Always unplug the appliance when not in use.
- This heater is hot when in use. To avoid burns, do not let bare skin touch hot surfaces.
- Caution: Some parts of this appliance can become very hot and cause burns. Particular attention must be given when children and vulnerable people are present.
• DO NOT install this appliance close to curtains and other combustible materials. - Always use the handle when moving the heater (if available) or hold on the sides if not available (make sure the unit is turned off). Keep combustible materials such as furniture, pillows, bedding, papers, clothes and curtains at least 1m from the heater.
- For safe use of the product, the product installation position should have a minimum height of 1.8m from the ground and a minimum distance of 0.5m from the ceiling, roof and both sides walls.
- The heater must not face with the heating element pointing upwards towards a ceiling. The heater element must be facing the area it is to heat.
- Warning: To avoid overheating, DO NOT cover the heater.
- This appliance is not intended for use by persons (including children) with reduced physical, sensory or mental capabilities, or lack of experience and knowledge, unless they have been given supervision or instruction concerning use of the appliance by a person responsible for their safety. Children should be supervised to ensure that they do not play with the appliance.
- If the supply cord is damaged, it must be replaced by the manufacturer, its service agent, or similarly qualified persons in order to avoid a hazard.
- Do not use the product if there are any visible signs of damage to the appliance.
- Do not attempt to repair or adjust any electrical or mechanical functions on this unit. The unit does not contain any user serviceable parts. Only a qualified electrician should perform servicing or repairs. Attempting to repair the unit yourself will void your warranty.
- If the mains cable is damaged it must be replaced by the manufacturer, its service agent, or similarly qualified persons in order to avoid a hazard.
- Do not handle the element with bare hands. If it is inadvertently touched, remove finger marks with a soft cloth and methylated spirits or alcohol, otherwise the marks will burn into the element causing premature heater failure.
- Do not replace or attempt to replace the element in this appliance.
- This appliance is suitable for outdoor use only. Do not operate the appliance in direct sunlight, near heat sources, humid environments or in places near water or other liquids such as bathrooms, shower or swimming pool.
- This product must not be left outdoors exposed to the elements for long periods of time.
- Do not operate with wet hands or spill water or other liquids on to the appliance the mains cable or plug.
- Do not run the power cable under carpeting. Do not cover the power cable with rugs, runner, or similar coverings. Arrange the power cable away from foot traffic and where it will not be tripped over.
- Do not wind the power cable around the unit.
- Do not insert or allow foreign objects to enter any ventilation or opening on the heater, as this may result in electric shock, fire, or damage to the heater.
- To prevent a possible fire, do not block the air vents.
- Do not use the appliance in areas where petrol, paints or other flammable substances are used or stored.
- Always position the appliance with the mains plug in an accessible position and avoid the use of an extension cables as they may overheat and create a potential fire risk.
• Always ensure the heater is plugged into a suitable socket, one that is tested for outdoor use.
- To disconnect heater, turn controls to OFF, then remove plug from socket. Do not unplug by pulling on the power cable.
• Always unplug the unit and ensure the unit is completely cold before moving, cleaning or storing.
- This heater is intended for domestic use only and should not be used commercially for contract purposes. Any alternative use, not recommended by the manufacturer, may result in fire, electric shock, or injury to persons.
- The use of attachments on the heater is not recommended.
- Warning: This heater is not equipped with a device to control the room temperature. Do not use this heater in small rooms when occupied by persons not capable of leaving a room on their own, unless constant supervision is provided.
- Check exterior walls for areas of damage before installing the heater.
- Check exterior walls for communication and electrical cables and pipelines. Should any service lines be present in the immediate vicinity, DO NOT install your heater, find an alternative location to install this product.
- Do not use this heater with a programmer, timer, separate remote-control system or any other
device that switches the heater on automatically, since a fire risk exists if the heater is covered or positioned incorrectly.
• The heater must not be located immediately below a socket-outlet.
- Regarding cleaning of the reflector, please refer to the relevant paragraph given below.
- Means for disconnection from the supply mains having a contact separation in all poles must be incorporated in the fixed wiring in accordance with the wiring rules.
HEATER COMPONENTS
| 1 | Aluminum box |
| 2 | Plastic cover |
| 3 | Aluminum Housing |
| 4 | Golden Carbon Heating tube |
| 5 | Power cord |
| 6 | Right housing |
| 7 | LED displayer |
| 8 | Protection grill |

Product includes:
1 x Instruction Manual
1 x Remote control
1 x Heating Unit
1 x Warranty card
4 x Brackets


4 sets x ST4 35 Screws
2 sets of Connect screws (2 x screws

2 x nuts

4 x washers

ASSEMBLY INSTRUCTIONS
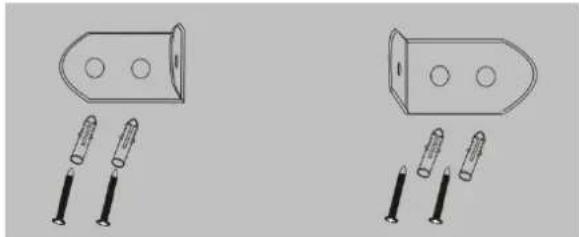
- There are 4 x brackets arrows in image below

and 4 × 25 × 25 square parts on the back for the unit as indicated by

- Loosen the screw (M5*10) of the square part on the back of the unit. Fix the first 2 brackets onto the square part on the back of unit and tighten the M5*10 screw.

Fix the distance from 45cm to 55cm between the two brackets.

- Fix the other two brackets onto the wall according to the distance of the bracket on the back of the unit. Drilling a round hole with 8mm diameter on the wall, place two 4 plastic plugs supplied into the hole, using the ST4 * 35 screw to tighten the bracket onto the wall. Make sure the bracket is fixed tightly and stable.
natural_image
Two identical diagrams showing a device with three circular holes and three vertically inserted pins, no text or symbols present.Caution: The distance between the floor and heater should no less than 1.8m and 0.5m between the heater and the ceiling if the unit is parallel to the floor.
- Connect the bracket fixed on the unit back and the bracket on the wall via the connection screw supplied. Adjust the heating angle you need.

Using the control panel on the unit:
- Plug the mains plug into an earthed wall socket.
- Press the power key and the blue indicator light on the touch screen icon will turn on Display will not be on.
- Press the one time, the blue indicator light remains, the display should show P0, the heater will be on standby.
- Press the 2 times. The blue indicator light will change to red; display will show F1, the heater starts to work.
- Same applies for settings 1 to 9. That is, press key 10 times, the indicator light remains red and display will show F9.
- Press 11 times, the indicator light will show blue and the display will show P0 again.
- Press the touch screen key once, blue color indicator light remains unchanged, display will show 00.
- Press the touch screen key two times, the blue indicator light changes to red, the display shows 01.
- Press the touch screen key three times, the indicator light shows red, the display shows 02.
- It is the same from 1 hour to 24 hours timer setting.
Remote control instructions:

- Press the on/off key, the display show "P0".
- Press 1 time for setting 1. The colour of this key on the touch screen will change from blue to red, display panel will show F1 and the total power consumption is 10%.
- Press 2 times for setting 2. The key on the touch screen will show red and the display will show F2.
- Same applies for settings 1 to setting 9.
- Pressing the button will lower the settings.
- Press P1 key once. The power consumption is 50% of the total and the display will show P1.
- Press P2 key twice, this is the full power consumption, and the display will show P2.
- Press key, the blue indicator light remains unchanged, display will show 00.
- Press 📋 key twice, the blue indicator light will change from blue to red, display will show 01.
- Press 📋 key 3 times, the indicator light will show red, the display will show 02.
- The same applies from hours 0 to 24 for the timer settings.
ATTENTION: Careful and regular maintenance of this infrared heater is required to attain a long and efficient operation of your appliance.
- Check the cleanliness of the reflector and IR-filament at least once a month. If necessary, apply cleaning and maintenance instructions.
- The number of checks may be increased depending on the amount of the dust in the environment in which the heater is kept.
- Check the deformation of the reflector, wire and frame visually while cleaning the appliance. In the case of any deformation, consult a qualified technician.
- Check the power cable and plug visually while cleaning the appliance. In the case of any deformation, consult a qualified technician.
- It is recommended to change the reflector every 2 years for more efficient operation.
ATTENTION: Regular and careful cleaning helps your heater operate more efficiently and ensures a longer life span.
- Unplug the power cable for your safety before cleaning your appliance.
- Remove the front grid wire through the inlets on the frame using a slotted screwdriver.
- Make sure that the power is off for your safety. Power cable plug must be unplugged.
- The reflector and filament must be cleaned with a soft cloth, a smooth brush or cool or dry air. The cloth may be damp but never too wet and the cleaner should not contain any chemicals.
- Refrain from using cleaning material likely to damage the reflector (cleanser etc.).
- Insert the wire grid using a slotted screwdriver.
Specifications
Model: HIH20
| Voltage | AC220-240V |
| Frequency | 50-60Hz |
| Electric power(W) | 2000W |
CUSTOMER SERVICE
Australian Customer Service
GAF Control (Sales) Pty Ltd
P.O Box 19
Altona North, Victoria, 3025
Phone: 1300 659 489
Hours: 9am-5pm (EST) Mon-Fri
www.gafcontrol.com.au
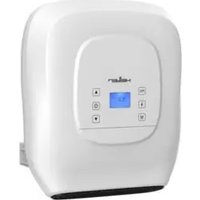
*This product may vary slightly to the product illustrated due to ongoing product development.
- BEFORE OPERATING THIS PRODUCT, READ, UNDERSTAND, AND FOLLOW THESE INSTRUCTIONS.
- READ AND SAVE THESE INSTRUCTIONS FOR FUTURE REFERENCE
- IMPORTANT
- SAFETY WARNINGS
- HEATER COMPONENTS
- Product includes:
- ASSEMBLY INSTRUCTIONS
- Using the control panel on the unit:
- Remote control instructions:
- CUSTOMER SERVICE
- Australian Customer Service
Brand : Heller
Model : HIH20
Category : Heating