
Platinum Series PS600 - Sound system Bogen - Free user manual and instructions
Find the device manual for free Platinum Series PS600 Bogen in PDF.


| Product Type | Public Address Amplifier (Platinum Series) |
| Model | PS600 (600W) |
| Power Output (RMS) | 600 watts |
| Frequency Response | 20 Hz to 20 kHz, +0/-2 dB |
| Total Harmonic Distortion | 0.3% (typ.), 20 Hz to 20 kHz |
| Signal-to-Noise Ratio (MIC) | -60 dB or better (200 ohms) |
| Signal-to-Noise Ratio (AUX) | -70 dB |
| Inputs | 4 XLR (MIC 1-4) with selectable phantom power, 2 pluggable screw terminals (MIC 5/TEL, MIC 6/AUX 1), 2 RCA (AUX 1, AUX 2) |
| Outputs | Speaker (8 ohm, 25V/70V), Pre Out (RCA), Tape Out (RCA) |
| Phantom Power | 13V DC, individual switches for MIC 1-4 |
| Equalizer | 5-band full parametric with independent Gain, Frequency, and Q controls |
| Audio Enhancement | Yes, adjustable level for improved voice intelligibility |
| Remote Volume Control | Yes, via optional GSRVC (up to 1000 ft) |
| Dimensions (W x H x D) | 16-1/2" x 3-1/2" x 13-1/2" (419 x 89 x 343 mm) |
| Shipping Weight | 14 lb (6.35 kg) |
| Power Supply | 100-240 VAC, 50/60 Hz, 5.30 A |
| Protections | Overload (automatic reset), thermal (thermistor), DC, high-frequency, FAULT LED |
| Safety Standards | UL Listed to UL Standard EN62368-1:2014 |
| Warranty | 5 years limited |
| Rack Mountable | Yes, 2RU with optional kit |
Frequently Asked Questions - Platinum Series PS600 Bogen
User questions about Platinum Series PS600 Bogen
0 question about this device. Answer the ones you know or ask your own.
Ask a new question about this device
Download the instructions for your Sound system in PDF format for free! Find your manual Platinum Series PS600 - Bogen and take your electronic device back in hand. On this page are published all the documents necessary for the use of your device. Platinum Series PS600 by Bogen.
USER MANUAL Platinum Series PS600 Bogen
Platinum Series Public Address Amplifiers
PS600, PS240, PS120, PS60 Models
Installation and Use Manual
WARNING: To reduce the risk of fire or electric shock, do not expose this apparatus to rain or moisture.
The apparatus shall not be exposed to dripping or splashing and that no objects filled with liquids, such as vases, shall be placed on apparatus.
The mains plug is used as disconnect device. The mains plug of apparatus should not be obstructed OR should be easily accessed during intended use. To be completely disconnect the power input, the mains plug of apparatus shall be disconnected from the mains.
CAUTION: DO NOT INSTALL OR PLACE THIS UNIT IN A BOOK CASE, BUILT-IN CABINET, OR IN ANOTHER CONFINED SPACE.
ENSURE THE UNIT IS WELL VENTILATED. TO PREVENT THE RISK OF SHOCK OR FIRE HAZARD DUE TO OVER HEATING.
ENSURE THAT CURTAINS AND ANY OTHER MATERIALS DO NOT OBSTRUCT THE VENTILATION VENTS.
Always comply with the following basic safety precautions when installing and using the unit:
-
Read these instructions.
-
Keep these instructions.
-
Heed all warnings.
-
Follow all instructions.
-
DO NOT use this apparatus near water.
-
Clean only with dry cloth.
-
DO NOT block any ventilation openings. Install in accordance with the manufacturer's instructions.
-
DO NOT install near any heat sources such as radiators, heat registers, stoves, or other apparatus (including amplifiers) that produce heat.
-
DO NOT defeat the safety purpose of the polarized or grounding-type plug. A polarized plug has two blades with one wider than the other. A grounding-type plug has two blades and a third grounding prong. The wide blade, or the third prong, are provided for your safety. If the provided plug does not fit into your outlet, consult an electrician for replacement of the obsolete outlet.
-
Protect the power cord from being walked on and/or pinched, particularly at plugs, convenience receptacles, and the point where they exit from the apparatus.
-
Only use attachments/accessories which are specified by the manufacturer.
-
Unplug this apparatus during lightning storms or when unused for long periods of time.
-
Refer all servicing to qualified service personnel. Servicing is required when the apparatus has been damaged in any way, such as power-supply cord or plug is damaged, liquid has been spilled or objects have fallen into the apparatus, the apparatus has been exposed to rain or moisture, does not operate normally, or has been dropped.
This equipment is not suitable for use in locations where children are likely to be present. Equipment is intended for use only in a restricted access area.
CAUTION
RISK OF ELECTRIC SHOCK DO NOT OPEN
CAUTION: TO PREVENT THE RISK OF ELECTRIC SHOCK, DO NOT REMOVE ANY FRONT/BACK COVERS OR PANELS. NO USER-SERVICEABLE PARTS INSIDE. REFER SERVICING TO QUALIFIED PERSONNEL.

The lightning flash with arrowhead symbol, within an equilateral triangle, is intended to alert the user to the presence of uninsulated "dangerous voltage" within the product's enclosure that may be of sufficient magnitude to constitute a risk of electric shock to persons.

The exclamation point within an equilateral triangle is intended to alert the user to the presence of important operating and maintenance (servicing) instructions.

WARNING:
The apparatus shall be connected to a mains socket outlet with a protective earthing connection.
To reduce the risk of fire or electric shock, do not expose this apparatus to rain or moisture.
The apparatus shall not be exposed to dripping or splashing and that no objects filled with liquids, such as vases, shall be placed on the apparatus.
Where the mains plug or an appliance coupler is used as the disconnect device, the disconnect device shall remain readily operable.
Minimum distances 10cm around the apparatus for sufficient ventilation.
The ventilation should not be impeded by covering the ventilation openings with items, such as newspapers, table-cloths, curtains, etc.
No naked flame sources, such as lighted candles, should be placed on the apparatus.
The use of apparatus in moderate climates.
Packing Contents ....1
Accessories 1
Panel Descriptions .....2-3
Front Panel 2
Rear Panel 3
Input Connections 4
MIC 1-4 4
MIC 5/TEL 4
MIC 6/AUX 1 4
AUX 2 ....4
Remote Volume Control 4
Precedence Connections ....4
Output Connections ....5
Pre-Out/Power Amp In Jack 5
Tape Out 5
SPKR Out 5
Distributed 70V or 25V Operation ....5
Operation 6-8
Power Switch....6
Individual Volume Controls 6
Master Volume Control 6
Lo-Cut Filter 6
Contour Switch 6
Audio Enhancement 6
Parametric Equalizer 7
Variable Mute 7
Telephone Paging Controls & Settings 7
ALC 8
VOX 8
LEDs 8
Troubleshooting 9
Technical Specifications ....10
Limited Warranty; Exclusion of Certain Damages....11
The Bogen Platinum Series Public Address Amplifier offers powerful features rarely found in other commercial amplifiers – such as a 5-band full parametric EQ, without the need for add-on modules, delivering outstanding value for a wide variety of installed sound applications such as retail, restaurants, hospitality, corporate meeting rooms, educational facilities, houses of worship and many more. The Platinum Series model lineup includes the PS60 (60W), PS120 (120W), PS240 (240W), and PS600 (600W), all manufactured with proven Bogen quality and reliability and backed by an industry-leading five (5) year warranty.
Unlike other typical amplifier lines, the professional sound contractor need not purchase a higher-powered amplifier just to get more extensive features or flexibility. Each of the Platinum Series amplifier models incorporate the exact same set of features.
In addition to its extensive input flexibility, the Platinum Series amplifiers offer a combination of features rarely found in any other commercial amplifier.
Features
- 4 Dedicated microphone inputs (XLR connectors MIC 1-4) with selectable phantom power
• 1 Selectable MIC 5/TEL input
• 1 Selectable MIC 6/AUX 1 input
• 1 Dedicated AUX 2 input
• 8-ohm, 25V/70V speaker output - Standard 19" rack mountable – 2RU package for all models
- 5-band full parametric equalizer with independent Gain, Frequency, and Q controls
• True loudness contour function on AUX 1 and AUX 2
• Audio Enhancement feature for improved voice intelligibility with adjustable level - Lo-cut filter for all MIC channels
-
Selectable AUX input muting during TEL paging: -60, -21, -10, and 0dB
• VOX sensitivity adjustment for TEL paging -
Input muting with individual selection available on all inputs
- Adjustable automatic level control on TEL input
• AUX fade back after TEL page - Remote master volume control capability (using optional GSRVC)
- Preamp out/Power amp in connections, serves as an Insert for external audio processing
- Tape output connection, pre-master
- Level indicator meter, and peak limiting when amplifier is driven toward clipping
• 100VAC-240VAC, 50/60 Hz universal power supply - Detachable IEC power cord
- Detachable, tamper-resistant front cover included
- Listed to UL Standard EN62368-1:2014 for U.S. and Canada
Packing Contents
1 - Platinum Series Amplifier
1 - Model GSTRC - A Plexiglas front panel cover to protect control settings from tampering
1 - Installation & Use Manual
Accessories
The following accessories are available for your Platinum-Series Amplifier:
- Model PSRPK — Rack mounting installation kit
- Model GSRVC — This remote wall mount volume control adjusts the volume of the amplifier from distances up to 1000 feet away from the amplifier
Front Panel (All Models)
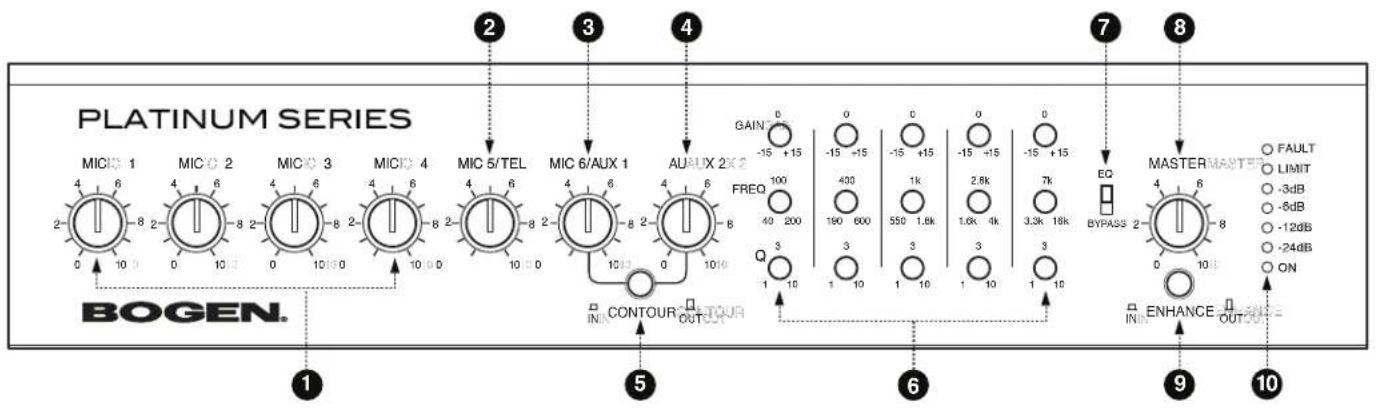
- MIC 1 to 4 - Individual level controls for dedicated microphone inputs.
- MIC 5/TEL - Individual level control for MIC 5 or TEL input depending on input mode selected.
- MIC 6/AUX 1 - Individual level control for MIC 6 or AUX 1 input depending on input mode selected.
- AUX 2 - Individual level control for dedicated AUX 2 input.
- Contour - Enables or disables loudness equalization. Affects only AUX 2 and MIC 6/AUX 1 if set in AUX mode.
- Equalizer - 5-band parametric EQ with gain, frequency, and Q controls.
- Equalizer/Bypass Selector Switch - Enables or bypasses the 5-and parametric EQ.
- MASTER - Master output level control.
- AUDIO ENHANCEMENT - Enables or disables the Audio Enhancement effect. Affects all input signals.
- LEDs - Power on, output power level meter, and amplifier fault status indicators.
22
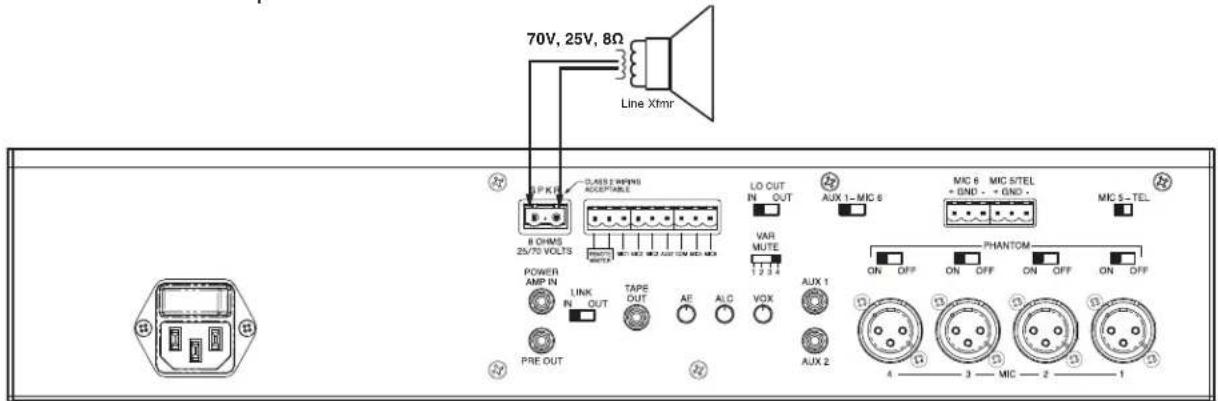
Rear Panel (All Models)

- IEC Power Input - AC mains connection.
- POWER Switch - AC power switch.
- Amplifier Output Speaker Terminals - Pluggable screw terminals connect to speaker loads. Class 2 wiring acceptable.
- REMOTE MASTER - Pluggable screw terminals pair for connection of remote master volume control (Bogen model GSRVC).
- MIC/AUX/TEL PRECEDENCE - Pluggable screw terminal connections that allow externally controlled muting of individual inputs.
- VAR MUTE - 4 switch selectable levels of AUX input signal muting during TEL page (works only in the TEL input mode).
- LO CUT FILTER - Enables or disables low frequency roll off (65 Hz) for all microphone inputs.
- MIC 6/AUX 1 - Switch selects either MIC 6 or AUX 1 connections as input.
- MIC 6 - Screw terminals for balanced microphone (active only when AUX 1/MIC 6 switch is set to MIC 6).
- MIC 5/TEL - Dual-function screw terminals for either balanced microphone or 600-ohm balanced input from telephone page port.
- MIC 5/TEL - Switch selects either MIC 5 or TEL connections as input.
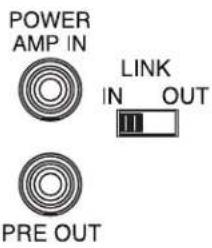
- POWER AMP IN - RCA unbalanced direct input to power amp stage for connection to external signal processing equipment (used in conjunction with PRE OUT and LINK switch).
- PRE OUT - RCA unbalanced output from preamp/mixer stage for connection to external signal processing equipment (used in conjunction with POWER AMP IN and LINK switch).
- LINK - Switch that makes or breaks the internal connection between preamp/mixer stage and power amp stage when used with external signal processing equipment.
- TAPE OUT - RCA unbalanced output, pre-EQ and master volume. (Post Lo-Cut filter, see #7).
- AE - Variable control for adjusting the amount of Audio Enhancement effect.
- ALC - Variable control adjusts amount of Automatic Level Control applied to TEL input (works only in TEL input mode).
- VOX - Variable control adjusts TEL input signal level trigger point for automatic muting of the AUX inputs (works only in TEL input mode).
- AUX 1 - RCA unbalanced input for AUX 1 input signal (works only when AUX 1/MIC 6 switch is set to AUX 1).
- AUX 2 - RCA unbalanced input for dedicated AUX 2 input.
- MIC 1 to 4 - Balanced XLR connectors for dedicated microphone inputs.
- PHANTOM (MIC 1 to 4) - Individual switches enable or disable phantom power to each of the 4 dedicated microphone inputs.
Installation Note
Keep input leads away from the output leads and AC power cables. Unless the driving source provides a low-impedance output, keep the input lead under ten feet in length. Make all connections to the unit with the POWER switch in the OFF position
MIC 1-4 (Rear Panel; #21 and #22)
MIC 1 through 4 utilize female XLR-type microphone connectors. A slide switch located above each XLR connector is used to supply phantom power for condenser microphones.
MIC 5/TEL (Rear Panel; #10 and #11)
The MIC 5/TEL input is designed to accept input from a microphone or from a telephone page port. A slide switch is provided to select MIC 5 or TEL input. To connect a microphone, place the MIC 5/TEL switch in the MIC position. Use two conductor shielded cable and connect the cable shield to the center GND terminal. To use the TEL input, place the MIC 5/TEL switch in the TEL position and connect the 600-ohm telephone paging source (dry signal only - no DC voltage) to the MIC 5/TEL screw terminals.
MIC 6/AUX 1 (Rear Panel; #8, #9, #19)
The MIC 6/AUX 1 input is designed to accept input from a microphone using terminal strip connections or from a line level auxiliary source such as a tuner or CD player using the AUX 1 RCA jack. A slide switch is used to select input type. Connect a microphone to the screw terminals labeled MIC 6 (works only when AUX 1/MIC 6 switch is in the MIC 6 position). Use two conductor shielded cable and connect the cable shield to the center GND terminal. Connect an auxiliary input source to the AUX 1 RCA jack (only works when the AUX 1/MIC 6 switch is in the AUX1 position.)
AUX 2 (Rear Panel; #20)
The AUX 2 input uses an RCA plug and accepts input from a dedicated AUX source.
Remote Volume Control (Rear Panel; #10)
If remote volume control is desired, connect the Bogen accessory GSRVC Remote Volume Control to the screw terminals marked REMOTE MSTR. Wire length can be up to 1000 feet using 22-gauge wire. Connections are not polarity sensitive.
Precedence Connections (Rear Panel; #11)
Precedence connections allow any combination of inputs to be completely muted with a contact closure. Closing a contact across any of the precedence terminals and the PREC COM 1 terminal will mute that input. A customer-supplied normally-open SPST switch, push-to-talk switch, microphone switch, relay or telephone system contact can be used to provide the closure.
Note: Activating the precedence control for AUX inputs completely mutes the input signal. The VAR MUTE control has no effect when muting inputs using precedence control.





Pre-Out/Power Amp In Jacks (Rear Panel; #12, #13, #14)
These jacks permit the insertion of signal processing equipment into the signal path between the preamp output and the power amp input. The LINK switch should be in the IN position for normal operation. When using external signal processing equipment, place the switch in the OUT position and connect PRE OUT to the signal processing equipment's input. Connect the POWER AMP IN to the signal processing equipment's output.
Note: Ensure that the LINK switch is in the IN position when NOT using external signal processing equipment, otherwise there will be no output from the amplifier.
Tape Out (Rear Panel; #15)
The TAPE OUT jack provides a line-level output to feed a recording device. The output is not effected by the Master volume control or EQ, however, the output is affected by the microphone inputs' Lo-Cut filter.
SPKR Out (Rear Panel; #3)
The SPKR OUT provides an amplified speaker level signal intended to drive 8 ohms, 25V, or 70V terminations. Each output pin is driven by the output of an amplifier. Therefore, neither pin of the SPKR terminal can be connected to chassis or Earth ground. Doing so will cause the amplifier to mute the audio and re-main in Protect mode and flash the FAULT LED (page 9) as long as the grounded connection remains.
Direct 8 ohms operation:
Direct 8 ohms operation consists of terminating (without speaker transformers) the amplifier with:
- Two 4-ohm speakers in series
• One 8-ohm speaker - Two 16-ohm or four 32-ohm speakers in parallel
Distributed 70V or 25V Operation:
For 70V and 25V operation, use the appropriate 70V or 25V transformers as the installation requires at each speaker. The combined total power across all speaker transformer input taps must not exceed 80% of the rated amplifier power. Also, the total distributed impedance of all transformer inputs must not be less than 8 ohms.


NOTICE
The combined minimum impedance of a 70V/25V/8 ohm system should not be less than 8 ohms. The combined total power of all speaker taps must not exceed 80% of the rated amplifier power for 70V/25V loads.
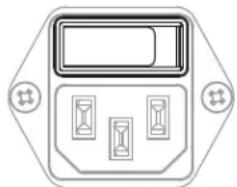
Power Switch (Rear Panel; #2)
The POWER switch applies power to the unit. An LED labeled ON, which is located on the front panel, illuminates GREEN when power is on.
natural_image
Front view of a hexagonal electronic device with three ports and a display (no text or symbols)Individual Volume
Controls (Front Panel; #1- #4)
Each input is controlled by an individual volume control.

Master Volume Control (Front Panel; #8)
The overall volume is controlled by the MASTER volume control.

Lo-Cut Filter (Rear Panel; #7)
The Lo-Cut filter on the rear panel provides low-frequency attenuation on the microphone inputs. This helps reduce mic breath pop, wind noise, and rumble.

Contour Switch (Front Panel; #5)
This switch enables or bypasses the variable loudness contour. This feature only effects the AUX inputs.
This feature is designed to improve richness of sound by restoring the high and low frequencies that the ear is insensitive to at low volume levels. The effect diminishes as volume is increased.

Audio Enhancement
(Front Panel; #9 / Rear Panel; #16)
The front panel Audio Enhancement switch enables or bypasses the Audio Enhancement feature. This feature effects all inputs when enabled.
By regenerating the upper harmonics, this audio enhancement system recreates the presence and realism that is lost in the audio amplification process. This results in increased presence and clarity, increased intelligibility, greater perceived loudness (without using extra power), and reduced listener fatigue.
The rear panel AE adjustment controls the mix of the Audio Enhancement effect with the audio signal. Counterclockwise rotation of the control minimizes the Audio Enhancement effect. Clockwise rotation of the control maximizes the Audio Enhancement effect.


Parametric Equalizer (Front Panel; #6)
A parametric equalizer offers continuous and independent control over the audio signal's frequency content, which is divided into five frequency bands on the Platinum Series amplifiers. These controls are:
- GAIN - The gain (boost/cut) for each frequency band. The gain range for the Platinum Series is -15 dB to ±15 dB as indicated on the GAIN row of controls on the Platinum Series front panel.
- FREQ (Frequency) - The frequency region where the gain boost/cut is desired. The five filter frequency ranges are indicated in the FREQ row of controls on the Platinum Series front panel. Each frequency band is approximately two octaves wide and is constrained within the five control columns on the Platinum Series front panel.
- Q - This is a form of "frequency bandwidth" control centered about the frequency region where the gain boost/cut is desired. Its value is calculated as the ratio of the center frequency to the bandwidth. The filter Q setting is indicated in the Q row of controls on the Platinum Series front panel.
In equalizers, Q is the ratio of center frequency to bandwidth, and if the center frequency is fixed, then bandwidth is inversely proportional to Q—meaning that as you raise the Q, you narrow the bandwidth. For example, if the 1kHz filter is set to 1kHz, the Q will vary from (1618-618)/1000 = 1000/1000 = 1 minimum Q, or maximum bandwidth of 1000 Hz, to 1000/(1051-951) = 1000/100 = 10 maximum Q, or minimum bandwidth of 100 Hz.
Q is the most useful tool a parametric EQ offers, allowing you to boost/cut (with the GAIN control for that frequency band) a very narrow or wide range of frequencies within each EQ band.
A narrow bandwidth (high Q value) is particularly useful for removing unpleasant tones. By notching out the offending frequency, you can remove the problem without removing adjacent frequency content.
A broad bandwidth (low Q value) boosts/cuts (with the GAIN control for that frequency band) a larger band of frequencies. Broad and narrow bandwidths (low and high Q, respectively) are usually used in conjunction with one another to achieve the desired sonic effect.
Variable Mute (Rear Panel; #6)
The VAR MUTE control mutes the AUX input(s) only during telephone pages. The control allows the user to select from 4 levels of muting: 1 = -60 dB, 2 = -21 dB, 3 = -10 dB, 4 = 0 dB.
Telephone Paging Controls & Settings (Front Panel; #3)
The MIC 5/TEL volume control on the front panel controls the volume of the telephone paging input when the control is set to the TEL mode (See page 4 for information on setting the TEL input mode).
The TEL input mode uses voice-activated muting for the AUX inputs and automatic level control for providing constant paging level. To optimize TEL input performance, both the ALC control and the VOX threshold may need to be adjusted.


ALC (Rear Panel; #17)
The TEL input features an automatic level control (ALC) which compensates for different voice levels and speaking styles of the individuals using the system. The amplifier is shipped with this control in the OFF (max. counterclockwise) position.
To adjust the ALC:
- Rotate the MIC 5/TEL and MASTER controls to the highest level likely to be used.
- Speak softly and distinctly into the telephone mouthpiece while adjusting the MIC 5/TEL volume control to the desired output level.
- Speak in a loud voice directly into the telephone mouthpiece while rotating the ALC control clockwise to the point where the output of the amplifier is reduced to the same level as that obtained in Step 2.
- The MIC 5/TEL and MASTER controls can be used to vary the overall volume without upsetting the ALC adjustment.
VOX (Rear Panel; #18)
The telephone page input features voice-activated AUX muting. This feature always mutes AUX 2 and only mutes AUX 1 when the AUX1/MIC 6 switch is set in that position.
The VOX control should be set so that only the desired signal is above the threshold level, while unwanted noise is below it.
To adjust the sensitivity of the VOX circuit:
-
Rotate the VOX control fully clockwise. While making a public address announcement and talking at a low level, the sound should not be choppy or missing parts of words. If it is choppy or intelligibility is poor, rotate control counterclockwise to the point where the sound is clear and crisp (but not to the maximum counterclockwise position).
-
If the background music shuts down when no page is in progress, rotate the control clockwise until the music will not shut down when no page is in progress.
LEDs (Front Panel; #10)
- FAULT - This flashing LED will indicate a mode where the amplifier is self-protecting. This indication signifies a malfunction. For more information, refer to Amplifier flashes the FAULT LED in the Troubleshooting section.
- LIMIT - This LED indicates full-power output. It also is calibrated at the level where the amplifier's output will no longer increase, even with increasing input, thus the amplifier is limiting its output power level.
- -3 dB - The power-level indicator calibrated at 3 dB down or 1/2 from full power.
- -6 dB - The power-level indicator calibrated at 6 dB down or 1/4 from full power.
- -12 dB - The power-level indicator calibrated at 12 dB down or 1/16th from the amplifier's full power.
- -24 dB - This LED is the beginning of a power-level indicator. Its calibration point is 24 dB down, or 1/256th, from the amplifier's full power output.
- ON - Illuminates green to indicate power is on.


| Amplifier will not turn ON. | Check the fuse. Replace fuse only with same type and rating. |
| No audio output. | Double-check the position of the LINK switch. |
| No telephone output. | Make sure that the MIC 5/TEL switch is in the TEL position.Make sure the VOX control is set properlyWhen connecting the telephone Tip & Ring, make sure to use the two outside terminals and not the center terminal (GND). |
| AUX Input will not mute with telephone page. | Check that the VAR MUTE control is not set to 4 (0 dB). This control adjusts the level of the background music when making a page. See page 9. |
| Microphone squeals or hums when using the 3-pin connectors but not when using screw terminals. | Check your wiring connections for the 3-pin connector. Pin 1 is the shield connection. Pins 2 and 3 connect to the balanced signal leads on the mic cable. |
| Condenser MIC will not work. | Make sure that phantom power switch (MIC 1 - 4) is on. See page 4. |
| Telephone input cuts off the music when not making a page. | Adjust the VOX control on the rear panel to eliminate any unwanted noise that may be triggering the VAR MUTE circuit. See page 8 |
| Telephone input is choppy or cuts off the beginning of a page. | Adjust the VOX control counterclockwise to make the trigger activate at a lower input signal level. See page 8. |
| The telephone page volume is too loud on some pages. | Adjust the ALC control on the rear panel. See page 8. |
| AUX 1 Input not working. | Make sure MIC 6/AUX 1 switch is in the AUX 1 position.Make sure the signal source is plugged into the AUX 1 RCA jack. |
| Amplifier flashes the FAULT LED. | There are several causes for the FAULT LED to flash:Over-current.This is usually caused by the total speaker distribution impedance being below 8 ohms, probably due to wiring failure or installation errors.High-temperature.Make sure that the amplifier's vent slots are not blocked and that there is adequate free air flow.DC voltage present on the amplifier outputs. To recover from this condition, turn the power switch off, count to five, and then turn the power switch back on.High-frequency protection.Detection circuitry will cause the amplifier to temporarily protect itself by muting the outputs. There is an automatic reset of the amplifier for this condition. |
Power Rating (RMS): .....PS60: 60 watts; PS120: 120 watts; PS240: 240 watts; PS600: 600 watts
Frequency Response: .....20 Hz to 20 kHz, +0/-2 dB @ -2 dB
Distortion: .....0.3% (typ.), 20 Hz to 20 kHz
Signal-to-Ratio Noise: . . . . . Fundamental: -70 dB or better; AUX 1 & 2: -70 dB; TEL: -70 dB or better @ 600-ohms; MIC 1 through MIC 6: -60 dB or better @ 200 ohms
Inputs/Outputs:
MIC: .....6 Lo-Z balanced via 4 XLR connectors and 2 pluggable screw terminals, Sensitivity: 11mV (200 ohms
AUX: .....2 Hi-Z RCA jacks. Sensitivity: 0.085V (10k ohms)
TEL: ..... Pluggable screw terminals. Sensitivity: 0.07V (600 ohms)
Power Amp In/Pre Out: .....In 1V/Out 1V via RCA jacks
Tape Output: .....700 mV @ Rated Output via RCA jack
Speaker Output: .....All models: 8-ohm, 25V/70V
Output Regulation: .....Better than 2 dB from no load to full load
AC Input Voltage: .....100-240VAC, 50/60 Hz
AC Current: .....PS60: 0.83A; PS120: 1.55A; PS240: 2.37A; PS600: 5.30A
Variable Mute Range: .....-60, -21, -10, 0 dB (AUX 1 & AUX 2)
ALC: .....Distortion: less than 0.5%; Compression: 25 dB (TEL)
VOX Threshold: .....TEL Input 20 mV (VOX control max. CW position)
MIC/AUX/TEL Precedence: . . . . . Via pluggable screw terminals. -60 dB: MIC 1, 2, 3, 4, 5/TEL, 6/AUX 1, AUX 2
Power In/Pre Out: .....In 1V/Out 1V via RCA jacks
Phantom Power: .....13V DC
Lo-Cut: .....-3 dB @ 85 Hz
Loudness Contour: .....+8 dB @ 100 Hz, +4 dB @ 10 kHz (AUX 1 & AUX 2 control at 1/4 CW position)
Parametric Equalizer: .....5-bands with independent GAIN, FREQ and Q controls
Overload Protection: .....Electronic with automatic reset
Thermal Protection: .....Thermistor attached to heat sink
Dimensions: .....16-1/2" W x 3-1/2" H x 13-1/2" D
Shipping Weight: .....All Models: 14 lb.
Limited Warranty; Exclusion of Certain Damages
Bogen's Platinum Series amplifiers are warranted to be free from defects in material or workmanship for five (5) years from the date of sale to the original purchaser. Any part of any Bogen product covered by this warranty that, with normal installation and use, becomes defective (as confirmed by Bogen upon inspection) during the applicable warranty period, will be repaired or replaced by Bogen, at Bogen's option, provided the product is shipped insured and prepaid to: Bogen Factory Service Department, 4570 Shelby Air Drive, Suite 11, Memphis, TN 38118 USA. Repaired or replacement product will be returned to you freight prepaid. This warranty does not extend to any of our products that have been subjected to abuse, misuse, improper storage, neglect, accident, improper installation or have been modified or repaired or altered in any manner whatsoever, or where the serial number or date code has been removed or defaced.
THE FOREGOING LIMITED WARRANTY IS BOGEN'S SOLE AND EXCLUSIVE WARRANTY AND THE PURCHASER'S SOLE AND EXCLUSIVE REMEDY. BOGEN MAKES NO OTHER WARRANTIES OF ANY KIND, EITHER EXPRESS OR IMPLIED, AND ALL IMPLIED WARRANTIES OF MERCHANTABILITY OR FITNESS FOR A PARTICULAR PURPOSE ARE HEREBY DISCLAIMED AND EXCLUDED TO THE MAXIMUM EXTENT ALLOWABLE BY LAW. Bogen's liability arising out of the manufacture, sale or supplying of products or their use or disposition, whether based upon warranty, contract, tort or otherwise, shall be limited to the price of the product. IN NO EVENT SHALL BOGEN BE LIABLE FOR SPECIAL, INCIDENTAL OR CONSEQUENTIAL DAMAGES (INCLUDING, BUT NOT LIMITED TO, LOSS OF PROFITS, LOSS OF DATA OR LOSS OF USE DAMAGES) ARISING OUT OF THE MANUFACTURE, SALE OR SUPPLYING OF PRODUCTS, EVEN IF BOGEN HAS BEEN ADVISED OF THE POSSIBILITY OF SUCH DAMAGES OR LOSSES. Some States do not allow the exclusion or limitation of incidental or consequential damages, so the above limitation or exclusion may not apply to you. This warranty gives you specific legal rights, and you may also have other rights which vary from State to State.
Products that are out of warranty will also be repaired by the Bogen Factory Service Department -- same address as above or call 201-934-8500. The parts and labor involved in these repairs are warranted for 90 days when repaired by the Bogen Factory Service Department. All shipping charges in addition to parts and labor charges will be at the owner's expense. All returns require a Return Authorization number. For most efficient warranty or repair service, please include a description of the failure.
Products manufactured and labeled by other companies may be covered by warranties offered by such companies. Please call Bogen Customer Service or refer to product packaging for manufacturer's warranty for non-Bogen branded products.
11/2014
BOGEN®
COMMUNICATIONS, INC.
www.bogen.com
- Platinum Series Public Address Amplifiers
- CAUTION
- RISK OF ELECTRIC SHOCK DO NOT OPEN
- WARNING:
- Panel Descriptions .....2-3
- Input Connections 4
- Output Connections ....5
- Operation 6-8
- Troubleshooting 9
- Technical Specifications ....10
- Limited Warranty; Exclusion of Certain Damages....11
- Features
- Packing Contents
- Accessories
- Installation Note
- MIC 1-4 (Rear Panel; #21 and #22)
- MIC 5/TEL (Rear Panel; #10 and #11)
- MIC 6/AUX 1 (Rear Panel; #8, #9, #19)
- AUX 2 (Rear Panel; #20)
- Remote Volume Control (Rear Panel; #10)
- Precedence Connections (Rear Panel; #11)
- Pre-Out/Power Amp In Jacks (Rear Panel; #12, #13, #14)
- Tape Out (Rear Panel; #15)
- SPKR Out (Rear Panel; #3)
- Direct 8 ohms operation:
- Distributed 70V or 25V Operation:
- NOTICE
- Power Switch (Rear Panel; #2)
- Individual Volume
- Controls (Front Panel; #1- #4)
- Master Volume Control (Front Panel; #8)
- Lo-Cut Filter (Rear Panel; #7)
- Contour Switch (Front Panel; #5)
- Audio Enhancement
- (Front Panel; #9 / Rear Panel; #16)
- Parametric Equalizer (Front Panel; #6)
- Variable Mute (Rear Panel; #6)
- Telephone Paging Controls & Settings (Front Panel; #3)
- ALC (Rear Panel; #17)
- To adjust the ALC:
- VOX (Rear Panel; #18)
- To adjust the sensitivity of the VOX circuit:
- LEDs (Front Panel; #10)
- Limited Warranty; Exclusion of Certain Damages
Brand : Bogen
Model : Platinum Series PS600
Category : Sound system