PXCHTS-018U - Hedge Trimmer Ozito - Free user manual and instructions
Find the device manual for free PXCHTS-018U Ozito in PDF.


| Brand | Ozito |
| Model | PXCHTS-018U |
| Product Type | Hedge Trimmer |
| Power Source | 18V Li-ion Battery (not included) |
| Blade Length | 610 mm (24 in) |
| Tooth Spacing | 20 mm |
| Cutting Capacity | Up to 20 mm diameter branches |
| Weight | 2.8 kg (battery not included) |
| Overall Length | 950 mm |
| Motor Type | Brushed DC motor |
| No Load Speed | 2400 rpm |
| Safety Features | Dual switch operation, hand guard, blade tip protector |
| Ergonomic Design | Soft grip handle, 270° rotating rear handle |
| Battery System | Ozito Power X Change (compatible with all 18V Ozito batteries) |
| Warranty | 5 years (after registration) |
| Maintenance | Clean after each use; lubricate blade with light oil; sharpen as needed |
| Spare Parts Available | Blade set, battery, charger, safety guard |
| Repairability | Modular design; user-replaceable blade and battery |
| Included Accessories | Blade cover, user manual |
Frequently Asked Questions - PXCHTS-018U Ozito
User questions about PXCHTS-018U Ozito
0 question about this device. Answer the ones you know or ask your own.
Ask a new question about this device
Download the instructions for your Hedge Trimmer in PDF format for free! Find your manual PXCHTS-018U - Ozito and take your electronic device back in hand. On this page are published all the documents necessary for the use of your device. PXCHTS-018U by Ozito.
USER MANUAL PXCHTS-018U Ozito
Sharpening the cutting blade
- Start and stop your hedge trimmer until the cutter blade
and the guard are slightly offset
- Remove the battery pack from
your hedge trimmer.
- Clamp the blade assembly in a vise and file the exposed cutting surface of each
blade tooth. Remove as little material as porcelain
nose material as possible.
- Remove the hedge trimmer from the vine and insert the battery.
the wise and insert the battery pack. Repeat steps 1-3 for the unsharpened edges of the
blade teeth.
Note: Do not operate your hedge trimmer with
dull or damaged cutting blades. This may cause
overload and will give unsafe results

Lubricating the blade
For best operation and longer blade life, lubricate the hedge trimmer blade with light
weight machine oil before and after each use

WARNING! DO NOT OIL WHILE THE HEDGE TRIMMER IS RUNNING
15 RONNI
Cleaning and Storage
- Keep air intake clean and air vents free of debris to avoid overheating the motor
- Do not use cleaning agents to clean the plastic parts of the tool. A mild deterrent on a clean cloth is recommended. Water must
A third surgeon on a dialg tool is recommended. Water most never come into contact with the tool.
• If the trimme
a mechanical problem continued operation could lead to injury or damage.
• Always place the blade cover on the blade before stinning or transporting the hedge thinning. Use caution to avoid the sharp teeth of the blade.
- Store the hedge trimmer indoors, in a dry place that is inaccessible to children.
Note: Delta Industries will not be responsible for any damage or injuries caused by the repair of the trimmer by an unauthorized person or by mishandling of the trimmer. This tool is designed for DIY use - use in commercial or industrial environments will void the warranty.
TROUBLESHOOTING
| Problem | Cause | Remedy |
| Trimmer is not starting | Possible clogging | Clean the trimmer blade of any leaves or debris. |
| Battery is low in charge | Charge battery | |
| Battery not inserted properly | Insert battery pack correctly | |
| Trimmer is not operating at full capacity | Possible clogging | Clean the trimmer blade of any leaves or debris. |
| Motor stops while trimming | Battery has no power | Charge battery |
BATTERY AND CHARGER SAFETY WARNINGS
THIS MANUAL CONTAINS IMPORTANT SAFETY AND OPERATING INSTRUCTIONS FOR YOUR
THIS MANUAL CONTAINS IMPORTANT SAFETY AND OF CHATING INSTRUCTIONS FOR YOUR BATTERY CHARGER.
-
Before using the charger next all instructions and cautionary markings on the charger, battery pack and the product using the battery pack.
-
This charger is not intended for any uses other than charging rechargeable batteries. Any other use may result in risk of fire, electric shock or electrocution.
-
Do not place any object on top of the charger or place the charger on a soft surface that may result in excessive internal heat. Place the charger in a position-away from any heat source.
-
To reduce risk of damage to the electric plug and cord, pull by the plug rather than the cord when disconnecting the charger.
-
Make sure the cord is located so that it will not be stopped on, tripped over, or otherwise subjected to damage or stress.
-
An electronic cold should not be used extremely absolutely necessary. One of an improper hydrogen and could result in the tax or fire, electric shock or electrocution.
-
Do not assume the decrease in heat required to show heat levels decreased as effective decreases in any way. Fit is a short-lived
-
Ltd. (operator of the Change) is a basis of the Group (Group) and its ungraved or surveillance broadband in any way. Refer to instructions by an electrician or power tool repairer.
-
Do not closeassemble charger. Ioku it to an electrician or power tool repairer when service or repair is required. Incorrect reassembly may result in a risk of electric shock, electrocution or fine.
-
To reduce risk of electric shock, unplug the charger from the outlet; therefore attempting any cleaning. Removing the battery pack will not reduce this risk.
-
However, cannot support 7 charging something
-
Willi test the 10-confirmed 2 charging together.
-
Do NOT store or use the tool and battery pack in locations where the temperature may reach or exceed 45°C (such as inside sheets or above buildings)
-
The charger is designed to operate on standard household electrical power (240 volts). On not attempt to use it on any other
-
The battery pack is not fully charged set of the carton. First read the safety instructions and then follow the charging notes and procedures.
-
The longest life and best performance can be obtained if the battery pack is changed when the air temperature is between 18 - 24°F. On our share the battery pack is an incremental below 420V as above 420V. This is important and will prevent damage
24 L. Del M. Change the battery pack in an (simpension) above 15 L of labor for L. Tint. It is required and also (prevent damage to the battery pack).
- DO NOT increase the battery pack when it is not about damage or to completely form it out. The battery can open in a line.
-
Never attempt to open the battery pack for any reason. If the plastic housing of the battery pack breaks or cracks, immediately disconting or use and do not rechange.
-
During-charging, the battery must be placed in a well ventilated area
DESCRIPTION OF SYMBOLS
| V | Volts | Hz | Hertz |
| = | Alternating current | W | Watts |
| dd/mm | Direct current | Diameter | |
| mA | Milliamperes | e | No load speed |
| /min | Revolutions orreciprocation per minute | Double insulated | |
| Read instruction manual | Warning | ||
| Wear eye and ear protection. | Decibel level | ||
| Keep bystanders away. Do not operate whilst people especiallychildren or pets are in the area. | |||
SPARE PARTS
Spare parts can be ordered from the Special Orders Desk at your local
Bunnings Warehouse or Homebase store
For further information, or any parts visit
www.ozito-diy.co.uk of contact Ozito Customer Service: Great Britain: 0151 204 4489
Great Britain. 0151 2 Ireland: 1850 882711
F-mail: enquires@ozito-div.co.uk
ELECTRICAL SAFETY
WARNING! When using mains-powered tools, basic safety precautions, including the following should show it followed to reduce risk of fire electric shock.
Use Resolving, Stakes always be resolved to Reduce Risk of life, electric shock, personal injury and material damage.
Read the vehicle manual carefully and make sure you know how to switch the tool off in an emergency, before operating the tool. Save these instructions and other documents supplied with this tool for future reference.
Before you connect: the charger to the mains supply make sure that the data on the rating plate are identical to the mains data.

is tools charger is double insulated therefore no earth wire is required.
A WARNING! Read all safety warnings and all instructions
instructions may result in electric shock, fire-and/or serious injury.
Bonn all warnings and instructions for future reference. The term "power tool" is the
warnings refers to your mains-operated (corded) power tool or battery-operated (cordless)
- Work area safety
a. Keep work area clean and well lit. Outstened or dark areas invite accidents. b. Do not operate power tools in explosive atmosphere, such as in the presence of
flammable liquids, gases or dust. Power tools create sparks: which may ignite the dust or fumes.
- Keep children a control.
- Electrical safety
- Power tool plugs must match the outlet. Never modify the plug in any way. Do not use
any adopter pl
Avoid body contact with earthed or grounded surfaces, such as pipes, radiators, ranges
and refrigerators. There is an increased risk of electric shock if your body is earthed or grounded.
- De 1932 expensed power supply to Hall of Electrations. Install entering a power tool will increase the mix of electric shock.
Do not abuse the cord. Never use the cord for carrying, pulling or unplugging the power tool. Keep cord assay from heat, oil, sharp edges or moving parts. Damaged or entanglect cords
increase the risk of electric shock.
When operating a power tool outdoors, use an extension cord suitable for outdoor use. Use of a cord suitable for outdoor use reduces the risk of electric shock.
If operating a p [BCD] projector
-
Personal safety
-
Stay alert, watch what you are doing and use common sense when operating a power tool. Do not see a power tool while you are tired or under the influence of drugs, alcohol
or medication. A moment of insertion while operating power tools may result in serious personal injury.
- Use personal protective equipment. Always wear eye protection. Protective equipment such as dual mask, non-skid safety shoes, hard hat, or hearing protection used for appropriate conditions will reduce personal injuries.
: Present unintentional starting. Ensure the switch is in the off-position before connecting to open frame and (in bottom back, sliding up to carrying the tool, limiting output)
to power source and/or battery pack, picking up or carrying the tool. Carving power tools with your finger on the switch or energising power tools that have the switch on invites accidents.
Remove any adjusting key or wrench before turning the power tool or attached to a suitable cut of the power tool may result in external issues.
Do not overreach. Keep proper footing and balance at all times.
Notes: Double insulation does not take the place of normal safety precautions when operating this tool. The insulation system is for added protection system (using procedure from a possible analytical insulation failure within the tool).
The power supply for this product charger should be protected by a residual current device-rated at 30mA or less. A residual current
device reduces the risk of electric shock.
[Non-Text]


Dress properly. Do not wear loose clothing or jewellery. Keep your hair, clothing and
glews away from moving parts. Loose clothes, jewellery or long hair can be sought in moving parts.
If clones are provided for the connection of dust extraction and collection facilities, ensure these are connected and properly used. Use of dust collection can nucleus dust-related hazard
- Point
Do not force the power tool. One line correct power tool for your application. Time could power tool will do the job better and safer at the rate for which it was designed.
- Do cont
: Disconnect the plug from the power source and/or the battery pack from the power
tool before making any adjustments, changing accessories, or storing power tools. Such preventive safety measures reduce the risk of starting the power tool accidentally.
- Store idle power tools out of the reach of children and do not allow persons unfamilies.
with
- Maintain power tools. Check for misalignment or binding of moving parts, breakage or
parts and any other condition that may affect the power tool's operation. If damaged have the power tool repaired before use. Many accidents are caused by poorly maintained power tools.
Keep cutting tools sharp and clean. Properly maintained cutting tools with sharp cutting edges are less 10
bind Use
-
Use the power ball, which is also the sun in all other than three times that taking into account the working conditions and the work to be performed. Use of the pure
-
Bass
-
Recharge only with the charger specified by the manufacturer. A charger that is suitable for a lot of battery and may create a risk of favorable use with more than battery and
Use
create a risk of injury and fire. : When battery pack is not in use, keep it away from other metal objects, like paper pl
poin
under abusive conditions, liquid may be ejected from the battery; avoid contact. If
contact accidentally occurs, flush with water. If liquid contacts eyes, additionally see medical help. Liquid-mediated from the barriers monocourse irritation or burns
S. Serv
- Have your power tool serviced by a qualified repair person using only identical replacement parts. This will ensure that the parts of the power tool is maintained.
•
m = 311
s
5
m = 311
WARNING! When servicing, use only identical replacement parts. Use of any other par
!
- SICULO DE PERSONAL DE A QUINICA ESE MÉSICIA - INWARNING: This confirms is not intended for use in any way to ensure availability
A
Supervised by a resupervised person to ensure that they will be the appliance solely. Young children should be supervised to ensure that they do not play with the appliance.
[Non-Text]
[Non-Text]
[Non-Text]
[Non-Text]
[Non-Text]
[Non-Text]
[Non-Text]
[Non-Text]
[Non-Text]
[Non-Text]
[Non-Text]
[Non-Text]
[Non-Text]
[Non-Text]
[Non-Text]
[Non-Text]
[Non-Text]
[Non-Text]
[Non-Text]
[Non-Text]
[Non-Text]
[Non-Text]
[Non-Text]

18V LITHIUM ION
CORDLESS HEDGE
TRIMMER
ORIGINAL INSTRUCTIONS
2019.10.25
SPECIF
Voltage:
Cuts/min:
Max. Cutting
Blade Cutting
Weight
azito-div
m = 311
m = 311
The Ground Truth image displays a single, solid horizontal line. According to Rule 2 (UNDERSCORE & LINE RULES), this is a stylistic or background line, not a placeholder underscore. Therefore, the OCR result must ignore it and output nothing or only meaningful text. The provided OCR content is "____", which consists of four underscores. This is an incorrect interpretation of the line as a placeholder, violating the rule that stylistic lines must be ignored. The OCR has hallucinated underscores where none should exist based on the GT's visual context. Hence, the OCR result is inconsistent with the Ground Truth.
m = 311
m = 311
m = 311
Ev
-
1906
The Ground Truth image displays a single, solid horizontal line. According to Rule 2 (UNDERSCORE & LINE RULES), this is a stylistic or background line, not a placeholder underscore. Therefore, the OCR result must ignore it and output nothing or only meaningful text. The provided OCR content is "____", which consists of four underscores. This is an incorrect interpretation of the line as a placeholder, violating the rule that stylistic lines must be ignored. The OCR has hallucinated underscores where none should exist based on the GT's visual context. Hence, the OCR result is inconsistent with the Ground Truth.
m = 311
广力云智慧零售收银系统
m = 311
- 实验原理
m = 311
fill of our
Condition
department
telephone
which guar
[Non-Text]
- These w
mentioned
guarantee
- The war
a product
either the
whichever
Please not
application
commercia
guarantee
- The foliage
- Паваде
incorrect in
it to an inc
safety inst
lack of can
- Damage
device or t device / rev
device (suc by externa
- Damade
normal use
(二)报告期末
- Your Pro
and is inte
广力云智慧零售收银系统
OZITO
0210
[Non-Text]
[Non-Text]
[Non-Text]
[Non-Text]
[Non-Text]
[Non-Text]
[Non-Text]
[Non-Text]
[Non-Text]
[Non-Text]
[Non-Text]
[Non-Text]
[Non-Text]
[Non-Text]
[Non-Text]
[Non-Text]
[Non-Text]
[Non-Text]
[Non-Text]
[Non-Text]
[Non-Text]
[Non-Text]
[Non-Text]
[Non-Text]
[Non-Text]
[Non-Text]
[Non-Text]
[Non-Text]
[Non-Text]
[Non-Text]
[Non-Text]
[Non-Text]
[Non-Text]
[Non-Text]
[Non-Text]
[Non-Text]
[Non-Text]
[Non-Text]
[Non-Text]
[Non-Text]
[Non-Text]
[Non-Text]
[Non-Text]
[Non-Text]
[Non-Text]
[Non-Text]
[Non-Text]
[Non-Text]
[Non-Text]
[Non-Text]
[Non-Text]
[Non-Text]
[Non-Text]
[Non-Text]
[Non-Text]
[Non-Text]
[Non-Text]
[Non-Text]
[Non-Text]
[Non-Text]
[Non-Text]
[Non-Text]
[Non-Text]
[Non-Text]
[Non-Text]
[Non-Text]
[Non-Text]
[Non-Text]
[Non-Text]
[Non-Text]
[Non-Text]
[Non-Text]
[Non-Text]
[Non-Text]
[Non-Text]
[Non-Text]
[Non-Text]
[Non-Text]
[Non-Text]
[Non-Text]
[Non-Text]
[Non-Text]
[Non-Text]
KNOW YOUR PRODUCT
CORDLESS HEDGE TRIMMER

ACCESSORIES

BATTERY & CHARGER (sold separately)
This tool is compatible with all battery and chargers from the Ozito Power X Change Range.
ONLINE MANUAL
Scan this OR Code with your mobile
Device to take yard to one while manual.

SETUP & PREPARATION
1. ASSEMBLY 3. INSERTING &

Blade Cover
The blade cover protects the blade when not in use. Simply slide it off the blade before use. Once finished operating, place the cover back over the blade.


Safety Guard
Ensure the safety guard is fitted securely onto the hedge trimmer before use. Tighten the screws on either side if necessary.


WARNING! NEVER USE THE HEDGE TRIMMING UNLESS THE SAFETY GUARD IS FITTED.
2. BATTERY & CHARGING (sold separately) 4

The purchased battery will be shipped in a low charge condition, and requires charging prior to use. Allow several cycles of charging and discharging (through use of the tool) for the battery to reach its optimum performance / runtime.
1. Connect the charger into a mains
2. The charger LED will flash green showing power is being supplied to the charger.
Charging your lithium ion battery - Fast Charger

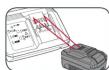
4. The charger LED will illuminate red signifying that the battery is charging.
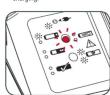
5. The charger LED will illuminate
green once the battery is charged.
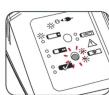

Charging your lithium ion battery - Eco Charger
- Connect the charger into a main
-
The charger LED will flash green showing power is being supplied to the charger.
-
With the battery sitting on a flat surface, align the raised ribs on the battery with the recess in the charger and slide onto the battery ensuring a firm connection.
-
The charger LED will illuminate red si
- When removing the charger from the battery, first press the battery release tab, then slide the charger from its position.
| Charger LED Indicator | |
| LED Indicator | Situation |
| GREEN (Flushing) | Stand by (no battery peck is inserted) |
| RED (Illuminated) | Battery is charging (low charge) |
| GREEN (Illuminated) | Battery is charged and ready for use |
| RED (Flushing) | Battery or Charger fault |
| RED & GREEN (Flushing) | Battery pack is too hot or too cold (remove battery from charge and stone at room temperature 20°C. Insert battery again when at correct charging temperature). If this happens again, the battery is defective and needs to be replaced. |
Battery Charge Indicator
The purchased battery is equipped with a battery charge indicator to show the state of the battery charge. Press the charge indicator button and look to see which LED lights.
battery requires immediate charging
Low state of charge
Mid state of charge
Full state of charge.
Note: The battery needs to be removed from the tool to check the state of charge.
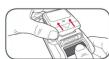
The Ground Truth image displays a single, solid horizontal line. According to Rule 2 (UNDERSCORE & LINE RULES), this is a stylistic or background line, not a placeholder underscore. Therefore, the OCR result must ignore it and output nothing or only meaningful text. The provided OCR content is "____", which consists of four underscores. This is an incorrect interpretation of the line as a placeholder, violating the rule that stylistic lines must be ignored. The OCR has hallucinated underscores where none should exist based on the GT's visual context. Hence, the OCR result is inconsistent with the Ground Truth.
m = 311
battery pack is inserted)
eging (low charge)
aged and ready for use
to hot or too cold (remove battery from
store at room temperature 20°C. Insert
when at correct charging temperature: If again, the battery is defective and needs
1
[EMPTY]
(No text)
1
1
[Non-Text]
1
(1)
[Non-Text]
requires charging soon.
[Non-Text]
[Non-Text]
[Non-Text]
(1) m = 311 .
REMOVING THE BATTERY
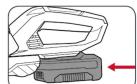
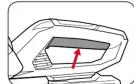
Inserting a Battery into the Hedge Trimmer
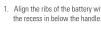
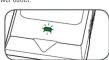

ignifying that the battery is charging.
[Non-Text]
[Non-Text]
[Non-Text]
2. Slide the battery in so that it clicks into place.
[Non-Text]
L
12x - 1 > 0
F
m = 311
Removing a Battery from the Hedge Trimmer
1. Press and hold the battery
release tab to release the battery.
[Non-Text]
[Non-Text]
[Non-Text]
[Non-Text]
表 1. 项目名称:
2. Shade the battery but.
1
The Ground Truth image displays a single, solid horizontal line. According to Rule 2 (UNDERSCORE & LINE RULES), if the GT contains lines used for stylistic emphasis or as background (like ruled paper), the OCR result must ignore them. The provided OCR content is "____", which consists of four underscores. This is incorrect because underscores are not equivalent to a solid line and are not permitted under the “Stylistic/Background Lines (Ignore)” rule. The OCR has hallucinated underscores where none should exist in the GT, violating the “Stylistic/Background Lines (Ignore)” rule. Therefore, the OCR result is inconsistent with the Ground Truth.
图2-1
F
(
WARNING DO NOT U
WARNING: DO NOT USE ANY ATTACHMENTS OR ACCESSORIES NOT RECOMMENDED BY THE
MANUFACTURER OF THIS PRODUCT, AS IT CAN RESULT IN SERIOUS PERSONAL INJURY.
Theorem 1.2. (Theorem 1.3) Let be a finite field and let (x) be the set of all elements of . Then

(No text)


IF THIS PRODUCT, AS IT CAN
S PERSONAL INJURY.
OPERATION
Switching On and Off
1. Press and hold the safety switch.

- To start the hedge
trimmer, squeeze the on/
on sign - To stop execution
release the on/off
trigger.

WARNING! CLEAR THE AREA TO BE CUT BEFORE
EACH USE. REMOVE ALL OBJECTS, SUCH AS CORDS, LIGHTS, WIRE, OR STRING WHICH CAN BECOME
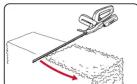
Top cutting
ENTANGLED IN THE CUTTING BLADE AND CREATE A RISK OF SERIOUS PERSONAL INJURY
Use a wide sweeping motion.
cutting blades in the direction
Side cutting
When trimming the sides of the hedge begin at the bottom and cut upwards.
Trim the side of a hedge so that it will
be slightly handover at the top. This shape will expose more of the hedge.
resulting in a more uniform growth


WARNING! IF THE BLADE JAMS ON ANY ELECTRICAL GORD OR LINE, DO NOT TO VIEW THE BLADELIFE
GORD OR LINE, DO NOT TOUCH THE BEADE. IT CAN BECOME ELECTRICALLY LIVE AND VERY
DANGEROUS. CONTINUE TO HOLD THE HEDGE
OR LAY IT DOWN AND AWAY FROM YOU IN A
SAFE MANNER. DISCONNECT THE ELECTRICA
SERVICE TO THE DAMAGED LINE OR CORN PE
SERVICE TO THE BANAGED LIVE ON GARS BEFORE ATTEMPTING TO FREE THE BLADE. FAILURE TO HEED
THIS WARNING MAY RESULT IN SERIOUS PERSONAL IN JURY OR POSSIBLE DEATH
INSORT OR POSSIBLE DEATH.
5 YEAR REPLACEMENT WARRANTY
PXCHTS-018U


- BATTERY AND CHARGER SAFETY WARNINGS
- SPARE PARTS
- ELECTRICAL SAFETY
- 18V LITHIUM ION
- CORDLESS HEDGE
- TRIMMER
- KNOW YOUR PRODUCT
- SETUP & PREPARATION
- ASSEMBLY 3. INSERTING &
- BATTERY & CHARGING (sold separately) 4
- Charging your lithium ion battery - Eco Charger
- Battery Charge Indicator
- REMOVING THE BATTERY
- OPERATION
- YEAR REPLACEMENT WARRANTY
Brand : Ozito
Model : PXCHTS-018U
Category : Hedge Trimmer