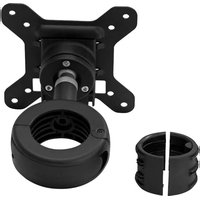
SD-DO - Monitor stand Spacedec - Free user manual and instructions
Find the device manual for free SD-DO Spacedec in PDF.


| Product Type | Display mount (Quickshift Donut) for pole mounting |
| Compatible Pole Diameters | 42 mm and 50 mm |
| VESA Compatibility | Standard VESA plate (likely 75x75 mm or 100x100 mm) |
| Weight Capacity | Estimated up to 30 kg (dependent on pole strength) |
| Adjustment Range | 40° angular movement via VESA Ball Mount |
| Material | Aluminum and steel construction |
| Color | Black (typical) |
| Security Feature | Optional security screw with Phillips-head |
| Installation | Tool-less sliding onto pole, lever lock; VESA plate attachment |
| Included Hardware | Mounting screws M4x10, M4x12, M4x16 (4 each), 3mm Allen key, security screw |
| Compatibility Note | Designed for Spacedec 42mm and 50mm poles; Visidec 42mm extrusion compatible |
| Maintenance | Periodic check of tension and screws; clean with dry cloth |
| Safety Warnings | Do not overtighten; ensure correct pole diameter; professional installation recommended |
| Repairability | Individual parts available (VESA ball mount, tension plate, screws) |
Frequently Asked Questions - SD-DO Spacedec
User questions about SD-DO Spacedec
0 question about this device. Answer the ones you know or ask your own.
Ask a new question about this device
Download the instructions for your Monitor stand in PDF format for free! Find your manual SD-DO - Spacedec and take your electronic device back in hand. On this page are published all the documents necessary for the use of your device. SD-DO by Spacedec.
USER MANUAL SD-DO Spacedec
! The Spacedec Display Quickshift Donut is to be used on 42mm and 50mm diameter poles only.
! The Manufacturer accepts no responsibility for incorrect installation.
Component Checklist
Check you have received all parts against this Component Checklist prior to installation.

Step 1. Install Quickshift Donut
Select your correct product configuration: A, B, or C.

flowchart
graph TD
    A["Use this configuration with a standard 50mm pole\n(No inserts required)"] --> B["Or"]
    B --> C["Use this configuration with a Visidec 42mm extrusion pole"]
    C --> D["Or"]
    D --> E["Note: Ensure inserts are fitted in correct orientation. Arrows point to top surface"]
Slide the Quickshift Donut onto the pole (with the lever open), removing the End Cap if necessary.
Rear groove insert must align with slot in the Pole.
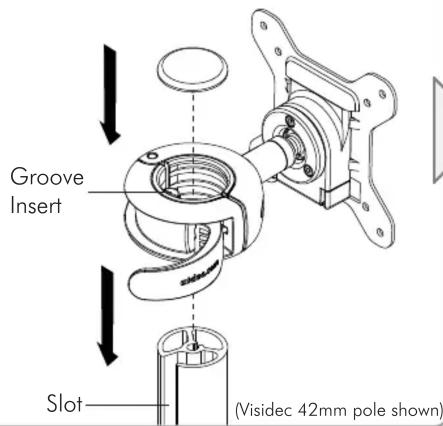
Slide the Quickshift Donut into the desired position. If necessary, adjust the tension between the Quickshift Donut and the Pole using the 5mm Allen Key supplied.
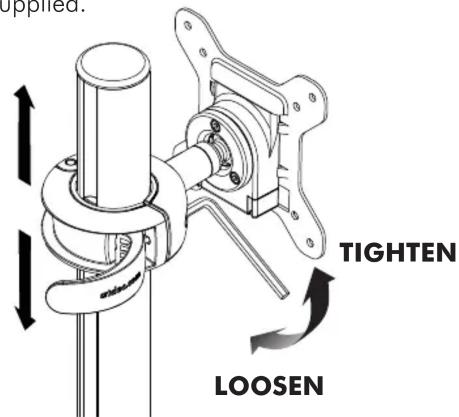
WARNING: Be careful not to overtighten
Once in place, close the lever to lock the Quickshift Donut in the desired position.

Step 2. Remove VESA plate from Quickshift Donut
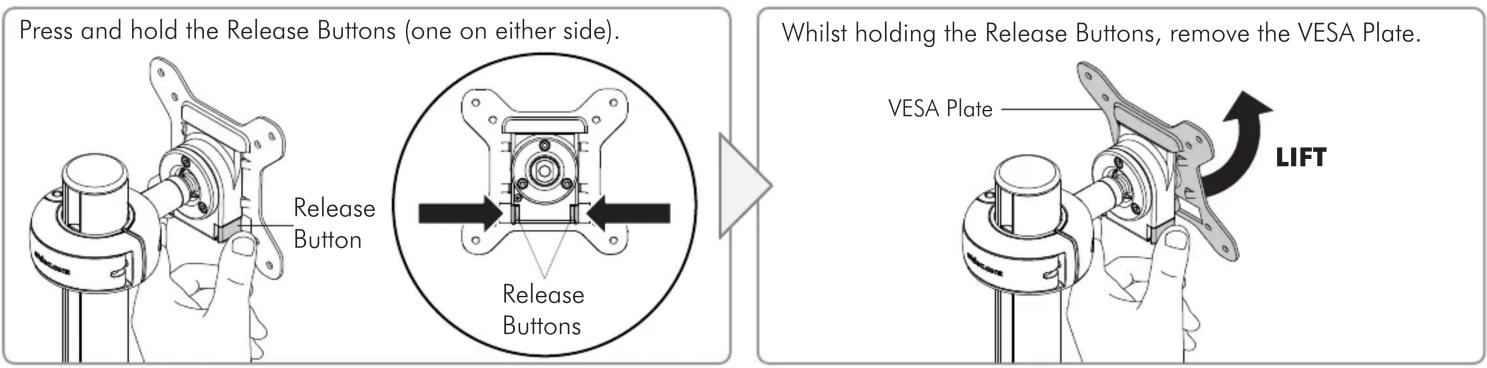
Step 3. Attach the VESA plate to your Display

Step 4. Attach your Display to the Quickshift Donut
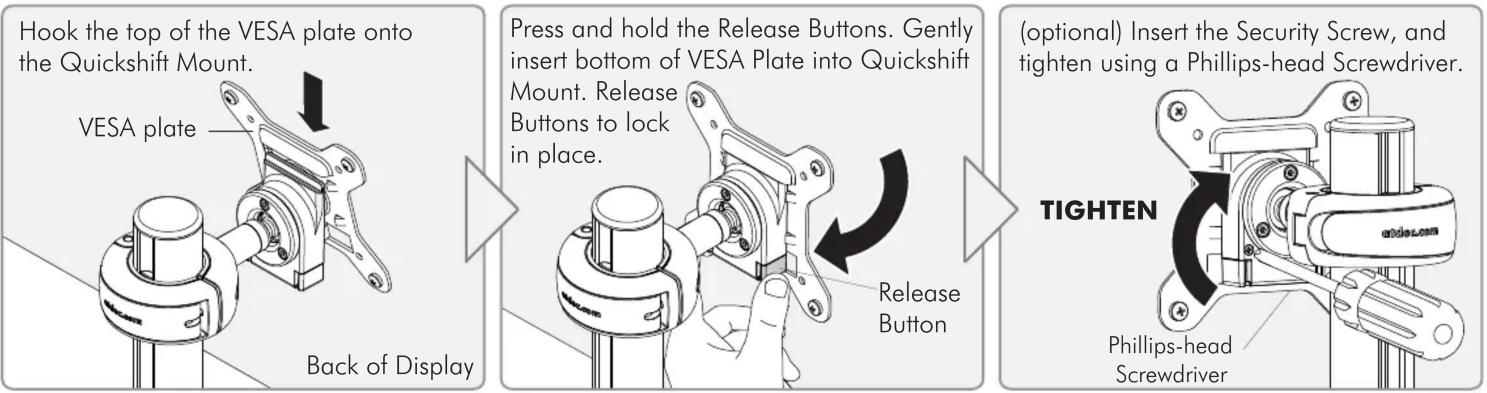
flowchart
graph LR
    A["Hook the top of the VESA plate onto the Quickshift Mount. VESA plate"] --> B["Back of Display"]
    B --> C["Press and hold the Release Buttons. Gently insert bottom of VESA Plate into Quickshift Mount. Release Buttons to lock in place."]
    C --> D["Release Button"]
    D --> E["(optional) Insert the Security Screw, and tighten using a Phillips-head Screwdriver."]
    E --> F["TIGHTEN Phillips-head Screwdriver"]
Step 5. Adjusting the VESA Ball Mount
Position your Display to the desired viewing angle, using the 40^ angular movement allowed by the VESA Ball Mount.
Depending on the weight of the display, it may be necessary to make adjustments to the VESA Ball Mount. If the display does not hold its position, or is too resistant, adjust the Tension Plate located at the rear of the VESA Ball Mount (see diagram right).
To make any adjustments tension evenly using the 3mm Allen Key supplied. Apply half a turn at a time to each screw on the Tension Plate to adjust evenly.
Check the display, and then adjust again if necessary.

Installation Complete

Brand : Spacedec
Model : SD-DO
Category : Monitor stand