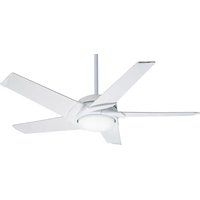
Stealth 59091 - Ceiling fan Casablanca - Free user manual and instructions
Find the device manual for free Stealth 59091 Casablanca in PDF.


| Product Type | Ceiling Fan |
| Brand | Casablanca |
| Model | Stealth 59091 |
| Blade Span | 52 inches |
| Number of Blades | 5 |
| Motor Type | DC Motor |
| Speed Settings | 6 speeds |
| Light Kit | Compatible (LED light kit optional) |
| Control Type | Remote control included |
| Direction Reversible | Yes (summer/winter) |
| Warranty | Lifetime motor warranty |
| Weight | 18 lbs |
| Height | 12 inches |
| Power Source | 120V AC, 60Hz |
| Airflow | 5000 CFM (approx.) |
| Energy Efficiency | Energy Star rated |
| Installation | Standard ceiling mount |
| Finish | Matte black |
| Safety Rating | ETL listed |
| Mounting Type | Downrod or flush mount |
| Includes Remote | Yes, with wall bracket |
Frequently Asked Questions - Stealth 59091 Casablanca
User questions about Stealth 59091 Casablanca
0 question about this device. Answer the ones you know or ask your own.
Ask a new question about this device
Download the instructions for your Ceiling fan in PDF format for free! Find your manual Stealth 59091 - Casablanca and take your electronic device back in hand. On this page are published all the documents necessary for the use of your device. Stealth 59091 by Casablanca.
USER MANUAL Stealth 59091 Casablanca
COTTAGE™ Owner's Manual
READ AND SAVE THESE INSTRUCTIONS!
Safety and the proper operation of your Casablanca fan both require a thorough knowledge of the product and proper installation; therefore, before attempting to install and operate your Casablanca fan, read this owner's manual completely and carefully. Retain this manual for future reference.
CAUTION: To avoid possible electrical shock, make certain that electricity is turned off at the circuit breaker or fuse box before attempting any installation procedure.
INTRODUCTION
Before You Start 2
Safe Use....2
MOUNTING RECOMMENDATIONS
General Guidelines....3
Sloped Ceiling Installations ....3
FAN INSTALLATION
Getting Started....4
Crossbar Mounting Bracket Installation....4
Lag Screw Installation (Optional)....5
Canopy Installation....5
Fan Preparation....6
Hanging the Fan....7
Canopy Electrical Connections....7
Canopy Hatch Installation 7
Remove Dummy Switch Housing & Shipping blocks 8
Blade Badge Installation 8
Blade & Blade Holder Installation 9
Switch Housing Installation 9
VERSA•TOUCH2™ CONTROL INSTALLATION
Control Bracket Installation ....10
Remote Operation....11
Changing Transmitter Frequency Setting....11
TROUBLESHOOTING TIPS....12
CARE RECOMMENDATIONS....13
AUTHORIZED SERVICE CENTERS ....14
PRODUCT SPECIFICATIONS 16
INTRODUCTION
BEFORE YOU START
- CAUTION: RISK OF ELECTRICAL SHOCK! Installation is to be in accordance with the National Electrical Code, ANSI/NFPA 70-1999, and local codes. All wiring must be performed in accordance with national and local electrical codes. If you are unfamiliar with the wiring codes, you should use a qualified electrician. To avoid overheating and possible damage to other equipment, do not install control to a receptacle, fluorescent light fixture, motor operated appliance, or transformer-supplied appliance.
- This fan is designed to be installed on an existing electrical outlet box. The outlet box must be UL Listed for ceiling fan installations, if it is not, a new box must be installed. Casablanca extension poles are available for sloped or high ceiling installations.
- This ceiling fan requires a grounded electrical supply of 120 VAC, 60 Hz and a minimum 15 amp circuit. The maximum current requirement for the fan with light fixture is 3 amps. The fan uses about 1 amp or 100 watts. Maximum light current is about 2 amps or 240 watts of lighting.
- Where wire nuts are employed, be sure all bare wires are within the connectors. When installing the canopy hatch, make sure all wires are within the canopy and that no wires are being pinched.
- WARNING: Do not bend the blade brackets when installing the brackets, balancing the blades or cleaning the fan. Do not insert foreign objects in between the rotating fan blades.
- WARNING: To reduce the risk of fire or electric shock, do not use this fan with any solid state speed control device. Use only the control provided with or recommended for this fan.
Unpacking
Before assembling and installing your ceiling fan, remove all parts from the shipping cartons and check them against the parts listed in the parts guide. Before discarding packaging material, be certain that all parts have been removed.
For best performance and for your warranty to be valid, use only genuine Casablanca blades, light fixtures, and accessories.
SAFE USE
- The blades in each pack are matched for equal weight to assure smooth fan operation. If more than one fan is being installed, be careful not to mix blades from different cartons.
- Inspect the contents of your carton for possible shipping or handling damage. If parts are missing or damaged, call 1-888-227-2178.
- It is always a good idea to have an assistant to help with the installation.
- When cleaning, painting, or working near your fan, be very careful of the fan and blades. Always turn the power OFF to the ceiling fan before working on it or replacing lightbulbs.
- Never insert anything into the path of the fan blades while the fan is in operation.
• Never install a fan over a pool or spa. - Never operate a fan that has been damaged in any way. Contact Casablanca Fan Company by calling 1-888-227-2178, or contact your local authorized Casablanca dealer for assistance in obtaining service.

MOUNTING RECOMMENDATIONS
GENERAL GUIDELINES
Before mounting your Casablanca fan, read the following helpful recommendations. The location of the fan, air circulation, and fan size are all important factors to consider before installation.
Location
Ceiling fans have practical uses in almost every room in your home. We suggest you follow these mounting recommendations as you decide where to install your Casablanca fan.
- For safety reasons, the fan blades must be a minimum of 7' above the floor.
- Do not locate the fan in a doorway or above a swinging door.
• In bedrooms, fans work best when mounted above the foot of the bed.
• Over pool tables, be sure to provide plenty of clearance to avoid damage from pool cues. - In kitchens be sure to allow for open cupboard doors to clear the fan blades.
- Do not install a fan close to or over a pool or spa. High humidity combined with corrosive gases will destroy the fi nish and warp the blades.

Fan Size
Variable fan speed capability permits the use of a full-size 52" fan even in smaller rooms. For very large rooms, two fans may be needed.
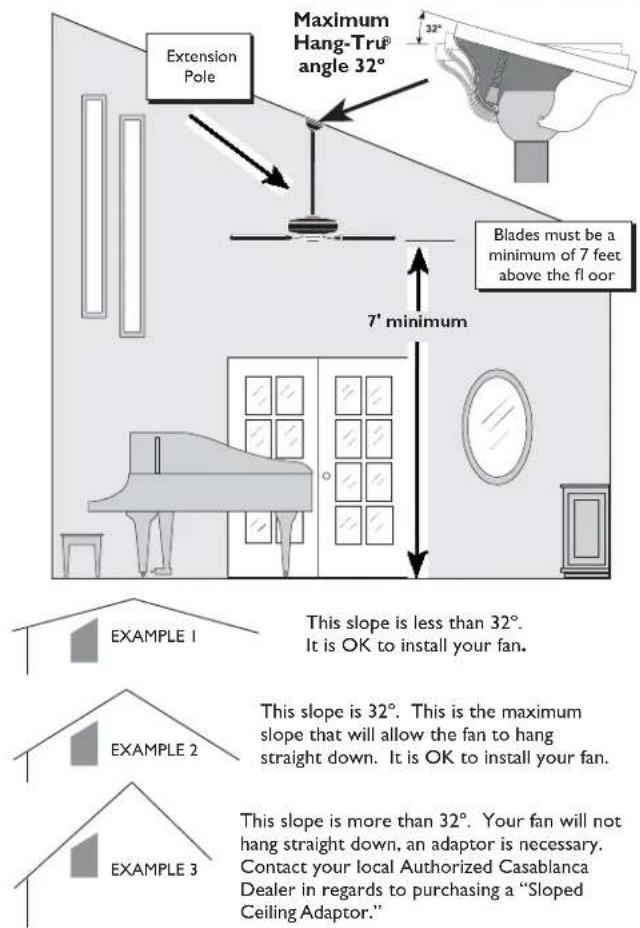
SLOPED CEILING INSTALLATIONS
SUGGESTED EXTENSION POLE LENGTHS
| Ceiling Height Pole Length | |
| 8' 0" | standard |
| 8' 6" | standard |
| 9' 0" | 6" |
| 9' 6" | 12" |
| 10' 0" | 12" |
| 11' 0" | 18" |
| 12' 0" | 24" |
| 13' 0" | 36" |
| 14' 0" | 48" |
When to Use Extension Poles
For optimum performance and appearance, an extension pole should be used with your Casablanca fan when installing on high (cathedral) ceilings or sloped ceilings. Casablanca offers standard poles in increments of 6" up to 5'. Custom poles are available in lengths up to 9'9". See your Authorized Casablanca Dealer for details.
NOTE: Fan may wobble or vibrate if pole length is not long enough and inside blade is too close to downslope or side wall. Extending pole length will usually solve problem.
Calculation of Ceiling Angle
Use the tear-off Ceiling Angle Template card inserted in this manual. It provides you with a simple "go" or "no-go" for installing your fan on a sloped ceiling.
FAN INSTALLATION
GETTING STARTED
Installing a New Ceiling Fixture Outlet Box
If you do not have an existing fi xture located where you wish to place your Casablanca fan, an approved ceiling fi xture outlet box must be installed and wired.
WARNING!
To reduce the risk of fire, electrical shock, or personal injury, mount to outlet box marked "Acceptable Fan Support of 22.7 kg (50 lbs.) or less" using the mounting hardware provided with the outlet box.
Using Existing Ceiling Fixture Outlet Box
After turning the power OFF at its source (either the circuit breaker or fuse box), lower the old fi xture and disconnect the wiring. Check the ceiling fi xture outlet box to be sure it is marked "Approved for Ceiling Fan Mounting." If it is not, a new box must be installed.
Note: The weight of this fan is 28 pounds.
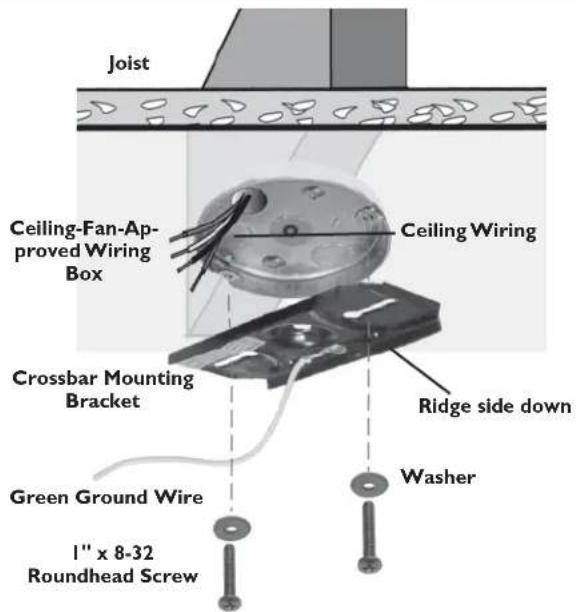
CROSSBAR MOUNTING BRACKET INSTALLATION
CEILING HARDWARE (not to scale)

Crossbar Mounting Bracket

natural_image
Close-up of four metal fasteners: two screws, one washer and one nut (no text or symbols visible)Screw Pack A: Lag Screw and Washer (1) 1" x 8-32 Roundhead Screw and Washer (2) 2 ^1/4 " x 8-32 Roundhead Screw (2)

Wire Nut (4)
Note: After removing the old fixture, check the outlet box to insure that it is supported by a joist or beam across its upper surface. If not, a 2 x4 stud must be installed.
Step 1a. Remove the knockout plug in the center of the outlet box or drill a ^1/2 -inch hole for the lag screw to pass through. Th en drill ^1 /a-inch guide hole into the joist or beam to a depth of 3 inches.
Step 1b. Route the outlet box wires through the keyhole slot of the crossbar mounting bracket as shown. Attach the crossbar mounting bracket to the outlet box with the screws provided in Pack A, making sure the outlet box wires are not pinched by the washer.
CAUTION:
To reduce the risk of personal injury, use only the mounting hardware provided with the approved outlet box to install the crossbar mounting bracket.
WARNING!
Support directly to building structure only.

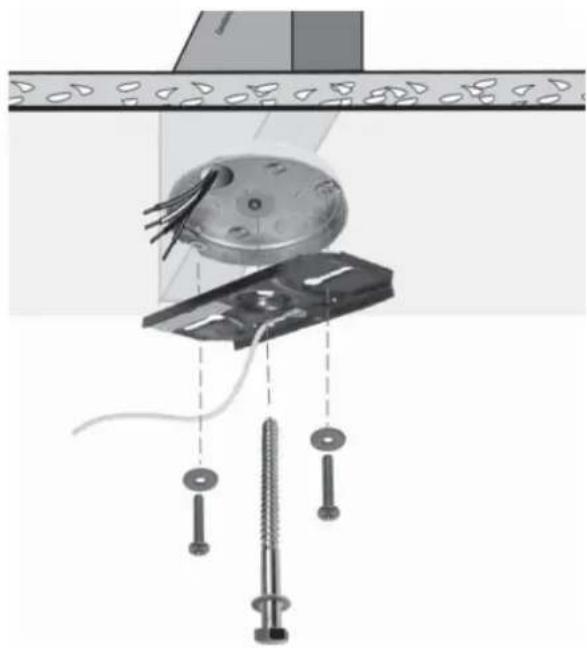
LAG SCREW INSTALLATION (OPTIONAL)
NOTE: 'Th is step is required only under two conditions: If the fan weighs 36 lbs. or more (which does not pertain to this fan) or if the existing ceiling fi xture outlet box needs to be modified for a ceiling fan application (for example, if the house is not new construction and you are replacing an existing light fi xture). We recommend that the ceiling box be of sufficient capacity to support the weight of the fan and light fi xture under any conditions. If in doubt whether you need to install the lag screw, consult a qualified electrician.
Step 2 (optional). With the large washer attached, pass the lag screw (Pack A) through the center hole of the crossbar mounting bracket and screw into the guidehole. Tighten until the outlet box is mounted firmly to the beam. Th is box must be secured to the ceiling firmly.
natural_image
Diagram of a mechanical assembly with a spherical component and supporting screws (no text or symbols)CANOPY INSTALLATION
CANOPY HARDWARE (not to scale)

natural_image
Illustration of a canopy hatch and its corresponding device (no text or symbols on the diagram itself)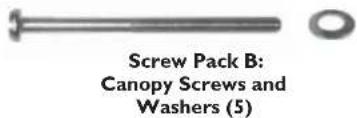
Step 3. Attach the canopy to the crossbar mounting bracket with three of the 8-32 x 2 ^1/2 " long canopy screws (Screw Pack B) and lock washers provided with your Casablanca fan. Tighten using the provided screwdriver until snug against the ceiling.
NOTE: On sloped ceilings, align the canopy opening with the top or peak of the room.

FAN PREPARATION
PERMA·LOCK™ HARDWARE (not to scale)

Allen Wrench

Perma•Lock™ Downrod and Ball Assembly
IMPORTANT SAFETY INFORMATION:
Before starting the installation of your ceiling fan, install the threaded downrod into the motor coupling and lock the assembly.
Prepare for fan installation as follows:
Step 4a. Remove the paper shield from the motor.
Step 4b. Using the provided Allen wrench (attached to the paper motor warning shield), loosen the Allen set screw attached to the motor coupling.
Step 4c. Route the wires through the Perma•Lock™ downrod and ball assembly. Insert the downrod into the motor coupling and turn it clockwise until it stops turning, ensuring that the pole has bottomed out.
TIP: The downrod has a tapered thread that is designed to lock completely when installed correctly.
Step 4d. Tighten the set screw with the Allen wrench to ensure safe operation of your fan. If it is tight enough, you should not be able to turn the downrod counterclockwise with your hands. If in doubt, tighten the set screw with the Allen wrench until you cannot turn it any further.
CAUTION: Failure to fully lock in the downrod before securely tightening the Allen set screw may cause the fan to separate from the downrod and fall during normal operation.

HANGING THE FAN
Step 5a. To hang the fan body in the canopy, hold the fan body firmly and insert the ball into the canopy opening. Check that no wires are pinched. Rotate the fan body until the slot in the ball fi ts into the pin opposite the canopy opening.
Step 5b. Trim excess motor wires, leaving at least 6 inches above the downrod. Strip 12 -inch insulation from the end of each wire using a wire stripper (available at your local hardware store). The e splices after being made should be turned upward and pushed carefully into the outlet box.

CANOPY ELECTRICAL CONNECTIONS
Step 6. Attach the fan wires to the ceiling fixture outlet box wiring by placing the bare ends of the wires side by side and then securing with a wire nut. Test that the connection is secure by pulling on the wire nut. Connect in this order:
- GREEN leads from mounting plate and downrod assembly of fan to GROUND conductor of power source. Secure with wire nut.
- WHITE wire from fan to white NEUTRAL wire in ceiling fi xture outlet box. Secure with wire nut.
- BLACK power wire from fan to black POWER wire in ceiling outlet box. Secure with wire nut
After making the wire connections, the wires should be spread apart with the grounded conductor and the equipment-grounding conductor on one side of the outlet box and the ungrounded conductor on the other side of the outlet box.
NOTE: If the color of your ceiling wires differs from that described, consult an electrician.

CANOPY HATCH INSTALLATION
Step 7a. Tuck the wires into the canopy with the wire nuts pointed upwards, so that the WHITE and BLACK wires are on opposite sides of the canopy and all wires are clear of the canopy opening.
Step 7b. Install the canopy hatch with the last canopy screw and lock washer using the provided screwdriver. To do this, tilt the fan body away from the hatch opening. Tighten the screws firmly.
Step 7c. Straighten the fan, then check to ensure there is no movement between the canopy and the ceiling or the Perma·Lock ^™ downrod and the ball assembly.

natural_image
White industrial fan with mechanical components and a prohibition symbol (no text or labels)Step 8. To reach the blade holder mounting holes in the fan motor, the dummy switch housing must be removed.
Take out the two 5-32 x 3/8" screws securing the dummy switch housing as shown. Put the two screws aside for the moment. They will be used in Step 13A to install the switch housing after the blades are installed. The dummy switch housing is used only when shipping the fan.
Step 9. Unscrew and remove the fi ve shipping blocks. You can discard these fi ve screws and the shipping blocks. The shipping blocks are only used when shipping the fan.
BLADE HARDWARE (not to scale)
Blades (5)
Blade Irons (5)
Medallion Nails (21)
Screw Pack C:
Blade Screws (21)
Screw Pack D:
Blade Iron Screws (11)
Attach Blade Irons
Step 10. Using Screw Pack C and the provided screwdriver, carefully align the Medallion Nail on the front of the blade and install the screw. Tighten securely by hand. Repeat three more times per blade. And repeat for each blade. (Check installation to make sure that the Medallion Nails are aligned straight).
Step 11a. Carefully tilt the blade holder between the motor housing and the motor, as shown.
BLADE & BLADE HOLDER INSTALLATION
Step 11b. Using two screws from screw pack "C" and the screwdriver provided; attach the blade/blade holder assembly to the motor. Tighten securely by hand only.
TIP: For balancing purposes, loosely install all fi ve blades to the motor before tightening the blade screws securely.
CAUTION:
Blade screws must be tightened securely before operating the fan.

natural_image
Close-up of a ceiling lamp with internal components and directional arrows indicating airflow or movement (no text or symbols)SWITCH HOUSING INSTALLATION
Preparation
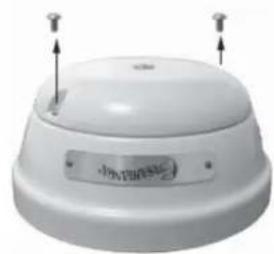
Step 12. Locate the switch housing cap assembly and remove the two 8-32 x 3/8" screws holding the cap onto the switch housing.
NOTE: Save the two screws — they will be used in Step 13.
Install the Switch Housing Mounting Screws
Step 13a. Locate the two dummy switch housing screws you removed in Step 12. Install them onto the motor as shown, leaving approximately 1/8" of the threads exposed for installation of the switch housing.
Step 13b. Line up the two keyholes in the switch housing cup with the two screws installed in step 13a.
Step 13c. Rotate the cup so that the screws are aligned with the smaller side of they keyholes. Tighten the screws securely by hand only.
Install the Switch Housing Cap
Step 14. Line up the two clearance holes in the cap with the two threaded holes on the raised rim of the switch housing. Press the cap onto the switch housing to seat the guide pins into the alignment holes of the switch housing.
natural_image
White dome-shaped electronic device with two vertical arrows pointing upward, no visible text or symbols on the body.
natural_image
Close-up of a ceiling fan with visible blades and mounting brackets (no text or symbols)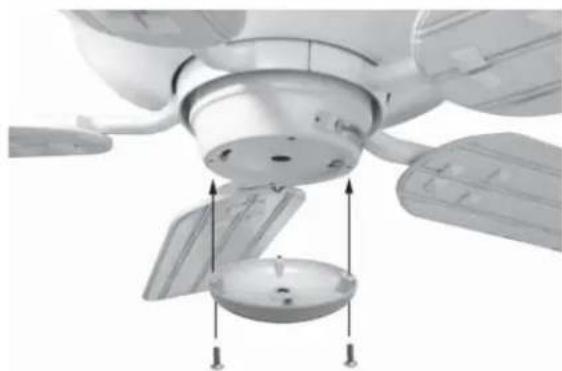
natural_image
Close-up of a ceiling fan assembly with mounting holes and blades (no text or symbols visible)VERSA•TOUCH2™ CONTROL INSTALLATION
VERSA•TOUCH2™ HARDWARE (not to scale)

CONTROL BRACKET INSTALLATION
SAFETY FIRST: To reduce the risk of electrical shock, this fan must be installed with an isolating wall control/switch.
CAUTION! Do not use with wall dimmer.
WARNING: To reduce the risk of fire or electric shock, do not use this fan with any solid state speed control device.
Use only the control provided with this fan.
Step 15. Follow instructions for the type of transmitter control bracket you will be using.

Standard Light Switch
Step A. Remove the two screws holding the switch cover plate. Do not remove the cover plate.
Step B. Orient the control bracket as shown and line up the two inner mounting holes with those on the switch.
Step C. Insert and tighten the screws using the provided screwdriver.
Wall Installation
Step A. Locate a 2x4 wall stud in a convenient location.
Step B. Orient the control bracket as shown over the 2x4 stud.
Step C. Insert the 1" wood screws in either the inner or outer mounting holes and tighten using the provided screwdriver.

natural_image
Technical diagram of a mechanical clamp or bracket assembly with mounting holes and internal features (no text or labels)
Rocker Light Switch
Step A. Break off the two tabs by pushing outward.
Step B. Remove the two screws holding the switch cover plate. Do not remove the cover plate.
Step C. Orient the control bracket as shown and line up the two inner mounting holes with those on the switch.
Step D. Insert and tighten the screws using the provided screwdriver.
NOTE: The wall anchors and 6-32 x 1" screws may be used in situations where mounting to a stud is not possible. Use the inner mounting holes. After securing the anchor, discard the anchor's pointed screws and use the 6-32 decor ovalhead screws supplied.

REMOTE OPERATION
Fan Control
To start the fan. Press the selected speed button to run the fan at the desired speed.
LOW=Low speed MED=Medium speed HIGH=High speed
To turn off the fan, press the FAN OFF button.
Airflow Direction
To reverse the airflow, press the REVERSE button. REVERSE operates at any speed whether the fan is on or off. The fan returns to its set speed after reversing.
Light Control
Turn the light on or off independently from the fan by pressing the LIGHT button. If you press the button for more than 0.7 seconds, it becomes a dimmer. The light varies from "bright" to "dim" over approximately 8 seconds. If you continue to hold the LIGHT button, this sequence will reverse when the light reaches its brightest or dimmest level. Release the button when the desired level is reached.
Auto Resume
Quick (pressing less than 0.7 seconds) on/off operation of the LIGHT button maintains the desired brightness level set previously.

CHANGING TRANSMITTER FREQUENCY SETTING
Note: All fans leave the factory set to "00000."
You will only have to change the dip switch settings in the remote if you are using more than one fan in the same area and want to control them separately.
Step 1. At the circuit breaker or fuse box, turn the power off for the fan you want to change.
Step 2. Open the battery door of the Versa•Touch control and remove the batteries.
Step 3. Change the dip switch settings, assuring that they are different from the previously installed Versa•Touch fan.
Step 4. Reinstall the batteries and the battery door on the control.
Step 5. At the circuit breaker or fuse box, turn the power back on for the fan whose frequency you are changing.
Step 6. Within 20 seconds of restoring power, push the HIGH, MED, and LOW buttons (in that order).
Note: You may want to label your controls to assure you do not mix them up.

WARNING!
Do not turn the power off at the circuit breaker, then back on, for the previously installed Versa•Touch2 fan(s), as you may inadvertently change the frequency settings for it as well.
If the fan is not functioning after installation:
Step 1. Check to make sure that batteries are installed correctly in the control.
Step 2. Turn the power off to the fan (from the circuit breaker) for at least 5 seconds.
Step 3. Turn the power back on (at the circuit breaker) and push the HIGH, MED, and LOW buttons-in that order-within 20 seconds. The fan should now function properly.

Circuit Breaker or Fuse Box

Press in this order to set new frequency:
1. HIGH 2. MED 3. LOW
TROUBLESHOOTING TIPS
Please refer to this troubleshooting guide before requesting service or contacting your dealer for assistance.
| PROBLEM | POSSIBLE | REMEDIES |
| Fan will not start | Check the main circuit fuses, circuit breakers, and wall switch position. Check all wire connections. Make sure the power is turned off during this inspection.Th e battery is weak. Install a fresh battery.Th e fan receiver is defective. Replace the fan receiveCheck the frequency setting. Turn the power off at the circuit breaker for the fan that is not functioning only. Check that the jumper switches match in both the receiver and the transmitter. | |
| Fan wobbles or shakes excessively • Be sure the canopy pin is set properly into the slot on the ball.• Check that the bladeholders have not been bent during installation and the blades are balanced.Th e hanger bracket and/or the ceiling outlet are attach the hanger bracket is attached tightly to the ceiling outlet box and the downrod assembly is secured firmly.The downrod is attached to the downrod base too loosely. Make sure all the screws are securely tightened. | ||
| Fan is noisy during operation | Check and tighten the light fixture retaining screws, glass shade screws, and/or lightbulb(s).Tighten the canopy screws and mounting plate assembly. Make sure the wire nuts inside the canopy and switch housing are not touching the metal parts and that they have not fallen off the wire splices. Tighten as necessary.Tighten the blade holders to the flywheel (or direct drive motor) and the blade to the bladeholder screws.Make sure all the screws in the motor housing are snug but not overly tight. | |
| Fan does not run on low speed | If fan is new, it may need to be “broken in.” Run at high speed for several days. | |
| Battery life is short | Replace with alkaline batteries. | |
| Light works, but fan does not work | The fan wires are not connected properly. Follow the instructions in Step 6. | |
| Fan and light run only on full speed | The fan receiver is defective. Replace the fan receiver. | |
| Fan is missing one speed | The fan receiver is defective. Replace the fan receiver. | |
| Fan does not change speed, but light works | The fan receiver is defective. Replace the fan receiver. | |
| Reverse does not work | The fan receiver is defective. Replace the fan receiver. | |
| Fan starts working by itself | There is frequency interference. Change frequency as described on Page 11. | |
| Fan operates only when transmitter is close | Check that antenna wire is not touching the metal plate. | |
| Fan works, but light does not dim | The fan receiver is defective. Replace the fan receiver. | |
| Fan works, but light does not work | The fan receiver is defective. Replace the fan receiver.Th e light socket is broken. Replace the socket.A lightbulb is defective. Replace the lightbulb. | |
CARE RECOMMENDATIONS
Fan Finishes
- For cleaning, a soft brush or lint-free cloth should be used to prevent scratching the finish.
- A vacuum cleaner brush nozzle can remove heavier dust.
- Surface smudges or an accumulation of dirt and dust can be removed easily using a mild detergent and slightly dampened soft cloth. An antistatic agent may be used, but never use abrasive cleaning agents as these will damage the finish.
Blades
- Wood-finish blades should be cleaned with a furniture polishing cloth. Occasionally, a light coat of furniture polish may be applied for added protection and beauty.
- For painted and high-gloss blades, surface smudges or an accumulation of dirt and dust can be removed easily using a mild detergent and slightly dampened soft cloth. An antistatic agent may be used, but never use abrasive cleaning agents as these will damage the finish.
No Need for Lubrication
- Never lubricate this fan! The precision motor at the heart of your Casablanca fan features sealed bearings that are lubricated for life.
- Do not attempt to oil the motor.
Changing Lightbulbs
- Be sure to turn the power to OFF at the wall switch or circuit breaker before changing lightbulbs.
- Replace bulbs with the same type as you removed from the light fixture.
- The maximum wattage rating for this fan's light kit is 240 watts.
For questions or to locate the nearest Casablanca Authorized Service Center call toll free: 1-888-227-2178 or visit us on the web at: www.casablancafanco.com
This device complies with Part 15 of the FCC rules. Operation is subject to the following two conditions:
- Th is device may not cause harmful interference.
- This device must accept any interference received, including interference that may cause undesired operation.
This equipment has been tested and found to comply with the limits for a class B digital device, pursuant to Part 15 of the FCC rules. These limits are designed to provide reasonable protection against harmful interference in a residential installation. This equipment generates, uses, and can radiate radio frequency energy and, if not installed and used in accordance with the instructions, may cause harmful interference to radio communication. However, there is no guarantee that the interference will not occur in a particular installation. If this equipment does cause harmful interference to radio or television reception, which can be determined by turning the equipment off and on, the user is encouraged to try to correct the interference by one or more of the following measures:
- Reorient or relocate the receiving antenna.
- Increase the separation between the equipment and receiver.
- Connect the equipment into an outlet on a circuit different from that to which the receiver is connected.
- Consult the dealer or an experienced radio/TV technician for help.
NOTE: Any changes or modifications to the transmitter or receiver not expressly approved by Casablanca Fan Company may void one's authority to operate this remote control.
AUTHORIZED SERVICE CENTERS
| STATE/CITY | ZIP | SERVICE CENTER NAME | PHONE | TYPE |
| ALASKA | ||||
| Anchorage 99518 Bering Sea Eccotech 907-563-7988 | ||||
| ALABAMA | ||||
| Mobile 36618 Azalea City Service Ctr. 251-341-0663 | ||||
| Tuscaloosa | 35405 | Lighting | Plus | 2 |
| ARIZONA | ||||
| Green Valley 85614 Goble Electric | 520-625-4938 | |||
| Mesa | 85204 | Gallery of Fans | 480-962-0477 | |
| Mesa | 85210 | Loud Inc. dba Fans Plus | 480-827-9302 | |
| Phoenix | 85032 | Brasswinds Fan Doctor | 602-482-1881 | |
| Phoenix | 85019 | Fantastic Electric | 602-866-1090 | |
| Prescott | 86305 | Marc Parent | 928-778-5935 | |
| Scottsdale | 85254 | Vandervoort Electric | 602-996-9637 | |
| Sedona | 86336 | Oak Creek Audio | 928-282-5625 | |
| Tucson | 85735 | Desert Breeze Fan & Elec. | 520-623-4646 | |
| Tucson | 85716 | Illuminations | 520-325-3031 | |
| Tucson | 85711 | Sun Lighting Company | 520-322-4303 | WTS |
| Youngtown | 85363 | Brasswinds Fan Doctor | 623-933-0240 | |
| Yuma | 85364 | Curley's Litehouse | 928-783-6931 | |
| ARKANSAS | ||||
| Little Rock | 72212 | The Randy Hall Co. Inc. | 501-227-9915 | |
| CALIFORNIA | ||||
| Auburn | 95603 | The Fan Doctor | 530-823-8768 | |
| Bakers:eld | 93306 | Hillcrest Lighting | 661-324-0649 | |
| Bakers:eld | 93309 | RB Electric & Lighting | 661-831-2438 | |
| Cathedral City 92234 R & R Service | 760-324-2942 | |||
| Cerritos | 90703 | Comforts of Home | 562-865-6666 | ISO |
| Chico | 95928 | J & J Lighting | 530-342-1815 | ISO |
| Clovis | 93612 | Omega Services Inc. | 559-299-0495 | ISO |
| Folsom | 95630 | Folsom Lighting Co. | 916-983-5575 | |
| Fresno | 93711 | James & Co. Lighting | 559-486-7900 | ISO, WTS |
| Fresno | 93704 | Larry McCollum | 559-438-5764 | |
| Fresno | 93710 | The Energy Saving House | 559-432-1500 | ISO |
| Glendale | 91208 | Fantastic Fan Service | 800-800-3871 | |
| Grass Valley | 95945 | Accent Lighting | 530-477-5483 | ISO |
| Huntington Beach | 92647 | Trading Post Fan Company | 714-848-4353 | |
| Jamestown | 95327 | Da Silva's Lamp & Clg. | 209-984-4035 | |
| Los Alamitos | 90720 | Jaben Holdings | 562-594-1249 | ISO |
| Manteca | 95336 | Manteca Lighting | 209-823-1999 | ISO |
| Mission Viejo | 92691 | Moore's Sew, Vac, & Fan | 949-580-2520 | ISO, WTS |
| Modesto | 95350 | Phillips Lighting & Home | 209-524-6287 | WTS |
| Moorpark | 93021 | R.J. Sieg Elect. Co. | 805-523-7434 | |
| Murrieta | 92562 | Fan Diego | 951-600-7867 | ISO, WTS |
| Newhall (Santa Clarita) | 91321 | Dan Martin | 661-252-5769 | |
| Pleasanton | 94588 | S & L Lighting Services | 925-895-3762 | |
| Rancho Mirage | 92270 | Fan Diego | 760-779-9916 | ISO |
| Redding | 96002 | North Valley Lighting | 530-221-6277 | ISO, WTS |
| Riverside | 92505 | Verne Smith | 951-687-9552 | |
| Sacramento | 95819 | A & A Light Fixtures | 916-452-7641 | ISO |
| San Diego | 92111 | Fan Diego | 858-292-9244 | ISO |
| San Francisco | 94109 | House of Fans Inc. | 415-885-1947 | ISO |
| San Marcos | 92069 | Fan Diego | 760-743-3267 | ISO |
| San Marcos | 92069 | RD Electrical Cont. | 760-727-1215 | |
| San Rafael | 94901 | Rafies Fans | 415-456-6660 | ISO |
| Santa Clara | 95051 | Sal Zamora's Fan Repair | 510-742-5560 | |
| Santa Cruz | 95062 | Riverside Lighting | 831-423-7411 | ISO |
| Santa Maria | 93455 | Ever-Ready Electric | 805-934-7091 | |
| Santa Rosa | 95404 | Asef's Appl. & Elec. Svc. | 707-575-3737 | |
| Saugus | 91350 | Valley Breeze Fan Co. | 800-339-3267 | WTS |
| Shingle Springs | 95682 | John Rozowski Const. 530-677-3850 | ||
| South Lake Tahoe | 96150 | Tahoe Pool Service | 530-541-4958 | |
| Stockton | 95205 | Risso Electric | 209-466-0781 | |
| Tarzana | 91356 | Hye Lighting Co. | 818-345-5544 | ISO, WTS |
| Temecula | 92592 | Tab Electric | 951-303-0850 | |
| Tulare | 93274 | Anchor Lighting | 559-688-0696 | WTS |
| Valencia | 91354 | Fantastic Fan Service | 800-800-3871 | |
| COLORADO | ||||
| Colorado Springs | 80903 | Home Lighting | 719-471-3520 | WTS |
| Denver | 80229 | M.D Electric | 303-288-7988 | |
| Fort Collins | 80525 | Light Center | 970-226-3430 | WTS |
| Longmont | 80504 | LA Enterprises | 800-299-0222 | |
TYPE OF SERVICES OFFERED:
ISH = IN-HOUSE SERVICE ISO = IN-SHOP ONLY WTS = SERVICES ONLY WHAT THEY SELL
| STATE/CITY | ZIP | SERVICE CENTER NAME | PHONE | TYPE |
| COLORADO (Continued) | ||||
| Longmont | 80501 | Lumenarea.com, Inc. | 303-485-6800 | WTS |
| Loveland | 80538 | Fireside Lighting | 970-669-3540 | WTS |
| CONNECTICUT | ||||
| Bridgeport | 06605 | Federal Elect. Const. Co. | 203-334-6455 | |
| Clinton | 06413 | Graham Co. | 800-942-5575 | |
| East Hartford | 06118 | Graham Co. | 800-942-5575 | |
| Greenwich | 06830 | Fashion Light Center | 203-869-3098 | ISO, WTS |
| Hartford | 06114 | Connecticut Ltg. Center | 860-249-7631 | ISO |
| New Hartford | 06057 | B.W. Morse & Sons Inc. | 860-379-9855 | |
| New Haven | 06511 | New Grand Light | 203-777-5781 | ISO |
| Willington | 06279 | George Opalenik | 860-684-4558 | |
| Woodstock | 06281 | Randy Matteau | 860-963-8979 | |
| DELAWARE | ||||
| Dover | 19901 | Bruce Drajem | 302-734-7737 | |
| TNew Castle | 19720 | Eric Shurr | 302-998-5147 | |
| DISTRICT OF COLUMBIA | ||||
| Washington | 20007 | Fan Fair | 202-342-6290 | ISO |
| FLORIDA | ||||
| Bonita Springs | 34135 | Goodwin Electric | 239-649-8880 | |
| Boynton Beach | 33437 | C M S | 561-736-0170 | |
| Brandon | 33511 | Lumenair Lighting & Fan | 813-653-3460 | ISO |
| Coral Gables | 33134 | Michael Hansen 305-444-4111 | ||
| Davie | 33330 | Laserland Inc. | 954-558- | |
| Fern Park | 32730 | Henry Electric Co. | 407-834-4032 | ISO |
| Gainesville | 32608 | Authorized Appliance | 352-375-3886 | ISO |
| Jacksonville | 32217 | Authorized Appliance Serv. | 904-737-5312 | ISO |
| Maitland | 32751 | Henry Electric Co. | 407-834-4032 | ISO |
| Naples | 34109 | Wilson Fans & Lighting | 239-592-6006 | ISO, WTS |
| Nokomis | 34275 | Graham Electrical Cont. | 941-486-8190 | |
| Orlando | 32806 | Mid-Florida Fan | 407-893-6226 | |
| Port Charlotte | 33952 | Jackson's Lighting | 941-625-0044 | WTS |
| S. Daytona | 32119 | Bob's Fix-It | 386-761-4055 | |
| Spring Hill | 34606 | Fan Doctor | 352-683-4428 | |
| Tallahassee | 32303 | Jim Laczko | 850-562-4661 | |
| Tarpon Springs | 34689 | Peter Lontakos | 727-938-8895 | |
| Winter Haven | 33880 | All About Fans | 863-299-9593 | |
| Winter Haven | 33884 | Cypress Ltg. Showroom | 863-676-9097 | |
| GEORGIA | ||||
| Grayson | 30017 | RG Tenney Electric | 770-378-9255 | |
| HAWAII | ||||
| Alea | 96701 | Fan Shop Inc. | 808-488-1221 | WTS |
| Hilo | 96720 | Bay Lighting & Design | 808-961-5688 | |
| Kahului | 96732 | Read Lighting | 808-871-8995 | |
| Kailua-Kona | 96740 | Kona Coast House of Lights | 808-329-0748 | |
| Kaulua Kona 96740 Ku's Electronic Service 808-329-4346 | ||||
| Kihei | 96753 | Fans Etc. | 808-875-6347 | |
| IDAHO | ||||
| Idaho Falls | 83402 | Home Lighting | 208-523-2300 | |
| Meridian | 83642 | S-K Electric, Inc. | 208-941-6264 | |
| ILLINOIS | ||||
| Centralia | 62801 | Baker Appliance Repair | 618-532-8437 | |
| Champaign | 61821 | Springfield Electric Supply | 217-351-7600 | ISO |
| Champaign | 61821 | Terry Gobble | 217-384-5891 | ISO |
| Chicago | 60630 | D & S Fan Specialist | 847-824-2430 | |
| Cornland | 62519 | Delmar Veech | 217-364-4124 | |
| Frankfort | 60423 | KKA Services | 815-464-6714 | |
| Mchenry | 60051 | Northwest Electrical | 815-363-1800 | |
| Mokena | 60448 | KKA Services | 815-464-6714 | |
| Normal | 61761 | Kirk Small Appliance | 309-452-5248 | ISO |
| Princeton | 61356 | Elmore Electric Inc. | 815-643-2354 | |
| Quincy | 62305 | Heintz Lighting Center 217-223-0101 | ||
| Smithton | 62285 | John Hassenstab | 618-236-3018 | |
| Trenton | 62293 | Light Brite Distributing | 618-224-7314 | |
| Urbana | 61801 | Terry Gobble | 217-384-5891 | ISO |
| Yorkville | 60560 | Unised Supply, Inc. | 630-553-0660 | |
| INDIANA | ||||
| Evansville | 47711 | Michael Baxter | 812-453-6498 | |
| Fort Wayne 46805 Carl Smith 260-484-7295 | ||||
| Greenfield | 46140 | D & D Repair | 317-467-0600 | |
| Indianapolis | 46222 | Indiana Lighting Center | 317-293-9333 | ISO |
| Valparaiso | 46383 | D & K Electric | 219-464-7576 | |
IOWA
Carroll 51401 J & L Electric Inc. 712-792-2444 ISO
Cedar Rapids 52404 Acme Electric Company 319-365-8677
Coralville 52241 Ralston Creek 319-351-2189 ISO. WTS
| Davenport | 52803 | Shaw | Electric | |
| Des Moines | 50311 | Advanced Lighting | 515-255-5009 | WTS |
| Monticello | 52310 | Rem Electric | 319-465-3346 | |
| Sioux Center | 51250 | Hills Home Systems | 712-722-4905 | |
| Sioux City | 51106 | Diversified Electronics | 712-276-1034 |
KANSAS
| Emporia | 66801 | C.A.P. | 620-342-0448 | IHS |
| Lenexa | 66215 | Rensen House Of Lights | 913-888-0888 | ISO |
| Manhattan | 66502 | Endacott Lighting | 785-776-4472 | |
| Overland Park | 66213 | Kal Electric | 913-897-6767 | |
| Overland Park | 66210 | Randy Russell | 913-338-5330 | |
| Overland Park | 66223 | Western Chandelier Co. 913-685-2000 | ||
| Overland Park | 66212 | Wilson Fans & Lighting | 913-642-1500 | |
| Salina | 67401 | Salina Appliance Showroom | 785-827-1420 | |
| Wichita | 67208 | Accent Lighting |
KENTUCKY
Louisville 40205 Kaelins, Inc. 502-454-8938
LOUISIANA
| Baton Rouge | 70815 | Total Home Service | 225-272-7725 | ISO |
| Houma | 70363 | Gulf South Armature Inc. | 985-872-0486 | |
| Lafayette 70501 | Acadia Service Co. | 337-233-8910 | ||
| Lake Charles | 70601 | Josephs Electrical Center | 337-436-4930 | |
| Metairie | 70006 | Romaine's | 504-887-7077 | |
| Monroe | 71201 | Albert Surlco | 318-699-0619 | ISO |
| New Iberia | 70560 | Walet's Inc. | 337-364-7486 | ISO |
MAINE
South Portland 04106 T.A. Napolitano Inc. 207-799-0538
MARYLAND
| Forestville | 20747 | Burgess Lighting & Dist. 301-568-8000 ISO, WTS | |
| Frederick | 21704 | GL Fan Service | 301-831-4925 IHS |
| Fulton | 20759 | GL Fan Service | 301-831-4925 IHS |
| White Hall | 21161 | BT Electric | 410-329-6353 |
MASSACHUSETTS
| Belmont | 02478 | H.O Electric | 617-489-6324 | IHS |
| Bridgewater | 02324 | Biltcliffe Electric | 508-697-7630 | ISO |
| Cochituate | 01778 | J.G. Electric Co. Inc. | 508-653-3042 | ISO |
| Danvers | 01923 | Plaza Lighting | 978-774-7801 | ISO |
| Dennis | 02638 | Rick Sexton | 508-385-7536 | |
| Natick | 01760 | J.G. Electric Co Inc. | 508-653-3042 | ISO |
| New Bedford | 02740 | Vander Electric & Equipment | 508-993-6383 | ISO |
| Orleans | 02653 | Associated Electrical | 508-255-4589 | |
| S. Attleboro | 02703 | A J Electric | 508-761-5021 | |
| W. Springfield | 01089 | Jalbert Electric | 413-734-4976 | |
| Worcester | 01603 | Edward A. Tortora | 508-755-3735 |
MICHIGAN
| Belleville | 48111 | Mike Ayerst | 734-699-9698 | |
| Birmingham | 48009 | 21st Century Electric | 248-645-6464 | |
| Grand Rapids | 49512 | Grand Rapids Lighting Ctr. | 616-949-4931 | ISO, WTS |
| Howell | 48855 | Lightning Elec. Inc. | 810-227-3375 | |
| Lansing 48906 | Integrity Electric Inc. | 517-484-0300 | ||
| Lansing | 48917 | Largent Enterprises | 517-327-6161 | |
| Portage 49024 | Hodgson Light & Log | 800-451-0860 | WTS | |
| Traverse City | 49686 | Lighting & Fan Service | 231-938-1332 | |
MINNESOTA
| Baxter | 56425 | The Light Depot 218-829-0770 | ISO | |
| Burnsville | 55336 | Fan Man | 952-898-2754 | ISO |
| Eden Prairie | 55344 | Fan Man | 952-941-9243 | ISO |
| Maplewood | 55109 | North Country Electric | 651-486-7099 | |
| Minneapolis | 55422 | Leo's Elec. Sales & Service | 763-546-5625 | |
| Minneapolis | 55411 | Penn Elec. Motor Service | 612-588-5333 | |
| Rochester | 55906 | Kroupa's Electronics | 507-361-1280 |
MISSISSIPPI
Madison 39110 Jackson Service Ctr. 601-856-9469
MISSOURI
| Branson | 65616 | The Light House Gallery/Loyds | 417-334-2171 | ISO |
| Spring:eld | 65807 | The Light House Gallery/Loyds | 417-334-2171 | ISO |
| St. Louis | 63123 | Leinweber Service Co. | 314-892-8177 |
MONTANA
Helena 59601 Supreme Lighting 406-442-8200 Kalispell 59901 Lasalle Lighting 406-752-2424
| STATE/CITY | ZIP | SERVICE CENTER NAME | PHONE | TYPE |
MONTANA (Continued)
Missoula 59801 Western Montana Lighting Supply 406-543-7166 ISO
NEBRASKA
| Grand Island | 68803 | Quality Sew & Vac | 308-382-7310 | ISO |
| Lincoln | 68510 | Lincoln Lighting Center | 402-476-1297 | |
| Norfolk | 68701 | The Power Station | 402-371-6671 | |
| Omaha | 68104 | D & L Electronics | 402-571-5233 | |
| Omaha | 68144 | Oak Hills Electric Inc. | 402-691-4567 |
NEVADA
| Henderson | 89015 KS & S Electric, LLC | 702-222-9306 | |
| Las Vegas | 89119 Fanco | 702-898-8522 | ISO |
| Sparks | 89431 Eagle Electric, Inc. 775-356-7300 |
NEW HAMPSHIRE
| Nashua | 03060 | Affordable Fans Etc. | 603-759-8332 |
| Newmarket | 03857 | Edward Heine | 603-659-5999 |
NEW JERSEY
| 316-6CHESTER | 07930 | Chester Lighting, Inc. 908-879-7200 | WTS |
| Hillsborough | 08844 | Top Line Electric | 908-431-1888 IHS |
| Jackson | 08527 | Robert Rolzhausen | 732-363-3729 |
| Linwood | 08221 | Jack Breslau | 609-601-1797 |
| Morris Plains | 07950 | Manny Herrera | 973-993-1137 |
| Mullica Hill | 08062 | Stephen Rice | 856-223-8645 |
| Park Ridge | 07656 | Krell Lighting | 201-391-7685 WTS |
| Randolph | 07869 | Anthony Makomaski | 908-475-5569 |
| Thorofare | 08086 | Harry R. Habicht | 856-845-2541 |
| Trenton | 08619 | Wiring Unlimited | 609-584-1122 |
| W. Long Branch | 07764 | No Shorts Electric | 732-222-4228 ISO |
| Washington | 07882 | C.P. Orlando | 908-689-4750 |
NEW MEXICO
| Albuquerque | 87112 | A-1 Lamp Doctor | 505-296-5050 |
| Albuquerque | 87109 | B-Electric Inc. | 505-828-0241 |
| Albuquerque | 87123 | Frank's Electric LLC | 505-293-6724 ISO |
NEW YORK
| Amherst | 14226 | Royalite Lighting | 716-832-1492 | ISO |
| Amherst | 14228 | Shanor Lighting Center 716-691-3622 | ISO | |
| Bedford Hills | 10507 | Bedford Ltg | 914-666-0680 | ISO |
| Brooklyn | 11204 | Jerry Piccolino/J&R Svc. | 718-259-1789 | |
| Brooklyn | 11219 | Main Lamp Corp. | 718-436-8500 | ISO |
| Brooklyn | 11223 | Manhattan Lights | 718-998-1111 | |
| Buffalo | 14206 | Craftmasters Servicenter | 716-893-9557 | |
| Buffalo | 14215 | The Fan Collection, Inc. | 716-839-2447 | ISO |
| Carle Place | 11514 | Elements | 516-747-4748 | ISO |
| Commack | 11725 | Air-Tek | 631-499-1854 | ISO |
| Commack | 11725 | Tumpike Appliance | 631-499-3355 | |
| East Meadow | 11554 | C.D. Service | 516-538-3481 | |
| Glens Falls | 12801 | Dean Electric | 518-792-4781 | |
| Hastings | 13076 | Electrical Work By Marty | 315-668-0220 | |
| Long Beach | 11561 | Nick's Improvement Company | 516-659-8989 | |
| Lynbrook | 11563 | Shaderite-PZ Repair | 516-593-8973 | |
| New York | 10003 | Superior Light & Fan | 212-677-9191 | |
| Newburgh | 12550 | J D Parrella Electric | 845-562-4112 | |
| Plainview | 11803 | Joseph Gottdank | 516-932-7618 | |
| Poughkeepsie | 12601 | Mannino Electric Inc. | 845-452-3520 | ISO |
| Queensbury | 12804 | Dean Electric | 518-792-4781 | |
| Rego Park | 11374 | Mark Ralin | 718-896-7844 | |
| Rochester | 14620 | Cam Electric | 585-271-8560 | |
| Schenectady | 12303 | Frank Salvatore | 518-355-5789 | |
| Shokan | 12481 | Olive Fans & Lighting | 845-657-5823 | |
| Staten Island | 10301 | Frank Ragucci | 718-273-5518 | |
| Staten Island | 10312 | Joe Valletutti Jr. | 718-608-9008 | |
| Staten Island | 10304 | V & P Service Co. | 917-751-2562 | |
| Troy | 12180 | Troy Light Company | 518-274-6931 | ISO |
| Yonkers 10704 Jay D. Kosack | 914-237-9051 | |||
NORTH CAROLINA
| Charlotte | 28205 | Eird's Interiors Inc. | 704-376-5648 | ISO |
| Charlotte | 28203 | Simpsons Lighting | 704-376-5463 | WTS |
| Hickory | 28602 | Eird's Interiors Inc. | 828-322-2203 | ISO |
| Salisbury 28146 | Hauss Electrical Svc. | 704-637-7774 |
NORTH DAKOTA
| Fargo | 58103 JDP Electric Inc. | 701-293-0441 |
| OHIO | ||
| Canton | 44706 Appliance Parts Co. | 330-453-8077 |
| Cleveland | 44109 Westside Lighting Ctr. | 216-459-1970 |
| Columbus | 43231 The Lamp Lighter | 614-891-7940 |
| Dayton | 45419 Larkin Electric Co. | 937-294-4115 |
| STATE/CITY | ZIP | SERVICE CENTER NAME | PHONE | TYPE |
| OHIO (Continued) | ||||
| Dayton | 45459 | Ohio Lamp & Fixture Co. | 937-439-0822 | ISO |
| Galena | 43021 | Certified Systems | 614-799-0878 | |
| Loveland | 45140 | Hank Grinshpan | 513-683-8666 | |
| Maumee | 43537 | K.O.V. Electronic Repair | 419-865-8893 | |
| North Lima | 44452 | Joe Dickey Electric | 330-549-3976 | |
| North Olmsted | 44070 | Chandelier Shack Inc. | 440-777-6969 | ISO |
| OKLAHOMA | ||||
| Oklahoma City | 73105 | Appliance Service By CK | 405-525-8862 | |
| Oklahoma City | 73127 | James Lighting Inc. | 405-947-6663 | |
| OREGON | ||||
| Portland | 97225 | Sylvan Electronics Inc. | 800-473-1244 | ISO |
| PENNSYLVANIA | ||||
| Allentown | 18105 | Lighting Fixture & Supply | 610-435-9691 | |
| Allentown | 18102 | Scholl's Electric | 610-435-5876 | |
| Conshohocken | 19428 | Kay Elec. Supply | 800-331-5111 | ISO |
| Downingtown | 19335 | Tobias Electric | 610-942-4000 | IHS |
| Drexel Hill | 19026 | Patrick Hastings | 610-853-2709 | |
| Easton | 18045 | Primrose Electric | 610-258-1359 | |
| Fairless Hills | 19030 | Astro Lighting Galleries | 215-943-8650 | ISO |
| Harrisburg | 17111 | Yale Electric Supply Co. | 717-233-8401 | ISO |
| Hopwood | 15445 | George R. Smalley Inc. | 724-437-1927 | |
| Lancaster | 17601 | S. Dean's Electric | 717-285-4545 | |
| Philadelphia | 19111 | Klaus Otte | 215-745-4266 | |
| Pittsburgh | 15224 | Mark Diulus Elec. | 412-681-2553 | |
| State College | 16803 | Whitehill Lighting & Supply | 814-238-2449 | |
| West Reading | 19611 | A TO Z Vacuum Stores | 610-374-4888 | WTS |
| Willow Grove | 19090 | Northwest Electric | 215-659-5757 | |
| RHODE ISLAND | ||||
| Pawtucket | 02861 | Wickford Appliance | 401-726-4240 | ISO |
| SOUTH CAROLINA | ||||
| Columbia | 29212 | Eastwind Enterprises | 803-781-3267 | |
| Goose Creek | 29445 | David Mims | 843-514-2380 | |
| Hanahan | 29406 | Bobby Lutes Electrical | 843-832-2058 | ISO |
| Ladson | 29456 | Bobby Lutes Electrical | 843-832-2058 | ISO |
| Myrtle Beach | 29575 | Ray Electric | 843-293-0068 | |
| Okatie | 29909 | J. Heavener & Co. | 843-837-8300 | |
| Spartanburg | 29306 | Bobby Jackson Electr. | 864-583-6035 | |
| Sioux Falls | 57105 | Lamps and Shades Inc. | 605-332-6680 | |
| Sioux Falls | 57104 | Mahlander's | 605-336-7798 | |
| TENNESSEE | ||||
| Brentwood | 37027 | Sunshine Electrical | 615-371-9383 | |
| Maryville | 37803 | Ben Snyder | 865-385-1302 | |
| Memphis | 38111 | Appliance Service Ctr. | 901-324-5898 | ISO |
| Mount Carmel | 37645 | Appalachian Electronics Svc. | 423-357-0783 | ISO |
| TEXAS | ||||
| Amarillo | 79106 | DI's Lamp & Fan Repairs | 806-331-5267 | |
| Arlington | 76001 | P & M Quality Const. | 817-478-2004 | |
| Austin | 78757 | Klock Electric | 512-837-4704 | |
| Austin | 78703 | Texas Ceiling Fan Shop | 512-477-3132 | ISO |
| Beaumont | 77702 | Fan Factory | 409-833-8207 | ISO |
| Carrollton | 75006 | Adfantage Ceiling Fans | 972-446-9393 | |
| Corpus Christi | 78404 | Brand Appliance & Microwave | 512-854-1851 | ISO |
| Dallas | 75206 | Lights Fantastic | 214-369-1101 | |
| Damon | 77430 | Gulf Coast Fan Svc. | 281-495-6434 | |
| Denton | 76201 | Fantasia Ceiling Fans | 940-484-4222 | |
| Denton | 76201 | Larry W. Goff | 940-387-7304 | |
| STATE/CITY | ZIP | SERVICE CENTER NAME | PHONE | TYPE |
| TEXAS (Continued) | ||||
| Denton | 76201 | Southern Comforts | 940-536-1406 | |
| Freeport | 77541 | Skip's Electric & Air | 979-233-3903 | |
| Harlingen | 78550 | The Light House | 956-423-6664 | WTS |
| Hearne | 77859 | Thompson Supply | 979-280-5737 | |
| Houston | 77089 | Bennett Fan Install. Inc. | 281-484-1401 | |
| Houston | 77069 | Champions Lighting | 281-440-5339 | ISO |
| Houston | 77063 | Lighting Plus | 713-784-2440 | ISO |
| Humble | 77338 | Carol's Lighting & Fan Shop | 281-446-7613 | ISO |
| Hurst | 76053 | Arc Fan & Lighting | 817-268-2218 | ISO, WTS |
| Kernville | 78028 | Maurice Hammit | 830-367-4937 | |
| Mcallen | 78504 | The Light House | 956-631-1155 | WTS |
| Paris | 75460 | Hargis Electric | 903-785-8055 | |
| Richardson | 75080 | Cool Breezes | 972-690-4580 | |
| San Angelo | 76903 | Heritage Haus | 325-655-4900 | |
| San Antonio | 78212 | Ceiling Fan Service Ctr. | 210-804-1362 | |
| Tyler | 75707 | Charles Rains | 903-566-3119 | |
| Victoria | 77904 | Hall Electric | 361-578-6221 | |
| Wichita Falls | 76308 | Lantern House | 940-692-7381 | ISO |
| UTAH | ||||
| Layton | 84040 | Haruo Yoshikawa | 801-546-6008 | |
| Murray | 84107 | Central Electric Co. Inc. | 801-467-5479 | |
| Riverton | 84065 | Vern O. Francis | 801-254-4178 | |
| VERMONT | ||||
| Bolton Valley | 05477 | Joseph Ashley | 802-434-6510 | |
| VIRGINIA | ||||
| Burke | 22015 | L & S Electric Inc. | 703-237-0011 | |
| Rapidan | 22733 | Ceiling Fan Installations, Inc. | 866-631-6565 | |
| Richmond | 23228 | Fanning Elec. Svc. | 804-262-3681 | |
| Virginia Beach | 23451 | Fans, Lighting 'N More | 757-422-3616 | |
| Williamsburg | 23185 | Taproot Co. | 757-229-3722 | ISO |
| WASHINGTON | ||||
| Pasco | 99301 | Total Service Inc. | 509-547-3799 | |
| Spokane | 99216 | Brite-Way Electric | 509-939-3995 | |
| Tacoma | 98404 | M.G.M. Electronics | 253-752-9826 | |
| Wenatchee | 98801 | Sew Creative Advantage Store | 509-663-5516 | |
| Yakima | 98902 | Inland Lighting | 509-248-4647 | ISO |
| WEST VIRGINIA | ||||
| South Charleston | 25309 | Pepper Electric | 304-768-8195 | |
| Wheeling | 26003 | Top Hat Stove Sales | 304-233-6262 | |
| WISCONSIN | ||||
| Brookfield | 53005 | City Lights Design Showroom | 262-781-9048 | ISO, WTS |
| Fontana | 53125 | J&L Property Maint. | 262-275-2345 | |
| Green Bay | 54313 | Karl Devroy | 920-494-6090 | |
| La Crosse | 54601 | Wettstein's | 608-784-5555 | |
| Madison | 53719 | Madison Lighting | 608-271-6911 | |
| Milwaukee | 53219 | Bob's Fan Repair | 414-546-2501 | |
| CANADA | ||
| Toronto, Ontario | M6M2P5 Zaneen Lighting Inc. | 800-388-3382 |
| OVERSEAS | ||
| St. Thomas, Virgin Islands 00805 | Duane Loberg | 304-775-2399 |
PRODUCT SPECIFICATIONS
Collection: Casablanca
Model Name: Cottage
Model Number: C12S72M
Dimensions:
NOTE: Dimension B includes light fixture and glass.
A
B
C
D
E

Weight: 28
lbs.
Finishes: Architectural White
Motor: 188 x 20mm Direct Drive ™
Blade Span: 52"
Blade Iron Pitch: 15°
13 No. of Blades: 5 3" Technology: Versa•Touch2™ W-72
13.3"
5.6"
- COTTAGE™ Owner's Manual
- READ AND SAVE THESE INSTRUCTIONS!
- INTRODUCTION
- MOUNTING RECOMMENDATIONS
- FAN INSTALLATION
- VERSA•TOUCH2™ CONTROL INSTALLATION
- BEFORE YOU START
- SAFE USE
- GENERAL GUIDELINES
- Location
- Fan Size
- SLOPED CEILING INSTALLATIONS
- When to Use Extension Poles
- Calculation of Ceiling Angle
- GETTING STARTED
- WARNING!
- CROSSBAR MOUNTING BRACKET INSTALLATION
- CAUTION:
- LAG SCREW INSTALLATION (OPTIONAL)
- CANOPY INSTALLATION
- FAN PREPARATION
- IMPORTANT SAFETY INFORMATION:
- HANGING THE FAN
- CANOPY ELECTRICAL CONNECTIONS
- CANOPY HATCH INSTALLATION
- Attach Blade Irons
- BLADE & BLADE HOLDER INSTALLATION
- SWITCH HOUSING INSTALLATION
- Preparation
- Install the Switch Housing Mounting Screws
- Install the Switch Housing Cap
- CONTROL BRACKET INSTALLATION
- Standard Light Switch
- Wall Installation
- Rocker Light Switch
- REMOTE OPERATION
- Fan Control
- Airflow Direction
- Light Control
- Auto Resume
- CHANGING TRANSMITTER FREQUENCY SETTING
- TROUBLESHOOTING TIPS
- CARE RECOMMENDATIONS
- Fan Finishes
- Blades
- No Need for Lubrication
- Changing Lightbulbs
- IOWA
- KANSAS
- KENTUCKY
- LOUISIANA
- MAINE
- MARYLAND
- MASSACHUSETTS
- MICHIGAN
- MINNESOTA
- MISSISSIPPI
- MISSOURI
- MONTANA
- MONTANA (Continued)
- NEBRASKA
- NEVADA
- NEW HAMPSHIRE
- NEW JERSEY
- NEW MEXICO
- NEW YORK
- NORTH CAROLINA
- NORTH DAKOTA
- PRODUCT SPECIFICATIONS
Brand : Casablanca
Model : Stealth 59091
Category : Ceiling fan